


When you should transfer numerous information or transfer particular information on a number of computer systems, then PowerShell is a good device to make use of. With PowerShell, we are able to shortly write a script that can transfer a file and even add some logging to it if wanted.
Transferring information is a fairly frequent process, it’s possible you’ll, for instance, need to archive all information older than x days to a special location. By leveraging PowerShell, we are able to write a script and schedule it to run routinely.
On this article, I’ll clarify how one can transfer a file with PowerShell and provide you with some examples.
Transfer a File with PowerShell
Transferring a single file with PowerShell is completed with the Transfer-Merchandise cmdlet. It requires a path to the supply file and a vacation spot to maneuver a file. The instance beneath strikes the readme.txt file to the d:archive folder:
Transfer-Merchandise -Path "C:tempfilesreadme.txt" -Vacation spot "D:archive"
Vital to notice is that the vacation spot folder might want to finish with a . The explanation for that is, that if the vacation spot folder, archive on this case, doesn’t exist, then PowerShell will transfer the file to D:, and title it archive, with none file extensions.
If you wish to see which information are copied within the console, then you should utilize the -PassThru parameter. This can output an object with all of the information which might be moved.
Transferring all Information in a Folder
You possibly can transfer all of the information in a folder through the use of the wildcard * character. In the event you solely need to transfer the information, and never any subfolders, then use *.* within the path parameter:
# Transfer solely all of the information
Transfer-Merchandise -Path "C:tempfiles*.*" -Vacation spot "D:archive"
To maneuver all of the subfolders, and their content material as nicely, you’ll be able to merely use a * as wildcard:
# transfer all information and subfodlers
Transfer-Merchandise -Path "C:tempfiles*" -Vacation spot "D:archive"
Transferring Particular Information
Typically you solely need to transfer particular information. You are able to do this through the use of the wildcard character and specifying the file extension of the information that you simply need to transfer. So for instance, to maneuver all .csv information from the folder, we are able to use the next command:
Transfer-Merchandise -Path "C:tempfiles*.csv" -Vacation spot "D:archive"

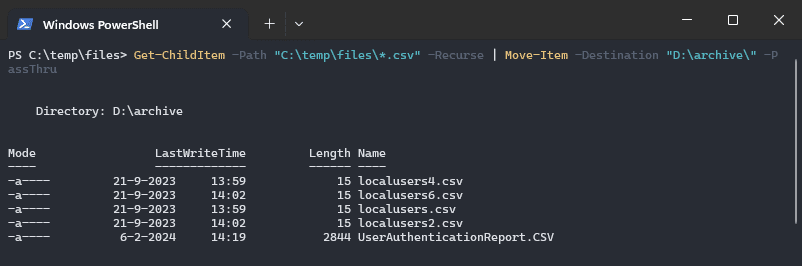
Within the instance above, solely CSV information within the given folder are moved to the vacation spot. If you wish to transfer information CSV information from the subfolders as nicely, then we’ll first must get all of the objects with the Get-ChildItem cmdlet.
The Get-ChildItem cmdlet will get all objects from the given path. By utilizing the -Recurse parameter, it would additionally get all of the objects from the subfolders. We will then pipe the Transfer-Merchandise cmdlet to it, to maneuver the chosen information to the brand new vacation spot:
Get-ChildItem -Path "C:tempfiles*.csv" -Recurse | Transfer-Merchandise -Vacation spot "D:archive"
Utilizing Embrace and Exclude Parameters
The Transfer-Merchandise cmdlet has an -Embrace and -Exclude parameter that you could possibly use. They will let you specify file sorts that you simply need to transfer or to not the vacation spot.
Transfer-Merchandise -Path "c:tempfiles*" -Embrace "*.txt","*.csv" -Vacation spot "d:archive"
Now if you’re making an attempt to make use of these parameters in PowerShell 5.x, then you’ll in all probability discover that it throws an error, “… doesn’t exist” on all of the objects that don’t match the embrace or exclude parameter.
The issue is solved in PowerShell 7, however if you’re utilizing PowerShell 5.x then you’ll be able to work round this concern through the use of the Get-ChildItem cmdlet first. An alternative choice is to specify a number of Paths with all of the file sorts that you simply need to transfer:
Transfer-Merchandise -Path "c:tempfiles*.csv", "c:tempfiles*.txt" -Vacation spot "d:archive"
Power overwriting Information
Whenever you attempt to transfer a file that already exists within the vacation spot folder, then you’ll get an error that the file exists. To overwrite the prevailing file, merely use the -Power parameter.
Superior Transfer File Examples
It is best to now have a good suggestion of the fundamentals in the case of the move-item cmdlet. Let’s check out some extra superior examples.
Transferring Information older than x Days
A typical observe when cleansing up directories is to archive solely information which might be older than x days. To do that, we’ll first must calculate the file date. Let’s say we need to archive or transfer all information which might be older than 30 days, we then first must get the date from 30 days in the past:
# Get the date from right this moment minus 30 days

$dateTime = (Get-Date).AddDays(-30)
The subsequent step is to get all information which might be older than the given date. To do that we’re going to examine the lastwritetime of the file with the datetime that we calculated:
Get-ChildItem -Path $Path -Recurse -File | The place-Object { $_.LastWriteTime -lt $dateTime }
We then solely need to pipe the Transfer-Merchandise cmdlet behind it to really transfer the information to a brand new location
$dateTime = (Get-Date).AddDays(-30)
$path = "C:tempfiles"

# Transfer all information from the given path and subfolders which might be older than 30 days
Get-ChildItem -Path $Path -Recurse -File | The place-Object { $_.LastWriteTime -lt $dateTime } | Transfer-Merchandise -Vacation spot "D:archive"
Transfer Information Bigger Than
One other frequent motion is to maneuver solely the big information from a given folder. Similar to with transferring older information solely, we’re first going to get the objects with the Get-ChildItem cmdlet.
$path = "C:tempfiles"

# Set file measurement
$sizeInMb = 500

# Calculate precise file measurement
$measurement = $sizeInMb*1024*1024

# Transfer all information which might be bigger then given measurement
Get-ChildItem -Path $Path -Recurse -File | The place-Object { $_.size -gt $measurement } | Transfer-Merchandise -Vacation spot "D:archive"
Wrapping Up
Transferring information with the Transfer-Merchandise cmdlet is fairly simple. If you wish to choose solely explicit information or need to use superior information, then you should utilize the Get-ChildItem cmdlet to pick the information that you simply want.
If you wish to create a log file of the information which might be moved, then be sure to learn this text as nicely. Additionally, you’ll be able to learn extra about scheduling your scripts on this article.
I hope you appreciated this text, just be sure you subscribe to the e-newsletter or observe me on Fb to get the newest article. When you’ve got any questions, simply drop a remark beneath.