

To export your AD customers to CSV we will use PowerShell and the Get-ADUser cmdlet. This enables us to shortly export all customers out of your energetic listing right into a usable CSV file.
Exporting your customers to verify if they’ve the proper attributes set is a standard process for system directors. It means that you can confirm in the event that they nonetheless have the proper contact info listed and if there are any out of date accounts that you just may want to shut.
On this article, we’re going to check out learn how to export AD customers to CSV and I’ve an entire script for you on the finish.
Necessities
To export the Lively Listing customers, we’re going to use PowerShell. You’ll need to just be sure you have the Lively Listing Module put in. That is put in by default on the area controller, however if you wish to run the scripts or cmdlets from a distinct machine, then you will have to put in it.
To put in the module on a Home windows 10/11 computer systems, you’ll be able to run the next PowerShell command:
Add-WindowsCapability –on-line –Title “Rsat.ActiveDirectory.DS-LDS.Instruments~~~~0.0.1.0”
Export Lively Listing Customers to CSV
To export the customers out of your Lively Listing to a CSV file, we’re going to use two cmdlets, Get-ADuser and Export-CSV. The primary cmdlet will get all of the customers out of your AD and mean you can choose solely the knowledge that you just want.
The second cmdlet exports the chosen information to a CSV file. Exporting to CSV is fairly simple, you solely have to specify the trail and file identify, as I’ll present you within the steps beneath.
As talked about, I’ve an entire script on the finish of the article, however it’s necessary that you just perceive the way it works, so you’ll be able to change it to your wants. That’s the reason I’ll information you thru the steps required to export AD customers to a CSV file.
Step 1 – Deciding on the customers with Get-ADUser
Step one to exporting customers is to pick the customers that you just wish to export from the Lively Listing. We do that with the Get-ADUser cmdlet. This cmdlet accepts completely different filters which permits us to pick solely the customers that we want.
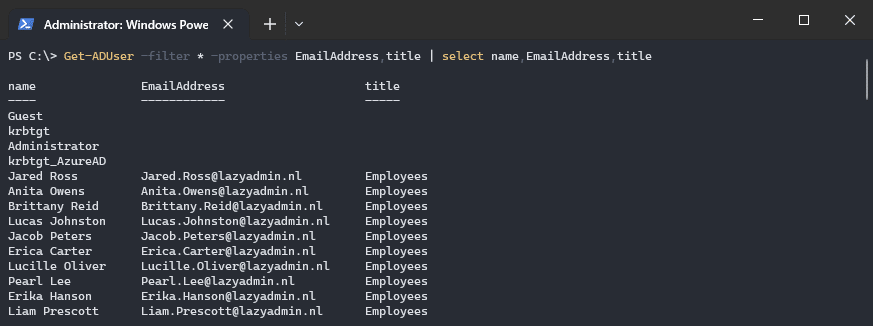
To get all customers in your area, with their identify, e-mail deal with, and title, you employ the next command:
Get-ADUser -filter * -properties emailaddress,title | choose identify,emailaddress,title
Choose and Filter Customers
You don’t at all times wish to export all of the customers from the Lively Listing. Typically you solely want customers from a particular OU or need solely the energetic or disabled customers. To do that, we will use completely different filtering choices:
- Filter – Lets you filter the outcomes for instance on identify, title, or e-mail deal with
- SearchBase – You may specify which OU(s) you wish to get the customers from
- Identification – Lets you specify a particular consumer
I’ll briefly clarify the completely different choices beneath, if you wish to know extra, then be sure you learn this text in regards to the Get-ADUser cmdlet. It goes extra into element on how the completely different choices work.
The -filter parameter means that you can discover all customers with a selected attribute. For instance, once you wish to export all customers with the job title “fixer”, then we will use the next command:
Get-ADUser -filter "title -eq 'fixer'" -properties * | choose identify, emailaddress, title | Export-CSV -path c:tempexport.csv
We will additionally use the filter to export solely the enabled consumer accounts, or solely the disabled accounts:
# Export all disabled consumer accounts
# change false to true for enabled accounts

Get-ADUser -filter "enabled -eq 'false'" -properties * | choose identify, emailaddress, title | Export-CSV -path c:tempexport.csv
The -SearchBase property is used to export solely the consumer accounts from a selected OU in your Lively Listing. You’ll need to make use of the distinguished identify of the OU. You may mix the SearchBase property with the SearchScope property to find out what number of ranges deep you wish to go.
Get-ADUser -Filter * -SearchBase "OU=IT,OU=Amsterdam,OU=Websites,DC=Lazyadmin,DC=NL" | Export-CSV -path c:tempexport.csv
Step 2 – Deciding on the Properties
Now we all know learn how to choose the customers that we wish to export, we will take a look at which attributes we wish to embrace in our export. In the event you don’t specify any property, then just some primary info is exported, just like the identify, objectID, and userprincipal identify.
To view all properties which can be out there from the Get-ADUser cmdlet, you should utilize the command beneath. This may return all properties of a single consumer:
Get-ADUser -filter * -properties * -ResultSetSize 1 | choose *

# Or to view all properties from a particular consumer:
Get-ADUser -identity ztucker -properties * | choose *
When you’ve got your listing of properties that you really want in your export, you’ll be able to specify them within the -properties parameter and choose the consequence. I like to recommend testing/checking the output first within the console earlier than you export it to a CSV file.
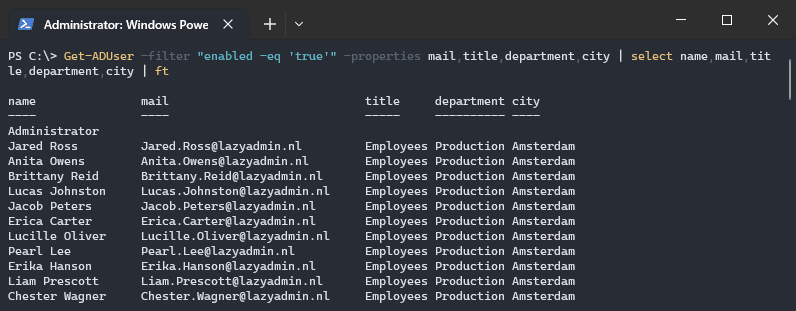
Within the instance beneath we choose the mail, title, supervisor, and workplace attribute. Just remember to additionally choose these attributes with the choose assertion, in any other case, you’ll nonetheless get all of the default fields as nicely:
Get-ADUser -filter "enabled -eq 'true'" -properties mail, title, division, metropolis | choose identify,
 mail, title, division, metropolis | ft
When you’re making a script, then I like to recommend placing your properties inside a hashtable. The benefit of hashtables is which you could simply change the attributes, and on this case, we will use the identical listing for each the properties parameter because the choose assertion.
$properties = @(
  'identify',
  'userprincipalname',
  'mail',
  'title',
  'enabled',
  'division'
)

Get-ADUser -Filter * -Properties $properties | Choose-Object $properties
Step 3 – Export to CSV
We now have chosen the Lively Listing customers we wish to export and chosen the attributes that we wish to embrace in our CSV export. The final step is to export the outcomes to a CSV file. For this, we can be utilizing the Export-CSV cmdlet.
The Export-CSV cmdlet solely requires a path (with a filename) to export the consequence. I additionally advocate so as to add the next two parameters to the cmdlet: -NoTypeInformation -Encoding UTF8. These will take away the header with info in your CSV file and be sure that all characters are exported with UTF8.
# Export all enabled consumer accounts with to a CSV file
Get-ADUser -filter "enabled -eq 'true'" -properties mail, title, division, metropolis | choose identify,
 mail, title, division, metropolis | Export-CSV -path c:tempusers.csv -NoTypeInformation -Encoding UTF8
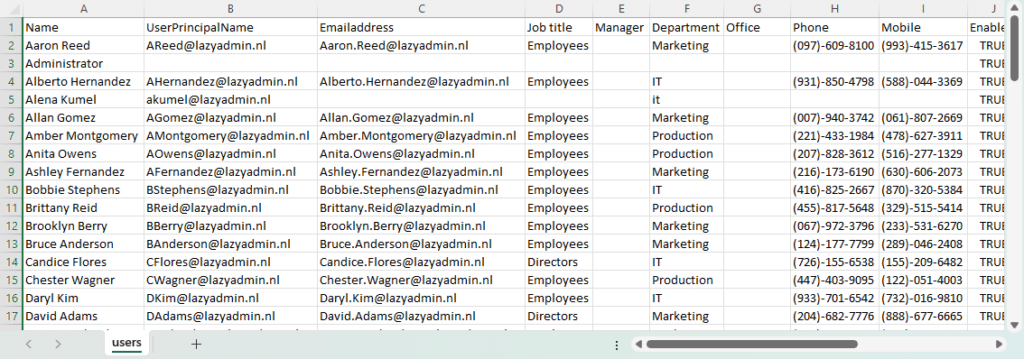
Full Export AD Customers to CSV script
I’ve created a PowerShell script that can Export all AD Customers to CSV for you with probably the most generally wanted properties. In the event you specify a path for the CSV file, the script will create the CSV file and open Excel as soon as it’s completed.
Once you run the script you specify a few choices:
- Get the supervisor’s show identify or not (default true)
- Specify the searchBase (OU), default complete Lively Listing
- Get enabled or disabled accounts or each (default solely enabled)
- Export path CSV file (default script location)
The script will get all of the consumer accounts from the Lively Listing if you happen to don’t specify the searchBase (OU). It’s additionally potential to specify a number of OU’s:
.Get-ADusers.ps1 -searchBase "OU=customers,OU=Amsterdam,DC=LazyAdmin,DC=Native","OU=customers,OU=Oslo,DC=LazyAdmin,DC=Native" -path c:tempusers.csv
You’ll find the most recent model of the script right here in my GitHub repository.
param(
  [Parameter(
    Mandatory = $false,
    HelpMessage = "Get the users manager"
  )]
  [switch]$getManager = $true,

  [Parameter(
    Mandatory = $false,
    HelpMessage = "Enter the searchbase between quotes or multiple separated with a comma"
    )]
  [string[]]$searchBase,

  [Parameter(
    Mandatory = $false,
    HelpMessage = "Get accounts that are enabled, disabled or both"
  )]
    [ValidateSet("true", "false", "both")]
  [string]$enabled = "true",

  [Parameter(
    Mandatory = $false,
    HelpMessage = "Enter path to save the CSV file"
  )]
  [string]$CSVpath
)

Operate Get-Customers {
    <#
    .SYNOPSIS
      Get customers from the requested DN
    #>
    param(
      [Parameter(Mandatory = $true)]
      $dn
    )
    course of{
      # Set the properties to retrieve
      $properties = @(
        'identify',
        'userprincipalname',
        'mail',
        'title',
        'enabled',
        'supervisor',
        'division',
        'telephoneNumber',
        'workplace',
        'cellular',
        'streetAddress',
        'metropolis',
        'postalcode',
        'state',
        'nation',
        'description',
        'lastlogondate',
        'passwordlastset'
      )

      # Get enabled, disabled or each customers
      swap ($enabled)
      {
        "true" {$filter = "enabled -eq 'true'"}
        "false" {$filter = "enabled -eq 'false'"}
        "each" {$filter = "*"}
      }

      # Get the customers
      Get-ADUser -Filter $filter -Properties $properties -SearchBase $dn | Choose-Object $properties
    }
}


Operate Get-AllADUsers {
  <#
    .SYNOPSIS
      Get all AD customers
  #>
  course of {
    Write-Host "Amassing customers" -ForegroundColor Cyan
    $customers = @()

    if ($searchBase) {
     # Get the requested mailboxes
      foreach ($dn in $searchBase) {
        Write-Host "- Get customers in $dn" -ForegroundColor Cyan
        $customers += Get-Customers -dn $dn
      }
    }else Choose-Object -ExpandProperty DistinguishedName
      Write-Host "- Get customers in $dn" -ForegroundColor Cyan
      $customers += Get-Customers -dn $dn


    $customers | ForEach-Object {

      $supervisor = ""

      If (($getManager.IsPresent) -and ($_.supervisor))  Choose-Object -ExpandProperty Title


      [pscustomobject]@{
        "Title" = $_.Title
        "UserPrincipalName" = $_.UserPrincipalName
        "Emailaddress" = $_.mail
        "Job title" = $_.Title
        "Supervisor" = $supervisor
        "Division" = $_.Division
        "Workplace" = $_.Workplace
        "Telephone" = $_.telephoneNumber
        "Cell" = $_.cellular
        "Enabled" = $_.enabled
        "Avenue" = $_.StreetAddress
        "Metropolis" = $_.Metropolis
        "Postal code" = $_.PostalCode
        "State" = $_.State
        "Nation" = $_.Nation
        "Description" = $_.Description
        "Final login" = $_.lastlogondate
        "Password final set" = $_.passwordlastset
      }
    }
  }
}

If ($CSVpath) {
  # Get mailbox standing
  Get-AllADUsers | Kind-Object Title | Export-CSV -Path $CSVpath -NoTypeInformation -Encoding UTF8
  if ((Get-Merchandise $CSVpath).Size -gt 0) {
      Write-Host "Report completed and saved in $CSVpath" -ForegroundColor Inexperienced

      # Open the CSV file
      Invoke-Merchandise $CSVpath
  } else {
      Write-Host "Did not create report" -ForegroundColor Purple
  }
} Else  Kind-Object Title
Wrapping Up
Exporting Lively Listing Customers to a CSV Checklist can actually aid you with protecting monitor of all customers and their properties. It’s good to grasp how one can create your personal scripts for these sorts of duties.
I hope this text helped you to grasp learn how to export customers out of your AD to a CSV file. If in case you have any questions, simply drop a remark beneath.