

Do you wish to attempt a special working system however don’t wish to danger putting in it in your fundamental pc? Maybe it is advisable take a look at software program on numerous platforms however don’t wish to arrange completely different computer systems? Don’t fret. You possibly can set up VirtualBox on Home windows 10 and create visitor VMs as a substitute.
VirtualBox is a free virtualization program that makes it extraordinarily handy to arrange digital machines on completely different working methods. This tutorial will educate you set up VirtualBox on Home windows 10 and the fundamentals to get you began.
Stipulations
This tutorial shall be a hands-on demonstration. In the event you’d wish to comply with alongside, make certain you may have the next.
- A Home windows 10 pc. This information makes use of Home windows 10 21H2 64bit, however VirtualBox ought to work wonderful on any latest model of Home windows 10 or 11.
- An ISO file for the working system you wish to set up. This ISO could possibly be of any VirtualBox-supported visitor OSes.
- Free space for storing. How a lot you want will rely upon the dimensions of the ISO you’re utilizing, however generally, there must be a minimum of 20 GB of free disk area.
- RAM. How a lot you want will rely upon the working system you wish to set up and the way you intend on utilizing it.
Putting in VirtualBox on Home windows 10
To put in VirtualBox on Home windows 10, you will need to first obtain the suitable set up file to your host. From there, the set up course of makes use of a Wizard interface, which shouldn’t be too sophisticated, even for a newbie.
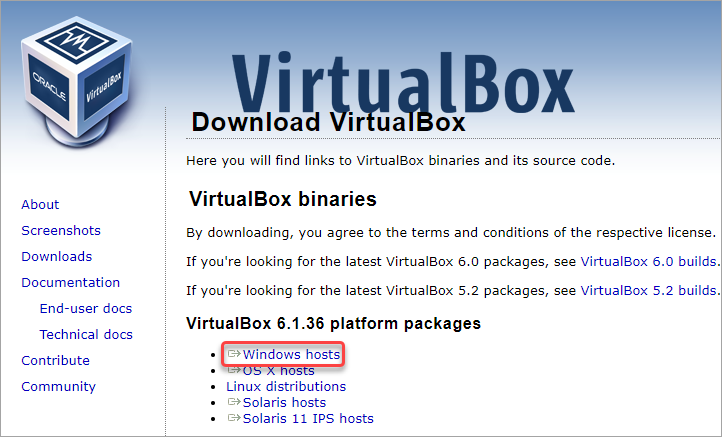
1. Open a browser and open the VirtualBox downloads web page and click on the Home windows hosts hyperlink. The most recent VirtualBox model as of this writing is 6.1.36. Save the installer someplace you may rapidly find it, like your Downloads folder.
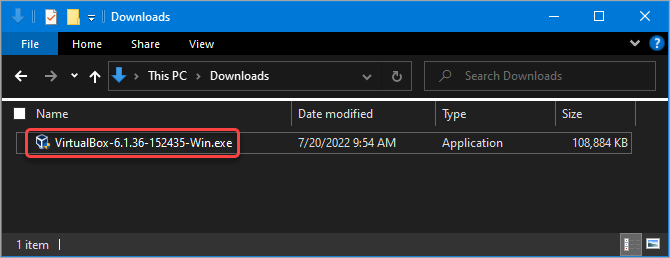
2. Find the VirtualBox installer file utilizing your File Explorer. Double-click the file to launch the VirtualBox Setup wizard.
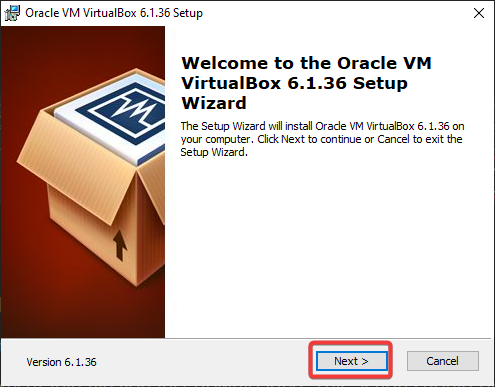
3. Click on Subsequent on the primary display. This motion tells the Wizard that you simply wish to set up VirtualBox.
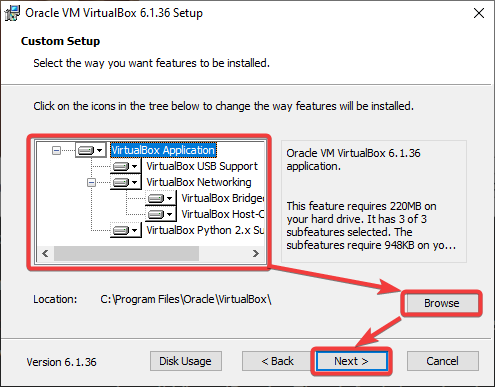
4. Do the next actions on the Customized Setup display.
- You’ll see a listing of the options the Wizard will set up. On this instance, depart the default choice.
- Browse and choose the placement you wish to set up VirtualBox in. The default location is okay, however be at liberty to alter it when you desire.
- Click on Subsequent while you’re able to proceed.
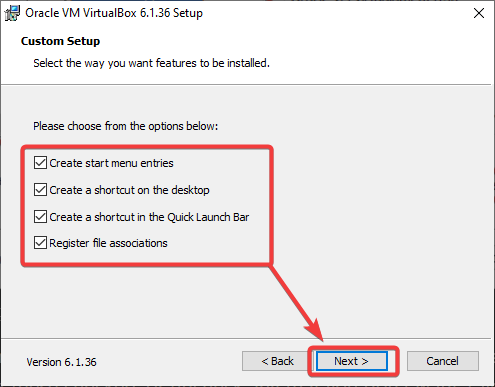
5. On the following display, you’ll see a listing of the shortcuts and file associations the set up will create. Examine or uncheck the gadgets you want to embody or exclude and click on Subsequent. This instance leaves all choices checked.
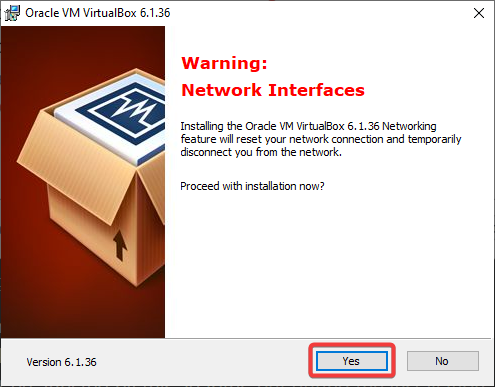
6. On the following display, you’ll see a warning about networking. The setup course of will set up a digital community adapter, which can trigger your community connection to disconnect momentarily. Click on Sure to proceed.
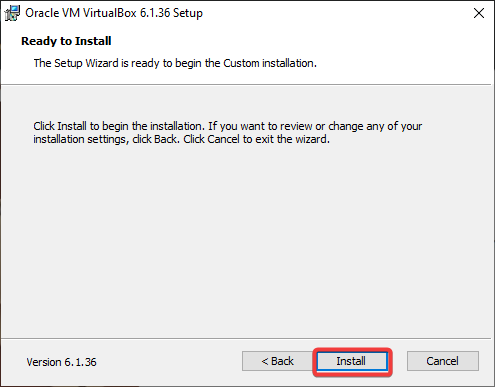
7. Lastly, you’ll see a display asking you to verify the set up. Click on Set up to put in VirtualBox on Home windows 10.
8. The set up course of takes a number of minutes, relying in your system pace. Click on End to shut the Wizard after the set up and begin utilizing VirtualBox.

Creating Your First Digital Machine
After you put in VirtualBox on Home windows 10, your can create your first digital machine.
Home windows 11 had compatibility points with VirtualBox, reminiscent of VMs can not begin, crashing, and having corrupted shows. However Microsoft confirmed that such points now not exist in VirtualBox 6.1.28 and later variations, so you too can apply all of the steps beneath on Home windows 11.
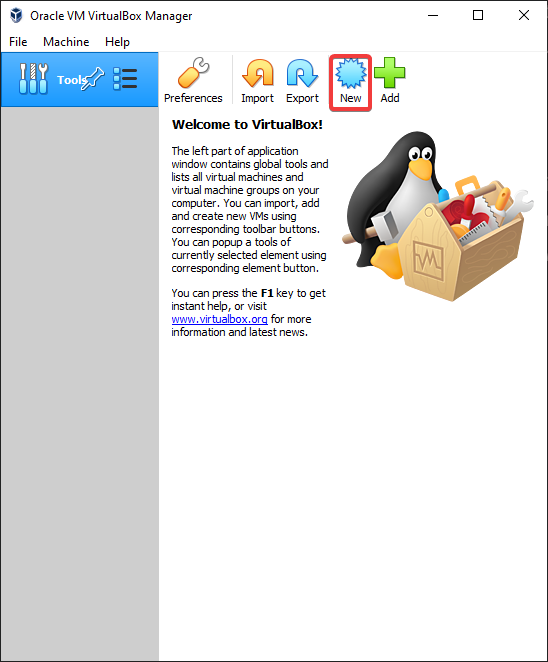
1. First, click on the New button within the top-right nook of the VirtualBox window. This motion brings up the Create Digital Machine wizard. This Wizard allows you to configure your new VM with the settings you need.
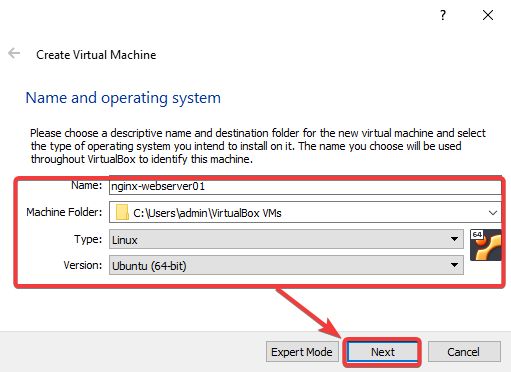
2. Configure the next on the Title and working system web page.
- Title: Give your VM a reputation. This identify may be something you need.
TIP: Title the VM based mostly on its supposed functions, reminiscent of nginx-web-server or windows10-development, so you may higher establish the VM later.
- Machine Folder: Specify the placement to retailer your digital machine recordsdata. You possibly can depart the default location or click on the Browse button to pick a special one.
TIP: Guarantee there’s sufficient area in your drive to your VM. A Linux VM may be as small as 4GB, however a Home windows VM will want a minimum of 20GB.
- Sort: VirtualBox provides many several types of OSes. Choose the working system you wish to set up from the drop-down menu. This tutorial selects Linux for the sort.
TIP: If the OS you need doesn’t seem within the listing, you may choose Different on the backside. This selection tells VirtualBox to attempt to autodetect the options of your OS in the very best means.
- Model: Choose the model of the working system you wish to set up from the drop-down menu. This tutorial goes with Ubuntu 20.04 LTS 64bit, so its model is Ubuntu (64-bit).
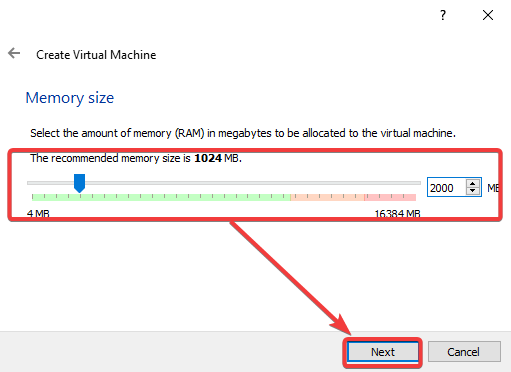
3. On the Reminiscence measurement web page, set how a lot reminiscence (RAM) your VM can have. You possibly can select between 4MB (this worth is just too low for any OS) to 16384MB. The default is 1024MB, however you may enhance it.
Usually, 2000MB is an efficient start line for a Linux VM, whereas 4096MB for a Home windows VM.
Watch out to not allocate an excessive amount of reminiscence to your VM. In the event you do, your host pc might begin to lag or turn out to be non-responsive. Alternatively, when you set too little reminiscence for the VM, your visitor OS and apps might not have sufficient assets to run appropriately. Select the reminiscence measurement correctly.
Click on Subsequent to proceed.
4. On the Arduous disk display, resolve whether or not to create a brand new onerous disk to your visitor VM or use an present one. This instance chooses to create a brand new onerous disk since.
This digital onerous disk shall be your visitor VM’s main onerous disk that holds all the information, such because the visitor OS, apps, and different recordsdata.
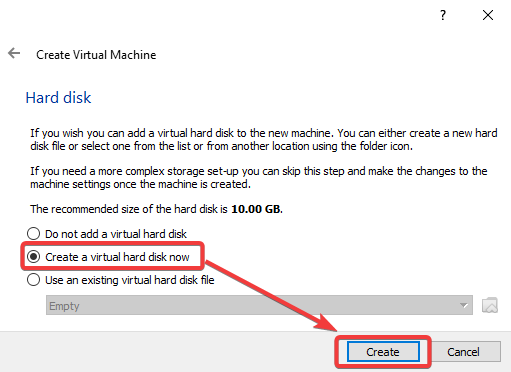
You possibly can choose Use an present onerous disk you probably have an ISO picture or VDI file that already incorporates a visitor working system.
5. On the Arduous disk file kind web page, choose VDI (VirtualBox Disk Picture) and click on Subsequent to proceed. This file kind is the default for VirtualBox.
Chances are you’ll select the corresponding possibility when you plan to make use of the digital onerous disk with different virtualization options, like VMware or Hyper-V.

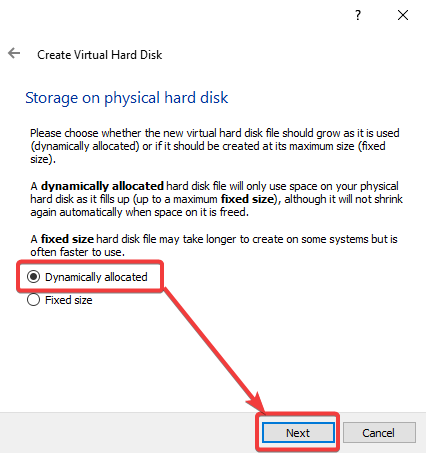
6. On the Storage on bodily onerous disk, choose Dynamically allotted or Fastened measurement, relying on the way you wish to provision the digital disk file measurement allocation. This instance chooses the Dynamically allotted possibility. Click on Subsequent to proceed.
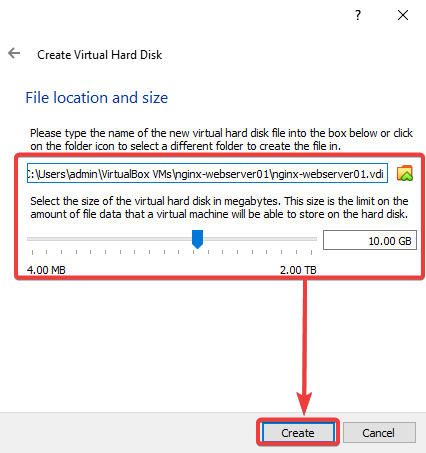
7. On the File location and measurement display, specify the placement and most measurement of the brand new digital disk, and click on Create.
An excellent rule of thumb is to allocate a minimum of 10GB for a Linux VM and 40GB for a Home windows VM.
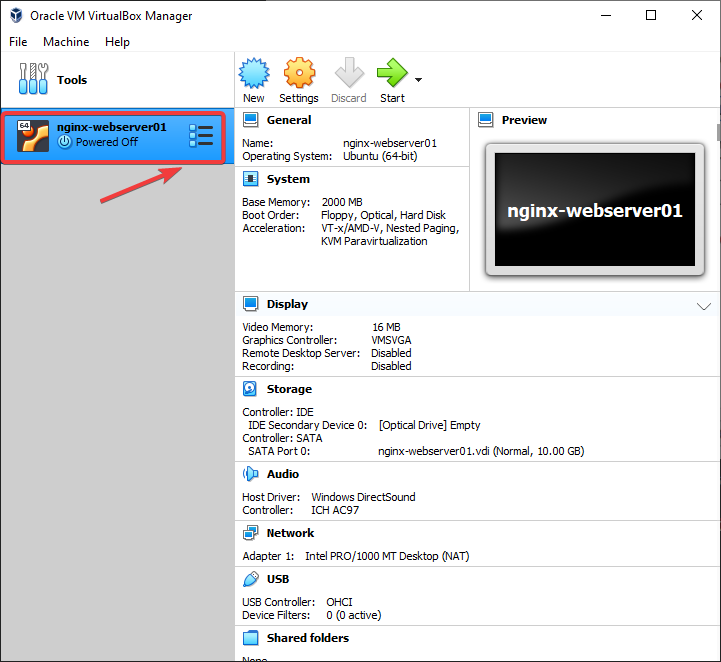
You’ve got a brand new digital VM, as proven within the VirtualBox Supervisor window beneath.
Putting in the Visitor Working System
You’ve created a brand new digital machine, however it’s ineffective with out an working system. On this part, you’ll learn to set up a visitor working system in your new VM.
You want an ISO file with the OS set up recordsdata to put in the visitor OS. You possibly can obtain ISO recordsdata for a lot of standard working methods from the web. For instance, you will get a Ubuntu 20.04 ISO file from the Ubuntu official web site.
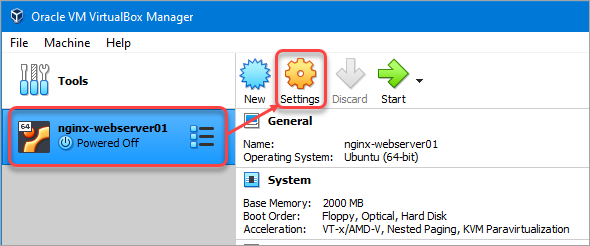
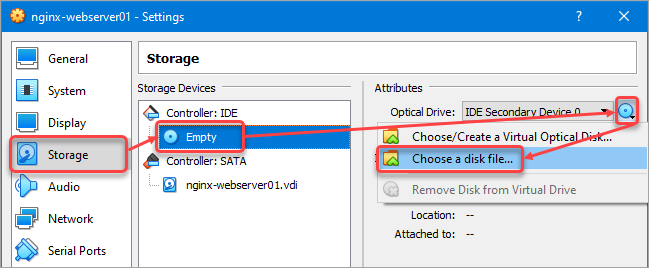
1. Click on your VM on the listing and click on Settings.
2. On the Settings window, click on Storage → Empty disk → the Optical Drive icon → Select a disk file.
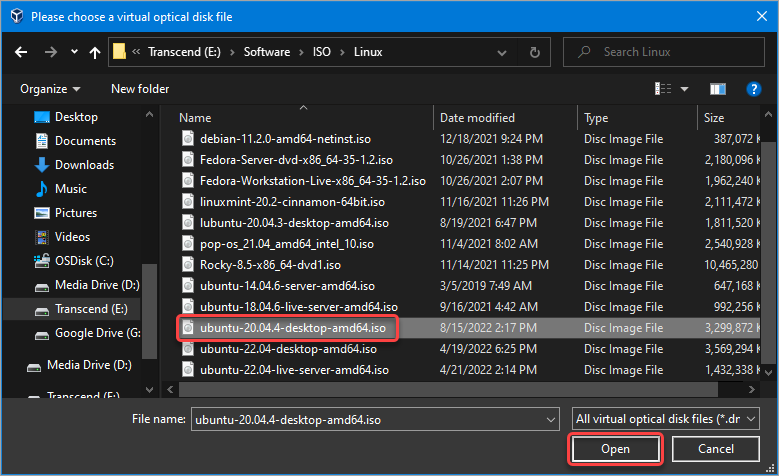
3. Find the ISO file and click on Open. This instance chooses the ubuntu-20.04.4-desktop-amd64.iso file.
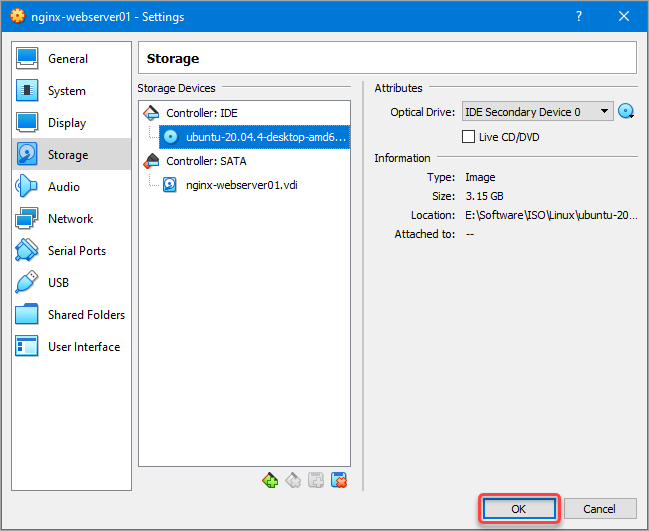
4. After loading the ISO file, click on OK.
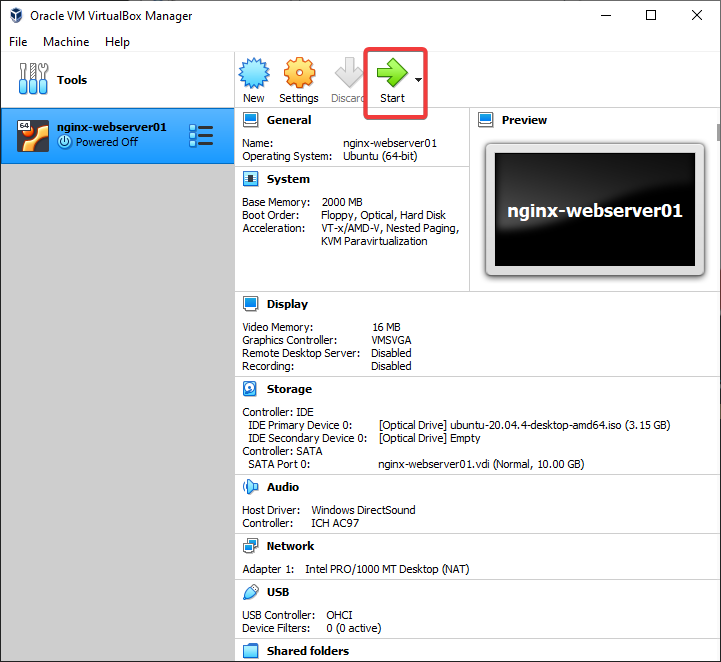
5. Begin your VM by clicking the Begin button within the VirtualBox Supervisor window. The VM will boot from the ISO file. Set up the working system as you’d on a bodily machine.
6. As soon as the set up is full, yet one more job associated to your new VM is to put in the Digital Field Visitor Additions. The Visitor Additions allow options just like the shared clipboard, shared folders, mouse integration, show resize choices, and so forth.
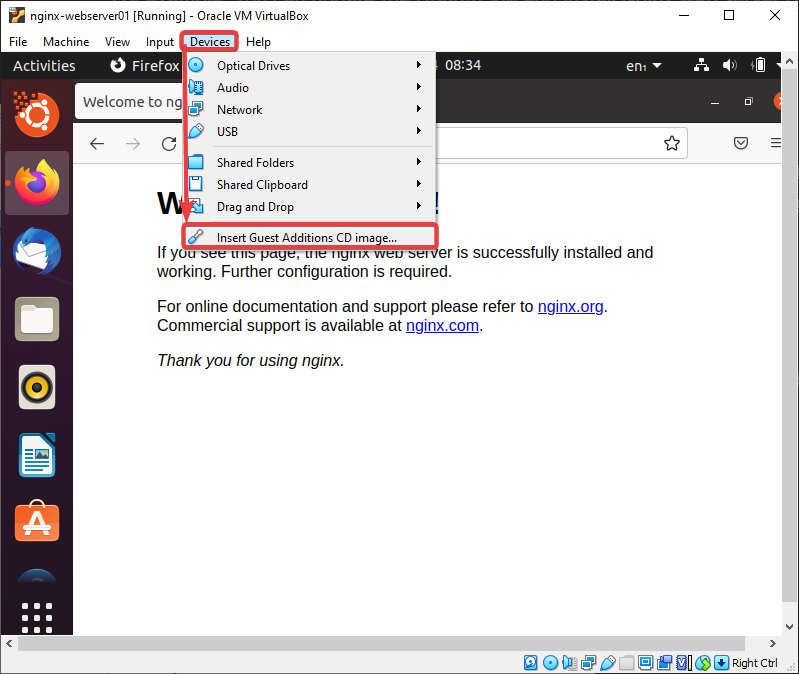
To put in the Visitor Additions, click on the Units menu and Insert Visitor Additions CD Picture. Doing so mounts the VBoxGuestAdditions.iso to your visitor VM.
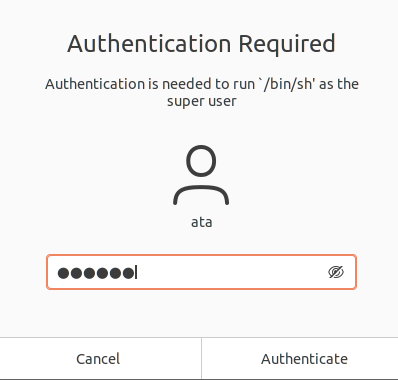
7. Present your consumer password on the immediate and click on Authenticate.
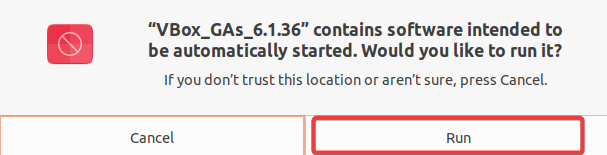
8. Subsequent, click on Run to permit the Visitor Additions set up.
9. Observe the on-screen directions to complete the set up. As soon as the set up is full, reboot your VM for the adjustments to take impact.
Conclusion
This text taught you set up VirtualBox on Home windows 10 and create your first digital machine. You additionally discovered set up the visitor working system on the VM and set up the Visitor Additions.
Now that you’ve a primary understanding of VirtualBox, you may experiment with completely different OSes and study extra about virtualization. With this new talent, why not create a WireGuard VPN connection inside a VM and entry the web safely from a public Wi-Fi community?