

Bitlocker helps to guard your knowledge however typically may also forestall you from accessing your knowledge. In these instances, you will want to enter the Bitlocker Restoration Key to unlock the information in your arduous disk. However the place do you discover the restoration key?
Good to know is that the restoration key for Bitlocker is more often than not mechanically saved in a secure location, which you’ll be able to entry from one other system. However if you happen to can’t discover the restoration key, then the information can’t be decrypted anymore.
On this article, I’ll first clarify briefly how Bitlocker works. However most significantly, we’ll check out the completely different locations the place we are able to discover the Bitlocker Restoration Key.
How does Bitlocker work?
Earlier than we take a look at the locations the place we are able to discover the restoration key, it’s good to understand how Bitlocker works. This may occasionally even end in fixing the issue with out the necessity for the restoration key.
Bitlocker is used to encrypt the information in your arduous drive. This manner, if any individual positive aspects bodily entry to your system, they are going to be unable to learn the information out of your pc even when they place the arduous drive into one other pc. To do that, Bitlocker makes use of the TPM chip that’s built-in into your pc. To encrypt and decrypt the information, a secret’s used that’s saved contained in the TPM chip.
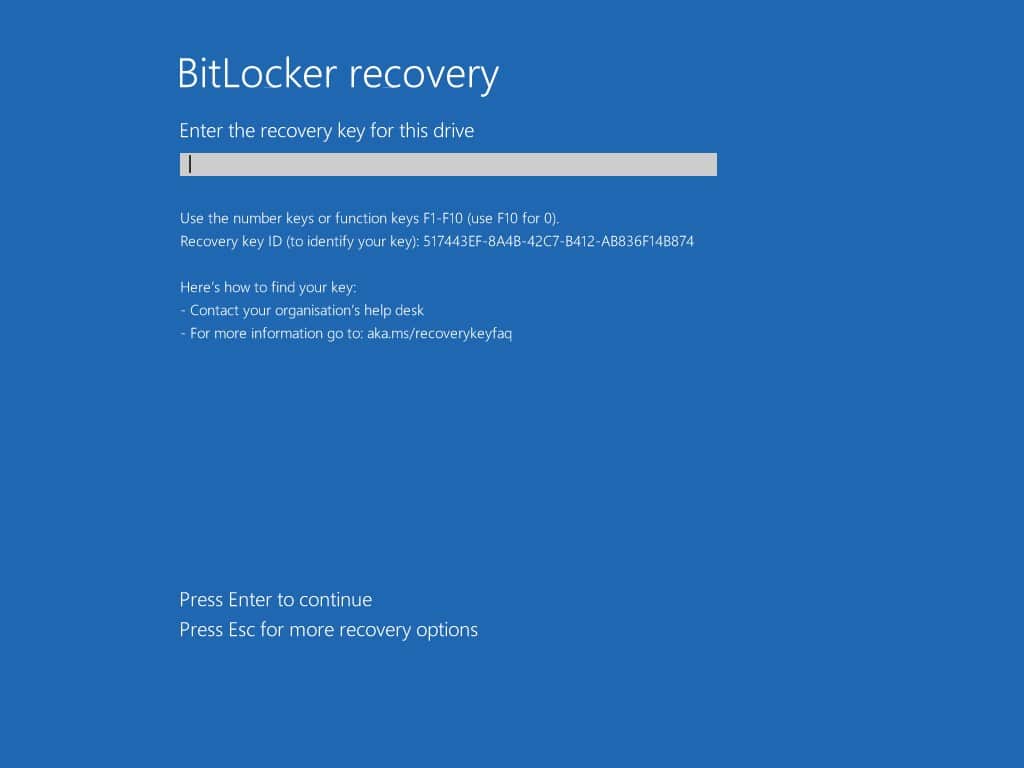
While you begin your pc, the TPM chip does a few measurements to verify the pc hasn’t been tampered with. When all the pieces is okay, then it’ll give the restoration key to Home windows, so your pc can begin up.
But when it detects a change, then it’ll ask for the Bitlocker Restoration Key to guard your knowledge. The next adjustments can set off the Bitlocker Restoration display:
- {Hardware} adjustments
- BIOS adjustments
- Modifications within the Home windows Kernel recordsdata (updating / reinstalling Home windows)
- Firmware updates
- Modifying boot elements
Reverting {Hardware} Modifications
A very powerful one to notice from this checklist is the {hardware} change. You possibly can change one {hardware} part at a time. Including an extra RAM module gained’t set off the Bitlocker Restoration display. However if you happen to set up a brand new video card and add RAM on the identical time, then you definately may have to enter the restoration key.
So if you happen to simply have modified {hardware} elements and may’t discover the restoration key, then the best step to resolve this, is to revert the {hardware} change. As soon as all the pieces is restored as earlier than, you’ll in all probability have the ability to boot your pc.
Then it’s essential to first disable or droop Bitlocker, make the adjustments, after which re-enable Bitlocker and retailer this time the important thing in a secure place.
Discovering your BitLocker Restoration Key
While you enabled Bitlocker in your pc you got a few choices to retailer the restoration key. Good to know which you could’t retailer the restoration key on the encrypted drive itself. The choices which might be given are:
- Save to your Microsoft Account (for private gadgets)
- Save to Azure AD (for firm gadgets)
- Save to a file
- Print the restoration key
Save to a file is simply attainable on one other drive or USB drive. So just be sure you verify any USB drive or exterior arduous drive that you’ve laying round.
Tip
You probably have ever logged in together with your workaccount in your private pc, then it’s attainable that the restoration secret’s saved within the Azure AD setting of your work. It is perhaps value reaching out the your works IT division for it.
Microsoft Account
For private gadgets, you got the choice to save lots of the Bitlocker Restoration Key to your Microsoft account. That is essentially the most beneficial choice for private gadgets, so let’s have a look in your Microsoft account. You possibly can entry your account out of your cellphone or one other system.
Tip
Your Microsoft Account doesn’t have be an @dwell, @hotmail or @outlook account title. It may be any electronic mail handle because the person title, together with Gmail, Yahoo!, private or enterprise electronic mail addresses.
So be sure you attempt all attainable accounts that you’ve!
- Open account.microsoft.com
- Click on on Signal-In and log in together with your private account
- Below Units, click on on view particulars beneath your pc

- Scroll a bit down and click on on Handle restoration keys
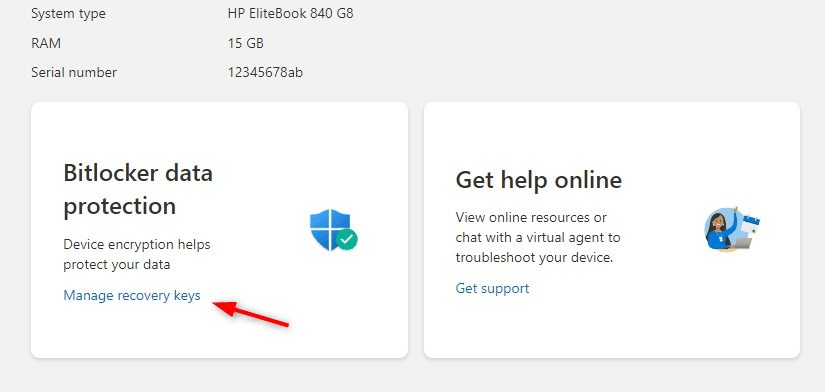
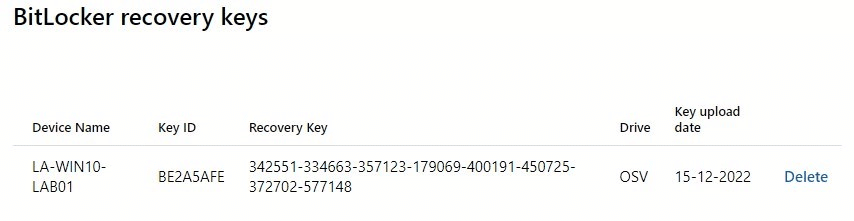
- The restoration key will likely be listed right here. In the event you see a number of keys, use the final one or make it possible for the Key ID match.
Saved to a File or USB
When you might have chosen to save lots of the restoration key to a file or USB, then the secret’s saved inside a textual content file. Within the textual content file, you’ll discover the Key ID (Identifier), which ought to match the ID that you simply see in your blue display and likewise the restoration key
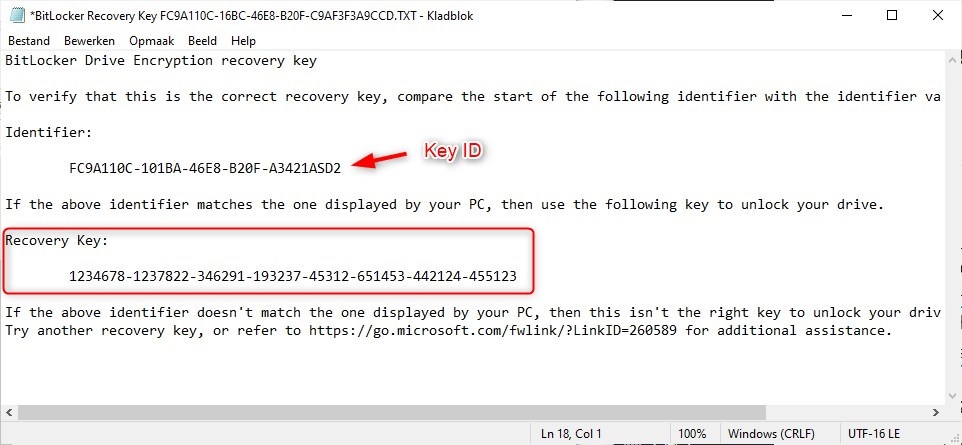
The title of the textual content file begins with BitLocker Restoration Key adopted by an ID. Take into account that the file can solely be saved on a tough drive that isn’t encrypted with BitLocker.
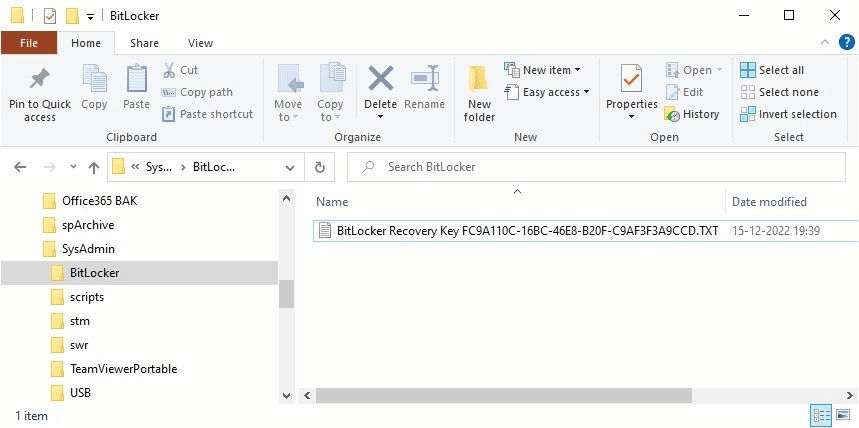
You probably have a number of arduous drives or partitions in your pc, then it’s attainable that you’ve saved it on one other disk. To entry the drive, you’ll be able to take away your arduous drive out of your pc, and join to a different pc. You’ll then have the ability to entry all non-encrypted partitions and seek for the restoration key.
You should utilize the next small PowerShell script to mechanically seek for the restoration file:
# Search the D: Drive for a filter that begins with 'Bitlocker Restoration Key'
Get-ChildItem -Path d: -Filter 'Bitlocker Restoration Key*' -Recurse
Azure AD
Is it a company-owned system and is your organization utilizing Microsoft Workplace 365? Then there’s a good likelihood that your system administrator can discover the restoration key in Azure AD.
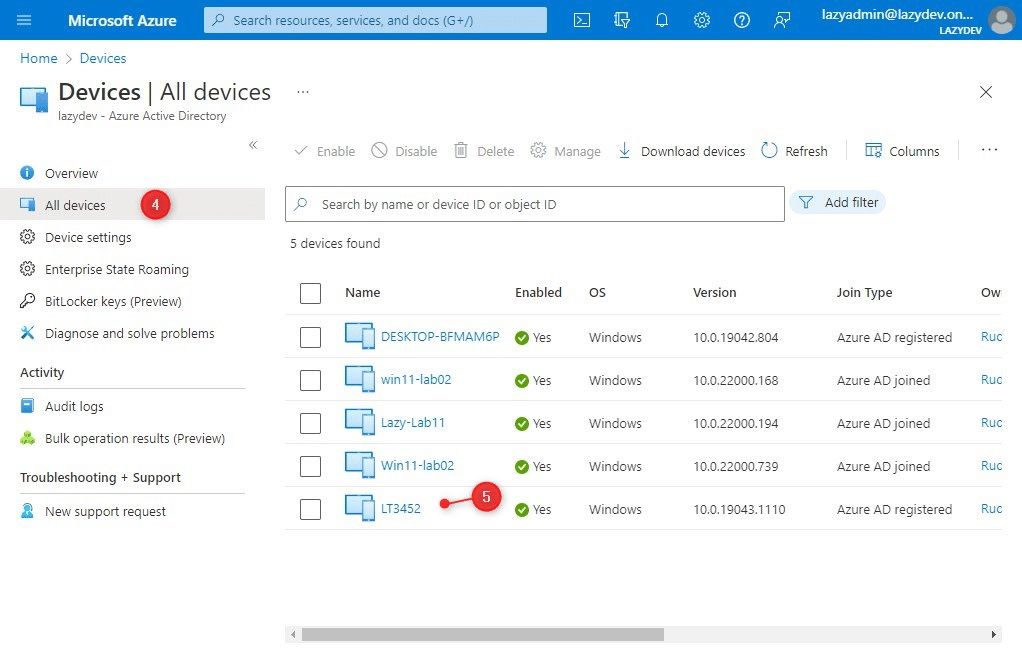
- Open Azure Portal
- Click on on Azure Lively Listing
- Choose Units on the left facet
- Click on on All Units
- Open the system in query
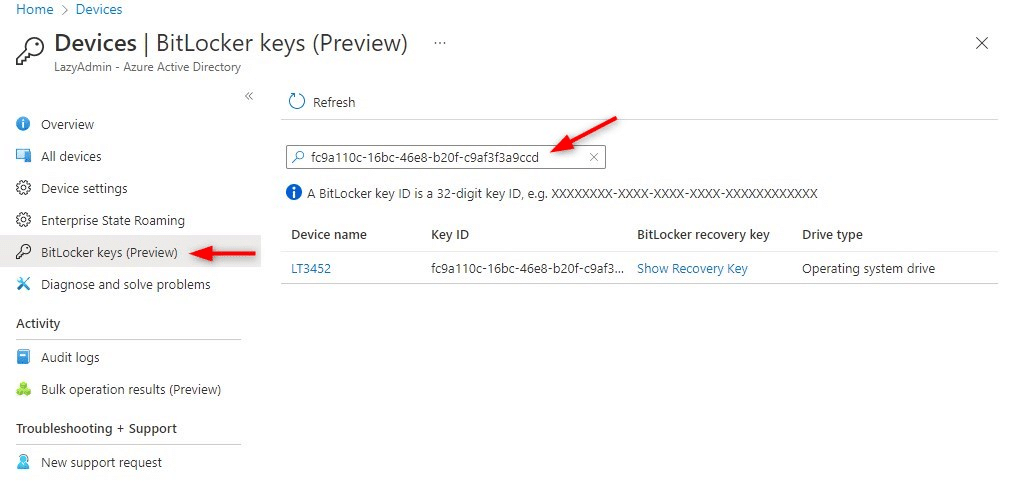
You can see the Bitlocker Restoration Key on the finish of the Properties web page. In the event you see a number of Bitlocker keys, then make it possible for the ID matches the one on the bluescreen.
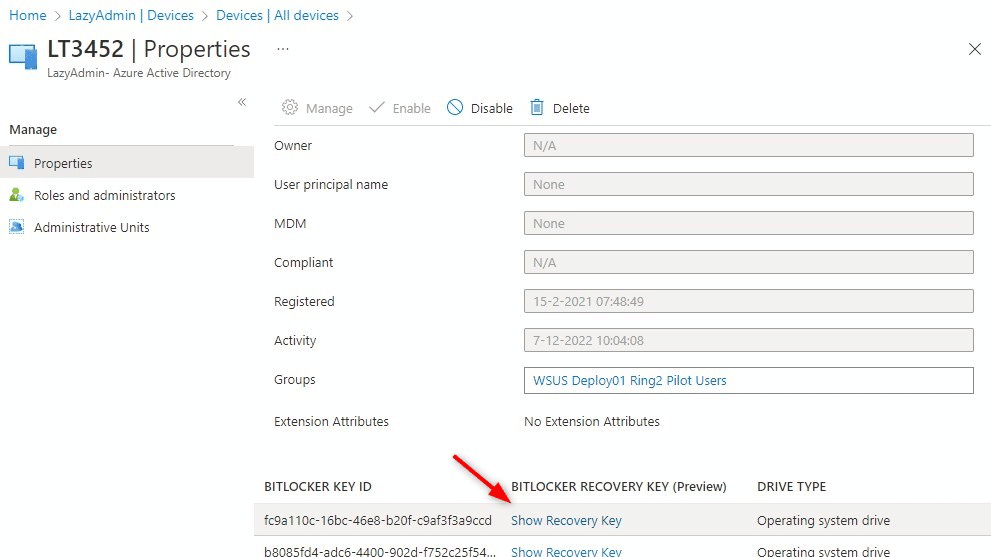
In the event you don’t know the system title, then you may also search by all restoration keys utilizing the Bitlocker Key ID, which is displayed on the Bluescreen on the shopper’s system. In Azure AD, choose Bitlocker Keys beneath the Units and enter the important thing ID.
Lively Listing
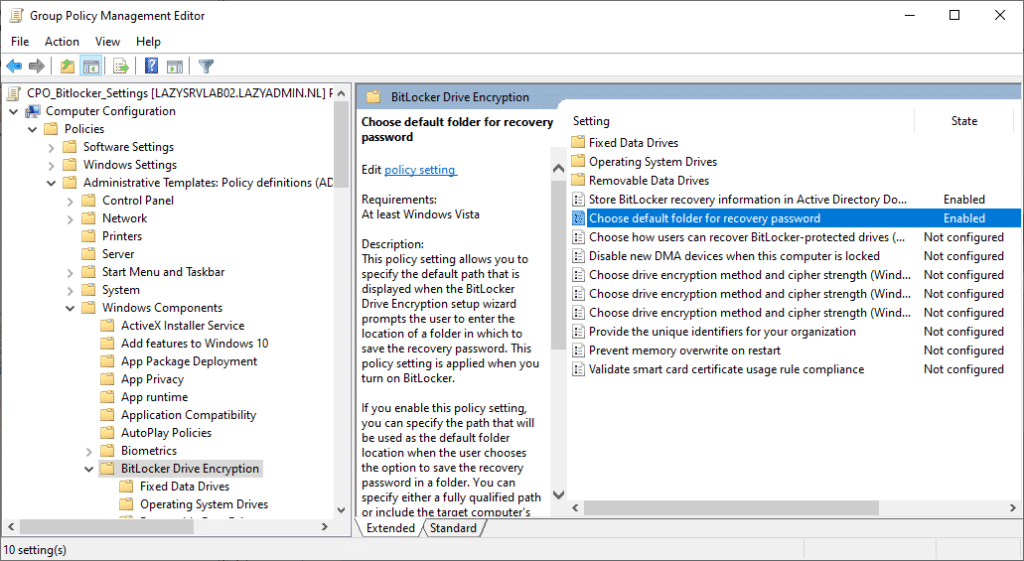
The restoration keys will also be saved in your Lively Listing when configured accurately. For this, the coverage “Retailer Bitlocker Restoration data in Lively Listing” must be enabled, which you’ll find within the group insurance policies beneath Windows Parts > Bitlocker Drive Encryption.
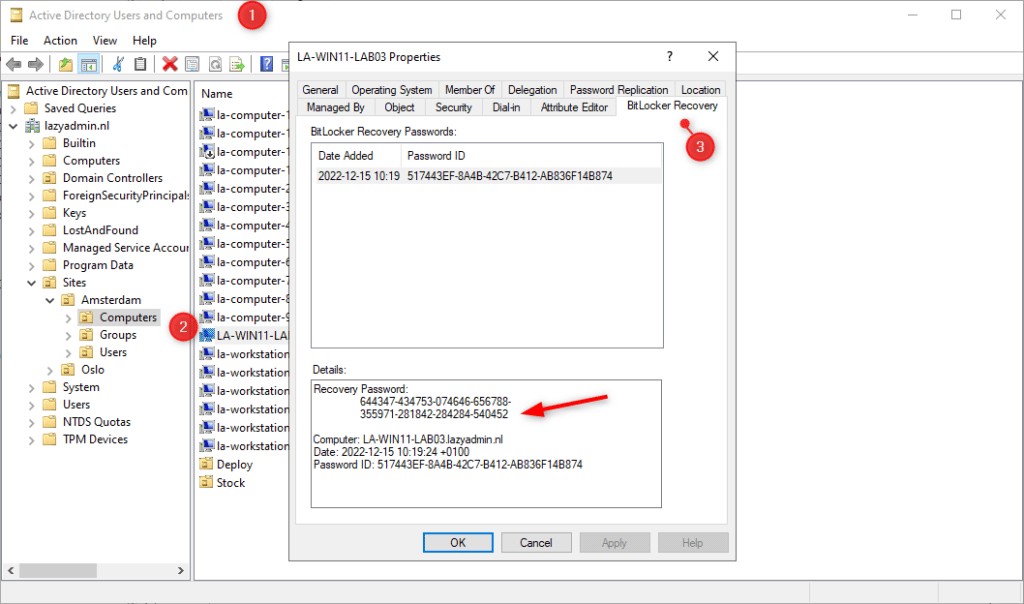
To view the restoration keys, we have to open the pc properties within the Lively Listing:
- Open the Lively Listing Customers and Computer systems
- Open the pc in query
- Click on on the Bitlocker Restoration tab to view the Restoration password
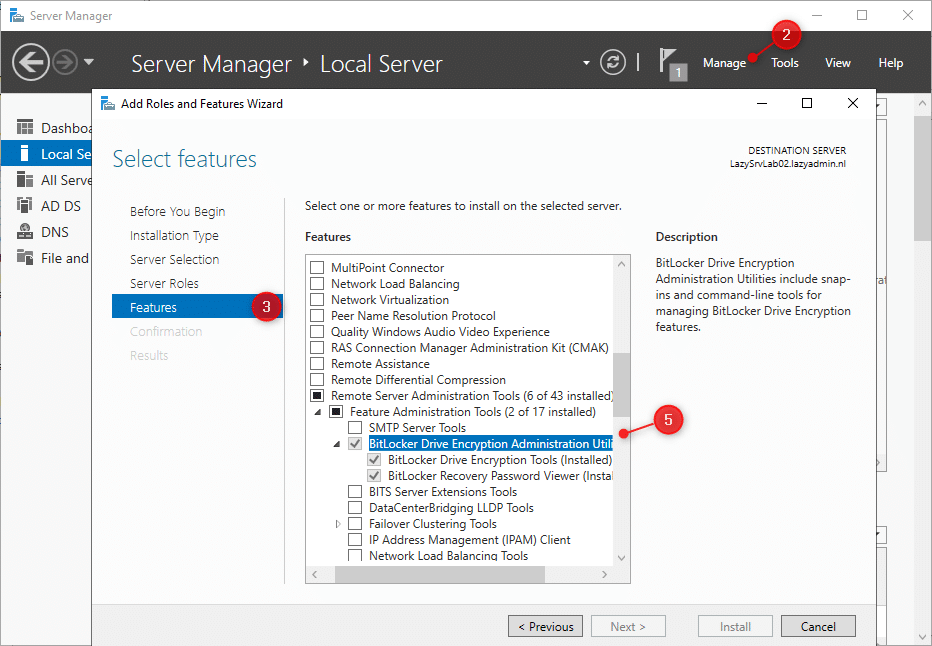
In the event you don’t see the Bitlocker Restoration tab within the Lively Listing, then you will want so as to add a characteristic within the server supervisor.
- Open the Server Supervisor
- Click on on Handle > Add Roles and Options
- Click on Subsequent and choose Options
- Increase Distant Server Administration Instruments
- Allow Bitlocker Drive Encryption Administration Utility beneath Feature Administration Instruments
- Click on on Set up
- Re-open the Lively Listing, the tabs needs to be seen now
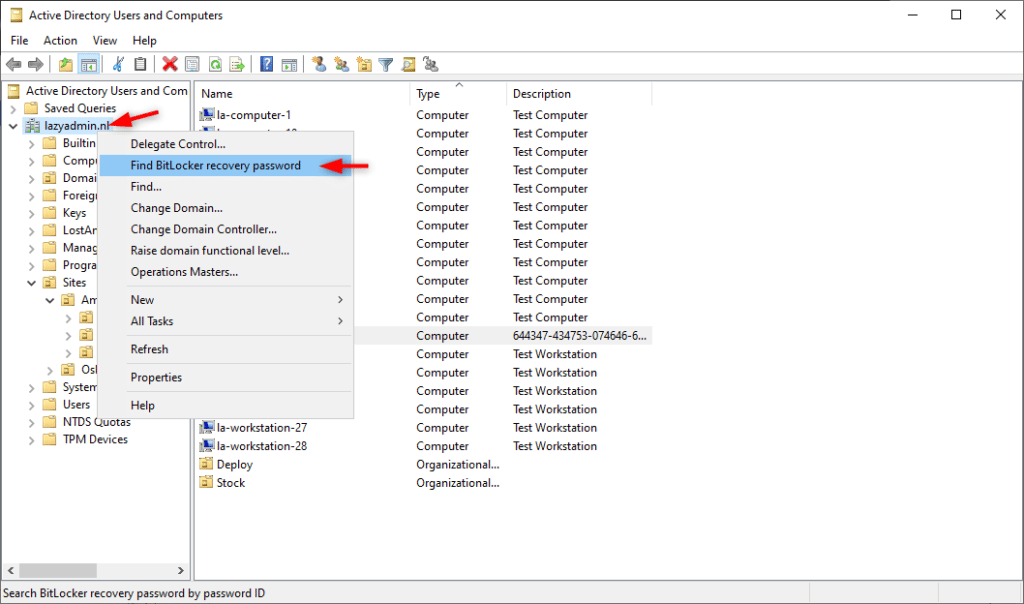
In the event you don’t know the pc title of the system in query, then you may also seek for the important thing in Lively Listing. Proper-click on the area and choose Discover BitLocker Restoration password. You possibly can then search on the password ID utilizing the primary 8 characters which might be displayed on the shopper.
Community folder
An alternative choice is that the restoration keys are saved in a community folder. There’s a group coverage within the Lively Listing that may be configured which can set a default folder path to retailer the restoration password file. So if you’ll find the keys in any of the above locations, then it is perhaps a good suggestion to verify if the coverage is configured.
The easiest way to seek out out if the coverage is ready is to run an RSOP (Consequence Set of Insurance policies) on the shopper. Comply with this text to run the RSOP and verify if the next coverage is ready:
Laptop Configuration > Administrative Templates > Home windows Parts > Bitlocker Drive Encryption > Select default folder for restoration password.
Again up your Bitlocker Restoration Key
In the event you had been capable of achieve entry to your pc with one of many strategies talked about above, then it is perhaps a good suggestion to make further backups of your restoration key. The very best place for that is within the cloud, this fashion you’ll be able to entry it from any location. To do that you will want so as to add a Microsoft account to your pc beneath Settings > Accounts.
To create further backups of the important thing, open the beginning menu and seek for Bitlocker. Within the BitLocker Drive Encryption display, select Backup your Restoration key.
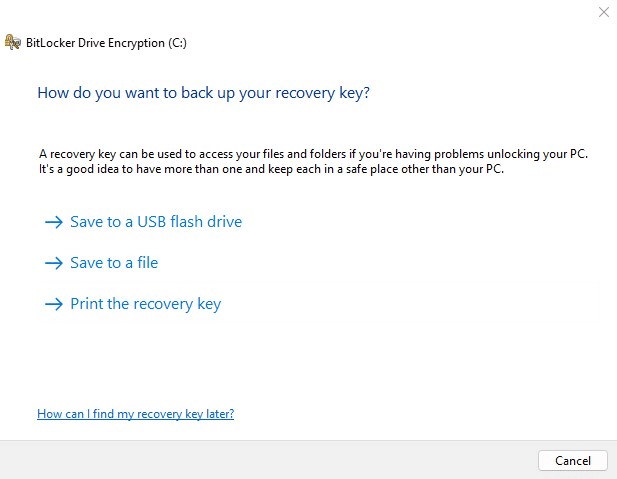
Select one of many strategies, for instance, Print the restoration key and retailer it within the secure or different locations that you’ve for essential private data.
Wrapping Up
I actually hope you had been capable of recuperate the important thing with one of many strategies above. While you had been unable to recuperate the important thing in one of many locations above, then your solely choice will likely be re-install Home windows, which can consequence within the lack of all of your knowledge. Even Microsoft assist can’t recuperate the important thing for you.
You probably have any questions or suggestions then simply drop a remark beneath.