

Microsoft LAPS can be utilized to handle native administrator passwords in your domain-joined units. LAPS (Native Administrator Password Answer), creates a singular and random password for every system shopper in your community and saved the password within the Lively Listing.
The benefit of Microsoft LAPS is that solely customers with the proper permissions can entry the passwords and the native administrator account. And extra importantly, attackers gained’t be capable of entry and infect different computer systems when one account is compromised.
On this article, we’re going to deploy and configure Microsoft LAPS. Take into account that that is the legacy model of Microsoft LAPS. The brand new model, Home windows LAPS, can be obtainable in public preview round Q2 2023.
What’s Microsoft LAPS?
Directors typically use the identical password for every system when deploying Home windows on a brand new machine. This native administrator account can be utilized instead solution to log in when troubleshooting issues on the machine. However having the identical password on every system is a large safety threat, that is the place LAPS (Native Administrator Password Answer) from Microsoft is available in.
When attackers achieve entry to at least one native admin account, they will use the identical credentials to entry all different units within the community. So utilizing a singular password for every system is advisable. However we’d like a solution to handle these passwords. With LAPS, the password for every system is randomly generated and saved within the Lively Listing. Solely customers with the suitable permission can learn the password from the Lively Listing and use the native administrator account.
To search for the LAPS password we are able to use both PowerShell, the LAPS Shopper UI, or discover it within the Lively Listing.
Necessities
There are a few necessities in terms of putting in and utilizing Microsoft LAPS:
- It solely works on Area Joined units
- Protects just one native admin account (advocate disabling every other accounts)
- We have to prolong the Lively Listing scheme
- Configuration is finished with a Group Coverage
- LAPS Shopper must be put in on all shopper units
Putting in LAPS
Putting in LAPS is finished in 3 components. We’re first going to configure the Lively Listing and insurance policies on the Area Controller. Subsequent, we are going to set up the administration instruments on our personal machine and the final step is to roll out the LAPS shopper to all of the shopper units.
Step 1 – Configuring the Area Controller
We’re first going to carry out all the mandatory steps on the area controller. Because of this we are going to prolong the Lively Listing schema, create a safety group with customers which might be allowed to learn the LAPS passwords, arrange the proper permissions, and configure the Group Coverage.
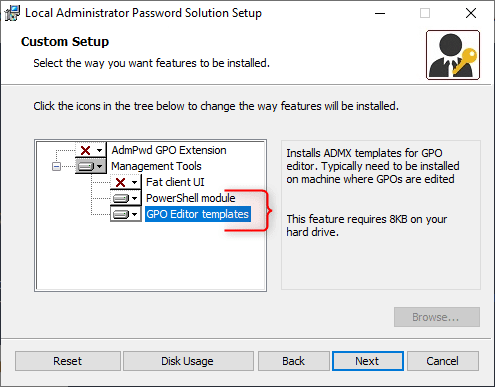
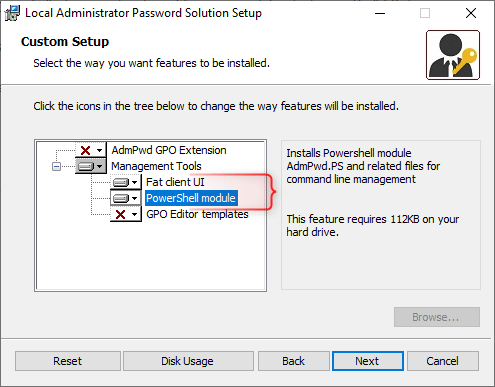
Step one is to obtain the Native Administrator Password Answer. Choose and obtain the LAPS.x64.msi file and open the setup as soon as it’s downloaded. On the area controller, we solely want to put in the next elements:
- PowerShell module
- GPO Editor templates
Prolong the Lively Listing Schema
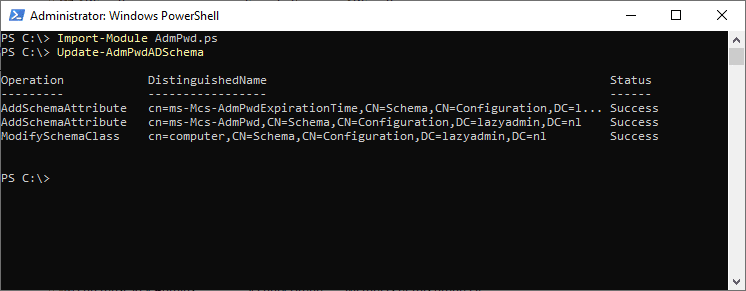
We might want to prolong the Lively Listing Schema so as to add the brand new attribute fields for the LAPS password. Now to increase the AD Schema, you will have to be a member of the Safety Group Schema Admins which you will discover within the Lively Listing. In case you are not a member of the schema admins, then you’ll get an error consumer has inadequate entry rights.
- Open PowerShell on the Area Controller
- Sort the next instructions to increase the AD Schema:
Import-Module AdmPwd.ps
Replace-AdmPwdADSchema
Set permissions within the Lively Listing
With the PowerShell window nonetheless open (in any other case, Import the AdmPwd.ps once more), we’re going to set the permissions which might be required for LAPS. We might want to give the SELF built-in account on the pc’s write entry so it may well replace the password within the Lively Listing. And we might want to give the directors learn (and possibly write) permissions to learn the saved LAPS password.
For the pc, we’re going to goal them utilizing the OU. The setting will apply to all nested OUs as effectively. You’ll be able to repeat the steps beneath for any OU with computer systems that you’ve got. In PowerShell kind the next command to set the permissions on the Computer systems OU:
Observe
To focus on the OU you should use the OU identify (if it’s distinctive) or the distinguished identify.
Set-AdmPwdComputerSelfPermission -OrgUnit Computer systems
If the OU identify isn’t distinctive, then all matching OUs are displayed and an error can be thrown that a couple of object is discovered. Utilizing the DistinguishedName to focus on the proper OU:

Set-AdmPwdComputerSelfPermission -OrgUnit "OU=Computer systems,OU=Amsterdam,OU=Websites,DC=lazyadmin,DC=nl"
The subsequent step is to create a brand new safety group that accommodates the customers which might be allowed to learn the LAPS password. I prefer to create two teams, one with learn/write permissions (these customers can pressure a password reset of the LAPS password) and one group with solely learn entry. You’ll be able to create the teams within the Lively Listing or use PowerShell:
# AD Safety Group for LAPS learn/write entry
New-ADGroup -name 'LAPS Admins' -GroupCategory Safety -GroupScope International

# AD Safety Group for LAPS readonly  entry
New-ADGroup -name 'LAPS ReadOnly' -GroupCategory Safety -GroupScope International
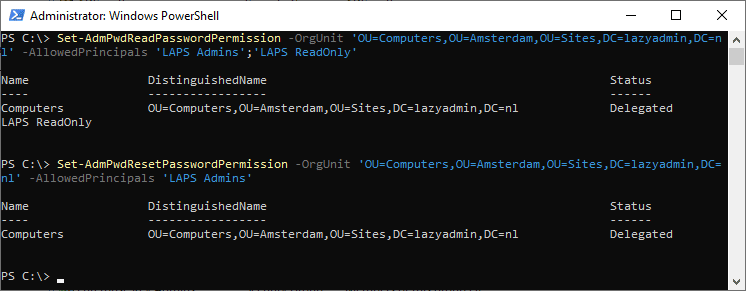
We are able to now give the brand new safety teams the suitable permissions. First, we are going to give each teams learn permission to the LAPS password (the ms-Mcs-AdmPwd attribute):
Set-AdmPwdReadPasswordPermission -OrgUnit Computer systems -AllowedPrincipals 'LAPS Admins';'LAPS ReadOnly'
Directors must also be capable of reset the password, so we are going to give the LAPS Admins group additionally reset permission:
Set-AdmPwdResetPasswordPermission -OrgUnit Computer systems -AllowedPrincipals 'LAPS Admins'
Organising the LAPS GPO
With the permission all sorted we achieve configure the LAPS GPO (Group Coverage Object). First, we might want to copy the LAPS Admx file to the Lively Listing Central Retailer.
- On the area controller, navigate to C:WindowsPolicyDefinitions
- Copy the AdmPwd.admx to contoso.localSysVolcontoso.localPoliciesPolicyDefinitions
Do the identical for the Adml file which you will discover within the language folder:
- On the area controller, navigate to C:WindowsPolicyDefinitionsen-US
- Copy the AdmPwd.adml to contoso.localSysVolcontoso.localPoliciesPolicyDefinitionsen-US
We are able to now create a brand new GPO for LAPS:
- Open the Group Coverage Administration Console
- Create a new Group Coverage in your Computer systems OU
- Proper-Click on the brand new Coverage and choose Edit
- Navigate to : Pc Configuration > Polices > Administrative Templates > LAPS
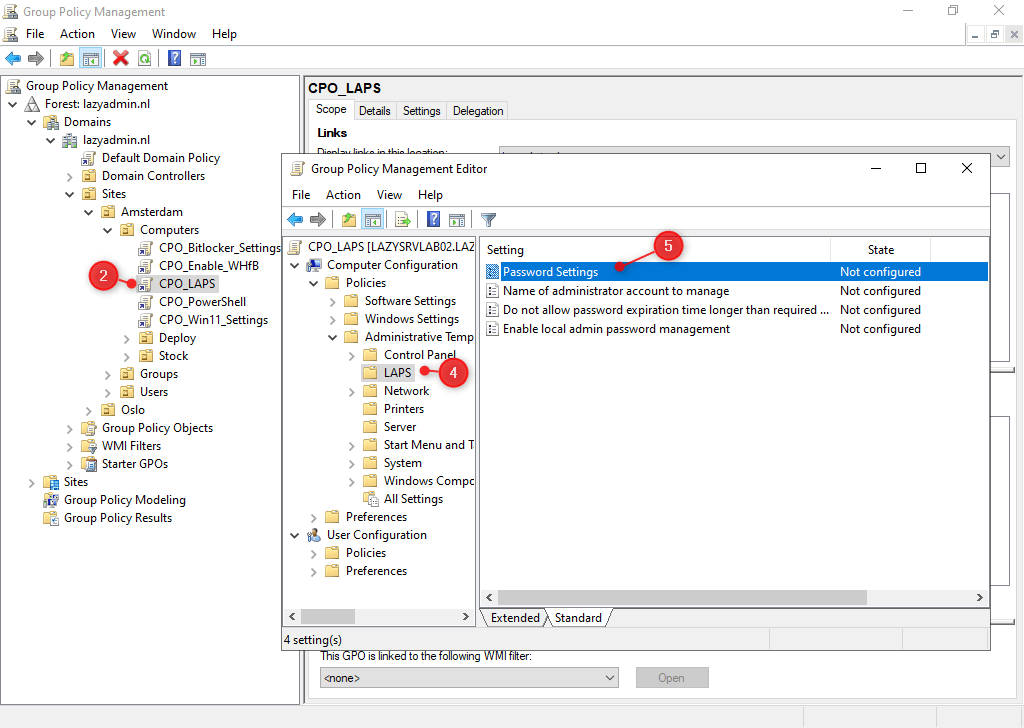
- Open the Password Settings
- Allow the setting
- Configure the password complexity (the default settings are typically advantageous)
- Click on Okay when performed
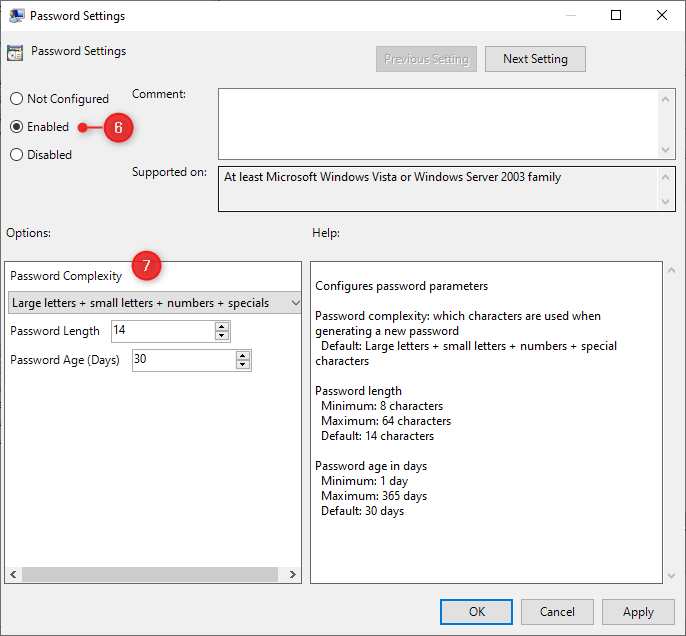
- Subsequent, open the setting Identify of the administrator account to handle
- Allow the setting
- Beneath Administrator account identify enter LAPSAdmin
Observe
LAPS can solely defend one native admin account. Utilizing a definite native admin account identify permits us to simply confirm if the pc is protected with LAPS. Plus the built-in Administrator account is commonly disabled by default.
- Open the setting Allow native admin password administration
- Click on Allow and shut the window
Elective GPO Settings
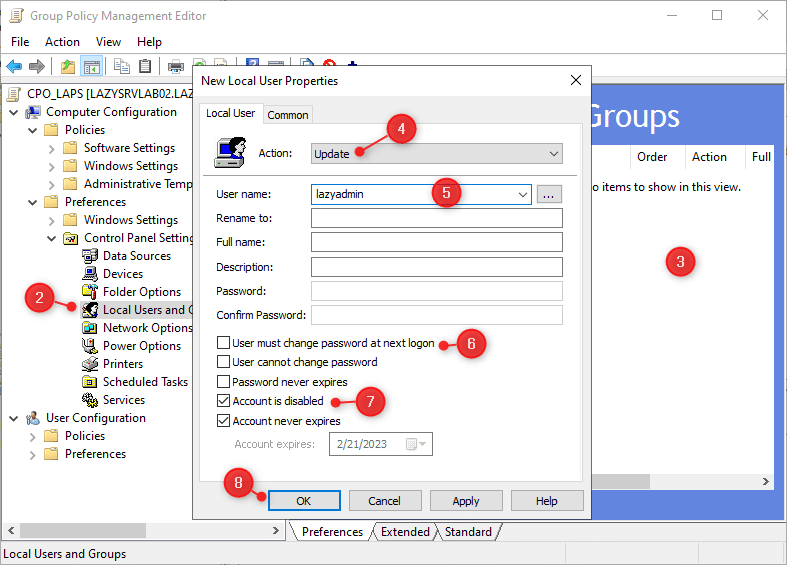
The next settings are non-obligatory. If have already got a neighborhood admin account, identify lazyadmin, for instance. Then you definitely in all probability need to disable this account when deploying LAPS. We are able to do that in the identical coverage that we simply created:
- Edit the CPO_LAPS coverage
- Navigate to: Pc Configuration > Preferences > Management Panel Settings > Native Customers and Teams
- Proper-Click on within the white space and select New > Native Person
- Set Motion to Replace
- Enter the identify of the present native admin account
- Uncheck Person should change password at subsequent logon
- Test Account is disabled
- Click on OK
Now we have now efficiently configured the Lively Listing and Group Coverage for Microsoft LAPS. Just be sure you apply the newly created coverage to all OUs that comprise computer systems the place you need to use LAPS on.
Step 2 – Set up the LAPS Shopper on the Computer systems
We might want to set up the LAPS Shopper element on all Home windows computer systems. Now the easiest way to put in software program on a number of purchasers is to make use of a deployment device like PDQ Deploy or Action1.
In PDQ Deploy you possibly can create a brand new package deal and use the LAPS.x64.msi file that we downloaded earlier. Just be sure you add the parameter CUSTOMADMINNAME=LAPSAdmin in your package deal. It’s additionally a good suggestion so as to add a PowerShell or Command step with the gpupdate command.
Observe
The CUSTOMADMINNAME parameter will create a neighborhood admin account on the pc with the username LAPSAdmin.
If you happen to don’t have a deployment device that you should use, then might additionally use a bunch coverage to deploy the shopper. The one drawback is which you could’t simply add the required parameter CUSTOMADMINNAME to the MSI file. You would want to switch the MSI file utilizing a device referred to as ORCA, however that’s out of the scope of this text.
Deployment by GPO can also be attainable when you possibly can re-use the prevailing native admin account:
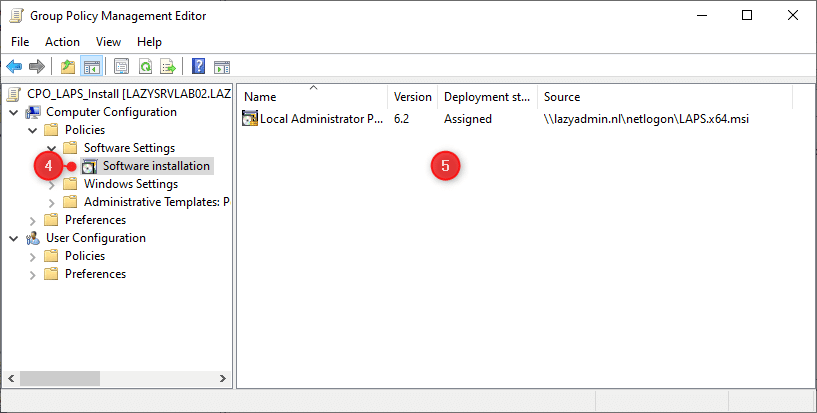
First, copy the LAPS.x64.msi file to your Netlogon folder (contoso.localnetlogon)
- Open the Group Coverage Administration console
- Create a brand new GPO in your Computer systems OU (identical location because the LAPS GPO) and identify it CPO_LAPS_Install
- Edit the brand new coverage
- Navigate to: Pc Configuration > Insurance policies > Software program Settings > Software program Set up
- Proper-Click on on the white house and choose New > Bundle…
- Navigate to your Netlogon folder and choose the LAPS.x64.msi file
- Choose Assigned
Another choice is to put in the MSI manually or use a PowerShell script:
if (-not(Get-Bundle -name "native administrator password resolution" -ErrorAction Ignore)) {
    Begin-Course of msiexec.exe -Wait -ArgumentList "/i 'contoso.localnetlogonLAPS.x64.msi /qn /norestart /l*v 'c:templaps-install.log' CUSTOMADMINNAME=LAPSAdmin"
}
You’ll be able to simply confirm if the LAPS shopper is efficiently put in by checking if the LAPS Admin account is created on the shopper:
- Press Home windows Key + R
- Sort lusrmgr.msc to view the native customers accounts
- LAPSAdmin needs to be listed
Step 3 – Put in the LAPS Administration UI
To search for the LAPS Password of a shopper we might want to use both the LAPS Shopper UI or the PowerShell module. You’ll be able to set up the administration components on as many machines as you want. Solely to view or reset the password, the consumer will have to be a member of one of many safety teams that we created earlier (LAPS Admin or LAPS ReadOnly).
Obtain the Native Administrator Password Answer once more from Microsoft. Choose and obtain the LAPS.x64.msi file and open the setup as soon as it’s downloaded. We’re going to set up the Fats shopper UI and the PowerShell module:
Retrieving Microsoft LAPS Password
After the set up is accomplished you can find the Microsoft LAPS shopper within the begin menu. If you happen to open LAPS UI you possibly can enter the pc identify and click on on Search to lookup the LAPS password:
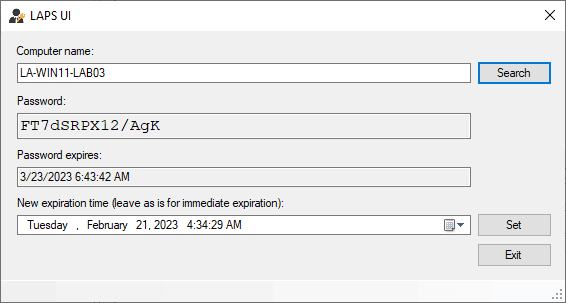
When you’ve got reset permissions then you too can reset the password by clicking on Set. It will reset the password instantly. Another choice is the set the expiration date of the LAPS Password.
Get LAPS Password with PowerShell
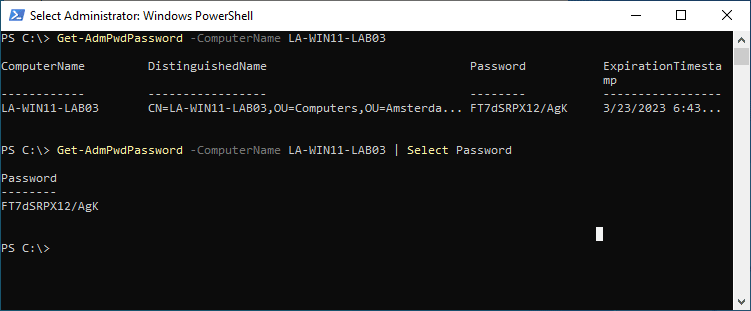
We are able to additionally use PowerShell to search out and reset the LAPS Password. Just be sure you have put in the PowerShell module from the Native Administrator Password Answer setup. We are able to use the cmdlet Get-AdmPwdPassword to get the password from the precise laptop:
Get-AdmPwdPassword -ComputerName LA-WIN11-LAB03

# Or to return solely the password:
Get-AdmPwdPassword -ComputerName LA-WIN11-LAB03 | Choose Password

# End result
Password
--------
FT7dSRPX12/AgK
As you possibly can see within the screenshot beneath, the cmdlet doesn’t solely return the password, but in addition the pc identify, distinguished identify, and expiration timestamp. With a easy choose we are able to ensure that solely the password is returned.
We are able to additionally copy the password mechanically to our clipboard by piping the Set-Clipboard cmdlet behind it. For that we might want to broaden the password property first, in order that solely the worth is copied, as an alternative of the entire object:
Get-AdmPwdPassword -ComputerName LA-WIN11-LAB03 | Choose -ExpandProperty Password | Set-Clipboard
Utilizing the Lively Listing
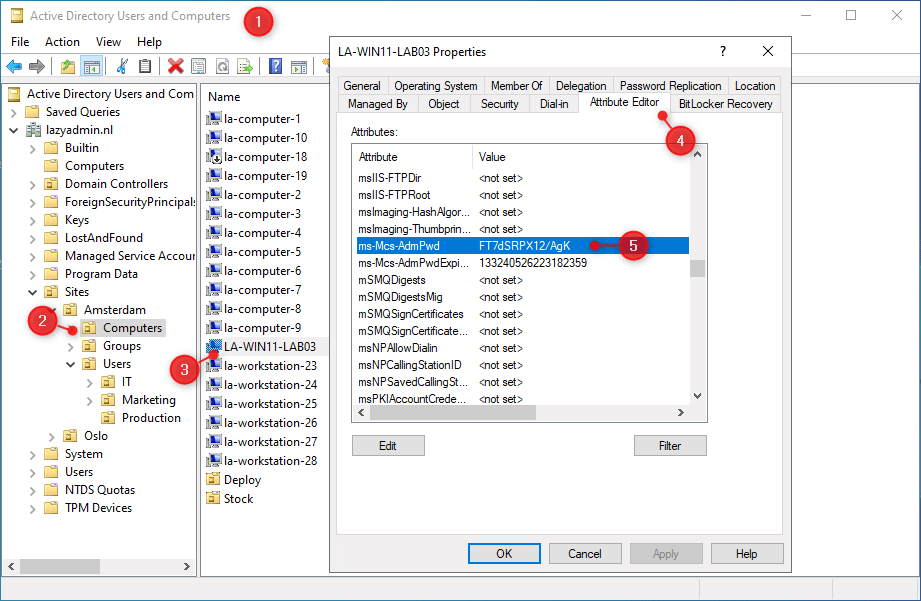
We are able to additionally search for the Microsoft LAPS password within the Lively Listing. The password is saved within the ms-MCS-AdmPwd attribute. So to retrieve it we might want to open the Attribute editor of the pc object:
- Open the Lively Listing Customers and Computer systems
- Navigate to the computer systems OU
- Double-click on the laptop object
- Open the Attribute Editor tab
- Scroll all the way down to the ms-MCS-Adm-Pwd attribute to view the password
Wrapping Up
Microsoft LAPS is a superb resolution to handle your native administration password. Take into account that a brand new model of LAPS, named Home windows LAPS, can be launched within the second half of 2023. This model can even retailer the password in Azure Lively Listing, amongst with different advantages.
I hope this text helped you with configuring the native administrator password resolution. When you’ve got any questions, simply drop a remark beneath.