

TL;DR: Be taught so as to add mail merge performance to the Blazor Wealthy Textual content Editor! We’ll arrange a Blazor app, configure the editor, and add merge fields utilizing a customized toolbar and Point out part. Lastly, we’ll course of knowledge with Scriban for seamless customized content material creation.
Syncfusion Blazor Wealthy Textual content Editor is a feature-rich WYSIWYG HTML editor and WYSIWYG Markdown editor. It’s used to create blogs, discussion board posts, notes sections, assist tickets (incidents), remark sections, messaging apps, and extra. The management supplies an environment friendly consumer interface with cellular assist for a greater modifying expertise. It has a wide range of instruments to edit and format wealthy content material and returns legitimate HTML markup or Markdown (MD) content material. It permits customers to insert photographs, hyperlinks, tables, and lists with modular architectures.
On this weblog, we’ll see tips on how to simply add a mail merge characteristic to the Blazor Wealthy Textual content Editor. This characteristic is helpful for sending customized messages to many individuals directly. With a easy setup, customers could make their content material creation and distribution a lot smoother, bettering their communication course of. Preserve studying to discover ways to take advantage of the Blazor Wealthy Textual content Editor with mail merge!
Stipulations
We’re going to exhibit the method utilizing a Blazor server-side app. So, the next stipulations are wanted:
Let’s get began!
Step 1: Create a Blazor server-side app
First, create a Blazor server-side app and configure the Syncfusion Blazor providers.
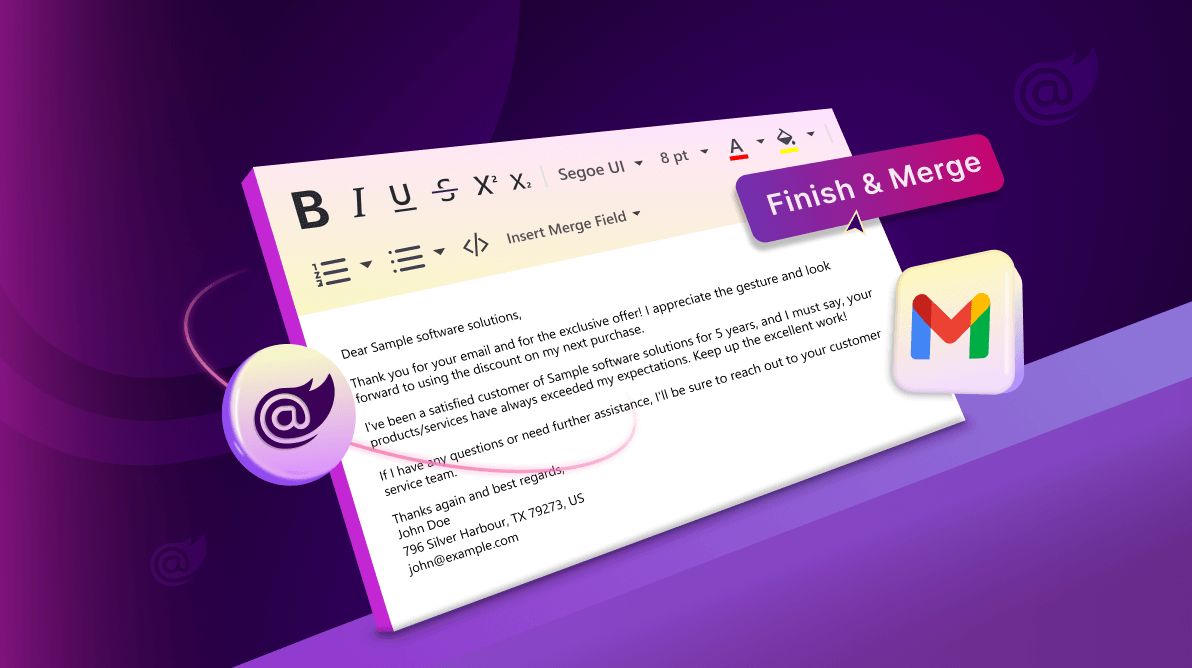
Step 2: Add the Insert Merge Area menu button within the Blazor Wealthy Textual content Editor toolbar
Let’s add a customized menu button labeled Insert Merge Area to the toolbar of the Blazor Wealthy Textual content Editor. For that, we should always configure the Blazor Menu part to incorporate obtainable insert merge subject choices. This menu button allows customers to pick and insert merge fields into their textual content. This may be achieved by binding the ItemSelected occasion of the Menu part and calling the Wealthy Textual content Editor’s ExecuteCommandAsync technique with the command identify InsertHTML.
Consult with the next code instance.
@web page "/"
@utilizing Syncfusion.Blazor.RichTextEditor
@utilizing Syncfusion.Blazor.Navigations

<SfRichTextEditor ID="mailMerge" @ref="rteObj" @bind-Worth="TextEditorValue">
 <RichTextEditorToolbarSettings Gadgets="@Instruments" Kind="ToolbarType.MultiRow">
  <RichTextEditorCustomToolbarItems>
   <RichTextEditorCustomToolbarItem Title="InsertMergeField">
    <Template>
     <SfMenu TValue="MenuItem">
      <MenuEvents TValue="MenuItem" ItemSelected="ItemSelected"></MenuEvents>
      <MenuItems>
       <MenuItem Textual content="Insert Merge Area">
        <MenuItems>
         <MenuItem Textual content="bill.company_details">
          <MenuItems>
           <MenuItem Textual content="bill.company_details.identify"></MenuItem>
           <MenuItem Textual content="bill.company_details.handle"></MenuItem>
           <MenuItem Textual content="bill.company_details.telephone"></MenuItem>
          </MenuItems>
         </MenuItem>
         <MenuItem Textual content="bill.customer_details">
          <MenuItems>
           <MenuItem Textual content="bill.customer_details.identify"></MenuItem>
           <MenuItem Textual content="bill.customer_details.handle"></MenuItem>
           <MenuItem Textual content="bill.customer_details.e mail"></MenuItem>
          </MenuItems>
         </MenuItem>
         <MenuItem Textual content="bill.invoice_number"></MenuItem>
        </MenuItems>
       </MenuItem>
      </MenuItems>
     </SfMenu>

    </Template>
   </RichTextEditorCustomToolbarItem>
  </RichTextEditorCustomToolbarItems>
 </RichTextEditorToolbarSettings>
</SfRichTextEditor>


@code {
    SfRichTextEditor? rteObj;
    public string TextEditorValue { get; set; } = @"<p>Expensive {{bill.company_details.identify}},</p>

                <p>Thanks to your e mail and for the unique supply! I recognize the gesture and stay up for utilizing the low cost on my subsequent buy.</p>

                <p>I have been a happy buyer of {{bill.company_details.identify}} for five years, and I have to say, your merchandise/providers have at all times exceeded my expectations. Sustain the wonderful work!</p>

                <p>If I've any questions or want additional help, I am going to make sure to attain out to your customer support workforce.</p>

                <p>
                    Thanks once more and greatest regards,<br>
                    {{bill.customer_details.identify}} <br />
                    {{bill.customer_details.handle}} <br />
                    {{bill.customer_details.e mail}}
                </p>";

    public class PersonData
    {
        public string? Title { get; set; }

        public string? Standing { get; set; }
    }
    Listing<PersonData> EmailData = new Listing<PersonData> {
      new PersonData() { Title="bill.company_details.identify",  Standing = "lively",  },
      new PersonData() { Title="bill.company_details.handle",  Standing = "away" },
      new PersonData() { Title="bill.company_details.telephone", Standing = "busy" },
      new PersonData() { Title="bill.customer_details.identify", Standing = "lively"},
      new PersonData() { Title="bill.customer_details.handle", Standing = "busy" },
      new PersonData() { Title="bill.customer_details.e mail", Standing = "lively" },
      new PersonData() { Title="bill.issue_date", Standing = "away"},
      new PersonData() { Title="bill.due_date", Standing = "busy" }
    };

    non-public Listing<ToolbarItemModel> Instruments = new Listing<ToolbarItemModel>()
    {
        new ToolbarItemModel() { Command = ToolbarCommand.Daring },
        new ToolbarItemModel() { Command = ToolbarCommand.Italic },
        new ToolbarItemModel() { Command = ToolbarCommand.Underline },
        new ToolbarItemModel() { Command = ToolbarCommand.StrikeThrough },
        new ToolbarItemModel() { Command = ToolbarCommand.SuperScript },
        new ToolbarItemModel() { Command = ToolbarCommand.SubScript },
        new ToolbarItemModel() { Command = ToolbarCommand.Separator },
        new ToolbarItemModel() { Command = ToolbarCommand.FontName },
        new ToolbarItemModel() { Command = ToolbarCommand.FontSize },
        new ToolbarItemModel() { Command = ToolbarCommand.FontColor },
        new ToolbarItemModel() { Command = ToolbarCommand.BackgroundColor },
        new ToolbarItemModel() { Command = ToolbarCommand.Separator },
        new ToolbarItemModel() { Command = ToolbarCommand.LowerCase },
        new ToolbarItemModel() { Command = ToolbarCommand.UpperCase },
        new ToolbarItemModel() { Command = ToolbarCommand.Separator },
        new ToolbarItemModel() { Command = ToolbarCommand.Picture },
        new ToolbarItemModel() { Command = ToolbarCommand.CreateLink },
        new ToolbarItemModel() { Command = ToolbarCommand.CreateTable },
        new ToolbarItemModel() { Command = ToolbarCommand.Separator },
        new ToolbarItemModel() { Command = ToolbarCommand.Codecs },
        new ToolbarItemModel() { Command = ToolbarCommand.Alignments },
        new ToolbarItemModel() { Command = ToolbarCommand.Separator },
        new ToolbarItemModel() { Command = ToolbarCommand.NumberFormatList },
        new ToolbarItemModel() { Command = ToolbarCommand.BulletFormatList },
         new ToolbarItemModel() { Command = ToolbarCommand.SourceCode },
        new ToolbarItemModel() { Title = "InsertMergeField", TooltipText = "Insert Merge Area" },
        new ToolbarItemModel() { Command = ToolbarCommand.Undo },
        new ToolbarItemModel() { Command = ToolbarCommand.Redo }
    };

    public async Process ItemSelected(MenuEventArgs<MenuItem> args)
    {
        if (args.Merchandise.Gadgets == null)
        {
            await this.rteObj.ExecuteCommandAsync(CommandName.InsertHTML, "<span  contenteditable="false" class="e-mention-chip">{{" + args.Merchandise.Textual content + "}}</span>", new ExecuteCommandOption() { Undo = true });
        }
    }

}
Consult with the next picture.
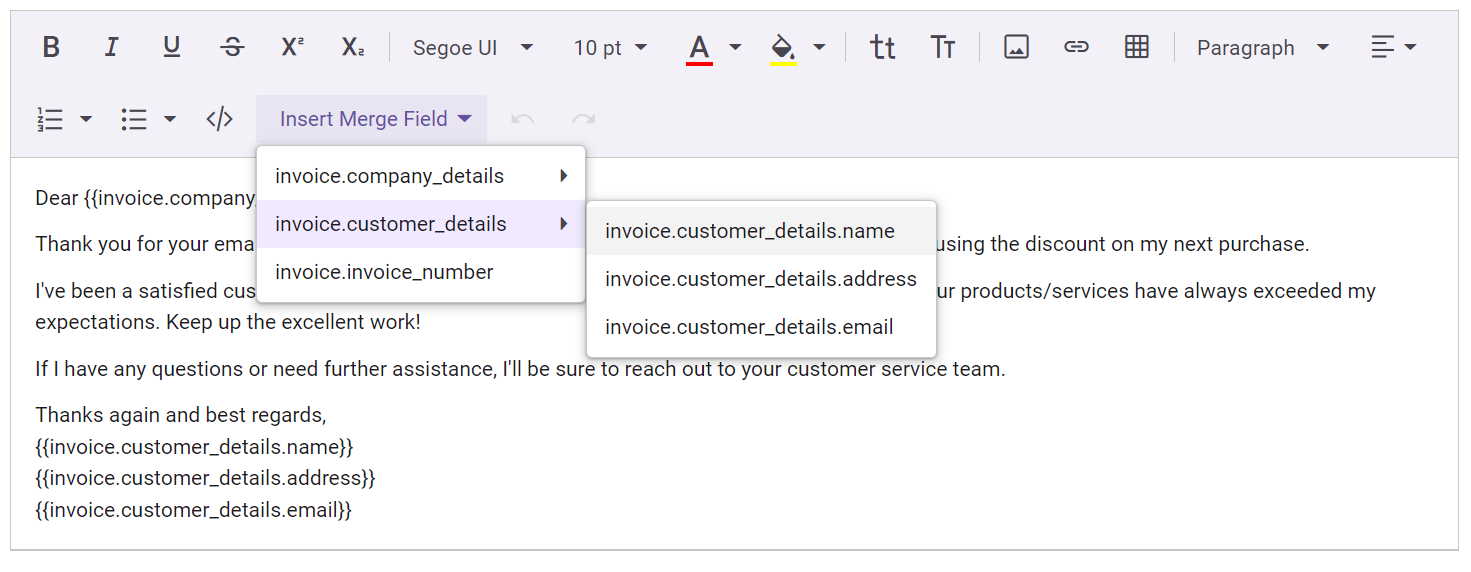
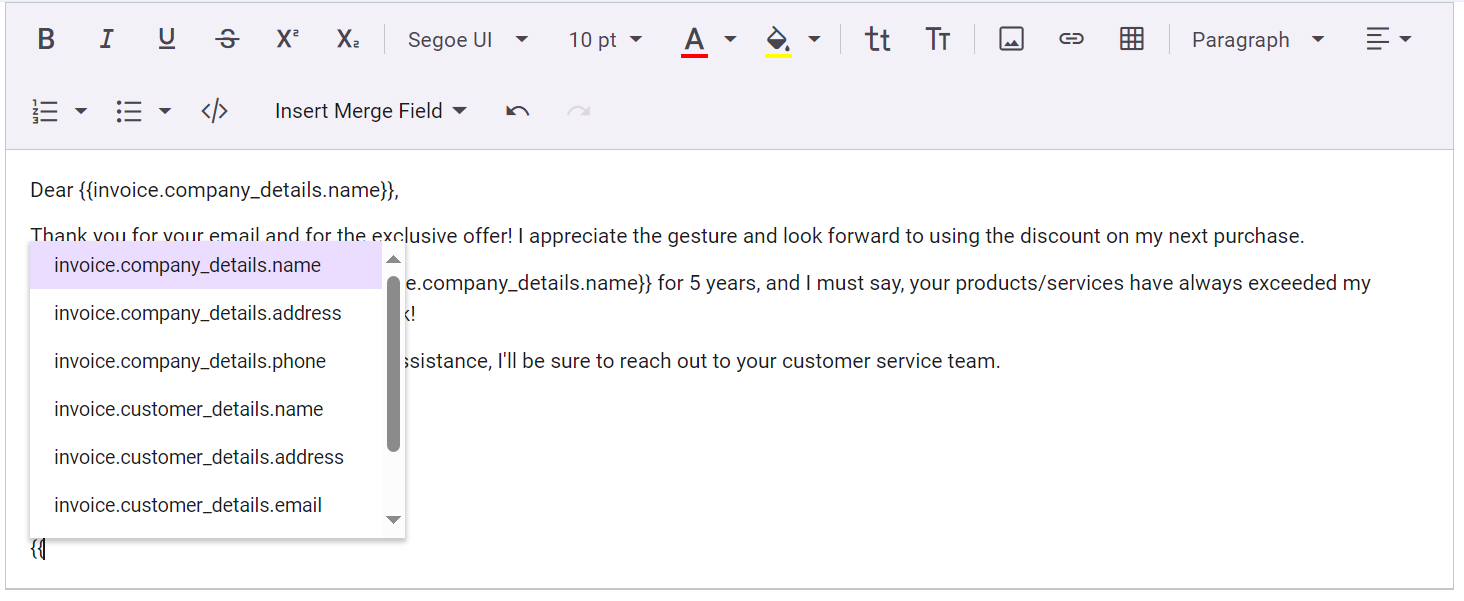
Step 3: Combine the Blazor Point out part to insert the merge subject
First, we have to set up the Syncfusion.Blazor.DropDowns bundle. Now, add the Blazor Point out part with the required insert merge subject knowledge. Then, combine it with the Wealthy Textual content Editor by setting the Goal property of the Point out part because the Wealthy Textual content Editor’s content material editable factor id [mailMerge_rte-editable]. Additionally, configure the MentionChar property as “{“. When urgent the point out character within the editor, it should seem, permitting customers to pick and show it within the editor.
Consult with the next code instance.
@web page "/"
@utilizing Syncfusion.Blazor.RichTextEditor
@utilizing Syncfusion.Blazor.DropDowns
@utilizing Syncfusion.Blazor.Navigations

<SfRichTextEditor ID="mailMerge" @ref="rteObj" @bind-Worth="TextEditorValue">
 <RichTextEditorToolbarSettings Gadgets="@Instruments" Kind="ToolbarType.MultiRow">
  <RichTextEditorCustomToolbarItems>
   <RichTextEditorCustomToolbarItem Title="InsertMergeField">
                …
                …
                …
   </RichTextEditorCustomToolbarItem>
  </RichTextEditorCustomToolbarItems>
 </RichTextEditorToolbarSettings>

</SfRichTextEditor>

<SfMention TItem="PersonData" MentionChar="@mentionChar" Goal="#mailMerge .e-rte-content .e-content" DataSource="@EmailData" SuggestionCount=8 AllowSpaces="true" PopupHeight="200px" PopupWidth="250px">

<DisplayTemplate>
   {{@((context as PersonData).Title)}};
</DisplayTemplate>
<ChildContent>
 <MentionFieldSettings Textual content="Title"></MentionFieldSettings>
</ChildContent>
</SfMention>


@code {
    …
    …
    …

    public char mentionChar="{";
    public class PersonData
    {
        public string? Title { get; set; }

        public string? Standing { get; set; }
    }
    Listing<PersonData> EmailData = new Listing<PersonData> {
      new PersonData() { Title="bill.company_details.identify",  Standing = "lively",  },
      new PersonData() { Title="bill.company_details.handle",  Standing = "away" },
      new PersonData() { Title="bill.company_details.telephone", Standing = "busy" },
      new PersonData() { Title="bill.customer_details.identify", Standing = "lively"},
      new PersonData() { Title="bill.customer_details.handle", Standing = "busy" },
      new PersonData() { Title="bill.customer_details.e mail", Standing = "lively" },
      new PersonData() { Title="bill.issue_date", Standing = "away"},
      new PersonData() { Title="bill.due_date", Standing = "busy" }
   };
   …
   …
   …

}
Consult with the next picture.
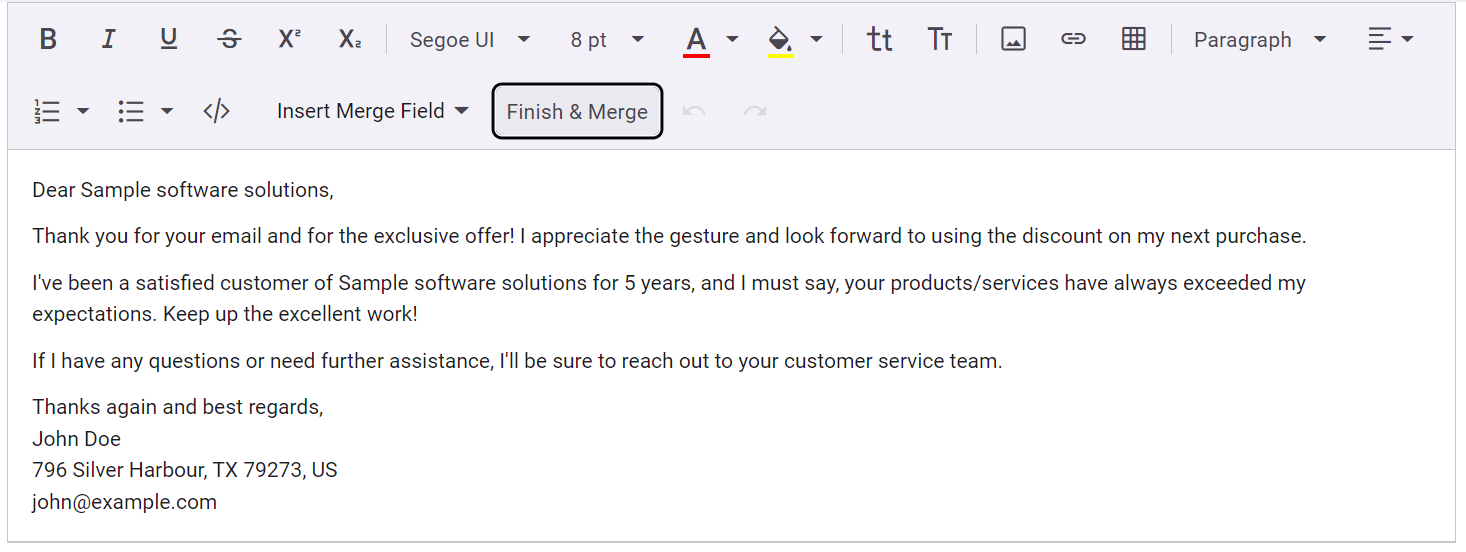
Step 4: Add the End and Merge button to the Wealthy Textual content Editor toolbar and merge the placeholder textual content
Let’s add a customized button labeled End & Merge to the Blazor Wealthy Textual content Editor’s toolbar. Then, outline the JSON knowledge within the InvoiceData.json file for buyer and firm particulars to merge the placeholder textual content.
Utilizing the Scriban, we will render the mail merge placeholder textual content and assign it to the Wealthy Textual content Editor’s Worth property.
Consult with the next code instance.
@web page "/"
@utilizing Syncfusion.Blazor.RichTextEditor
@utilizing Syncfusion.Blazor.DropDowns
@utilizing Syncfusion.Blazor.Navigations
@utilizing RichTextEditorMailMerge.Mannequin
@utilizing Newtonsoft.Json
@utilizing Scriban

<SfRichTextEditor ID="mailMerge" @ref="rteObj" @bind-Worth="TextEditorValue">
 <RichTextEditorToolbarSettings Gadgets="@Instruments" Kind="ToolbarType.MultiRow">
  <RichTextEditorCustomToolbarItems>
   <RichTextEditorCustomToolbarItem Title="InsertMergeField">
                …
                …
                …
   </RichTextEditorCustomToolbarItem>
   <RichTextEditorCustomToolbarItem Title="FinishMerge">
    <Template>
     <button class="e-btn e-tbar-btn" @onclick="ClickHandler">
      <span type="font-size:14px">End & Merge</span>
     </button>
    </Template>
   </RichTextEditorCustomToolbarItem>
  </RichTextEditorCustomToolbarItems>
 </RichTextEditorToolbarSettings>

</SfRichTextEditor>
…
…
…


@code {
    …
    …
    …
    non-public Listing<ToolbarItemModel> Instruments = new Listing<ToolbarItemModel>()
    {
        …
        …
        …
        new ToolbarItemModel() { Title = "InsertMergeField", TooltipText = "Insert Merge Area" },
        new ToolbarItemModel() { Title = "FinishMerge", TooltipText = "End & Merge" },
        new ToolbarItemModel() { Command = ToolbarCommand.Undo },
        new ToolbarItemModel() { Command = ToolbarCommand.Redo }
    };
    public void ClickHandler()
    {
        Bill ? bill = JsonConvert.DeserializeObject<Bill>(File.ReadAllText(".InformationInvoiceData.json"));
        string invoiceHTML = TextEditorValue;
        Template template = Template.Parse(invoiceHTML);
        var templateData = new { bill };
        //Fill the template with actual bill knowledge
        TextEditorValue = template.Render(templateData);
    }
    …
    …
    …
}
RichTextEditorMailMerge.Mannequin
utilizing Newtonsoft.Json;

namespace RichTextEditorMailMerge.Mannequin
{
    public class Bill
    {
        public string? InvoiceNumber { get; set; }
        public string? IssueDate { get; set; }
        public string? DueDate { get; set; }

        public UserDetails? CompanyDetails { get; set; }
        public UserDetails? CustomerDetails { get; set; }

    }
    public class UserDetails
    {
        public string? Title { get; set; }
        public string? Tackle { get; set; }
        public string? E-mail { get; set; }
        public string? Telephone { get; set; }
    }
}
Consult with the next picture.
GitHub reference
For extra particulars, seek advice from the Mail merge in Blazor Wealthy Textual content Editor GitHub demo.

Attempt it Free
Conclusion
Thanks for studying! On this weblog, we’ve seen tips on how to combine mail merge performance into the Blazor Wealthy Textual content Editor. Check out the steps on this weblog and supply your suggestions!
If you’re new to Syncfusion, strive our management options by downloading a 30-day free trial.
You may as well contact us by means of our assist discussion board, assist portal, or suggestions portal. We’re at all times joyful to help you!