The tkinter is an ordinary Python interface for creating GUI-based functions in Python.
Chances are you’ll use tkinter for creating completely different GUI parts like buttons, frames, labels, scrollbars, radio buttons, and many others.
On this tutorial, we’ll present you creating buttons utilizing tkinter.
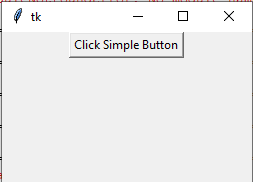
On this program, now we have created a easy button through the use of tkinter library. See this system under with slightly particulars that the way it labored.
Python program:
|
1 2 3 4 5 6 7 8 9 10 11 12 13 14 15 16 17 18 19 20
|
#Instance of button utilizing tkinter
from tkinter import *
prime = Tk()
#Setting window measurement containing button
prime.geometry(“250×150”)
#Specify button choices
btn = Button(prime,textual content = “Click on Easy Button”)
btn.pack()
prime.mainloop() |
Output:
How did it work?
- Initially, the tkinter library is imported (if you’re utilizing Python 3.x). For two.x it’s essential use Tkinter (i.e. T in capital).
- We created a Tk object and specified the window that accommodates the button.
- Then we specified the button possibility. In that case, we supplied caption/textual content for the button.
Within the following instance, we used virtually the identical code as above besides we added an motion (command) because the button is clicked.
Python code:
|
1 2 3 4 5 6 7 8 9 10 11 12 13 14 15 16 17 18
|
#Instance of button utilizing tkinter
from tkinter import *
prime = Tk()
#Setting window measurement containing button
prime.geometry(“250×250”)
#Specify button choices together with shut command
btn = Button(prime,textual content = “Click on to Shut”, command = prime.destroy)
btn.pack()
prime.mainloop() |
After executing the above program, as you click on on the button, it would shut.
The Aid possibility is used to set the border fashion of the buttons. The next values can be utilized for the Aid possibility:
- SUNKEN
- RAISED
- FLAT
- GROOVE
- RIDGE
See the Python program under with all these values and output:
|
1 2 3 4 5 6 7 8 9 10 11 12 13 14 15 16 17 18 19 20 21 22 23 24 25 26 27 28 29 30 31 32 33 34 35 36 37 38 39 40 41
|
#Instance of buttons with completely different borders
from tkinter import *
import tkinter
prime = Tk()
prime.geometry(“200×300”)
#Creating button with completely different borders
BtnRAISED = Button(prime, textual content =“RAISED Button”, aid=RAISED )
BtnSUNKEN = Button(prime, textual content =“SUNKEN Button”, aid=SUNKEN )
BtnFLAT = Button(prime, textual content =“FLAT Button”, aid=FLAT )
BtnGROOVE = Button(prime, textual content =“GROOVE Button”, aid=GROOVE )
BtnRIDGE = Button(prime, textual content =“RIDGE Button”, aid=RIDGE )
BtnRAISED.pack()
BtnSUNKEN.pack()
BtnFLAT.pack()
BtnGROOVE.pack()
BtnRIDGE.pack()
prime.mainloop() |
Output:

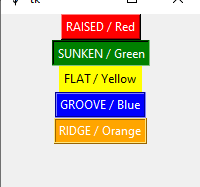
On this instance, we’ll set the background and foreground colours of the buttons.
The bg possibility is used to set the background shade of the button in a standard state.
The fg units the foreground shade i.e. textual content shade of the button.
For instance, bg = “Pink” and fg = “White”.
See the instance under the place we’ll set the colours of the above instance’s created buttons through the use of these two choices.
Python program:
|
1 2 3 4 5 6 7 8 9 10 11 12 13 14 15 16 17 18 19 20 21 22 23 24 25 26 27 28 29 30 31 32 33 34 35 36 37 38 39
|
#Instance of buttons with foreground and background colours
from tkinter import *
import tkinter
prime = Tk()
prime.geometry(“200×300”)
#Creating button with completely different borders, foreground and background colours
BtnRAISED = Button(prime, textual content =“RAISED / Pink”, aid=RAISED, bg = “crimson”, fg = “white” )
BtnSUNKEN = Button(prime, textual content =“SUNKEN / Inexperienced”, aid=SUNKEN, bg = “inexperienced”, fg = “white” )
BtnFLAT = Button(prime, textual content =“FLAT / Yellow”, aid=FLAT, bg = “yellow” )
BtnGROOVE = Button(prime, textual content =“GROOVE / Blue”, aid=GROOVE, bg = “blue” , fg = “white” )
BtnRIDGE = Button(prime, textual content =“RIDGE / Orange”, aid=RIDGE, bg = “orange”, fg = “white” )
BtnRAISED.pack()
BtnSUNKEN.pack()
BtnFLAT.pack()
BtnGROOVE.pack()
BtnRIDGE.pack()
prime.mainloop() |
Output:
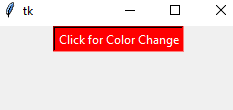
Setting the background/foreground colours on mouse click on
Equally, it’s possible you’ll set the button background and foreground shade on mouse click on. For that, it’s possible you’ll use the next two choices:
- activebackground (for button background shade)
- activeforeground (for button textual content/caption)
The next instance exhibits how:
|
1 2 3 4 5 6 7 8 9 10 11 12 13 14 15 16 17 18 19 20
|
#Instance of button lively colours
from tkinter import *
prime = Tk()
#Setting window measurement containing button
prime.geometry(“250×150”)
#Specify button choices / lively foreground and background colours
btn = Button(prime,textual content = “Click on for Shade Change”, activeforeground = “white”, activebackground = “crimson”)
btn.pack()
prime.mainloop() |
Output:
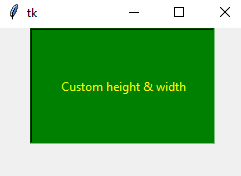
By utilizing top and width choices, it’s possible you’ll set the button measurement as utilizing tkinter library.
The next instance creates a button larger than the above examples – each for top and width.
Code:
|
1 2 3 4 5 6 7 8 9 10 11 12 13 14 15 16 17 18 19 20
|
#Instance of button top and width
from tkinter import *
prime = Tk()
#Setting window measurement containing button
prime.geometry(“250×150”)
#Specify button choices / top and width
btn = Button(prime,textual content = “Customized top & width”, top = “7”, width = “25”, activeforeground = “yellow”, activebackground = “inexperienced”)
btn.pack()
prime.mainloop() |
Output:
Show a message field through the use of command possibility instance
The next instance exhibits some motion because the button is clicked.
For that, we’ll use the command possibility of the button widget and name a perform.
Contained in the perform, msgbox(), we’ll show a message field with easy textual content.
So, click on the button to name the perform and show the message field.
Code:
|
1 2 3 4 5 6 7 8 9 10 11 12 13 14 15 16 17 18 19 20 21 22 23 24 25 26 27 28 29 30
|
#Instance of button command / message field
from tkinter import *
from tkinter import messagebox
prime = Tk()
#Setting window measurement containing button
prime.geometry(“250×150”)
#Perform to name as button is clicked/pressed
def msgbox():
messagebox.showinfo(“Welcome”, “That is tkinter tutorial!”)
#Specify button possibility / command with a perform name
btn = Button(prime,textual content = “Show message field”, command = msgbox)
btn.pack()
prime.mainloop() |
Output:
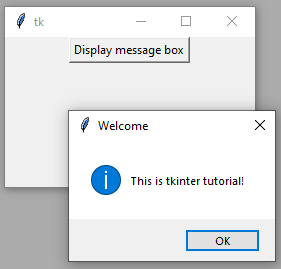
Be aware that, it’s a must to import messagebox from tkinter with a view to work with this instance.
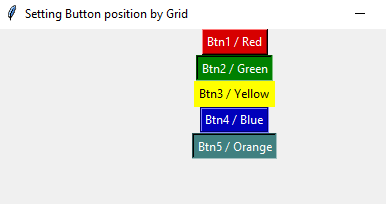
On this instance, the background (bg), foreground (fg), activebackground, and activeforeground colours are set through the use of the colour code slightly than shade names. For instance, #034232.
In addition to, we additionally set the title of the window containing the button not like the above examples with the default “tk” title. Take a look:
Code:
|
1 2 3 4 5 6 7 8 9 10 11 12 13 14 15 16 17 18 19 20 21 22 23 24 25 26 27 28 29 30 31 32 33 34 35 36 37 38 39 40 41
|
#Instance of buttons with foreground and background shade codes
from tkinter import *
import tkinter
btn_colors = Tk()
btn_colors.title(“Setting Button place by Grid”)
btn_colors.geometry(“200×300”)
#Creating button with completely different colours by codes
BtnRAISED = Button(btn_colors, textual content =“Btn1 / Pink”, aid=RAISED, bg = “#D70000”, fg = “#FFFFFF”, activeforeground = “#FFFFFF”, activebackground = “#FFA8A8” )
BtnSUNKEN = Button(btn_colors, textual content =“Btn2 / Inexperienced”, aid=SUNKEN, bg = “#008000”, fg = “#FFFFFF”, activeforeground = “#FFFFFF”, activebackground = “#804040” )
BtnFLAT = Button(btn_colors, textual content =“Btn3 / Yellow”, aid=FLAT, bg = “#FFFF00”, activeforeground = “#000000”, activebackground = “#00FFFF” )
BtnGROOVE = Button(btn_colors, textual content =“Btn4 / Blue”, aid=GROOVE, bg = “#0000BB” , fg = “#FFFFFF”, activeforeground = “#FFFFFF”, activebackground = “#800080” )
BtnRIDGE = Button(btn_colors, textual content =“Btn5 / Orange”, aid=RIDGE, bg = “#FF8000”, fg = “#FFFFFF”, activeforeground = “#FFFFFF”, activebackground = “#408080” )
BtnRAISED.pack()
BtnSUNKEN.pack()
BtnFLAT.pack()
BtnGROOVE.pack()
BtnRIDGE.pack()
btn_colors.mainloop() |
Output:
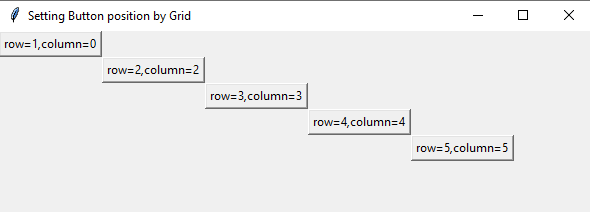
The next methods can be utilized to set the place of the button:
- pack (to show button within the heart as in all of the above examples)
- grid (specify row and column)
- place (specify x & y positions to show button).
The instance under exhibits the utilization of those methods.
By grid possibility
Code:
|
1 2 3 4 5 6 7 8 9 10 11 12 13 14 15 16 17 18 19 20 21 22 23 24 25 26 27 28 29 30 31 32 33 34 35
|
from tkinter import *
pos_grid=Tk()
pos_grid.title(“Setting Button place by Grid”)
pos_grid.geometry(“450×375”)
button1=Button(pos_grid, textual content=“row=1,column=0”)
button1.grid(row=1,column=0)
button2=Button(pos_grid, textual content=“row=2,column=2”)
button2.grid(row=2,column=2)
button3=Button(pos_grid, textual content=“row=3,column=3”)
button3.grid(row=3,column=3)
button4=Button(pos_grid, textual content=“row=4,column=4”)
button4.grid(row=4,column=4)
button5=Button(pos_grid, textual content=“row=5,column=5”)
button5.grid(row=5,column=5)
pos_grid.mainloop() |
Output:
By place possibility
Code:
|
1 2 3 4 5 6 7 8 9 10 11 12 13 14 15 16 17 18 19 20 21 22 23 24
|
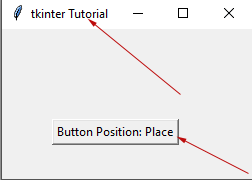
#Instance of button positioning
from tkinter import *
pos = Tk()
pos.title(“tkinter Tutorial”)
#Setting window measurement containing button
pos.geometry(“250×150”)
#Specify button place by place
btn = Button(pos,textual content = “Button Place: Place”).place(x=50, y=90)
pos.mainloop() |
Output: