


In the event you plan to put in packages on a macOS, the method may be difficult in the event you’re unfamiliar with the command line interface. The excellent news is {that a} bundle supervisor may also help seamlessly set up packages in your laptop. So why not set up Homebrew? Homebrew helps you to painlessly set up the stuff you want in your machine.
On this tutorial, you’ll study to put in and use Homebrew on macOS to put in packages with out problem.
Learn on to take your administration expertise to the following stage!
Stipulations
This tutorial shall be a hands-on demonstration. In the event you’d prefer to observe alongside, make certain you will have a macOS laptop helpful. This tutorial makes use of Mac M1.
Putting in Xcode Command Line Instruments
Earlier than putting in Homebrew, it’s essential to have the Xcode Command Line Instruments put in in your laptop. The Xcode Command Line Instruments are a set of software program instruments that help you work together together with your laptop utilizing the command line setting.
Different instruments, like PuTTY or Telnet, additionally want the Xcode Command Line Instruments to be put in to operate appropriately.
Generally, the Xcode Command Line Instruments are put in mechanically once you set up Xcode. However in the event you’ve by no means put in Xcode in your laptop earlier than, or in the event you’ve uninstalled it, chances are you’ll want to put in the Xcode Command Line Instruments manually.
To put in the Homebrew CLI:
1. Open your terminal, and run the beneath xcode-select command within the terminal to examine if the Xcode Command Line Instruments is already put in.
This command prints the trail of the energetic developer listing.
You will note the next output if the Xcode Command Line Instruments are put in in your macOS. This output tells you the Xcode Command Line Instruments are put in within the /Library/Developer/CommandLineTools listing.

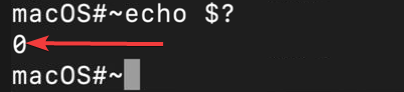
2. Subsequent, run the echo $? command to examine the exit standing of the xcode-select -p command you ran in the first step.
The output beneath signifies the xcode-select -p command was profitable, and the Xcode Command Line Instruments are put in in your macOS machine.
If the command was profitable, the exit standing is 0, so you possibly can skip to the “Putting in Homebrew” part. However in the event you get an exit standing of 1, it’s essential to set up the Xcode Command Line Instruments.
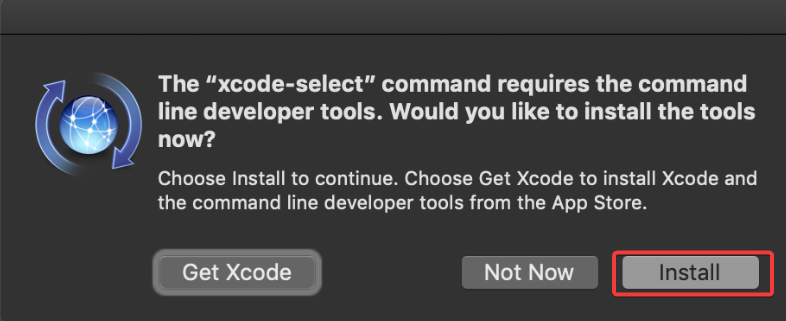
3. Run the beneath command to –set up the Xcode Command Line Instruments. This command installs the required Xcode Command Line Instruments bundle and all its dependencies.
You possibly can set up the Xcode Command Line Instruments from the App Retailer, however the terminal technique is beneficial. Why? The terminal technique is extra environment friendly and light-weight because you don’t want to put in the complete Xcode IDE — a hefty 13GB obtain.
4. Now, click on Set up on the pop-up dialog field to substantiate putting in the Xcode Command Line Instruments.
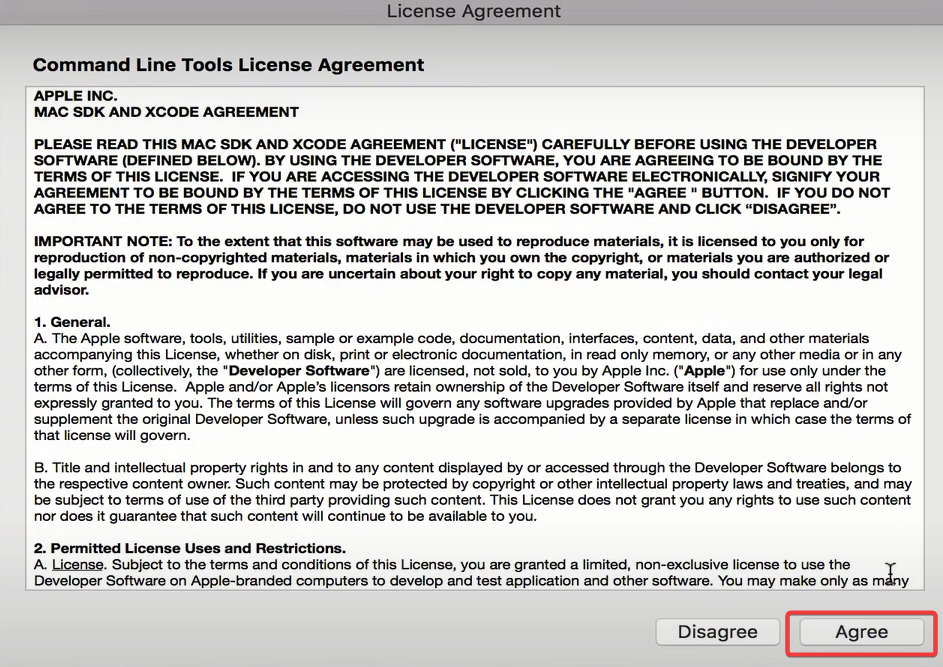
5. Click on Agree to simply accept the phrases and circumstances of the software program license settlement and begin the set up, which can take a couple of minutes to finish.
6. Lastly, run the beneath instructions to confirm that the Xcode Command Line Instruments are put in in your laptop.
ggc -v
make -v
xcode-select -p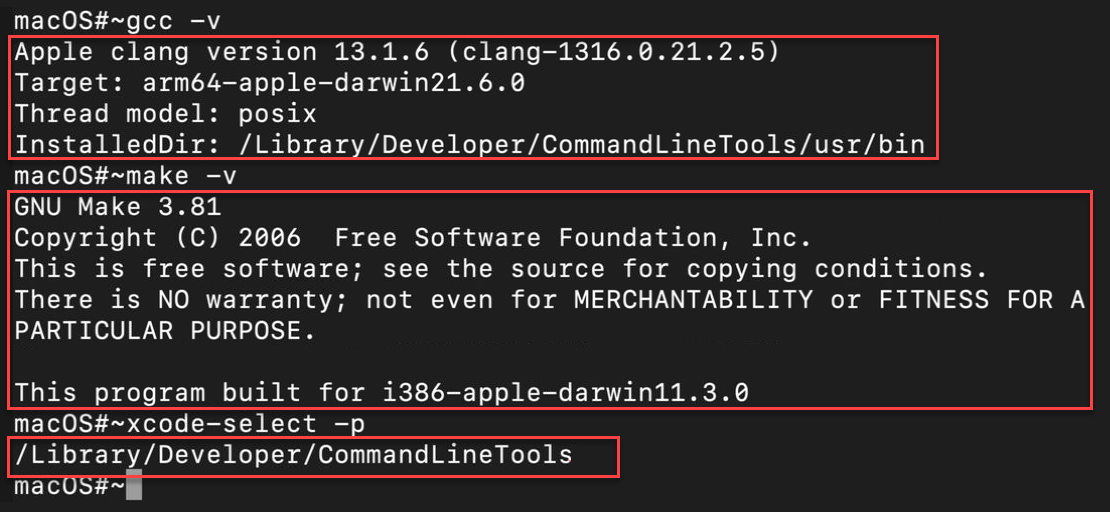
Putting in Homebrew on macOS
Now that you’ve got the Xcode Command Line Instruments put in, it’s time to put in Homebrew in your macOS. Some Homebrew parts depending on the Xcode Command Line Instruments bundle ought to work appropriately at this level.
1. Run the next command to put in Homebrew in your macOS.
This command downloads the Homebrew set up script (set up.sh) from the Homebrew GitHub repository and runs it in your laptop.
- The
-cpossibility tells the terminal to run the command that follows it.
- The -fsSL flag tells the curl command to fetch the URL with no error, observe any redirects, and present the progress bar in the course of the obtain.
/bin/bash -c "$(curl -fsSL https://uncooked.githubusercontent.com/Homebrew/set up/HEAD/set up.sh)"2. Enter your person password when prompted, and press Enter.

3. Now, press Enter when prompted to proceed with the set up, as proven beneath.
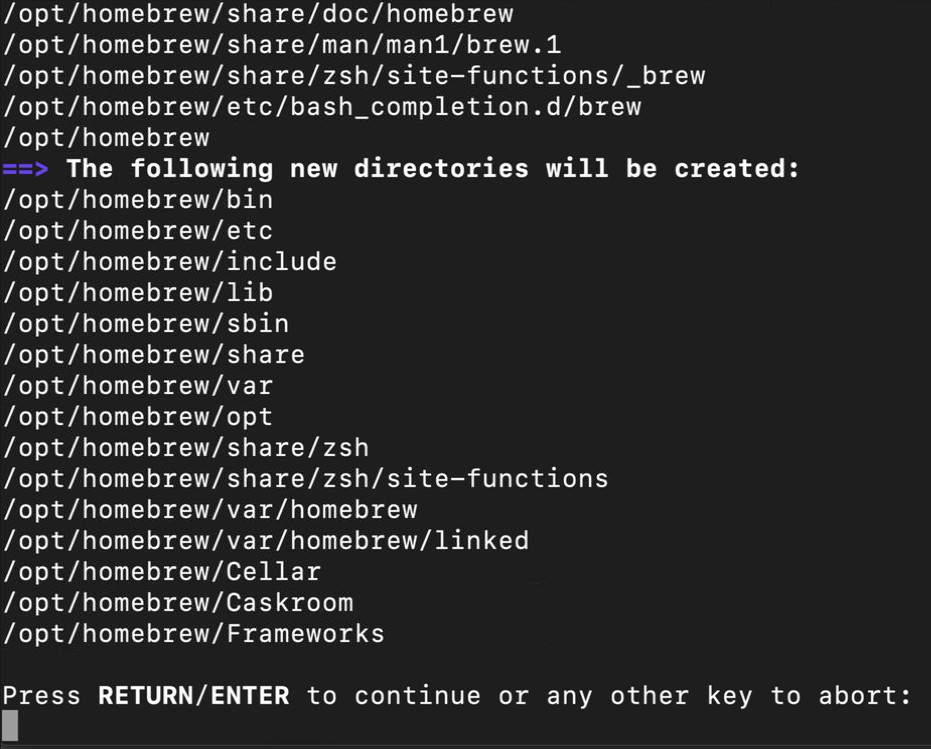
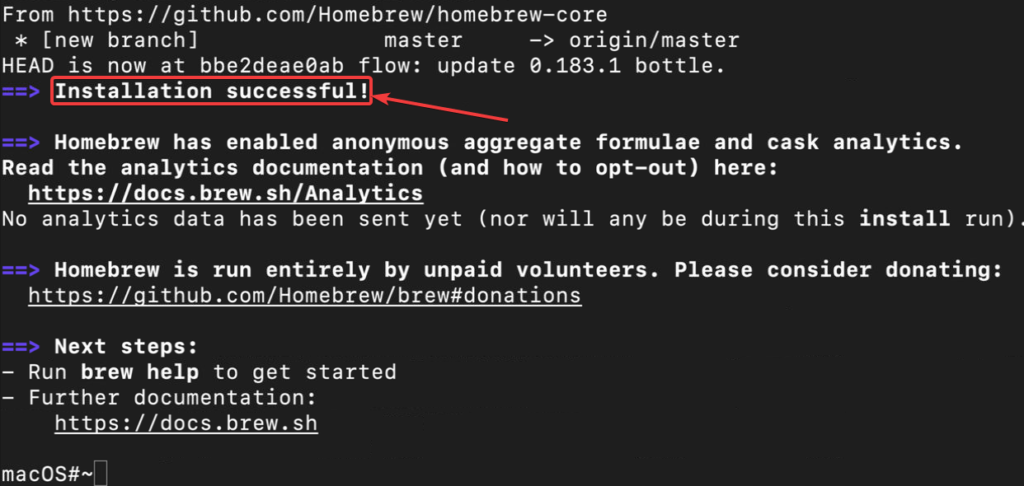
You’ll see the next output as soon as the set up completes.
Configuring Homebrew’s PATH Setting Variables
Homebrew is now put in in your laptop however isn’t configured appropriately. If you run a command within the terminal, the terminal seems for that command within the directories specified by the PATH setting variable.
The PATH setting variables inform the terminal the place to search for executables. So earlier than you should utilize Homebrew, you have to configure it with the proper PATH setting variables. In the event you don’t, you’ll must kind the total path of the executable each time you run it.
These steps apply to the brand new macOS operating Apple Silicon processors. You possibly can skip this part in the event you’re utilizing an older macOS operating Intel processors.
1. Run the which brew command beneath to print out the total path of the brew executable.
In case you are a long-time person of Homebrew, you possibly can see that the trail of the brew executable has modified from /usr/native/bin/brew to /choose/homebrew/bin/brew.
Apple has modified the default set up listing as a result of:
- The /choose listing is meant for the set up of third-party software program.
- An excessive amount of software program within the /usr/native listing may cause battle.
- There are safety threats if the /usr/native listing is writable by non-privileged customers.

2. Subsequent, open the ~/.zshrc file in your most popular textual content editor. This file shops the PATH setting variable for the zsh shell.
In the event you’re utilizing a unique shell, open the corresponding file as an alternative.
3. Add the next line on the finish of the .zshrc file, save the adjustments and shut the file.
This line creates Homebrew’s appropriate PATH setting variable everytime you open a brand new terminal session.
eval "$(/choose/homebrew/bin/brew shellenv)"4. Now, run the supply command beneath, which doesn’t present output however applies the adjustments you made to the ~/.zshrc file.
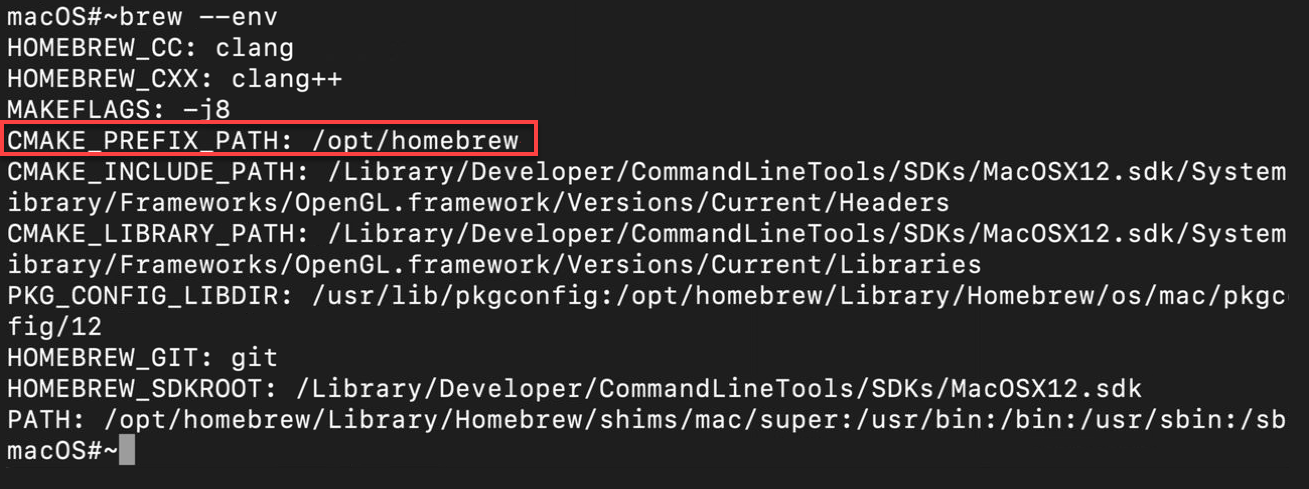
5. After sourcing, run the beneath brew command to examine if the PATH setting variable (–env) is ready appropriately.
As you possibly can see beneath, the PATH setting variable is appropriately set and consists of the trail of the brew executable.
6. Lastly, run the next brew physician command to examine in case your system is prepared for brewing.
After each important change to your system (akin to after putting in or updating Homebrew), operating this command is a wonderful technique to examine for potential issues.

Putting in Packages Utilizing Homebrew
After putting in and configuring Homebrew, it’s time to discover learn how to handle packages with Homebrew. Probably the most important job you possibly can carry out with Homebrew is putting in a bundle.
Under is the syntax for putting in packages with Homebrew.
brew set up <package_name>
Suppose you’re searching for a utility to obtain information from the net. One such utility is wget, which you’ll set up with Homebrew.
1. Run the next instructions to replace the Homebrew bundle repository to incorporate the most recent bundle variations, and confirm your machine is prepared for brewing.
# Updates bundle repository
brew replace
# Confirm your machine is prepared for brewing
brew physician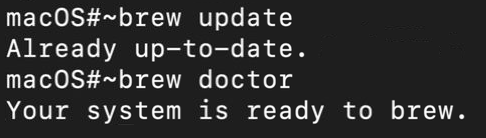
2. Subsequent, run the brew set up command beneath to put in wget in your system.
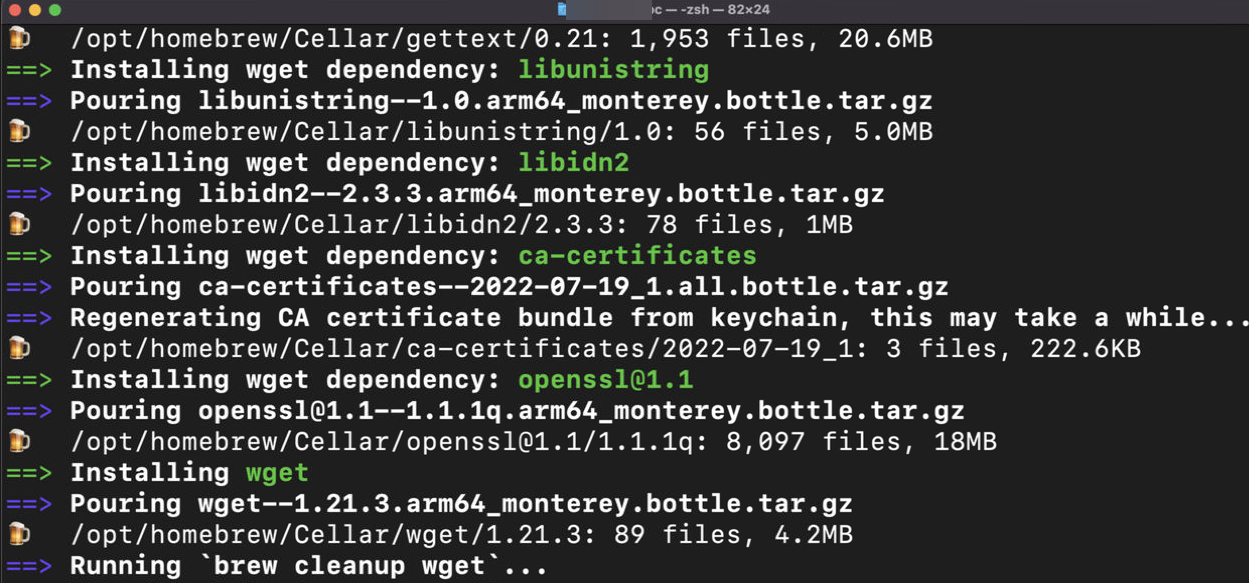
3. Now run the wget command beneath, passing a URL to wget to obtain the corresponding file. This command helps you to check if Homebrew efficiently put in wget in your system.
wget https://adamtheautomator.com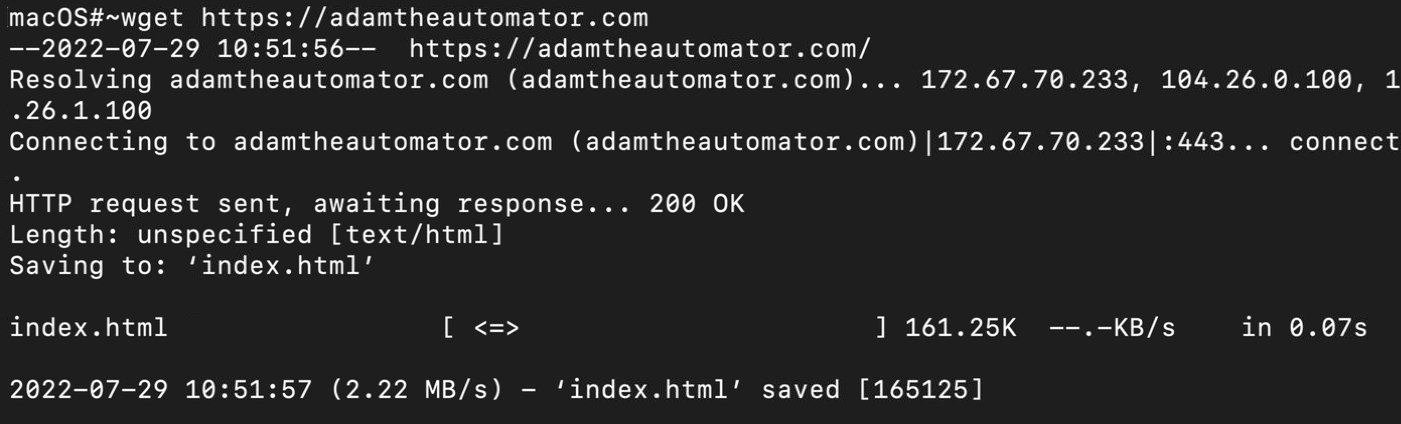
Upgrading Current Packages
Builders commonly launch new software program bundle variations, and Homebrew helps you to improve all put in packages in your system. Upgrading Homebrew and the put in packages not less than as soon as per week is beneficial.
Run the beneath command to examine for outdated packages first earlier than performing updates.
The output beneath signifies there aren’t any outdated packages on the system.
In the event you get the identical one beneath, upgrading is pointless. However in the event you get an inventory of outdated packages, leap to the next step.

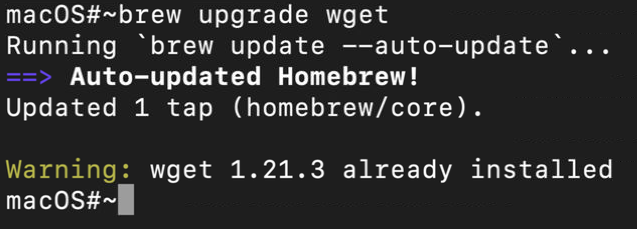
Now, run the brew improve command adopted by the bundle title to improve (wget).
Maybe you’d prefer to go ballistic and improve all outdated packages. In that case, run the brew replace command as an alternative. Word that this command takes no formulation names or arguments.
Eradicating Pointless Packages
Suppose you not want some packages in your system. In that case, you possibly can take away them with Homebrew.
Under is the syntax for eradicating packages out of your system.
brew take away <package_name>
1. Run the brew take away command beneath to take away the wget bundle.

2. Subsequent, run the next brew deps command to examine all bundle dependencies (wget).
Different packages in your system could use a bundle’s dependencies. In such circumstances, you possibly can’t delete these dependencies. Homebrew gives you an error in the event you attempt to delete them.
brew deps wget --tree --installed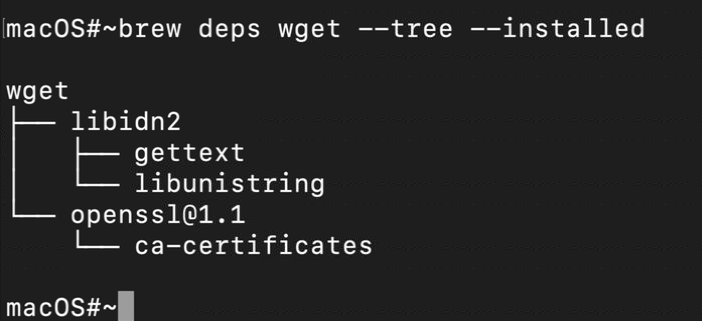
3. Now, run the beneath command to –ignore-dependencies and take away the bundle.
Take warning in the event you select to run this command. Doing so can probably break your system. Uninstalling a bundle together with its dependencies is at all times a greater possibility.
brew take away --ignore-dependencies wget
Conclusion
Managing packages in your system shouldn’t be a fancy job. And on this tutorial, you’ve realized learn how to set up Homebrew on macOS for fast bundle administration. You by no means have to fret about lacking out on the most recent options of your packages. Homebrew helps you to replace present packages and take away those you not want.
At this level, it’s best to have a sound understanding of learn how to set up and handle packages utilizing Homebrew. With this newfound data, why not create a customized Homebrew Formulae to put in your favourite developer instruments on a brand new Mac?