


Google internet providers have grow to be a necessary a part of many tasks’ infrastructure, a significant integration aspect. We will not think about on-line providers with out them. In the meantime, Google builders are engaged on increasing the capabilities of their providers, creating new APIs, and growing the safety of our information. Often, updates are launched easily for customers and don’t require any adjustments in your facet. However not this time with the brand new Google Sheets API.
Preface: Progress Is a Ache
In 2021, Google launched model 4 of its Sheets API, which is incompatible with the earlier one. This affected information safety and privateness. Sheets API v3 assist was prolonged till August 2021 to offer builders with extra time emigrate to the brand new API model. For the reason that finish of assist for the v3 API, many JavaScript builders have confronted migration points. And though Google supplied an in depth migration information, because it often occurs, a number of essential particulars are lacking from it.
As a assist engineer at AnyChart, I’ve acquired and proceed to take care of quite a few requests for assist from our JS charting library customers who all of the sudden confronted points with feeding visualizations with information from their Google spreadsheets. It reveals the issue has been and stays actually topical. So I made a decision to make a fast Google Sheets API v4 integration information for anybody else on the market.
This text showcases a fundamental method to accessing a spreadsheet doc on Google Sheets and loading the info from it as apparently the most typical use case.
Accessing Google Spreadsheets from JavaScript
To entry a Google Sheets spreadsheet from the JavaScript code, you want google-api-javascript-client and Sheets API, in addition to a configured Google mission and a doc itself.
Let me stroll you thru all this step-by-step.
Configuration on Google Aspect
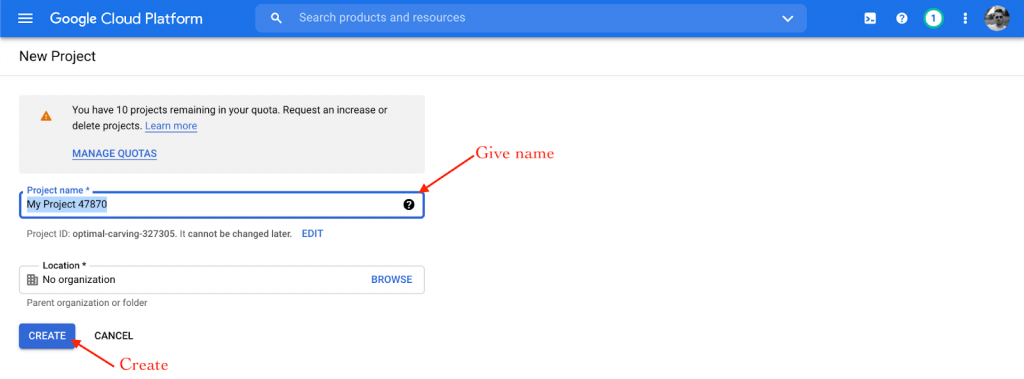
1) Create a mission
- Go to the Google Cloud Platform:
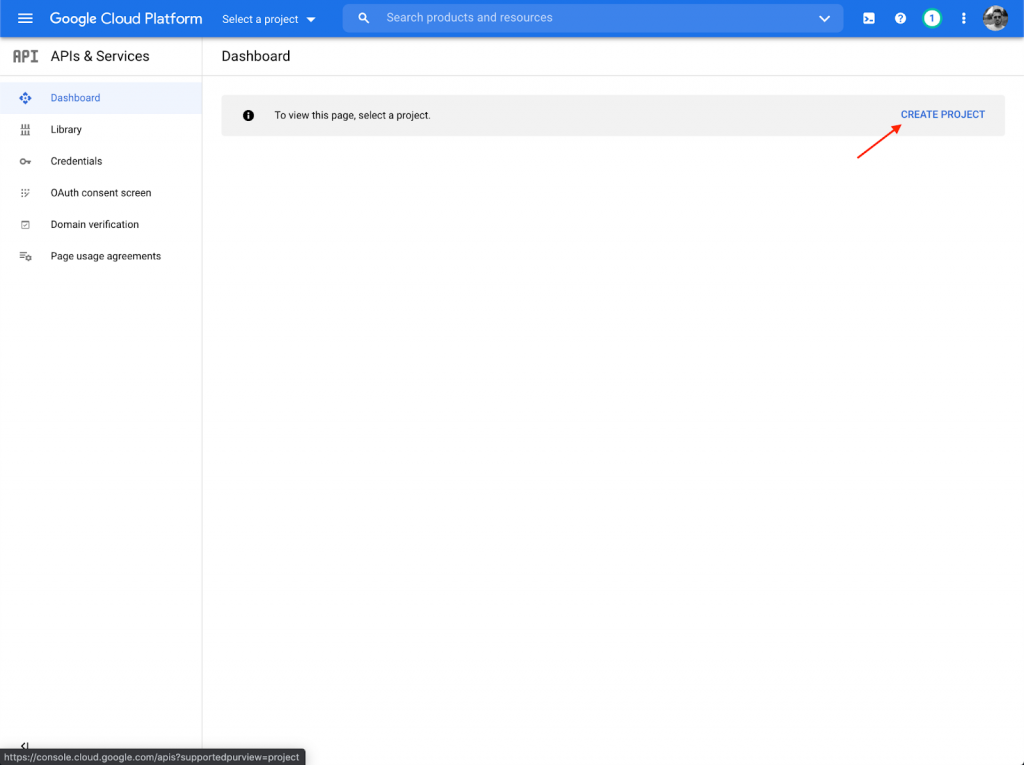
- Create a brand new mission:
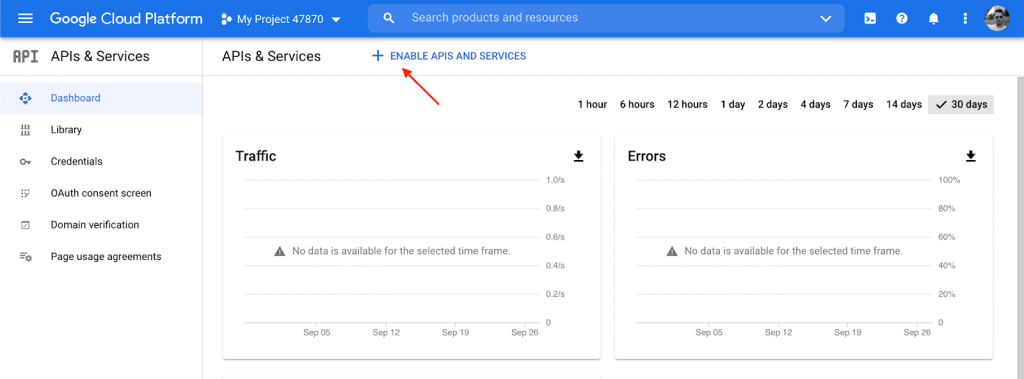
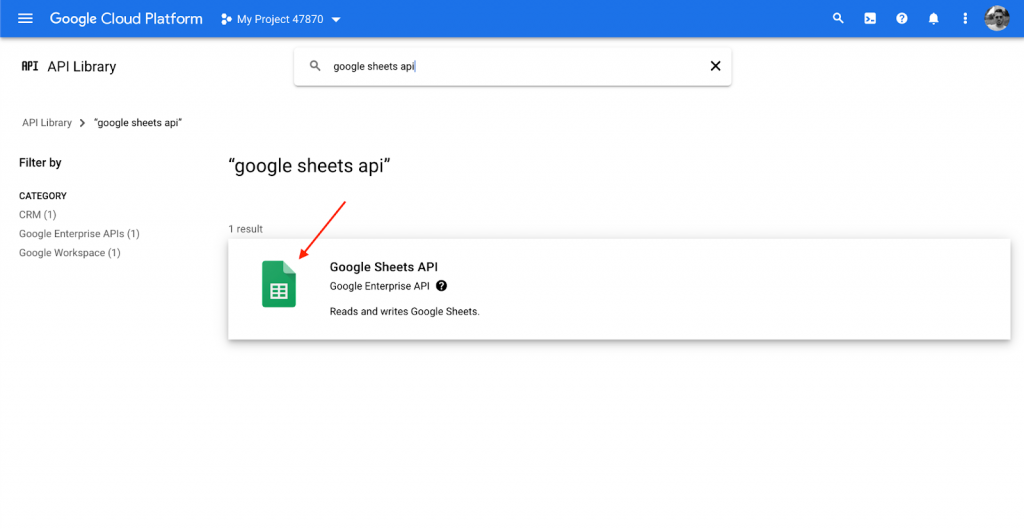
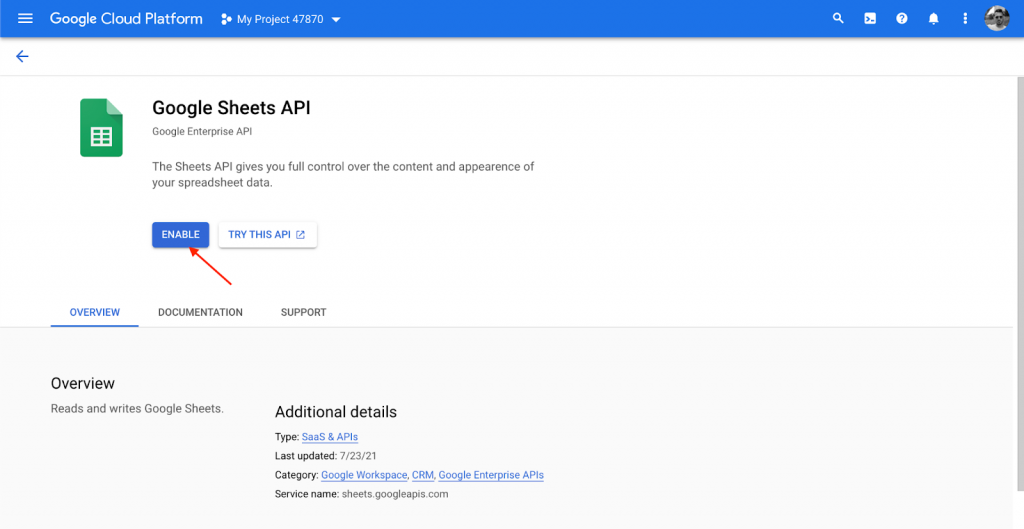
2) Allow API
- Go to “Allow APIS and providers”:
- Sort “google sheets” within the search area to search out the API:
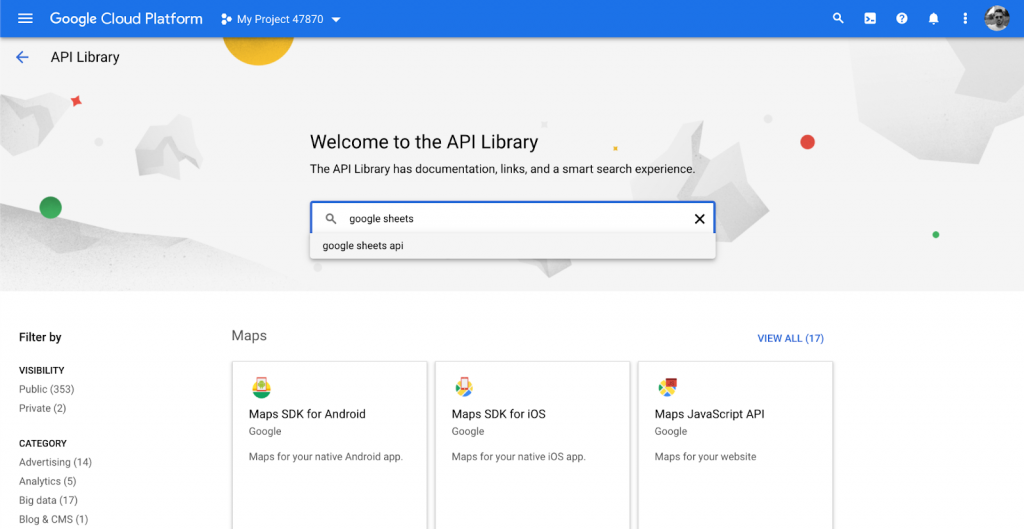
- Choose “Google Sheets API”:
- Allow the Google Sheets API:
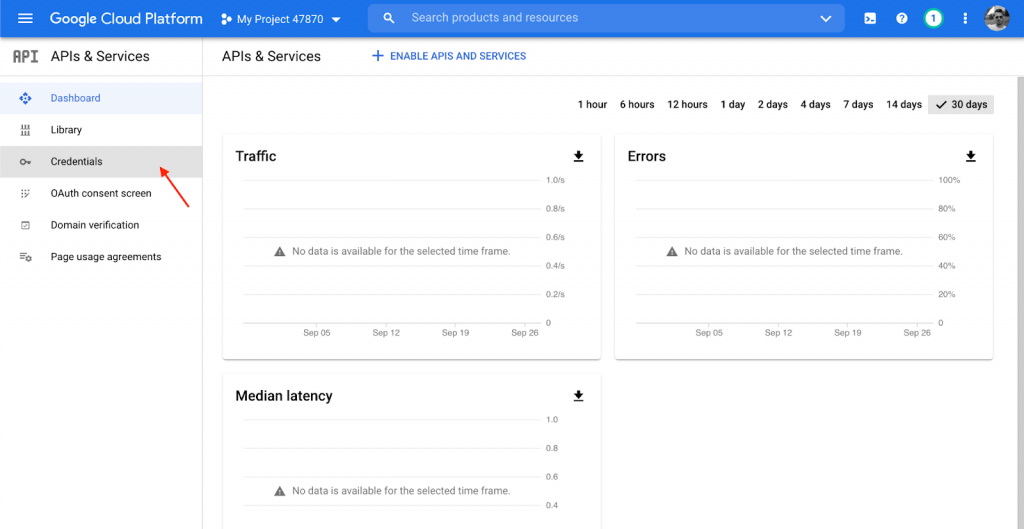
3) Credentials
- Go to the “Credentials” tab:
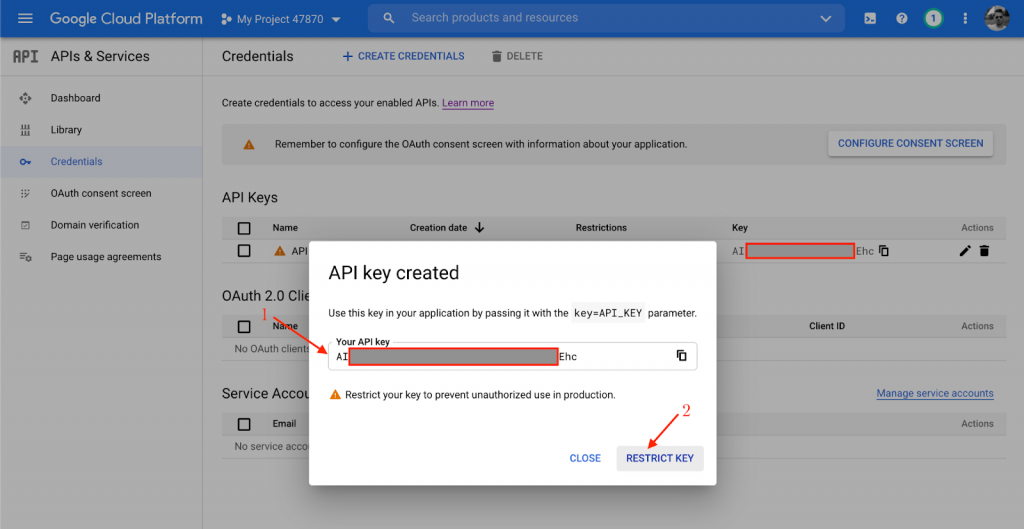
- Click on “Create credentials” and choose “API key”:
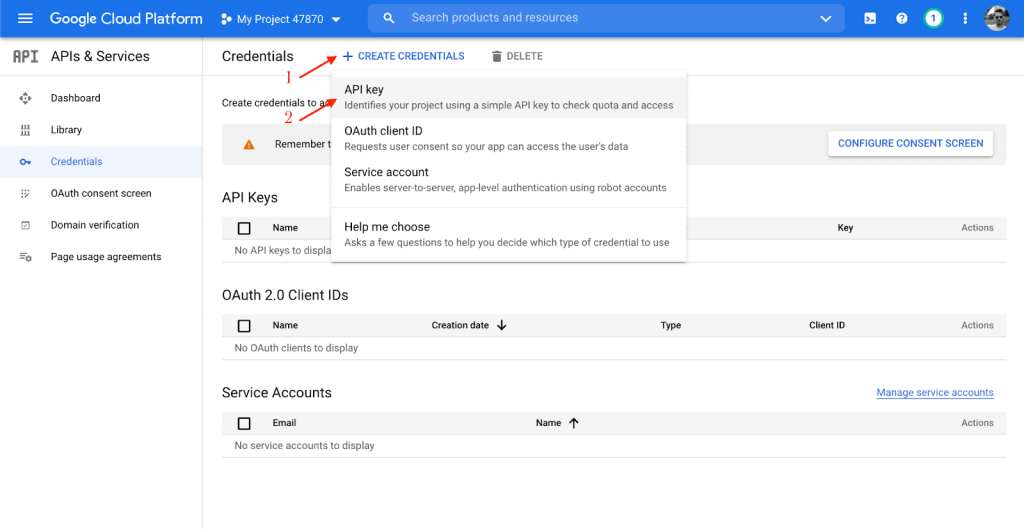
Be aware: Copy and retailer the API key. You have to it within the JavaScript code later ({GOOGLE_API_KEY} within the JS code).
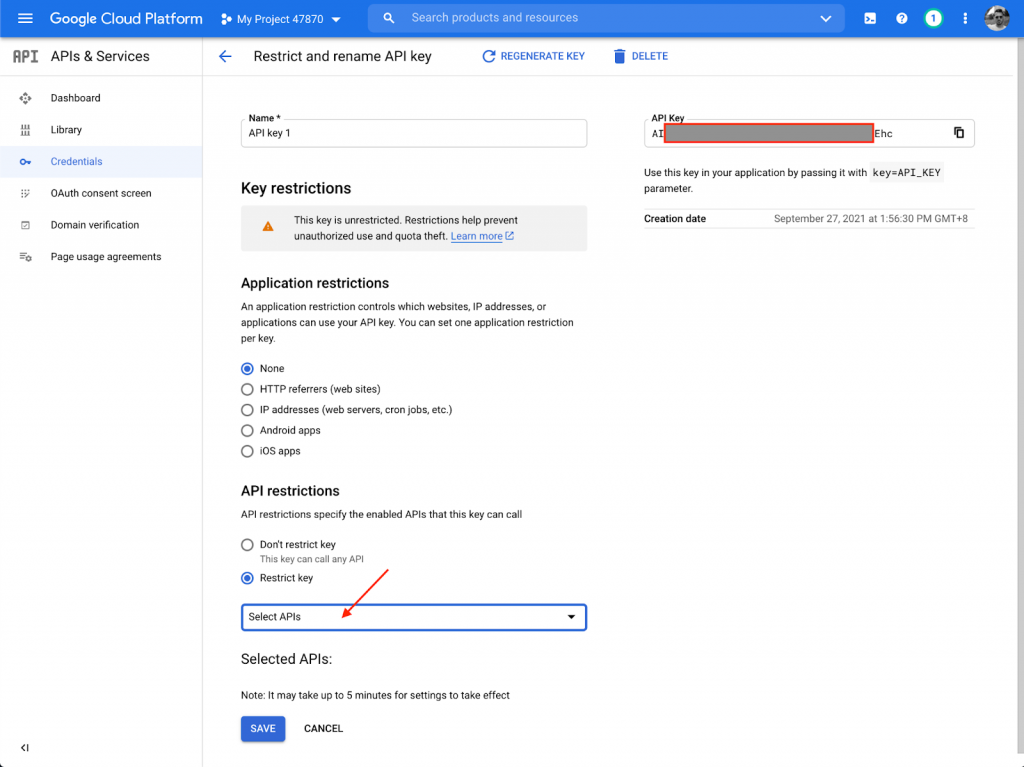
c) Click on “Limit key”:
Be aware: Maintain your API keys safe throughout each storage and transmission. Greatest practices for this are properly coated by Google in this text. All of the code snippets beneath are simplified for demonstration functions and don’t describe safety elements.
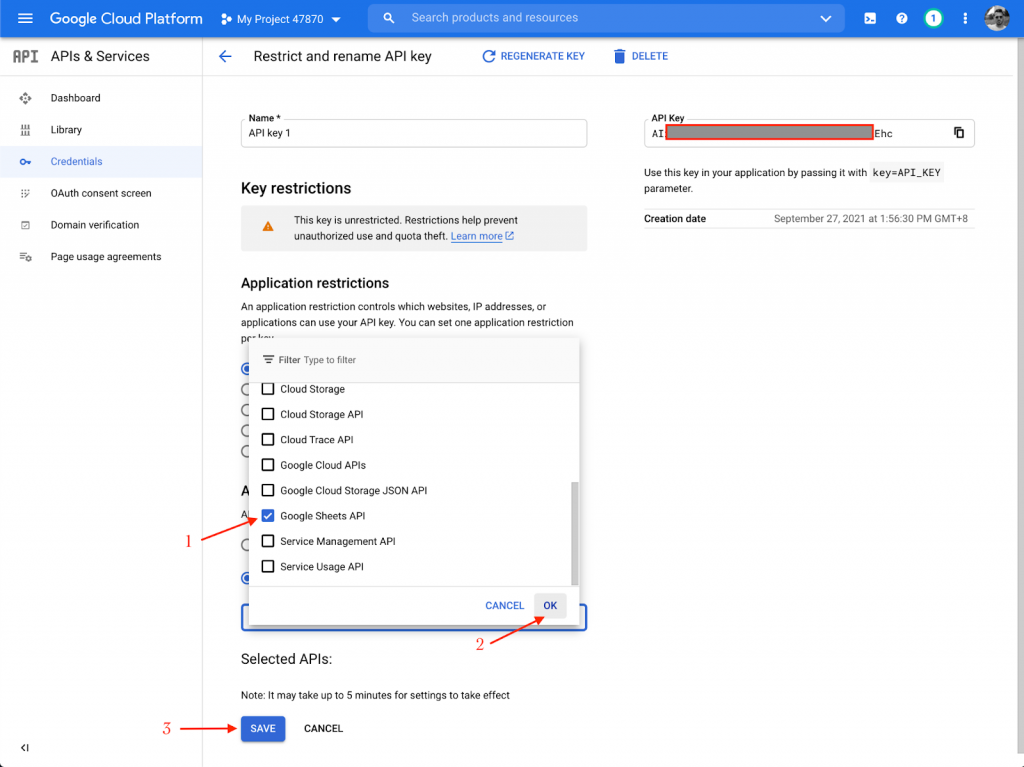
d) Within the “Limit key” dropdown menu, find the “Google Sheets API” merchandise:
e) Choose it, click on “OK” and “SAVE”:
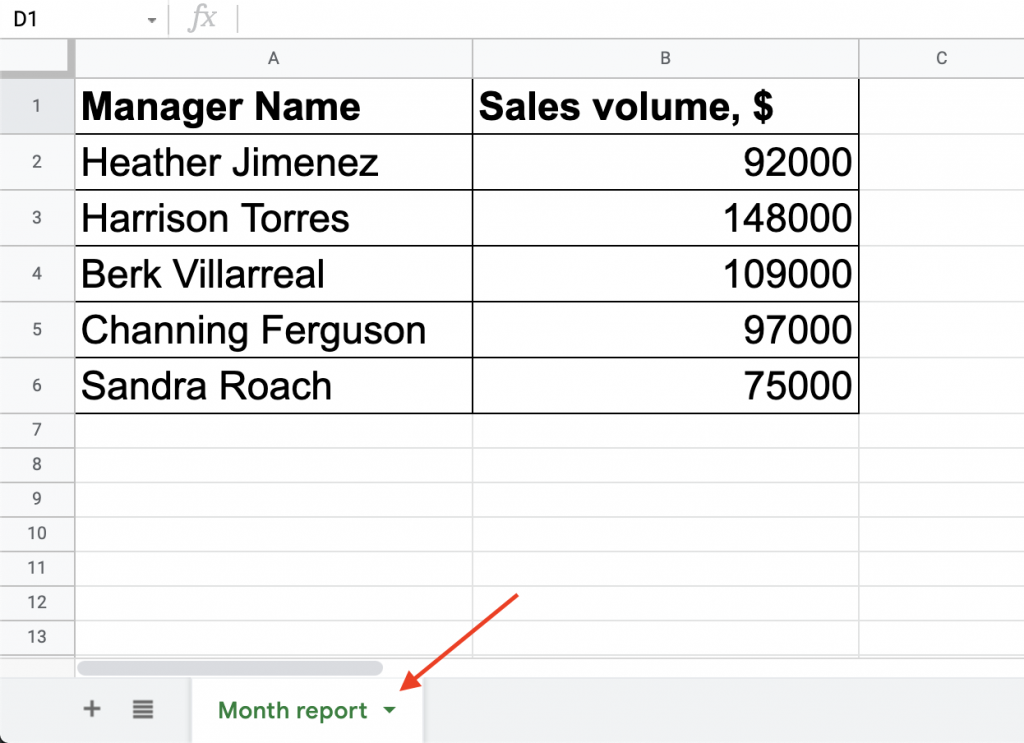
4) Create a doc
- Create a Google Sheets doc the way in which you often do and fill it with some information. Set a reputation for the sheet together with your information or copy the default one — it is going to be required later within the JS code ({SHEET_NAME}).
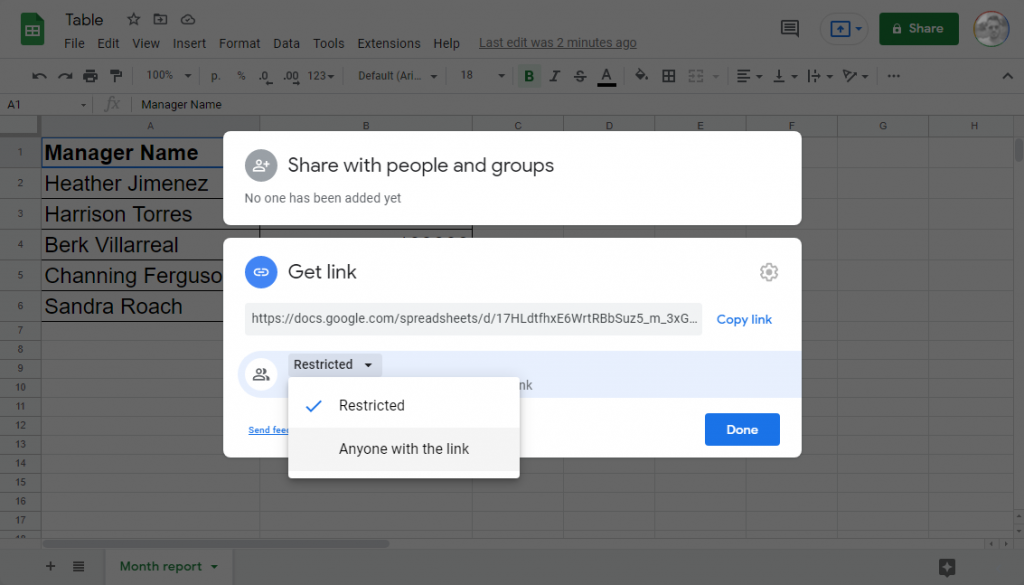
- Allow entry to the doc through a hyperlink. You are able to do it by clicking on the “Share” button and selecting “Anybody with the hyperlink”. (The “Viewer” entry is sufficient.)
- Copy the ID of the doc. It may be discovered within the doc’s URL, between the “/spreadsheets/d/” and “/edit” elements. This ID will likely be required later within the JS code ({SPREADSHEET_ID}).

All the required settings on the Google facet are accomplished. Let’s transfer on to an utility.
Accessing Google Spreadsheet Knowledge from JavaScript Functions
Now, I’ll clarify methods to create a easy JavaScript utility that fetches the info from the spreadsheet and reveals it to customers. To attach the app to the Sheets API, I’ll use the Google API Consumer Library for JavaScript (aka gapi), which is properly described in its GitHub repository.
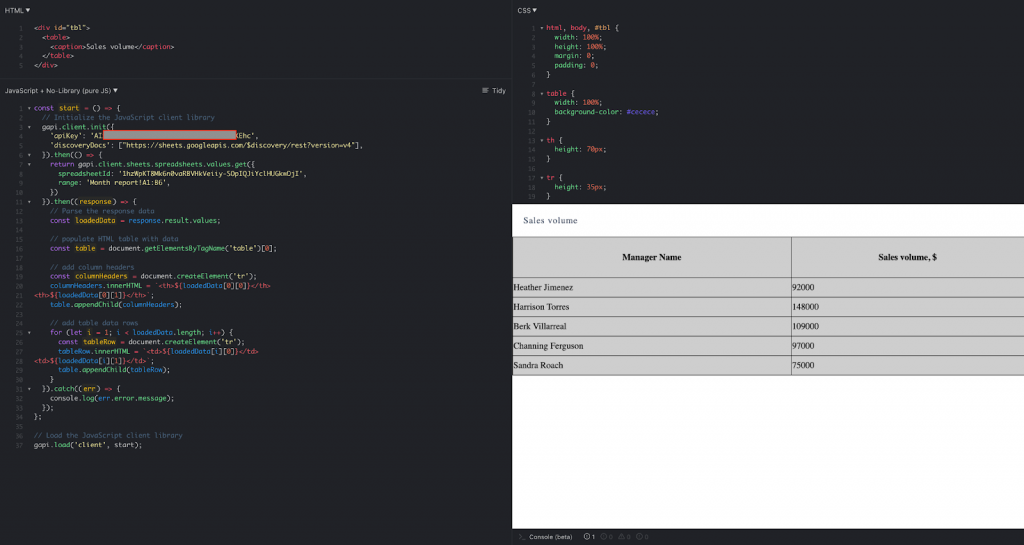
1) Making a fundamental JavaScript utility
To start with, embody the gapi library in your web page utilizing the direct hyperlink.
Add the <desk> tag to the HTML code and apply the CSS code you want for the desk and its future content material.
Within the JavaScript code, create a perform that will likely be used for fetching the info.
const begin = () => {};Inside that perform, initialize the gapi shopper together with your Google API key created earlier.
 gapi.shopper.init({
    'apiKey': '{GOOGLE_API_KEY}',
    'discoveryDocs': ["https://sheets.googleapis.com/$discovery/rest?version=v4"],
  })
Then execute a request to get values through the gapi shopper. Within the request, it’s best to present the spreadsheet ID and the vary of cells the place the info you need to entry is situated.
.then(() => {
    return gapi.shopper.sheets.spreadsheets.values.get({
      spreadsheetId: '{SPREADSHEET_ID}',
      vary: '{SHEET_NAME}!{DATA_RANGE}',
    })
  })
If all settings are appropriate, the resolved promise returns a response with the fetched information. Now you may get the info from the response and populate the HTML desk utilizing a easy JS script.
.then((response) => {

    const loadedData = response.end result.values;


    const desk = doc.getElementsByTagName('desk')[0];


    const columnHeaders = doc.createElement('tr');
    columnHeaders.innerHTML = `<th>${loadedData[0][0]}</th>
<th>${loadedData[0][1]}</th>`;
    desk.appendChild(columnHeaders);


    for (let i = 1; i < loadedData.size; i++) {
      const tableRow = doc.createElement('tr');
      tableRow.innerHTML = `<td>${loadedData[i][0]}</td>
<td>${loadedData[i][1]}</td>`;
      desk.appendChild(tableRow);
    }
  }).catch((err) => {
  	console.log(err.error.message);
  });
To execute the code, name the load() perform from the gapi library and cross the perform created above as an argument.
gapi.load('shopper', begin);The ensuing utility appears like beneath. You’re welcome to take a look at the complete code template of this HTML desk with information from Google Sheets on JSFiddle. To get your personal factor like this working, simply change {GOOGLE_API_KEY}, {SPREADSHEET_ID}, {SHEET_NAME}, and {DATA_RANGE} with your personal info (and don’t maintain the braces).
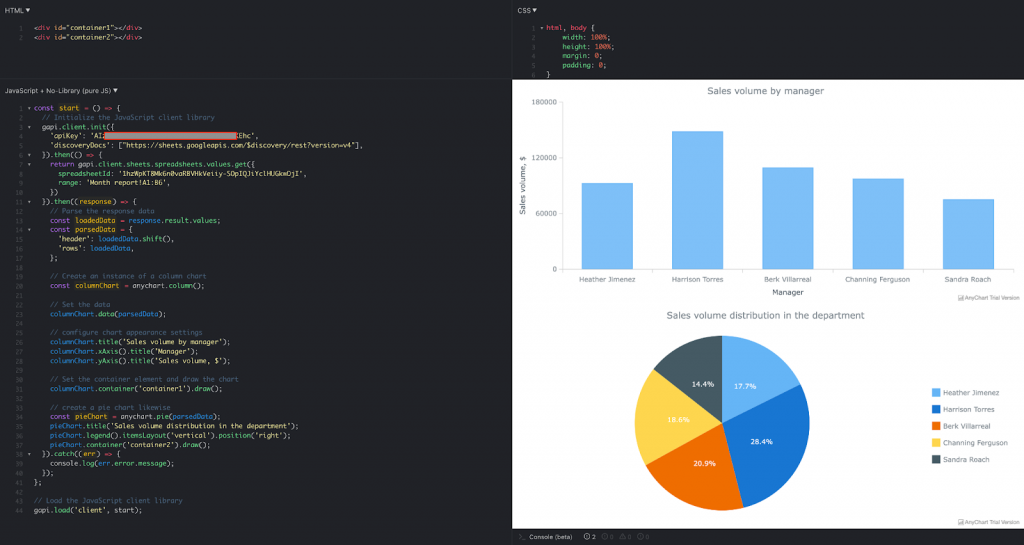
2) Tinkering output — present the info as a chart
In real-world functions, easy HTML tables are often not sufficient; we need to visualize and analyze the info. Let me present you methods to create a dashboard that will increase the readability of the info and brings us nearer to the real-world use case. When I’m on obligation and requested for help with Google Sheets API integration, it’s really the primary instance I share, and principally, nearly all the time the final because it’s very illustrative and no additional assist is required.
So, let’s use the AnyChart JS library for information visualization. It contains column charts and pie charts, which might be sufficient for this straightforward dashboard.
Earlier than the rest, add AnyChart’s base JS module to HTML:
<script src="https://cdn.anychart.com/releases/8.11.0/js/anychart-base.min.js"></script>Additionally, add <div> tags for dashboard containers and apply an appropriate ID for every:
<div id="container1"></div>
<div id="container2"></div>
A lot of the JavaScript code stays completely the identical. I’ll simply rework the code that handles the Sheets API response.
So, maintain the primary a part of the JS code unchanged:
const begin = () => {

  gapi.shopper.init({
    'apiKey': '{GOOGLE_API_KEY}',
    'discoveryDocs': ["https://sheets.googleapis.com/$discovery/rest?version=v4"],
  }).then(() => {
    return gapi.shopper.sheets.spreadsheets.values.get({
      spreadsheetId: '{SPREADSHEET_ID}',
      vary: '{SHEET_NAME}!{DATA_RANGE}',
    })
  }).then((response) => {

In the response handler, parse the info to compose a construction suitable with the AnyChart API:

    const loadedData = response.end result.values;
    const parsedData = {
      'header': loadedData.shift(),
      'rows': loadedData,
    };

Now we’ve bought every little thing we have to create and configure charts for the dashboard:


    const columnChart = anychart.column();


    columnChart.information(parsedData);


    columnChart.title('Gross sales quantity by supervisor');
    columnChart.xAxis().title('Supervisor');
    columnChart.yAxis().title('Gross sales quantity, $');


    columnChart.container('container1').draw();


    const pieChart = anychart.pie(parsedData);
    pieChart.title('Gross sales quantity distribution within the division');
    pieChart.legend().itemsLayout('vertical').place('proper');
    pieChart.container('container2').draw();

Then goes the identical ending half as with the HTML desk — let’s recollect it simply in case:

  }).catch((err) => {
  	console.log(err.error.message);
  });
};


gapi.load('shopper', begin);
Beneath is what the ensuing dashboard appears like. You’ll be able to try the complete template code of this dashboard visualizing information from Google Sheets utilizing the v4 API on JSFiddle. To get your personal mission like this, merely put your personal info rather than {GOOGLE_API_KEY}, {SPREADSHEET_ID}, {SHEET_NAME}, and {DATA_RANGE} (and don’t maintain the braces).
Epilogue and Hyperlinks
I hope this text will likely be useful to anybody who decides to construct an app that makes use of information from Google Sheets and entry it from JavaScript functions. If in case you have any additional questions, please be at liberty to get in contact with me and I will likely be comfortable to do my greatest that can assist you out.
On your comfort, here’s a listing of all helpful hyperlinks from this text, in a single place:
Stipulations
Integration examples