


CSS Grid help has been broadly obtainable since March 2017 in all main browsers. But, right here we’re in 2024, and I nonetheless see few individuals utilizing the grid template areas characteristic.
It’s no shock that many keep away from template areas as making sense of the grid is difficult sufficient. On this interactive article, I goal to make clear this characteristic and, hopefully, persuade you to make use of it extra usually. When you see the simplicity and energy of template areas, chances are you’ll attain for them way more often.
Introduction
Within the following instance, we have now a grid structure with three columns.
.web page {
  show: grid;
  grid-template-columns: 1fr 1fr 1fr;
  hole: 1rem;
}
If I must place little one objects throughout the grid, I must specify the road quantity for every merchandise through the use of grid-column.
.item-1 {
  grid-column: 1 / 3;
}

.item-2 {
  grid-column: 3 / 4;
}
Right here is the outcome.
At first look, it appears high-quality and works as anticipated. However have you considered how I got here up with the road numbers? I don’t all the time prefer to open the DevTools and activate the road numbers so I can place the objects the place I want them.
The road numbers look one thing like this:
You may’t see the road numbers till you examine the aspect within the browser DevTools. Let’s take a fast quiz.
Think about the next CSS grid:
.web page {
  show: grid;
  grid-template-columns: 1fr 1fr 1fr 1fr 1fr;
  hole: 1rem;
}
Write the road numbers wanted to position the second merchandise within the final three columns.
⚠️ Don’t open the DevTools, guess it your self.
Should you guessed it from the primary time, it’s nice. Nonetheless, for me, I typically miss the proper line quantity and should open the DevTools to get it proper.
See the beneath instance with the road numbers activated.
Wanting on the line numbers, it sounds simpler, proper? I agree too. This could change into tougher if we have to place each the columns and rows.
Let’s take it additional.
Within the following demo, we have now a structure with 5 columns and a couple of rows.
.web page {
  show: grid;
  grid-template-columns: 1fr 1fr 1fr 1fr 1fr;
  grid-template-rows: 1fr 1fr;
  hole: 1rem;
}
Are you able to guess what’s the proper line numbers to position “Merchandise 1” within the first three columns?
Cool, the following step is to place the second merchandise within the final 3 columns. Attempt to guess the road numbers worth.
Good work! For me, coping with line numbers is feasible provided that the DevTools are energetic. Oftentimes, my mind is dealing with numerous particulars whereas constructing a structure and “imagining” the road numbers isn’t certainly one of them.
CSS named grid areas
In CSS grid, we will identify every grid space and reference it all through the CSS. Let’s take the next fundamental instance.
Instance 1: Fundamental downside
We’ve a two-column grid. I used grid-template-areas to outline an space for every merchandise I’ve.
.web page {
  show: grid;
  grid-template-columns: 1fr 1fr;
  grid-template-areas: "item1 item2";
  hole: 1rem;
}
Then, I can map the names of every merchandise, respectively:
.item-1 {
  grid-area: item1;
}

.item-2 {
  grid-area: item2;
}
Through the use of a grid-area, it’s like mapping every aspect within the grid to its designated space. Within the following instance, see how every column is mapped to a grid space identify.

Don’t fear if it’s nonetheless not clear, I’ll clarify it in additional element within the following examples.
Instance 2: Card structure
Within the following instance, we have now a grid of three columns.
.wrapper {
  show: grid;
  grid-template-columns: 1fr 1fr 1fr;
  grid-template-areas: "featured featured article";
  hole: 1rem;
}
I mapped the named grid strains in a method that offers:
- 2 columns for the featured article
- 1 column for the traditional article
Let’s suppose that we have now a card part. We are able to place the cardboard both within the “featured” or the “article” grid areas.
See the next demo and attempt to play with the toggles within the grid-area.
featuredarticle
Grid template areas
Ahmad Shadeed
Discover how the cardboard modifications its place and measurement? We’re altering the road numbers through the use of the named grid-area solely.
Within the following sections, I’ll clarify the grid space syntax intimately after which stroll you thru totally different examples and use instances.
Grid template space guidelines
The outlined space ought to be like a rectangle
An outlined space should have a rectangle-like form within the code.
.structure {
  grid-template-areas:
    "header header"
    "sidebar principal"
    "header footer";
}


.structure {
  grid-template-areas:
    "header header"
    "sidebar principal"
    "sidebar footer";
}
See the next determine:

All areas should be outlined
When utilizing grid-template-areas, all areas should be outlined even in the event you received’t want all of them.
.structure {
  grid-template-areas:
    "header header"
    "sidebar principal"
    "header";
}


.structure {
  grid-template-areas:
    "header header"
    "sidebar principal"
    "sidebar footer";
}
Grid template syntax
To make use of CSS grid template areas, we have to outline the grid areas by way of grid-template-areas property. The principle issues it is advisable know for now:
- It may take a number of space strings
- One string means having a one-dimentional structure (column solely)
- A number of space strings means having a multi-dimentional structure (column and rows)
What I like about grid areas is that they supply us with a visualization of the grid in CSS.
Grid space syntax, instance 1
On this instance, we have now one-dimensional grid with two columns. The primary one is mounted and the opposite is fluid to the obtainable area.
.aspect {
  show: grid;
  grid-template-columns: 200px 1fr;
  grid-template-areas: "apart principal";
  hole: var(--gutter-1);
}
See the next determine:

As soon as the template areas are outlined, we will reference them in CSS and assign every named space to its designated aspect through the use of the grid-area property,
.apart {
  grid-area: apart;
}

.principal {
  grid-area: principal;
}
The above is a fundamental instance that lays the muse for the article. Preserve studying to find why named areas are highly effective within the following examples.
Grid space syntax, instance 2
Constructing on the earlier instance, I want so as to add a footer to the grid structure. What ought to we do?
We are able to add one other space string to the grid-template-areas.
After we outline a number of space string values for grid template areas, implicit grid rows are created robotically.
.aspect {
  show: grid;
  grid-template-columns: 200px 1fr;
  grid-template-areas: "apart principal" "footer footer";
  hole: var(--gutter-1);
}
Attempt to visualize the grid primarily based on the outlined areas above. Are you able to guess it?
After we add a number of space strings in grid-template-areas, it’s observe to stack them into a number of strains as it can assist us to visualise them higher.
.aspect {

  grid-template-areas:
    "apart principal"
    "footer footer";
}
Every space string represents a row within the grid. Think about it like a desk.
Grid space syntax, instance 3
We are able to change the structure by simply altering the grid-template-areas for the primary wrapper. The next CSS is fixed, we simply want to alter the grid space string.
.apart {
  grid-area: apart;
}

.principal {
  grid-area: principal;
}

.footer {
  grid-area: footer;
}
See the next demo and attempt to change the structure.
.web page {
grid-template-areas:
"apart principal"
"footer footer";
}
By altering the grid-template-areas string, the entire structure updates robotically, utilizing the identical distinctive grid-area names (apart, principal, footer). This centralizes structure management, making changes simple and environment friendly.
Within the following instance, we will change the UI parts structure by simply updating the grid-template-areas string(s).
Attempt to change the dropdown worth and see what occurs. Discover the way it seems to be like a mapping for the structure.
“apart principal”“footer “
Empty grid cells
We are able to outline an empty cell by including one or a number of dots. For instance:
.aspect {

  grid-template-areas:
    "apart principal"
    "... footer";
}
The dots ”…” right here characterize an empty grid cell. Let’s see that in motion:
An instance displaying an empty grid cell
“apart principal”“footer “
CSS grid named grid strains
Intro
Once I first realized about named grid strains, I noticed issues like the next:
.structure {
  grid-template-columns:  [full-start] 1fr
                          [content-start] 2fr
                          [content-end] 1fr [full-end];
}
I didn’t perceive if the *-start or *-end had been customized names by the creator, or perhaps the browser generated them. Usually talking, this syntax is complicated however it’s useful in some use-cases. I’ll attempt to clarify it clearly on this part.
Within the following instance, we have now a grid with three columns.
.structure {
  show: grid;
  grid-template-columns: 1fr 2fr 1fr;
  hole: 1rem;
}
In grid, the variety of strains is the same as the columns plus one. If we have now 3 columns, then we may have 4 grid strains.
See the next instance:
Say that we wish to place an merchandise from line 2 to line 3. We are able to do this:
.merchandise {
  grid-column: 2 / 3;
}
With named grid strains, the thought is that we will identify every grid line with a singular identify as a substitute of the default line numbers.
.structure {

  grid-template-columns:  1fr
                          2fr
                          1fr;


  grid-template-columns:  [full-start] 1fr
                          [content-start] 2fr
                          [content-end] 1fr [full-end];
}
It is essential to understand that the road numbers are nonetheless there so that you can use. Naming the strains would not change the road numbers.
Say that we wish to place the merchandise the identical as we did within the earlier demo, however with named grid strains.
.merchandise {
  grid-column: content-start / content-end;
}
Sounds clearer, proper?
Possibly we wish to place it on one of many sides.
.merchandise {
  grid-column: full-start / content-end;
}
Within the following demo, you may toggle the road numbers on and off. Attempt it your self and see what occurs.
If it’s nonetheless not clear but, don’t fear. I’ll clarify the idea beneath in one other method.
Grid tracks
In CSS grid, we have now a time period referred to as “observe measurement”, which represents the dimensions of the column or row. See the next instance:
.structure {
  show: grid;
  grid-template-columns: 1fr 1fr;
}
The 1fr and 1fr are observe sizes. With named grid strains, we care about naming the strains round these tracks.
Keep in mind that we’re naming grid strains.
See the next determine:

Discover how the road numbers are across the tracks. We’ve two tracks, so we have now three strains.
On this instance, we have now an apart and a principal part.
.structure {
  show: grid;
  grid-template-columns:
          [aside-start] 200px [aside-end main-start] 1fr [main-end];
}
See the next determine:

The road identify should be written earlier than the observe measurement. Discover that the values between the brackets can share a number of line names. In our instance beneath, the road aside-end is identical because the main-start.
What’s nice about utilizing named strains like that is that we will place the objects like this:
.apart {
  grid-column: aside-start / aside-end;
}
or this:
.apart {
  grid-column: apart;
}
When defining the beginning and finish of a line like aside-start and aside-end, that is referred to as implicit line naming. The browser will take them and permit us to make use of the realm (e.g: grid-column: apart);
Additionally, we will take this additional and have two rows as a substitute of 1.
.structure {
  show: grid;
  grid-template-columns:
          [aside-start] 200px [aside-end main-start] 1fr [main-end];
  grid-template-rows:
          [aside-start main-start] auto [aside-end main-end footer-start]
          40px [footer-end];
}
Defining the *-start / *-end names for strains will generate an implicit grid areas.
Consequently, when utilizing the customized indents ([*-start] or [*-end]), it’s the identical as the next CSS:
.structure {
  show: grid;
  grid-template-columns: 200px 1fr;
  grid-template-rows: auto 40px;
  grid-template-areas: "apart principal"
                      "footer footer"
}
Utilizing grid-template-areas is less complicated for me, however we would want to make use of line names in some use instances (I’ll present examples within the use instances part).
Named grid strains are non-obligatory
It’s not obligatory to call all strains. We are able to identify solely the strains we care about probably the most in our structure.
On this instance, I named solely the strains for the second column.
.structure {
  grid-template-columns:  1fr
                          [content-start] 2fr
                          [content-end] 1fr;
}
Right here is an instance that reveals it in motion:
The dimmed line numbers are named.
Mixing line numbers and names
We are able to combine line numbers and names when putting a grid merchandise. Within the following instance, I positioned the merchandise from line 1 to the road “content-end”.
.merchandise {
  grid-column: 1 / content-end;
}
See it in motion:
The dimmed line numbers are named.
I like this flexibility in CSS grid. Having the ability to select regardless of the resolution or method of working that fits you is a blessing.
Use instances for grid template areas
Reversing Grid Route
Say that we have now a card part and we wish to flip the path of the structure. In flexbox, that is pretty simple as we simply want to make use of flex-direction: row-reverse.
In CSS grid, we have to change every merchandise’s placement within the grid.
Think about the next instance.
.card {
  --cols: 150px 1fr;
  show: grid;
  grid-template-columns: var(--cols);
}

.card__thumb {
  grid-column: 1 / 2;
}

.card__content {
  grid-column: 2 / 3;
}
It seems to be like this:
Wandering in nature. Life is cool
A little bit of desc
If we wish to flip the structure, we might want to:
- Change the columns definition.
- Change the
grid-columnfor every little one aspect.
.card--flip {
  --cols: 1fr 150px;
}

.card__thumb {
  grid-column: 2 / 3;
}

.card__content {
  grid-column: 1 / 2;
  grid-row: 1;
}
And right here is the outcome:
Wandering in nature. Life is cool
A little bit of desc
We are able to do higher with through the use of named grid areas. Within the present resolution, we have now to alter the grid-column begin and finish numbers for every little one merchandise.
.card {
  show: grid;
  grid-template-columns: 150px 1fr;
  grid-template-areas: "thumb content material";
}

.card__thumb {
  grid-area: thumb;
}

.card__content {
  grid-area: content material;
}
To flip the structure, all we have to do is:
.card--flip {
  grid-template-columns: 1fr 150px;
  grid-template-areas: "content material thumb";
}
We don’t have to consider the road numbers. That is a better naming for the net designer who’s constructing the structure.
Attempt the next demo:
Wandering in nature. Life is cool
A little bit of desc
.card {
grid-template-columns: 150px 1fr;
grid-template-areas: "picture content material";
}
.card-image {
grid-area: picture;
}
.card-content {
grid-area: content material;
}
We solely change the columns and named areas order. Which is less complicated to edit, utilizing named areas or line numbers?
Even higher, we will use the grid-template shorthand property, too.
.card--flip {
  grid-template: "content material picture" / 1fr 150px;
}
It’s as much as you on utilizing the shorthand or not, however I desire the longhand model because it’s extra clear to scan.
In a header structure, we will use grid areas to outline the structure.
Within the following design,

In CSS, I created a grid with three equal-size columns.
.header {
  show: grid;
  grid-template-columns: 1fr 1fr 1fr;
}
If we wish to place them utilizing line numbers, will probably be like this:
.emblem {
  grid-column: 1 / 2;
}

.nav {
  grid-column: 2 / 3;
}

.actions {
  grid-column: 3 / 4;
}
Right here is the outcome:
Lorem ipsum dolor sit amet consectetur adipisicing elit. Distinctio placeat, ipsum suscipit reprehenderit nobis iusto omnis vero tempore officia accusantium minima repellendus. Blanditiis voluptatum accusantium ut et architecto ab dolorum.
Lorem ipsum dolor sit amet consectetur adipisicing elit. Quis nesciunt perspiciatis ratione sapiente est sunt pariatur hic? Accusantium asperiores quam nihil dicta tempora ipsa cum, non cumque a minus facere.
This works high-quality. Can we discover how you can make it responsive by simply utilizing grid areas? First, I must outline every grid space for the kid objects.
.header {
  show: grid;
  grid-template-columns: 1fr 1fr 1fr;
  grid-template-areas: "emblem nav actions";
}

.emblem {
  grid-area: emblem;
}

.nav {
  grid-area: nav;
}

.actions {
  grid-area: actions;
}
Right here is the outcome. It seems to be the identical.
Lorem ipsum dolor sit amet consectetur adipisicing elit. Distinctio placeat, ipsum suscipit reprehenderit nobis iusto omnis vero tempore officia accusantium minima repellendus. Blanditiis voluptatum accusantium ut et architecto ab dolorum.
Lorem ipsum dolor sit amet consectetur adipisicing elit. Quis nesciunt perspiciatis ratione sapiente est sunt pariatur hic? Accusantium asperiores quam nihil dicta tempora ipsa cum, non cumque a minus facere.
We are able to make it responsive by altering the grid-templare-areas worth. Let’s begin with the smallest measurement.
.header {
  grid-template-areas:
    "emblem emblem actions"
    "nav nav nav";
}
Lorem ipsum dolor sit amet consectetur adipisicing elit. Distinctio placeat, ipsum suscipit reprehenderit nobis iusto omnis vero tempore officia accusantium minima repellendus. Blanditiis voluptatum accusantium ut et architecto ab dolorum.
Lorem ipsum dolor sit amet consectetur adipisicing elit. Quis nesciunt perspiciatis ratione sapiente est sunt pariatur hic? Accusantium asperiores quam nihil dicta tempora ipsa cum, non cumque a minus facere.
And the medium measurement:
@media (min-width: 380px) {
  .header {
    grid-template-areas:
      "emblem nav nav"
      "emblem actions actions";
  }

  .nav {
    justify-self: finish;
  }
}
Lorem ipsum dolor sit amet consectetur adipisicing elit. Distinctio placeat, ipsum suscipit reprehenderit nobis iusto omnis vero tempore officia accusantium minima repellendus. Blanditiis voluptatum accusantium ut et architecto ab dolorum.
Lorem ipsum dolor sit amet consectetur adipisicing elit. Quis nesciunt perspiciatis ratione sapiente est sunt pariatur hic? Accusantium asperiores quam nihil dicta tempora ipsa cum, non cumque a minus facere.
The biggest measurement:
@media (min-width: 900px) {
  .header {
    grid-template-areas: "emblem nav actions";
  }
}
Have you ever observed how clear it’s to make use of grid space? It’s like a mapping of the UI proper within the CSS code.
Lorem ipsum dolor sit amet consectetur adipisicing elit. Distinctio placeat, ipsum suscipit reprehenderit nobis iusto omnis vero tempore officia accusantium minima repellendus. Blanditiis voluptatum accusantium ut et architecto ab dolorum.
Lorem ipsum dolor sit amet consectetur adipisicing elit. Quis nesciunt perspiciatis ratione sapiente est sunt pariatur hic? Accusantium asperiores quam nihil dicta tempora ipsa cum, non cumque a minus facere.
Within the following demo, I highlighted the presently energetic grid space. Attempt to resize and see how the structure modifications.
Lorem ipsum dolor sit amet consectetur adipisicing elit. Distinctio placeat, ipsum suscipit reprehenderit nobis iusto omnis vero tempore officia accusantium minima repellendus. Blanditiis voluptatum accusantium ut et architecto ab dolorum.
Lorem ipsum dolor sit amet consectetur adipisicing elit. Quis nesciunt perspiciatis ratione sapiente est sunt pariatur hic? Accusantium asperiores quam nihil dicta tempora ipsa cum, non cumque a minus facere.
grid-template-areas:
"emblem emblem actions"
"nav nav nav";
grid-template-areas:
"emblem nav nav"
"emblem actions motion";
grid-template-areas:
"emblem nav actions";
As a bonus, here’s a demo with 5 totally different choices for the structure. All I want to alter is the grid-template-areas definition and the remaining will simply work.
Change the energetic choice to see it your self.
Notice: this solely works on giant viewports.
Lorem ipsum dolor sit amet consectetur adipisicing elit. Distinctio placeat, ipsum suscipit reprehenderit nobis iusto omnis vero tempore officia accusantium minima repellendus. Blanditiis voluptatum accusantium ut et architecto ab dolorum.
Lorem ipsum dolor sit amet consectetur adipisicing elit. Quis nesciunt perspiciatis ratione sapiente est sunt pariatur hic? Accusantium asperiores quam nihil dicta tempora ipsa cum, non cumque a minus facere.
Cool, proper?
Editorial structure: instance 1
On this instance, we have now a structure that comprises several types of content material like a title, textual content, and a picture.
Through the use of CSS grid and grid-areas we will simply outline the structure and alter it throughout totally different viewport sizes.
On this variation, I outlined the columns and rows by simply utilizing grid-template-areas and the browser will do the remaining.
.part {
  show: grid;
  grid-template-areas:
    ". title title"
    "thumb content material content material";
  hole: 1rem;
}
Discover how the “dot” represents an empty area on the left aspect of the title. That “dot” is known as a null cell token and is a part of the CSS grid spec.
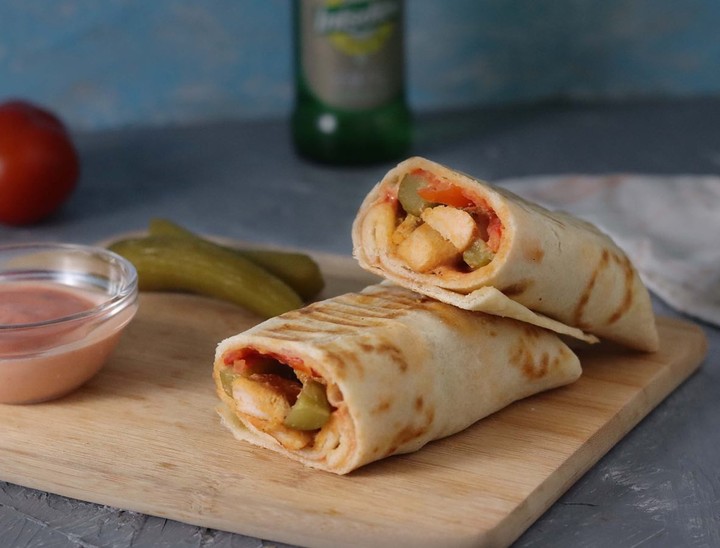
Shawarma Wrap with Home made Bread
Benefit from the pleasant flavors of Center Japanese delicacies with our step-by-step recipe for Shawarma Wrap with Home made Bread. Whether or not you are craving a hearty meal or planning a gathering with buddies, this dish is bound to impress.
The mixture of tender, marinated meat wrapped in delicate home made bread, complemented by recent greens and a tangy sauce
Editorial structure: instance 2
On this instance, I took a have a look at time.com and came upon that they’re utilizing CSS grid areas to deal with the part structure. I’ll attempt to clarify it on this part with a number of modifications.
See the next determine.

.featured-section {
  show: grid;
  grid-template-areas:
    ". characteristic most-read ."
    ". secondary most-read .";
  grid-template-columns: 1fr minmax(auto, 57.313rem) minmax(12rem, 18.75rem) 1fr;
  grid-template-rows: minmax(auto, 25rem) 1fr;
}
To concentrate on the primary structure implementation, the next demos will solely embrace the primary structure and I received’t clarify about coding the internal elements as they’re out of the scope of the article.
Just a few issues to control:
- There’s an empty column on the beginning and finish of the grid, primarily to work as a spot on either side.
- Unsure of the utilization of
minmax()for each the column and rows. The structure switches to the cellular design very early however I’ll hold them for now. - There isn’t a want for
grid-template-rowsas we will outline them within the grid areas definition.
Let’s construct the grid skeleton with grid areas!
Now that we have now the skeleton, let’s see how you can make the part responsive by altering the columns and areas definition.
.featured-section {
  show: grid;
  grid-template-columns: 32px 1fr 32px;
  grid-template-areas:
    ". characteristic ."
    ". secondary ."
    ". most-read .";
  hole: 1rem;

  @media (min-width: 500px) {
    grid-template-columns: 32px minmax(auto, 57.313rem) minmax(90px, 130px) 32px;

    grid-template-areas:
      ". characteristic characteristic ."
      ". secondary most-read .";
  }

  @media (min-width: 900px) {
    grid-template-areas:
      ". characteristic most-read ."
      ". secondary most-read .";
  }
}
See the demo beneath and attempt to resize the window:
Threads app publish
Whereas reviewing how the CSS is written on Threads app by Meta, I observed an fascinating use of CSS grid.
.publish {
  show: grid;
  grid-template-columns: 48px minmax(0, 1fr);
  grid-template-rows: 21px 19px max-content max-content;
}
That is my first time attempting Threads. It is cool!
To put a grid merchandise, the workforce used line numbers. Right here is an instance:
.postBody {
  grid-column-start: 2;
  grid-row-start: 2;
  grid-row-end: span 3;
}
The publish part has a number of variations. We are able to use grid-template-areas to outline each. For me, that is simpler.
Right here is how you can do it in CSS:
.publish {

  grid-template-areas:
    "avatar header"
    "avatar physique"
    ". physique"
    ". footer";
}

.post--reply {
  grid-template-rows: 40px max-content max-content;
  grid-template-areas:
    "avatar header"
    "physique physique"
    "physique physique"
    "footer footer";
}

.post--nested {
  grid-template-areas:
    "avatar header"
    "avatar physique"
    "line physique"
    "footer footer";
}
Play with the variations within the following interactive demo.
That is my first time attempting Threads. It is cool!
That is my first time attempting Threads. It is cool!
Overlapping objects with grid areas
When utilizing grid-template-areas, we will place objects in rectangular shapes. Think about the next instance:
.structure {
  show: grid;
  grid-template-columns: 1fr 1fr fr;
  grid-template-areas:
    "card tag tag"
    "title title card";
}
Within the instance, I used card two occasions. That is invalid and can break the grid. The worth should be just like an oblong form.
Here’s a visible that reveals what I imply by a rectangular form.
What to do then? Properly, we will outline a brand new space identify and use it to position each the column and row for the merchandise we want.
See the next instance the place we have now a card part.

Baking
Thyme Bread with Cheese and Olives
<div class="card">
  <img class="thumb" src="thumb.jpg" alt="" />
  <h3 class="title">Thyme Bread with Cheese and Olives<h3/>
  <p class="tag">Baking<p/>
</div>
We are able to stack the title and the tag over the picture through the use of grid-template-areas as within the following instance.
.card {
  show: grid;
  grid-template-columns: auto auto 1fr;
  grid-template-rows: auto auto;
  grid-template-areas:
    "thumb-1 tag"
    "title thumb-2";
}
Discover how I outlined thumb-1 and thumb-2. I can use them with grid-area.
.thumb {
  grid-column: thumb-1 / thumb-2;
  grid-row: thumb-1 / thumb-2;
}
And I positioned each the title and tag of their areas plus made certain they had been aligned accurately.
.tag {
  grid-area: tag;
  align-self: begin;
  justify-self: finish;
}

.title {
  grid-area: title;
  align-self: finish;
}
Please understand that you have to to handle the stacking order of the kid objects (if wanted). In my case, I didn’t want that because the supply order already solved it for me.
Right here is the ultimate demo:
Baking
Thyme Bread with Cheese and Olives
The earlier examples had been impressed by Oddbird’s Cascading Layouts web page.
Conditional layouts with CSS :has()
We are able to take grid areas to the following degree by combining it with CSS :has() selector. For instance, we will change a structure primarily based on the presence of a component.
On this instance, I’m altering the structure of a <determine> aspect primarily based on having a figcaption or not.
Right here is the fundamental CSS:
determine {
  show: grid;
  grid-template-columns: 1fr 1fr 1fr;
  grid-template-areas: "img img img";
  hole: 0.5rem;
}

img {
  grid-area: img;
}

figcaption {
  grid-area: caption;
}
Thyme Bread with Cheese and Olives
Discover ways to make this superior handmade bread with just some steps. Excellent for dipping or sandwiches.
.card:has(figcaption) {
grid-template-areas:
"img img caption"
"img img .";
}
Do you wish to be taught extra? I wrote a whole interactive information on CSS :has. Additionally, you may verify my Conditional CSS with :has and :nth-last-child article.
Multilingual help (LTR/RTL)
It’s value mentioning that CSS Grid will modify the structure primarily based on the web page path (LTR or RTL). This implies the named grid areas will even comply with the web page path.
Toggle the “RTL” checkbox within the demo to see how the structure will flip.
To be taught extra about writing CSS for RTL layouts, I wrote a whole information on that matter referred to as RTL Styling 101.
All the key browsers have good tooling for grid areas (Chrome, Safari, and Firefox). Here’s a preview of every browser:
Chrome
- I don’t significantly admire that it locations the realm identify on the prime left nook. It makes areas overlap.
- Unsure concerning the colour overlay. It modified how my design seems to be like.

Safari
- The pink outlines assist to stipulate the objects clearly.
- I like how Safari permits us to see the road names.

Right here is how Safari reveals the road names.

Whereas that is helpful, the structure would possibly want some enhancements (e.g.: stack the strains as a substitute of displaying them subsequent to one another).
Firefox
- The realm names are clearer than Chrome and Safari.
- I like that it gives an autocomplete checklist when typing an space identify with the customized indents (
*-startor*-end).

When enhancing the grid-area for a kid merchandise, Firefox gives a listing of all of the potential line names.

That is nice characteristic that I admire in Firefox.
Outro
Utilizing grid areas is a good way to have a visible of the grid structure in CSS. I can see it useful for workforce members who would possibly want to alter a structure. I hope that this text was helpful to you.
Assets
Credit
Because of Sam Rose, Egor Kloos and Arpit Agrawal for proof studying the article and offering helpful suggestions.
Loved the learn? If you would like to help my work,
take into account shopping for me a espresso. Every article takes about 15
cups to create. Thanks a latte!
![]()