

Conditional Entry Insurance policies let you fine-grain your entry management in Microsoft 365. It means that you can management from which gadgets, or places customers can entry your sources, and specify what strategies of authentication are required to entry it.
The issue with MFA alone is that customers can get MFA fatigue. They’re prompted too usually to approve a sign-in motion, that they could by accident approve a malicious login try. By utilizing Conditional Entry now we have extra management on when to indicate MFA and even fully block dangerous sign-ins.
On this article, we are going to have a look at how a Conditional Entry Coverage works, what one of the best practices are, and learn how to create conditional entry insurance policies in your Azure atmosphere.
How does Conditional Entry work?
Conditional Entry insurance policies are basically if-then statements for entry management. It makes use of completely different alerts to determine which coverage it ought to implement. This coverage may very well be to require extra authentication or to dam entry altogether.

Conditional Entry insurance policies in Azure can use all kinds of alerts from completely different sources to find out which coverage it ought to implement. These alerts embrace the next:
- Person, Group membership, or Function (privileged roles)
- System state – Primarily based on (non)compliant gadgets, gadget platform
- Location – Trusted IP Ranges or based mostly on nations/areas
- Software – Filter insurance policies on particular functions or browsers
- Person danger – Implement coverage based mostly on person danger stage
- Signal-In Threat – Primarily based on real-time and calculated danger detection
These alerts can be utilized in a coverage to decide about if the person is granted entry or if extra authentication is required. We’ve got the next choices on the subject of entry management:
- Block entry
- Grant entry
- Require MFA – Which means that the person should full an MFA request to entry to useful resource. You’ll be able to set the authentication energy (SMS, Passwordless MFA or Phishing-resistant MFA)
- Require System to be compliant
- Require Microsoft Entra hybrid joined gadget
- Require app safety coverage
- Require password change – Use should change password. Works solely together with MFA
Moreover blocking or granting entry, we are able to additionally implement session-level controls, corresponding to limiting entry to particular actions inside an app or making use of real-time monitoring.
Conditional Entry is an important a part of trendy safety frameworks like Zero Belief, which operates on the precept of “by no means belief, all the time confirm.” As a substitute of assuming every part behind the company firewall is protected, the Zero Belief mannequin assumes breach and verifies every request as if it originates from an open community.
Named Places
One of many elements that you’ll want to make use of when making a coverage, is the Named Places. These are both Nations or IP Ranges that you need to use as a situation in your coverage.
A typical coverage is to dam entry from all nations to your Microsoft 365, besides from the nations the place your customers work. To create this coverage you may outline the nations in your Named Places.
An alternative choice is so as to add the general public IP Addresses out of your places of work in your Named Places. This lets you cut back the sign-in frequency for instance from these places.
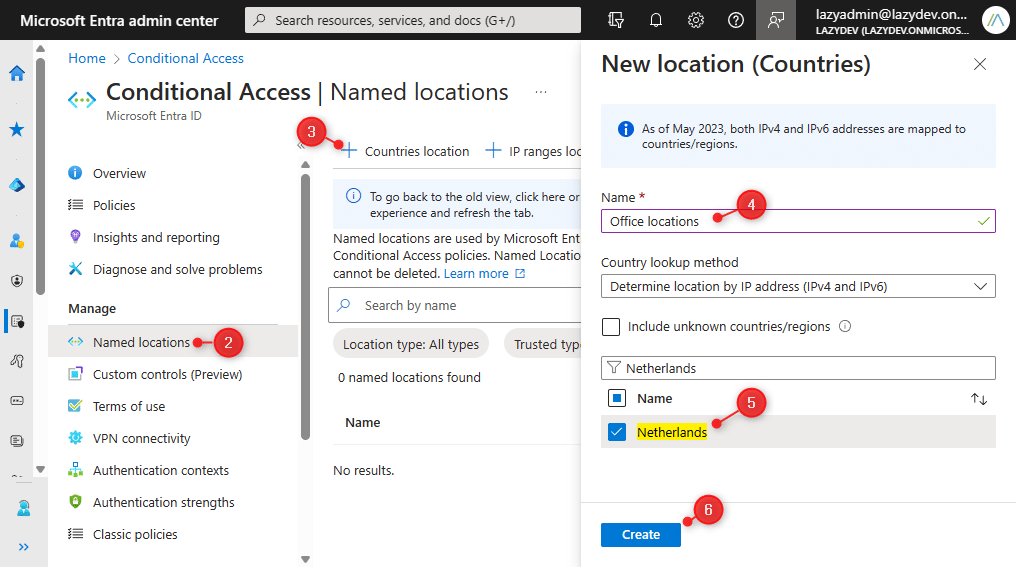
You’ll be able to add a Named Location in Microsoft Entra as follows:
- Open Microsoft Entra and go to Conditional Entry underneath Safety
- Select Named Places
- Click on on + Nations Location
- Give your places a reputation
- Choose the nations that you simply need to add to the record
- Click on on Create
Necessities
Although Conditional Entry Insurance policies are extremely really useful to make use of by Microsoft, they don’t seem to be included in each Microsoft 365 license. To make use of Conditional Entry in Microsoft 365, you’ll need to have at the least a Microsoft Entra ID P1 license.
This license is included in Microsoft 365 Enterprise Premium and Microsoft Workplace 365 E3. You may also purchase the license individually, however it prices $6 per person per 30 days.
It’s additionally essential that you’ve an Emergency entry account in Microsoft Entra. This account shouldn’t be assigned to a particular person and is just used when the traditional Admin account can’t be used. For instance, when the worldwide admin account is locked out as a result of an incorrect conditional entry coverage, or when MFA isn’t working as a result of a cell community outage.
Vital
Just be sure you exclude the emergency entry account from every conditional entry coverage that you simply create. This manner you may by no means be locked out from Microsoft Entra.
Deploying a Baseline
Conditional Entry Insurance policies will be tailor-made to the wants of your group, however it’s good to start out with a baseline. Now to create this baseline you have got a few choices. You’ll be able to create every coverage manually, use the Microsoft Coverage Templates, or use the Adaptive MFA setup wizard.
Microsoft at present affords 16 coverage templates that you need to use. These templates let you deploy a coverage with just a few clicks. The MFA setup wizard will allow MFA if that isn’t enabled but in your tenant and create 5 baseline insurance policies.
Earlier than we begin with any of the insurance policies, just be sure you have created an emergency entry account which we are able to exclude within the insurance policies, so we don’t lose entry to Entra.
Utilizing Adaptive MFA setup wizard
The adaptive MFA setup wizard is a good place to begin for small and medium organizations. It means that you can rapidly allow MFA and it deploys a Conditional Entry Coverage baseline for you.
- Open the Microsoft 365 Admin Middle and click on on Setup
- Scroll a bit down and select Configure multifactor authentication (MFA)
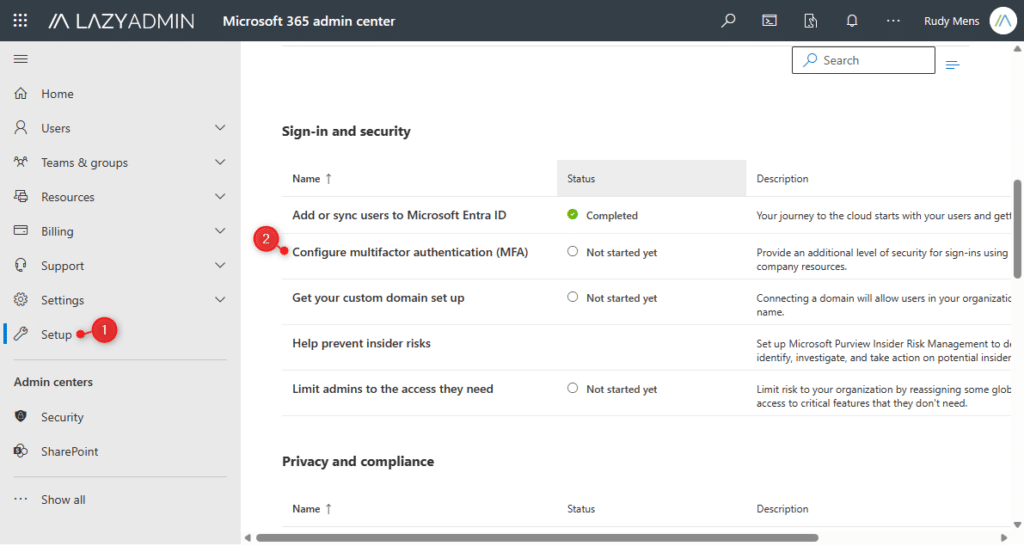
- Click on on Get began
- Click on Subsequent to skip the MFA Overview
- Ensure that at the least the Microsoft Authenticator App is chosen.
It’s not really useful to make use of low-security choices, like SMS and name.

- Within the subsequent step, Adaptive MFA utilizing Conditional Entry, we need to Customise the coverage templates.
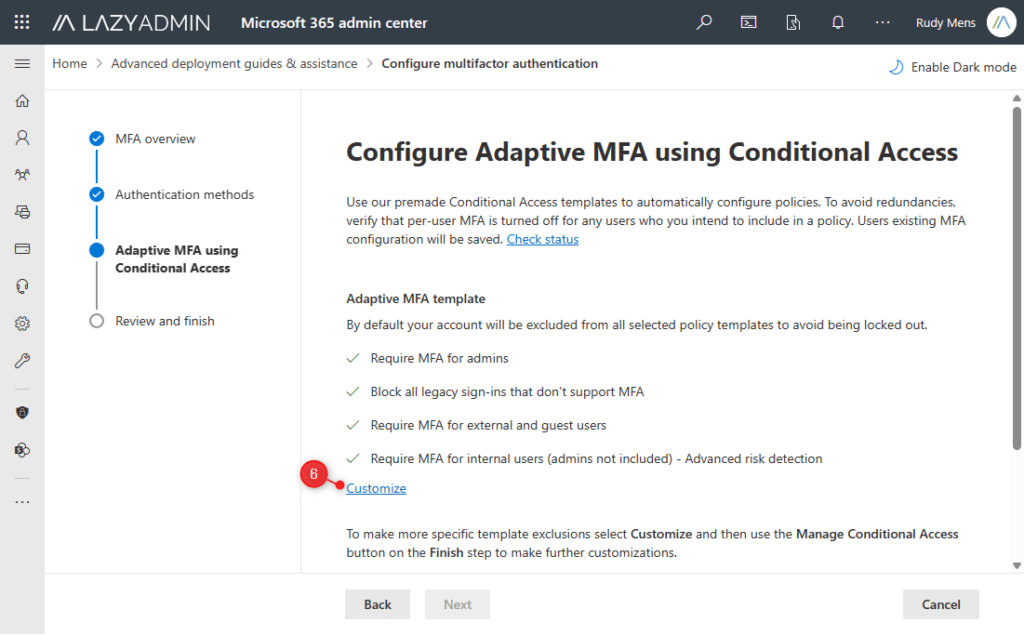
- We need to exclude our Emergency Admin account from the MFA requirement for Admins.
Increase the Require MFA for Admins and choose Exclude particular customers or teams. - Enter the account identify of your Emergency Admin account
Word
It’s not really useful to call your emergency admin account really Emergency Admin. That is in fact strategy to convient for attackers. Be sure to identify it one thing much less which means full 😉
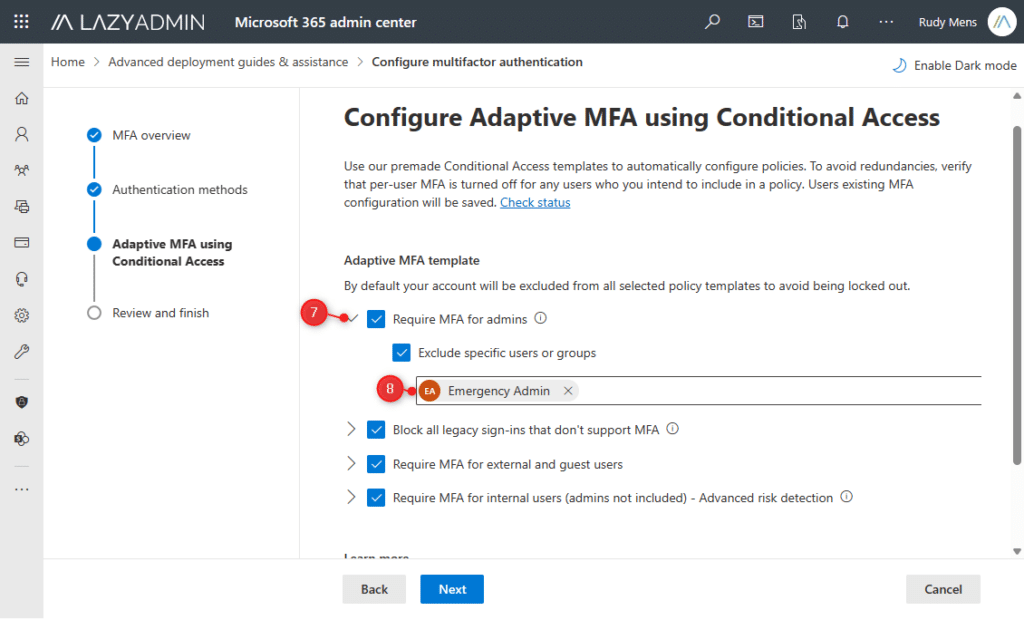
- Assessment the settings and click on on Save Configuration
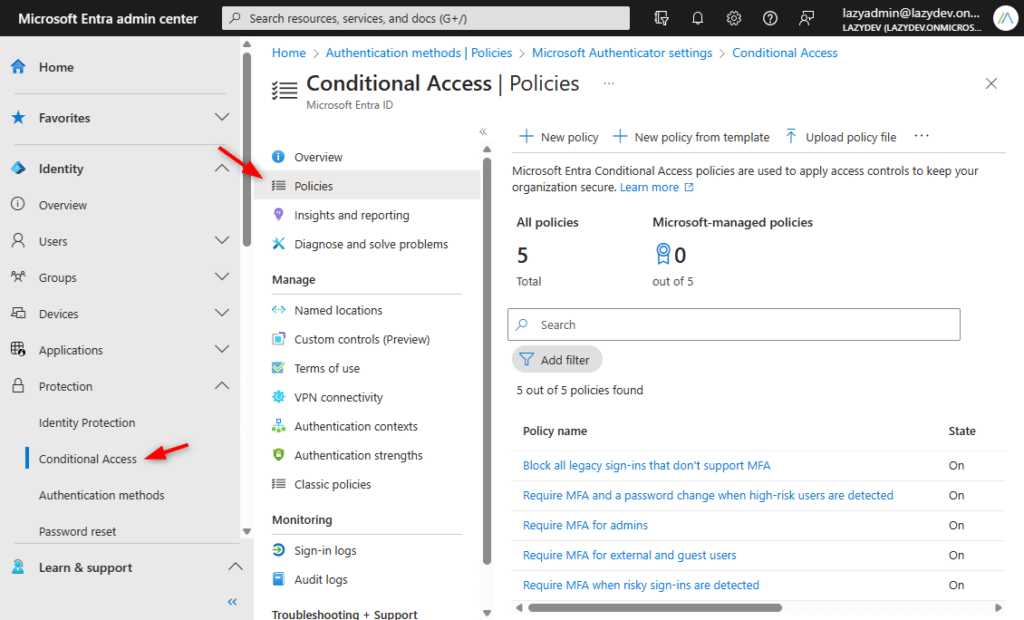
If you happen to now open Microsoft Entra and navigate to Id > Safety > Conditional Entry > Insurance policies, then you will notice that the 5 default insurance policies are created.
Utilizing Microsoft Templates
The Microsoft Template insurance policies are a fantastic place to begin and provide safety for the commonest threats. There are at present 16 insurance policies to select from:
- Block legacy authentication
- Require multifactor authentication for admins
- Require multifactor authentication for all customers
- Require multifactor authentication for visitor entry
- Require multifactor authentication for Azure Administration
- Securing safety information registration
- Require compliant or hybrid Azure AD joined gadget or multifactor authentication for all customers
- Require compliant or hybrid Azure AD joined gadget or multifactor authentication for admins
- Require multifactor authentication for dangerous sign-ins
- Require password change for high-risk customers
- Block entry to unknown or unsupported gadget platform
- No persistent browser session
- Require authorised consumer apps or app safety insurance policies
- Use application-enforced restrictions for O365 Apps
- Require phishing-resistant multifactor authentication for admins
- Require multifactor authentication for Microsoft Admin portals
Identical to once you create customized insurance policies, it is strongly recommended to deploy these insurance policies first in Report Solely mode. This lets you check and monitor the coverage so you may confirm that it really works as anticipated earlier than you activate it.
Whenever you deploy a template coverage, the present person is all the time excluded from the coverage. That is the account that you’re signed in inside Microsoft Entra. You’ll be able to change this after you have got deployed the coverage.
Deploying a Template Coverage
- Open Microsoft Entra and go to Conditional Entry underneath Safety
- Click on on Insurance policies
- Click on on New coverage from template
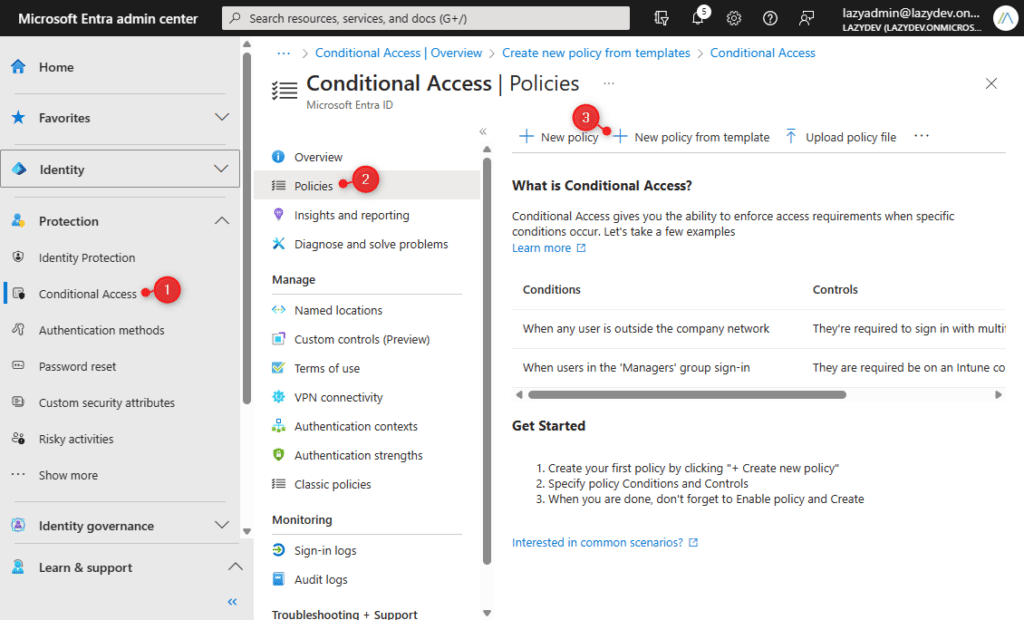
- Choose a template that you simply need to deploy. You’ll be able to click on on View to view the template coverage.
- Click on on Assessment + create
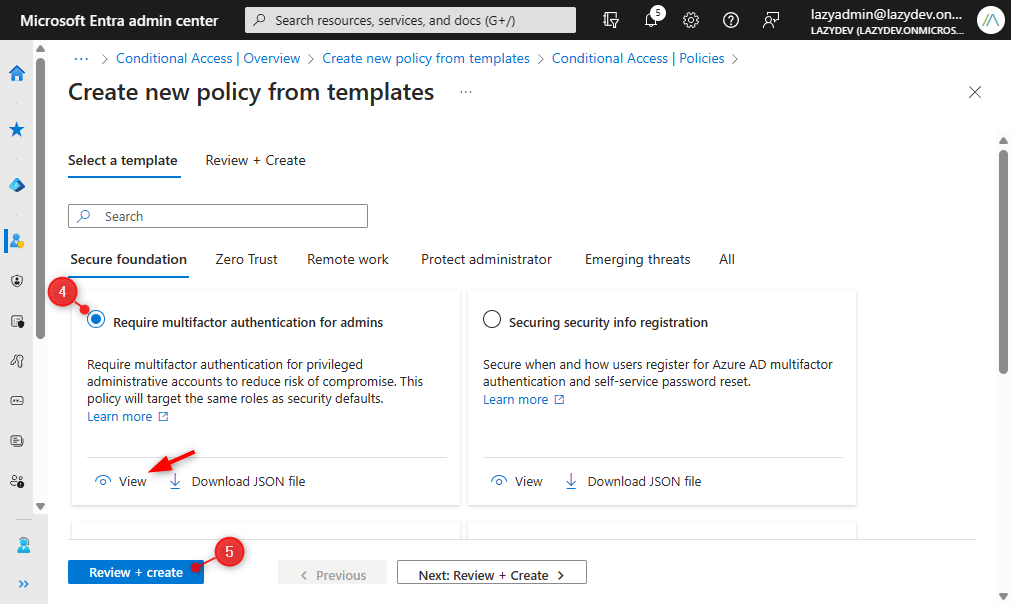
- Just be sure you hold the coverage state in Report solely
- Click on on Create to create the coverage
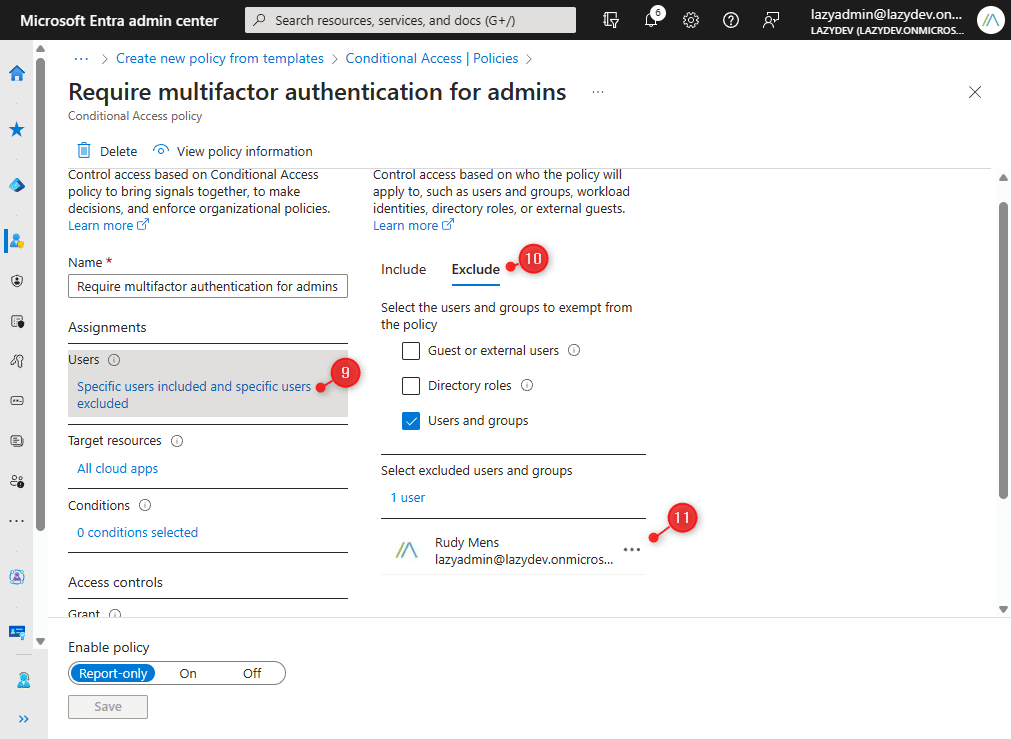
- Open the newly created coverage
We might want to take away at present signed-in person from the exclusion and add the emergency admin account as an alternative. - Click on on Particular customers included and particular customers excluded
- Click on on Exclude
- Take away the at present chosen person and add your emergency admin account.
- Click on on Save to replace the coverage
Which Template to make use of
As talked about, there are at present 16 coverage templates that you need to use. You don’t want to make use of all of them, however I like to recommend testing and use the next conditional entry insurance policies at the least in your Microsoft 365 tenant:
- Require multifactor authentication for admins
- Require multifactor authentication for all customers
- Block legacy authentication
- Securing safety information registration
- Require multifactor authentication for Azure Administration
- Block entry for unknown or unsupported gadget platform
Create a Conditional Entry Coverage
We will in fact additionally create our personal conditional entry insurance policies in Microsoft Entra. When creating customized insurance policies, just be sure you check them with a small group of customers first and run them in report-only mode to start out with.
Step one when making a coverage is to present the coverage a reputation. It’s essential to make use of a correct naming conference in your insurance policies so that you simply and your colleagues can simply perceive what a coverage does with out opening it.
Microsoft has give you a naming conference to make use of when creating insurance policies. You don’t have to make use of it precisely like this, however they’re a superb place to begin:

- SN – Sequence quantity – Permits for simple communication along with your colleagues. There may be even a numbering scheme that you need to use.
- Cloud app – Title of the app the coverage is for
- Response – For instance, Block, Grant, or Require MFA
- Principal – Customers, or Teams the coverage is for
- Situations – When to use the coverage, for instance, on exterior networks
So let’s check out how we are able to create our personal conditional entry coverage in Azure. We’re going to create a coverage that solely permits entry from nations which might be listed in our named places:
- Open Microsoft Entra and go to Conditional Entry underneath Safety
- Click on on Insurance policies
- Click on on New coverage
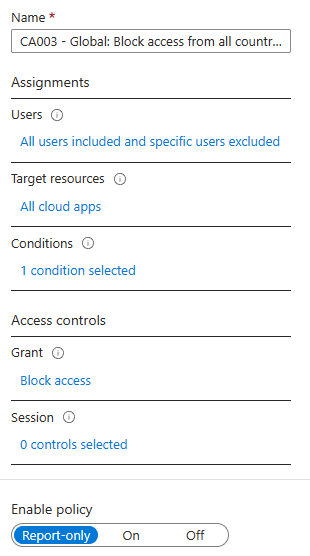
- Enter a reputation: CA003 – International: Block entry from all nations besides named places
- Click on on Customers
- Embrace > All Customers
- Exclude > Your emergency admin account
- Goal sources > All Cloud Apps
- Situations > Choose Places
- Embrace > Any places
- Exclude > Choose places and choose your named location with nations to permit entry from
- Grant > Block Entry
Ensure that coverage mode Report-Solely is chosen when creating a brand new coverage. This manner you may safely check and monitor a brand new coverage earlier than you allow it.
Testing New Coverage
When you have got created a brand new coverage it’s essential to totally check it earlier than you allow it in your tenant. One step is to run the coverage in Report-Solely mode so as to monitor the impression of the coverage.
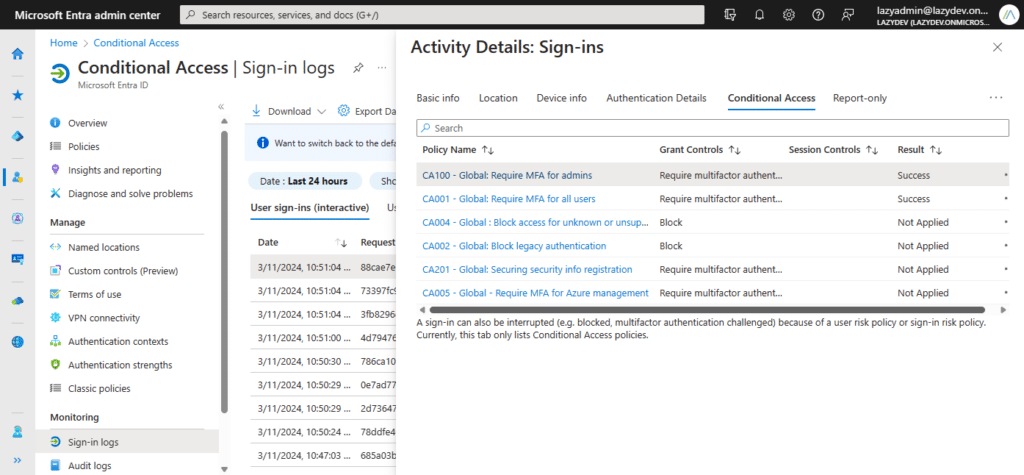
The monitor the coverage, you may verify the Signal-in Logs in Microsoft Entra > Conditional Entry. This can present all sign-in actions and let you view which insurance policies have been utilized or not. You’ll be able to click on on a coverage to view the small print.
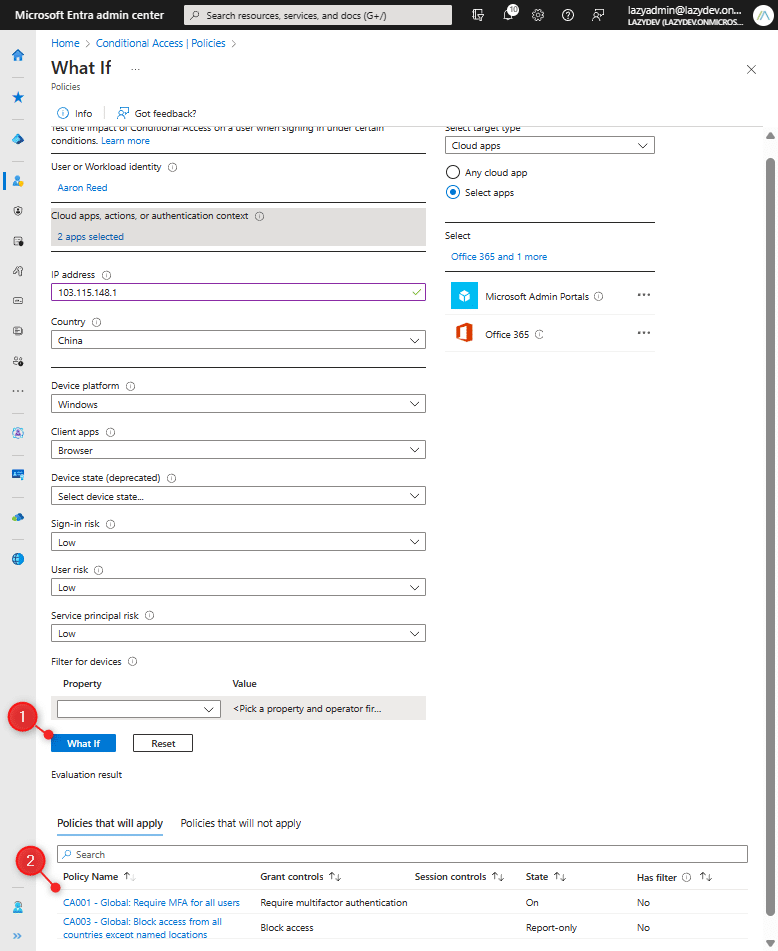
An alternative choice to check new insurance policies is to make use of the What If software in Microsoft Entra. This software means that you can replicate situations and check the impression of your conditional entry insurance policies.
Yow will discover the What If software underneath the Insurance policies web page within the Microsoft Entra > Conditional Entry. It means that you can configure all situations like person, cloud software, location, gadget particulars, sign-in danger, and extra. After you have got configured all of the situations, click on on What If (1) and you will notice which insurance policies are utilized and which aren’t (2)
The final choice is to make use of the Insights and reporting software. This software means that you can higher perceive the impression of your conditional entry insurance policies. To make use of it nevertheless, you’ll need to have an Azure Subscription and allow Log Analytics. Learn extra in this text on learn how to configure and use the software.
Import Insurance policies
Conditional Entry Insurance policies will be exported with PowerShell to JSON recordsdata. This lets you reuse the identical coverage in several tenants. In fact, you continue to might want to replace particular customers and teams, and alter the emergency admin account and named location. However reusing insurance policies will however prevent numerous time.
To import a coverage, merely click on on Add coverage file underneath Conditional Entry > Insurance policies and choose the JSON file. Just be sure you set the coverage state to Report-Solely or Off and click on on Assessment + Create
Finest Practices
In terms of finest practices concerning conditional entry insurance policies a superb place to begin is the Microsoft templates. They supply a superb basis for securing your tenant. Moreover the templates, I’ve another insurance policies that I like to recommend implementing in your tenant
- Block Entry from all nations besides allowed ones
This coverage makes use of a named location with the nations from the place your customers sign-in from. All different nations are blocked. - Block Service Accounts from all places besides Trusted IP addresses
In case you are utilizing service accounts to attach on-premise functions with Microsoft 365, then you may restrict the entry to Trusted IP addresses solely. - Block Friends from all Cloud Apps besides Workplace 365, My Profile, and SharePoint On-line
Friends ought to solely have entry to the apps that they want. These are usually solely Workplace 365, My Profile, and SharePoint On-line. Block entry to all different cloud apps. - Require Compliant gadget for Admins
If in case you have compliance insurance policies in place in your gadgets, then it is best to restrict entry to the admin portals from solely compliant gadgets. - Require Microsoft Entra hybrid joined gadgets
If all of your customers have company-owned gadgets and you’re utilizing an on-premise Energetic Listing, then you may restrict the entry to hybrid joined gadgets. You’ll be able to solely require this for the admin portals or add this as a requirement to vary safety data. - Block Entry from unused platforms
There may be already a template for this coverage, however I like to recommend limiting entry to solely the platforms that your group makes use of. In case your customers don’t use Linux or macOS, then there isn’t a want to permit entry from these gadgets for instance.
If in case you have Entra ID P2, then I like to recommend creating the next insurance policies as properly. These insurance policies use the sign-in and person danger ranges, that are a part of Entra Id Safety. It assigns a danger stage, low, medium, or excessive based mostly on the completely different parameters, like IP Handle and gadget state.
- Block Excessive-Threat sign-in
- Block Excessive Person Threat
- Require MFA for Low and Medium Signal-In
- Require MFA for Low and Medium Person Threat
Wrapping Up
Conditional Entry Insurance policies will be fairly overwhelming, however essential is to start out small. Begin with the baseline and broaden these when every part is operating with out issues. Additionally just be sure you don’t activate too many new insurance policies without delay as a result of that can make troubleshooting lots more durable.
And, I already talked about it a few occasions within the article, exclude your emergency admin account from each coverage, so that you all the time hold entry to your tenant.
I hope this text helped you to get began with conditional entry insurance policies, when you have any questions, simply drop a remark beneath.