


TL;DR: This weblog incorporates the step-by-step procedures for deploying the full-stack internet app constructed with Angular and GraphQL on each IIS and Azure App Service. It covers making ready the appliance and enabling IIS on Home windows, configuring Azure assets, and troubleshooting widespread internet hosting points.
Welcome to our thrilling journey of constructing a full-stack internet utility utilizing Angular and GraphQL. Within the earlier article of this collection, we added the watchlist characteristic to our utility, permitting customers so as to add or take away films from their watchlist. On this article, we are going to study to deploy our MovieApp on each IIS and Azure App Service.
Let’s get began!

Discover Now
Put together the app for deployment
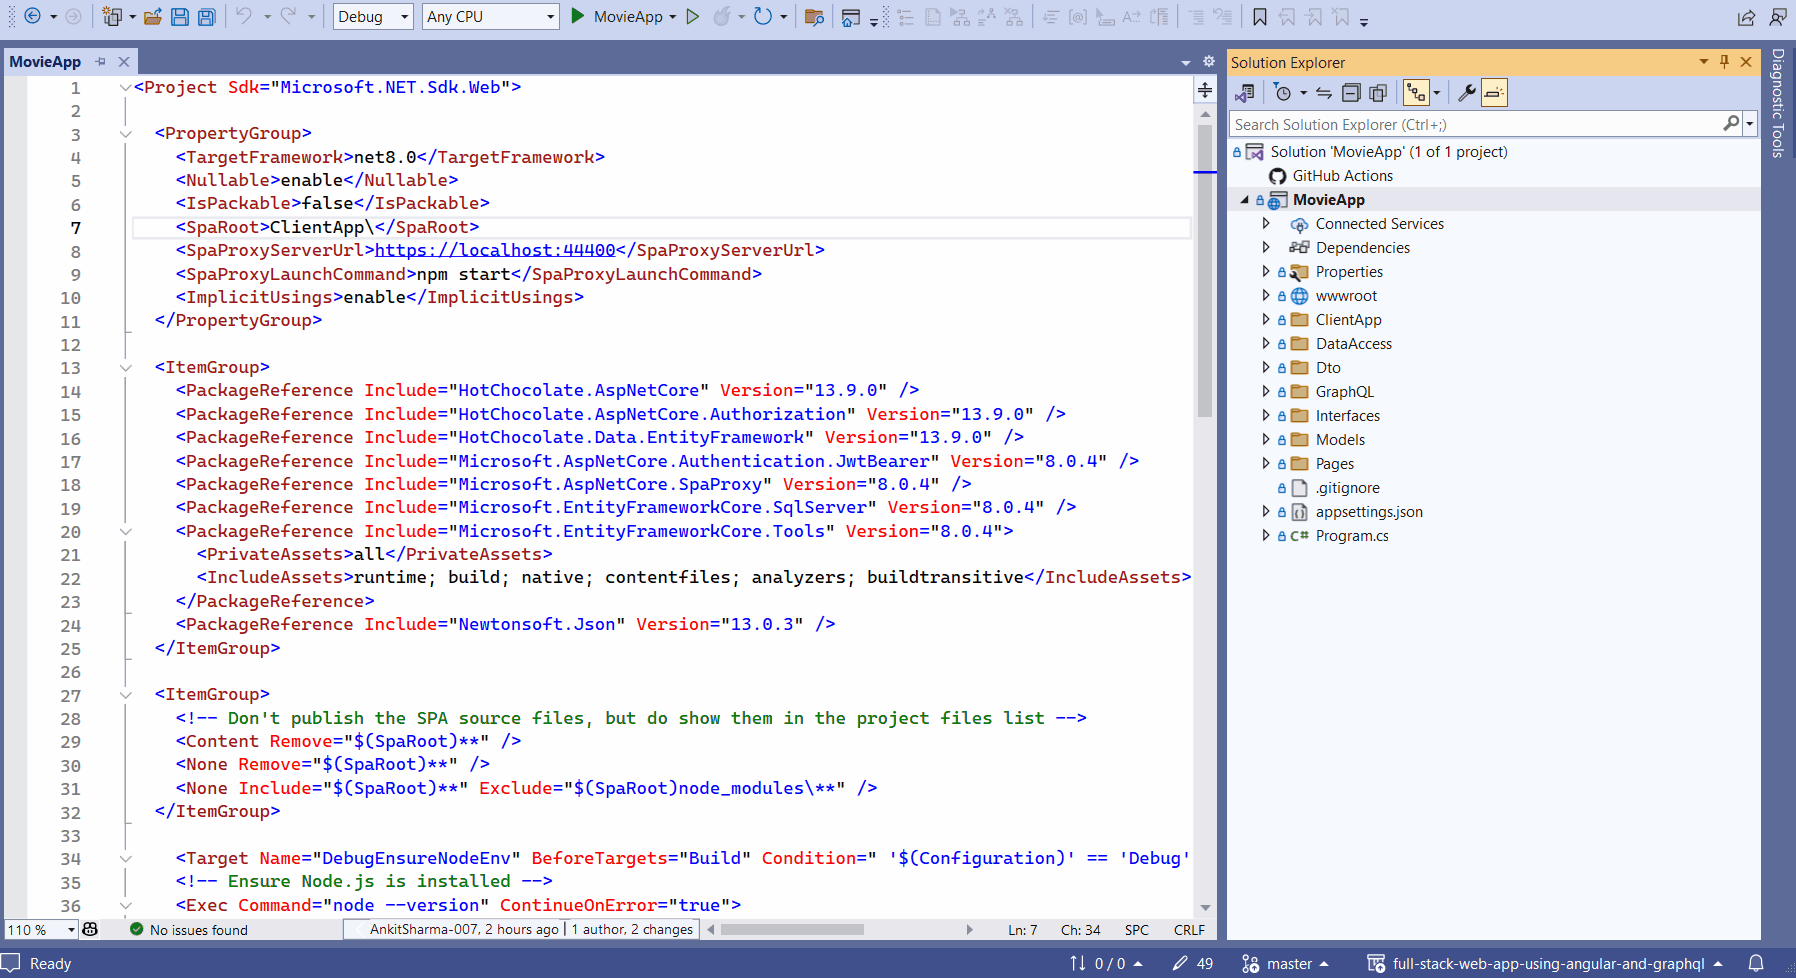
To arrange our app for deployment, we should guarantee it builds efficiently. The Angular app has a price range for the bundle dimension within the angular.json file.
To run the appliance, navigate to the clientApp folder and use the next command.
ng construct
You will note a bundle dimension exceeded error, as proven within the following screenshot.
This error signifies that the present bundle dimension is 4.94 MB, exceeding the allotted 1 MB price range. To resolve this problem, replace the bundle price range to five MB within the angular.json file.
"manufacturing": {
  "budgets": [
    {
      "type": "initial",
      "maximumWarning": "500kb",
      "maximumError": "5mb" // Update this line.
    },
    // Existing code.
  ],
},
Subsequent, replace the GraphQL server endpoint URL within the srcappgraphql.module.ts file. Confer with the next code to replace the URL.
const uri = 'https://localhost:7214/graphql'; // Present code.
const uri = 'graphql'; // replace to this.
We’re internet hosting the GraphQL server and the Angular consumer app on the identical server. In consequence, the bottom URL for the server and consumer will probably be an identical. This modification ensures that our consumer can join with the server utilizing the graphql endpoint identify on the identical base URL.
Nonetheless, in case your GraphQL server and Angular consumer app are hosted on completely different servers, you’ll want to offer the entire GraphQL server URL.
Allow IIS on a Home windows machine
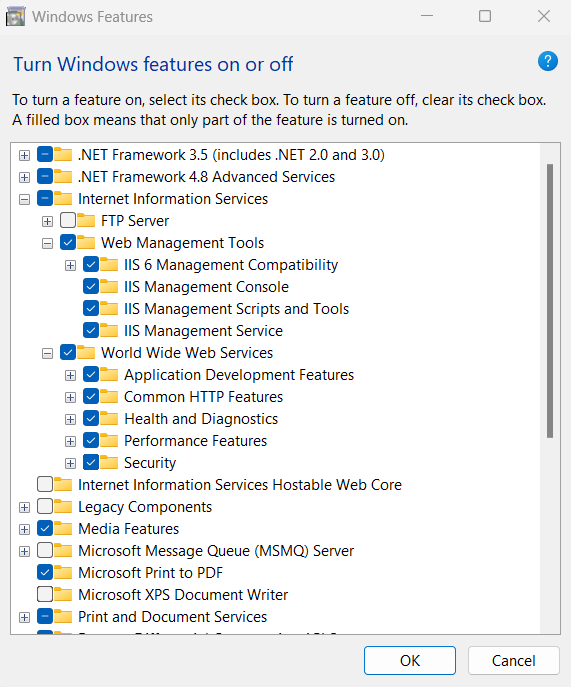
To allow Web Data Providers (IIS) on Home windows 11, comply with these steps:
- Click on on the search icon within the Home windows 11 taskbar.
- Sort options and choose Flip Home windows options on or off. It will open a window the place you may allow varied built-in choices, together with IIS.
- Develop the IIS possibility by clicking on the plus icon. Underneath it, you’ll discover a listing of suboptions.
- Choose all of the choices beneath Internet Administration Instruments & World Extensive Internet Providers. This won’t solely set up IIS but in addition the IIS Administration Console, together with utility options, widespread HTTP options, well being analysis, efficiency, and security measures.
- After choosing these choices, click on OK. Confer with the next picture.
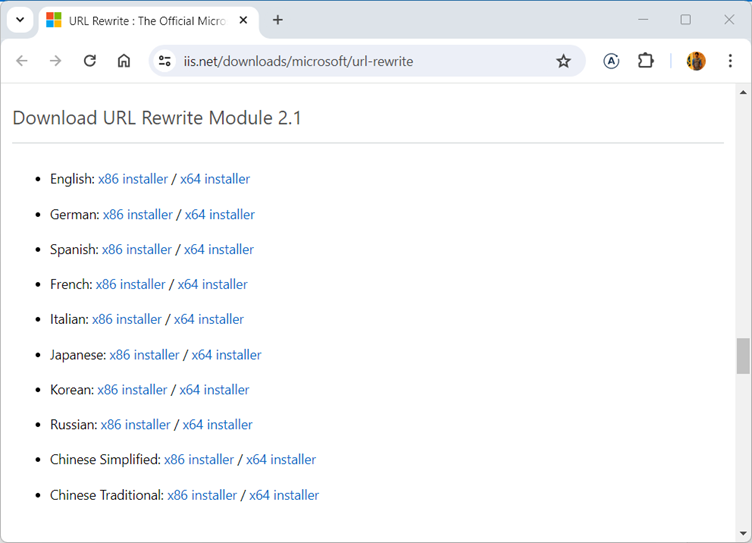
Set up URL rewrite module
The URL rewrite module permits web site directors to create customized guidelines for implementing user-friendly and Web optimization-enhanced URLs. To get began, take a look at the detailed directions within the Microsoft documentation.
Comply with these steps to put in it:
- Navigate to the URL Rewrite obtain web page.
- Scroll all the way down to the Obtain URL Rewrite Module 2.1 part.
- Obtain the installer that matches your most popular language and machine configuration. Confer with the next picture.
Learn Now
Set up the .NET Core internet hosting bundle
To energy your app with the .NET Runtime and IIS help, you’ll want the .NET Core Internet hosting Bundle. First, navigate to the .NET downloads web page and click on on the most recent secure model of .NET. For our app, we’re utilizing .NET 8.0, so choose that possibility.
Confer with the next picture.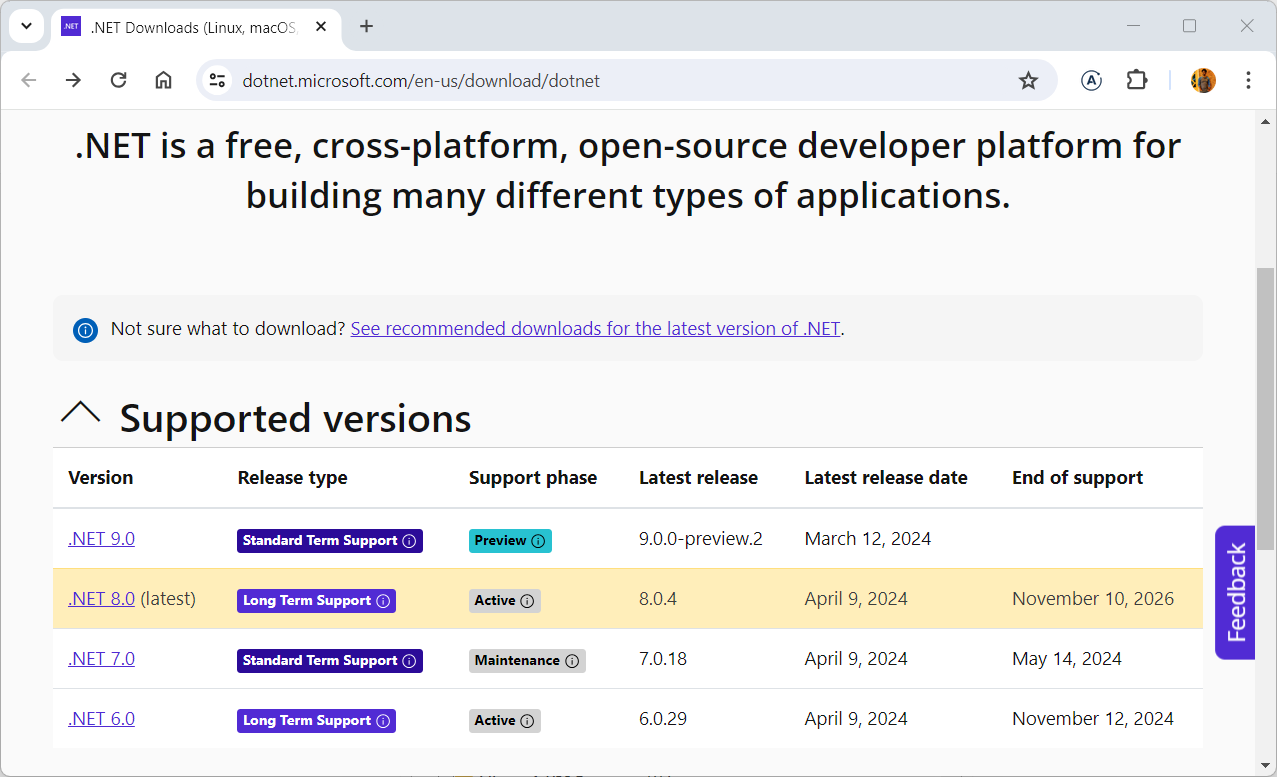
On the obtain web page, you’ll discover a desk beneath the Obtain .NET (Present) heading itemizing .NET variations. Give attention to the Run apps – Runtime column to search out the row for the particular .NET Core runtime model you want.
In that row, beneath the Home windows part, find the Internet hosting Bundle hyperlink. This hyperlink will take you to the obtain web page for the .NET Core Internet hosting Bundle for Home windows.
Confer with the next picture.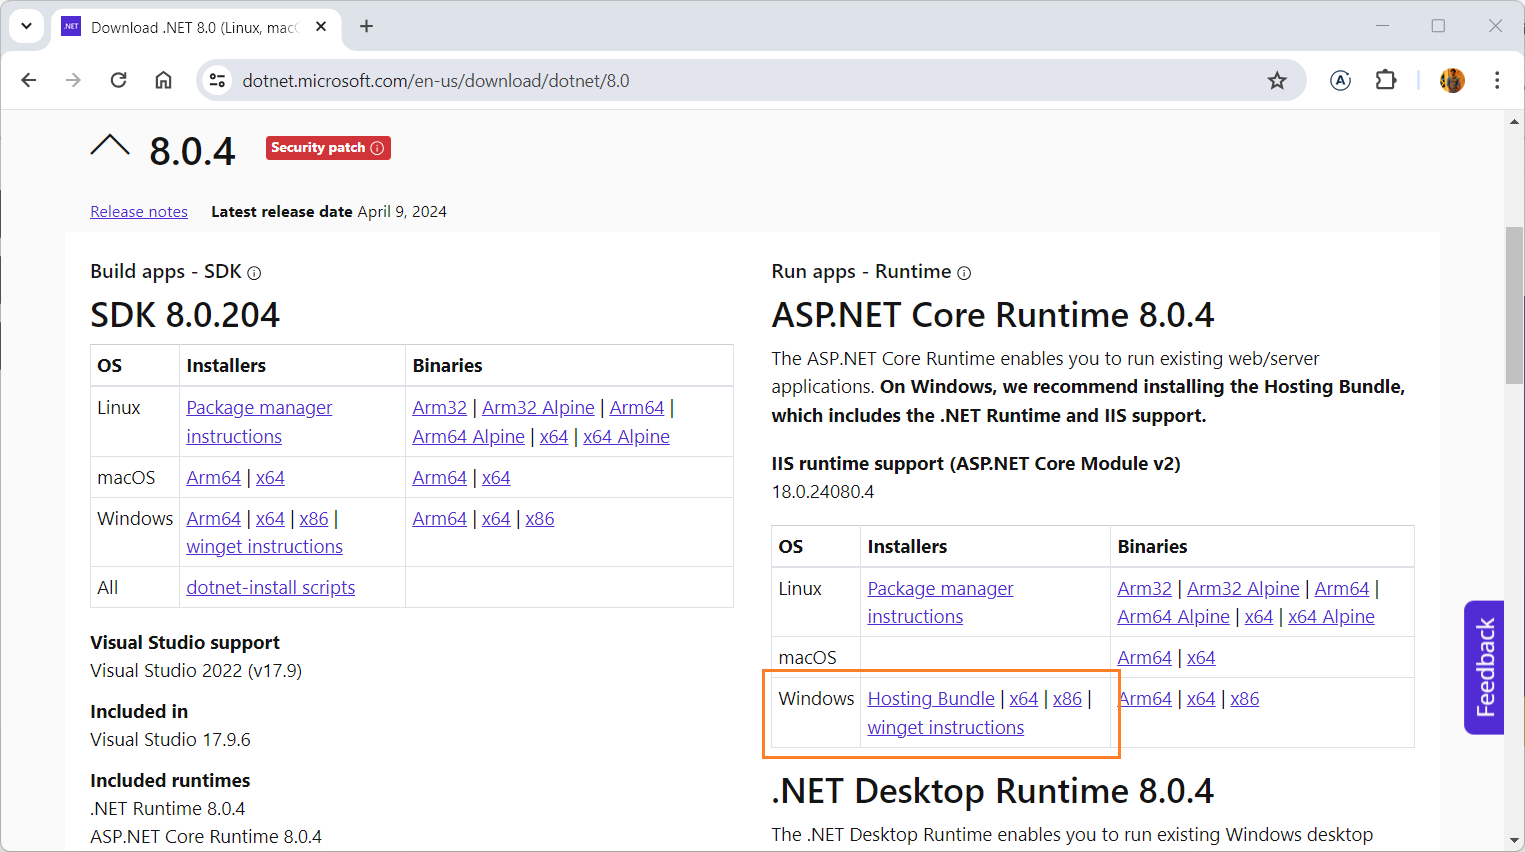
Be aware:
1. Set up the .NET Core internet hosting bundle after putting in IIS.
2. Restart your machine after putting in the .NET Core Internet hosting Bundle.
Publish the MovieApp app to IIS
After establishing IIS and putting in the required dependencies, it’s time to publish the MovieApp mission:
- In your answer explorer, right-click on the MovieApp mission.
- From the context menu, select Publish.
- Within the Publish window, click on on the Folder hyperlink, then click on Subsequent to proceed.
- Within the subsequent window, specify the trail of the folder the place you wish to publish your app. Click on End to verify your choice.
- Lastly, click on Publish on the high of the window to begin the constructing and publishing course of. Confer with the next picture.
If there aren’t any construct errors, the app will probably be efficiently printed to the required folder path.
Configuring IIS
To start out with IIS, open the Home windows 11 search field, kind IIS, and choose Web Data Providers (IIS) to launch the net server supervisor.
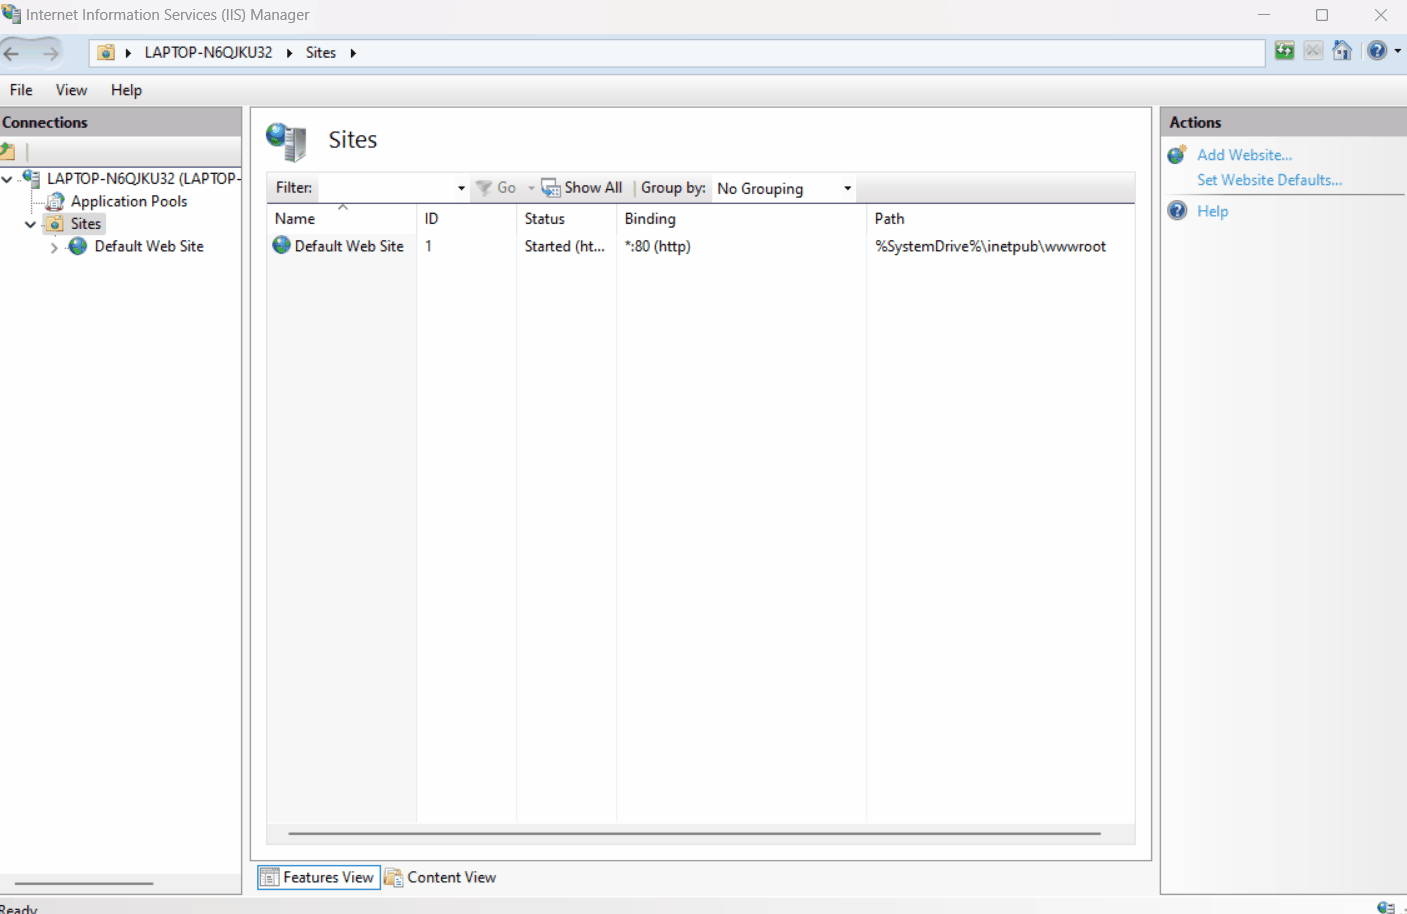
To create a web site:
- Open IIS Supervisor. Proper-click on Websites within the left pane.
- Choose Add Web site.
- Fill within the particulars:
- Web site identify: Enter a reputation in your web site. For this demo, we’ll use MovieApp.
- Bodily path: Present the folder path the place you’ve printed the MovieApp mission.
- Hostname: Specify the URL to entry the app. For this demo, we’ll use movieapp.com.
- Click on OK to create the web site.
Subsequent, you’ll must configure the appliance pool:
- Software swimming pools are robotically created for every web site utilizing the location identify you offered. Find the pool akin to your web site.
- Double-click on the pool. Within the edit Software Swimming pools window, choose No Managed Code from the .NET CLR model dropdown.
- Click on OK to avoid wasting the settings. Confer with the next picture.
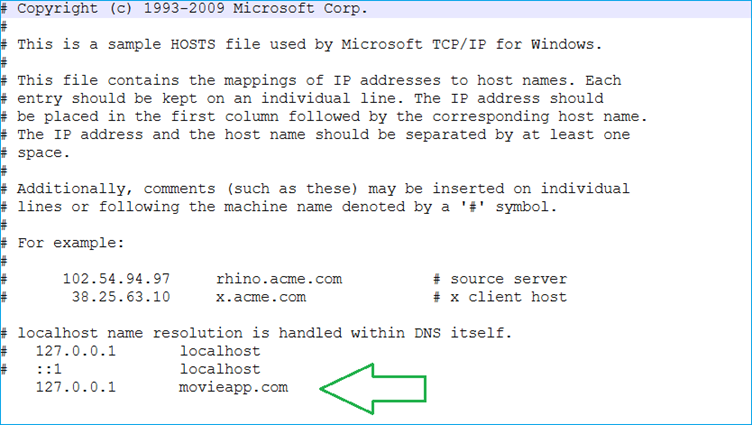
Configure the DNS host
To configure the host file in your machine in Home windows 11, comply with these steps:
- Earlier than modifying the host file, create a backup. This ensures you could restore it if something goes fallacious.
- Launch File Explorer and navigate to C:WindowsSystem32driversetc.
- Copy the host file to a different location for safekeeping.
- Open Notepad as an administrator.
- In Notepad, go to the File menu and select Open (or use the shortcut Ctrl+O).
- Paste the host file path (C:WindowsSystem32driversetchosts) into the File identify discipline within the Open dialog field. Press Enter to open the hosts’ file.
- As soon as the host file is open in Notepad, scroll to the top of the file and add a brand new line.
127.0.0.1 movieapp.com
- After including this line, save the file. Confer with the next picture.
Execution demo
After executing the earlier code examples, open a browser and navigate to the URL http://movieapp.com/. You will note the output as proven within the following picture.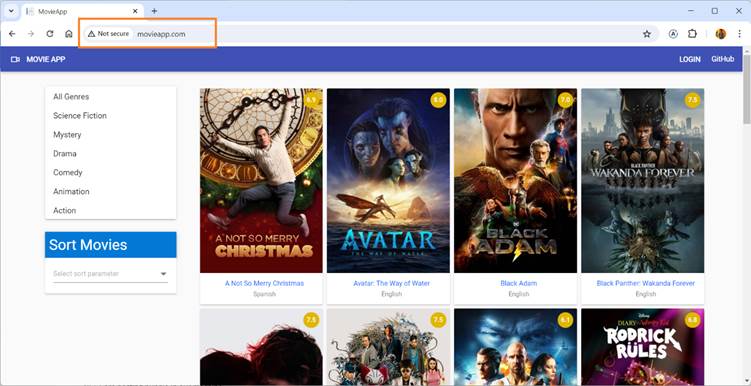
Troubleshooting widespread internet hosting points with IIS
Let’s handle the widespread points associated to internet hosting a .NET app.
Attempt Now
DNS Not Discovered Error
If you happen to encounter a DNS not discovered error when making an attempt to open your web site, strive the next:
- Confirm that the hostname (URL) is accurately configured within the host file positioned at C:WindowsSystem32driversetchosts.
- Guarantee your machine will not be related to any VPN server, as it would intervene with DNS decision.
- If you happen to’re utilizing an online proxy, briefly disable it and check out accessing the web site once more.
HTTP error 500.19 – inside server error
This error happens on account of invalid configuration information. To resolve it:
- Guarantee correct permissions for the publish folder (the place your app resides).
- Grant learn permission to the IIS_IUSRS group within the publish folder to entry the Internet.config file and different needed recordsdata.
500 inside server error with information not populated
Your web site hundreds, however information isn’t populated, and also you encounter a 500 inside server error. To resolve this:
- Be certain that your database connection string is within the right format.
- The consumer ID specified within the connection string ought to have each db_datareader and db_datawriter
- If the problem persists, contemplate offering the consumer with db_owner permission to troubleshoot.
Be aware: If you happen to republish the app, keep in mind to refresh your web site and the appliance pool in IIS.
With these points addressed, we’ve efficiently deployed the app to IIS. Now, let’s see how one can deploy it to Azure App Service.
Attempt It Free
Create a SQL Server useful resource on the Azure portal
Earlier than continuing, guarantee you might have an Azure subscription account.
Step 1: Create SQL Server on Azure
We are going to create an SQL Server on Azure to deal with our database operations.
Comply with these steps:
- Open the Microsoft Azure portal.
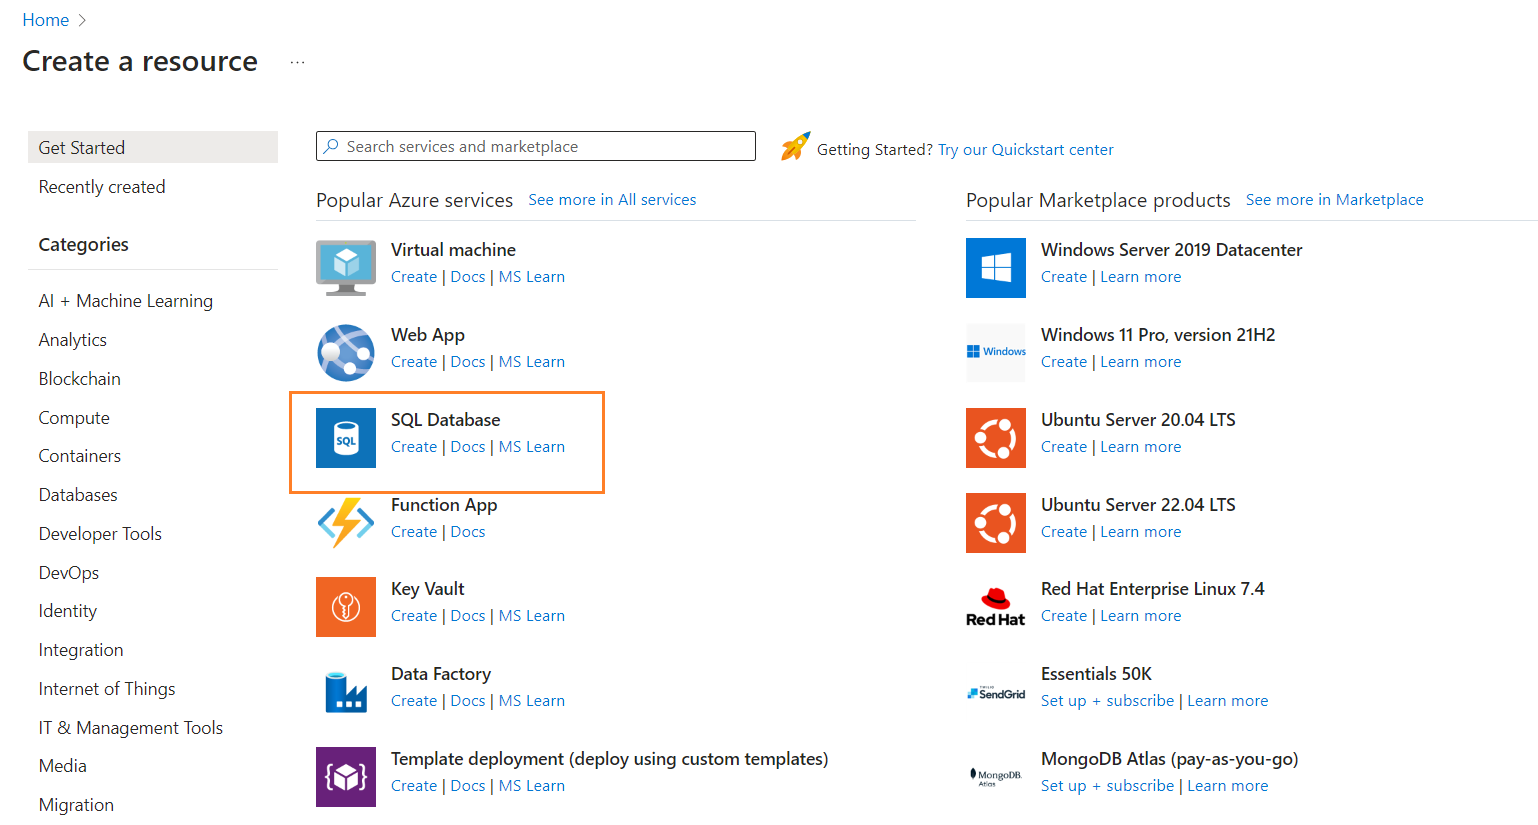
- Click on Create a useful resource.
- Find the SQL Database useful resource and click on Create. Confer with the next picture.
Step 2: Fill in SQL Database particulars
A brand new web page with the title “Create SQL Database” will seem. On this web page, you may be requested to furnish the small print in your SQL database.
Present the small print within the fundamentals tab as follows:
- Subscription: Select your Azure subscription kind from the dropdown menu.
- Useful resource group: You could have two choices:
- Choose an Present Useful resource Group: If you have already got a useful resource group, decide it from the listing.
- Create a New Useful resource Group: If you happen to don’t have one, click on Create new and supply a reputation in your new useful resource group (e.g., myResourceGroup).
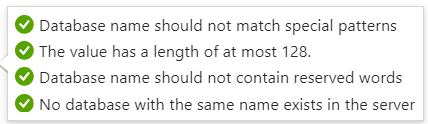
- Database identify: Assign a novel identify to your database, making certain that the identify adheres to the next validation standards.
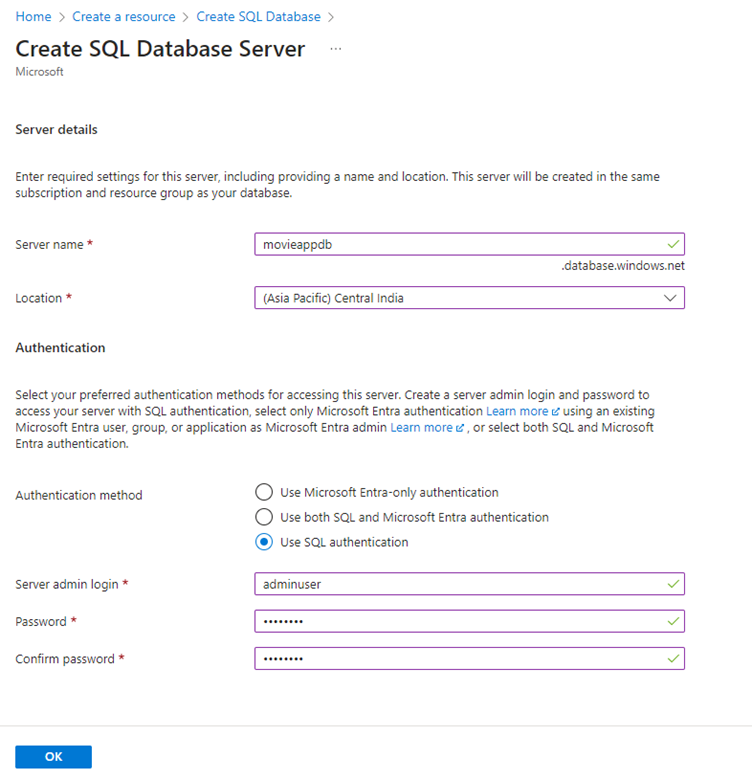
Step 3: Server configuration
Click on on Create new to arrange a brand new server in your database. Within the subsequent window, present the next particulars.
- Server identify: Select a novel server identify (e.g., movieappdb). Be certain that server names should be globally distinctive throughout all Azure servers.
- Location: Choose a location from the dropdown listing.
- Authentication methodology: Choose an authentication methodology in line with your necessities. On this demo, we are going to use SQL authentication.
- Server admin login: Set a username (e.g., adminuser).
- Password: Create a password that meets the necessities and ensure it. Confer with the next picture to grasp the server configuration.
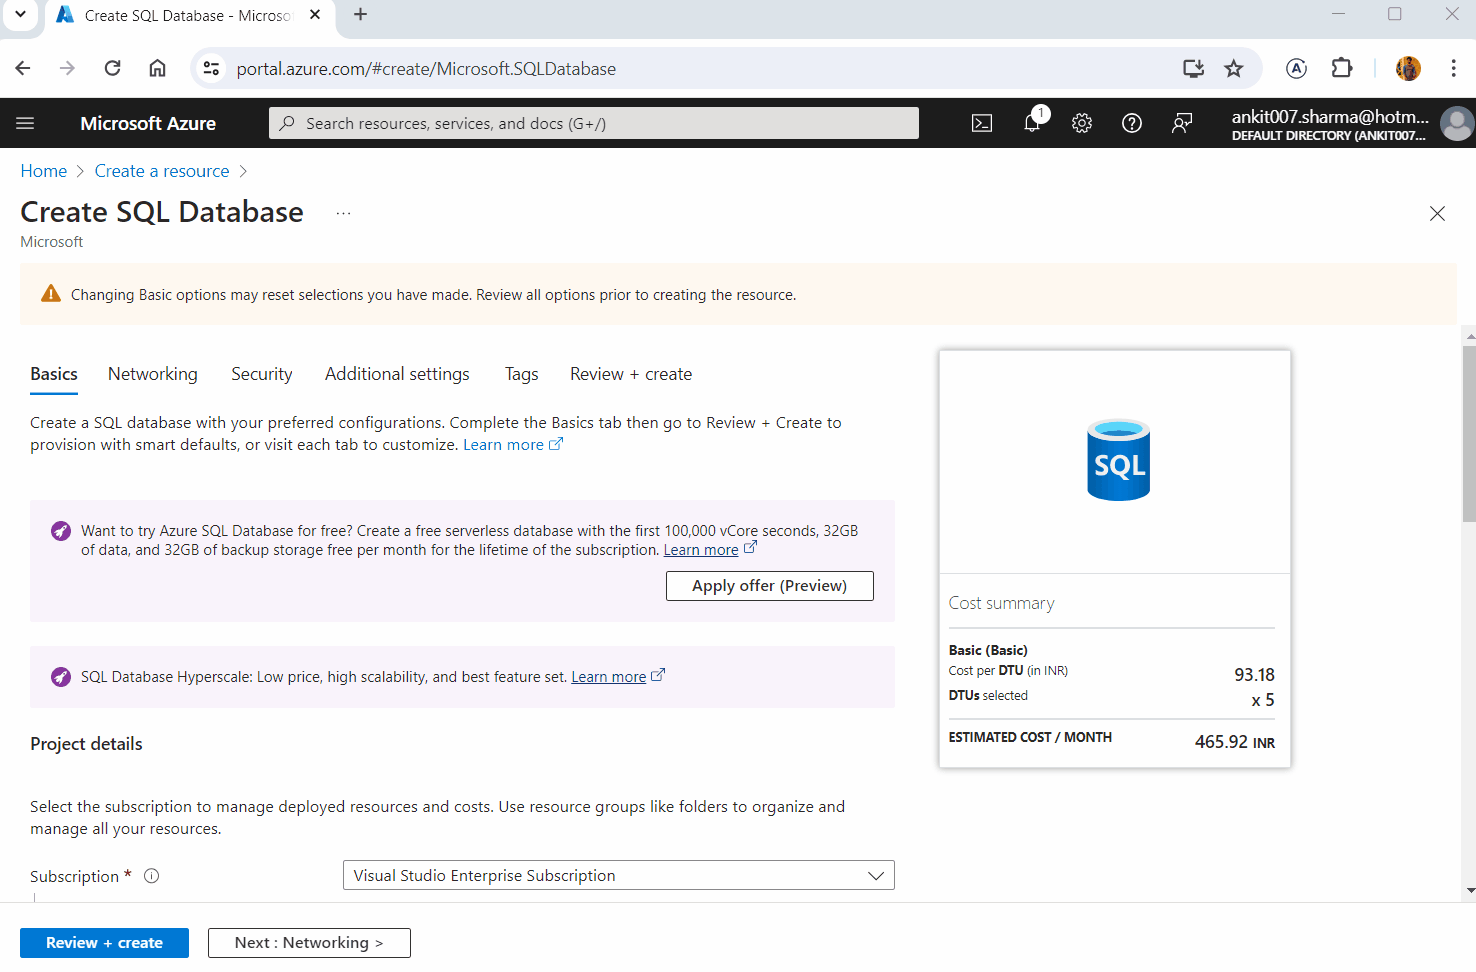
Step 4: Configure database efficiency and storage
- Click on on Configure database. Within the subsequent window, choose the specified service tier possibility from the dropdown.
- Click on Subsequent till you attain the Assessment + create tab.
- Lastly, click on Create on the backside of this tab to provoke the creation of your SQL database. Confer with the next picture.
Discover Now
Replace the connection string within the utility
Along with your database now created, the subsequent step is to arrange entry so to hook up with it out of your native machine and different Azure assets, just like the Azure App Service.
To permit the required entry to the database:
- Click on Set Server Firewall on the high of the web page.
- Underneath the Public entry tab, choose Chosen networks.
- Scroll all the way down to the Exceptions part. Examine Enable Azure companies and assets to entry this server checkbox.
- Click on Save on the backside.
To hook up with this database, you will want a connection string. First, click on on Connection strings within the Settings menu on the left aspect of the web page. Then, choose the ADO.NET tab and replica the offered connection string.
Confer with the next picture.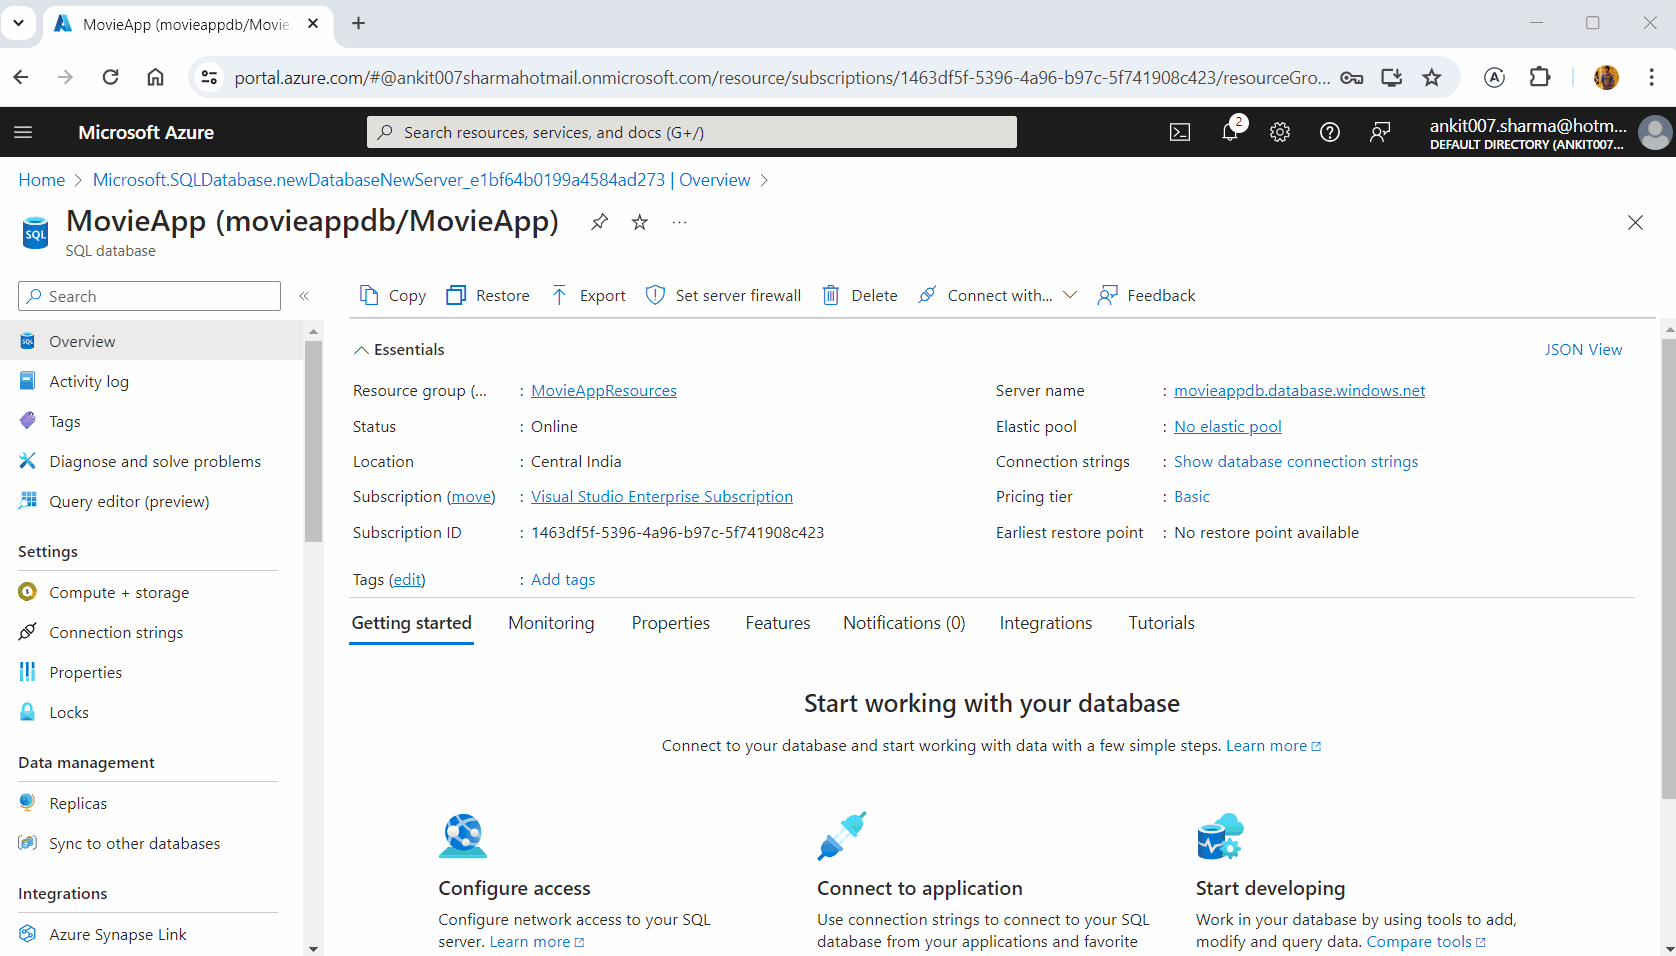
Subsequent, open the appsettings.json file in your mission and change the present native database connection string with the connection string of Azure SQL Server.
Confer with the next code.
"ConnectionStrings": {
      "DefaultConnection": "Server=tcp:moviedbserver.database.home windows.internet,1433;Preliminary Catalog=MovieDB;Persist Safety Data=False;Person ID={YourUserID};Password={YourPassword};MultipleActiveResultSets=False;Encrypt=True;TrustServerCertificate=False;Connection Timeout=30;"
  },
Creating database objects for Azure SQL Database
In Azure SQL Database, the tables wanted for our utility aren’t robotically created. Let’s stroll by the method of making them.
Step 1: Connect with Azure SQL server
Launch the SQL Server Administration Studio and hook up with your Azure SQL Server by offering the next particulars:
- Server identify: Use the server identify from the connection string.
- Authentication: Select SQL Server authentication.
- Login: Enter the server’s consumer ID.
- Password: Present the password related to the server.
- Click on Join to proceed.
Step 2: Organising firewall guidelines
When connecting out of your native machine, you’ll be prompted to arrange a firewall rule. Comply with the steps talked about beneath:
- Log in together with your Azure account credentials.
- Choose Add my consumer IP handle.
- Click on OK to verify.
Confer with the next picture.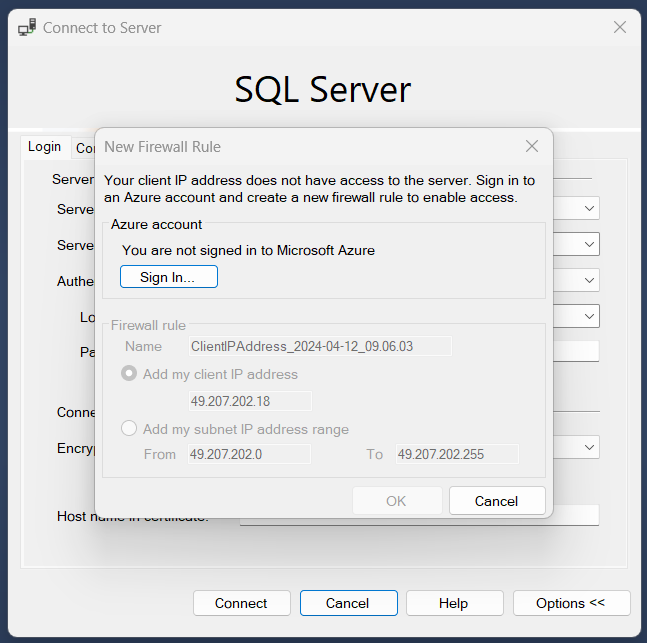
Step 3: Creating tables
As soon as related, create all the required tables within the database. The SQL scripts for desk creation are within the Configure the database part of Half 1 of this collection. Execute these scripts to generate the tables.
Step 4: Operating the appliance
Now, launch the appliance from Visible Studio. Initially, it is going to show no film information, however you may view style information. Confer with the next picture.
Attempt Now
Publish the MovieApp app to Azure
To publish your MovieApp mission:
- Proper-click on the MovieApp mission in your answer explorer.
- Choose Publish from the context menu. This motion will open a Publish window.
- Within the Publish window, select Azure and click on Subsequent.
- You’ll be prompted to hook up with your Azure account from Visible Studio. As soon as the login is profitable, it is going to ask you to pick out the Azure service to host the appliance. Select Azure App Service (Home windows) and click on Subsequent.
- The subsequent window will show all of the app companies related together with your account. Since we wish to create a brand new app service for this app, click on Create New.
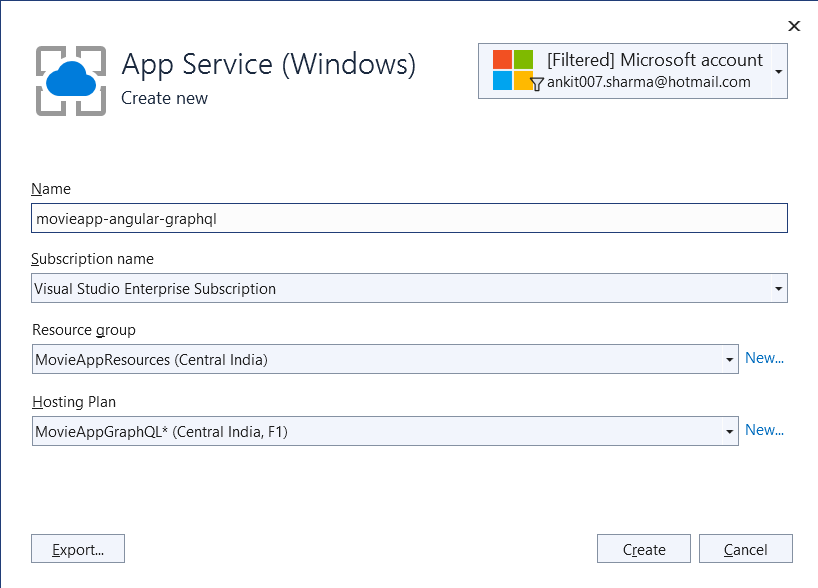
Within the new window, present the next particulars in your app service:
- Identify: Select a reputation that’s universally distinctive and never utilized by anybody else.
- Subscription identify: Choose the suitable subscription out of your account configuration.
- Useful resource group: Select a useful resource group or create a brand new one.
- Internet hosting Plan: You’ll be able to both choose an present plan or create a brand new one. Confer with the next picture.
Then, click on Create to provoke the creation of your Azure App Service occasion. As soon as the app service is created, choose its identify and click on End.
On the subsequent web page, overview all of the offered info. Click on Publish on the high to begin constructing and publishing your app. After the publication is profitable, the URL will robotically launch in your machine’s default browser.
The web site URL will probably be <app service identify>.azurewebsites.internet, and the webpage appears like the next picture.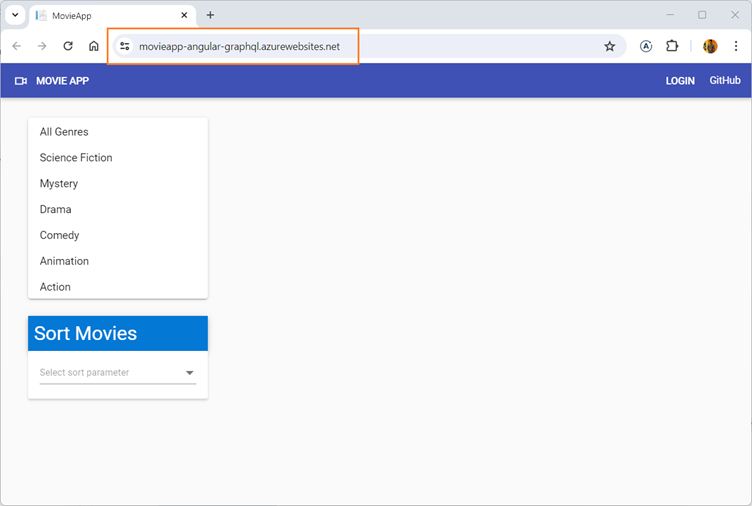
Because the database tables are empty, no information is displayed on the web page. To right this, add an entry for the Admin consumer within the UserMaster database, as described within the Replace the database part of Half 5 of this collection.
Log in because the admin consumer to entry the app and add some film information to populate the database tables. When you’ve added information, you may validate that the app is works as anticipated.
Execution demo
The applying created on this collection of articles is offered at MovieApp.
GitHub useful resource
For extra particulars, confer with the entire supply code for the full-stack internet app with Angular and GraphQL on GitHub.
Attempt It Free
Abstract
Thanks for studying this text. In it, we realized to configure the IIS on a Home windows machine and deploy a full-stack .NET app on it. We created an SQL Server database on Azure and configured it for use because the database supplier in our app. Lastly, we deployed the app on the Azure app service.
Whether or not you’re already a valued Syncfusion consumer or new to our platform, we prolong an invite to discover our Angular elements with the comfort of a free trial. This trial permits you to expertise the complete potential of our elements to boost your app’s consumer interface and performance.
Our devoted help system is available in case you want steering or have any inquiries. Contact us by our help discussion board, help portal, or suggestions portal. Your success is our precedence, and we’re all the time delighted to help you in your growth journey!