

If you’re a front-end developer who labored with a CSS pre-pre-processor, then you definately’ve most likely come throughout or used the nesting characteristic. It has been a well-liked characteristic and for me, it’s been one of many options that saved me utilizing a CSS preprocessor..
This yr, native CSS nesting received supported in all main browsers: Chrome, Firefox, and Safari. This can be a main CSS characteristic that can make it simpler to jot down CSS. On this article, I’ll doc what I realized to date about CSS nesting and share my findings with you, together with use circumstances and examples.
There is no such thing as a prerequisite to observe alongside besides to your pleasure and focus.
Introduction
Nesting in CSS has been one of many long-awaited options for a lot of builders. We used to depend on CSS pre-processors like Sass or Much less. Let me provide you with a fast overview:
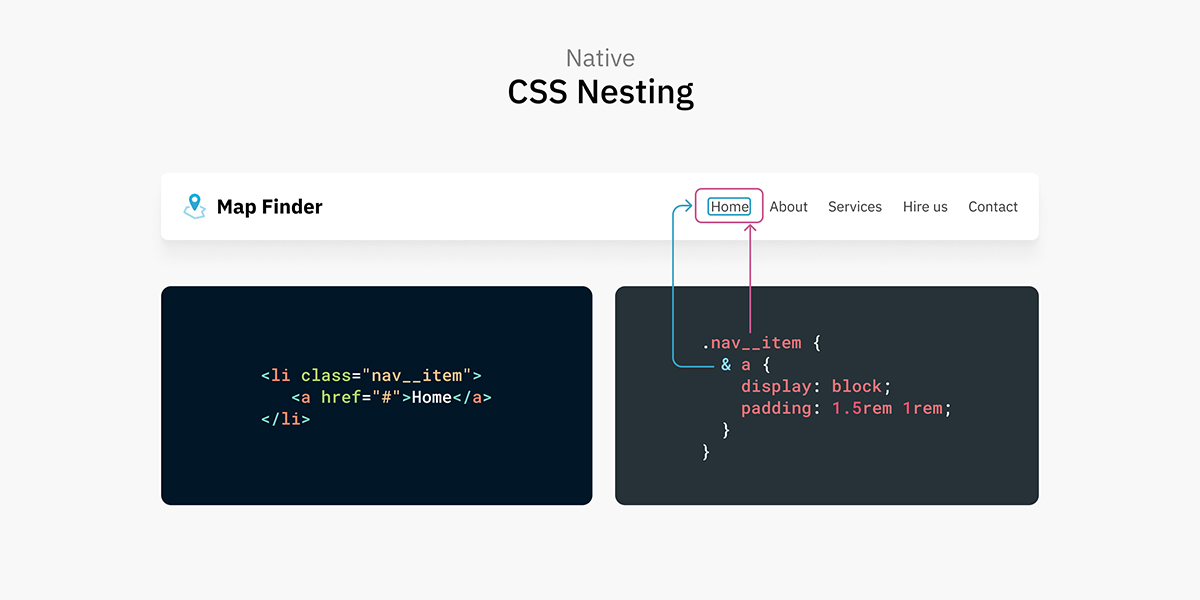
Think about the next instance. We’ve got an icon that’s nested throughout the selector .nav__item.
.nav__item {
  .icon {
    show: flex;
    padding: 1rem;
  }
}
The above is a sound Sass code. When compiled, it can appear to be the next to the browser:
.nav__item .icon {
show: flex;
padding: 1rem;
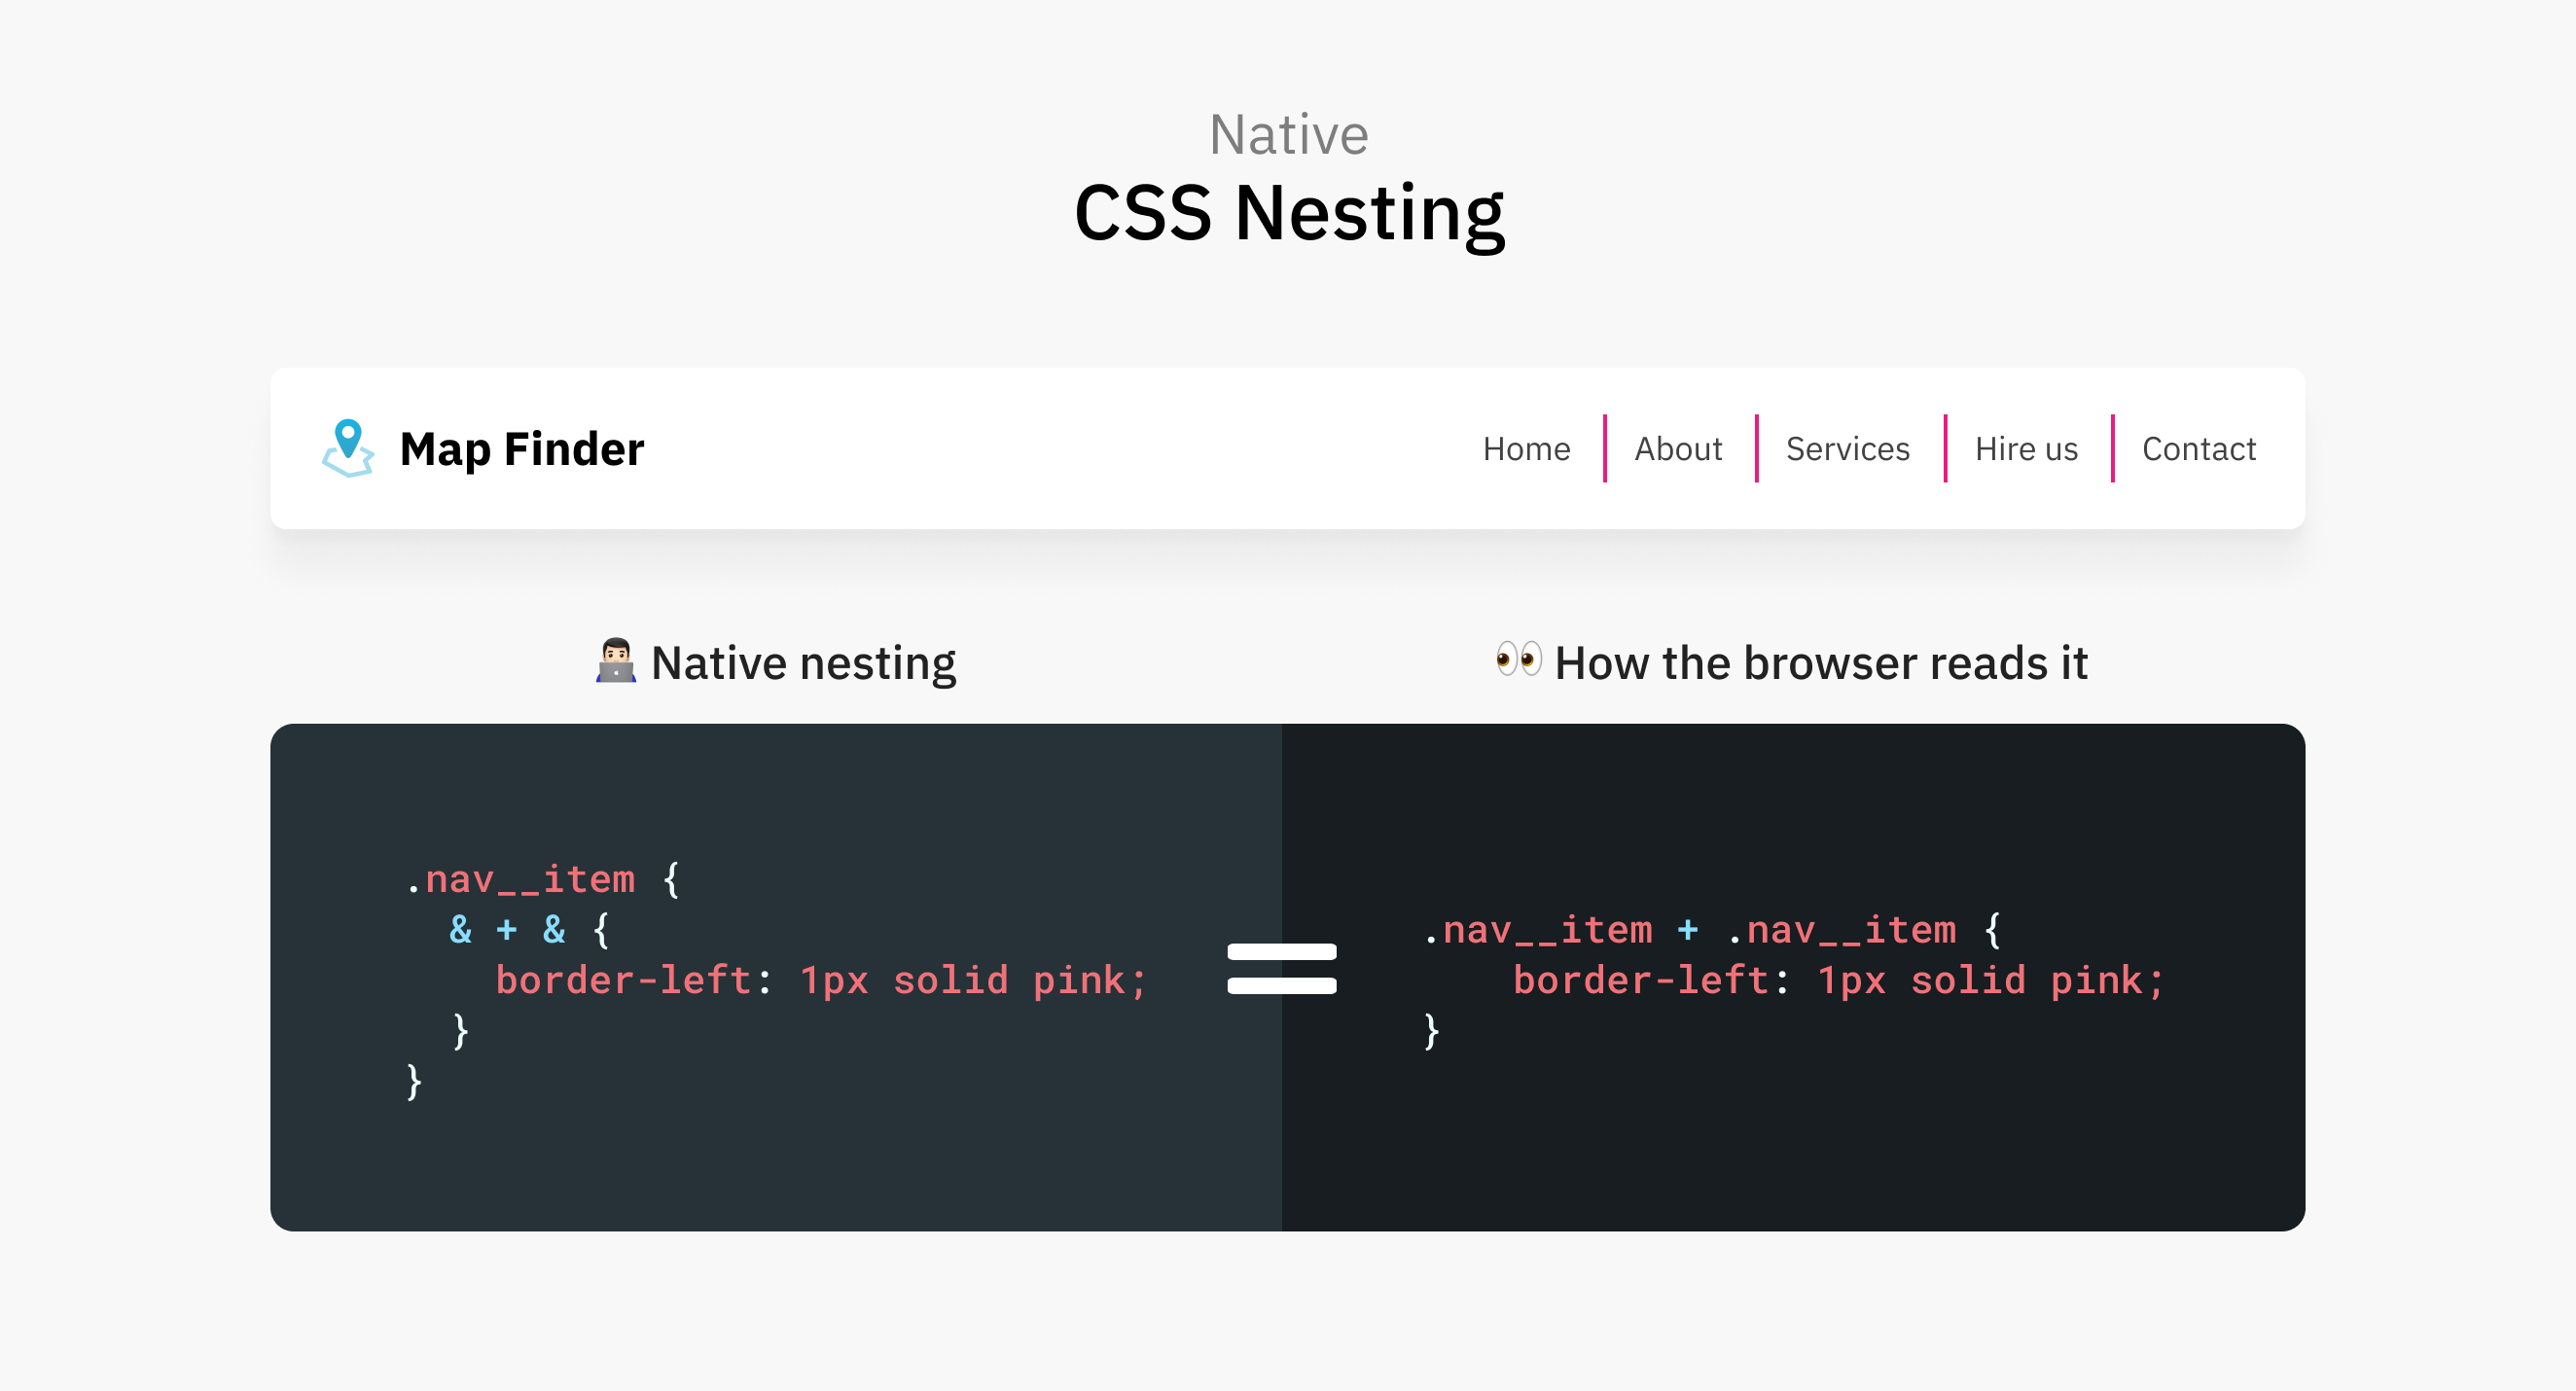
}With native CSS nesting, the identical CSS will work as is. Here’s a determine that reveals a comparability between native CSS nesting and the browser DevTools.
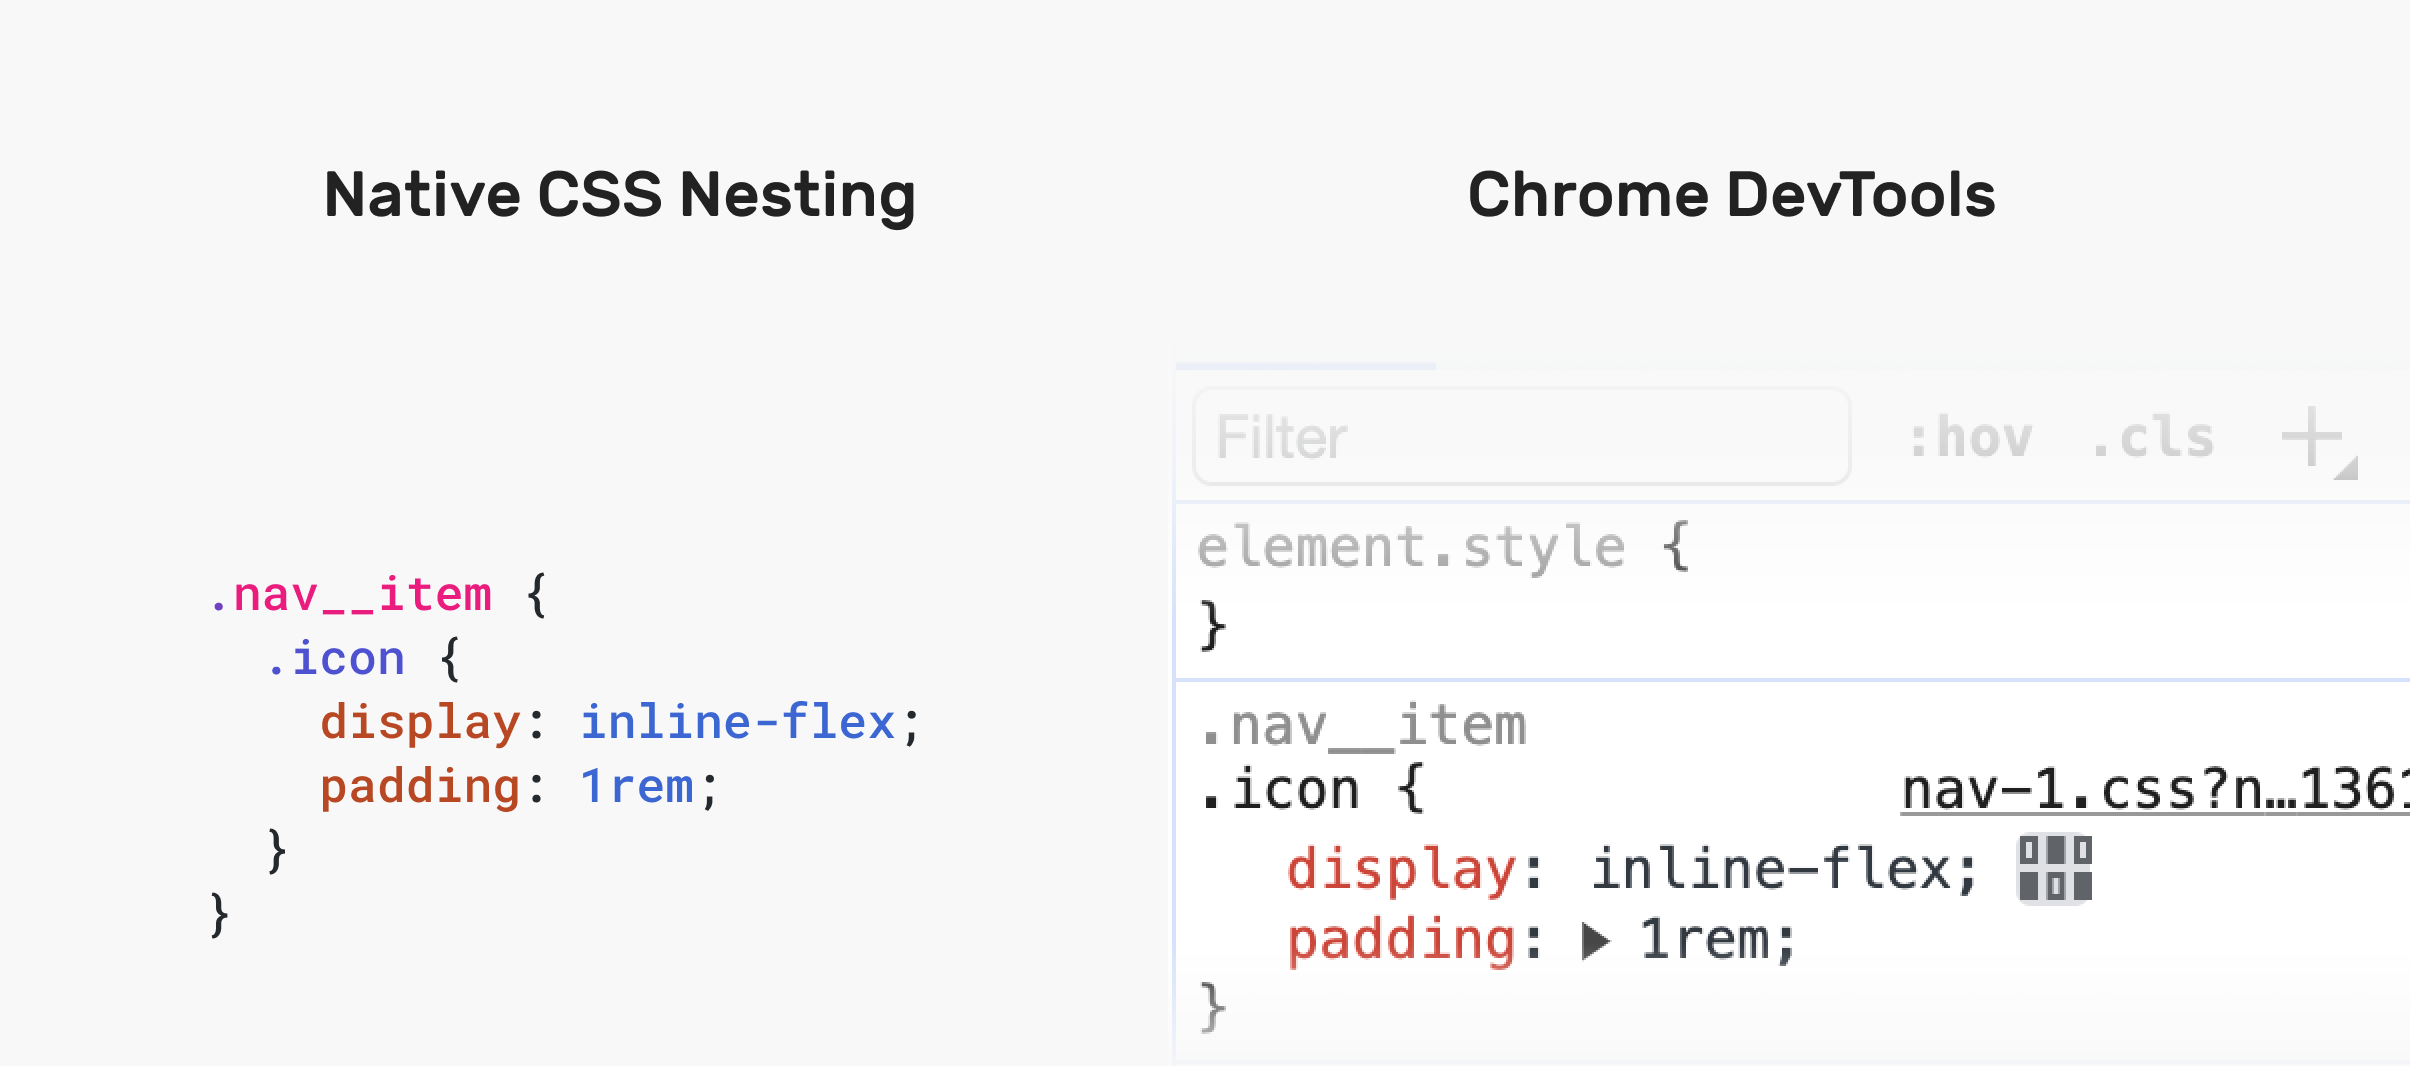
Discover how the browser is displaying the CSS comparable (nearly) to the way it’s displayed within the CSS.
If this CSS was compiled in Sass, the browser will present it like this:

Advantages of CSS nesting
There are some legitimate causes in my view which makes nesting CSS helpful:
- Simpler to learn CSS.
- Grouping type collectively.
- Scoping particular kinds.
- Styling HTML parts that don’t have a category or ID.
CSS nesting guidelines
To teach you about CSS nesting, I’ll attempt to present visible examples of various CSS issues and the way nesting may help resolve them.
To start with, it is advisable to study in regards to the ampersand image &. There are a number of circumstances the place this image is important.
Nesting a component and not using a class or ID
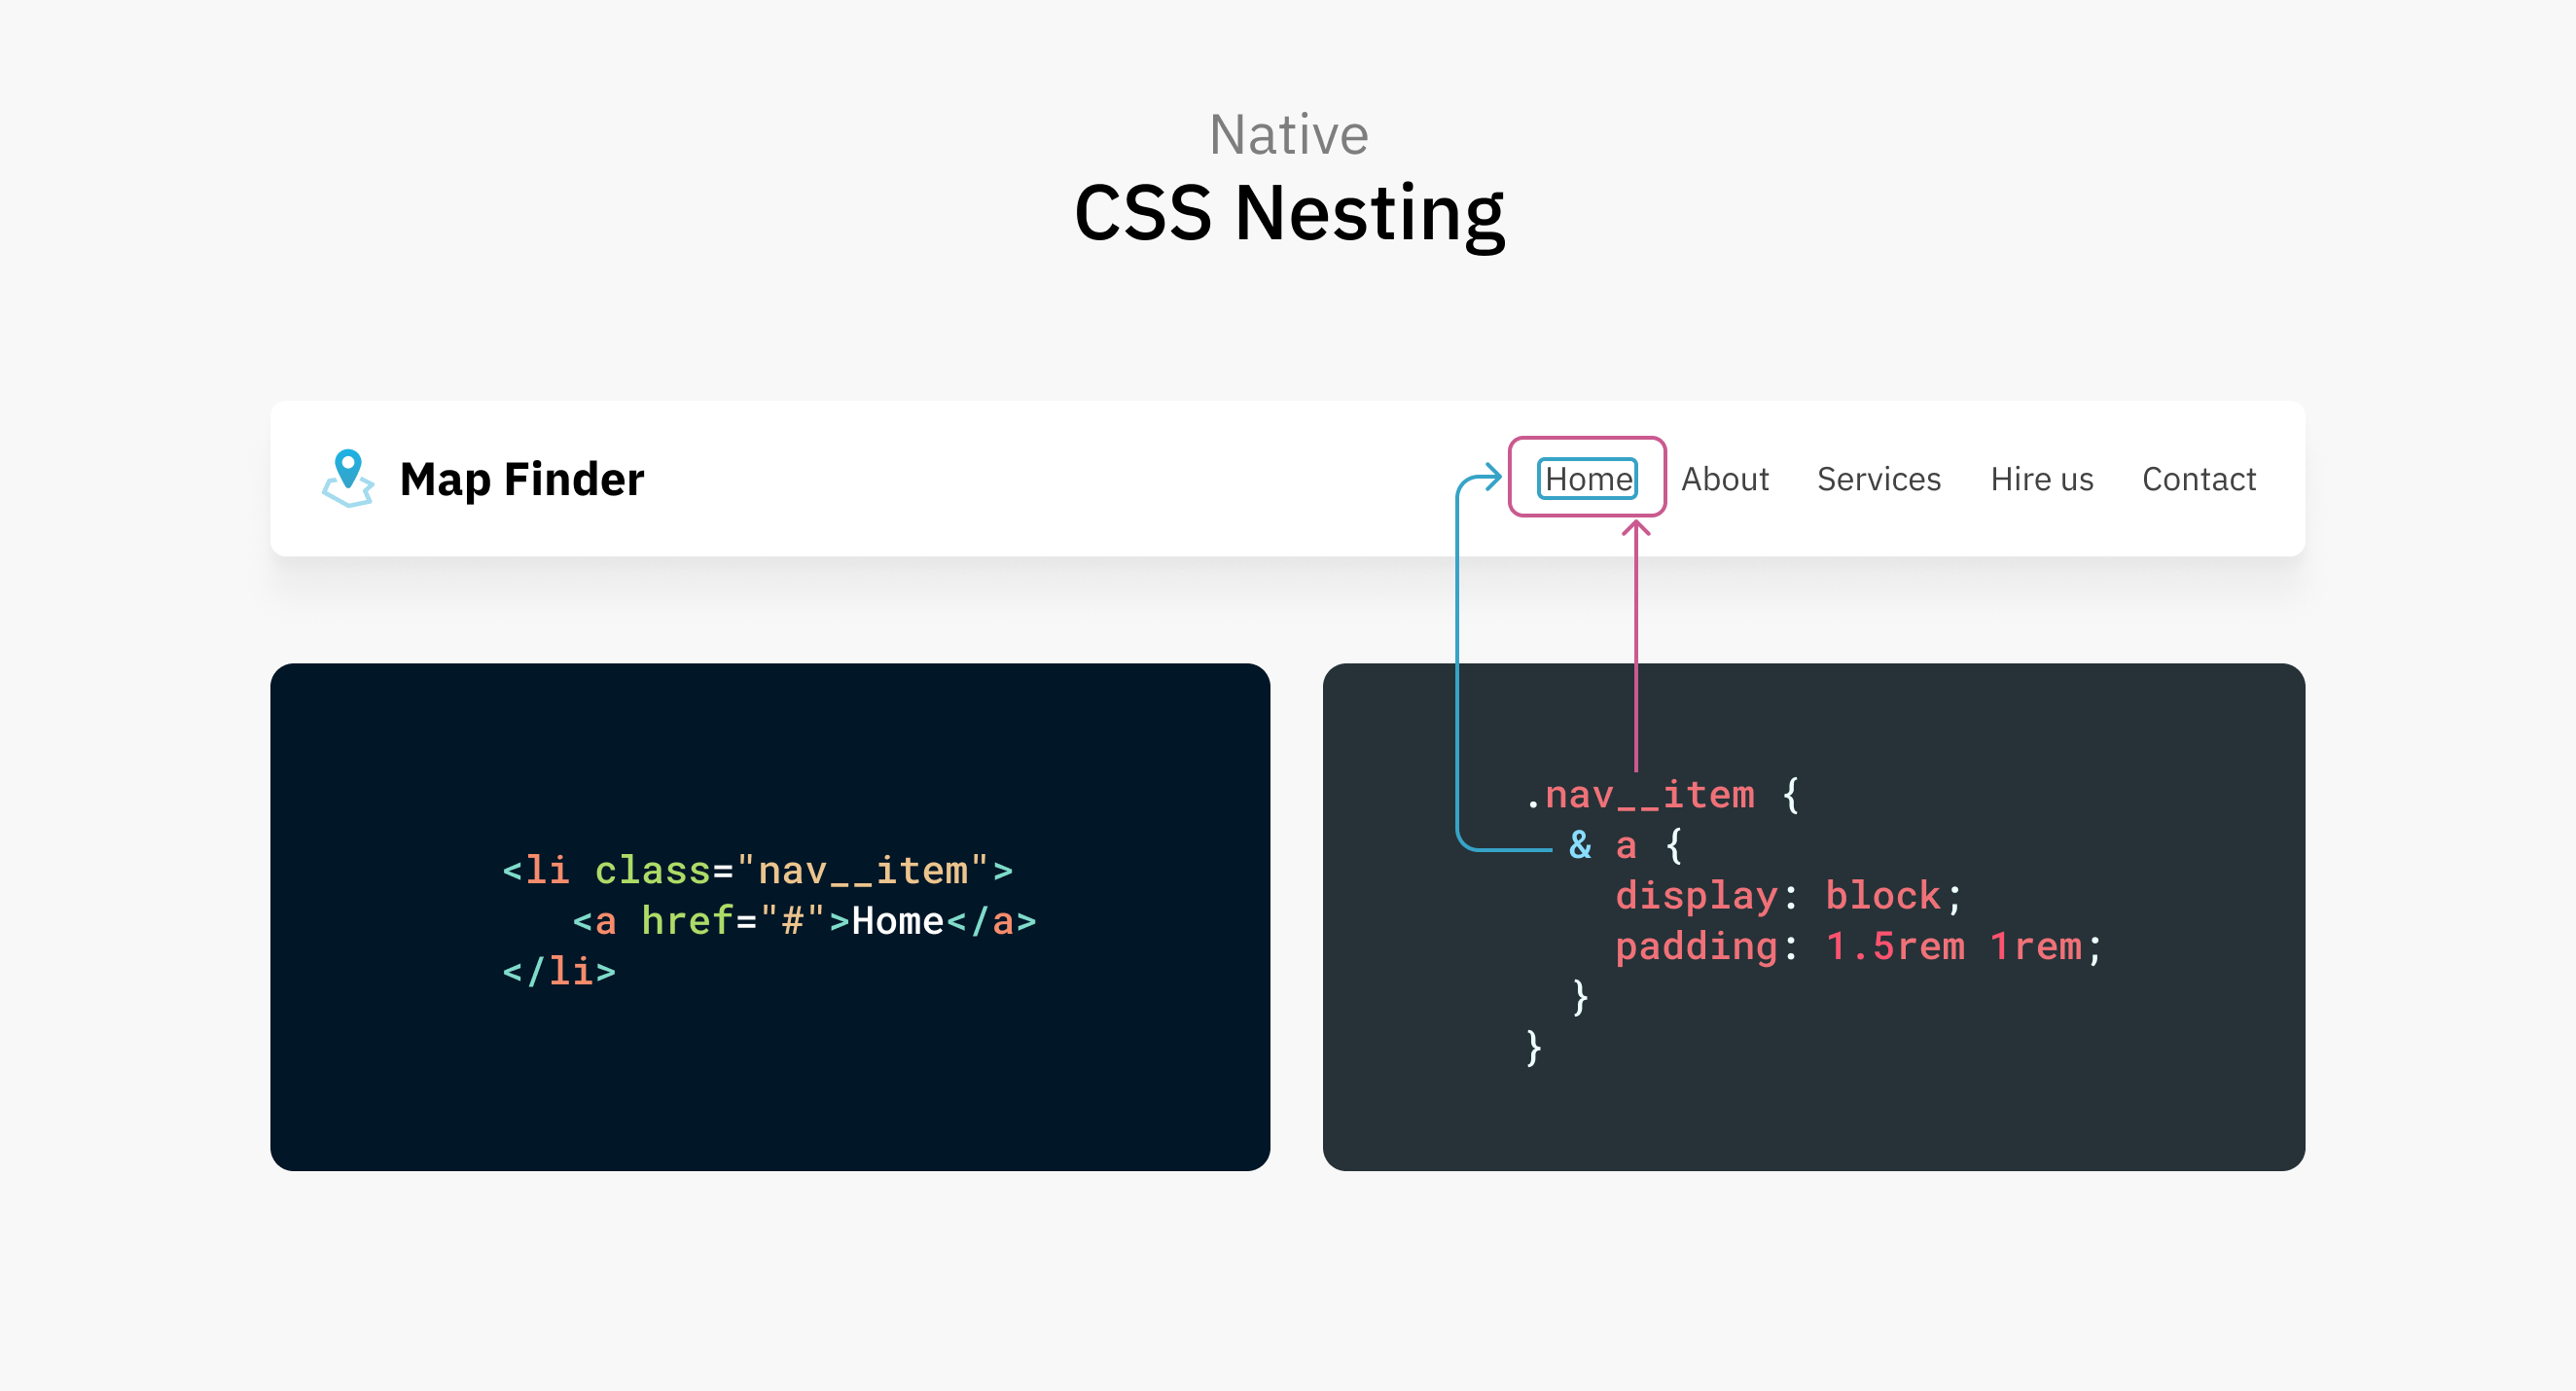
On this instance, the <a> ingredient is styled through the .nav__item. Utilizing the ampersand image is non-obligatory for the CSS to be legitimate.
.nav__item {
  & a {
    show: block;
    padding: 1.5rem 1rem;
  }
}


.nav__item a {
}
It’s also possible to decide out of the ampersand:
.nav__item {
  a {
    show: block;
    padding: 1.5rem 1rem;
  }
}


.nav__item a {
}
Word that this can be a current replace and known as Relaxed CSS nesting. It really works within the newest Chrome Canary and Safari Know-how Preview. Take a look at this put up on relaxed nesting by Adam Argyle.
Nesting a component with a category
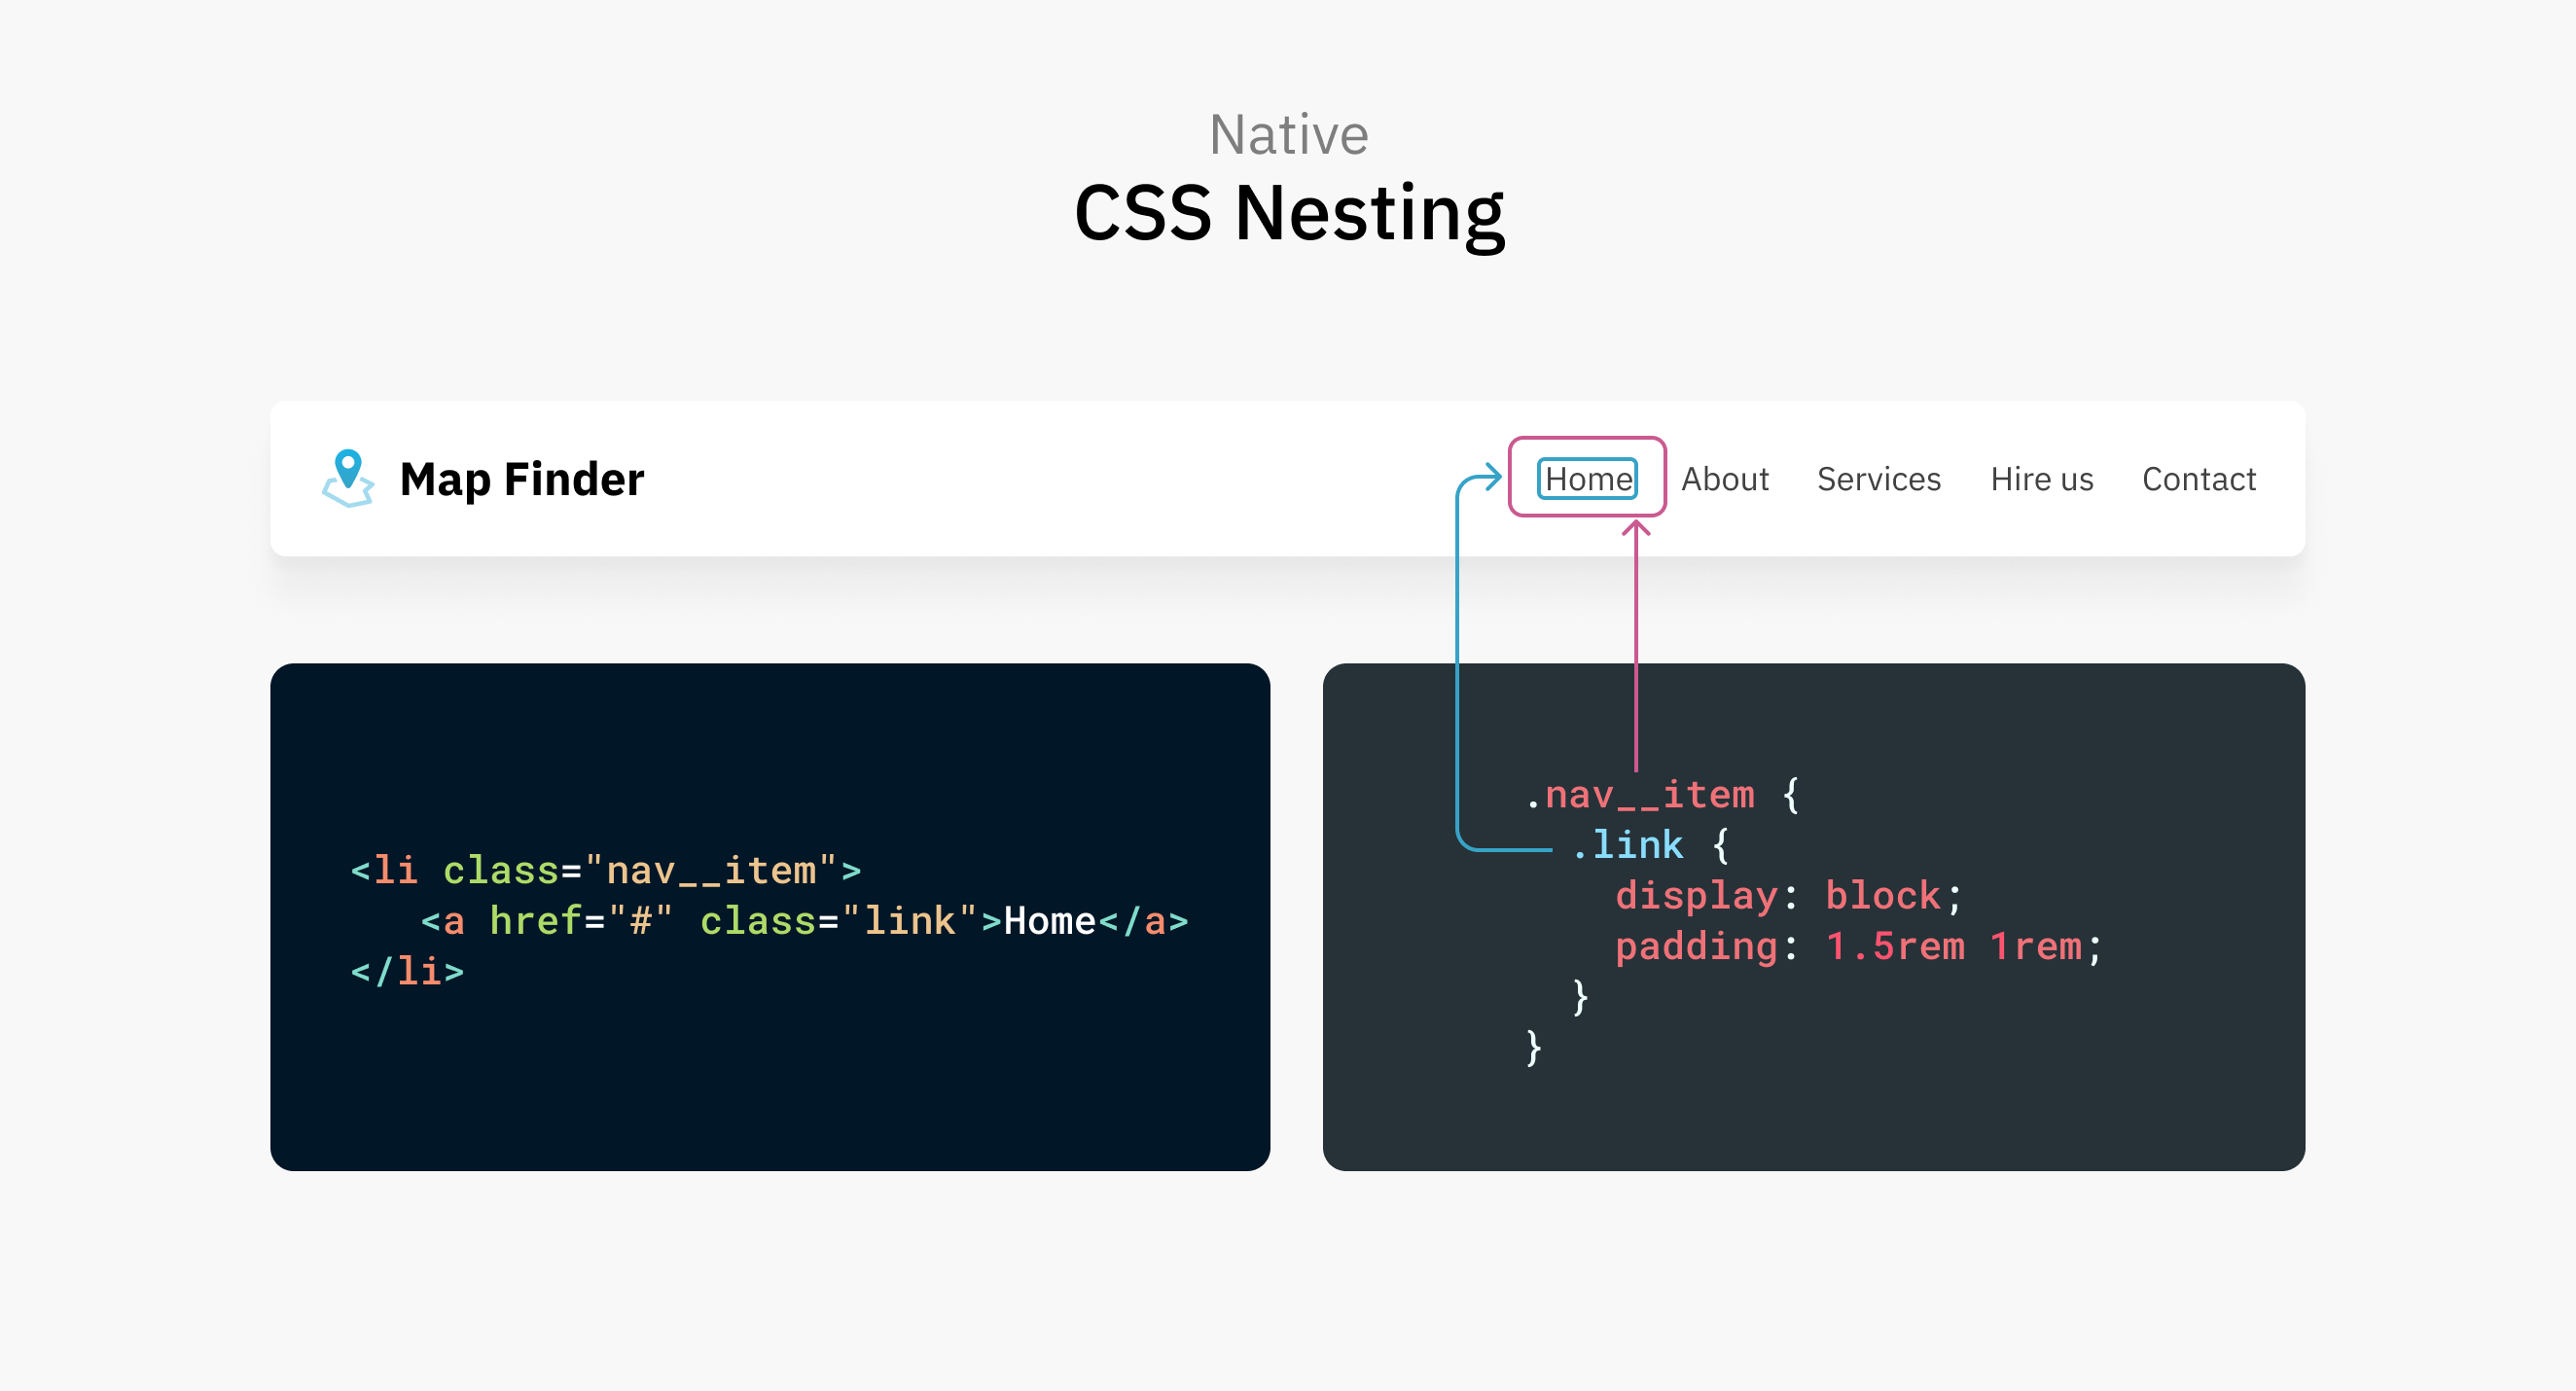
Take the identical earlier instance, however assume that the <a> ingredient has an HTML class.
.nav__item {
  .hyperlink {
    show: block;
    padding: 1.5rem 1rem;
  }
}


.nav__item .hyperlink {
}
No want to make use of the ampersand right here. The category identify will work nice.
Nesting CSS combinators
One of many advantages of CSS native nesting is utilizing combinators. Let’s take just a few examples.
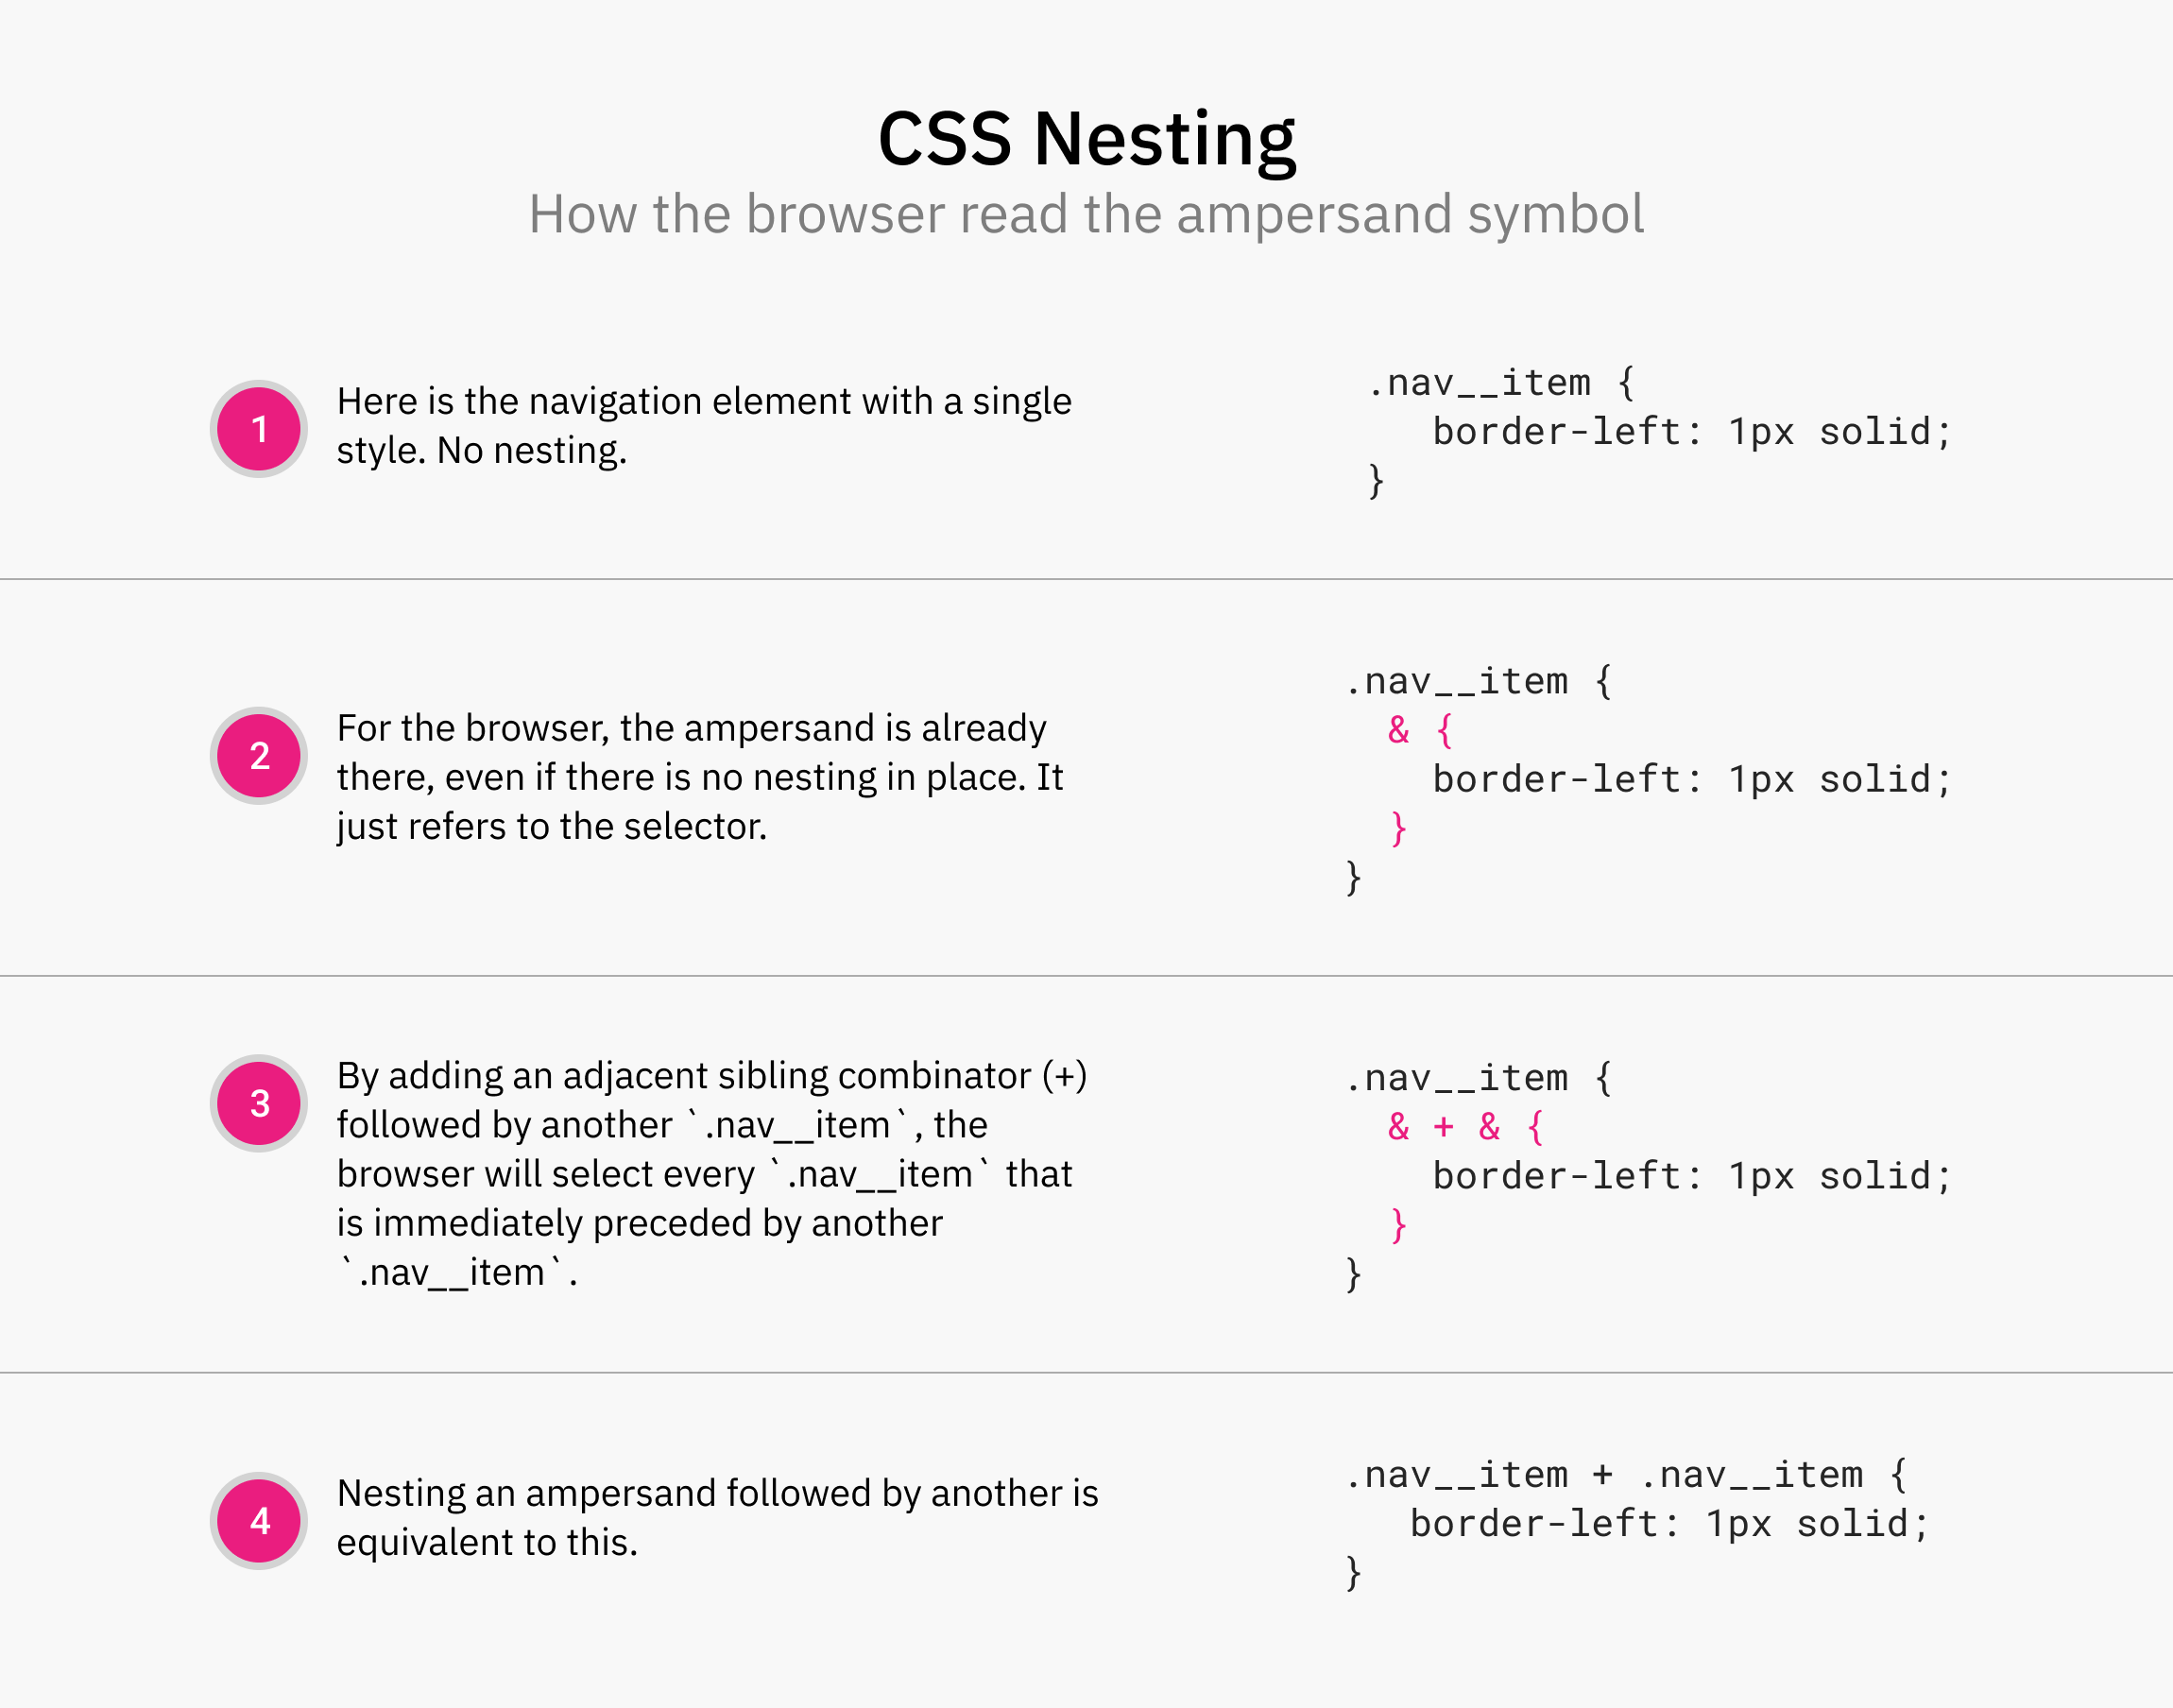
Within the following instance, I need to choose each ingredient with the category .nav__item that’s preceded by one other ingredient with the identical class. For that objective, I used the adjoining sibling selector.
In native CSS nesting, we are able to use the ampersand image to imitate that. Discover that I repeated it twice.
.nav__item {
  & + & {
    border-left: 2px strong;
  }
}
The magic occurs within the 2nd repetition of the ampersand. Right here, the browser will perceive that I need to use the adjoining sibling selector. Let me present you a determine that illustrates this:
One other instance is nesting the kid combinator. It might probably choose the direct baby of a component.
.nav__item {
  > a {
    padding: 1rem;
  }
}
The ampersand image
.nav__item {
  & a {
    shade: blue;
  }
}
This was required within the preliminary CSS nesting spec. In Safari TP 179+ and Chrome Canary 120, the ampersand image is now not required for nesting parts.
Because of this, the next works:
.nav__item {
  a {
    shade: blue;
  }
}
The one drawback is that it’s a must to fallback on the earlier model of the spec, which should embrace the ampersand & image.
Nesting by instance: lively, focus, hover
The :lively, :focus, and :hover is CSS pseudo-classed which are activated through person motion.
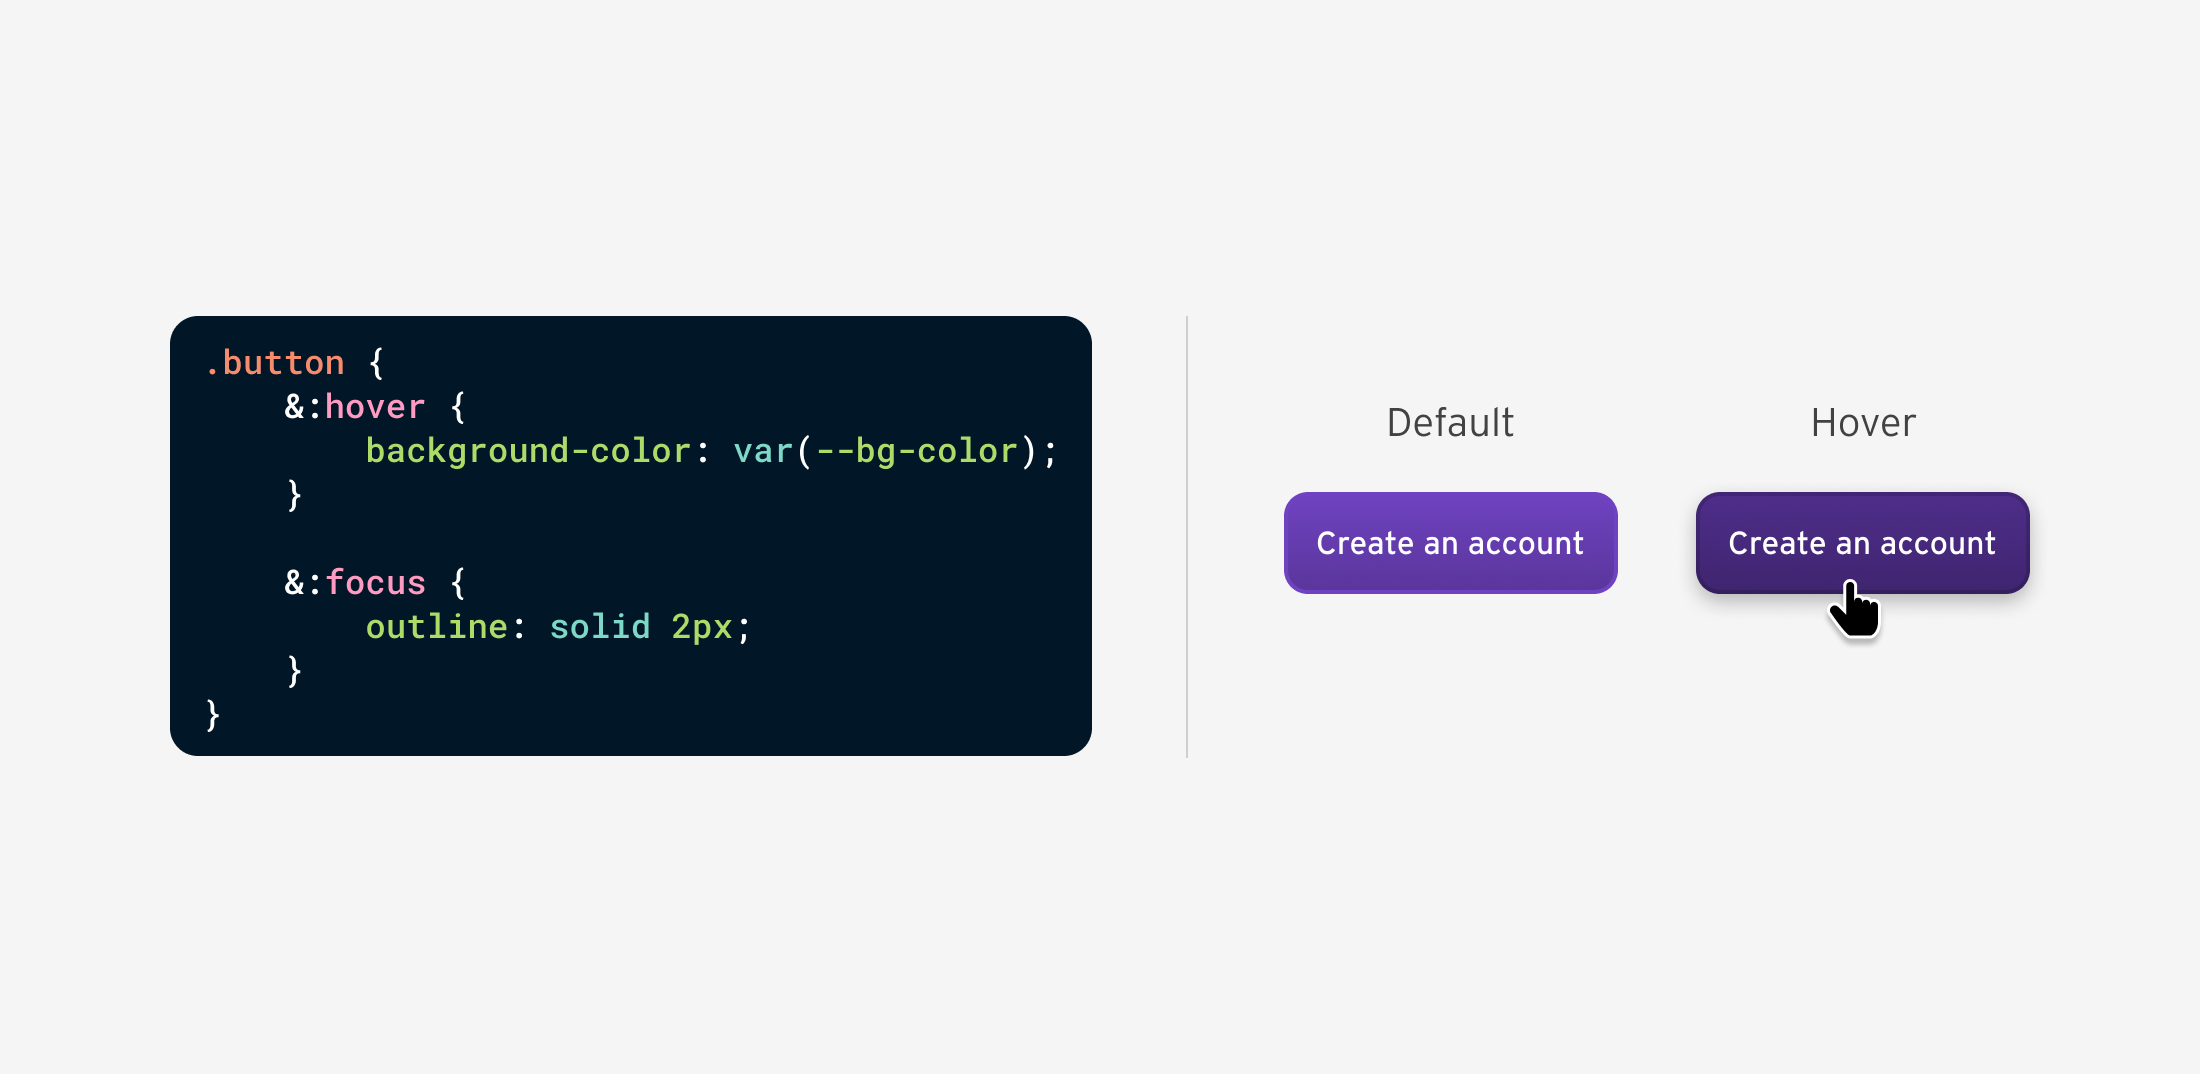
With CSS nesting, it’s potential to nest them unexpectedly to keep away from code duplication. Let’s take :hover for example:
button {
  &:hover {
    background-color: var(--bg-color);
  }

  &:focus {
    define: strong 2px;
  }
}
The distinction when utilizing a pre-processer for nesting is that the browser will render it like this:
button:hover {
  background-color: var(--bg-color);
}

button:focus {
  define: strong 2px;
}
Let’s check out how the native CSS nesting is rendered in Chrome, Safari, and Firefox.
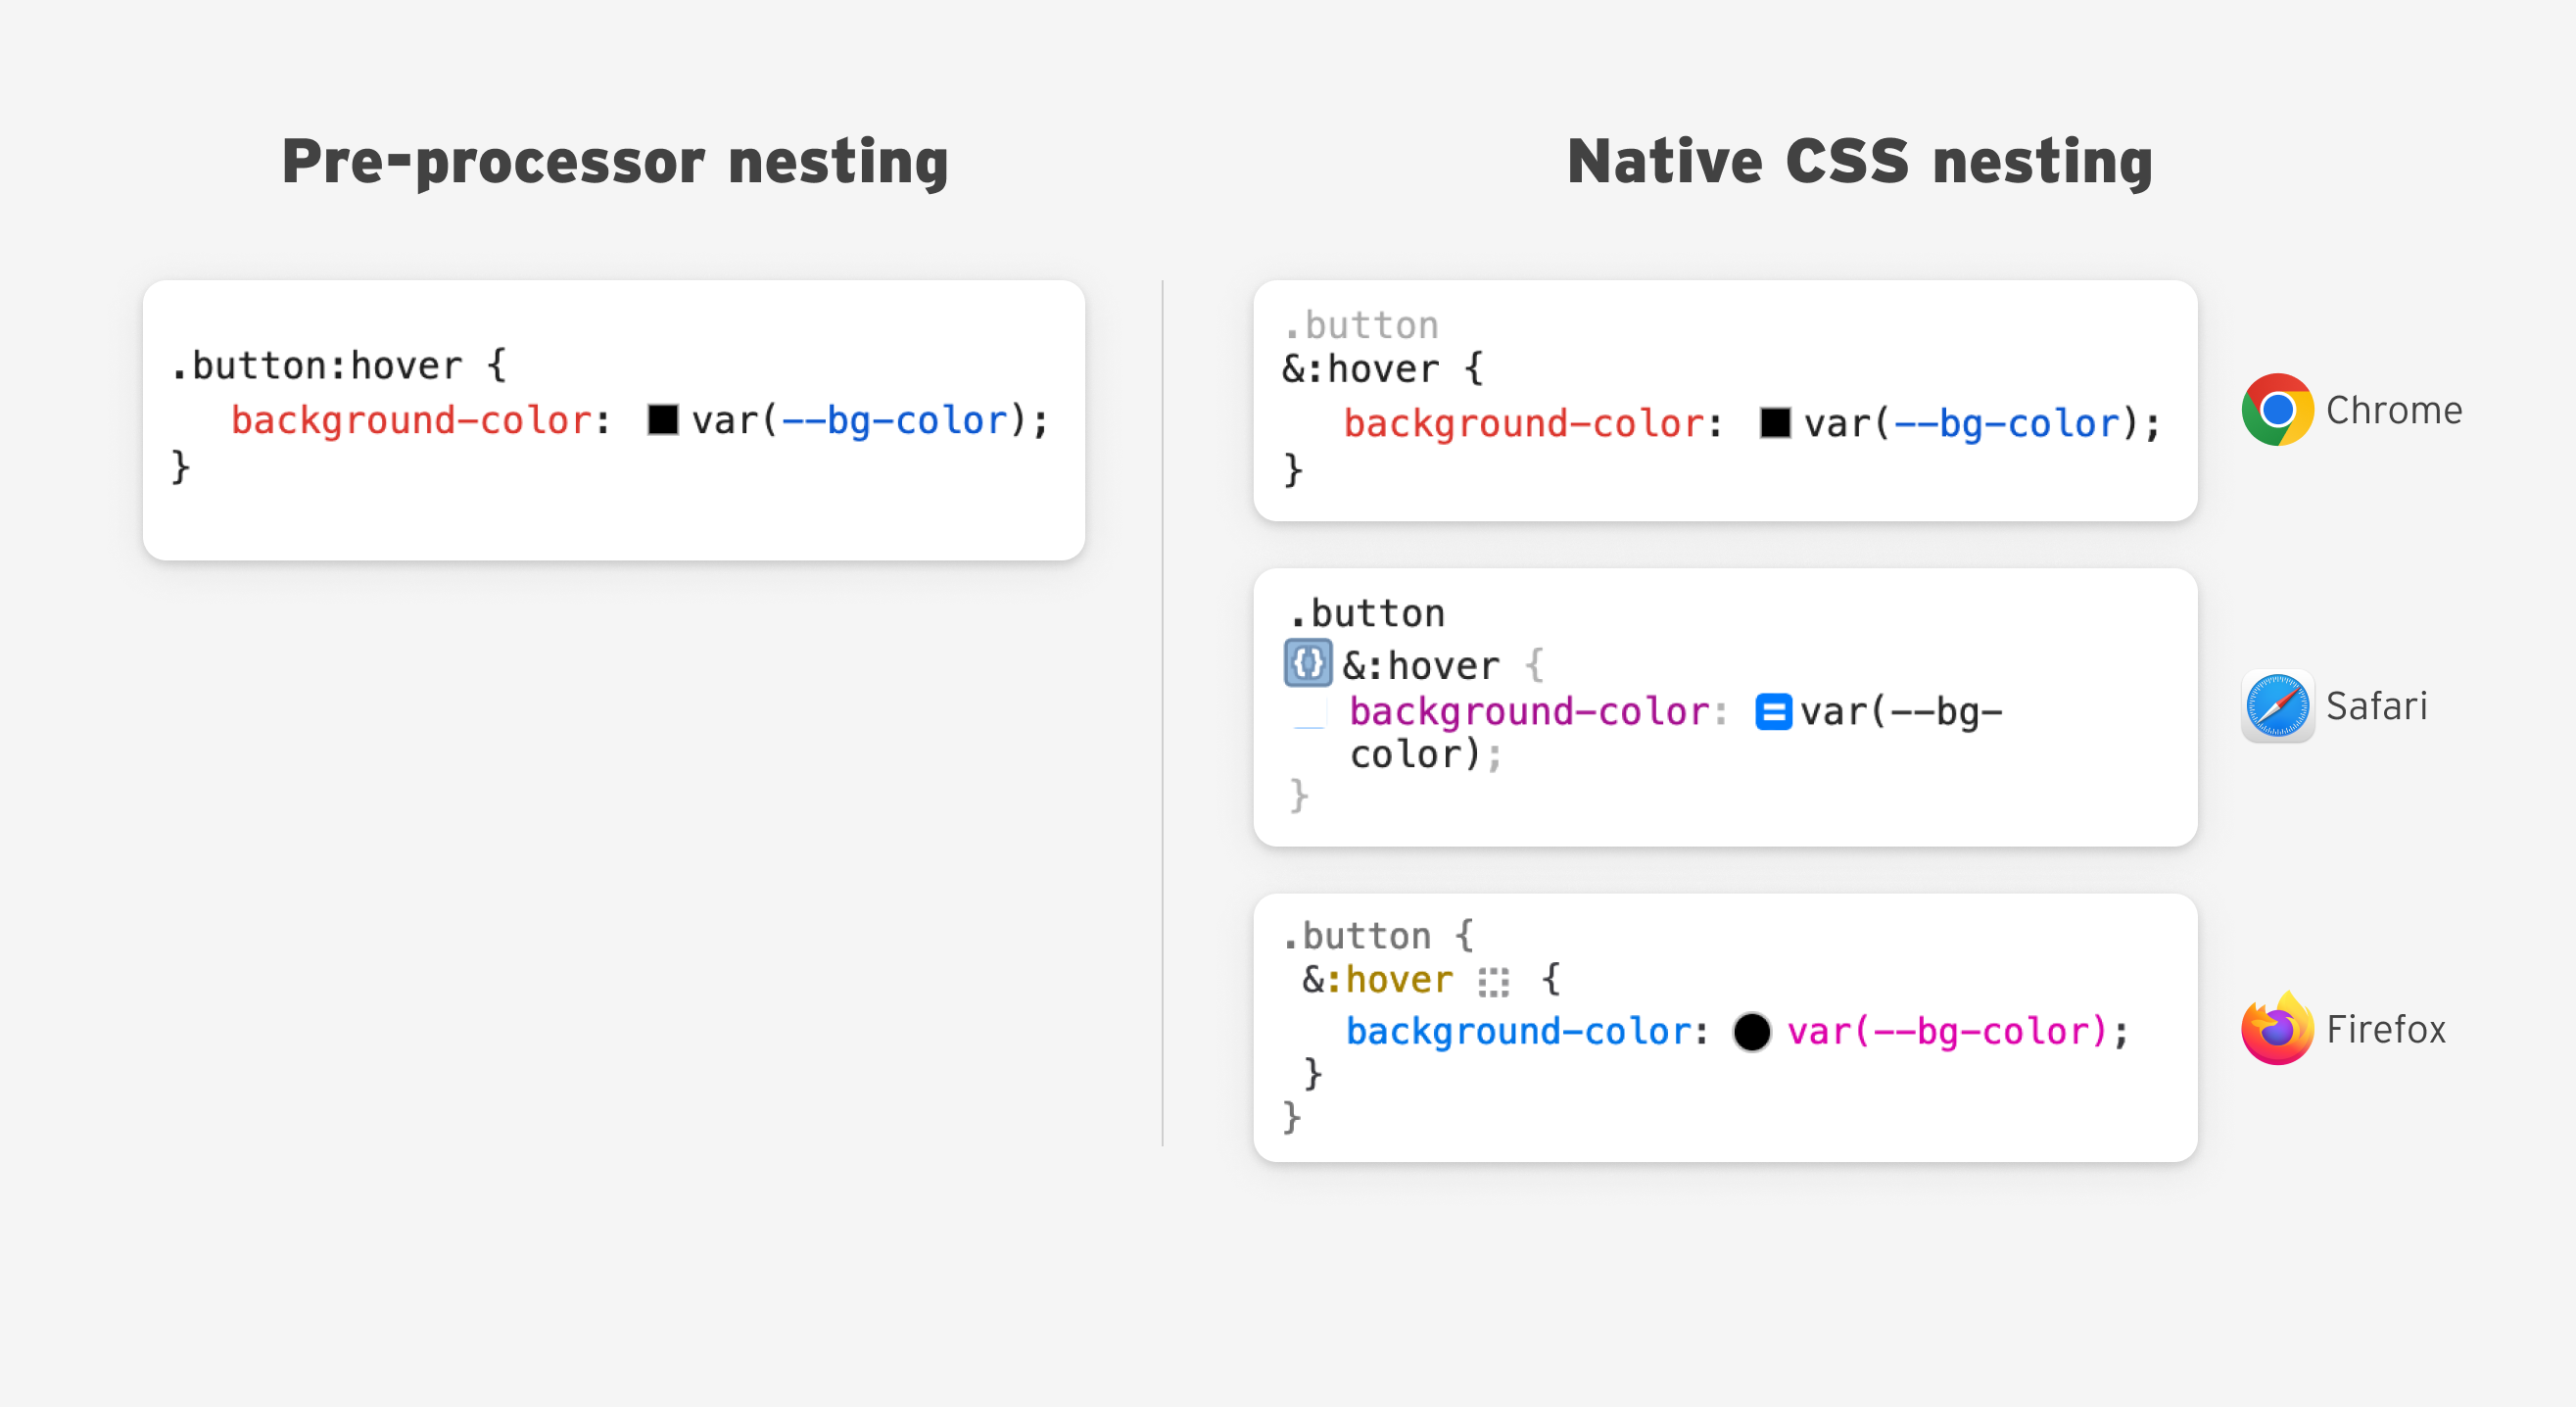
I’ve just a few ideas in regards to the DevTools UX for CSS nesting and can focus on them later within the article.
Nesting by instance: put up content material
One of many first examples to experiment with CSS nesting is styling a put up’s physique content material. Think about an article with physique headlines, textual content, pictures, quotes, and extra.
The headings
We are inclined to type headings like the next:
.post-content h1,
.post-content h2,
.post-content h3,
.post-content h4 {

}
With CSS nesting, it’s extra easy:
.post-content {
  h1,
  h2,
  h3,
  h4 {
    shade: var(--heading-color);
    font-weight: var(--heading-font-bold);
    margin-bottom: var(--size-2);
  }
}
We will additionally do the identical through the use of the :is() selector.
.post-content {
  :is(h1, h2, h3, h4) {
    shade: var(--heading-color);
    font-weight: var(--heading-font-bold);
    margin-bottom: var(--size-2);
  }
}
The paragraph ingredient
A standard case is to type a hyperlink that’s inside a paragraph. In such a case, CSS nesting works nice.
.post-content {
  & p {
    shade: var(--color-black);

    & a {
      font-weight: daring;
      text-decoration: underline;
    }
  }
}
The hyperlink would possibly want a hover or a spotlight impact, too.
.post-content {
  & p {
    shade: var(--color-black);

    & a {
      font-weight: daring;
      text-decoration: underline;

      &:hover {

      }
    }
  }
}
We will additionally nest media queries.
.post-content {
  & p {


    @media (min-width: 400px) {

    }
  }
}
In some circumstances, a CMS would possibly wrap a <p> ingredient inside one other ingredient, and for styling functions, it is advisable to solely type the direct <p> parts.
.post-content {

  > p {

  }
}
The block quote
On this instance, the quote will get its customized styling, and the <p> ingredient throughout the quote is chosen to reset the underside margin to zero.
.post-content {
& blockquote {
& p {
margin-bottom: 0;
}
}
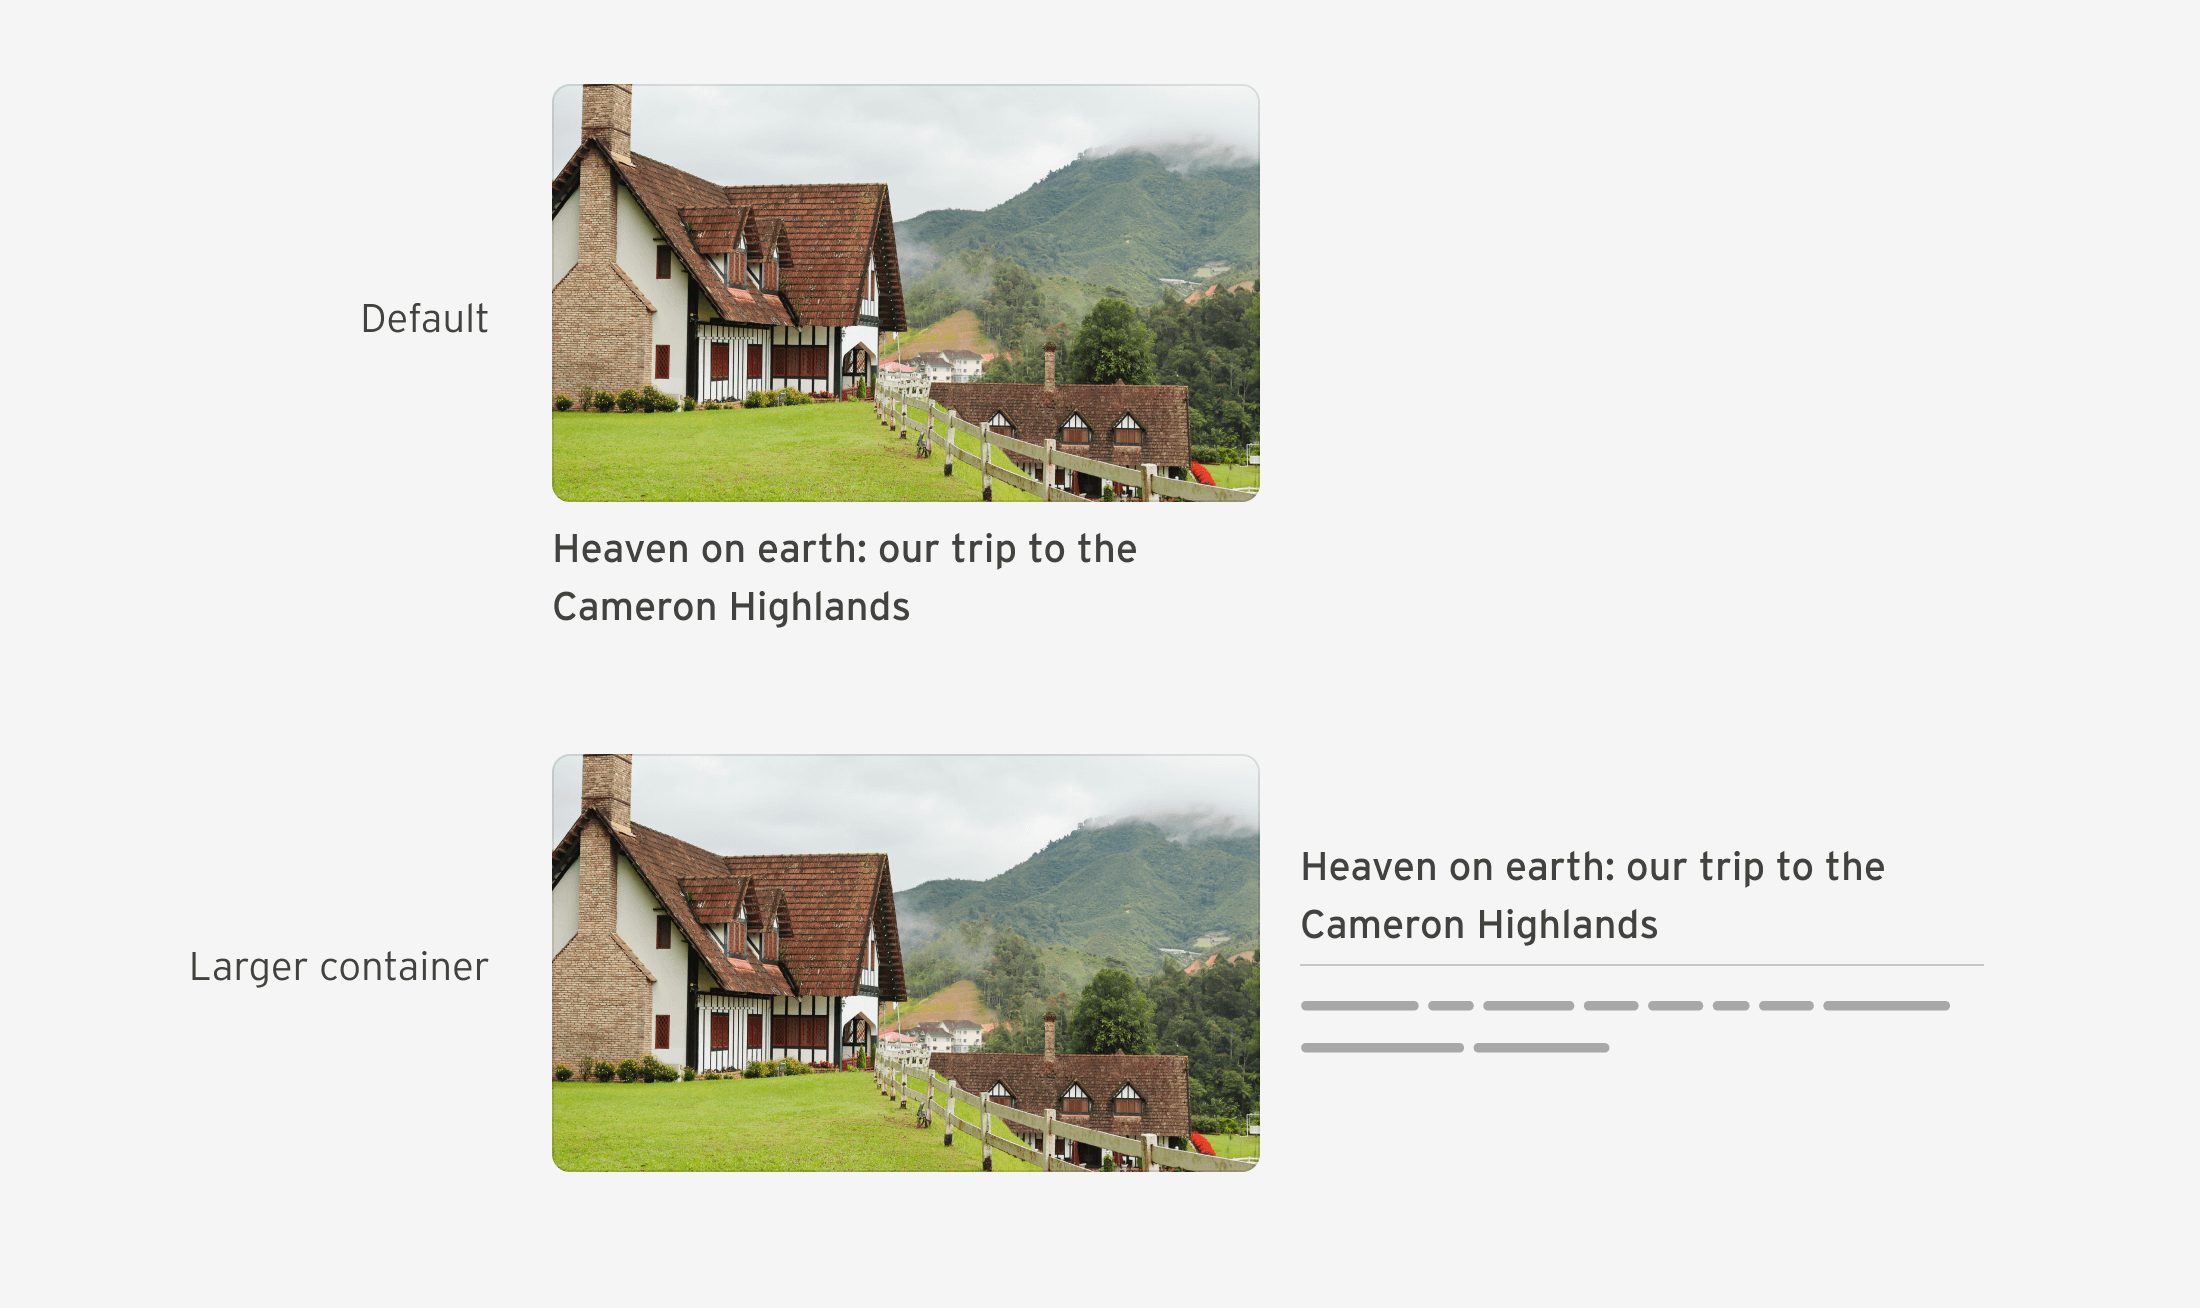
}The put up determine
The put up determine incorporates a picture and an non-obligatory <figcaption> to point out an outline of the picture.
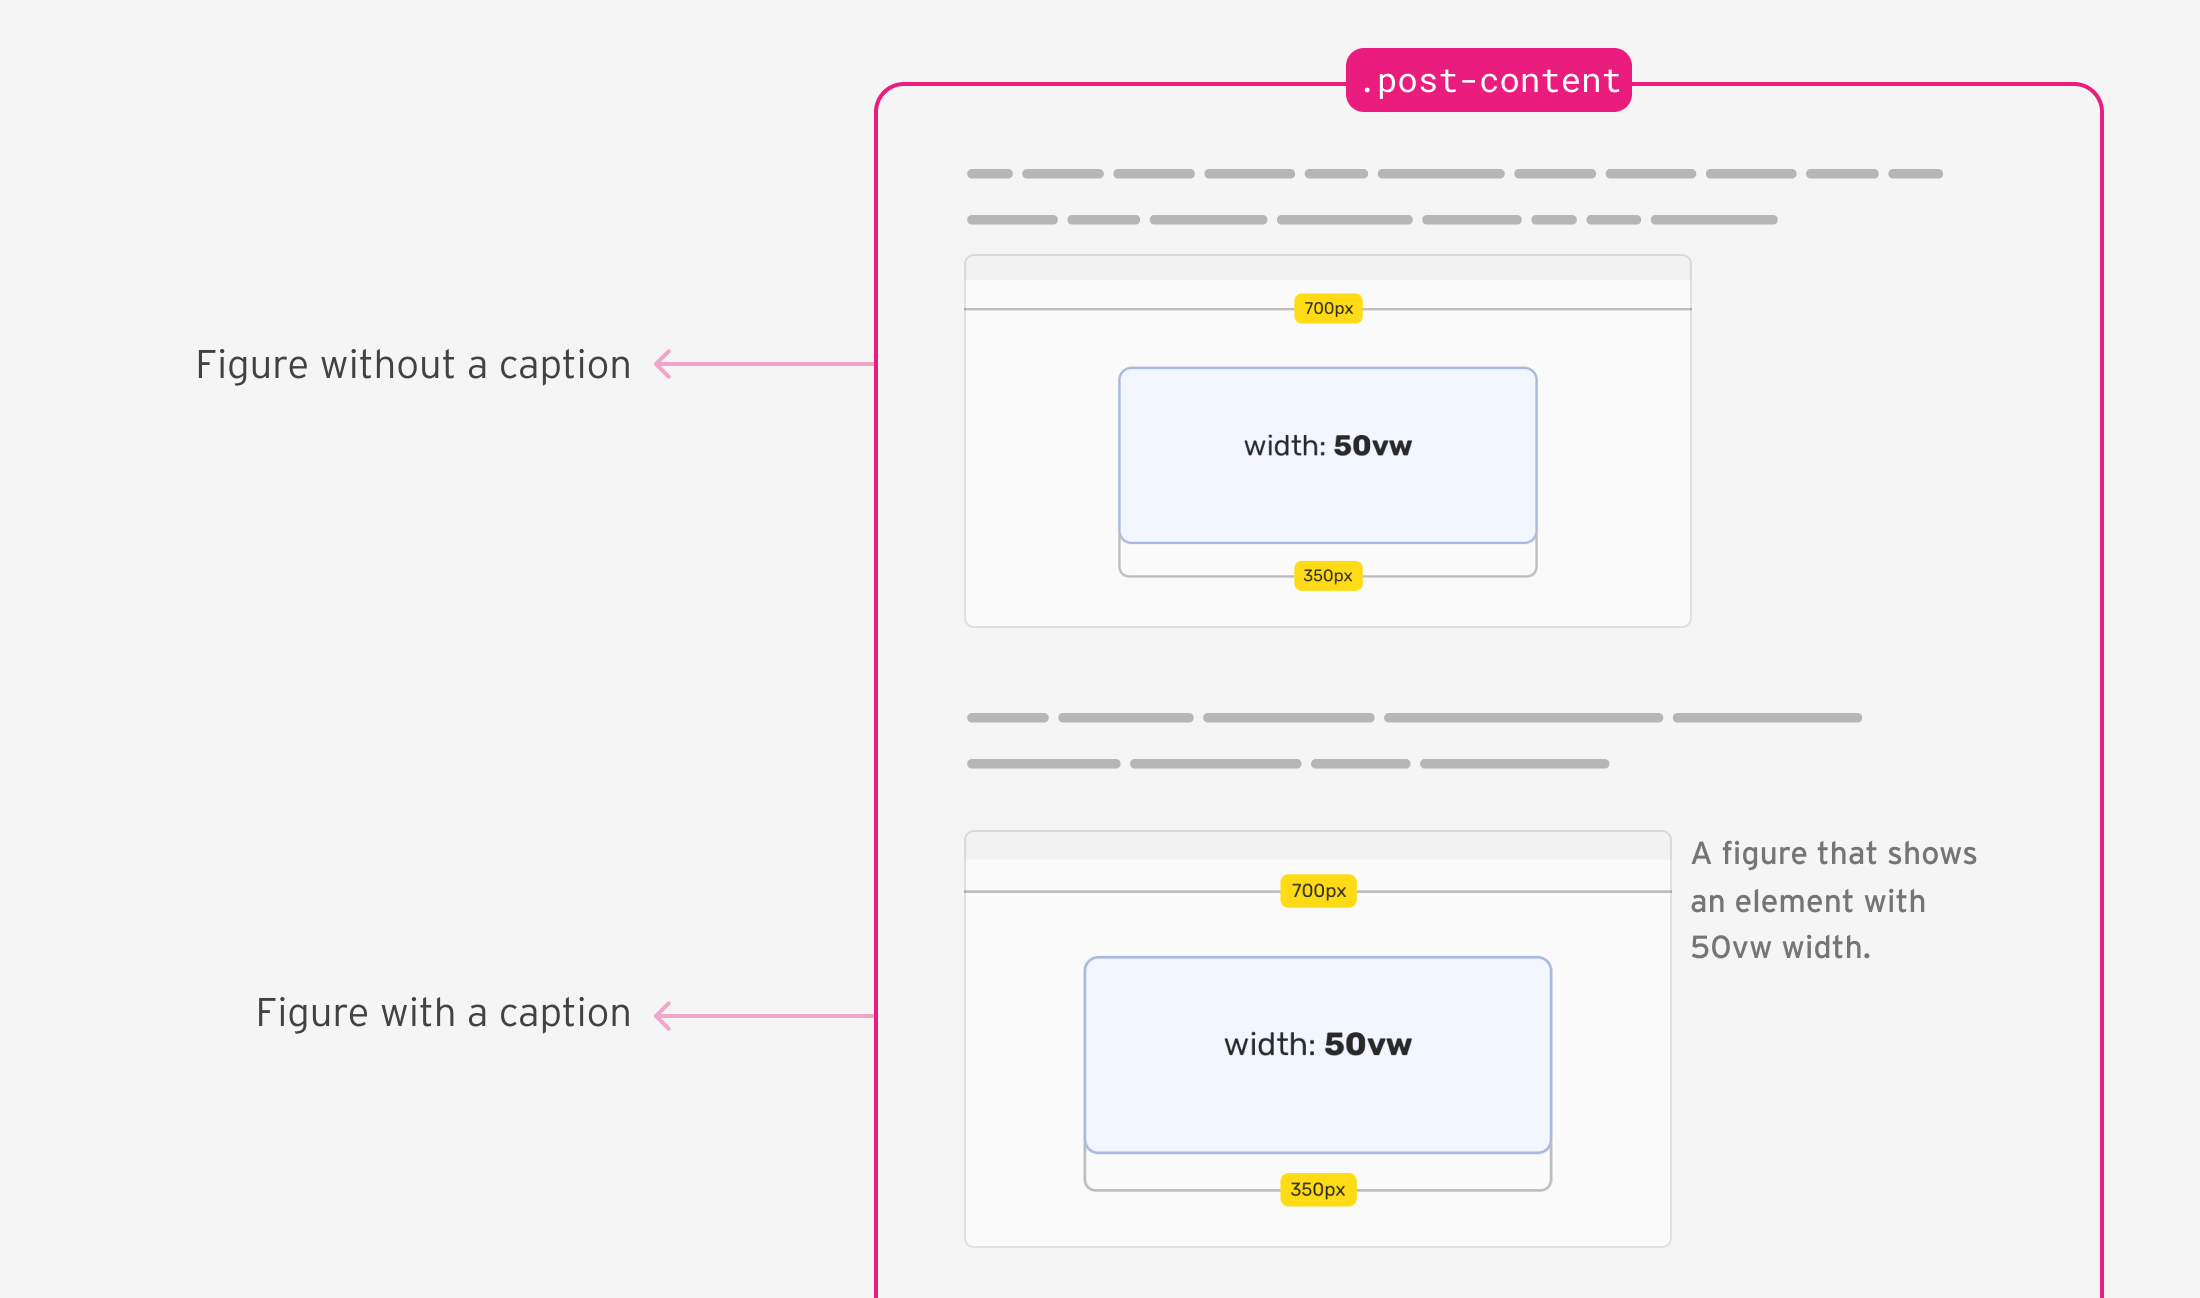
In my instance, I have to type the <determine> in a different way if it has a caption. By nesting CSS :has(), that is potential.
.post-content {
  & determine {
    & img {

    }


    &:has(figcaption) {
      show: flex;
      align-items: begin;
    }

    & figcaption {

    }
  }
}
The put up record
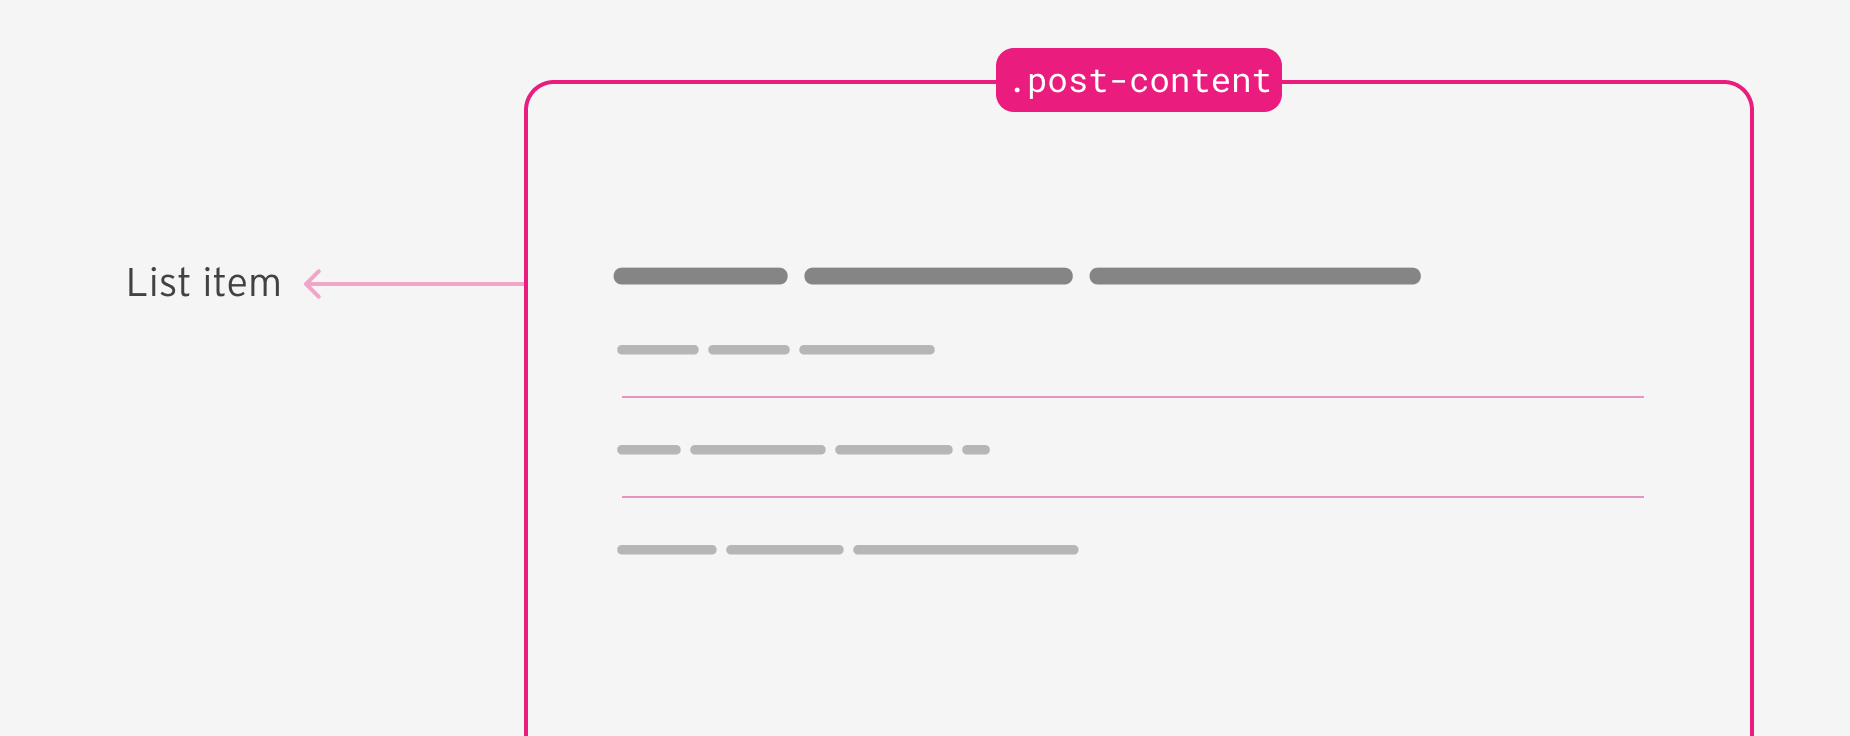
I want so as to add a border to all record objects besides the final one. For that objective, I used the :not() selector.
.post-content {
  li {
    &:not(:last-child) {
      border-bottom: 1px strong;
    }
  }
}
To make use of :not(), we have to append an ampersand earlier than it.
Customized spacing for headings
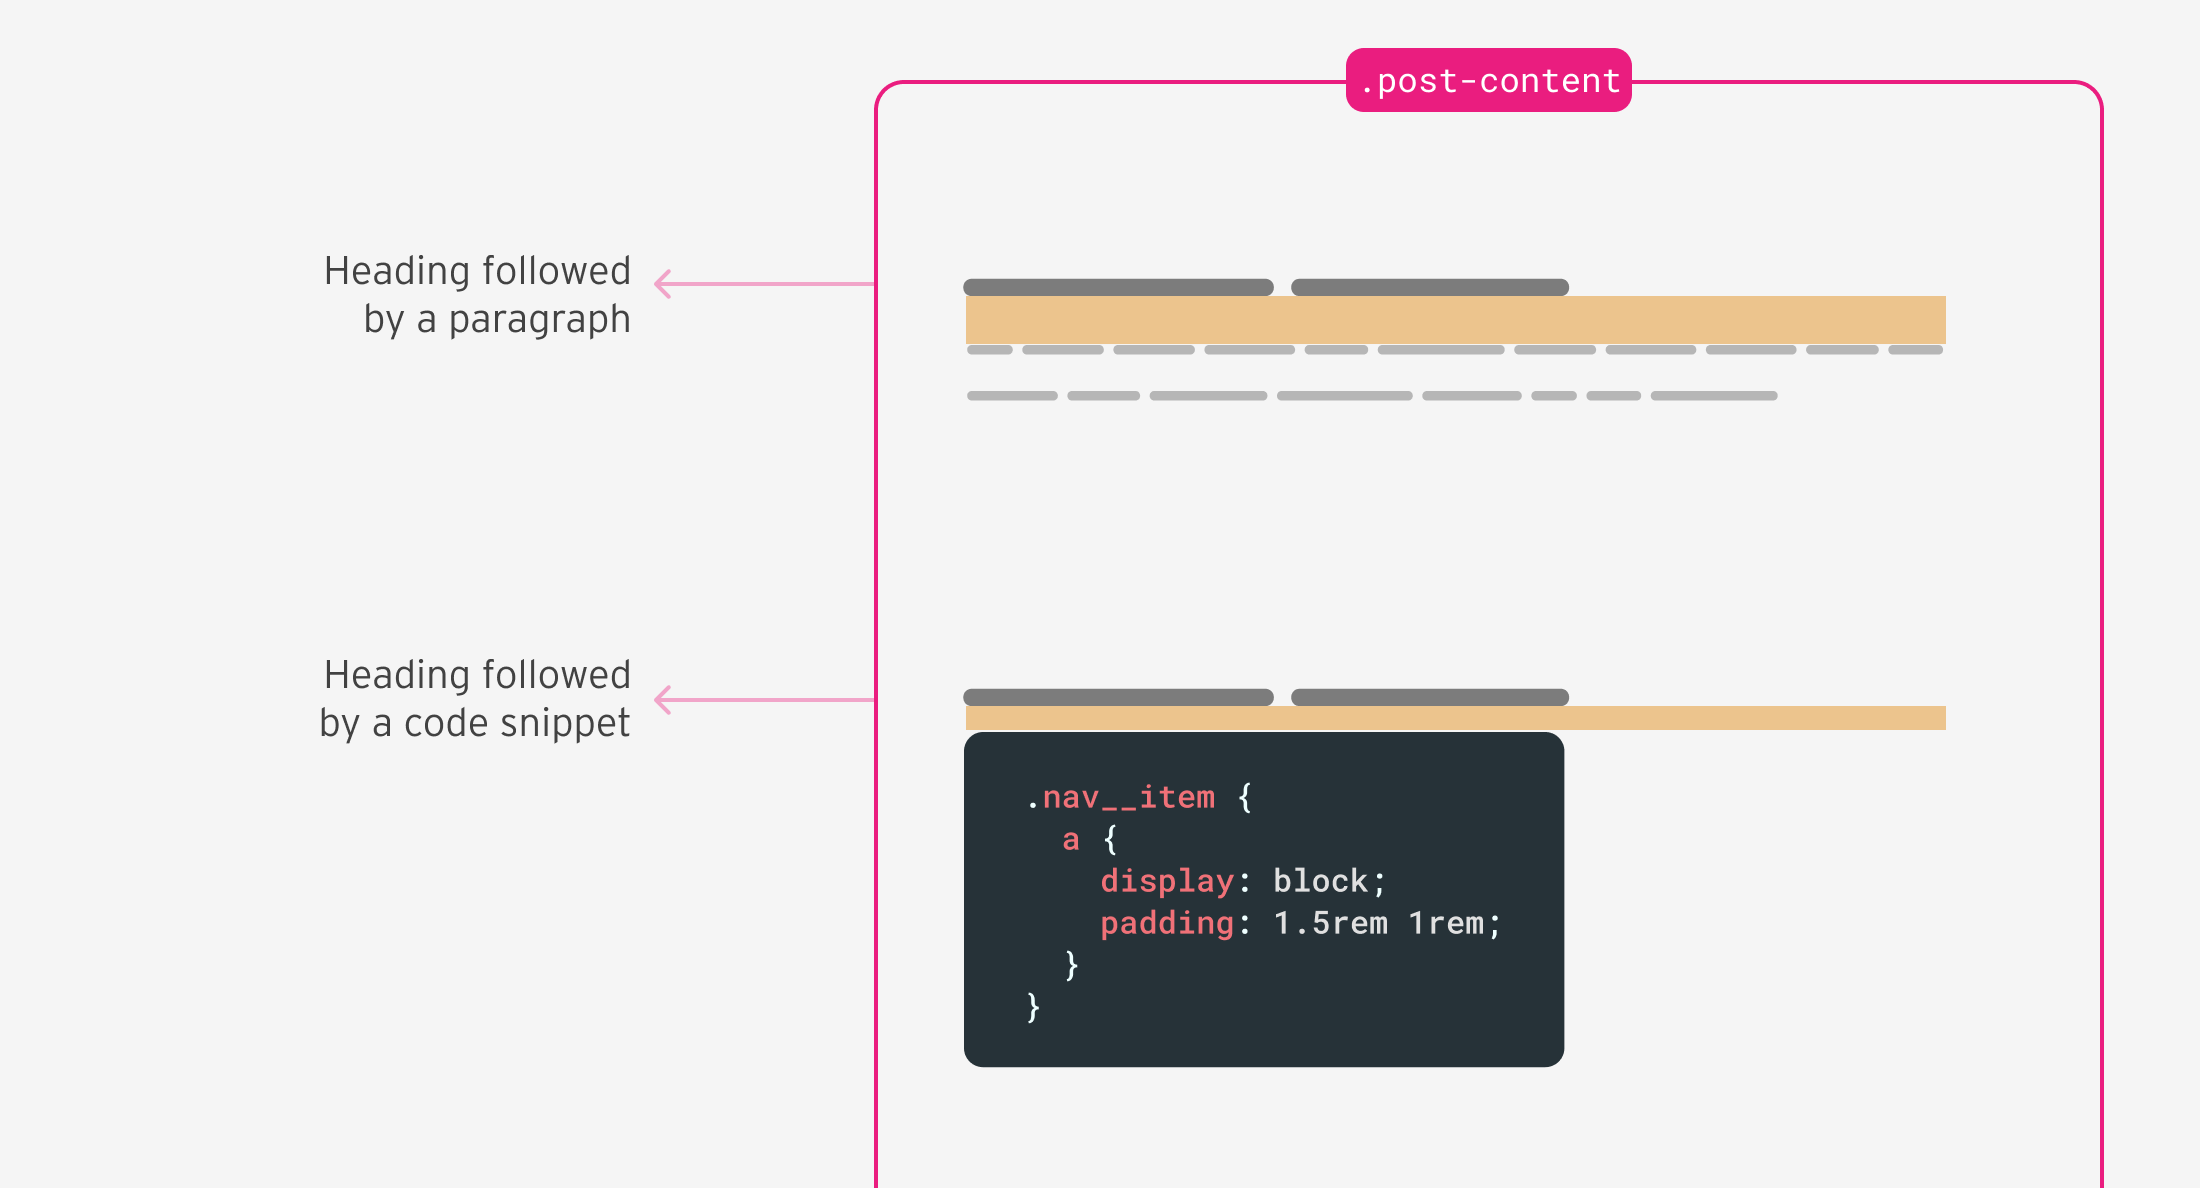
I want to cut back the spacing under <h3> and <h4> if certainly one of them is adopted by a code snippet.
.post-content {
  & h3 + [class*="language-"],
  & h4 + [class*="language-"] {
    margin-top: 0.5rem;
  }
}
As you’ve seen on this sensible instance, using CSS nesting is easy, particularly in case you’re coming from a CSS preprocessor expertise.
Nesting by instance: card part
I’ll show a easy card part that makes use of CSS nesting to realize the specified kinds.
Assuming that there’s a .card ingredient with default or fundamental kinds, I’ll transfer on to showcase using CSS nesting.
.card {

}
Nesting container queries
If the container width is greater than 400px, I would like the cardboard to turn out to be a flex container.
.card {


  @container card (min-width: 400px) {
    show: flex;
  }
}
Styling the paragraph ingredient
I need to type the paragraph ingredient through the <h3>. That method, I can add margins and paddings to the <p> ingredient. If it’s not there, the UI gained’t have additional spacing.
.card__content {
  & h3 + p {
    border-top: 1px strong #000;
    padding-top: 0.5rem;
    margin-top: 0.5rem;
  }
}
When the container width is 400px or bigger, the .card__content ingredient ought to turn out to be a flex container, too.
.card__content {
  & h3 + p {
    border-top: 1px strong #000;
    padding-top: 0.5rem;
    margin-top: 0.5rem;
  }

  @container card (min-width: 400px) {
    show: flex;
    flex-direction: column;
    justify-content: heart;
  }
}
Nesting by instance: kind enter
A standard case is to type the placeholder of an enter. The issue is that every browser vendor has its prefix (oh, it’s 2023).
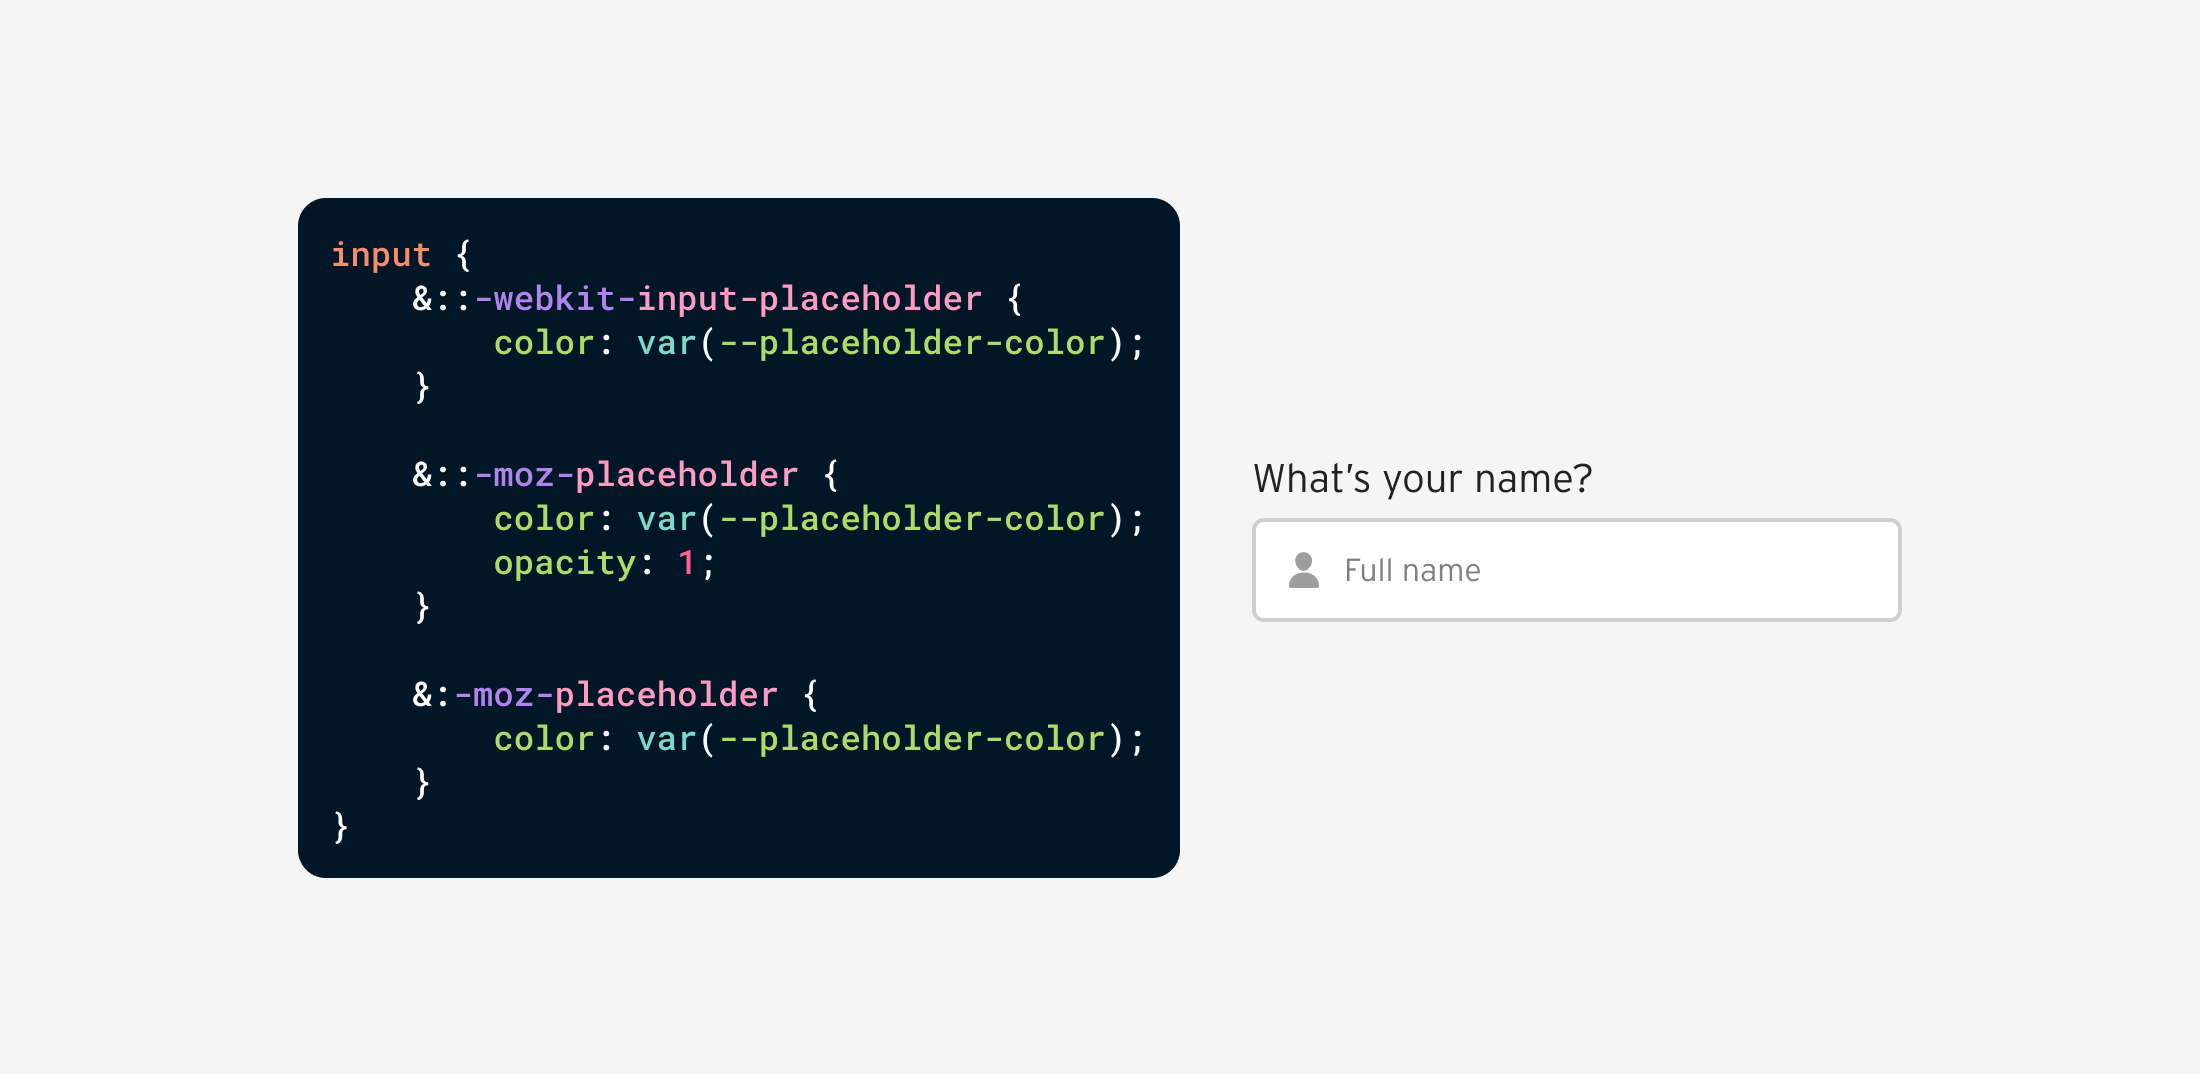
Because the prefix kinds want a double colon, we have to use the ampersand &, in any other case the kinds will break.
enter {
  --placeholder-color: #969696;


  &::-webkit-input-placeholder {
    shade: var(--placeholder-color);
  }

  &::-moz-placeholder {
    shade: var(--placeholder-color);
    opacity: 1;
  }

  &:-moz-placeholder {
    shade: var(--placeholder-color);
  }
}
You is perhaps questioning, what’s the distinction between utilizing CSS nesting, or straight writing the prefix type with out it.
enter {
  &::-webkit-input-placeholder {
    shade: var(--placeholder-color);
  }
}


enter::-webkit-input-placeholder {
  shade: var(--placeholder-color);
}
There is no such thing as a distinction between the 2. Each have the identical specificity (0, 1, 1).
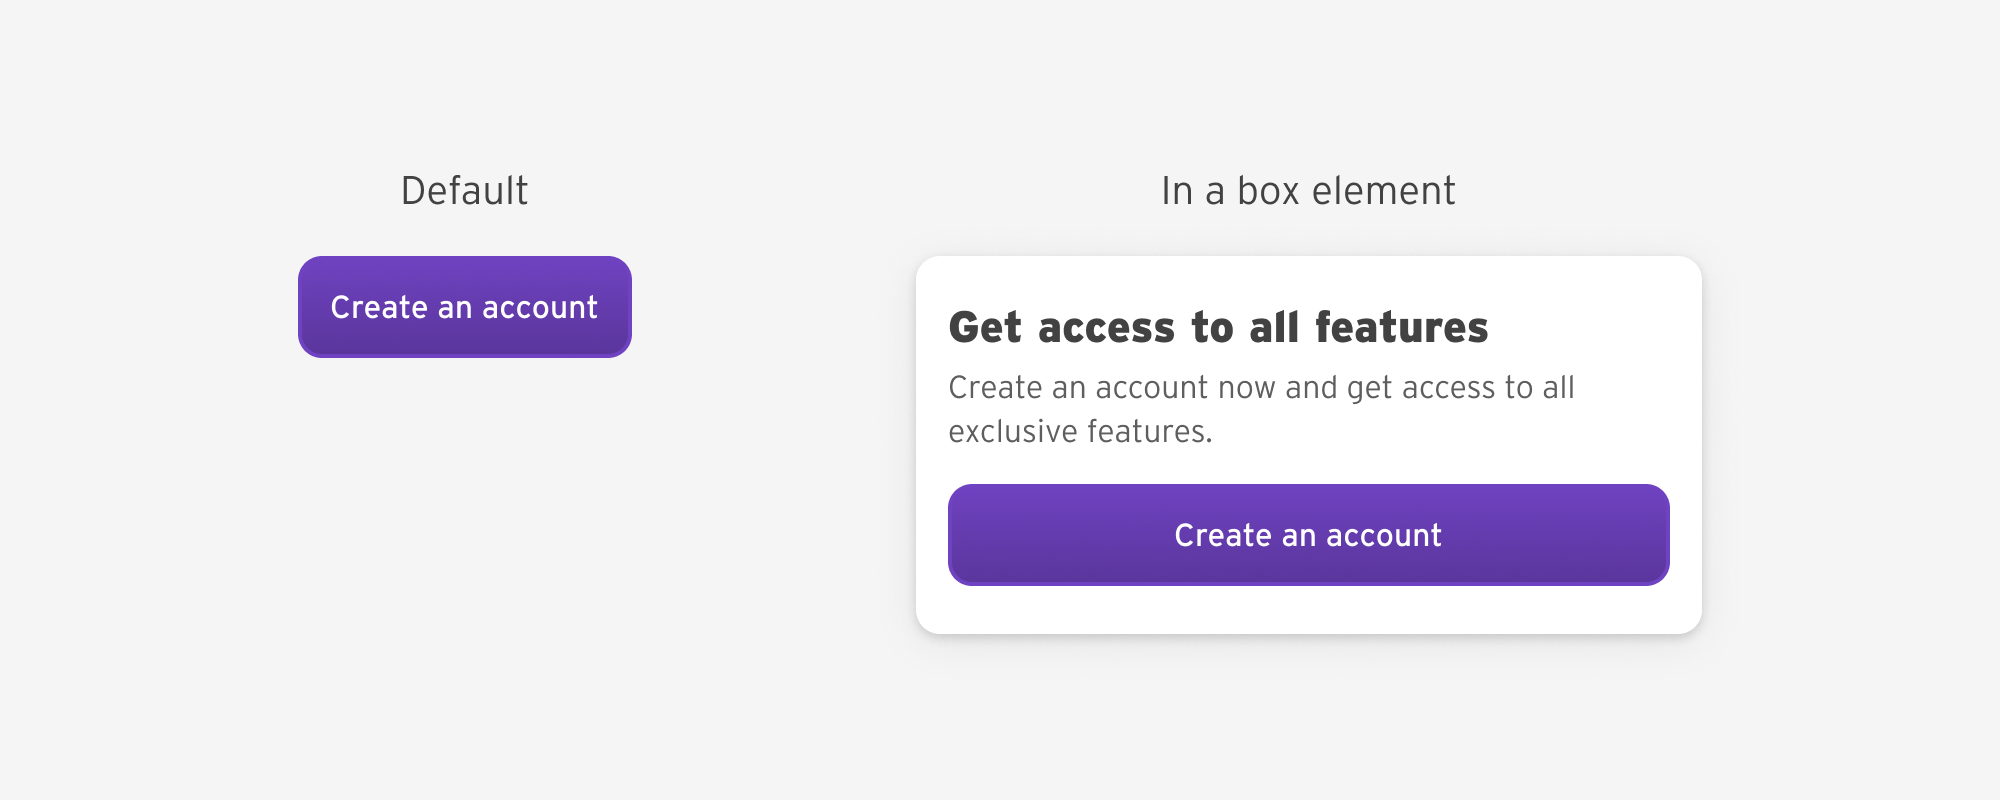
Nesting by instance: type a component through its father or mother
We will use native CSS nesting to vary a toddler’s kinds based mostly on the place it lives. For instance, if the .button ingredient lives inside a .field father or mother, it ought to take the complete width.
<div class="field">
    <h2>Get entry to all options</h2>
    <p>Create an account now and get entry to all unique options.</p>
    <a href="/supply" class="button">Create an account</a>
</div>
.button {
.field & {
width: 100%;
}
}
.field .button {
}Bugs I noticed whereas exploring CSS nesting
Utilizing the common selector with out the ampersand
Say that we have now a card and we need to choose all the weather inside it. With CSS native nesting, this could work:
.card {
  * {

  }
}
I discovered that this doesn’t work in Chrome secure, however works nice in Chrome Canary 121, Safari 17.1, and Firefox 119.
The repair is to append an ampersand.
.card {
  & * {

  }
}
Utilizing knowledge attributes with out the ampersand
On this subject, deciding on a knowledge attribute with out the ampersand gained’t render the anticipated outcome.
.card {
  [data-type="featured"] {

  }
}
I discovered that this doesn’t work in Chrome secure, however works nice in Chrome Canary 121, Safari 17.1, and Firefox 119.
To repair that, we have to append an ampersand:
.card {
  &[data-type="featured"] {

  }
}
Each of these bugs have been fastened within the launch for the relaxed CSS nesting in Chrome Canary.
Detecting help for CSS nesting
It’s potential to make use of @helps to test for CSS nesting help. In our case, we need to test if the browser identifies the ampersand or not.
@helps selector(&) {
  .post-content {
    & h2 {

    }
  }
}
You may discover different choices to detect help in this Codepen by Bramus.
For me, I’ll use the PostCSS nesting plugin at present, which compiles native CSS nesting to regular CSS. As soon as it’s protected to make use of, I’ll drop off the plugin.
I’m not an enormous fan of the present UX for CSS nesting within the browser DevTools.
![]()
I labored on a separate article the place I explored just a few proposals for a way I would really like CSS nesting to be within the DevTools.
Conclusion
CSS nesting is a significant characteristic that can improve how we write CSS. In the intervening time, utilizing nesting is feasible however it is advisable to watch out in regards to the viewers, because the help continues to be new.
I hope that you simply’ve realized one thing helpful. Thanks for studying!