


Angular directives help us in manipulating the DOM. We might customise a DOM component’s look, habits, or format utilizing directives. As well as, they assist us prolong the ability of HTML by way of actions, reactions, and interactions. For instance, directives will settle for arguments, carry out some motion with them, after which produce a reactive motion in your HTML.
Angular offers three varieties of directives: part, structural, and attribute. This text will deal with structural and attribute directives and talk about methods to create customized ones with Angular.
Structural directives
A structural directive is a sort of directive that’s chargeable for the HTML format. It dynamically reshapes the construction of the DOM by including, eradicating, or manipulating the host components to which they’re connected. Angular has three major built-in structural directives: NgFor, NgIf, and NgSwitch.
The next part is a whole step-by-step instance of making a customized structural directive.
Steps to create a customized structural directive
Let’s create a customized structural directive named Not, which is able to work reverse the NgIf directive. Our Not directive shows content material when the situation is false.
1. Create a directive named Not utilizing the next command on the Angular CLI.
ng generate directive Not |
This step creates a directive class named NotDirective and defines the CSS selector appNot to determine the directive in a template. Our new directive ought to seem like the next:
import { Directive } from '@angular/core';

@Directive({
selector: '[appNot]'
})

export class NotDirective {

constructor() {}

}
Notice: The customized directive identify shouldn’t be an Angular key phrase. It additionally shouldn’t begin with ng.
2. Configure the directive within the utility.
Subsequent, configure the created directive the identical means a part is configured to make it globally out there within the utility. You are able to do this by following the instance beneath.
Import { NotDirective } from ‘./directives/not.directive’;

@NgModule({

 declarations: [
 ------------------
 NotDirective
 ------------------
 ]
})
export class AppModule { }
3. Import Enter, TemplateRef, and ViewContainerRef from @angular/core.
To create a customized directive, we want just a few components:
- Enter: This decorator is used to speak between two parts. Right here, it permits the info to be enter into the directive from the mum or dad part.
- TemplateRef: Represents the embedded template used to instantiate the embedded views linked to the template which has but to be rendered.
- ViewContainerRef: Gives a container the place a number of views could be connected.
import { Directive, Enter, TemplateRef, ViewContainerRef } from ‘@angular/core’;

@Directive({ selector: ‘[appNot]’})

export class NotDirective {
}
4. Inject TemplateRef and ViewContainerRef as non-public variables by way of the constructor.
constructor(
 non-public templateRef: TemplateRef<any>,
 non-public viewContainer: ViewContainerRef) { }
)
5. Create a setter technique utilizing the @Enter decorator.
Be certain the tactic identify is similar because the directive identify.
@Enter() set appNot(situation: boolean) {
}
Use the next code snippet if it’s essential use a special technique identify. Right here, the @Enter() alias ought to be the identical because the directive identify.
@Enter('appNot') set myDirective(situation: boolean) {
}
6. Add the logic of the Not situation.
The Not customized structural directive will work within the reverse means of the NgIf directive. When a falsy situation is handed, the host component and its descendants are added to the DOM format, and if the situation is truthy, the host component and its descendants are faraway from the DOM format.
@Enter() set appNot(situation: boolean) {
 if (!situation && !this.hasView) {
     this.viewContainer.createEmbeddedView(this.templateRef);
     this.hasView = true;
 }
 else if (situation && this.hasView) {
     this.viewContainer.clear();
     this.hasView = false;
 }
}
Within the code instance above, the createEmbeddedView technique of ViewContainerRef provides the host component to the DOM format whereas the ViewContainerRef‘s clear technique removes the content material from the view container.
The entire directive.ts file is as follows:
import { Directive, Enter, TemplateRef, ViewContainerRef } from ‘@angular/core’;

@Directive({ selector: ‘[appNot]’})

export class NotDirective {
 non-public hasView = false;

constructor(
 non-public templateRef: TemplateRef<any>,
 non-public viewContainer: ViewContainerRef) { }

@Enter() set appNot(situation: boolean) {

/** Add the template content material to the DOM until the situation is true. */
if (!situation && !this.hasView) {
    this.viewContainer.createEmbeddedView(this.templateRef);
    this.hasView = true;
 }
else if (situation && this.hasView) {
    this.viewContainer.clear();
    this.hasView = false;
 }
}}
7. Testing the directive.
<p *appNot=”!situation”> A => This paragraph is displayed as a result of the situation is true. </p>

<p *appNot=”situation”> B => This paragraph is displayed as a result of the situation is fake. </p>
When the situation is true, the web page will show paragraph A and paragraph B will disappear. When the situation is false, paragraph A will disappear and paragraph B shall be displayed.
The asterisk (*) on a structural directive (e.g., *appNot as within the instance above) is a shorthand utilized by Angular. Angular transforms the * right into a <ng-template> surrounding the host component and its descendants.
Attribute directives
Attribute directives are used to vary or modify HTML components’ look, habits, properties, attributes, and parts. Angular’s mostly used built-in attribute directives are NgClass, NgModel, and NgStyle.
Steps to create a customized attribute directive
Within the earlier part, we mentioned the steps to create a customized structural directive. The identical strategy is used to create a customized attribute directive as effectively. Let’s see a step-by-step instance of making an attribute directive that modifications the background coloration of a number component to a coloration of our alternative.
1. Create a directive named spotlight utilizing the next command on the Angular CLI.
ng generate directive spotlight |
Just like creating the structural directive, this step will create a directive class named spotlight and outline the appHighlight CSS attribute selector used to determine the directive in a template. Our new directive ought to seem like the next code snippet.
import { Directive } from '@angular/core';
@Directive({
  selector: '[appHighlight]',
})

export class HighlightDirective {
  constructor() {}
}
2. Make the customized directive globally out there inside the utility.
To make use of our customized directive anyplace in our Angular utility, we have to configure it within the app module the identical means we configure a part.
import { HighlightDirective }  from './directives/spotlight.directive';

@NgModule({

  declarations: [
        ------------------
    HighlightDirective
        ------------------
  ]
----------------
----------------
})
export class AppModule { }
3. Import @Enter and ElementRef from @angular/core.
import { Directive, ElementRef, Enter } from ‘@angular/core’;
4. Utilizing dependency injection, get an occasion of ElementRef by way of the constructor.
Use ElementRef to entry the DOM component and alter its look or habits.
import { Directive, ElementRef, Enter } from '@angular/core';

@Directive({
  selector: '[appHighlight]',
})

export class HighlightDirective {
  constructor(non-public el: ElementRef) {}
}
5. Add a property named appHighlight utilizing the @Enter decorator for binding.
@Enter('appHighlight') highlightColor: string;
6. Add the logic to the HighlightDirective class.
ngOnInit(): void {
  this.el.nativeElement.fashion.backgroundColor = this.highlightColor;
}
The entire code of the directive.ts file is as follows:
import { Directive, ElementRef, Enter, OnInit } from '@angular/core';

@Directive({
  selector: '[appHighlight]',
})

export class HighlightDirective implements OnInit {
  @Enter('appHighlight') highlightColor: string;

  constructor(non-public el: ElementRef) {}

  ngOnInit(): void {
    this.el.nativeElement.fashion.backgroundColor = this.highlightColor;
  }
}
7. Within the app.part.ts file, add a coloration property to the AppComponent.
export class AppComponent {
 coloration="yellow";
}
8. Apply the attribute directive.
Apply the appHighlight directive to the <p> component and set the directive’s spotlight coloration utilizing the property binding.
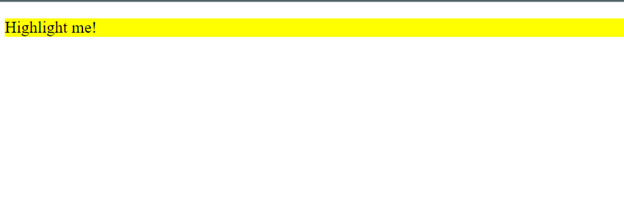
<p [appHighlight]="coloration">Spotlight me!</p>
You’ll get the next output.
Conclusion
On this article, I walked you thru a methods to construct a customized structural directive and a customized attribute directive in Angular. I hope you discovered this beneficial. Thanks for studying.
Syncfusion’s Angular UI part library is the one suite you’ll ever must construct an app. It incorporates over 65 high-performance, light-weight, modular, and responsive UI parts in a single package deal.
For present clients, the most recent Important Studio model is offered for obtain from the License and Downloads web page. In case you are not but a Syncfusion buyer, you’ll be able to strive our 30-day free trial to take a look at the out there options. Additionally, try our demos on GitHub.
For questions. you’ll be able to contact us by our help boards, help portal, or suggestions portal. We’re all the time pleased to help you!