

Regardless that internet and cell purposes seem to have taken over the software program growth market, there’s nonetheless demand for conventional graphical person interface (GUI) desktop purposes. When you’re interested by constructing these sorts of purposes in Python, you then’ll discover all kinds of libraries to select from. They embody Tkinter, wxPython, PyQt, PySide, and some others.
On this tutorial, you’ll be taught the fundamentals of constructing GUI desktop purposes with Python and PyQt.
For this tutorial, you’ll create a calculator app with Python and PyQt. This brief challenge will provide help to grasp the basics and get you up and operating with this GUI library.
You’ll be able to obtain the supply code for the challenge and all examples on this tutorial by clicking on the hyperlink beneath:
Attending to Know PyQt
PyQt is a Python binding for Qt, which is a set of C++ libraries and growth instruments offering platform-independent abstractions for graphical person interfaces (GUIs). Qt additionally gives instruments for networking, threads, common expressions, SQL databases, SVG, OpenGL, XML, and lots of different highly effective options.
Developed by RiverBank Computing Ltd, PyQt’s newest editions are:
- PyQt5: An version that’s constructed in opposition to Qt 5.x solely
- PyQt6: An version that’s constructed in opposition to Qt 6.x solely
On this tutorial, you’ll use PyQt6, as this model is the way forward for the library. Any more, remember to contemplate any point out of PyQt as a reference to PyQt6.
Notice: If you wish to dive deeper into the variations between these two variations of the library, then take a look at the PyQt6 documentation on the subject.
PyQt6 relies on Qt v6. Due to this fact, it gives courses and instruments for GUI creation, XML dealing with, community communication, common expressions, threads, SQL databases, internet looking, and different applied sciences accessible in Qt. PyQt6 implements binding for a lot of Qt courses in a set of Python modules, that are organized in a top-level Python package deal referred to as PyQt6. For PyQt6 to work, you want Python 3.6.1 or later.
PyQt6 is appropriate with Home windows, Unix, Linux, macOS, iOS, and Android. That is a beautiful characteristic should you’re searching for a GUI framework to develop multiplatform purposes which have a local feel and appear on every platform.
PyQt6 is out there below two licenses:
Your PyQt6 license should be appropriate along with your Qt license. When you use the GPL license, then your code should additionally use a GPL-compatible license. If you wish to use PyQt6 to create industrial purposes, you then want a industrial license in your set up.
Notice: The Qt Firm has developed and at the moment maintains its personal Python binding for the Qt library. The Python library is known as Qt for Python and is the official Qt for Python. Its Python package deal is known as PySide.
PyQt and PySide are each constructed on prime of Qt. Their APIs are fairly comparable as a result of they mirror the Qt API. That’s why porting PyQt code to PySide might be so simple as updating some imports. When you be taught one in every of them, you then’ll be capable to work with the opposite with minimal effort. If you wish to dive deeper into the variations between these two libraries, then you’ll be able to take a look at PyQt6 vs PySide6.
When you want extra details about PyQt6 licensing, then take a look at the license FAQs web page on the challenge’s official documentation.
Putting in PyQt
You could have a number of choices for putting in PyQt in your system or growth setting. The really useful choice is to make use of to make use of binary wheels. Wheels are the usual option to set up Python packages from the Python package deal index, PyPI.
In any case, it’s essential to contemplate that wheels for PyQt6 are solely accessible for Python 3.6.1 and later. There are wheels for Linux, macOS, and Home windows (64-bit).
All of those wheels embody copies of the corresponding Qt libraries, so that you received’t want to put in them individually.
One other set up choice is to construct PyQt from supply. This is usually a bit sophisticated, so that you may need to keep away from it if attainable. If you actually need to construct from supply, then take a look at what the library’s documentation recommends in these instances.
Alternatively, you could have the choice of utilizing package deal managers, equivalent to APT on Linux or Homebrew on macOS, to put in PyQt6. Within the subsequent few sections, you’ll undergo a few of the choices for putting in PyQt6 from completely different sources and on completely different platforms.
Digital Setting Set up With pip
More often than not, you need to create a Python digital setting to put in PyQt6 in an remoted method. To create a digital setting and set up PyQt6 in it, run the next in your command line:
Right here, you first create a digital setting utilizing the venv module from the usual library. Then you definately activate it, and eventually you put in PyQt6 in it utilizing pip. Notice that you will need to have Python 3.6.1 or later for the set up command to work appropriately.
System-Broad Set up With pip
You’ll hardly ever want to put in PyQt immediately in your system Python setting. When you ever must do this sort of set up, then run the next command in your command line or in your terminal window with out activating any digital setting:
$ python -m pip set up pyqt6
With this command, you’ll set up PyQt6 in your system Python setting immediately. You can begin utilizing the library instantly after the set up finishes. Relying in your working system, it’s possible you’ll want root or administrator privileges for this set up to work.
Regardless that it is a quick option to set up PyQt6 and begin utilizing it instantly, it’s not the really useful strategy. The really useful strategy is to make use of a Python digital setting, as you discovered within the earlier part.
Platform-Particular Set up
A number of Linux distributions embody binary packages for PyQt6 of their repositories. If this your case, then you’ll be able to set up the library utilizing the distribution’s package deal supervisor. On Ubuntu, for instance, you should utilize the next command:
$ sudo apt set up python3-pyqt6
With this command, you’ll set up PyQt6 and all of its dependencies in your base system, so you should utilize the library in any of your GUI initiatives. Notice that root privileges are wanted, which you invoke right here with the sudo command.
When you’re a macOS person, then you’ll be able to set up PyQt6 utilizing the Homebrew package deal supervisor. To do that, open a terminal and run the next command:
After operating this command, you’ll have PyQt6 put in in your Homebrew Python setting, and it’ll be prepared so that you can use.
When you use a package deal supervisor on Linux or macOS, then there’s an opportunity you received’t get the most recent model of PyQt6. A pip set up might be higher if you wish to guarantee that you’ve got the most recent launch.
Creating Your First PyQt Utility
Now that you’ve got a working PyQt set up, you’re able to create your first GUI app. You’ll create a Whats up, World! utility with Python and PyQt. Listed here are the steps that you simply’ll observe:
- Import
QApplicationand all of the required widgets fromPyQt6.QtWidgets. - Create an occasion of
QApplication. - Create your utility’s GUI.
- Present your utility’s GUI.
- Run your utility’s occasion loop, or major loop.
You’ll be able to obtain the supply code for the examples that you simply’ll code on this part by clicking the hyperlink beneath:
To kick issues off, begin by creating a brand new file referred to as howdy.py in your present working listing:
# howdy.py

"""Easy Whats up, World instance with PyQt6."""

import sys

# 1. Import QApplication and all of the required widgets
from PyQt6.QtWidgets import QApplication, QLabel, QWidget
First, you import sys, which can assist you to deal with the appliance’s termination and exit standing via the exit() perform. Then you definately import QApplication, QLabel, and QWidget from QtWidgets, which is a part of the PyQt6 package deal. With these imports, you’re performed with the first step.
To finish step two, you simply must create an occasion of QApplication. Do that as you’d create an occasion of any Python class:
# howdy.py
# ...

# 2. Create an occasion of QApplication
app = QApplication([])
On this line of code, you create the occasion of QApplication. You must create your app occasion earlier than you create any GUI object in PyQt.
Internally, the QApplication class offers with command-line arguments. That’s why it’s essential to cross in an inventory of command-line arguments to the class constructor. On this instance, you employ an empty record as a result of your app received’t be dealing with any command-line arguments.
Notice: You’ll usually discover that builders cross sys.argv to the constructor of QApplication. This object incorporates the record of command-line arguments handed right into a Python script. In case your utility wants to just accept command-line arguments, then you need to use sys.argv to deal with them. In any other case, you’ll be able to simply use an empty record, such as you did within the above instance.
Step three includes creating the appliance’s GUI. On this instance, your GUI might be primarily based on the QWidget class, which is the bottom class of all person interface objects in PyQt.
Right here’s how one can create the app’s GUI:
# howdy.py
# ...

# 3. Create your utility's GUI
window = QWidget()
window.setWindowTitle("PyQt App")
window.setGeometry(100, 100, 280, 80)
helloMsg = QLabel("<h1>Whats up, World!</h1>", guardian=window)
helloMsg.transfer(60, 15)
On this code, window is an occasion of QWidget, which gives all of the options that you simply’ll must create the appliance’s window, or type. As its names suggests, .setWindowTitle() units the window’s title in your utility. On this instance, the app’s window will present PyQt App as its title.
Notice: Extra exactly, this step requires you to create the app’s top-level or major window. The time period utility’s GUI is a bit generic. Sometimes, an utility’s GUI consists of multiple window.
You should utilize .setGeometry() to outline the window’s dimension and display place. The primary two arguments are the x and y display coordinates the place the window might be positioned. The third and fourth arguments are the window’s width and peak.
Each GUI utility wants widgets, or graphical elements that make the app’s GUI. On this instance, you employ a QLabel widget, helloMsg, to indicate the message Whats up, World! in your utility’s window.
QLabel objects can show HTML-formatted textual content, so you should utilize the HTML ingredient "<h1>Whats up, World!</h1>" to supply the specified textual content as an h1 header. Lastly, you employ .transfer() to position helloMsg on the coordinates (60, 15) on the appliance’s window.
Notice: In PyQt, you should utilize any widget—a subclass of QWidget—as a top-level window. The one situation is that the goal widget should not have a guardian widget. If you use a widget as your top-level window, PyQt mechanically gives it with a title bar and turns it into a traditional window.
The parent-child relationship between widgets has two complementary functions. A widget with no guardian is taken into account a major or top-level window. In distinction, a widget with an express guardian is a little one widget, and it’s proven inside its guardian.
This relationship is also called possession, with dad and mom proudly owning their youngsters. The PyQt possession mannequin ensures that should you delete a guardian widget, equivalent to your top-level window, then all of its little one widgets will mechanically be deleted as effectively.
To keep away from reminiscence leaks, you need to all the time ensure that any QWidget object has a guardian, with the only real exception of your top-level home windows.
You’re performed with step three, so you’ll be able to proceed with the ultimate two steps and get your PyQt GUI utility able to run:
# howdy.py
# ...

# 4. Present your utility's GUI
window.present()

# 5. Run your utility's occasion loop
sys.exit(app.exec())
On this code snippet, you name .present() on window. The decision to .present() schedules a paint occasion, which is a request to color the widgets that compose a GUI. This occasion is then added to the appliance’s occasion queue. You’ll be taught extra about PyQt’s occasion loop in a later part.
Lastly, you begin the appliance’s occasion loop by calling .exec(). The decision to .exec() is wrapped in a name to sys.exit(), which lets you cleanly exit Python and launch reminiscence assets when the appliance terminates.
You’ll be able to run your first PyQt app with the next command:
If you run this script, you’ll see a window that’ll look one thing like this:
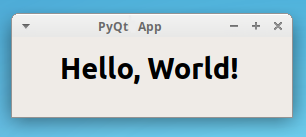
Your utility reveals a window primarily based on QWidget. The window shows the Whats up, World! message. To indicate the message, it makes use of a QLabel widget. And with that, you’ve written your first GUI desktop utility utilizing PyQt and Python! Isn’t that cool?
Contemplating Code Types
When you examine the code of your pattern GUI utility from the earlier part, you then’ll discover that PyQt’s API doesn’t observe PEP 8 coding type and naming conventions. PyQt is constructed round Qt, which is written in C++ and makes use of the camel case naming type for capabilities, strategies, and variables. That stated, once you begin writing a PyQt challenge, it’s essential to determine which naming type you’ll use.
On this regard, PEP 8 states that:
New modules and packages (together with third occasion frameworks) ought to be written to those requirements, however the place an present library has a unique type, inside consistency is most well-liked. (Supply)
As well as, the Zen of Python says:
…practicality beats purity. (Supply)
If you wish to write constant PyQt-related code, then you need to follow the framework’s coding type. On this tutorial, you’ll observe the PyQt coding type for consistency. You’ll use camel case as an alternative of the standard Python snake case.
Studying the Fundamentals of PyQt
You’ll must grasp the essential elements of PyQt if you wish to proficiently use this library to develop your GUI purposes. A few of these elements embody:
- Widgets
- Structure managers
- Dialogs
- Important home windows
- Purposes
- Occasion loops
- Indicators and slots
These components are the constructing blocks of any PyQt GUI utility. Most of them are represented as Python courses that stay within the PyQt6.QtWidgets module. These components are extraordinarily vital. You’ll be taught extra about them in the next few sections.
Widgets
Widgets are rectangular graphical elements which you can place in your utility’s home windows to construct the GUI. Widgets have a number of attributes and strategies that assist you to tweak their look and habits. They’ll additionally paint a illustration of themselves on the display.
Widgets additionally detect mouse clicks, keypresses, and different occasions from the person, the window system, and different sources. Every time a widget catches an occasion, it emits a sign to announce its state change. PyQt has a wealthy and trendy assortment of widgets. Every of these widgets serves a unique goal.
Among the commonest and helpful PyQt widgets are:
- Buttons
- Labels
- Line edits
- Combo packing containers
- Radio buttons
First up is the button. You’ll be able to create a button by instantiating QPushButton, a category that gives a basic command button. Typical buttons are Okay, Cancel, Apply, Sure, No, and Shut. Right here’s how they appear on a Linux system:
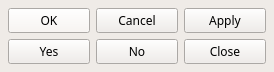
Buttons like these are maybe essentially the most generally used widgets in any GUI. When somebody clicks them, your app instructions the pc to carry out actions. That is how one can execute computations when a person clicks a button.
Up subsequent are labels, which you’ll be able to create with QLabel. Labels allow you to show helpful data as textual content or pictures:

You’ll use labels like these to elucidate learn how to use your app’s GUI. You’ll be able to tweak a label’s look in a number of methods. A label may even settle for HTML-formatted textual content, as you noticed earlier. You too can use labels to specify a keyboard shortcut to maneuver the cursor focus to a given widget in your GUI.
One other frequent widget is the line edit, also called the enter field. This widget lets you enter a single line of textual content. You’ll be able to create line edits with the QLineEdit class. Line edits are helpful when it’s essential to get the person’s enter as plain textual content.
Right here’s how line edits look on a Linux system:
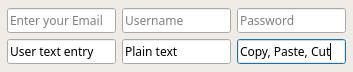
Line edits like these mechanically present fundamental enhancing operations like copy, paste, undo, redo, drag, drop, and so forth. Within the above determine, you may as well see that the objects on the primary row present placeholder textual content to tell the person what sort of enter is required.
Combo packing containers are one other basic sort of widget in GUI purposes. You’ll be able to create them by instantiating QComboBox. A combo field will current your person with a dropdown record of choices in a method that takes up minimal display area.
Right here’s an instance of a combo field that gives a dropdown record of in style programming languages:
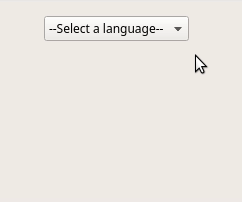
This combo field is read-only, which signifies that customers can choose one in every of a number of choices however can’t add their very own choices. Combo packing containers can be editable, permitting customers so as to add new choices on the fly. Combo packing containers may also comprise pixmaps, strings, or each.
The final widget that you simply’ll study is the radio button, which you’ll be able to create with QRadioButton. A QRadioButton object is an choice button which you can click on to change on. Radio buttons are helpful once you want the person to pick out one in every of many choices. All choices in a radio button are seen on the display on the identical time:
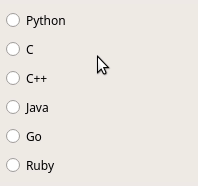
On this radio buttons group, just one button might be checked at a given time. If the person selects one other radio button, then the beforehand chosen button will change off mechanically.
PyQt has a big assortment of widgets. On the time of this writing, there are over forty accessible so that you can use to create your utility’s GUI. Right here, you’ve studied solely a small pattern. Nonetheless, that’s sufficient to indicate you the ability and suppleness of PyQt. Within the subsequent part, you’ll learn to lay out completely different widgets to construct trendy and totally useful GUIs in your purposes.
Structure Managers
Now that about widgets and the way they’re used to construct GUIs, it’s essential to know learn how to organize a set of widgets in order that your GUI is each coherent and useful. In PyQt, you’ll discover a couple of strategies for laying out the widgets on a type or window. As an example, you should utilize the .resize() and .transfer() strategies to offer widgets absolute sizes and positions.
Nonetheless, this method can have some drawbacks. You’ll should:
- Do many guide calculations to find out the proper dimension and place of each widget
- Do additional calculations to reply to window resize occasions
- Redo most of your calculations when the window’s format adjustments in any method
One other approach includes utilizing .resizeEvent() to calculate the widget’s dimension and place dynamically. On this case, you’ll have comparable complications as with the earlier approach.
The best and really useful approach is to make use of PyQt’s format managers. They’ll enhance your productiveness, mitigate the chance of errors, and enhance your code’s maintainability.
Structure managers are courses that assist you to dimension and place your widgets on the appliance’s window or type. They mechanically adapt to resize occasions and GUI adjustments, controlling the dimensions and place of all their little one widgets.
Notice: When you develop internationalized purposes, you then’ve most likely seen translated textual content get reduce off mid-sentence. That is prone to occur when the goal pure language is extra verbose than the unique one. Structure managers might help you stop this frequent challenge by mechanically adjusting the widget dimension to the accessible area. Nonetheless, this characteristic can typically fail with notably wordy pure languages.
PyQt gives 4 fundamental format supervisor courses:
The primary format supervisor class, QHBoxLayout, arranges widgets horizontally from left to proper, like with the hypothetical widgets within the following determine:
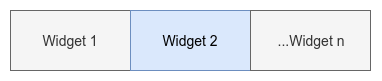
Within the horizontal format, the widgets will seem one subsequent to the opposite, ranging from the left. The code instance beneath reveals learn how to use QHBoxLayout to rearrange three buttons horizontally:
 1# h_layout.py
 2
 3"""Horizontal format instance."""
 4
 5import sys
 6
 7from PyQt6.QtWidgets import (
 8    QApplication,
 9    QHBoxLayout,
10    QPushButton,
11    QWidget,
12)
13
14app = QApplication([])
15window = QWidget()
16window.setWindowTitle("QHBoxLayout")
17
18format = QHBoxLayout()
19format.addWidget(QPushButton("Left"))
20format.addWidget(QPushButton("Heart"))
21format.addWidget(QPushButton("Proper"))
22window.setLayout(format)
23
24window.present()
25sys.exit(app.exec())
Right here’s how this instance creates a horizontal format of buttons:
- Line 18 creates a
QHBoxLayoutobject referred to asformat. - Traces 19 to 21 add three buttons to
formatby calling the.addWidget()methodology. - Line 22 units
formatas your window’s format with.setLayout().
If you run python h_layout.py out of your command line, you’ll get the next output:
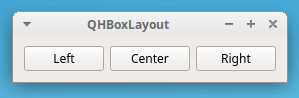
The above determine reveals three buttons in a horizontal association. The buttons are proven from left to proper in the identical order as you added them in your code.
The following format supervisor class is QVBoxLayout, which arranges widgets vertically from prime to backside, like within the following determine:
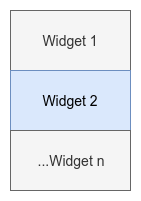
Every new widget will seem beneath the earlier one. This format lets you to assemble vertical layouts and arrange your widgets from prime to backside in your GUI.
Right here’s how one can create a QVBoxLayout object containing three buttons:
 1# v_layout.py
 2
 3"""Vertical format instance."""
 4
 5import sys
 6
 7from PyQt6.QtWidgets import (
 8    QApplication,
 9    QPushButton,
10    QVBoxLayout,
11    QWidget,
12)
13
14app = QApplication([])
15window = QWidget()
16window.setWindowTitle("QVBoxLayout")
17
18format = QVBoxLayout()
19format.addWidget(QPushButton("Prime"))
20format.addWidget(QPushButton("Heart"))
21format.addWidget(QPushButton("Backside"))
22window.setLayout(format)
23
24window.present()
25sys.exit(app.exec())
On line 18, you create an occasion of QVBoxLayout referred to as format. Within the subsequent three traces, you add three buttons to format. Lastly, you employ the format object to rearrange the widget in a vertical format via the .setLayout() methodology on line 22.
If you run this pattern utility, you’ll get a window that appears one thing like this:
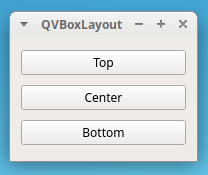
This determine reveals three buttons in a vertical association, one beneath the opposite. The buttons seem in the identical order as you added them to your code, from prime to backside.
The third format supervisor in your record is QGridLayout. This class arranges widgets in a grid of rows and columns. Each widget may have a relative place on the grid. You’ll be able to outline a widget’s place with a pair of coordinates like (row, column). Every coordinate should be an integer quantity. These pairs of coordinates outline which cell on the grid a given widget will occupy.
The grid format will look one thing like this:
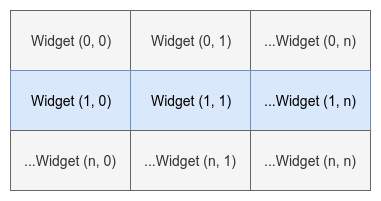
QGridLayout takes the accessible area, divides it up into rows and columns, and places every little one widget into its personal cell.
Right here’s learn how to create a grid format association in your GUI:
 1# g_layout.py
 2
 3"""Grid format instance."""
 4
 5import sys
 6
 7from PyQt6.QtWidgets import (
 8    QApplication,
 9    QGridLayout,
10    QPushButton,
11    QWidget,
12)
13
14app = QApplication([])
15window = QWidget()
16window.setWindowTitle("QGridLayout")
17
18format = QGridLayout()
19format.addWidget(QPushButton("Button (0, 0)"), 0, 0)
20format.addWidget(QPushButton("Button (0, 1)"), 0, 1)
21format.addWidget(QPushButton("Button (0, 2)"), 0, 2)
22format.addWidget(QPushButton("Button (1, 0)"), 1, 0)
23format.addWidget(QPushButton("Button (1, 1)"), 1, 1)
24format.addWidget(QPushButton("Button (1, 2)"), 1, 2)
25format.addWidget(QPushButton("Button (2, 0)"), 2, 0)
26format.addWidget(
27    QPushButton("Button (2, 1) + 2 Columns Span"), 2, 1, 1, 2
28)
29window.setLayout(format)
30
31window.present()
32sys.exit(app.exec())
On this instance, you create an utility that makes use of a QGridLayout object to prepare its widgets on the display. Notice that, on this case, the second and third arguments that you simply cross to .addWidget() are integer numbers defining every widget’s place on the grid.
On traces 26 to twenty-eight, you cross two extra arguments to .addWidget(). These arguments are rowSpan and columnSpan, they usually’re the fourth and fifth arguments handed to the perform. You should utilize them to make a widget occupy multiple row or column, such as you did within the instance.
When you run this code out of your command line, you then’ll get a window that appears one thing like this:
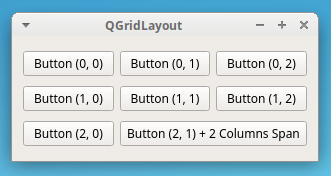
On this determine, you’ll be able to see your widgets organized in a grid of rows and columns. The final widget occupies two columns, as you specified on traces 26 to twenty-eight.
The final format supervisor that you simply’ll study is QFormLayout. This class arranges widgets in a two-column format. The primary column normally shows messages in labels. The second column usually incorporates widgets like QLineEdit, QComboBox, QSpinBox, and so forth. These enable the person to enter or edit knowledge relating to the data within the first column.
The next diagram reveals how type layouts work in observe:
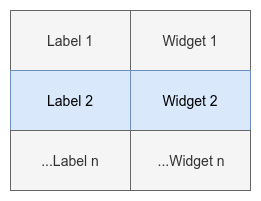
The left column consists of labels, whereas the proper column consists of enter widgets. When you’re creating a database utility, then this sort of format is usually a great tool that’ll enhance your productiveness when creating enter varieties.
The next instance reveals learn how to create an utility that makes use of a QFormLayout object to rearrange its widgets:
 1# f_layout.py
 2
 3"""Kind format instance."""
 4
 5import sys
 6
 7from PyQt6.QtWidgets import (
 8    QApplication,
 9    QFormLayout,
10    QLineEdit,
11    QWidget,
12)
13
14app = QApplication([])
15window = QWidget()
16window.setWindowTitle("QFormLayout")
17
18format = QFormLayout()
19format.addRow("Title:", QLineEdit())
20format.addRow("Age:", QLineEdit())
21format.addRow("Job:", QLineEdit())
22format.addRow("Hobbies:", QLineEdit())
23window.setLayout(format)
24
25window.present()
26sys.exit(app.exec())
Traces 18 to 23 do the laborious work on this instance. QFormLayout has a handy methodology referred to as .addRow(). You should utilize this methodology so as to add a two-widget row to the format. The primary argument to .addRow() ought to be a label or a string. Then, the second argument might be any widget that enables the person to enter or edit knowledge. On this particular instance, you’ve used line edits.
When you run this code, you then’ll get a window that appears one thing like this:
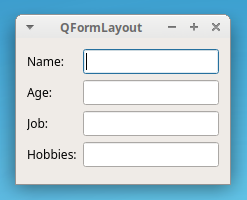
The above determine reveals a window that makes use of a type format. The primary column incorporates labels to ask the person for some data. The second column reveals widgets that enable the person to enter or edit the required data.
Dialogs
With PyQt, you’ll be able to develop two sorts of GUI desktop purposes. Relying on the category that you simply use to create the primary type or window, you’ll have one of many following:
- A major window–type utility: The applying’s major window inherits from
QMainWindow. - A dialog-style utility: The applying’s major window inherits from
QDialog.
You’ll begin with dialog-style purposes first. Within the subsequent part, you’ll study major window–type purposes.
To develop a dialog-style utility, it’s essential to create a GUI class that inherits from QDialog, which is the bottom class of all dialog home windows. A dialog window is a stand-alone window that you should utilize as the primary window in your utility.
Notice: Dialog home windows are generally utilized in major window–type purposes for temporary communication and interplay with the person.
If you use dialog home windows to speak with the person, these dialogs might be:
- Modal: Blocks enter to every other seen home windows in the identical utility. You’ll be able to show a modal dialog by calling its
.exec()methodology. - Modeless: Operates independently from different home windows in the identical utility. You’ll be able to show a modeless dialog through the use of its
.present()methodology.
Dialog home windows may also present a return worth and have default buttons, equivalent to Okay and Cancel.
A dialog is all the time an unbiased window. If a dialog has a guardian, then it’ll show centered on prime of the guardian widget. Dialogs with a guardian will share the guardian’s process bar entry. When you don’t set guardian for a given dialog, then the dialog will get its personal entry within the system’s process bar.
Right here’s an instance of the way you’d use QDialog to develop a dialog-style utility:
 1# dialog.py
 2
 3"""Dialog-style utility."""
 4
 5import sys
 6
 7from PyQt6.QtWidgets import (
 8    QApplication,
 9    QDialog,
10    QDialogButtonBox,
11    QFormLayout,
12    QLineEdit,
13    QVBoxLayout,
14)
15
16class Window(QDialog):
17    def __init__(self):
18        tremendous().__init__(guardian=None)
19        self.setWindowTitle("QDialog")
20        dialogLayout = QVBoxLayout()
21        formLayout = QFormLayout()
22        formLayout.addRow("Title:", QLineEdit())
23        formLayout.addRow("Age:", QLineEdit())
24        formLayout.addRow("Job:", QLineEdit())
25        formLayout.addRow("Hobbies:", QLineEdit())
26        dialogLayout.addLayout(formLayout)
27        buttons = QDialogButtonBox()
28        buttons.setStandardButtons(
29            QDialogButtonBox.StandardButton.Cancel
30            | QDialogButtonBox.StandardButton.Okay
31        )
32        dialogLayout.addWidget(buttons)
33        self.setLayout(dialogLayout)
34
35if __name__ == "__main__":
36    app = QApplication([])
37    window = Window()
38    window.present()
39    sys.exit(app.exec())
This utility is a little more elaborate. Right here’s what this code does:
- Line 16 defines a
Windowclass for the app’s GUI by inheriting fromQDialog. - Line 18 calls the guardian class’s
.__init__()methodology utilizingtremendous(). This name lets you correctly initialize cases of this class. On this instance, theguardianargument is ready toNoneas a result of this dialog might be your major window. - Line 19 units the window’s title.
- Line 20 assigns a
QVBoxLayoutobject todialogLayout. - Line 21 assigns a
QFormLayoutobject toformLayout. - Traces 22 to 25 add widgets to
formLayout. - Line 26 calls
.addLayout()ondialogLayout. This name embeds the shape format into the worldwide dialog format. - Line 27 defines a button field, which gives a handy area to show the dialog’s buttons.
- Traces 28 to 31 add two commonplace buttons,
OkayandCancel, to the dialog. - Line 32 provides the button field to the dialog by calling
.addWidget().
The if __name__ == "__main__": assemble wraps up the app’s major code. This type of conditional assertion is frequent in Python apps. It ensures that the indented code will solely run if the containing file is executed as a program slightly than imported as a module.
Notice: On line 26 within the above instance, you’ll word that format managers might be nested inside each other. You’ll be able to nest layouts by calling .addLayout() on the container format with the nested format as an argument.
The above code instance will present a window that appears one thing like this:
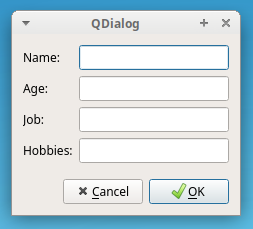
This determine reveals the GUI that you simply’ve created utilizing a QFormLayout object to rearrange the widgets and a QVBoxLayout format for the appliance’s international format.
Important Home windows
More often than not, your GUI purposes might be major window–type apps. Which means they’ll have a menu bar, some toolbars, a standing bar, and a central widget that’ll be the GUI’s major ingredient. It’s additionally frequent in your apps to have a number of dialogs to perform secondary actions that depend upon a person’s enter.
You’ll inherit from QMainWindow to develop major window–type purposes. An occasion of a category that derives from QMainWindow is taken into account the app’s major window and ought to be distinctive.
QMainWindow gives a framework for constructing your utility’s GUI rapidly. This class has its personal built-in format, which accepts the next graphical elements:
| Element | Place on Window | Description |
|---|---|---|
| One menu bar | Prime | Holds the appliance’s major menu |
| A number of toolbars | Sides | Maintain device buttons and different widgets, equivalent to QComboBox, QSpinBox, and extra |
| One central widget | Heart | Holds the window’s central widget, which might be of any sort, together with a composite widget |
| A number of dock widgets | Across the central widget | Are small, movable, and hidable home windows |
| One standing bar | Backside | Holds the app’s standing bar, which reveals standing data |
You’ll be able to’t create a major window with out a central widget. You want a central widget even when it’s only a placeholder. When that is the case, you should utilize a QWidget object as your central widget.
You’ll be able to set the window’s central widget with the .setCentralWidget() methodology. The primary window’s format will assist you to have just one central widget, however it may be a single or a composite widget. The next code instance reveals you learn how to use QMainWindow to create a major window–type utility:
 1# main_window.py
 2
 3"""Important window-style utility."""
 4
 5import sys
 6
 7from PyQt6.QtWidgets import (
 8    QApplication,
 9    QLabel,
10    QMainWindow,
11    QStatusBar,
12    QToolBar,
13)
14
15class Window(QMainWindow):
16    def __init__(self):
17        tremendous().__init__(guardian=None)
18        self.setWindowTitle("QMainWindow")
19        self.setCentralWidget(QLabel("I am the Central Widget"))
20        self._createMenu()
21        self._createToolBar()
22        self._createStatusBar()
23
24    def _createMenu(self):
25        menu = self.menuBar().addMenu("&Menu")
26        menu.addAction("&Exit", self.shut)
27
28    def _createToolBar(self):
29        instruments = QToolBar()
30        instruments.addAction("Exit", self.shut)
31        self.addToolBar(instruments)
32
33    def _createStatusBar(self):
34        standing = QStatusBar()
35        standing.showMessage("I am the Standing Bar")
36        self.setStatusBar(standing)
37
38if __name__ == "__main__":
39    app = QApplication([])
40    window = Window()
41    window.present()
42    sys.exit(app.exec())
Right here’s how this code works:
- Line 15 creates a category,
Window, that inherits fromQMainWindow. - Line 16 defines the category initializer.
- Line 17 calls the bottom class’s initializer. Once more, the
guardianargument is ready toNoneas a result of that is your app’s major window, so it should not have a guardian. - Line 18 units the window’s title.
- Line 19 units a
QLabelbecause the window’s central widget. - Traces 20 to 22 name private strategies to create completely different GUI components:
- Traces 24 to 26 create the primary menubar with a drop-down menu referred to as Menu. This menu may have a menu choice to exit the app.
- Traces 28 to 31 create the toolbar, which may have a toolbar button to exit the app.
- Traces 33 to 36 create the app’s standing bar.
If you implement GUI elements utilizing their very own strategies, such as you did with the menu bar, toolbar, and standing bar on this instance, you’re making your code extra readable and extra maintainable.
Notice: When you’re operating this instance on macOS, then you might have points with the app’s major menu. macOS hides sure menu choices, like Exit. Keep in mind that macOS reveals the Exit or Stop choice below the app’s entry on the highest of the display.
If you run the above pattern utility, you’ll get a window like the next:
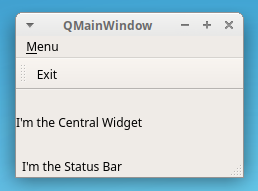
As you’ll be able to affirm, your major window–type utility has the next elements:
- One major menu generically referred to as Menu
- One toolbar with an Exit device button
- One central widget consisting of a
QLabelobject with a textual content message - One standing bar on the window’s backside
That’s it! You’ve discovered learn how to construct a major window–type utility with Python and PyQt. Up so far, you’ve discovered about a few of the extra vital graphical elements in PyQt’s set of widgets. Within the subsequent few sections, you’ll examine different vital ideas associated to constructing GUI purposes with PyQt.
Purposes
QApplication is essentially the most foundational class that you simply’ll use when creating PyQt GUI purposes. This class is the core element of any PyQt utility. It manages the appliance’s management move in addition to its major settings.
In PyQt, any occasion of QApplication is an utility. Each PyQt GUI utility will need to have one QApplication occasion. Among the obligations of this class embody:
- Dealing with the app’s initialization and finalization
- Offering the occasion loop and occasion dealing with
- Dealing with most system-wide and application-wide settings
- Offering entry to international data, equivalent to the appliance’s listing, display dimension, and so forth
- Parsing frequent command-line arguments
- Defining the appliance’s feel and appear
- Offering localization capabilities
These are simply a few of the core obligations of QApplication. So, it is a basic class in relation to creating PyQt GUI purposes.
Probably the most vital obligations of QApplication is to supply the occasion loop and the complete occasion dealing with mechanism. Within the following part, you’ll take a better have a look at what the occasion loop is and the way it works.
Occasion Loops
GUI purposes are event-driven. Which means capabilities and strategies are referred to as in response to person actions, like clicking on a button, deciding on an merchandise from a combo field, getting into or updating the textual content in a textual content edit, urgent a key on the keyboard, and so forth. These person actions are generally often known as occasions.
Occasions are dealt with by an occasion loop, also called a major loop. An occasion loop is an infinite loop by which all occasions from the person, the window system, and every other sources are processed and dispatched. The occasion loop waits for an occasion to happen after which dispatches it to carry out some process. The occasion loop continues to work till the appliance is terminated.
All GUI purposes have an occasion loop. When an occasion occurs, then the loop checks if it’s a terminate occasion. In that case, the loop finishes, and the appliance exits. In any other case, the occasion is distributed to the appliance’s occasion queue for additional processing, and the loop iterates once more. In PyQt6, you’ll be able to run the app’s occasion loop by calling .exec() on the QApplication object.
For an occasion to set off an motion, it’s essential to join the occasion with the motion that you simply need to execute. In PyQt, you’ll be able to set up that reference to the alerts and slots mechanism, which you’ll discover within the subsequent part.
Indicators and Slots
PyQt widgets act as event-catchers. Which means each widget can catch particular occasions, like mouse clicks, keypresses, and so forth. In response to those occasions, a widget emits a sign, which is a form of message that says a change in its state.
The sign by itself doesn’t carry out any motion. If you’d like a sign to set off an motion, then it’s essential to join it to a slot. That is the perform or methodology that’ll carry out an motion at any time when its related sign is emitted. You should utilize any Python callable as a slot.
If a sign is linked to a slot, then the slot is known as at any time when the sign is emitted. If a sign isn’t linked to any slot, then nothing occurs and the sign is ignored. Among the most related options of alerts and slots embody the next:
- A sign might be linked to 1 or many slots.
- A sign can also be linked to a different sign.
- A slot could also be linked to 1 or many alerts.
You should utilize the next syntax to attach a sign and a slot:
widget.sign.join(slot_function)
This may join slot_function to widget.sign. Any more, at any time when .sign is emitted, slot_function() might be referred to as.
The code beneath reveals learn how to use the alerts and slots mechanism in a PyQt utility:
 1# signals_slots.py
 2
 3"""Indicators and slots instance."""
 4
 5import sys
 6
 7from PyQt6.QtWidgets import (
 8    QApplication,
 9    QLabel,
10    QPushButton,
11    QVBoxLayout,
12    QWidget,
13)
14
15def greet():
16    if msgLabel.textual content():
17        msgLabel.setText("")
18    else:
19        msgLabel.setText("Whats up, World!")
20
21app = QApplication([])
22window = QWidget()
23window.setWindowTitle("Indicators and slots")
24format = QVBoxLayout()
25
26button = QPushButton("Greet")
27button.clicked.join(greet)
28
29format.addWidget(button)
30msgLabel = QLabel("")
31format.addWidget(msgLabel)
32window.setLayout(format)
33window.present()
34sys.exit(app.exec())
On line 15, you create greet(), which you’ll use as a slot. Then in line 27, you join the button’s .clicked sign to greeting(). This manner, at any time when the person clicks the Greet button, the greet() slot is known as and the label object’s textual content alternates between Whats up, World! and an empty string:
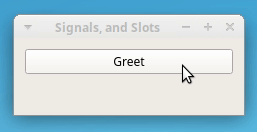
If you click on the Greet button, the Whats up, World! message seems and disappears in your utility’s major window.
Notice: Each widget has its personal set of predefined alerts. You’ll be able to examine them out on the widget’s documentation.
In case your slot perform must obtain additional arguments, then you’ll be able to cross them utilizing functools.partial(). For instance, you’ll be able to modify greet() to take an argument, like within the following code:
# signals_slots.py
# ...

def greet(identify):
    if msg.textual content():
        msg.setText("")
    else:
        msg.setText(f"Whats up, {identify}")

# ...
Now greet() must obtain an argument referred to as identify. If you wish to join this new model of greet() to the .clicked sign, then you are able to do one thing like this:
# signals_slots.py

"""Indicators and slots instance."""

import sys
from functools import partial

# ...

button = QPushButton("Greet")
button.clicked.join(partial(greeting, "World!"))

# ...
For this code to work, it’s essential to import partial() from functools first. The decision to partial() returns a perform object that behaves equally to greet() when referred to as with identify="World!". Now, when the person clicks on the button, the message Whats up, World! will seem within the label similar to earlier than.
Notice: You too can use a lambda perform to attach a sign to a slot that requires additional arguments. As an train, attempt to code the above instance utilizing lambda as an alternative of functools.partial().
The alerts and slots mechanism is what you’ll use to offer life to your PyQt GUI purposes. This mechanism will assist you to flip person occasions into concrete actions. You’ll be able to dive deeper into alerts and slots by testing the PyQt6 documentation on the subject.
Now the fundamentals of a number of vital ideas of PyQt. With this information and the library’s documentation at hand, you’re prepared to begin creating your individual GUI purposes. Within the subsequent part, you’ll construct your first totally useful GUI utility.
Making a Calculator App With Python and PyQt
On this part, you’ll develop a calculator GUI app utilizing the Mannequin-View-Controller (MVC) design sample. This sample has three layers of code, with each having completely different roles:
-
The mannequin takes care of your app’s enterprise logic. It incorporates the core performance and knowledge. In your calculator app, the mannequin will deal with the enter values and the calculations.
-
The view implements your app’s GUI. It hosts all of the widgets that the tip person would wish to work together with the appliance. The view additionally receives a person’s actions and occasions. To your instance, the view would be the calculator window in your display.
-
The controller connects the mannequin and the view to make the appliance work. Customers’ occasions, or requests, are despatched to the controller, which places the mannequin to work. When the mannequin delivers the requested consequence, or knowledge, in the proper format, the controller forwards it to the view. In your calculator app, the controller will obtain the goal math expressions from the GUI, ask the mannequin to carry out calculations, and replace the GUI with the consequence.
Right here’s a step-by-step description of how your GUI calculator app will work:
- The person performs an motion or request (occasion) on the view (GUI).
- The view notifies the controller in regards to the person’s motion.
- The controller will get the person’s request and queries the mannequin for a response.
- The mannequin processes the controller’s question, performs the required computations, and returns the consequence.
- The controller receives the mannequin’s response and updates the view accordingly.
- The person lastly sees the requested consequence on the view.
You’ll use this MVC design to construct your calculator app with Python and PyQt.
Creating the Skeleton for Your PyQt Calculator App
To kick issues off, you’ll begin by implementing a minimal skeleton in your utility in a file referred to as pycalc.py. You may get this file and the remainder of the supply code in your calculator app by clicking the hyperlink beneath:
When you’d want to code the challenge by yourself, then go forward and create pycalc.py in your present working listing. Open the file in your favourite code editor or IDE and kind the next code:
 1# pycalc.py
 2
 3"""PyCalc is an easy calculator constructed with Python and PyQt."""
 4
 5import sys
 6
 7from PyQt6.QtWidgets import QApplication, QMainWindow, QWidget
 8
 9WINDOW_SIZE = 235
10
11class PyCalcWindow(QMainWindow):
12    """PyCalc's major window (GUI or view)."""
13
14    def __init__(self):
15        tremendous().__init__()
16        self.setWindowTitle("PyCalc")
17        self.setFixedSize(WINDOW_SIZE, WINDOW_SIZE)
18        centralWidget = QWidget(self)
19        self.setCentralWidget(centralWidget)
20
21def major():
22    """PyCalc's major perform."""
23    pycalcApp = QApplication([])
24    pycalcWindow = PyCalcWindow()
25    pycalcWindow.present()
26    sys.exit(pycalcApp.exec())
27
28if __name__ == "__main__":
29    major()
This script implements all of the boilerplate code that you simply’ll must run a fundamental GUI utility. You’ll use this skeleton to construct your calculator app.
Right here’s how this code works:
-
Line 5 imports
sys. This module gives theexit()perform, which you’ll use to cleanly terminate the app. -
Line 7 imports the required courses from
PyQt6.QtWidgets. -
Line 9 creates a Python fixed to carry a hard and fast window dimension in pixels in your calculator app.
-
Line 11 creates the
PyCalcWindowclass to supply the app’s GUI. Notice that this class inherits fromQMainWindow. -
Line 14 defines the category initializer.
-
Line 15 calls
.__init__()on the tremendous class for initialization functions. -
Line 16 units the window’s title to
"PyCalc". -
Line 17 makes use of
.setFixedSize()to offer the window a hard and fast dimension. This ensures that the person received’t be capable to resize the window throughout the app’s execution. -
Traces 18 and 19 create a
QWidgetobject and set it because the window’s central widget. This object would be the guardian of all of the required GUI elements in your calculator app. -
Line 21 defines your calculator’s major perform. Having a
major()perform like it is a greatest observe in Python. This perform gives the appliance’s entry level. Insidemajor(), your program does the next:- Line 23 creates a
QApplicationobject namedpycalcApp. - Line 24 creates an occasion of the app’s window,
pycalcWindow. - Line 25 reveals the GUI by calling
.present()on the window object. - Line 26 runs the appliance’s occasion loop with
.exec().
- Line 23 creates a
Lastly, line 29 calls major() to execute your calculator app. If you run the above script, the next window seems in your display:
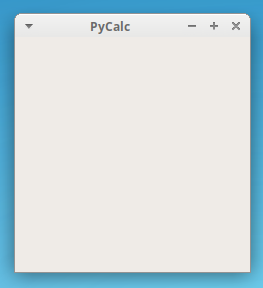
That’s it! You’ve efficiently constructed a completely useful app skeleton in your GUI calculator app. Now you’re able to proceed constructing the challenge.
Finishing the App’s View
The GUI that you’ve got at this level doesn’t actually appear to be a calculator. It is advisable to end this GUI by including a show to indicate the goal math operation and a keyboard of buttons representing numbers and fundamental math operators. You’ll additionally add buttons representing different required symbols and actions, like clearing the show.
First, it’s essential to replace your imports like within the code beneath:
# pycalc.py

import sys

from PyQt6.QtCore import Qt
from PyQt6.QtWidgets import (
    QApplication,
    QGridLayout,
    QLineEdit,
    QMainWindow,
    QPushButton,
    QVBoxLayout,
    QWidget,
)

# ...
You’ll use a QVBoxLayout format supervisor for the calculator’s international format. To rearrange the buttons, you’ll use a QGridLayout object. The QLineEdit class will work because the calculator’s show and QPushButton will present the required buttons.
Now you’ll be able to replace the initializer for PyCalcWindow:
# pycalc.py
# ...

class PyCalcWindow(QMainWindow):
    """PyCalc's major window (GUI or view)."""

    def __init__(self):
        tremendous().__init__()
        self.setWindowTitle("PyCalc")
        self.setFixedSize(WINDOW_SIZE, WINDOW_SIZE)
        self.generalLayout = QVBoxLayout()
        centralWidget = QWidget(self)
        centralWidget.setLayout(self.generalLayout)
        self.setCentralWidget(centralWidget)
        self._createDisplay()
        self._createButtons()

# ...
You’ve added the highlighted traces of code. You’ll use .generalLayout because the app’s basic format. On this format, you’ll place the show on the prime and the keyboard buttons in a grid format on the backside.
The calls to ._createDisplay() and ._createButtons() received’t work at this level, since you haven’t carried out these strategies but. To repair this challenge, you’ll begin by coding ._createDisplay().
Get again to your code editor and replace pycalc.py like within the following code:
# pycalc.py
# ...

WINDOW_SIZE = 235
DISPLAY_HEIGHT = 35

class PyCalcWindow(QMainWindow):
    # ...

    def _createDisplay(self):
        self.show = QLineEdit()
        self.show.setFixedHeight(DISPLAY_HEIGHT)
        self.show.setAlignment(Qt.AlignmentFlag.AlignRight)
        self.show.setReadOnly(True)
        self.generalLayout.addWidget(self.show)

# ...
On this code snippet, you first outline a brand new fixed to carry the show peak in pixels. Then you definately outline ._createDisplay() inside PyCalcWindow.
To create the calculator’s show, you employ a QLineEdit widget. Then you definately set a hard and fast peak of thirty-five pixels in your show utilizing the DISPLAY_HEIGHT fixed. The show may have its textual content left-aligned. Lastly, the show might be read-only to stop direct enhancing by the person. The final line of code provides the show to the calculator’s basic format.
Subsequent up, you’ll implement the ._createButtons() methodology to create the required buttons in your calculator’s keyboard. These buttons will stay in a grid format, so that you want a option to symbolize their coordinates on the grid. Every coordinate pair will include a row and a column. To symbolize a coordinate pair, you’ll use a record of lists. Every nested record will symbolize a row.
Now go forward and replace the pycalc.py file with the next code:
# pycalc.py
# ...

WINDOW_SIZE = 235
DISPLAY_HEIGHT = 35
BUTTON_SIZE = 40

# ...
On this piece of code, you outline a brand new fixed referred to as BUTTON_SIZE. You’ll use this fixed to supply the dimensions of your calculator’s buttons. On this particular instance, all of the buttons may have a sq. form with forty pixels per facet.
With this preliminary setup, you’ll be able to code the ._createButtons() methodology. You’ll use an inventory of lists to carry the keys or buttons and their place on the calculator keyboard. A QGridLayout will assist you to organize the buttons on the calculator’s window:
# pycalc.py
# ...

class PyCalcWindow(QMainWindow):
    # ...

    def _createButtons(self):
        self.buttonMap = {}
        buttonsLayout = QGridLayout()
        keyBoard = [
            ["7", "8", "9", "/", "C"],
            ["4", "5", "6", "*", "("],
            ["1", "2", "3", "-", ")"],
            ["0", "00", ".", "+", "="],
        ]

        for row, keys in enumerate(keyBoard):
            for col, key in enumerate(keys):
                self.buttonMap[key] = QPushButton(key)
                self.buttonMap[key].setFixedSize(BUTTON_SIZE, BUTTON_SIZE)
                buttonsLayout.addWidget(self.buttonMap[key], row, col)

        self.generalLayout.addLayout(buttonsLayout)

# ...
You first create the empty dictionary self.buttonMap to carry the calculator buttons. Then, you create an inventory of lists to retailer the important thing labels. Every row or nested record will symbolize a row within the grid format, whereas the index of every key label will symbolize the corresponding column on the format.
Then you definately outline two for loops. The outer loop iterates over the rows and the internal loop iterates over the columns. Contained in the internal loop, you create the buttons and add them to each self.buttonMap and buttonsLayout. Each button may have a hard and fast dimension of 40x40 pixels, which you set with .setFixedSize() and the BUTTON_SIZE fixed.
Lastly, you embed the grid format into the calculator’s basic format by calling .addLayout() on the .generalLayout object.
Notice: On the subject of widget dimension, you’ll hardly ever discover measurement models within the PyQt documentation. The measurement unit is assumed to be pixels, besides once you’re working with QPrinter class, which makes use of factors.
Now your calculator’s GUI will present the show and the buttons gracefully. Nonetheless, you don’t have any option to replace the data proven on the show. You’ll repair this by including a couple of additional strategies to PyCalcWindow:
| Methodology | Description |
|---|---|
.setDisplayText() |
Units and updates the show’s textual content |
.displayText() |
Will get the present show’s textual content |
.clearDisplay() |
Clears the show’s textual content |
These strategies will gives the GUI’s public interface and full the view class in your Python calculator app.
Right here’s a attainable implementation:
# pycalc.py
# ...

class PyCalcWindow(QMainWindow):
    # ...

    def setDisplayText(self, textual content):
        """Set the show's textual content."""
        self.show.setText(textual content)
        self.show.setFocus()

    def displayText(self):
        """Get the show's textual content."""
        return self.show.textual content()

    def clearDisplay(self):
        """Clear the show."""
        self.setDisplayText("")

# ...
Right here’s a breakdown of what every methodology does:
-
.setDisplayText()makes use of.setText()to set and replace the show’s textual content. It additionally makes use of.setFocus()to set the cursor’s give attention to the show. -
.displayText()is a getter methodology that returns the show’s present textual content. When the person clicks the equal signal (=) on the calculator’s keyboard, the app will use the return worth of.displayText()as the mathematics expression to be evaluated. -
.clearDisplay()units the show’s textual content to an empty string ("") in order that the person can introduce a brand new math expression. This methodology might be triggered each time the person presses the C button on the calculator’s board.
Now your calculator’s GUI is prepared to be used! If you run the appliance, you’ll get a window like the next:
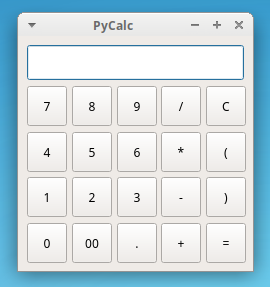
You’ve accomplished the calculator’s GUI, which seems fairly glossy! Nonetheless, should you attempt to do some calculations, then the calculator received’t reply as anticipated. That’s since you haven’t carried out the mannequin and the controller elements. Within the subsequent part, you’ll write the calculator’s mannequin.
Implementing the Calculator’s Mannequin
Within the MVC sample, the mannequin is the layer of code that takes care of the enterprise logic. In your calculator app, the enterprise logic is all about fundamental math calculations. So, your mannequin will consider the mathematics expressions that your customers launched within the calculator’s GUI.
The calculator’s mannequin additionally must deal with errors. To this finish, you’ll outline the next international fixed:
# pycalc.py
# ...

ERROR_MSG = "ERROR"
WINDOW_SIZE = 235
# ...
This ERROR_MSG fixed is the message that the person will see on the calculator’s show in the event that they introduce an invalid math expression.
With the above change, you’re able to code your app’s mannequin, which might be a single perform on this instance:
# pycalc.py
# ...

class PyCalcWindow(QMainWindow):
    # ...

def evaluateExpression(expression):
    """Consider an expression (Mannequin)."""
    attempt:
        consequence = str(eval(expression, {}, {}))
    besides Exception:
        consequence = ERROR_MSG
    return consequence

# ...
In evaluateExpression(), you employ eval() to judge a math expression that comes as a string. If the analysis is profitable, you then return consequence. In any other case, you come back the predefined error message. Notice that this perform isn’t excellent. It has a few vital points:
- The
attempt…besidesblock doesn’t catch a particular exception, so it’s utilizing a observe that’s discouraged in Python. - The perform makes use of
eval(), which may result in some critical safety points.
You’re free to remodel the perform to make it extra dependable and safe. On this tutorial, you’ll use the perform as is to maintain the give attention to implementing the GUI.
Creating the Controller Class for Your Calculator
On this part, you’re going to code the calculator’s controller class. This class will join the view to the mannequin that you simply simply coded. You’ll use the controller class to make the calculator carry out actions in response to person occasions.
Your controller class must carry out three major duties:
- Entry the GUI’s public interface.
- Deal with the creation of math expressions.
- Join all of the buttons’
.clickedalerts with the suitable slots.
To carry out all these actions, you’ll code a brand new PyCalc class in a second. Go forward and replace pycalc.py with the next code:
# pytcalc.py

import sys
from functools import partial
# ...

def evaluateExpression(expression):
    # ...

class PyCalc:
    """PyCalc's controller class."""

    def __init__(self, mannequin, view):
        self._evaluate = mannequin
        self._view = view
        self._connectSignalsAndSlots()

    def _calculateResult(self):
        consequence = self._evaluate(expression=self._view.displayText())
        self._view.setDisplayText(consequence)

    def _buildExpression(self, subExpression):
        if self._view.displayText() == ERROR_MSG:
            self._view.clearDisplay()
        expression = self._view.displayText() + subExpression
        self._view.setDisplayText(expression)

    def _connectSignalsAndSlots(self):
        for keySymbol, button in self._view.buttonMap.gadgets():
            if keySymbol not in {"=", "C"}:
                button.clicked.join(
                    partial(self._buildExpression, keySymbol)
                )
        self._view.buttonMap["="].clicked.join(self._calculateResult)
        self._view.show.returnPressed.join(self._calculateResult)
        self._view.buttonMap["C"].clicked.join(self._view.clearDisplay)

# ...
On the prime of pycalc.py, you import partial() from functools. You’ll use this perform to attach alerts with strategies that must take additional arguments.
Inside PyCalc, you outline the category initializer, which takes two arguments: the app’s mannequin and its view. Then you definately retailer these arguments in acceptable occasion attributes. Lastly, you name ._connectSignalsAndSlots() to make all of the required connections of alerts and slots.
In ._calculateResult(), you employ ._evaluate() to judge the mathematics expression that the person has simply typed into the calculator’s show. Then you definately name .setDisplayText() on the calculator’s view to replace the show textual content with the computation consequence.
As its identify suggests, the ._buildExpression() methodology takes care of constructing the goal math expression. To do that, the strategy concatenates the preliminary show worth with each new worth that the person enters on the calculator’s keyboard.
Lastly, the ._connectSignalsAndSlots() methodology connects all of the buttons’ .clicked alerts with the suitable slots methodology within the controller class.
That’s it! Your controller class is prepared. Nonetheless, for all this code to work as an actual calculator, it’s essential to replace the app’s major() perform like within the code beneath:
# pytcalc.py
# ...

def major():
    """PyCalc's major perform."""
    pycalcApp = QApplication([])
    pycalcWindow = PyCalcWindow()
    pycalcWindow.present()
    PyCalc(mannequin=evaluateExpression, view=pycalcWindow)
    sys.exit(pycalcApp.exec())
This piece of code creates a brand new occasion of PyCalc. The mannequin argument to the PyCalc class constructor holds a reference to the evaluateExpression() perform, whereas the view argument holds a reference to the pycalcWindow object, which gives the app’s GUI. Now your PyQt calculator utility is able to run.
Working the Calculator
Now that you simply’ve completed writing your calculator app with Python and PyQt, it’s time for a stay take a look at! When you run the appliance out of your command line, you then’ll get one thing like this:
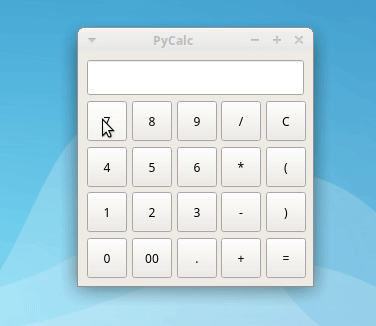
To make use of PyCalc, enter a legitimate math expression along with your mouse. Then, press Enter or click on the equal signal (=) button to compute and present the expression consequence on the calculator’s show. That’s it! You’ve developed your first totally useful GUI desktop utility with Python and PyQt!
Conclusion
Graphical person interface (GUI) purposes nonetheless maintain a considerable share of the software program growth market. Python affords a handful of frameworks and libraries that may provide help to develop trendy and sturdy GUI purposes.
On this tutorial, you discovered learn how to use PyQt, which is without doubt one of the hottest and strong libraries for GUI utility growth in Python. Now you know the way to successfully use PyQt to construct trendy GUI purposes.
On this tutorial, you’ve discovered learn how to:
- Construct graphical person interfaces with Python and PyQt
- Join the person’s occasions with the app’s logic
- Manage a PyQt utility utilizing a correct challenge format
- Create a real-world GUI utility with PyQt
Now you should utilize your Python and PyQt information to offer life to your individual desktop GUI purposes. Isn’t that cool?
You may get the supply code of your calculator app challenge and all its related assets by clicking the hyperlink beneath:
Additional Studying
To dive deeper into PyQt and its ecosystem, take a look at a few of the following assets:
Though the PyQt6 Documentation is the primary useful resource listed right here, some vital components of it are nonetheless lacking or incomplete. Thankfully, you should utilize the Qt documentation to fill within the blanks.