


On this tutorial, we’ll have a look at learn how to construct server-side UI parts in Django with django-viewcomponent, which may help you reuse code and hold your code clear and maintainable.
Venture Setup
Django Venture
Create a brand new mission listing together with a brand new Django mission:
$ mkdir django-component-example && cd django-component-example
$ python3.12 -m venv venv
$ supply venv/bin/activate
(venv)$

(venv)$ pip set up Django==5.0.3
(venv)$ django-admin startproject django_component_app .
(venv)$ python handle.py migrate
(venv)$ python handle.py runserver
Be at liberty to swap out virtualenv and Pip for Poetry or Pipenv. For extra, assessment Trendy Python Environments.
Navigate to http://127.0.0.1:8000/ to view the Django welcome display. Kill the server as soon as finished.
Create a necessities.txt file and add Django as a dependency:
Templates
Subsequent, let’s wire up a fast template.
Begin by including a brand new URL sample to django_component_app/urls.py:
from django.contrib import admin
from django.urls import path
from django.views.generic import TemplateView  # new

urlpatterns = [
    path("", TemplateView.as_view(template_name="index.html")),  # new
    path("admin/", admin.site.urls),
]
Replace TEMPLATES in django_component_app/settings.py so Django is aware of the place to search out the templates:
TEMPLATES = [
    {
        "BACKEND": "django.template.backends.django.DjangoTemplates",
        "DIRS": ["django_component_app/templates"],  # up to date
        "APP_DIRS": True,
        "OPTIONS": {
            "context_processors": [
                "django.template.context_processors.debug",
                "django.template.context_processors.request",
                "django.contrib.auth.context_processors.auth",
                "django.contrib.messages.context_processors.messages",
            ],
        },
    },
]
Add a brand new folder on your templates known as “templates” to the “django_component_app” folder. Then, inside that folder, add an index.html file:
<!DOCTYPE html>
<html>
<head>
    <meta charset="utf-8">
    <meta title="viewport" content material="width=device-width, initial-scale=1">
    <title>Bootstrap demo</title>
    <hyperlink href="https://cdn.jsdelivr.web/npm/[email protected]/dist/css/bootstrap.min.css"
          rel="stylesheet"
          integrity="sha384-rbsA2VBKQhggwzxH7pPCaAqO46MgnOM80zW1RWuH61DGLwZJEdK2Kadq2F9CUG65"
          crossorigin="nameless">
</head>
<physique>
  <div>
    <button kind="button" class="btn btn-primary">Main</button>
    <button kind="button" class="btn btn-secondary">Secondary</button>
    <button kind="button" class="btn btn-success">Success</button>
  </div>

  <script src="https://cdn.jsdelivr.web/npm/[email protected]/dist/js/bootstrap.bundle.min.js"
          integrity="sha384-kenU1KFdBIe4zVF0s0G1M5b4hcpxyD9F7jL+jjXkk+Q2h455rYXK/7HAuoJl+0I4"
          crossorigin="nameless"></script>
</physique>
</html>
Run the event server and navigate to http://127.0.0.1:8000/ once more. You must now see three buttons, which have been styled by Bootstrap.
django-viewcomponent
As you in all probability already know, Bootstrap offers plenty of helper CSS lessons and attributes that you should utilize for styling. For instance, for the buttons, we are able to change the:
- Coloration with
btn-primaryandbtn-secondary - Dimension with
btn-lgorbtn-sm
How can we make the colour and measurement dynamic? That is the place the django-viewcomponent library comes into play. We will use it to create reusable parts on your Django mission.
Add it to the necessities.txt file:
django-viewcomponent==1.0.5
Set up:
(venv)$ pip set up -r necessities.txt
Then add the app to the INSTALLED_APPS in settings.py:
INSTALLED_APPS = [
    ...
    "django_viewcomponent",
]
Modify the TEMPLATES part of settings.py like so:
TEMPLATES = [
    {
        "BACKEND": "django.template.backends.django.DjangoTemplates",
        "DIRS": ["django_component_app/templates"],
        "APP_DIRS": False,  # up to date
        "OPTIONS": {
            "context_processors": [
                "django.template.context_processors.debug",
                "django.template.context_processors.request",
                "django.contrib.auth.context_processors.auth",
                "django.contrib.messages.context_processors.messages",
            ],
            "loaders":[(  # new
                "django.template.loaders.cached.Loader", [
                    "django.template.loaders.filesystem.Loader",
                    "django.template.loaders.app_directories.Loader",
                    "django_viewcomponent.loaders.ComponentLoader",
                ]
            )],
        },
    },
]
With that, we are able to begin creating our first part!
Button Part
Create a parts/button/button.py file:
from django_viewcomponent import part


@part.register("button")
class ButtonComponent(part.Part):
    template = '<button class="btn {{ self.extra_css }}" kind="button">{{ self.content material }}</button>'

    size_map = {
        "sm": "btn-sm",
        "lg": "btn-lg",
    }

    variant_map = {
        "major": "btn-primary",
        "secondary": "btn-secondary",
        "success": "btn-success",
        "hazard": "btn-danger",
        "warning": "btn-warning",
        "information": "btn-info",
        "mild": "btn-light",
        "darkish": "btn-dark",
    }

    def __init__(self, variant="major", measurement=None, **kwargs):
        self.variant = variant
        self.extra_css = kwargs.get("extra_css", "")
        self.content material = kwargs.get("content material", "")

        if self.variant and self.variant in self.variant_map:
            self.extra_css += f" {self.variant_map[self.variant]}"

        # append css class to the extra_css
        if measurement and measurement in self.size_map:
            self.extra_css += f" {self.size_map[size]}"
Notes:
- We used
part.register("button")to register the part asbutton. - Within the
__init__methodology, we setself.extra_cssin keeping with thevariantandmeasuremententer. - The
templateis the inline HTML template for the button part.
Your file and folder construction ought to now seem like this:
├── parts
│   └── button
│       └── button.py
├── django_component_app
│   ├── __init__.py
│   ├── asgi.py
│   ├── settings.py
│   ├── templates
│   │   └── index.html
│   ├── urls.py
│   └── wsgi.py
├── handle.py
└── necessities.txt
Replace django_component_app/templates/index.html:
{% load viewcomponent_tags %}

<!DOCTYPE html>
<html>
<head>
  <meta charset="utf-8">
  <meta title="viewport" content material="width=device-width, initial-scale=1">
  <title>Bootstrap demo</title>
  <hyperlink href="https://cdn.jsdelivr.web/npm/[email protected]/dist/css/bootstrap.min.css"
        rel="stylesheet"
        integrity="sha384-rbsA2VBKQhggwzxH7pPCaAqO46MgnOM80zW1RWuH61DGLwZJEdK2Kadq2F9CUG65"
        crossorigin="nameless">
</head>
<physique>
  <div>
    {% part 'button' variant='major' %}
      Main
    {% endcomponent %}

    {% part 'button' variant='secondary' %}
      Secondary
    {% endcomponent %}

    {% part 'button' variant='major' measurement='sm' %}
      Small button
    {% endcomponent %}

    {% part 'button' variant='major' measurement='lg' %}
      Massive button
    {% endcomponent %}
  </div>

  <script src="https://cdn.jsdelivr.web/npm/[email protected]/dist/js/bootstrap.bundle.min.js"
          integrity="sha384-kenU1KFdBIe4zVF0s0G1M5b4hcpxyD9F7jL+jjXkk+Q2h455rYXK/7HAuoJl+0I4"
          crossorigin="nameless"></script>
</physique>
</html>
Notes:
- We positioned
{% load viewcomponent_tags %}on the prime so we are able to use the{% part %}tag. {% part 'button' variant="major" %}creates a button part, which we handedvariant="major"and kids ascontent materialto the part.- The part’s
__init__methodology is run andtemplatemight be used to render the part.
Restart the Django server and navigate to http://127.0.0.1:8000/. You must now see:
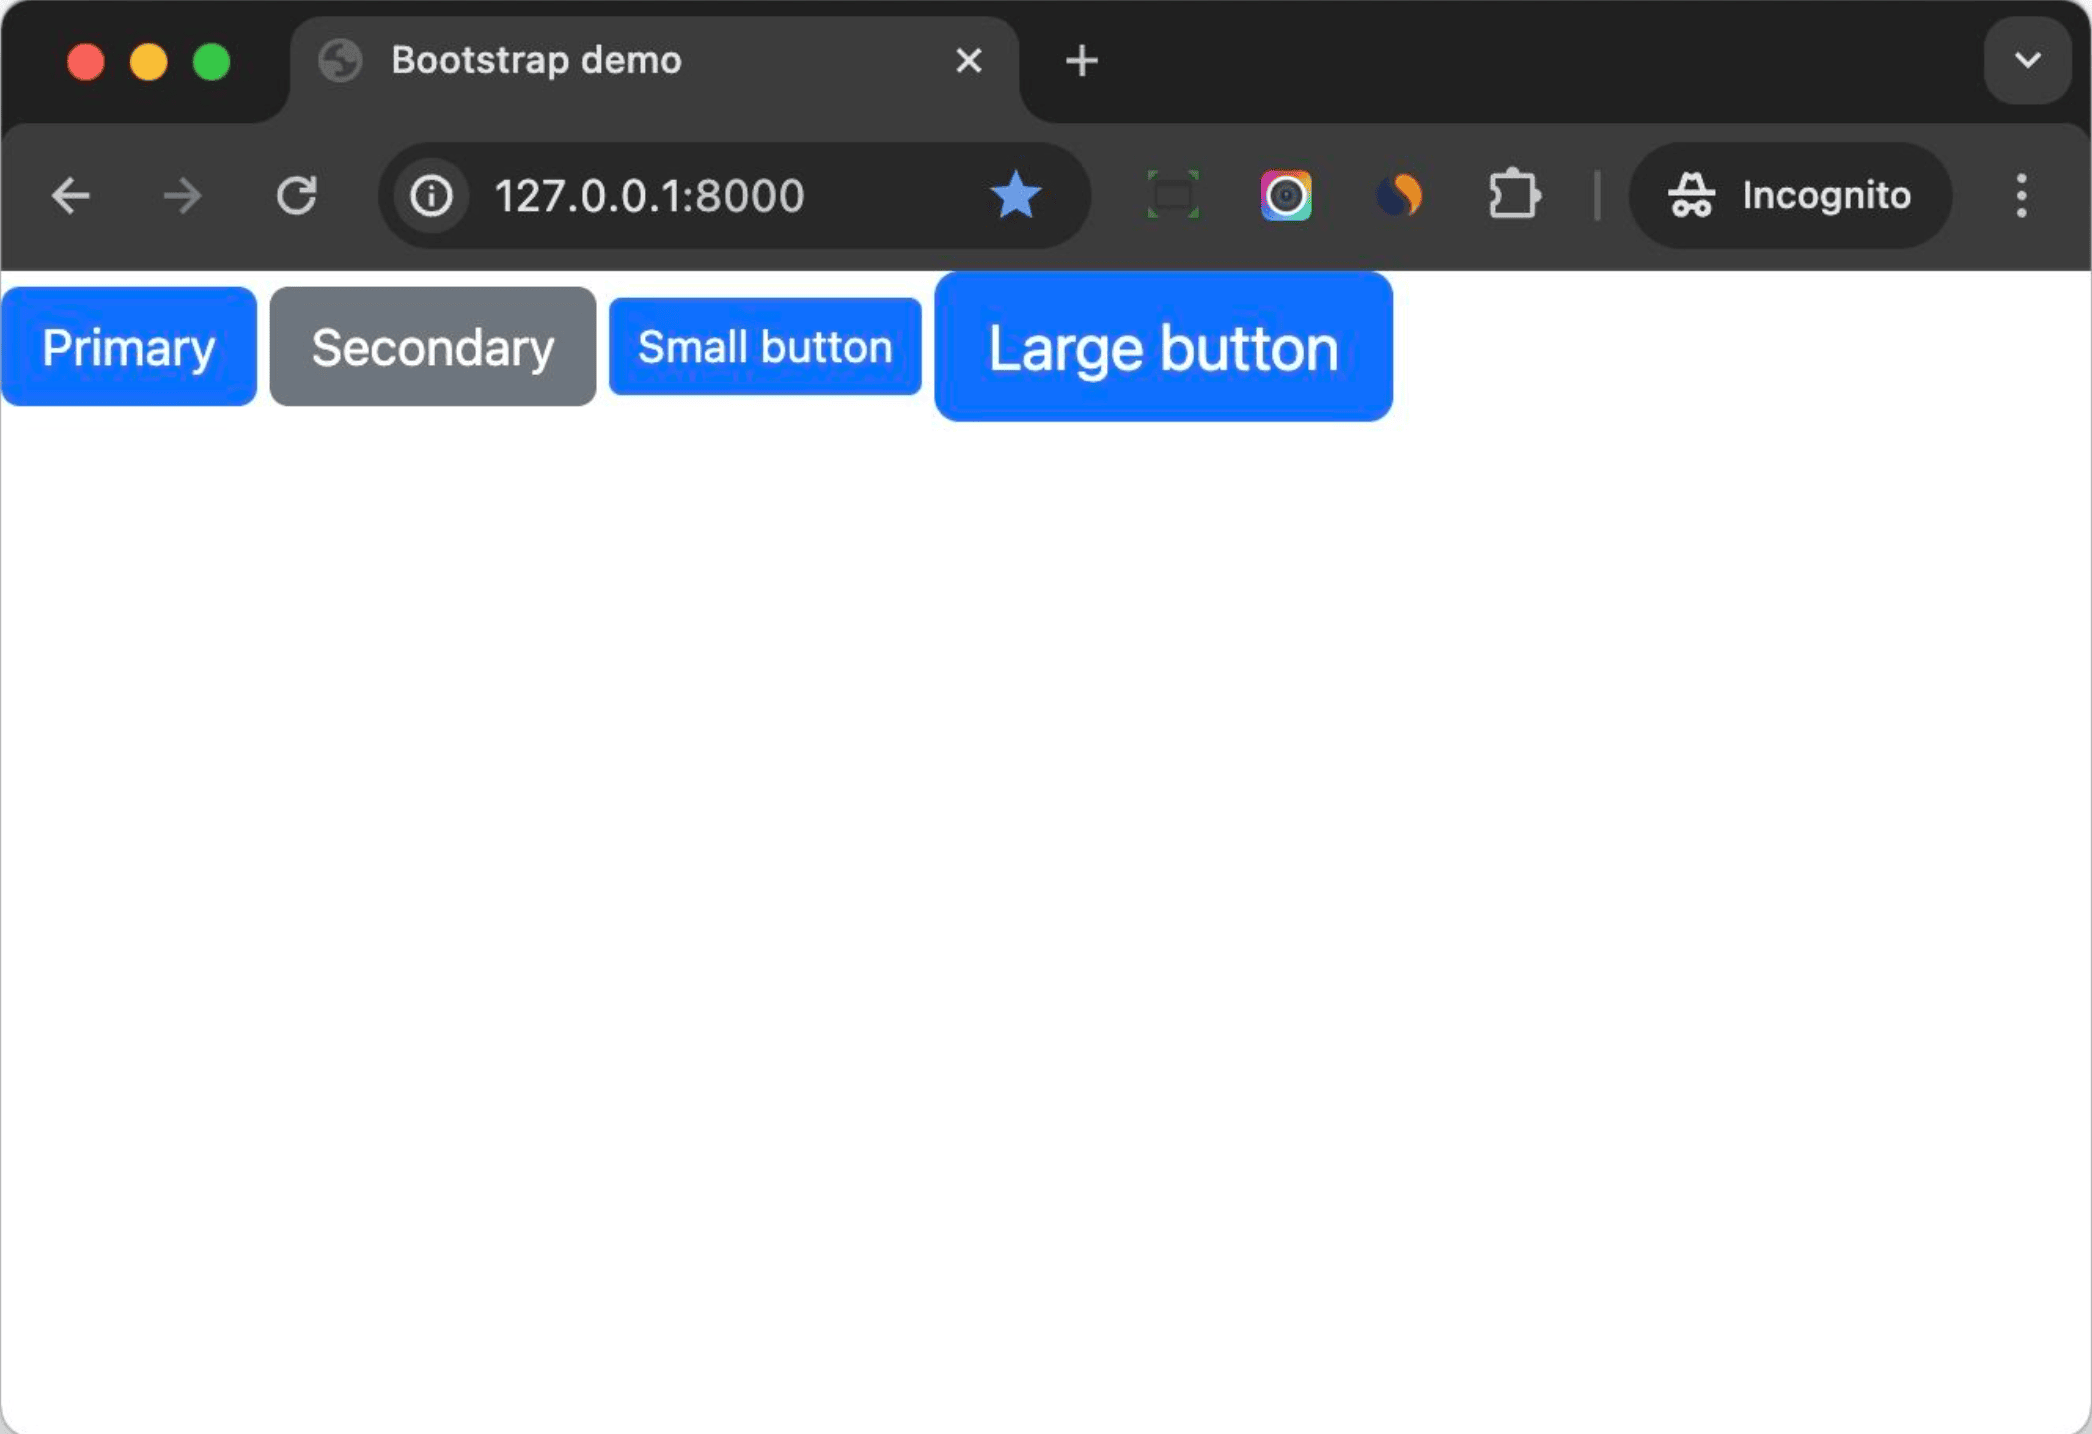
Notes:
- The button part helps us transfer some CSS class logic to the part stage. This helps to maintain our Django template clear and straightforward to learn.
{% part 'button' variant="major" measurement="lg" %}makes the part’s interface extra clear, making it simpler to make use of so that you need not refer again to the Bootstrap documentation fairly as typically.- If we need to swap our frontend resolution to a different CSS framework equivalent to Tailwind CSS later, we are able to simply replace the part’s code to get issues finished rapidly.
Modal Part
Now that you have already got a primary understanding of learn how to create a part utilizing django-viewcomponent, let’s dive right into a extra complicated part — a Modal.
Let’s first check out the under code, copied from the Bootstrap documentation:
<!-- Button set off modal -->
<button kind="button" class="btn btn-primary" data-bs-toggle="modal" data-bs-target="#exampleModal">
  Launch demo modal
</button>

<!-- Modal -->
<div class="modal fade" id="exampleModal" tabindex="-1" aria-labelledby="exampleModalLabel" aria-hidden="true">
  <div class="modal-dialog">
    <div class="modal-content">
      <div class="modal-header">
        <h1 class="modal-title fs-5" id="exampleModalLabel">Modal title</h1>
        <button kind="button" class="btn-close" data-bs-dismiss="modal" aria-label="Shut"></button>
      </div>
      <div class="modal-body">
        ...
      </div>
      <div class="modal-footer">
        <button kind="button" class="btn btn-secondary" data-bs-dismiss="modal">Shut</button>
        <button kind="button" class="btn btn-primary">Save modifications</button>
      </div>
    </div>
  </div>
</div>
I’ve seen many Django builders copy and paste the above code instantly into their Django templates after which replace the code to suit their wants. Whereas this may work, it isn’t a very good observe when your utility has a number of modals. So, let’s create a modal part {that a} developer can merely go the title and physique to. This might be a lot cleaner and simpler to learn.
parts/modal/modal.py:
from django_viewcomponent import part
from django_viewcomponent.fields import RendersOneField


@part.register("modal")
class ModalComponent(part.Part):
    modal_trigger = RendersOneField()
    modal_body = RendersOneField(required=True)
    modal_footer = RendersOneField(required=True)

    template_name = "modal/modal.html"

    def __init__(self, modal_id, modal_title, **kwargs):
        self.modal_id = modal_id
        self.modal_title = modal_title
Notes:
- We created a
ModalComponentclass which extendspart.Part. - Right here, we created three slot fields for the part,
modal_trigger,modal_body, andmodal_footer. The syntax may be very related with Django mannequin fields. modal_triggeris non-compulsory as a result of generally you may have to set off the modal in JavaScript, so we don’t set it as required.- We set
template_nametomodal/modal.html, so the part will use this template to render the part. - The part will settle for
modal_idandmodal_titleas required arguments.
Create the parts/modal/modal.html template:
{% if self.modal_trigger.crammed %}
  {{ self.modal_trigger.worth }}
{% endif %}

<div class="modal fade" id="{{ self.modal_id }}" tabindex="-1" aria-labelledby="{{ self.modal_id }}Label" aria-hidden="true">
  <div class="modal-dialog">
    <div class="modal-content">
      <div class="modal-header">
        <h1 class="modal-title fs-5" id="{{ self.modal_id }}Label">{{ self.modal_title }}</h1>
        <button kind="button" class="btn-close" data-bs-dismiss="modal" aria-label="Shut"></button>
      </div>
      <div class="modal-body">
        {{ self.modal_body.worth }}
      </div>
      <div class="modal-footer">
        {{ self.modal_footer.worth }}
      </div>
    </div>
  </div>
</div>
Notes:
- We solely render
modal_triggerif the slot area has been crammed. - We used
{{ self.modal_body.worth }}and{{ self.modal_footer.worth }}to render the content material of the slot fields
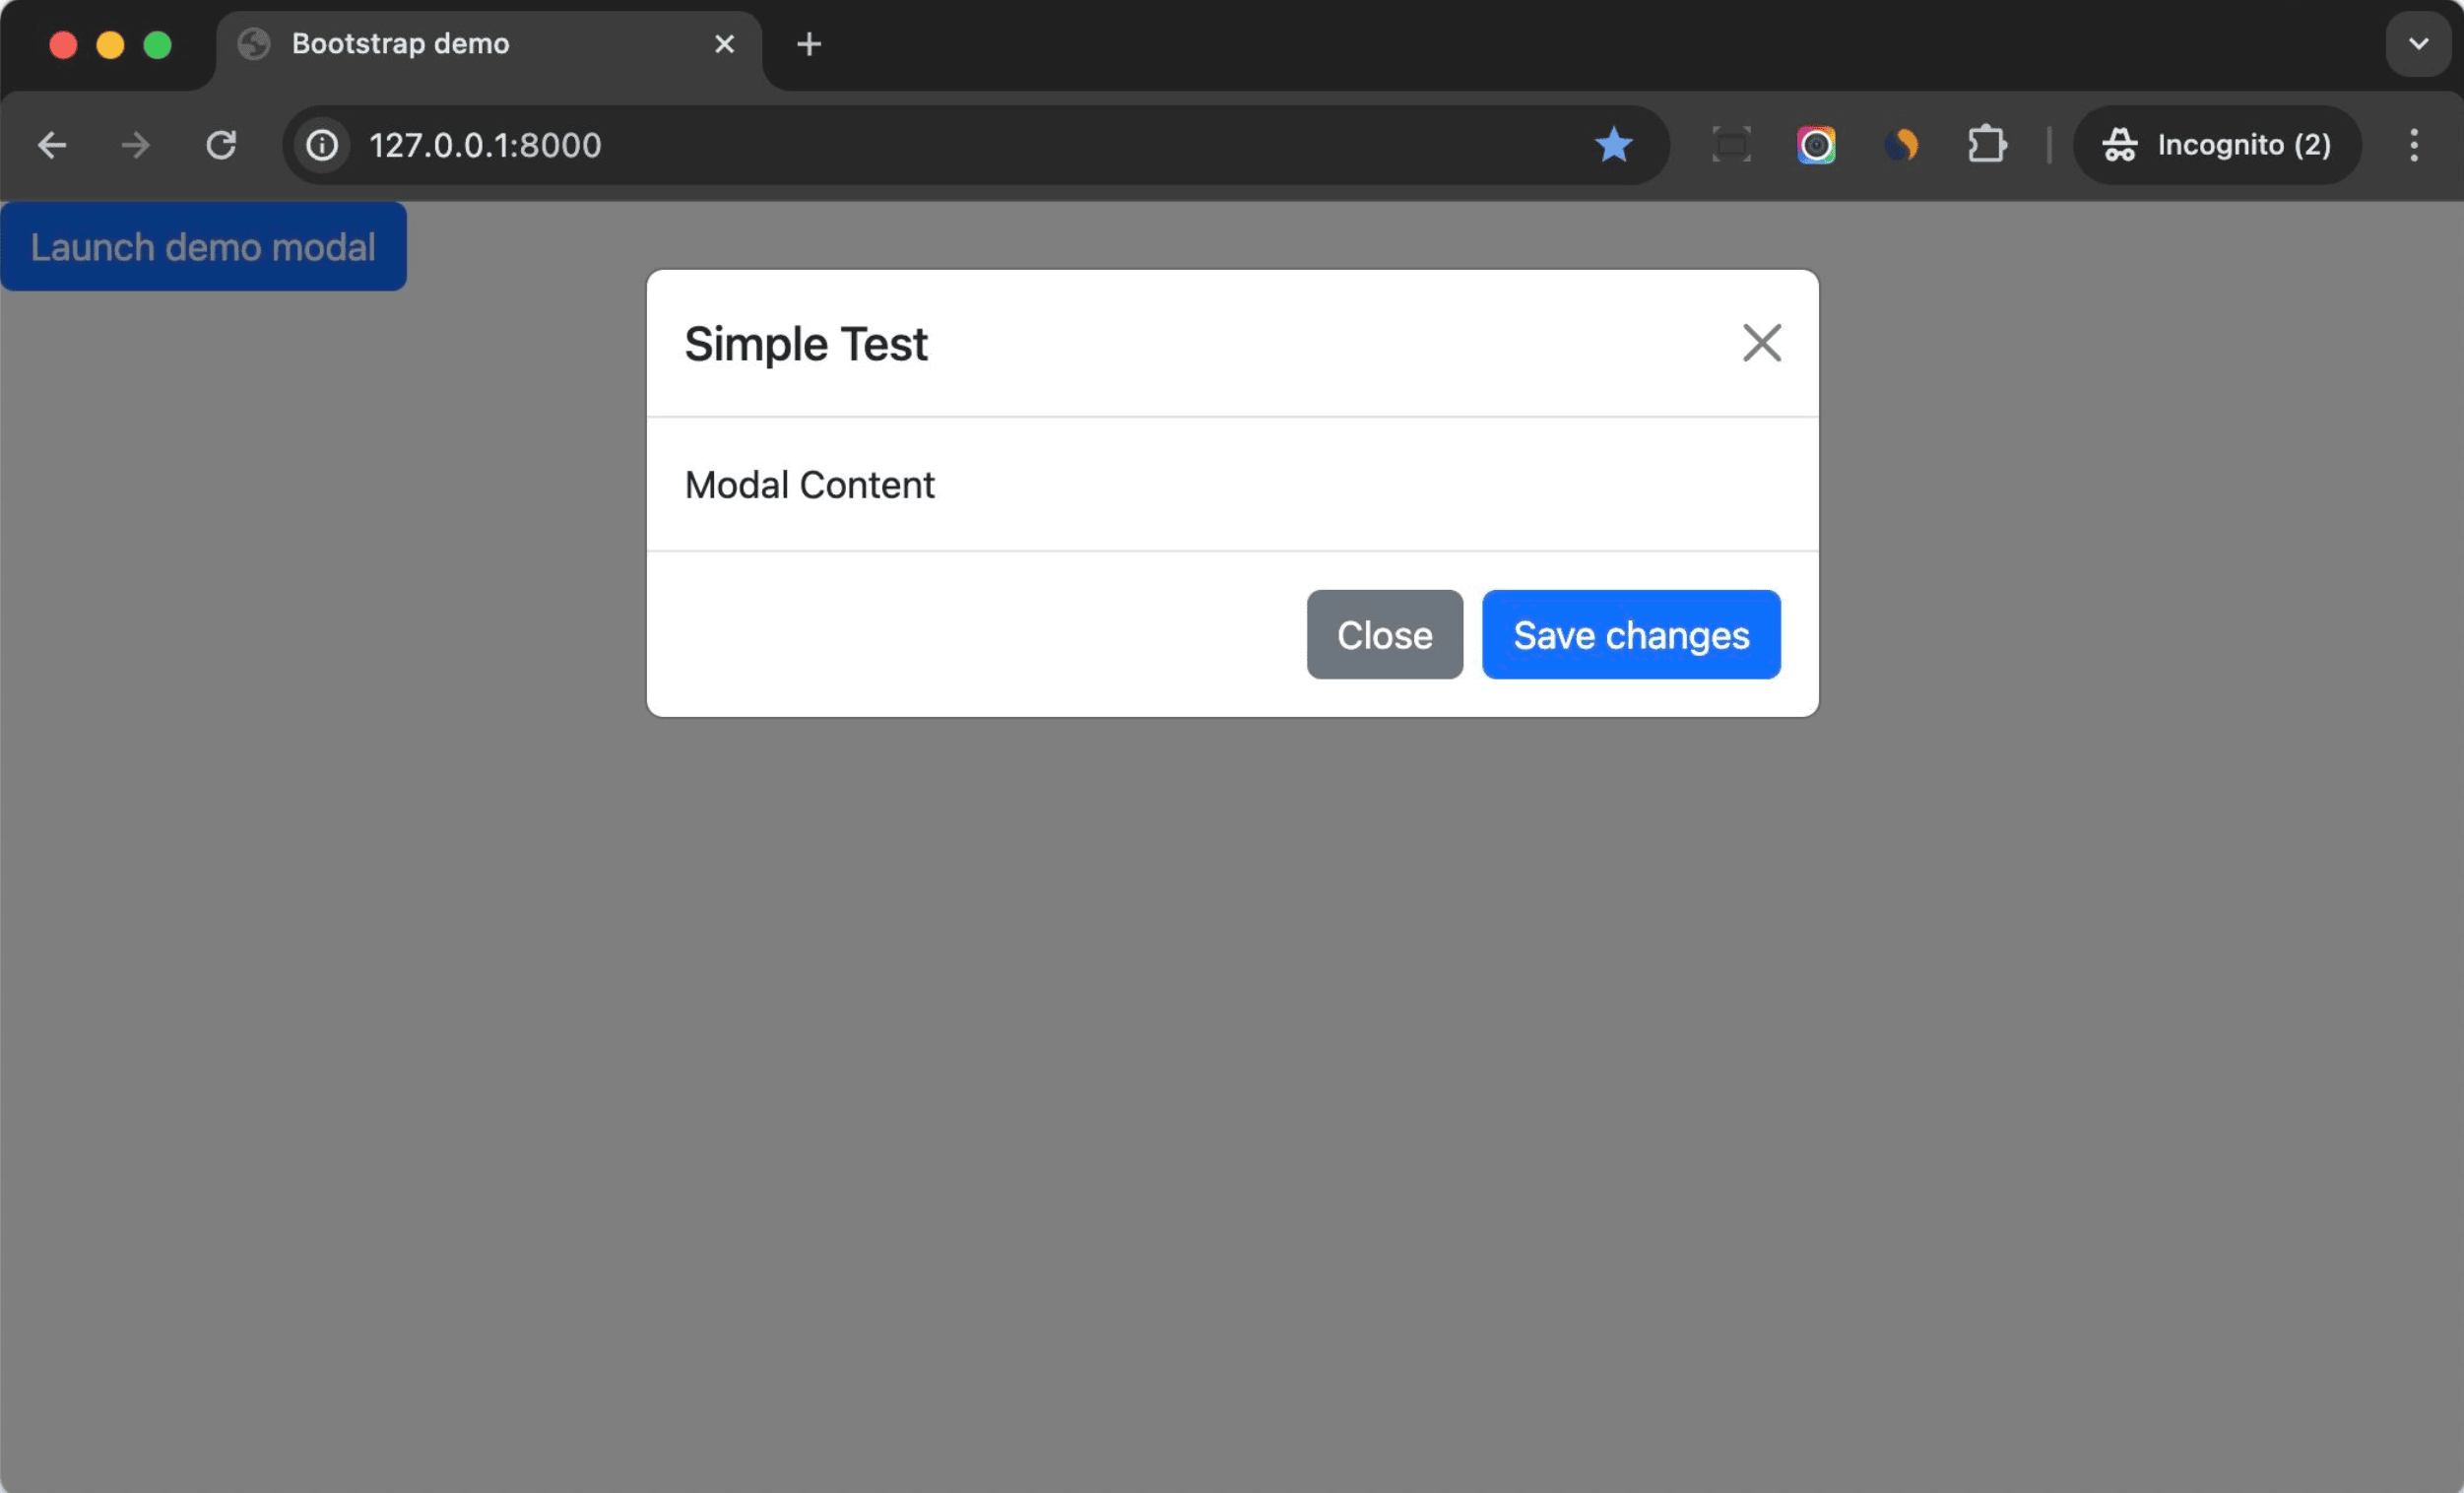
Replace django_component_app/templates/index.html like so:
{% load viewcomponent_tags %}

<!DOCTYPE html>
<html>
<head>
  <meta charset="utf-8">
  <meta title="viewport" content material="width=device-width, initial-scale=1">
  <title>Bootstrap demo</title>
  <hyperlink href="https://cdn.jsdelivr.web/npm/[email protected]/dist/css/bootstrap.min.css"
        rel="stylesheet"
        integrity="sha384-rbsA2VBKQhggwzxH7pPCaAqO46MgnOM80zW1RWuH61DGLwZJEdK2Kadq2F9CUG65"
        crossorigin="nameless">
</head>
<physique>
  <div>
    {% with modal_id='instance' modal_title='Easy Take a look at'%}
      {% part 'modal' modal_id=modal_id modal_title=modal_title as modal_comp %}
        {% name modal_comp.modal_trigger %}
          <button kind="button" class="btn btn-primary" data-bs-toggle="modal" data-bs-target="#{{ modal_id }}">
            Launch demo modal
          </button>
        {% endcall %}
        {% name modal_comp.modal_body %}
          Modal Content material
        {% endcall %}
        {% name modal_comp.modal_footer %}
          <button kind="button" class="btn btn-secondary" data-bs-dismiss="modal">Shut</button>
          <button kind="button" class="btn btn-primary">Save modifications</button>
        {% endcall %}
      {% endcomponent %}
    {% endwith %}
  </div>

  <script src="https://cdn.jsdelivr.web/npm/[email protected]/dist/js/bootstrap.bundle.min.js"
          integrity="sha384-kenU1KFdBIe4zVF0s0G1M5b4hcpxyD9F7jL+jjXkk+Q2h455rYXK/7HAuoJl+0I4"
          crossorigin="nameless"></script>
</physique>
</html>
Notes:
- We set
modal_idandmodal_titlewithin thewithblock. - We handed the worth to the modal part.
- We used slot fields to go HTML content material to the part. This makes the code extra clear and straightforward to grasp.
Subsequent, you may replace the modal part to make it help extra options. For instance:
- Use
measurementto regulate the dimensions of the modal. - Decide if the modal ought to embrace a modal backdrop aspect.
- Decide if the modal could be closed by way of the ESC key.
You may profit from Object-Oriented Programming and create a extremely customizable and reusable modal part.
If we hold updating the above button part then we are able to even write code like this:
{% with modal_id='instance' modal_title='Easy Take a look at'%}
  {% part 'modal' modal_id=modal_id modal_title=modal_title as modal_comp %}
    {% name modal_comp.modal_trigger %}
      {% part 'button' variant='major' data_bs_toggle="modal" data_bs_target="#{{ modal_id }}" %}Launch demo modal{% endcomponent %}
    {% endcall %}
    {% name modal_comp.modal_body %}
      Modal Content material
    {% endcall %}
    {% name modal_comp.modal_footer %}
      {% part 'button' variant='secondary' data_bs_dismiss="modal" %}Shut{% endcomponent %}
      {% part 'button' variant='major' %}Save modifications{% endcomponent %}
    {% endcall %}
  {% endcomponent %}
{% endwith %}
Tabs Part
Subsequent, let’s construct a tabs part.
parts/tabs/tabs.py:
from django_viewcomponent import part
from django_viewcomponent.fields import RendersManyField


@part.register("tabs")
class TabsComponent(part.Part):
    tabs = RendersManyField(required=True)
    panes = RendersManyField(required=True)

    template_name = "tabs/tabs.html"

    def __init__(self, tabs_id, **kwargs):
        self.tabs_id = tabs_id
Right here, we used RendersManyField as a result of we would like the tabs and panes to just accept a set of things.
Add the parts/tabs/tabs.html template:
<ul class="nav nav-tabs" id="{{ self.tabs_id }}" function="tablist">
  {% for tab in self.tabs.worth %}
    <li class="nav-item" function="presentation">
      <button class="nav-link {% if forloop.counter == 1 %}energetic{% endif %}" id="{{ self.tabs_id }}-tab-{{ forloop.counter }}"
              data-bs-toggle="tab"
              data-bs-target="#{{ self.tabs_id }}-tab-pane-{{ forloop.counter }}"
              kind="button"
              function="tab"
              aria-controls="home-tab-pane"
              aria-selected="true">
        {{ tab }}
      </button>
    </li>
  {% endfor %}
</ul>

<div class="tab-content" id="{{ self.tabs_id }}Content material">
  {% for pane in self.panes.worth %}
    <div class="tab-pane fade {% if forloop.counter == 1 %}present energetic{% endif %}"
         id="{{ self.tabs_id }}-tab-pane-{{ forloop.counter }}"
         function="tabpanel"
         aria-labelledby="profile-tab"
         tabindex="0">
      {{ pane }}
    </div>
  {% endfor %}
</div>
We used {% for tab in self.tabs.worth %} to loop by means of the tabs assortment and get the worth.
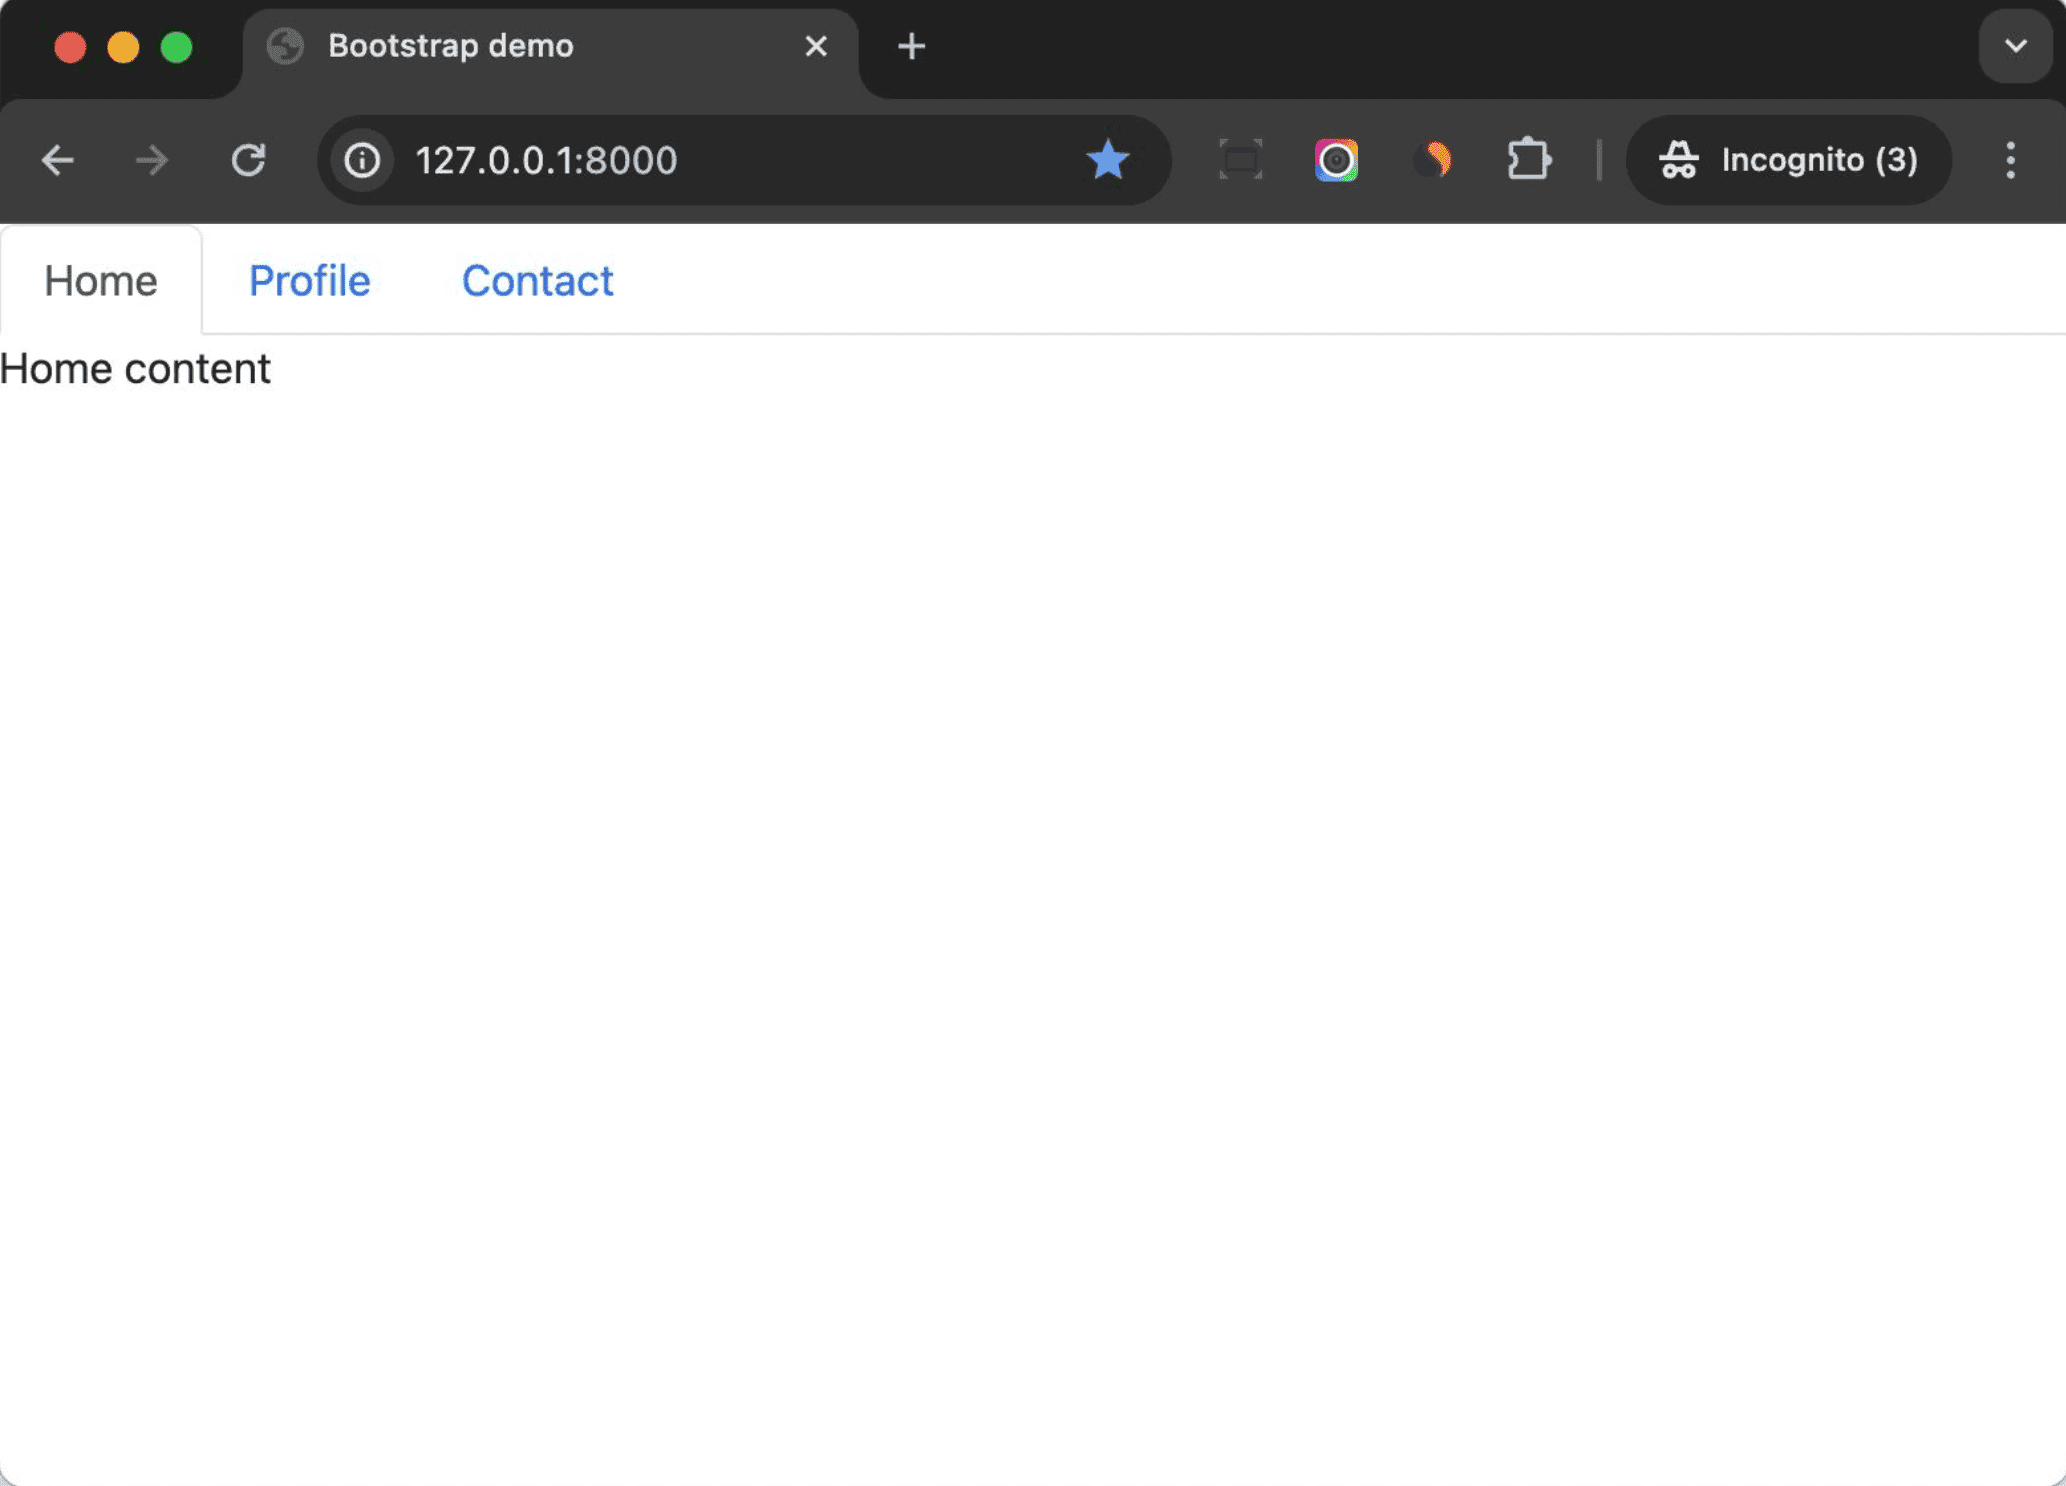
Subsequent, add the next HTML to django_component_app/templates/index.html:
{% part 'tabs' tabs_id='exampleTab' as tabs_comp %}
  {% name tabs_comp.tabs %}
    House
  {% endcall %}
  {% name tabs_comp.panes %}
    <div>House content material</div>
  {% endcall %}

  {% name tabs_comp.tabs %}
    Profile
  {% endcall %}
  {% name tabs_comp.panes %}
    <div>Profile content material</div>
  {% endcall %}

  {% name tabs_comp.tabs %}
    Contact
  {% endcall %}
  {% name tabs_comp.panes %}
    <div>Contact content material</div>
  {% endcall %}
{% endcomponent %}
We put the tab content material and the respective panes content material collectively, to make the code extra readable.
Previewing Parts
Up till now, we edited and checked our parts by modifying the index template file.
Throughout growth, builders may need to take a look at the part in an remoted atmosphere, with out touching the Django views or URLs.
Luckily, django-viewcomponent offers a preview mode to allow us to construct and preview the part in an remoted atmosphere.
Let’s have a look at the way it works.
Add the next to the settings file:
VIEW_COMPONENTS = {
    "preview_base": ["previews"],
    "show_previews": DEBUG,
}
Notes:
preview_baseis the bottom path on your previews.show_previewsis a boolean worth, which is used to regulate whether or not to indicate the previews or not. Right here, we set it with identical worth ofDEBUG. So, the previews will solely be proven within the growth atmosphere.
Replace django_component_app/urls.py:
from django.contrib import admin
from django.urls import path, embrace  # up to date
from django.views.generic import TemplateView

urlpatterns = [
    path("", TemplateView.as_view(template_name="index.html")),
    path("previews/", include("django_viewcomponent.urls")),  # new
    path("admin/", admin.site.urls),
]
Create a brand new template known as django_component_app/templates/django_viewcomponent/preview.html:
<!DOCTYPE html>
<html lang="en">
<head>
  <meta charset="UTF-8">
  <meta http-equiv="X-UA-Suitable" content material="IE=edge">
  <meta title="viewport" content material="width=device-width, initial-scale=1.0">
  <hyperlink rel="stylesheet" href="https://cdn.jsdelivr.web/npm/[email protected]/themes/prism.min.css">
  <hyperlink href="https://cdn.jsdelivr.web/npm/[email protected]/dist/css/bootstrap.min.css"
        rel="stylesheet"
        integrity="sha384-rbsA2VBKQhggwzxH7pPCaAqO46MgnOM80zW1RWuH61DGLwZJEdK2Kadq2F9CUG65"
        crossorigin="nameless">
</head>
<physique>
  <div>
    {{ preview_html }}
  </div>

  <div class="view-component-source-example">
    <h2>Supply:</h2>
    <pre><code class="language-python">{{ preview_source }}</code></pre>
  </div>

  <script src="https://cdn.jsdelivr.web/npm/[email protected]/prism.min.js"></script>
  <script src="https://cdn.jsdelivr.web/npm/[email protected]/parts/prism-python.min.js"></script>
  <script src="https://cdn.jsdelivr.web/npm/[email protected]/dist/js/bootstrap.bundle.min.js"
          integrity="sha384-kenU1KFdBIe4zVF0s0G1M5b4hcpxyD9F7jL+jjXkk+Q2h455rYXK/7HAuoJl+0I4"
          crossorigin="nameless"></script>
</physique>
</html>
Notes:
- This template file might be used to render the part preview.
- We imported Bootstrap CSS and JS to the web page to make the part work.
- Prism is used for code highlighting on the preview web page.
preview_htmlis the HTML generated by the strategies of the preview class.
Create a previews/modal_preview.py file:
from django.template import Context, Template
from django_viewcomponent.preview import ViewComponentPreview


class ModalComponentPreview(ViewComponentPreview):
    def default_modal(self, **kwargs):
        template = Template(
            """
            {% load viewcomponent_tags %}

            {% with modal_id='instance' modal_title='Easy Take a look at'%}
              {% part 'modal' modal_id=modal_id modal_title=modal_title as modal_comp %}
                {% name modal_comp.modal_trigger %}
                  <button kind="button" class="btn btn-primary" data-bs-toggle="modal" data-bs-target="#{{ modal_id }}">
                    Launch demo modal
                  </button>
                {% endcall %}
                {% name modal_comp.modal_body %}
                  Modal Content material
                {% endcall %}
                {% name modal_comp.modal_footer %}
                  <button kind="button" class="btn btn-secondary" data-bs-dismiss="modal">Shut</button>
                  <button kind="button" class="btn btn-primary">Save modifications</button>
                {% endcall %}
              {% endcomponent %}
            {% endwith %}
        """,
        )

        return template.render(Context({}))
Notes:
- We created a
ModalComponentPreviewclass, which inherits fromViewComponentPreview. - We outlined a public methodology known as
default_modal, which might be used to render the preview. default_modal can also be the title of the preview, and the returned worth ispreview_htmlin django_component_app/templates/django_viewcomponent/preview.html. - When the Django dev server is run, it’ll search information within the
preview_basepath, and render the preview by calling the strategies —default_modal, on this case. - Typically, you may create a number of strategies (a number of previews) for one part to display learn how to use the part.
Restart the event server, and navigate to http://127.0.0.1:8000/previews. You must see the default_modal preview. Click on on the hyperlink to see the preview of the part and the code:
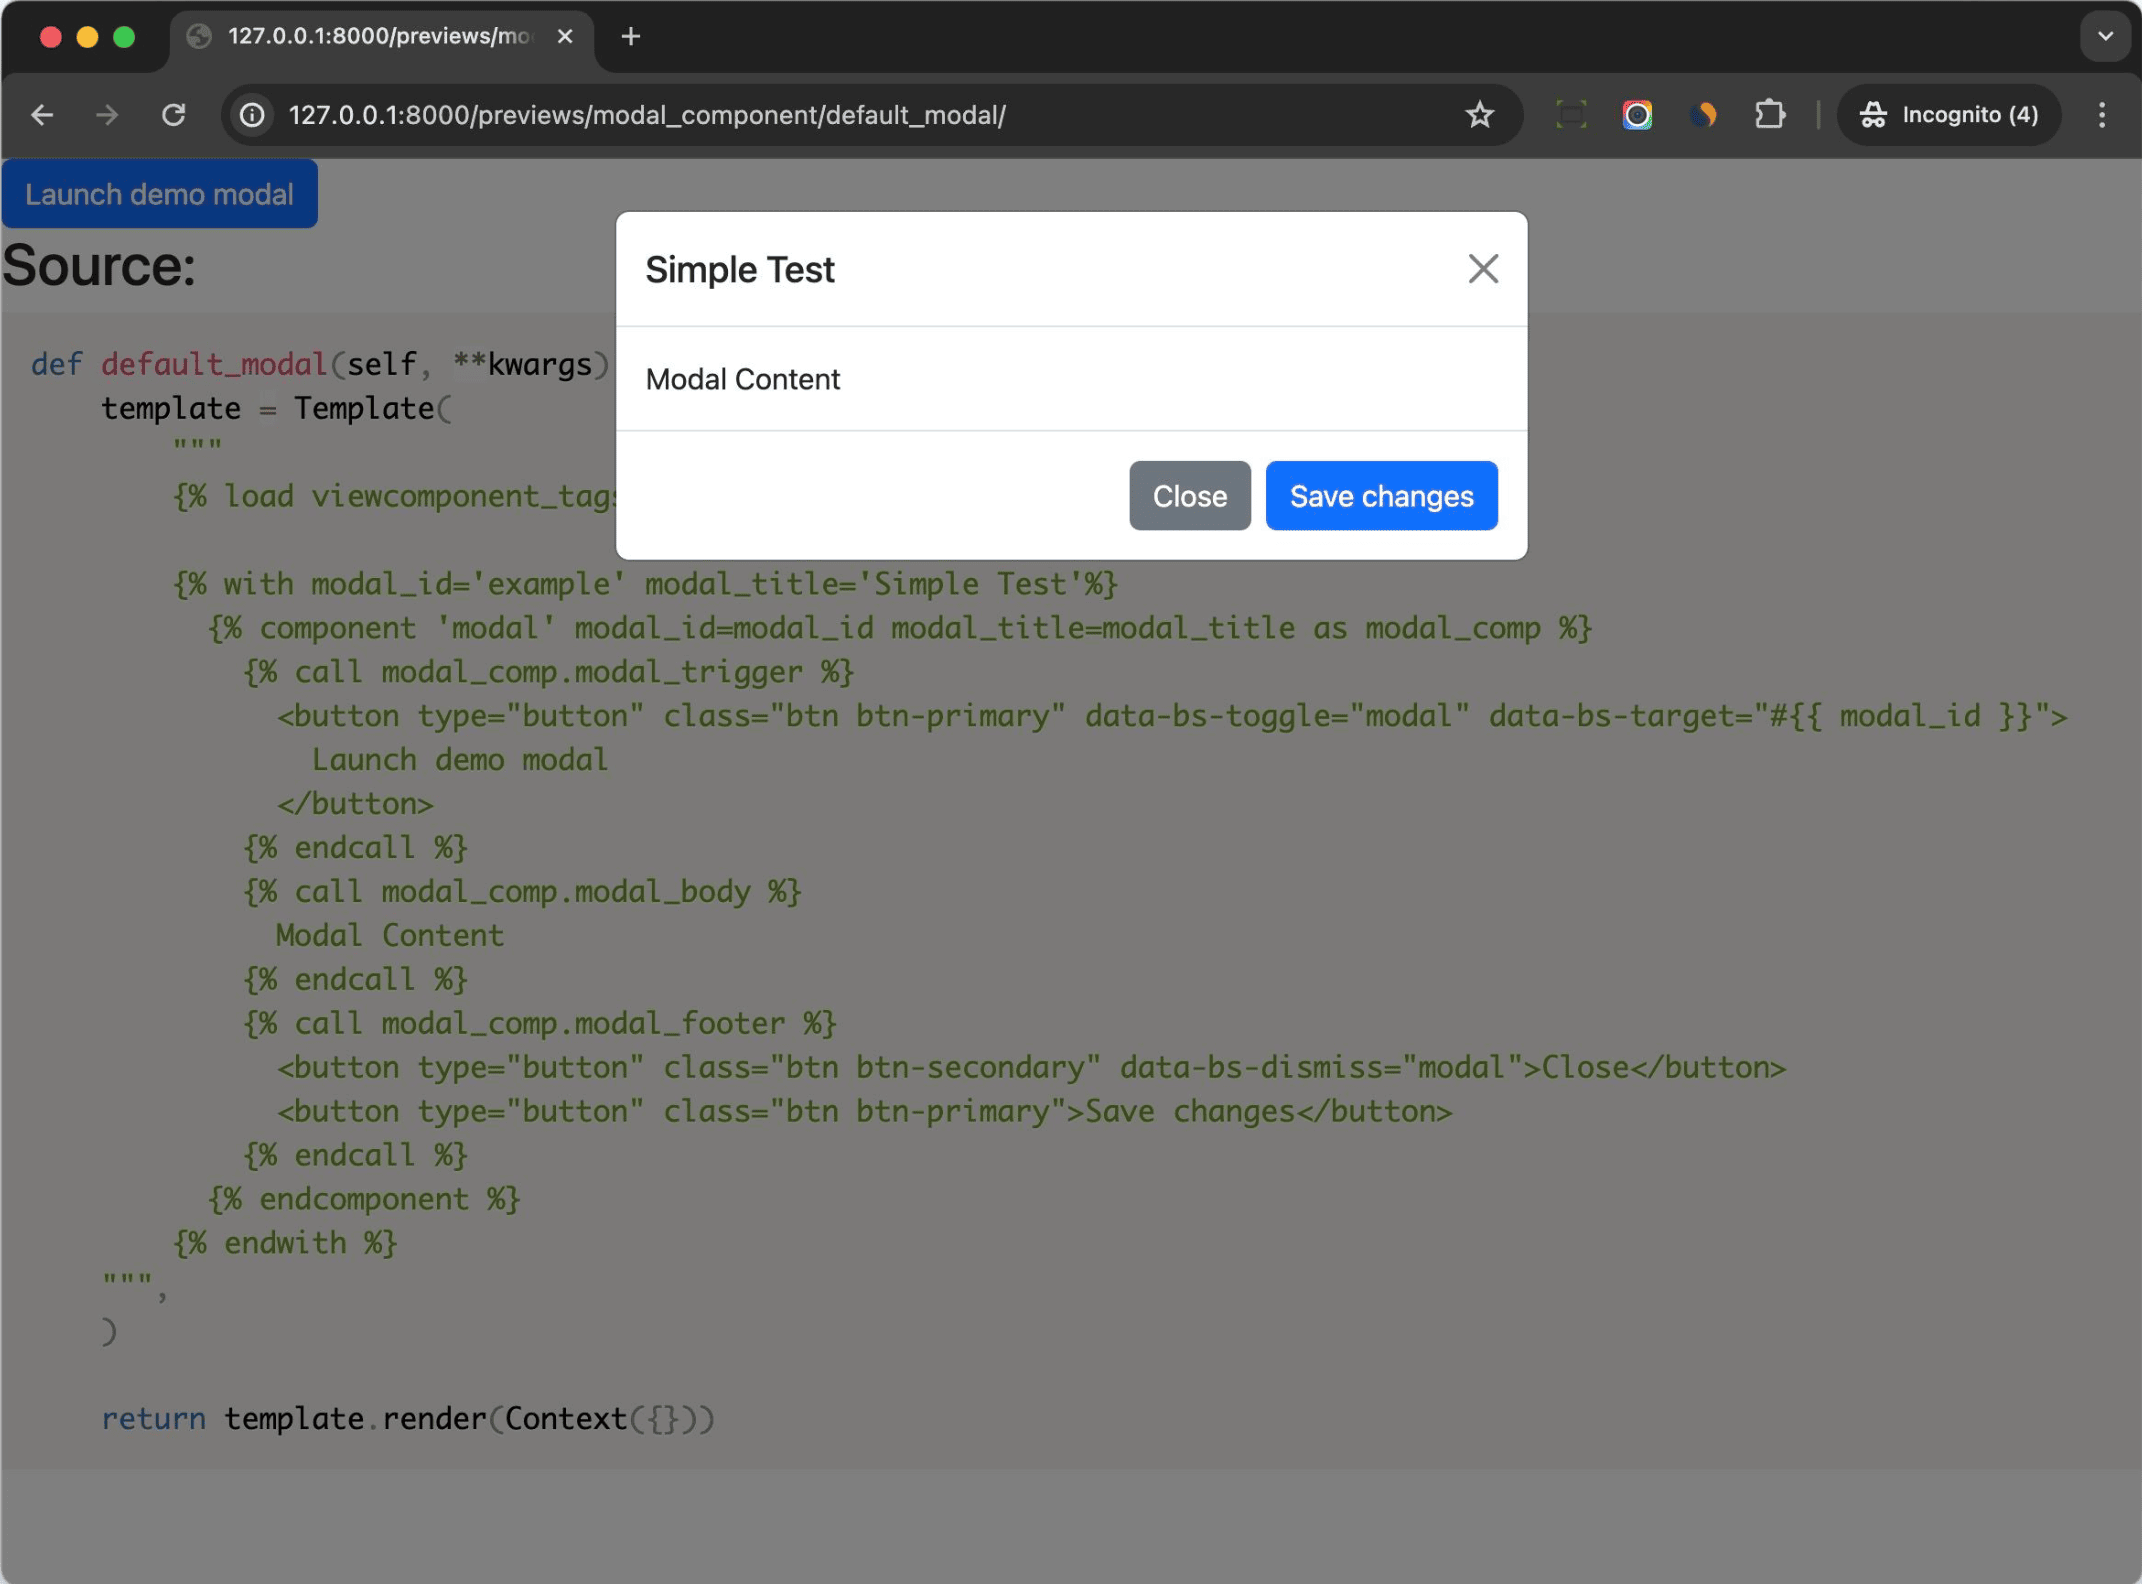
As you may see, the preview characteristic may be very helpful for us to develop and take a look at the part in an remoted atmosphere.
You may even construct a simplified model of the part library with it.
Your file and folder construction ought to now seem like this:
├── parts
│   ├── button
│   │   └── button.py
│   ├── modal
│   │   ├── modal.html
│   │   └── modal.py
│   └── tabs
│       ├── tabs.html
│       └── tabs.py
├── django_component_app
│   ├── __init__.py
│   ├── asgi.py
│   ├── settings.py
│   ├── templates
│   │   ├── django_viewcomponent
│   │   │   └── preview.html
│   │   └── index.html
│   ├── urls.py
│   └── wsgi.py
├── handle.py
├── previews
│   └── modal_preview.py
└── necessities.txt
Frontend Belongings
You may mix the server-side part resolution we talked about on this tutorial with any frontend techs you are thinking about. For instance:
- Light-weight JavaScript frameworks: Stimulus, Alpine.js
- React, Vue.js, Svelte
- Customized Internet Parts
And it is really helpful to place client-side logic in JavaScript information as an alternative of the Django template information to make it simpler to put in writing exams on your client-side logic.
You may put frontend property beside the server-side parts like so:
parts
└── modal
    ├── modal.js      # frontend property
    ├── modal.css     # frontend property
    ├── modal.html    # backend
    └── modal.py      # backend
If you wish to do that, please observe that the Javascript and CSS information ought to be processed by frontend bundling instruments like Webpack or Vite. The next libraries might assist:
- python-webpack-boilerplate – may help you begin a mission with Django and Webpack in minutes.
- django-vite – integration of Vite in a Django mission.
Part Library
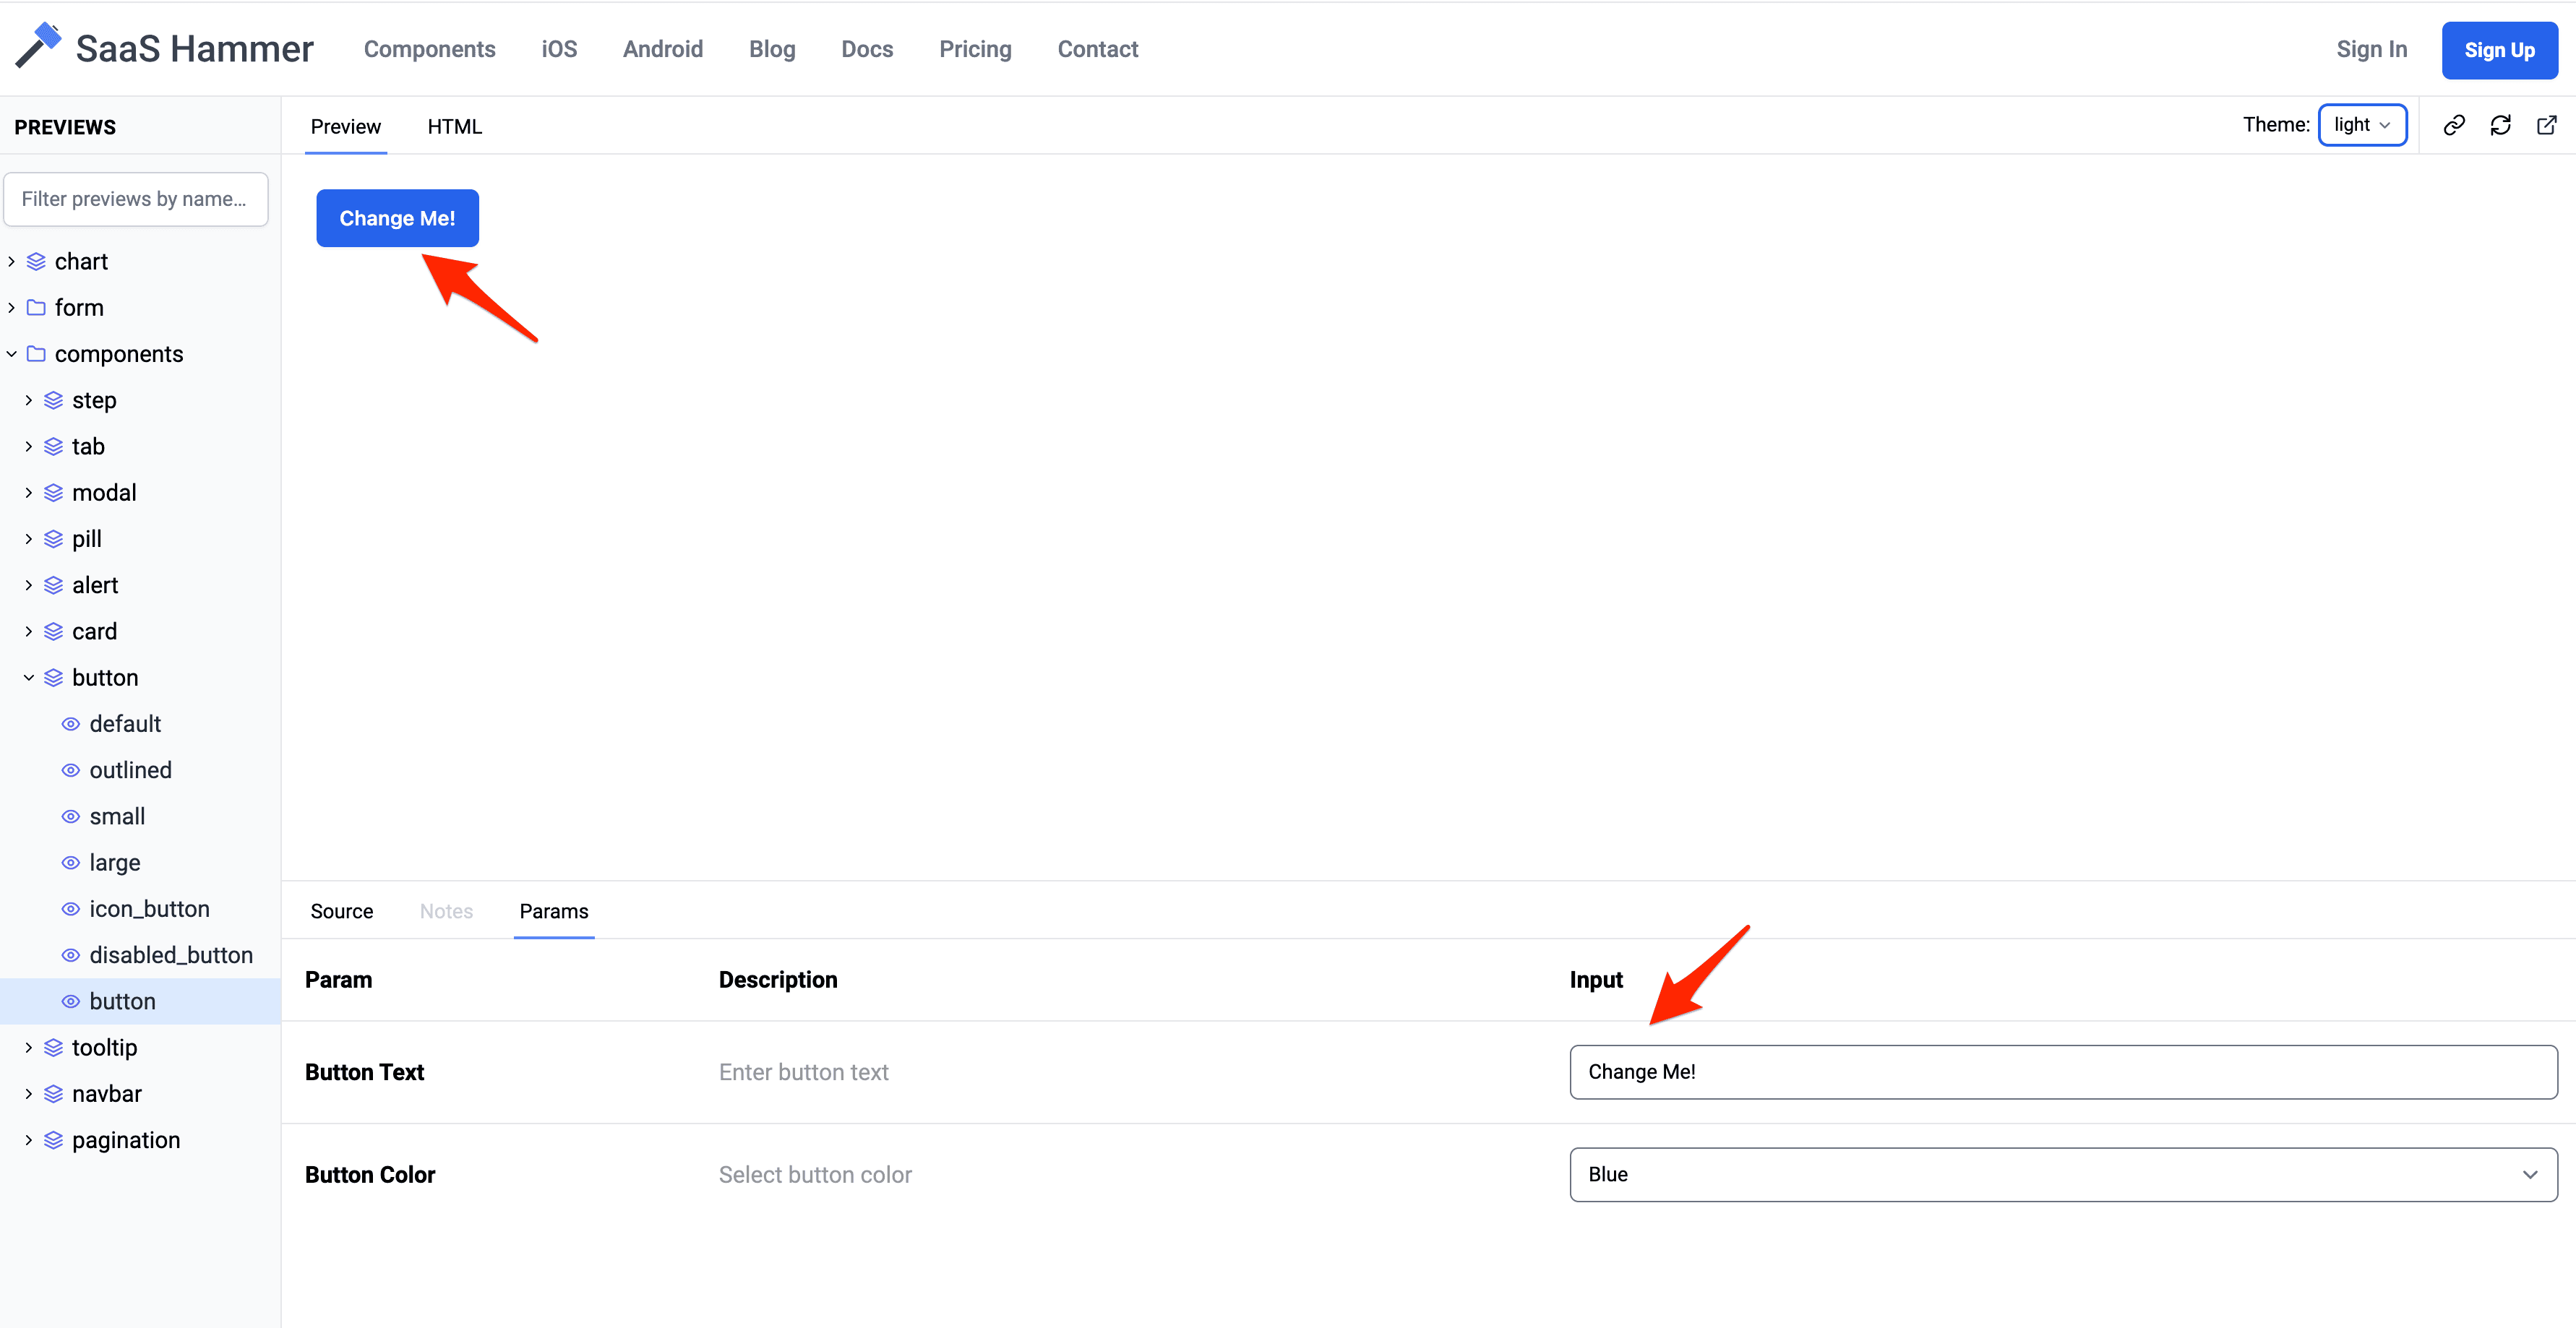
Is it potential to create one thing just like Storybook, a frontend workshop for constructing UI parts and pages in isolation, in Django?
One demo you may try is https://saashammer.com/lookbook/. This part library is developed by me, based mostly on the django-viewcomponent bundle. Take a look at the “Params” tab for an fascinating preview of what is potential. A consumer can replace the enter values to vary the part’s conduct:
Different Part Options
On this tutorial, we used django-viewcomponent as our server-side part resolution, however there are different options if you wish to examine our extra of what is potential:
- django-components is a very talked-about part resolution within the Django group.
- django-slippers is yet one more part resolution within the Django group. It encourages builders to construct parts in pure Django templates, so you may see it as improved model of Django’s built-in
embracetag. - django-pattern-library is a UI sample library for Django.
Sources
The next articles are written by Ruby on Rails builders. I extremely advocate that you just learn them because it will provide you with a greater understanding of the server-side part resolution. Additionally, server-side parts are far more mature within the Rails group.
Conclusion
On this tutorial, we checked out learn how to construct server-side UI parts in Django with the django-viewcomponent library.
The library:
- Is easy to make use of and will not break your present code.
- Works with any frontend techs you are thinking about.
- Can be utilized to construct parts in an remoted atmosphere (which you’ll be able to simply preview).
- Can be utilized to construct out a part library on your mission, step-by-step.
- Helps hold your code extra maintainable, reusable, and testable.
You probably have any suggestions, you may create situation on the repo or DM me on Twitter/X.
Thanks for studying.