


With Gatsby, it’s very simple to combine totally different knowledge sources into one utility. On this article, we’ll develop a job administration device whose knowledge is fetched from Airtable. We’ll use React for the entrance finish, with a hybrid rendering technique.
It’s a standard situation: you wish to develop an app that connects to knowledge from a spreadsheet utility or another knowledge supply. On this article, I’ll present you methods to implement an utility of this kind with the Gatsby framework. In our instance utility, duties will probably be imported from an Airtable workspace and visualized as a Gantt chart. The person can transfer the duties by drag and drop, after which all adjustments will probably be synchronized with Airtable. You should utilize the mission as a template for every kind of scheduling apps.
You’ll be able to strive the consequence stay on my Gatsby Cloud website. The src information of the mission might be present in my GitHub repository.
Setting Up the Undertaking
Gatsby is a static website generator. This implies you write your utility with React, and Gatsby interprets your code into HTML information which might be comprehensible to the browser. This construct course of is carried out at common intervals on the server aspect, in distinction to standard net functions the place the HTML code is first assembled on the consumer aspect within the person’s browser. The HTML information are subsequently statically accessible on the server (therefore the identify static website generator) and might be despatched on to the consumer when requested. This reduces the loading time of the applying for the person.
SitePoint’s Gatsby tutorial offers all the knowledge you’ll want to develop an utility with this framework. If you wish to develop my instance utility step-by-step, it is best to begin as outlines under.
First, it is best to obtain and set up Node.js. You’ll be able to verify if it’s put in accurately by typing node -v on the console. The present model of Node ought to be displayed:
node -v
> v14.16.0
With Node we additionally get npm, the Node bundle supervisor. With this device, we will now set up the Gatsby CLI:
npm set up -g gatsby-cli
We’re able to create a brand new mission utilizing the Gatsby CLI. I identify it “gantt-chart-gatsby”:
gatsby new gantt-chart-gatsby
Then transfer into the mission folder with the command cd gantt-chart-gatsby and construct the mission with the command gatsby develop. Now you may open the index web page of the mission within the browser on http://localhost:8000. At first, it is best to solely see the welcome web page that Gatsby has ready for us.
Within the subsequent step, it is best to study the src folder of the mission. The subfolder src/pages accommodates the React parts of the person pages of the mission. For now, it’s enough so that you can hold the index.js file for the index web page, as a result of, in our instance utility, we solely want one web page. You’ll be able to delete the opposite information on this folder, apart from 404.js (which might be helpful if somebody enters a incorrect deal with).
It’s a great place to begin for those who overwrite the present code in index.js with this code:
import * as React from 'react'

const IndexPage = () => {
  return (
   <foremost>
      <title>Gantt Chart</title>
      <h1>Welcome to my Gatsby Gantt Chart</h1>

    </foremost>
  )
}

export default IndexPage;
You’ll be able to construct the mission once more with the command gatsby develop on the command line and open the index web page within the browser. Now it is best to see an empty web page with the heading “Welcome to my Gatsby Gantt Chart”.
Constructing the Entrance Finish with React
The primary model of the index web page
We are going to implement the Gantt chart as a reusable React element. Earlier than I clarify the implementation of the element intimately within the following sections, I’d first like to point out the way it’s initialized and embedded within the index web page. So I’d suggest you to carry off utilizing the gatsby develop command till we’ve completed the primary model of the element. (I’ll let you recognize after we’re prepared!)
On this instance mission, I take advantage of the idea of “jobs” and “sources”. Jobs are the duties which might be drawn into the chart cells and that may be moved by drag and drop. Sources comprise the labels for the rows wherein the roles might be moved. These might be names for the duties, however in different use instances additionally the names of individuals, autos or machines finishing up the duties.
Jobs and sources are handed to the Gantt chart element as properties. Earlier than connecting the duty administration device to Airtable, we fill the lists with some hard-coded check knowledge in JSON format:
import * as React from "react";
import {GanttChart} from "../GanttChart";
import "../types/index.css";

let j = [
  {id: "j1", start: new Date("2021/6/1"), end: new Date("2021/6/4"), resource: "r1"},
  {id: "j2", start: new Date("2021/6/4"), end: new Date("2021/6/13"), resource: "r2"},
  {id: "j3", start: new Date("2021/6/13"), end: new Date("2021/6/21"), resource: "r3"},
];

let r = [{id:"r1", name: "Task 1"}, {id:"r2", name: "Task 2"}, {id:"r3", name: "Task 3"}, {id:"r4", name: "Task 4"}];

const IndexPage = () => {
  return (
    <foremost>
      <title>Gantt Chart</title>
      <h1>Welcome to my Gatsby Gantt Chart</h1>
      <GanttChart jobs={j} sources={r}/>
    </foremost>
  )
};

export default IndexPage;
CSS types for the Gantt chart
Within the subsequent step, we create a brand new index.css file within the types folder. (If the folder doesn’t exist, create a brand new folder types within the folder src of the mission.) The next CSS settings management the structure and look of the Gantt chart:
physique{
  font-family: Arial, Helvetica, sans-serif;
}

#gantt-container{
  show: grid;
}

.gantt-row-resource{
  background-color:whitesmoke;
  colour:rgba(0, 0, 0, 0.726);
  border:1px strong rgb(133, 129, 129);
  text-align: middle;
  padding: 15px;
}

.gantt-row-period{
  background-color:whitesmoke;
  colour:rgba(0, 0, 0, 0.726);
  border:1px strong rgb(133, 129, 129);
  text-align: middle;

  show:grid;
  grid-auto-flow: column;
  grid-auto-columns: minmax(40px, 1fr);
}

.interval{
  padding: 10px 0 10px 0;
}

.gantt-row-item{
  border: 1px strong rgb(214, 214, 214);
  padding: 10px 0 10px 0;
  place: relative;
  background-color:white;
}

.job{
  place: absolute;
  top:38px;
  prime:5px;
  z-index: 100;
  background-color:rgb(167, 171, 245);
  cursor: pointer;
}
Implementing the GanttChart element
Now I’ll clarify the implementation of the GanttChart element in additional element. First, we want a file named GanttChart.js within the src folder. On this tutorial, I take advantage of a simplified model of the GanttChart for just one month (June 2021). An prolonged model with choose fields for beginning month and finish month might be discovered at GitHub below the identify GanttChart_extended.js.
The chart desk is constructed up in three steps, represented by the capabilities initFirstRow, initSecondRow and initGanttRows:
import React from 'react';

export class GanttChart extends React.Part {

    names = ["Jan", "Feb", "Mar", "Apr", "May", "Jun", "Jul", "Aug", "Sep", "Oct", "Nov", "Dec"];

    constructor(props) {

        tremendous(props);

        this.state = {
            dateFrom: new Date(2021,5,1),
            dateTo: new Date(2021,5,30),
        };
    }

    render(){

        let month = new Date(this.state.dateFrom.getFullYear(), this.state.dateFrom.getMonth(), 1);

        let grid_style = "100px 1fr";

        let firstRow = this.initFirstRow(month);
        let secondRow = this.initSecondRow(month);
        let ganttRows = this.initGanttRows(month);

        return (

            <div className="gantt-chart">
                <div id="gantt-container" model={{gridTemplateColumns : grid_style}}>
                    {firstRow}
                    {secondRow}
                    {ganttRows}
                </div>
            </div>
        );
     }


    initFirstRow(month){...}

    initSecondRow(month){...}

    initGanttRows(month){...}


    formatDate(d){
        return d.getFullYear()+"-"+this.zeroPad(d.getMonth()+1)+"-"+this.zeroPad(d.getDate());
    }

    zeroPad(n){
        return n<10 ? "0"+n : n;
    }

    monthDiff(d1, d2) {
        let months;
        months = (d2.getFullYear() - d1.getFullYear()) * 12;
        months -= d1.getMonth();
        months += d2.getMonth();
        return months <= 0 ? 0 : months;
    }

    dayDiff(d1, d2){
        let diffTime = Math.abs(d2 - d1);
        let diffDays = Math.ceil(diffTime / (1000 * 60 * 60 * 24));
        return diffDays;
    }

}
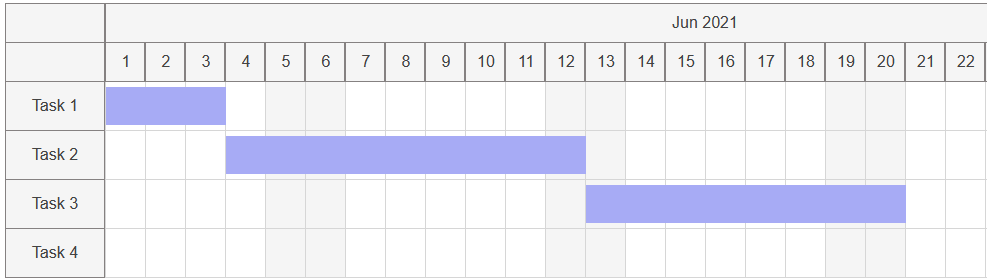
Within the initFirstRow perform, the primary row of the chart desk is generated. As you may see from the image above, the primary row consists of two grid cells. These are generated as divs, which in flip are inserted as youngsters into the “gantt-container” (see the itemizing above). The second div additionally accommodates the label for the present month.
React requires a novel “key” property for all components which might be a part of an enumeration. This helps to optimize the rendering efficiency:
 initFirstRow(month){

    let components = []; let i = 0;

    components.push(<div key={"fr"+(i++)} className="gantt-row-resource"></div>);

    components.push(<div key={"fr"+(i++)} className="gantt-row-period"><div className="interval">{this.names[month.getMonth()] + " " + month.getFullYear()}</div></div>);

    return components;
 }
The subsequent row of the chart desk is generated within the initSecondRow perform. We use the identical precept once more: for every desk cell, a div is created. You need to make it possible for the divs are nested accurately (the second div within the row accommodates particular person divs for every day of the month) in order that the CSS Grid settings (see the index.css file) will produce the specified structure:
initSecondRow(month){

    let components = []; let i=0;


    components.push(<div key={"sr"+(i++)} model={{borderTop : 'none'}} className="gantt-row-resource"></div>);

    let days = [];

    let f_om = new Date(month);
    let l_om = new Date(month.getFullYear(), month.getMonth()+1, 0);

    let date = new Date(f_om);

    for(date; date <= l_om; date.setDate(date.getDate()+1)){

        days.push(<div key={"sr"+(i++)} model={{borderTop: 'none'}} className="gantt-row-period interval">{date.getDate()}</div>);
    }


    components.push(<div key={"sr"+(i++)} model={{border: 'none'}} className="gantt-row-period">{days}</div>);

    return components;

}
The remaining rows of the chart desk are generated within the initGanttRows perform. They comprise the grid cells into which the roles are drawn. Once more, the rendering is finished row by row: for every row we first place the identify of the useful resource, then we iterate over the person days of the month. Every grid cell is initialized as a ChartCell element for a selected day and useful resource. With the cell_jobs record, the person cell is assigned the roles that should be drawn into it (usually that is precisely one job):
initGanttRows(month){

    let components = []; let i=0;

    this.props.sources.forEach(useful resource => {

        components.push(<div key={"gr"+(i++)} model={{borderTop : 'none'}} className="gantt-row-resource">{useful resource.identify}</div>);

        let cells = [];

        let f_om = new Date(month);
        let l_om = new Date(month.getFullYear(), month.getMonth()+1, 0);

        let date = new Date(f_om);

        for(date; date <= l_om; date.setDate(date.getDate()+1)){

            let cell_jobs = this.props.jobs.filter((job) => job.useful resource == useful resource.id && job.begin.getTime() == date.getTime());

            cells.push(<ChartCell key={"gr"+(i++)} useful resource={useful resource} date={new Date(date)} jobs={cell_jobs}/>);
        }

        components.push(<div key={"gr"+(i++)} model={{border: 'none'}} className="gantt-row-period">{cells}</div>);

    });

    return components;
}
Now add the next code for the ChartCell element on the finish of GanttChart.js. The element renders a single desk cell of the chart as a div containing a number of jobs as baby components. The HTML code for displaying a job is offered by the getJobElement perform:
class ChartCell extends React.Part {

    constructor(props) {

      tremendous(props);

      this.state = {
        jobs: props.jobs
      }
    }

    render(){

      let jobElements = this.props.jobs.map((job) => this.getJobElement(job));

      return (
        <div
            model={}
            className="gantt-row-item">
            {jobElements}
        </div>
      );
    }

    getJobElement(job){

        let d = this.dayDiff(job.begin, job.finish);


        return (
        <div    model={{width: "calc("+(d*100)+"% + "+ d + "px)"}}
                className="job"
                id={job.id}
                key={job.id}
        >

        </div>
        );
    }

    dayDiff(d1, d2){
        let diffTime = Math.abs(d2 - d1);
        let diffDays = Math.ceil(diffTime / (1000 * 60 * 60 * 24));
        return diffDays;
    }
}
At this level, you may construct the mission from the foundation folder utilizing the gatsby develop command. The hard-coded jobs from the index web page ought to be seen within the Gantt chart. They’ll’t be dragged and dropped but, however we’ll deal with that later.
Integrating Knowledge from Airtable
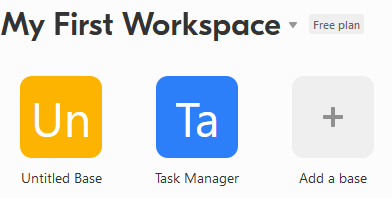
It’s time to attach our utility to Airtable so we will import jobs and sources from there. First, create a free account at Airtable. After logging in, you’ll see an “Untitled Base” (see picture under). Click on Add a base, then Begin from scratch, and enter a reputation on your base. I entered “Job Supervisor”.
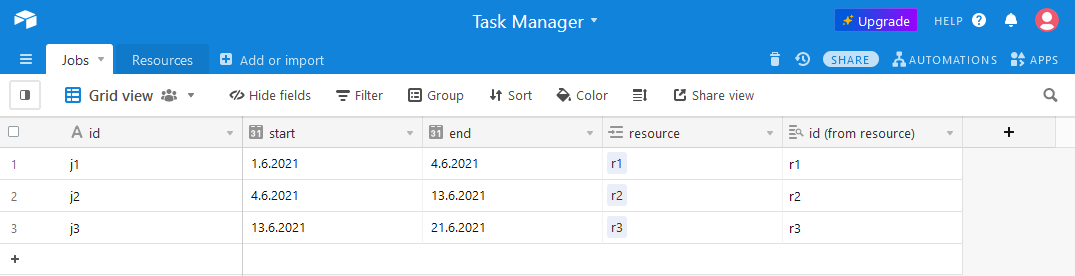
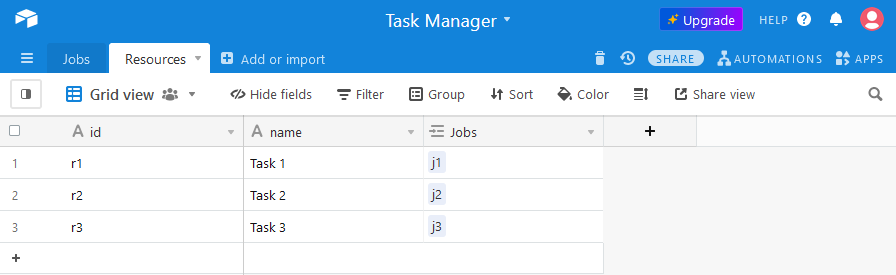
Establishing the Airtable base with the “Jobs” and “Sources” tables
Now you may outline the tables on your base, within the following steps:
- Outline the desk “Jobs” with the fields
id(area kind: textual content),begin(area kind: Date) andfinish(area kind: Date). - Outline the desk “Sources” with the fields
id(area kind: textual content) andidentify(area kind: textual content). - Go to the desk “Jobs”, add a area
useful resourcewith the sphere kind “Hyperlink to a different file”, then select the sphereidas a lookup area for the desk “Useful resource”.
After these steps, your tables ought to appear like within the photos under.
Importing knowledge from Airtable with GraphQL and Gatsby’s Airtable plugin
Subsequent, we wish to import knowledge from Airtable into our utility. For this objective, set up the plugin “gatsby-source-airtable” with npm set up --save gatsby-source-airtable. Then, modify the gatsby-config.js file in your mission folder as proven within the record under:
module.exports = {
  siteMetadata: {
    siteUrl: "https://www.yourdomain.tld",
    title: "Gatsby Gantt Chart",
  },
  plugins: [

  "gatsby-plugin-gatsby-cloud",

  {
    resolve: "gatsby-source-airtable",
    options: {
      apiKey: "XXX",
      concurrency: 5,
      tables: [
        {
          baseId: "YYY",
          tableName: "Jobs",
        },
        {
          baseId: "YYY",
          tableName: "Resources",
        }
      ]
    }
  }
  ],
};
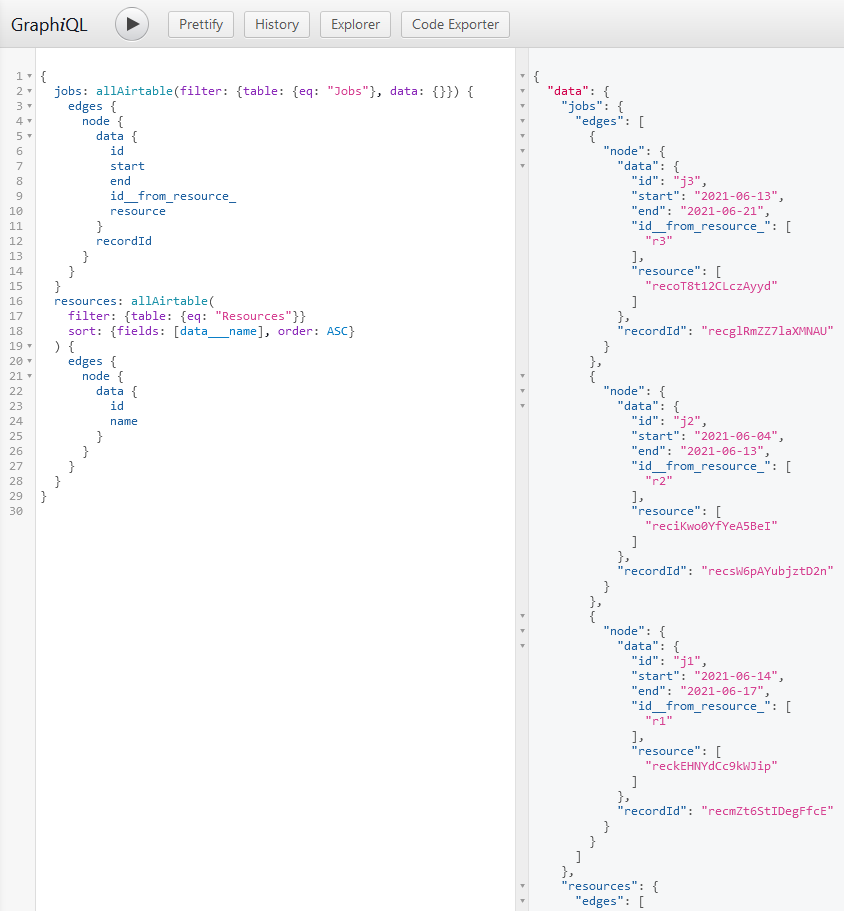
Now we will attempt to fetch knowledge from Airtable. Begin your utility with gatsby develop, then open the GraphiQL editor within the browser at http://localhost:8000/___graphql and paste the next question into the world on the left:
{
  jobs: allAirtable(filter: {desk: {eq: "Jobs"}, knowledge: {}}) {
    edges {
      node {
        knowledge {
          id
          begin
          finish
          id__from_resource_
          useful resource
        }
        recordId
      }
    }
  }
  sources: allAirtable(
    filter: {desk: {eq: "Sources"}}
    kind: {fields: [data___name], order: ASC}
  ) {
    edges {
      node {
        knowledge {
          id
          identify
        }
      }
    }
  }
}
Click on on the arrow image to run the question. The results of the question ought to seem on the appropriate aspect.
Now it’s time to take away the hardcoded lists with jobs and sources in index.js. Replace the code in index.js as proven within the following itemizing. What’s occurring right here? First, on the finish of the file you may see a so-called “web page question” that requests all jobs and sources. The results of the question is routinely assigned to the knowledge property of the element IndexPage. Thus, the knowledge property shops precisely what you’ve seen as a question consequence within the GraphiQL editor on the appropriate aspect. We will use the map perform to remodel the jobs and sources arrays into our most popular format.
Even when it appears a bit cumbersome, now we have to maintain the properties recordID and id__from_resource, that are routinely created by Airtable, for all jobs. That is mandatory in order that we will later save adjustments to the roles by way of the Airtable REST API:
import * as React from "react"
import { useStaticQuery, graphql } from "gatsby"
import {GanttChart} from "../GanttChart"
import '../types/index.css';


const IndexPage = (knowledge) => {

  let j = knowledge.knowledge.jobs.edges.map(edge => {

    let s = new Date(edge.node.knowledge.begin);
    s.setHours(0);

    let e = new Date(edge.node.knowledge.finish);
    e.setHours(0);

    return {
      airtable_id: edge.node.recordId,
      id:edge.node.knowledge.id,
      begin: s,
      finish: e,
      useful resource: edge.node.knowledge.id__from_resource_[0],
      resource_airtable_id: edge.node.knowledge.useful resource[0]
    };
  });

  let r = knowledge.knowledge.sources.edges.map(edge => {

    return{
      id: edge.node.knowledge.id,
      identify: edge.node.knowledge.identify
    }
  });

  if(r && j){
    return (
      <foremost>
        <title>Gantt Chart</title>
        <h1>Welcome to my Gatsby Gantt Chart</h1>
        <GanttChart jobs={j} sources={r}/>
      </foremost>
    )
  }else{
    return (
      <foremost>
        <title>Gantt Chart</title>
        <h1>Welcome to my Gatsby Gantt Chart</h1>
        <p>Lacking knowledge...</p>
      </foremost>
    )
  }
}

export const question = graphql`
      question{
        jobs: allAirtable(filter: {desk: {eq: "Jobs"}, knowledge: {}}) {
          edges {
            node {
              knowledge {
                id
                begin
                finish
                id__from_resource_
                useful resource
              }
              recordId
            }
          }
        }
        sources: allAirtable(
          filter: {desk: {eq: "Sources"}}
          kind: {fields: [data___name], order: ASC}
        ) {
          edges {
            node {
              knowledge {
                id
                identify
              }
            }
          }
        }
      }
  `
export default IndexPage;
When you construct and begin your utility regionally with gatsby develop, the information is fetched from Airtable and displayed in your Gantt chart. When you’ve arrange a Gatsby Cloud website in keeping with the Gatsby tutorial, the positioning is up to date as quickly as you push the code adjustments to the related GitHub account. Nonetheless, you’ll discover that the Airtable question is barely executed when the mission is constructed (no matter whether or not that occurs regionally or on the Gatsby Cloud website). When you modify the information in your Airtable base, the adjustments aren’t mirrored within the Gantt chart until you re-build the mission. That is typical for the server-side rendering strategy of Gatsby.
Within the subsequent part, we’ll focus on methods to take care of adjustments within the knowledge.
Realizing a Two-way Synchronization between Gatsby and Airtable
In our instance, adjustments to the information might be made in Airtable (by modifying the desk cells) or within the Gantt chart (by drag and drop). For synchronizing these components, I comply with a hybrid technique that entails each server-side and client-side replace operations.
1. Switch adjustments from Airtable to the Gantt chart (server-side)
Gatsby provides webhooks to remotely set off the server-side construct course of. It’s doable to configure Airtable to routinely set off the construct hook on sure occasions (akin to creating or altering information), offered you could have a professional membership there. (You will discover extra detailed details about the settings which might be mandatory for this objective right here).
2. Switch adjustments from Airtable to the Gantt chart (client-side)
Whereas the applying is used within the browser, the Gantt chart ought to load updates from Airtable dynamically (for instance, at a sure time interval). To make the method easy, we simply wish to re-download the entire lists of jobs and sources on the specified interval. For this, we’ll use the official Airtable API.
Within the IndexPage element, we use React’s useState hook to set the lists with the roles and sources because the element’s state. Then we apply the useEffect hook to set an interval at which the perform loadDataFromAirtable ought to be referred to as as soon as the element has been initialized:
const IndexPage = (knowledge) => {

  let j = knowledge.knowledge.jobs.edges.map(edge => {...});
  let r = knowledge.knowledge.sources.edges.map(edge => {...});

  const [resources, setResources] = useState(r);
  const [jobs, setJobs] = useState(j);

  useEffect(() => {
    const interval = setInterval(() => {

      let jobsLoaded = (j) => { setJobs(j) };
      let resourcesLoaded = (r) => { setResources(r) };

      loadDataFromAirtable(jobsLoaded, resourcesLoaded);

    }, 60000);

    return () => clearInterval(interval);
  }, []);

  if(sources && jobs){
    return (
      <foremost>
        <title>Gantt Chart</title>
        <h1>Welcome to my Gatsby Gantt Chart</h1>
        <GanttChart jobs={jobs} sources={sources}/>
      </foremost>
    )
  }else{
    return (
      <foremost>
        <title>Gantt Chart</title>
        <h1>Welcome to my Gatsby Gantt Chart</h1>
        <p>Lacking knowledge...</p>
      </foremost>
    )
  }
}
For the implementation of the loadDataFromAirtable perform, we check out the documentation of the Airtable API. The documentation is tailored to the chosen base (in our case “Job Supervisor”). When you click on on Jobs Desk and Checklist information on the left aspect, you’ll see the precise construction of a GET request to retrieve the information of all jobs within the “curl” space. This request might be carried out very simply in JavaScript utilizing the “fetch” methodology.
So, to obtain the information of all jobs and sources, we execute two asynchronous GET requests to Airtable in sequence. I’ve masked the precise URLs as a result of they comprise my private API key:
perform loadDataFromAirtable(onJobsLoaded, onResourcesLoaded){

  let j,r;

  let url_j= "XXXX";
  let url_r= "YYYY";

  fetch(url_j, {headers: {"Authorization": "ZZZZ"}})
  .then(response => response.json())
  .then(knowledge => {

    j = knowledge.information.map(file => {

      let s = new Date(file.fields.begin);
      s.setHours(0);

      let e = new Date(file.fields.finish);
      e.setHours(0);

       return {
        airtable_id: file.id,
        id: file.fields.id,
        begin: s,
        finish: e,
        useful resource: file.fields['id (from resource)'][0],
        resource_airtable_id: file.fields.useful resource[0]
       };
    });

    onJobsLoaded(j);
  });


  fetch(url_r, {headers: {"Authorization": "ZZZZ"}})
  .then(response => response.json())
  .then(knowledge => {

    r = knowledge.information.map(file => {

       return {
        id: file.fields.id,
        identify: file.fields.identify
       };
    });

    onResourcesLoaded(r);
  });
}
As a check, you can also make some adjustments to the job knowledge in your Airtable base. After the given interval time (right here one minute) the Gantt chart ought to replace routinely in your browser.
3. Switch adjustments from the Gantt chart to the Airtable base (client-side)
Earlier than the person can modify the Gantt chart, we should first make the roles draggable. For this, replace the ChartCell element as follows:
class ChartCell extends React.Part {

    constructor(props) {

      tremendous(props);
    }

    render(){

      let jobElements = this.props.jobs.map((job) => this.getJobElement(job));

      let dragOver = (ev) => {ev.preventDefault()};

      let drop = (ev) => {

        ev.preventDefault();

        let job_id = ev.dataTransfer.getData("job");

        this.props.onDropJob(job_id, this.props.useful resource.id, this.props.date)

      };

      return (
        <div
            model={}
            className="gantt-row-item" onDragOver={dragOver} onDrop={drop}>
            {jobElements}
        </div>
      );
    }

    getJobElement(job){

        let d = this.dayDiff(job.begin, job.finish);

        return (
        <div    model={{width: "calc("+(d*100)+"% + "+ d + "px)"}}
                className="job"
                id={job.id}
                key={job.id}
                draggable="true"
                onDragStart={this.dragStart}>
        </div>
        );
    }

    dragStart(ev){ ev.dataTransfer.setData("job", ev.goal.id);}

    dayDiff(d1, d2){

        let diffTime = Math.abs(d2 - d1);
        let diffDays = Math.ceil(diffTime / (1000 * 60 * 60 * 24));
        return diffDays;
    }
}
Implementing drag and drop isn’t notably difficult with JavaScript. You need to implement handlers for the occasions onDragStart (for the draggable components), onDragOver and onDrop (for the drop targets), as proven in this tutorial.
We have to specify which handler perform is known as on the onDropJob occasion, which is triggered by the drop handler. Within the initGanttRows perform, replace the next line:
cells.push(<ChartCell key={"gr"+(i++)} useful resource={useful resource} date={new Date(date)} jobs={cell_jobs} onDropJob={this.dropJob}/>);
Within the GanttChart element, add the perform dropJob:
dropJob(id, newResource, newDate){

      let job = this.props.jobs.discover(j => j.id == id );

      let newJob = {};
      newJob.useful resource = newResource;

      let d = this.dayDiff(job.begin, job.finish);
      let finish = new Date(newDate);
      finish.setDate(newDate.getDate()+d);

      newJob.begin = newDate;
      newJob.finish = finish;

      this.props.onUpdateJob(id, newJob);
  };
The precise modification of the job record is finished within the father or mother IndexPage element in index.js. The slice methodology is used to create a duplicate of the job record. The job that was moved utilizing drag and drop is situated within the record based mostly on its ID and is given the brand new properties. After that, the state of the IndexPage element is up to date by calling setJobs. Please observe that, precisely now, a re-render of the Gantt chart element is triggered and now the job aspect seems at its new place:
const IndexPage = (knowledge) => {

  ...

  let updateJob = (id, newJob) => {

    let new_jobs = jobs.slice();

    let job = new_jobs.discover(j => j.id == id );

    job.useful resource = newJob.useful resource;
    job.begin = newJob.begin;
    job.finish = newJob.finish;

    setJobs(new_jobs);
    updateJobToAirtable(job);
  }

  if(sources && jobs){
    return (
      <foremost>
        <title>Gantt Chart</title>
        <h1>Welcome to my Gatsby Gantt Chart</h1>
        <GanttChart jobs={jobs} sources={sources} onUpdateJob={updateJob}/>
      </foremost>
    )
  }else{
    ...
  }
}
Within the final step, now we have to implement the updateJobToAirtable perform. Once more, we comply with the Airtable API documentation, this time within the part Replace information:
perform updateJobToAirtable(job){

    let knowledge = {
      information: [
      {
        id: job.airtable_id,
        fields: {
          id: job.id,
          start: formatDate(job.start),
          end: formatDate(job.end),
          resource: [
            job.resource_airtable_id
          ]
        }
      }
    ]};

 fetch("XXX", {
    methodology: "PATCH",
    headers: {"Authorization": "ZZZ", "Content material-Kind": "utility/json"},
    physique: JSON.stringify(knowledge)
  });
}
Now you may transfer jobs within the Gantt chart and watch how the desk “Jobs” updates in actual time in your Airtable base.
Closing Ideas
The easy job administration utility on this article exhibits that server-side rendering may also be used for functions with wealthy client-side interplay. The principle benefit is the quick preliminary loading time, as a result of the DOM is ready on the server. Particularly for functions with a really complicated person interface (for instance, dashboards for planning duties), this may be essential. The periodical fetching of recent knowledge on the consumer aspect often doesn’t result in main efficiency issues, as a result of React makes use of a refined algorithm to find out which adjustments to the DOM are literally mandatory.
The Gatsby framework significantly simplifies the method of growing such hybrid functions by offering seamless help for server-side rendering in addition to quite a few plugins for importing knowledge from exterior sources.