


On this tutorial, we’re going to see how we will deploy serverless capabilities alongside our front-end software and create an API that generates photographs and grabs metadata from hyperlinks.
With serverless capabilities, builders can create and implement fashionable options and functionalities of their purposes with out going by the ache of establishing and managing back-end servers. The capabilities are hosted and deployed by cloud computing firms.
Netlify capabilities make creating and deploying serverless capabilities simple for purposes hosted on Netlify.
Conditions
To comply with together with this tutorial, you’ll must be accustomed to JavaScript, Vue.js, Git, GitHub, and Netlify. You also needs to have a textual content editor — corresponding to VS Code) with Vetur put in (for IntelliSense) — and a current model of Node put in in your machine. You’ll be able to set up Node right here. You’ll be able to test your model of Node by working the command node -vin your terminal.
You also needs to have an account on Netlify. You’ll be able to create one should you haven’t already.
What We’re Constructing
To point out how we will simply arrange serverless capabilities with our front-end software, we’ll be constructing an app with a customized hyperlink previewer part.
This part sends a request with a URL to our serverless operate. The operate then makes use of Puppeteer to get metadata from the goal web site utilizing the URL and to generate a screenshot of the positioning.
The operate sends the metadata and screenshots again to the part on our front-end to show it as a hyperlink preview within the software.
Right here’s the hyperlink to the instance venture deployed on Netlify. And right here’s the GitHub Repo to comply with alongside.
Create and Set Up the Vue Software
We’re going to create a Vue 3 software utilizing Vue CLI. We’ll additionally set up and arrange Tailwind CSS, a utility-first CSS framework that gives courses we will use for our app with out having to put in writing a whole lot of customized CSS.
Set up and arrange Vue
To shortly scaffold a Vue software, we’ll use Vue CLI. To put in Vue CLI, run:
npm set up -g @vue/cli
As soon as the CLI has been put in, we will create a venture by working:
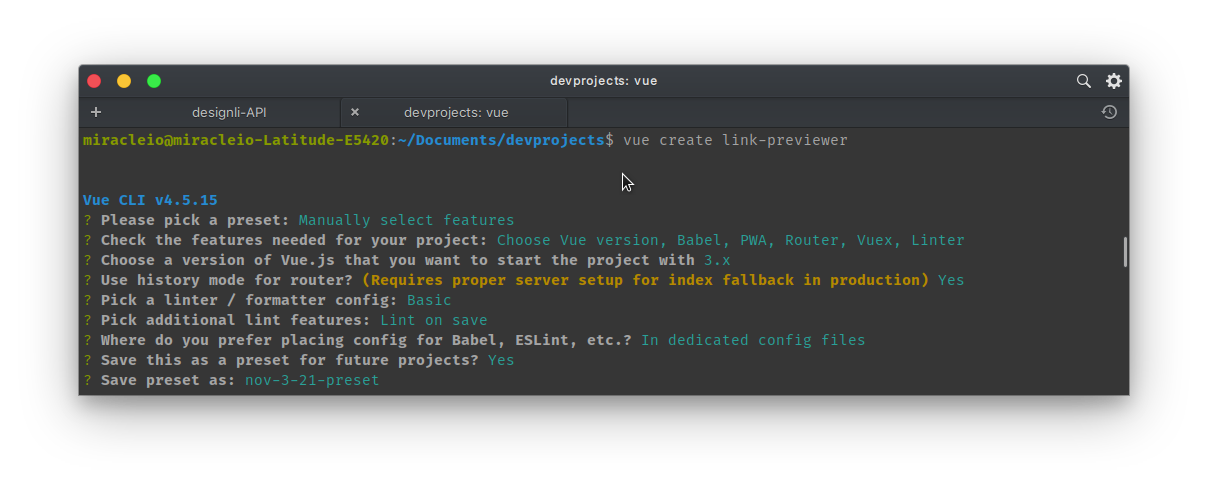
vue create link-previewer
This may immediate us to select a preset for our set up. We’ll choose “Manually choose options” in order that we will choose the options we’d like. Listed here are the choices I chosen:
Please choose a preset: Manually choose options
? Examine the options wanted for your venture: Select Vue model, Babel, PWA, Router, Vuex, Linter
? Select a model of Vue.js that you simply wish to begin the venture with: 3.x
? Use historical past mode for router? (Requires correct server setup for index fallback in manufacturing) Sure
? Decide a linter / formatter config: Fundamental
? Decide further lint options: Lint on save
? The place do you like inserting config for Babel, ESLint, and so on.? In devoted config information
After deciding on these choices, we’ll be requested if we wish to save the choices as a preset for later use. Choose Y (sure) or N (no) and proceed with the set up.
Run cd link-previewer to enter the newly created venture.
Set up and arrange Tailwind CSS
To put in Tailwind, we’ll use the PostCSS 7 compatibility construct, since Tailwind will depend on PostCSS 8 — which on the time of writing isn’t but supported by Vue 3. Uninstall any earlier Tailwind set up and re-install the compatibility construct:
npm uninstall tailwindcss postcss autoprefixer
npm set up -D tailwindcss@npm:@tailwindcss/postcss7-compat postcss@^7 autoprefixer@^9
Create the Tailwind configuration information
Subsequent, generate tailwind.config.js and postcss.config.js information:
npx tailwindcss init -p
This may create a minimal tailwind.config.js file on the root of the venture.
Configure Tailwind to take away unused types in manufacturing
Within the tailwind.config.js file, configure the purge possibility with the paths to all the pages and elements so Tailwind can tree-shake unused types in manufacturing builds:
module.exports = {
  purge: ['./index.html', './src/**/*.{vue,js,ts,jsx,tsx}'],
  ...
}
Embrace Tailwind within the CSS file
Create the ./src/belongings/css/essential.css file and use the @tailwind directive to incorporate Tailwind’s base, elements, and utilities types:
@tailwind base;
@tailwind elements;
@tailwind utilities;

physique{
  @apply bg-grey-50;
}
Tailwind will swap these directives out at construct time with all the types it generates based mostly on the configured design system.
Lastly, make sure the CSS file is being imported within the ./src/essential.js file:
import { createApp } from 'vue'
import App from './App.vue'
import './registerServiceWorker'
import router from './router'
import retailer from './retailer'
import './belongings/css/essential.css'

createApp(App).use(retailer).use(router).mount('#app')
And that’s it, we will run our server:
npm run serve

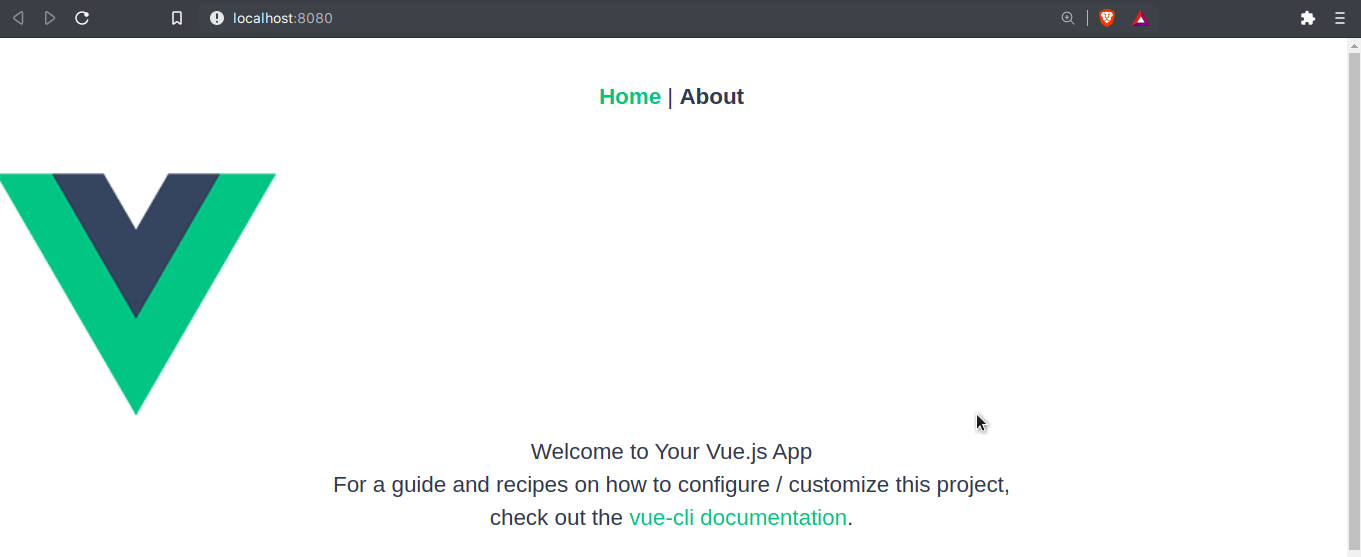
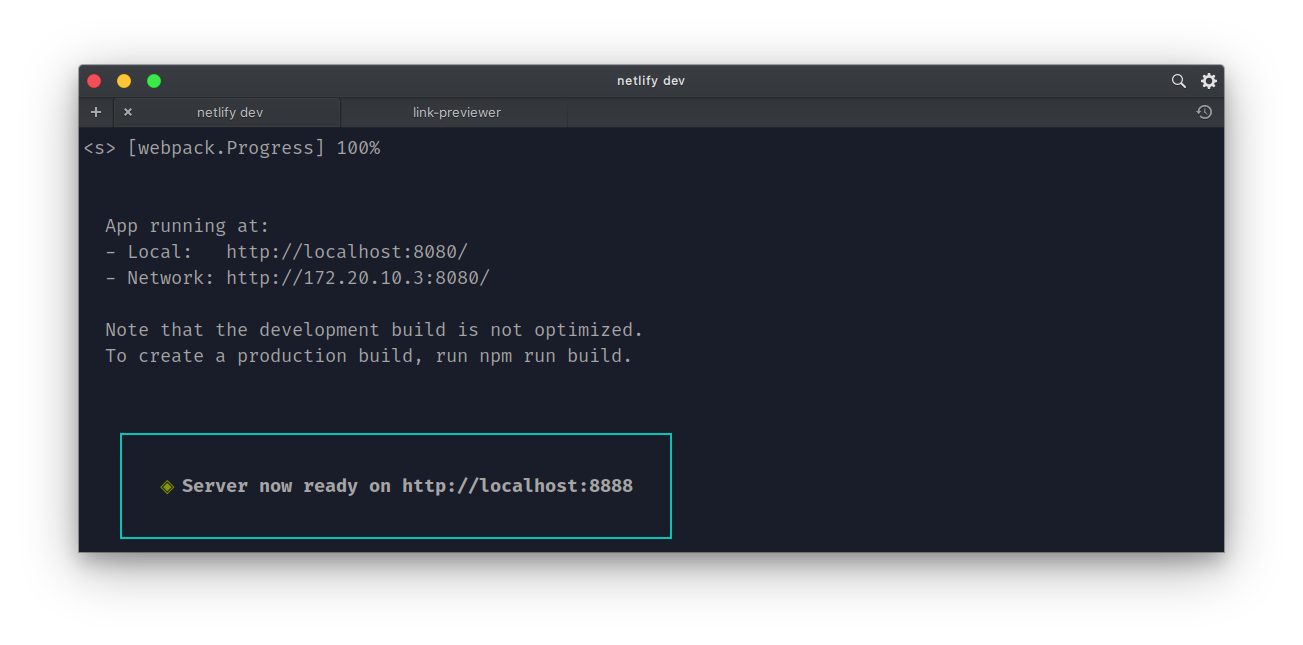
Now that the app is working, if we go to the URL offered, we must always see the default demo app for Vue and see that Tailwind’s preflight base types have been utilized.
Set up Tailwind CSS IntelliSense extension
For a smoother improvement expertise, set up the Tailwind CSS Intellisense extension for VS Code.
Fundamental app construction
Right here’s an summary of what our venture folder ought to appear like:
link-previewer/
├─ capabilities/
│  ├─ generate-preview.js
│  └─ hiya.js
├─ public/
│  ├─ favicon.ico
│  ├─ img/
│  │  └─ icons/
│  ├─ index.html
│  └─ robots.txt
├─ src/
│  ├─ essential.js
│  ├─ App.vue
│  ├─ registerServiceWorker.js
│  ├─ belongings/
│  │  ├─ css/
│  │  │  └─ essential.css
│  │  └─ emblem.png
│  ├─ elements/
│  │  └─ LinkPreviewer.vue
│  ├─ router/
│  │  └─ index.js
│  ├─ retailer/
│  │  └─ index.js
│  └─ views/
│     ├─ About.vue
│     └─ Dwelling.vue
├─ .git
├─ .gitignore
├─ .browserslistrc
├─ .eslintrc.js
├─ babel.config.js
├─ netlify.toml
├─ package-lock.json
├─ package deal.json
├─ postcss.config.js
├─ README.md
└─ tailwind.config.js
A Fast Introduction to Netlify Capabilities
Netlify Capabilities is a Netlify product that simplifies the method of making and deploying serverless capabilities. In line with the product’s house web page, it’s used to:
Deploy server-side code that works as API endpoints, runs mechanically in response to occasions, or processes extra complicated jobs within the background.
A fundamental Netlify Perform file exports a handler technique with the next syntax:
exports.handler = async operate(occasion, context){
  return {
    statusCode: 200,
    physique: JSON.stringify({message: "Hey World!"})
  }
}
Netlify gives the occasion and context parameters when the operate is known as/invoked. When a operate’s endpoint is known as, the handler receives an occasion object like this:
{
  "path": "Path parameter (unique URL encoding)",
  "httpMethod": "Incoming request’s technique identify",
  "headers": {Incoming request headers},
  "queryStringParameters": {Question string parameters},
  "physique": "A JSON string of the request payload",
  "isBase64Encoded": "A boolean flag to point if the relevant request payload is Base64-encoded"
}
The context parameter, alternatively, contains details about the context during which the operate was known as.
Throughout the operate, we’re returning an object with two essential properties:
statusCode, which is200on this casephysique, which is a stringified object.
The operate shall be known as from our web site at /.netlify/capabilities/hiya and on success, it could return the 200 standing code and the message, “Hey, World!”.
Now that we now have an thought of how Netlify capabilities work, let’s see them in apply.
Creating Our First Netlify Perform
To create our first Netlify operate, we’ll create a brand new file capabilities/hiya.js within the venture listing and enter the next:
exports.handler = async operate(occasion, context){
  return {
    statusCode: 200,
    physique: JSON.stringify({message: "Hey World!"})
  }
}
As soon as we’ve created the operate file, we now have to make some vital configurations to ensure that us to run our operate regionally.
Arrange Netlify configuration
We’ll create a netlify.toml file on the root of our venture folder that can inform Netlify the place to search out our capabilities:
[functions]
  listing = "./capabilities"
Netlify will now find and deploy the capabilities within the capabilities folder at construct time.
Set up Netlify CLI
To run our capabilities regionally with out having to deploy to Netlify, we have to set up Netlify CLI. The CLI permits us to deploy our initiatives with some nice Netlify options regionally.
To put in the CLI, ensure you have Node.js model 10 or later, then run:
npm set up netlify-cli -g
This installs Netlify CLI globally, so we will run netlify instructions from any listing. To get the model, utilization, and so forth, we will run:
netlify
Run the App with Netlify Dev
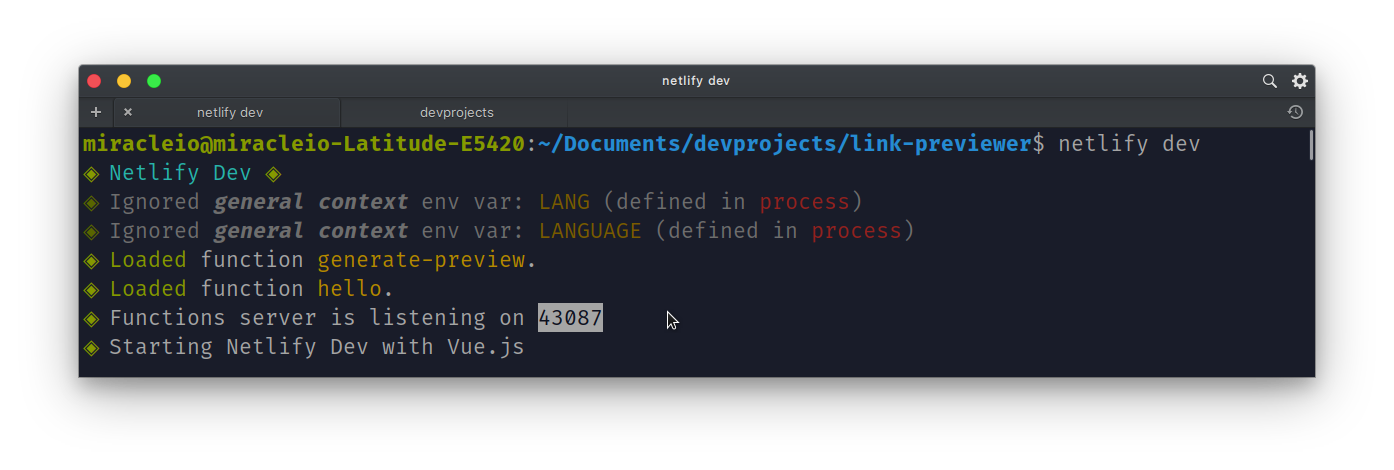
To run our venture regionally with Netlify CLI, cease the dev server (if it’s lively), then run:
netlify dev
And right here’s what we must always see:
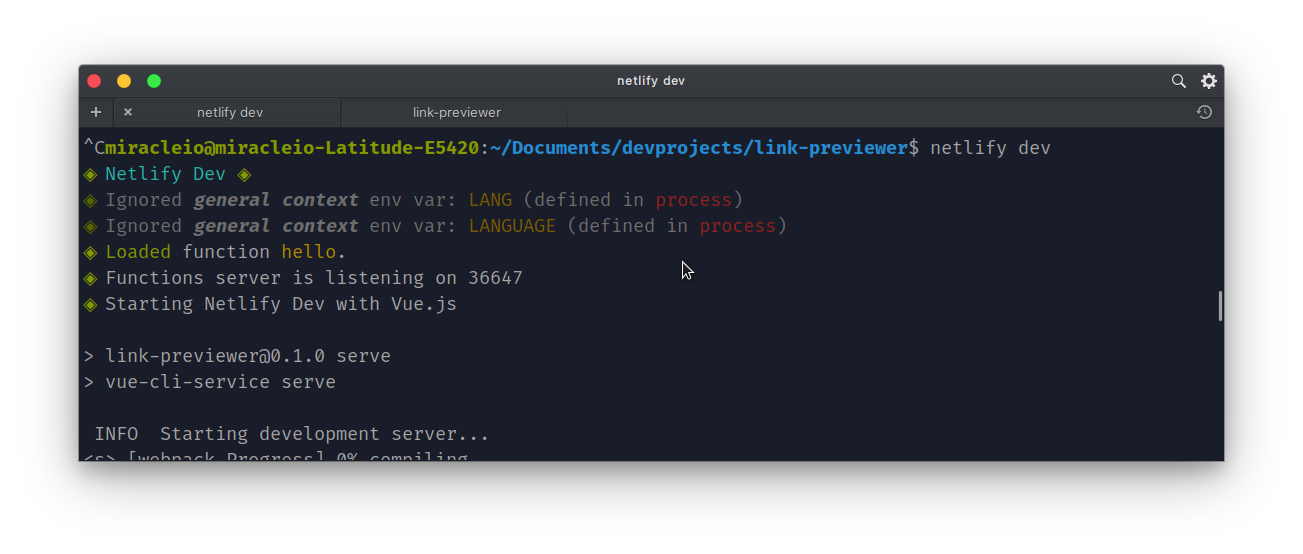
For those who look intently, you’ll see just a few issues occurring there:
-
Netlify tries to inject surroundings variables from our
.envinformation into the construct course of, which may then be accessed by our Netlify Capabilities. On this case, we now have no.envfile, so it masses the defaults outlined incourse of. -
Secondly, it masses or deploys our capabilities positioned within the capabilities listing. The Capabilities server is deployed on a special and random port —
36647. -
Lastly, it mechanically detects what framework the applying is constructed with and runs the required construct processes to deploy the applying. On this case, you possibly can see “Beginning Netlify Dev with Vue.js”. It additionally helps React and different well-liked frameworks.
Netlify then begins our improvement server on http://localhost:8888.
Now that our server has began and our capabilities arevloaded, we will name/invoke it. By default, we will entry our capabilities utilizing this route: /.netlify/capabilities/<operate identify>.
One essential factor to notice is that we don’t have to specify the port the place our Capabilities server is working. We will use the default route above to speak with our Capabilities server. Netlify mechanically resolves the URL and port behind the scenes.
if we ship a GET request to http://localhost:8888/.netlify/capabilities/hiya, we must always get a response of {"message":"Hey, World!"}.

Nice! Our first serverless operate works!
Create the Preview Perform API
Now that our Netlify operate works, we will start constructing the preview API. Right here’s a fast rundown of what our Capabilities API goes to do:
- it receives the goal URL that shall be despatched from the entrance finish
- it passes the information to Puppeteer
- Puppeteer then launches a brand new headless browser occasion
- Puppeteer opens a brand new web page within the browser and navigates to the goal URL
- Puppeteer then extracts the content material of the
<title>and<meta>tags for the outline of the goal web page - it captures a screenshot of the web page
- it sends the screenshot knowledge again to the entrance finish
Now that we now have a fundamental thought of what our Capabilities API goes to do, we will begin creating Capabilities. Let’s begin by putting in and establishing Puppeteer for Netlify Capabilities.
Set up and configure Puppeteer
Puppeteer is a Node library that gives a high-level API to regulate headless Chrome or Chromium browsers. It will also be configured to make use of the total (non-headless) chrome or Chromium. You are able to do most issues that you are able to do manually within the browser utilizing Puppeteer. Extra about Puppeteer might be discovered within the Puppeteer documentation.
To get began with Puppeteer, we’ll set up it in our venture.
Puppeteer for native improvement and manufacturing
Puppeteer downloads a current model of Chromium (~170MB macOS, ~282MB Linux, ~280MB Home windows) that’s assured to work with the API.
We will’t use the total puppeteer package deal for manufacturing. It’s because Netlify Capabilities has a most dimension of 50MB, and the Chromium package deal is just too massive.
Due to this very helpful article by Ire Aderinokun, we will nonetheless work with Puppeteer each regionally and in manufacturing. Right here’s what we now have to do:
Set up puppeteer as a improvement dependency* for native deployment:
npm i puppeteer --save-dev
For Puppeteer to work each regionally and in manufacturing, we now have to put in puppeteer-core and chrome-aws-lambda as manufacturing dependencies.
You’ll be able to take a look at the distinction between puppeteer and puppeteer-core right here. The principle distinction, although, is that puppeteer-core doesn’t mechanically obtain Chromium when put in.
Since puppeteer-core doesn’t obtain a browser, we’ll set up chrome-aws-lambda, a “Chromium Binary for AWS Lambda and Google Cloud Capabilities” which we will use in our Netlify Capabilities. These are the packages that can work in manufacturing:
npm i puppeteer-core chrome-aws-lambda --save-prod
Now that we’ve put in our packages, let’s create our operate.
Use already put in browser for Puppeteer
If Puppeteer putting in a full browser to work with regionally goes to be a problem, that could be because of sluggish community or bandwidth considerations. There’s a workaround, which is to make use of our already put in Chrome or Chromium browser for Puppeteer.
What we’d like is the trail to the browser in our native machine. We’ll use this as our executablePath, which we’ll go to the puppeteer.launch() technique. This tells Puppeteer the place to search out the browser executable file.
For those who don’t know precisely the place to search out the executable path, open up your browser and go to chrome://model/ to show the model of chrome.

Copy the trail and create a .env file within the root of the venture.
EXCECUTABLE_PATH=<path to chrome>
To get the content material of the .env file, we’ll set up one other package deal — dotenv:
npm set up dotenv
Now that we’ve efficiently put in the package deal, let’s create the Netlify operate.
Create the generate-preview operate
Create a brand new file, ./capabilities/generate-preview.js:
const chromium = require('chrome-aws-lambda')
const puppeteer = require('puppeteer-core')

exports.handler = async operate (occasion, context) {


  const { targetURL } = JSON.parse(occasion.physique)


  const browser = await puppeteer.launch( await chromium.executablePath,
    headless: true
  )


  const web page = await browser.newPage()


  await web page.setViewport({
    width: 768,
    peak: 425,
    deviceScaleFactor: 1
  })


  await web page.emulateMediaFeatures([
    {name: 'prefers-color-scheme', value:'dark'}
  ])


  strive{
    ...
  }
}
Within the code above, we’re doing a variety of issues. First, we get hold of the targetURL from the request payload in occasion.physique. This might be despatched with a POST request.
Subsequent, we launch the browser utilizing the chrome-aws-lambda package deal. We do that utilizing the puppeteer.launch() technique. This technique takes in an object as an argument with just a few elective properties. An essential property we go to this technique is the executablePath.
We assign the executablePath to course of.env.EXCECUTABLE_PATH || await chromium.executablePath enabling the package deal to find the obtainable headless browser to launch.
As soon as the browser is launched, we open a brand new web page within the browser utilizing the browser.newPage() technique. We additionally set our desired browser viewport for the web page utilizing the web page.setViewport() technique.
Discover that we’re utilizing the await key phrase when working any operate. It’s because Puppeteer works asynchronously and a few capabilities would possibly take a while earlier than they execute.
We will additionally do issues like outline the media options of the web page with Puppeteer utilizing the web page.emulateMediaFeatures() technique, which takes an array of media characteristic objects. That’s how we set the prefers-color-scheme to darkish.
Get web site meta knowledge and screenshot
Subsequent, we’ll navigate to the goal URL and get our title, description and screenshot:
...

strive {

  await web page.goto(targetURL)


  const title = (await web page.$eval(`head > title`, el => el.textContent) || null)


  const descriptions = await web page.consider(() => {
    let descriptions = {}

    let desc = doc.querySelector(`meta[name="description"]`)
    let og = doc.querySelector(`meta[property='og:description']`)
    let twitter = doc.querySelector(`meta[property='twitter:description']`)

    desc ? descriptions.desc = desc.content material : descriptions.desc = null
    og ? descriptions.og = og.content material: descriptions.og = null
    twitter ? descriptions.twitter = twitter.content material : descriptions.twitter = null

    return descriptions
  })


  const screenshot = await web page.screenshot({
    sort: 'jpeg',
    encoding: 'base64'
  })


  await browser.shut()


  return {
    statusCode: 200,
    physique: JSON.stringify({
      title,
      screenshot,
      descriptions
    })
  }

} catch (error) {


  await browser.shut()
  return {
    statusCode: 400,
    physique: JSON.stringify({
      error
    })
  }
}
Within the code above, we’re utilizing a trycatch block to wrap our code in order that, if something goes flawed, ranging from await web page.goto(targetURL), which navigates to the goal URL, we will catch the error and ship it to our entrance finish. An error would possibly happen by offering an invalid URL.
If the URL was legitimate, we get the title utilizing the web page.$eval() technique, which has similarities to the standard doc.querySelector technique in JavaScript. We go within the CSS selector — head > title — of the title tag as the primary argument. We additionally go a operate el => el.textContent because the second argument, the place el is a parameter we go to the operate and is the title factor. We will now get the worth utilizing title.textContent.
Discover that every one that is wrapped in a parentheses (()) and we now have a || null after web page.$eval. That is in order that title is assigned null if web page.$eval() fails to get the title of the web page.
To get the descriptions of the web page, we’ll use the web page.consider() technique, which permits us to run some client-side JavaScript and return a price to the assigned variable — descriptions.
We go a operate as and argument to the web page.consider() technique. Throughout the operate we use doc.querySelector to get the varied meta descriptions, corresponding to <meta identify="description" content material="<web site description>" /> for the default description, and <meta property="og:description" content material="<web site description>" /> for the OpenGraph description.
After getting the weather, we use ternary operators to get the content material and add it to the descriptions object if the weather exist, or null if the factor doesn’t exist.
As soon as we’ve gotten the descriptions, we take a screenshot of the web page utilizing the web page.screenshot() technique and shut the browser with browser.shut().
Lastly, we’re sending the web page particulars within the physique property a JSON object with a statusCode of 200. If an error happens in any of the earlier steps, it’s caught within the catch block and we ship a statusCode of 400 and the error message as an alternative.
Take a look at and deploy operate
Let’s take a look at our operate utilizing an API tester. You’ll be able to set up Postman or Talend API tester in your browser or use the Thunder Consumer extension, an API tester for VS Code.
You can even use cURL:
curl -X POST -H "Content material-Kind: software/json" -d '{"paramName": "worth"}' <URL>
Run the operate utilizing the netlify dev command.
We will ship a request utilizing the port for the capabilities server or the default :8888 port for the Netlify dev server to ship a request to our capabilities. I’ll be utilizing http://localhost:8888/.netlify/capabilities/generate-preview to ship a POST request with an object containing the targetURL within the physique:
{
  "https://www.sitepoint.com/puppeteer-serverless-functions-link-previewer/targetURL" : "https://miracleio.me"
}
After we ship the request, right here’s the response we get.
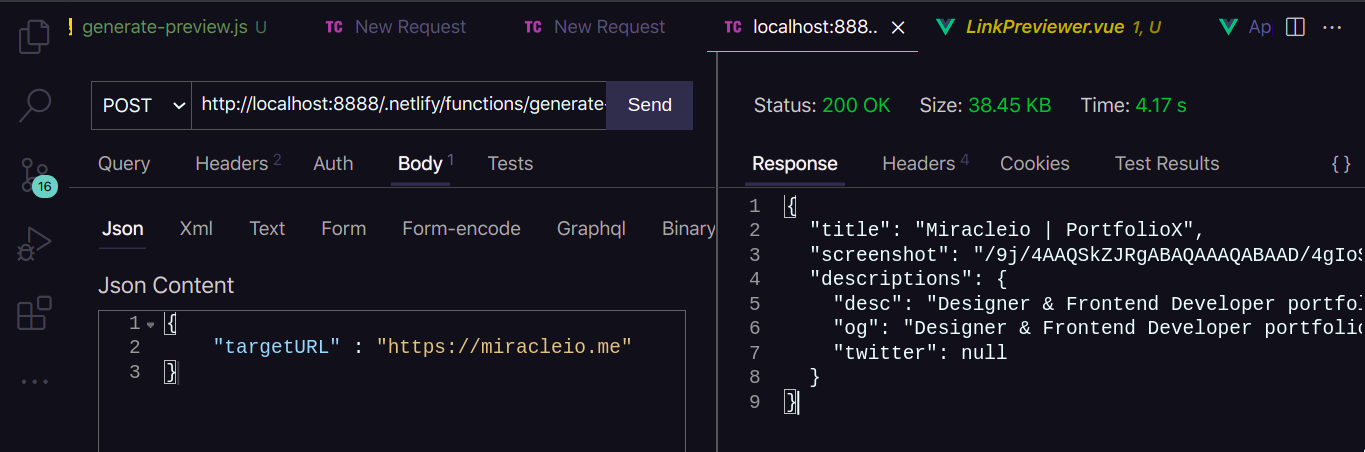
We get a JSON object containing our preview knowledge:
{
  "title": "Miracleio | PortfolioX",
  "screenshot": "/9j/4AAQSkZJRgABAQAAAQABAAD...",
  "descriptions": {
    "desc": "Designer & Frontend Developer portfolio web site. Constructed by Miracleio with love ❤",
    "og": "Designer & Frontend Developer portfolio web site. Constructed by Miracleio with love ❤",
    "twitter": null
  }
}
Now that our serverless operate works, let’s see how we will use it in our entrance finish.
Constructing the Hyperlink Preview Performance on the Consumer
In an effort to work together with our generate-preview operate, we’ll have to ship POST requests containing our targetURL.
We’ll create LinkPreview elements that can show regular hyperlinks. These elements shall be handed their goal URLs as props. Earlier than the part is mounted within the software, it’ll ship a POST request with the targetURL to our serverless operate, get the preview knowledge, and show it as soon as we hover on the hyperlink.
Creating the hyperlink preview part
First, let’s create our hyperlink preview part src/elements/LinkPreviewer.vue.
In our <script>, we’ll get the hyperlink preview knowledge by sending a request to our serverless operate and save the information in previewData object. We’ll use this later in our template to show the information:
// ./src/elements/LinkPreviewer.vue
...

<script>
import { computed, onBeforeMount, ref } from '@vue/runtime-core'
  export default {

    props: ["https://www.sitepoint.com/puppeteer-serverless-functions-link-previewer/targetURL"],
    setup(props) {

      const previewData = ref({})


      const generatePreview = async () => {
        strive {
          const res = await fetch('/.netlify/capabilities/generate-preview', {
            technique: 'POST',
            physique: JSON.stringify({
              targetURL : props.targetURL
            })
          })

          const knowledge = await res.json()
          return knowledge
        } catch (err) {
          console.log(err)
          return null
        }
      }


      onBeforeMount(async ()=>{

        previewData.worth = await generatePreview()


        const {desc, og, twitter} = previewData.worth.descriptions


        previewData.worth.description = computed(()=>(desc || og || twitter || ""))
      })


      return { generatePreview, previewData}
    }
  }
</script>
Within the code above, we get the targetURL as a prop that shall be handed into our part.
Within the setup(), we go props as an argument to ensure that us to entry part props like targetURL.
Then, we create a reactive peviewData object utilizing ref: const previewData = ref({}). In a brand new generatePreview() operate, we’re utilizing fetch to ship a POST request containing the targetURL to our serverless operate. This operate returns the response or null if an error happens.
Subsequent, to run the operate earlier than the part is mounted, we use the onBeforeMount() hook. We go an async operate as an argument. Throughout the operate, we assign previewData.worth to the generatePreview() operate. The descriptions (desc, og, twitter) are then gotten from the descriptions property.
To get the outline that shall be displayed within the preview, we’ll assign previewData.worth.description to (desc || og || twitter || ""). This manner, the primary property with a price will get assigned to the description.
Do that to show the preview knowledge in our template:
<!-- ./src/elements/LinkPreviewer.vue -->

<template>
  <div class="inline relative">
    <!-- show targetURL hyperlink -->
    <a category="hyperlink underline text-blue-600"
       :href="https://www.sitepoint.com/puppeteer-serverless-functions-link-previewer/targetURL"
       :goal="previewData ? previewData.title : '_blank'">
       {{targetURL}}
    </a>

    <!-- show preview knowledge if object exists -->
    <div v-if="previewData" class="result-preview absolute top-8 left-0 w-72 rework translate-y-4 opacity-0 invisible transition bg-white overflow-hidden rounded-md shadow-lg z-10">

      <!-- show picture utilizing the base64 screenshot knowledge -->
      <img v-if="previewData.screenshot"
           :src="`knowledge:picture/jpeg;base64,${previewData.screenshot}`"
           :alt="previewData.description" />

      <!-- show title and outline -->
      <div class="particulars p-4 text-left">
        <h1 class=" font-extrabold text-xl"> {{previewData.title}} </h1>
        <p> {{previewData.description}} </p>
      </div>
    </div>
  </div>
</template>

<script> ... </script>

<type scoped>
  .hyperlink:hover ~ .result-preview{
    @apply seen opacity-100 translate-y-0;
  }
</type>
Within the above code, so as to show our picture — which is actually a base64 string — we now have to go the string together with knowledge just like the picture sort and encoding into the src-"" attribute.
That’s about it for our LinkPreviewer.vue part. Let’s see it in motion. In ./src/views/Dwelling.vue:
<!-- ./src/views/Dwelling.vue -->

<template>
  <essential class="house">
    <header>
      <h1>Welcome to the hyperlink previewer app!</h1>
      <p>Listed here are some hyperlinks you can preview by hovering on them</p>
    </header>
    <ul class=" mb-4">
      <!-- render LinkPreviewer part for every demolink -->
      <li v-for="hyperlink in demoLinks" :key="hyperlink">
        <link-previewer :targetURL="hyperlink" />
      </li>
    </ul>
    <!-- enter subject so as to add new hyperlinks -->
    <enter class=" p-2 ring ring-blue-600 rounded-lg shadow-md" sort="url" @keyup.enter="addLink" required placeholder="enter legitimate url">
  </essential>
</template>

<script>
import { ref } from '@vue/reactivity'
import LinkPreviewer from '../elements/LinkPreviewer.vue'

export default{
  elements: { LinkPreviewer },
  setup(){
    // demo hyperlinks
    const demoLinks = ref([
      'http://localhost:5000',
      'https://google.com',
      'https://miracleio.me',
      'https://miguelpiedrafita.com/'
    ])

    // operate so as to add new hyperlinks to the demoLinks array
    const addLink = ({goal}) => {
      demoLinks.worth.push(goal.worth)
      goal.worth = ""
    }

    return {demoLinks, addLink}
  }
}
</script>
In our Dwelling.vue file, we’re mainly utilizing a demoLinks array of hyperlinks to render an inventory of LinkPreviewer elements, which we go to the targetURL props of the part.
We even have an <enter> factor, which we use to dynamically add extra LinkPreviewer elements to the checklist.
Right here’s what our easy app appears like now.

Candy! Our app works. Since we’ve been working regionally utilizing Netlify CLI, let’s see how we will deploy to Netlify utilizing the CLI.
Deploying the App to Netlify
Earlier than we deploy our app to Netlify, we now have to construct our app for manufacturing:
npm run construct
This may construct our app and create a dist/ folder we will deploy to manufacturing.
Subsequent, we have to log in to our Netlify account:
netlify deploy
This may log you into your Netlify account in your browser.
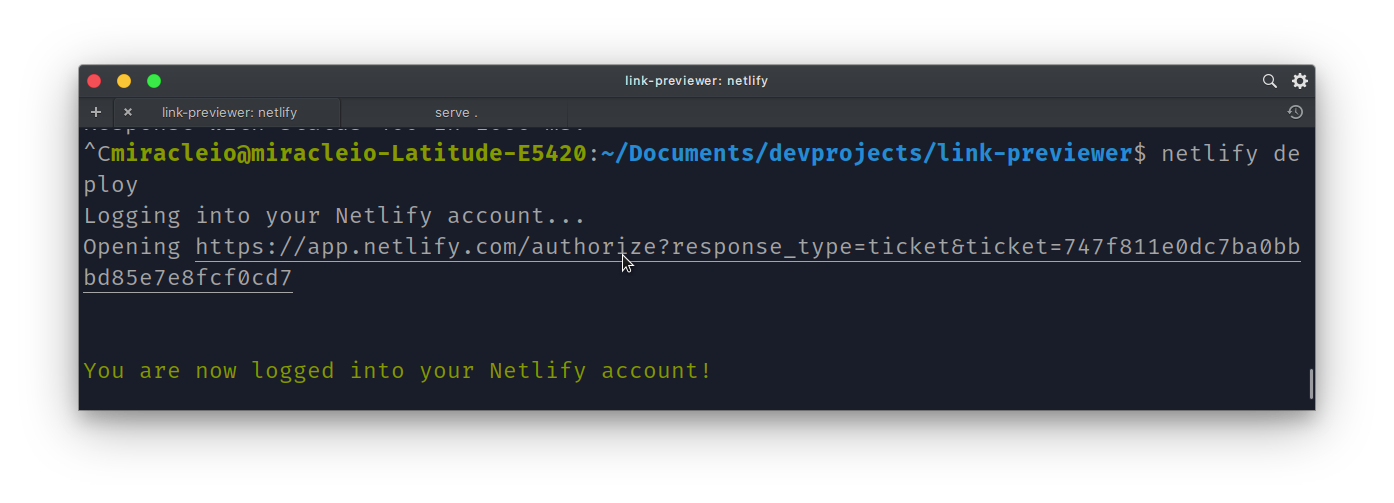
After authorizing the applying, we will hyperlink our venture to a brand new web site. Netlify will ask us a bunch of questions:
- What would you love to do? Select “Create & configure a brand new web site”.
- Group? Select
<your group>. - Select a singular web site identify? Select
<web site identify>. - Please present a publish listing (corresponding to “public” or “dist” or “.”). Enter
dist.
After this, Netlify will add our information and deploy them to our new web site.
Deploy utilizing GitHub
Alternatively, we will resolve to deploy our web site from GitHub. All you must do is to log in to GitHub, create a brand new repository, and duplicate the URL to our newly created repo.
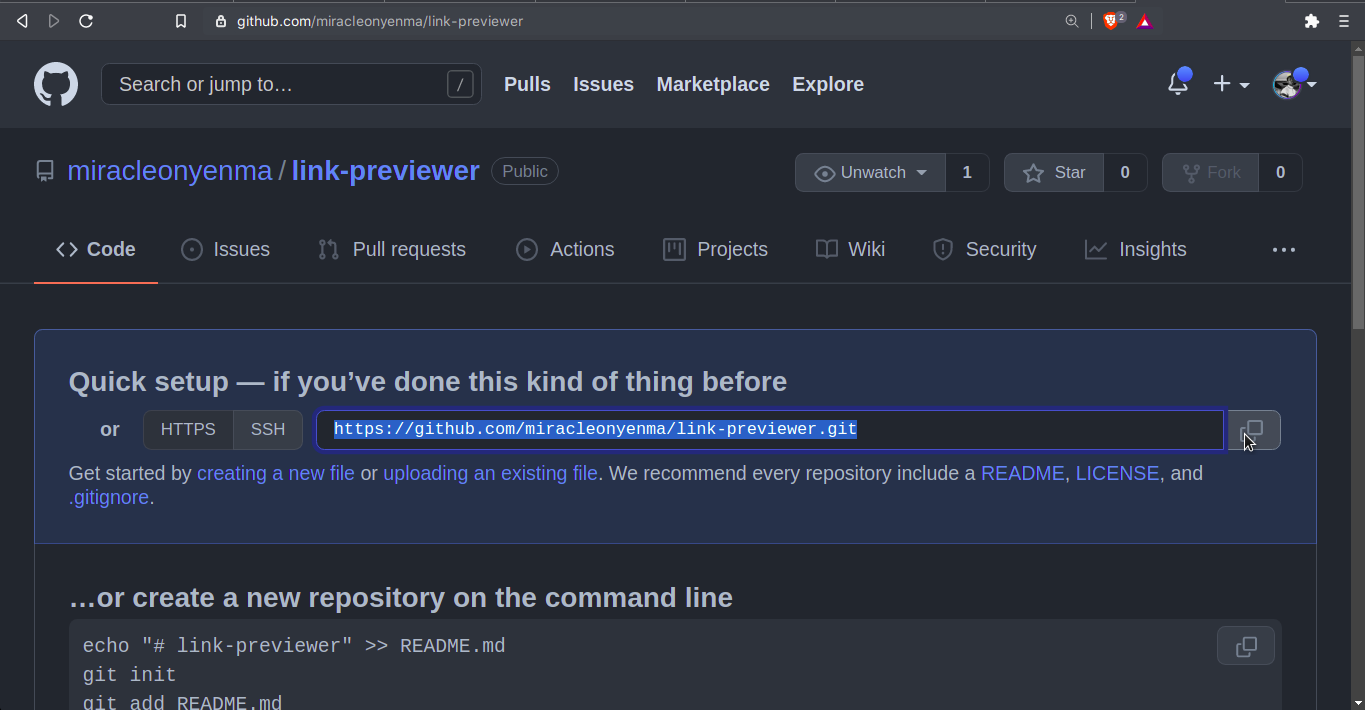
We then run the next command in our venture folder:
git init
git add .
git commit -m "first commit"
git department -M essential
git distant add origin https://github.com/miracleonyenma/link-previewer.git
git push -u origin essential
Word: chances are you’ll not have the ability to push to your repo out of your terminal due to authentication points, and also you would possibly get a message from Git like this: “Help for password authentication was eliminated on August 13, 2021. Please use a private entry token as an alternative.” Which means you must create a private entry token (PAT) and use it to log in. To try this, go to GitHub token settings and generate a brand new token. Choose all of the permissions you need. Ensure you’re capable of entry repos. After producing your PAT, copy it and reserve it someplace. Then strive the git push -u origin essential command once more and paste in your PAT when requested to your password.
As soon as we’ve pushed the venture to GitHub, head over to Netlify to create a brand new web site from GitHub.
Comply with the steps to decide on a repository and enter the construct settings to your venture. For our Vue venture, the construct command is npm run construct, and the deploy listing is dist.
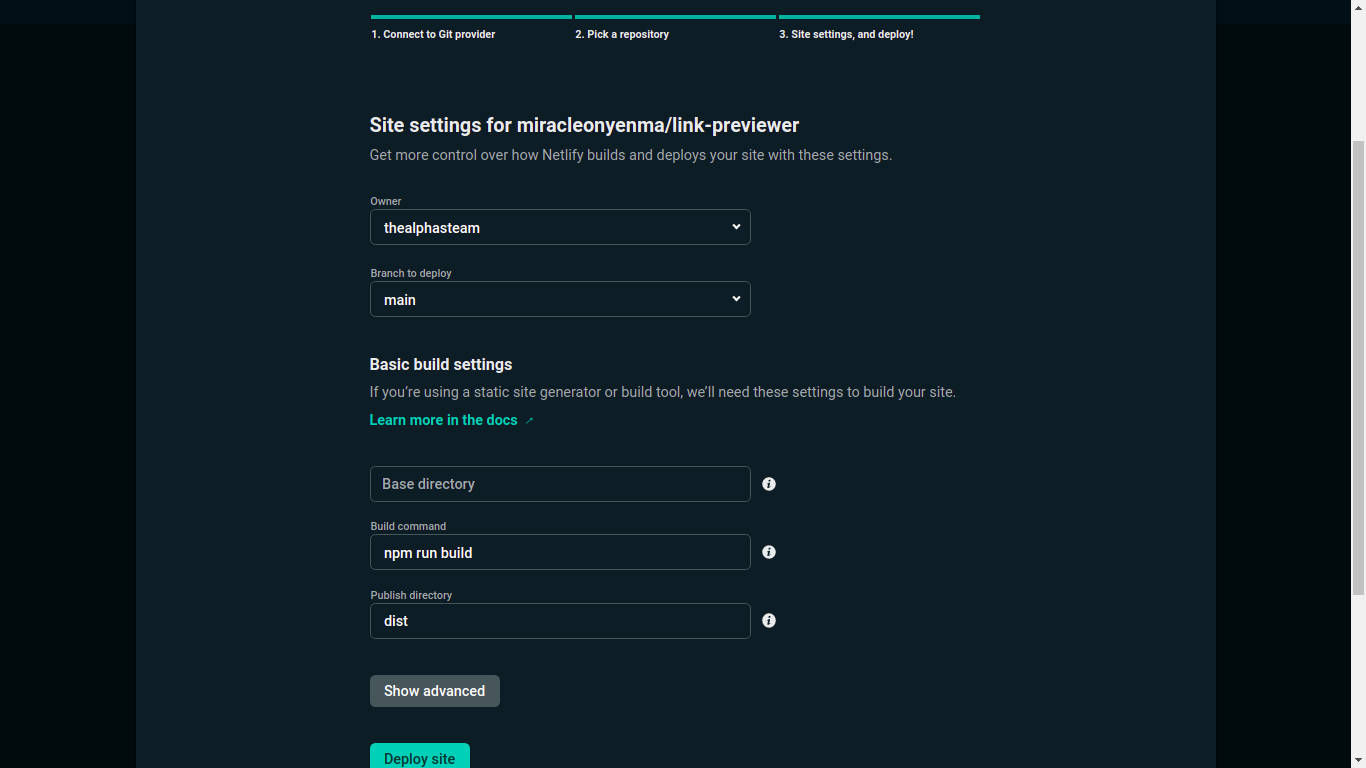
After that, click on on Deploy web site.
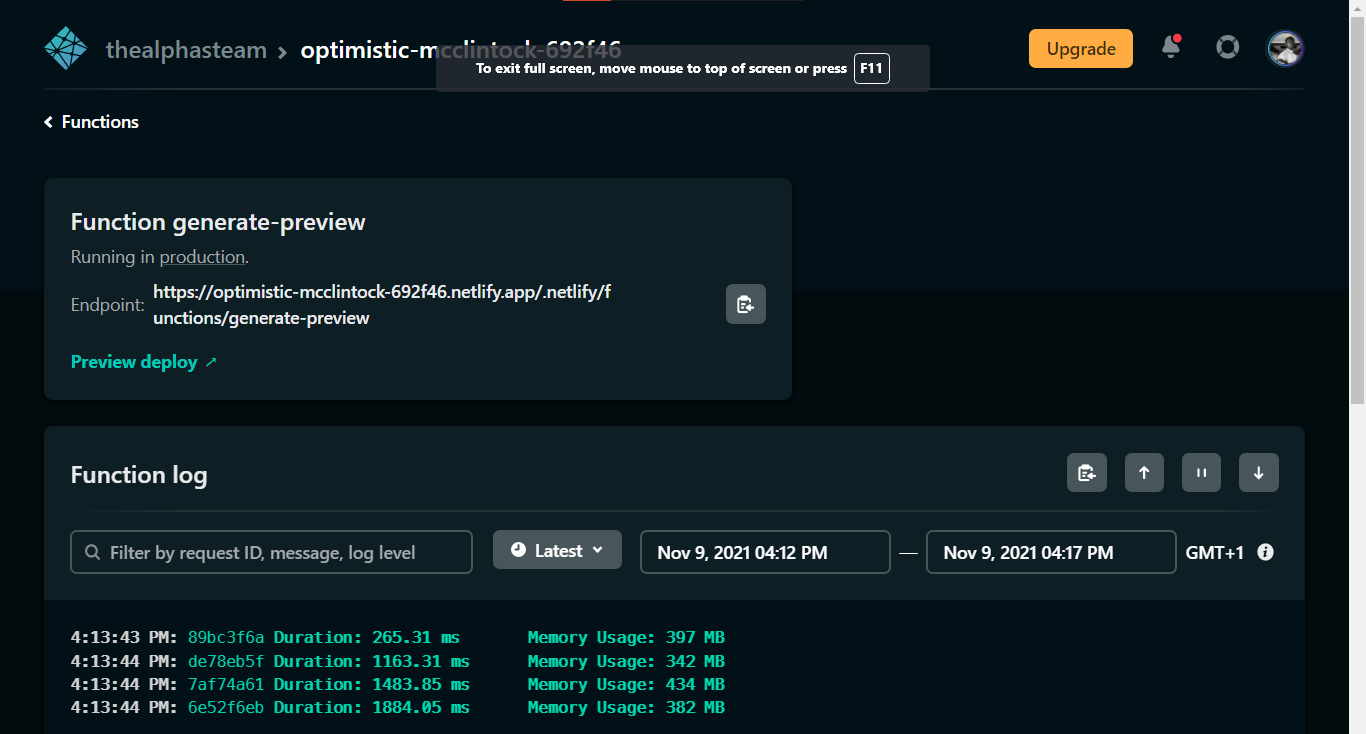
Netlify will deploy the positioning, and we will preview our web site by clicking on the deploy hyperlink offered. We will see our capabilities by going over to Capabilities from the highest menu.
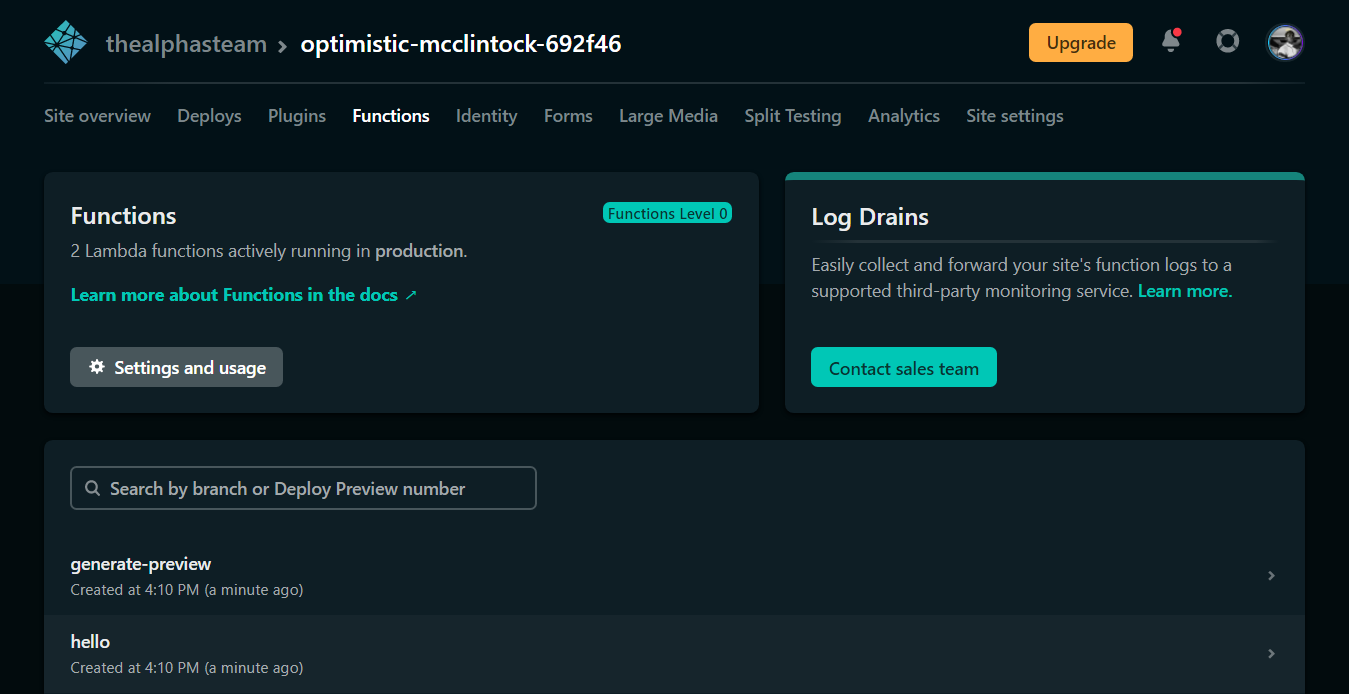
You’ll be able to choose a operate to view extra particulars and logs.
Candy!
Right here’s the hyperlink to the demo deployed on Netlify: https://lnkpreviewr.netlify.app
Conclusion
We’ve been capable of create and deploy serverless capabilities with Netlify utilizing Netlify capabilities. We’ve additionally seen how we will work together with the capabilities from our Vue entrance finish. This time, we used to it screenshot and get knowledge from different websites and constructed a hyperlink previewer part with it, however we will accomplish that rather more. With serverless capabilities, we will do extra on the entrance finish with out having to trouble on establishing a back-end server.
Additional Studying and Assets
Listed here are some sources and content material that I discovered helpful and I feel you’ll too: