


Putting in packages doesn’t at all times observe the identical steps as if you plan to put in a deb package deal on Ubuntu that isn’t accessible within the default repositories. Fear not, although. In such instances, you possibly can set up the software program by manually downloading and putting in the deb file.
On this tutorial, you’ll be taught some ways to put in deb packages on Ubuntu, what can go unsuitable, and how one can repair it.
Learn on to get your palms soiled with Ubuntu package deal administration!
Conditions
This tutorial can be a hands-on demonstration. If you happen to’d prefer to observe alongside, be certain you have got an Ubuntu system arrange. This tutorial makes use of Ubuntu 20.04, however any fashionable model of Ubuntu will work.
Downloading a Deb Bundle and Itemizing its Dependencies
Earlier than putting in a deb package deal, your aim is first to obtain the deb package deal. For this tutorial, you’ll obtain the Chrome deb package deal from Google.
Right now of writing, Google Chrome packages are unavailable within the default Ubuntu repositories. Why? As a result of Google Chrome just isn’t actually an open-source mission however Google-owned. However no worries, this tutorial has acquired you lined.
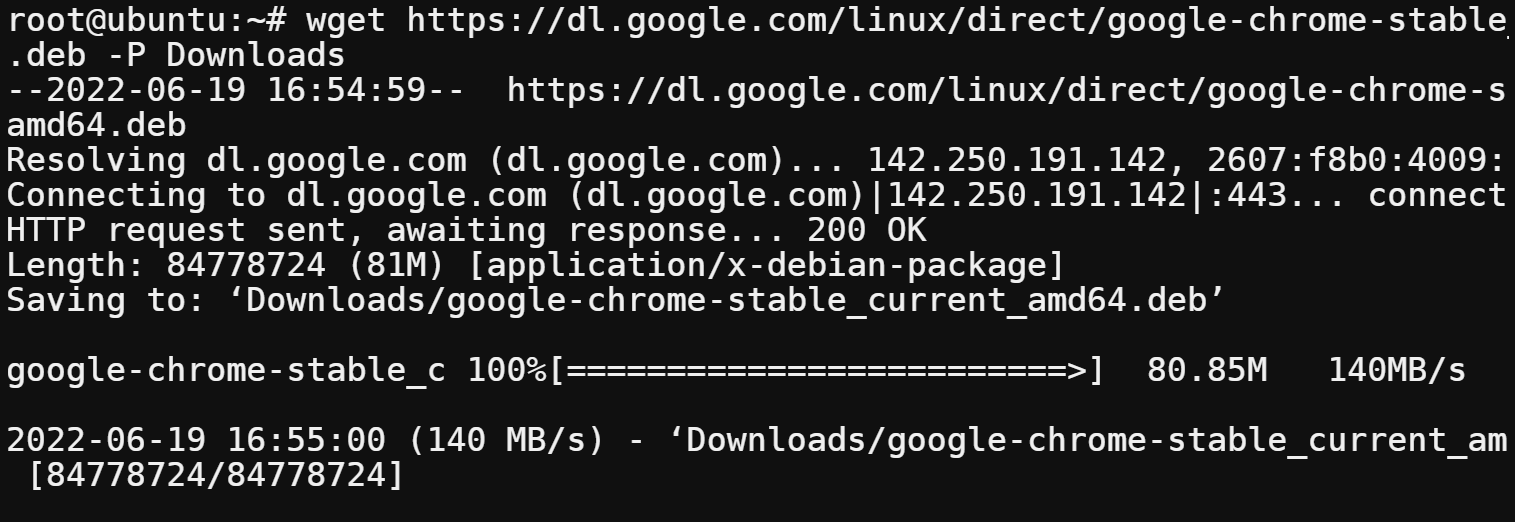
Run the wget command under to obtain, and save the Chrome deb package deal (google-chrome-stable_current_amd64.deb) to your Downloads listing.
wget <https://dl.google.com/linux/direct/google-chrome-stable_current_amd64.deb> -P Downloads
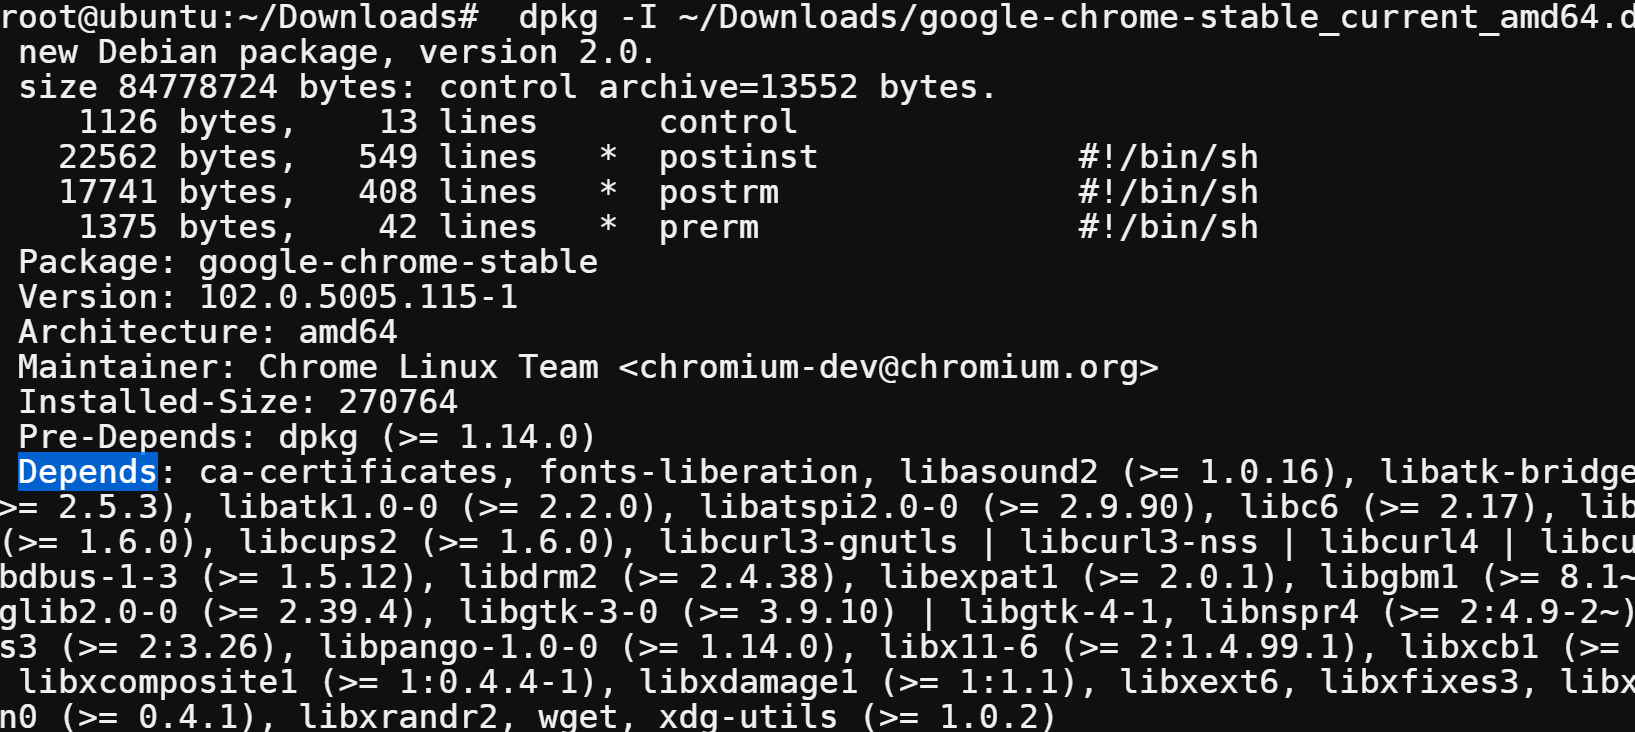
Now, run the under dpkg command to checklist all dependencies of the Chrome deb package deal (google-chrome-stable_current_amd64.deb). The -I choice tells the dpkg command to show details about your goal deb package deal, together with the model, dimension, dependencies, and so forth.
Understanding what dependencies a package deal has permits you to guarantee all dependencies are happy earlier than you attempt to set up the package deal. Virtually each Linux package deal has dependencies, not like Home windows or Android packages.
dpkg -I ~/Downloads/google-chrome-stable_current_amd64.deb
Concentrate on the Relies upon part within the output under, which lists all dependencies of the Chrome deb package deal. This data helps you management what will get put in in your system.
If you happen to don’t acknowledge a few of them, most are in all probability happy by different packages already put in in your system. You’ll be taught to take care of lacking dependencies later on this tutorial.
Observe that you would be able to additionally use this identical course of to put in some other software program not accessible within the default Ubuntu repositories.
Extracting All Recordsdata from a Deb Bundle
Putting in a deb file primarily extracts and copies all information from the package deal to the correct areas in your system. For this tutorial, you’ll extract all information contained in the Chrome deb package deal to a customized location.
Run the under command to extract (-x) the contents of the Chrome deb package deal (google-chrome-stable_current_amd64.deb) to the chrome listing with out putting in the package deal.
This command doesn’t present output, however you possibly can consider this command as a “dry run” of the set up course of.
dpkg -x ~/Downloads/google-chrome-stable_current_amd64.deb chrome
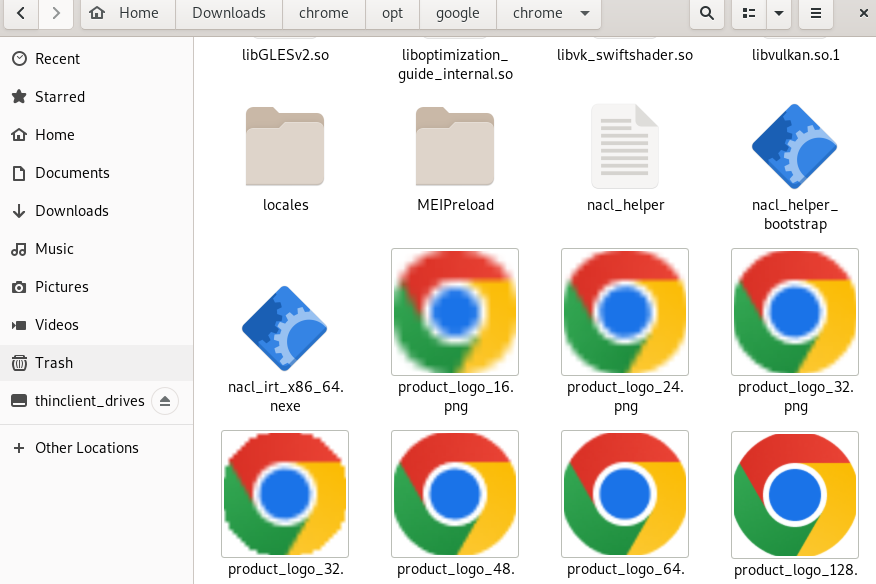
Open your file supervisor, navigate to the chrome listing, and see all of the information saved in your system as soon as you put in the Chrome deb package deal.
You’ll be able to see under that there are numerous information within the extracted listing. Most information are configuration information, shell scripts, and HTML information.
Putting in a Deb Bundle Utilizing GUI
If you happen to’re extra of a fan of clicking by means of a GUI when putting in packages, your best choice is the Ubuntu Software program Heart. Though the Ubuntu Software program Heart has been discontinued, this system was created for managing repositories with a high-level GUI for the APT/dpkg package deal administration methods.
To put in a deb package deal by way of Software program Heart:
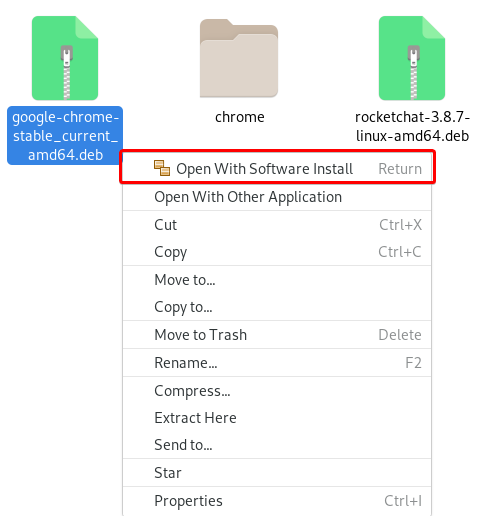
1. In your file supervisor, navigate to the place you saved the Chrome deb package deal.
2. Proper click on on the Chrome deb package deal, and select Open with Software program Set up to open the package deal within the Software program Heart.
3. As soon as the Software program Heart opens, click on the Set up button (top-left) to put in Google Chrome in your system.
The set up might take a couple of minutes to finish, relying on the package deal dimension and your laptop velocity.

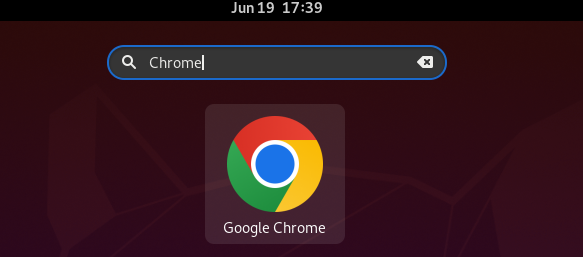
4. Lastly, press the tremendous key (or Home windows key in Home windows), seek for Chrome, and click on Google Chrome to open the appliance.
This step applies when opening Google Chrome no matter which technique you used to put in the Chrome deb package deal on this tutorial.
Putting in Deb Packages by way of Terminal
Not a tough fan of putting in packages in a GUI? If working in a command-line surroundings is your forte, set up deb packages by way of terminal as an alternative.
There are other ways to put in deb packages by working instructions in your terminal. And for this tutorial, you’ll work on two of the preferred, dpkg and apt. However for a begin, you’ll set up the Chrome deb package deal utilizing the dpkg command.
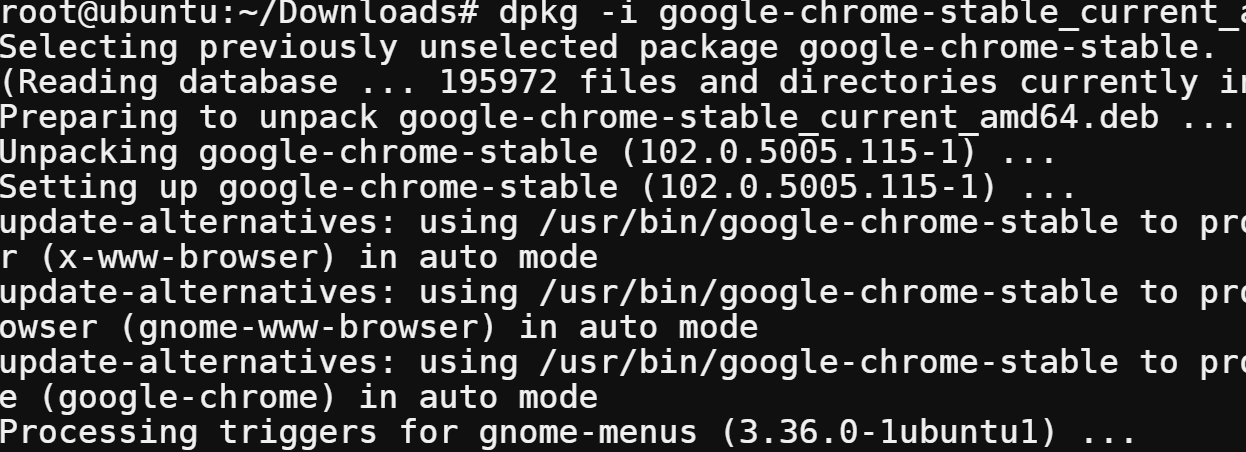
Run the dpkg command under to put in (-i) your Chrome deb package deal (google-chrome-stable_current_amd64.deb). The dpkg command is case-sensitive, so the -i choice should be lowercase.
sudo dpkg -i google-chrome-stable_current_amd64.deb
The apt command is a wrapper across the dpkg command that gives further options, like updating put in packages, resolving dependencies, and so forth.
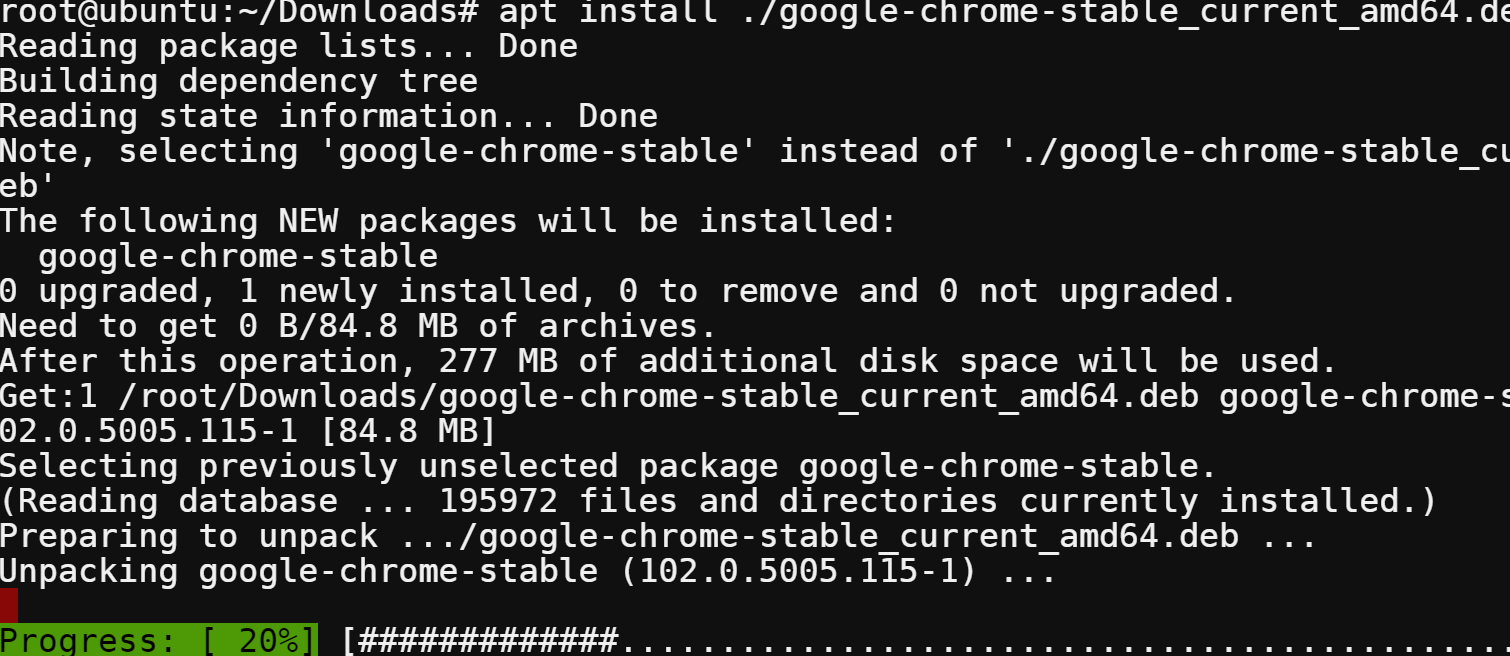
Now, run the apt set up command under to put in your Chrome deb package deal from the present listing (./).
The apt command is a strong command-line device that permits you to deal with packages in Debian-based methods. This device robotically handles mixing dependencies making APT perfect for putting in deb packages.
apt set up ./google-chrome-stable_current_amd64.deb
Fixing Unmet Dependencies Error
Up to now, you’ve seen some ways to put in deb packages which might be pushed by means of. However what in the event you get an error that claims dependency issues – leaving configured throughout set up?
The dependency issues error normally occurs if you attempt to set up a deb package deal that has unmet dependencies. To repair the error, you could first set up the required packages for the deb package deal set up to work appropriately.
Dependency issues happen if the software program developer doesn’t embody all dependencies within the deb package deal. Or the deb package deal is just too previous, and the dependencies have been up to date.
To see how you can repair dependency issues:
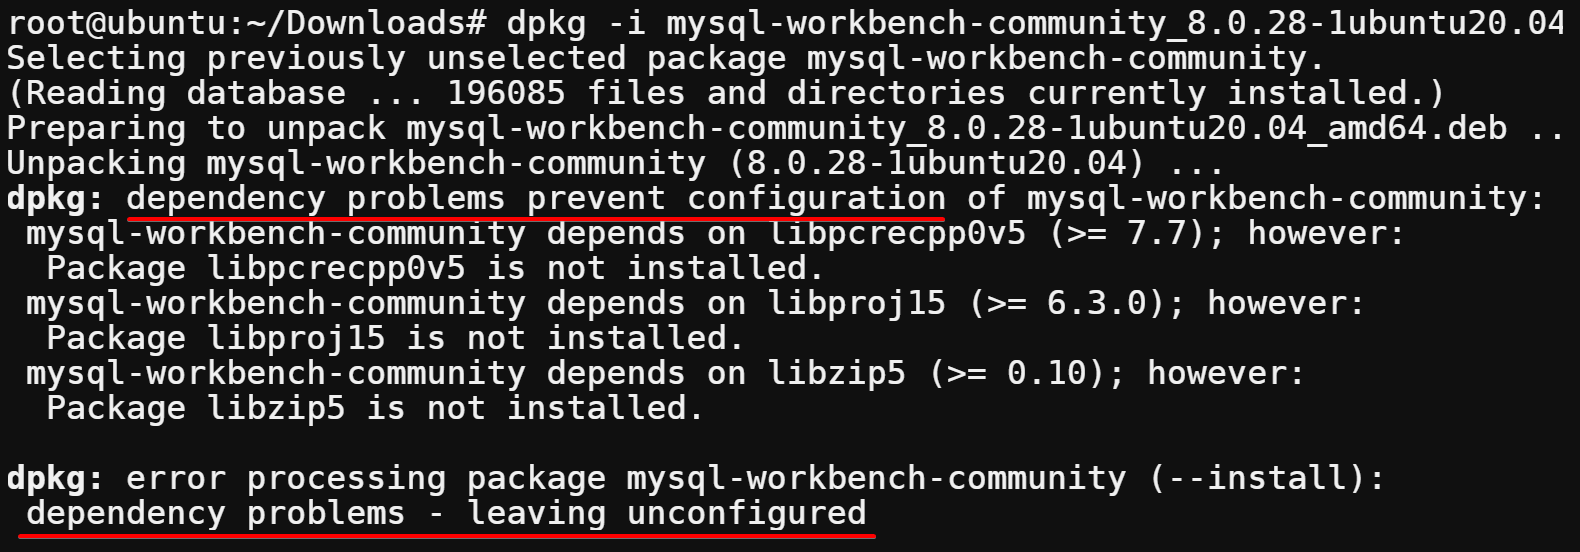
1. Run the wget command under to obtain the MySQL Workbench package deal to your Downloads listing.
wget https://downloads.mysql.com/archives/get/p/8/file/mysql-workbench-community_8.0.28-1ubuntu20.04_amd64.deb - P Downloads2. Subsequent, run the next dpkg command to put in (-i) the MySQL Workbench package deal.
dpkg -i mysql-workbench-community_8.0.28-1ubuntu20.04_amd64.debAfter working the command, you’ll get the next dependency issues – leaving configured error message.
Within the output under, there are packages you could set up first earlier than you possibly can retry putting in the MySQL Workbench package deal in your system.
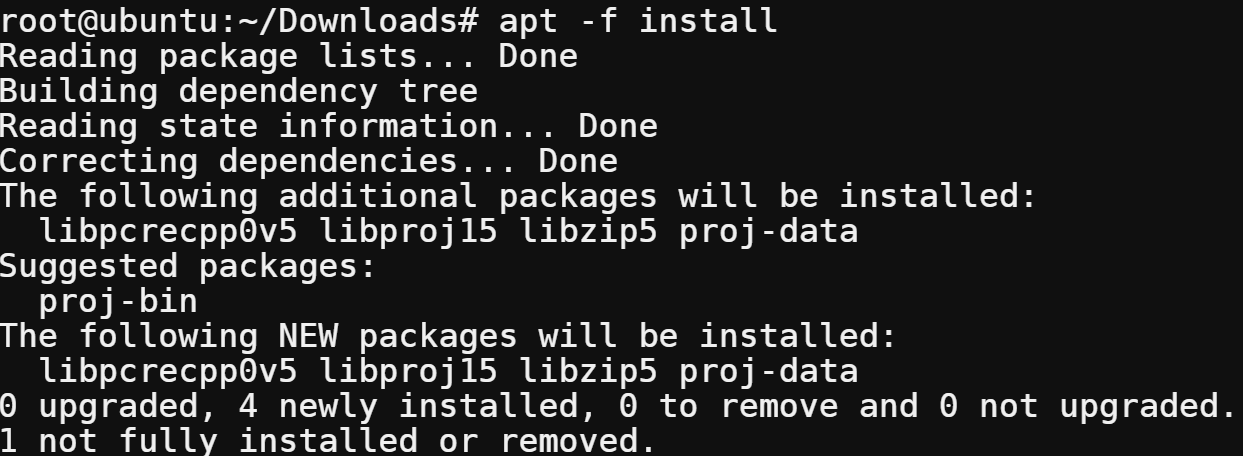
3. Now, run the apt command under with the -f choice to repair damaged dependencies.
Make sure to run this command proper after you’ve tried putting in the deb package deal with unmet dependencies.
As you possibly can see under, the command tries to repair all damaged and set up all lacking dependencies.
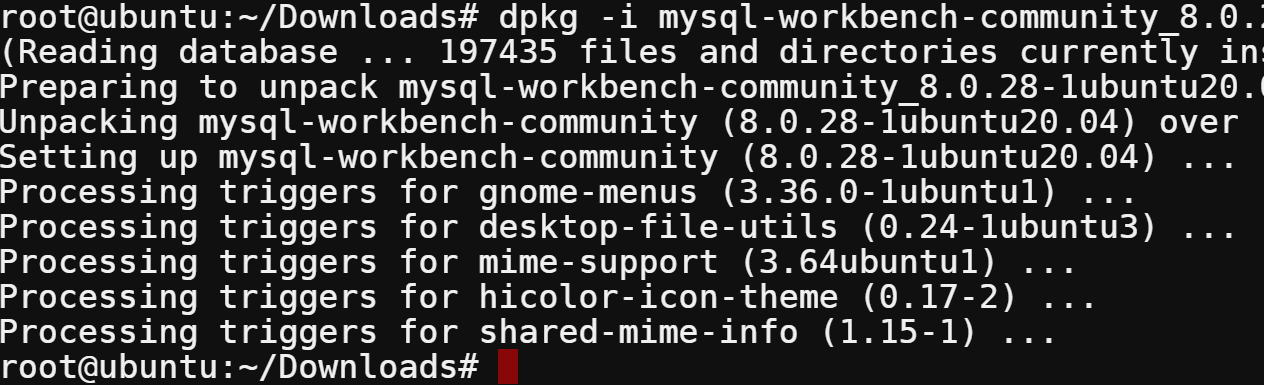
4. Lastly, rerun the dpkg command under to put in (-i) the MySQL Workbench package deal.
dpkg -i mysql-workbench-community_8.0.28-1ubuntu20.04_amd64.debThis time, you possibly can see the set up works easily since all required dependencies are preinstalled.
Conclusion
On this tutorial, you’ve seen some ways to put in deb packages on Ubuntu by way of GUI and terminal manually. At this level, you’re assured sufficient to put in deb packages because you already know how you can repair dependency issues in the event you ever get one.
Don’t cease right here, although. Why not discover ways to set up software program utilizing .rpm information in an RHEL-based system? Enhance your skillset by studying each package deal codecs, so you possibly can set up any software program you want on any Linux system.