

Within the new period of containerization, constructing photos for functions have to be quick and efficient. However how precisely? With Docker BuildKit, you may construct photos in parallel whereas decreasing pointless dependencies.
This tutorial will stroll you thru the method of using BuildKit to optimize Docker picture construct and save time for different important duties.
Learn on and get began having fun with constructing photos with BuildKit!
Stipulations
This tutorial contains hands-on demonstrations. To observe alongside, guarantee that you’ve the next:
Constructing a Docker Picture the Conventional Manner with Docker BuildKit
Earlier than getting began with BuildKit to optimize a Docker picture construct, you have to obtain a pattern Node.js undertaking you’ll use for this tutorial. You’ll later construct a Docker picture utilizing a standard/old-way Dockerfile configuration to make sure the applying works.
To construct a Docker picture the normal means:
1. Run the next git command to clone the pattern Node.js undertaking (hello-node).
git clone <https://github.com/Adam-the-Automator/hello-node-docker.git> hello-node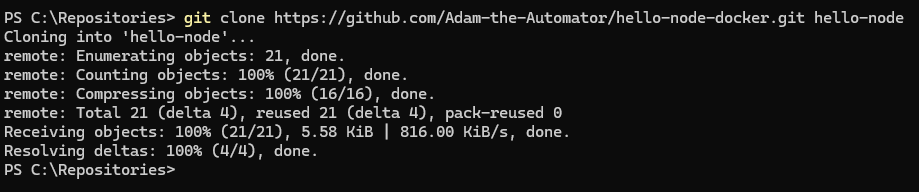
2. Subsequent, run the command beneath to listing (ls) the recordsdata included within the hello-node undertaking.
Beneath is the listing of recordsdata which are obtainable within the undertaking:
- app.js – A easy “good day world” Node.js software with Categorical.js.
- bundle.json – Incorporates details about the applying and its dependencies.
- Dockerfile.conventional – A Dockerfile for the containerized Node.js software with a standard strategy.
- Dockerfile.multi – A Dockerfile for the Node.js software with a multi-stage construct.
- Dockerfile.mount – A Dockerfile for the Node.js software with multi-stage construct and BuildKit mount cache implementation.

3. With the undertaking cloned, open the Dockerfile.conventional file along with your most popular editor, and guarantee you have got the next configuration.
# syntax=docker/dockerfile:1

# Use node 18 as the bottom picture from Docker Hub
FROM node:18

# Create a working listing /usr/src/app
WORKDIR /usr/src/app

# Copy the supply code to the container
COPY . .

# Set up app dependencies by way of Yarn
RUN yarn set up

# Expose port 8080 for app.js
EXPOSE 8080

# Outline a default command to start out app.js
CMD [ "node", "app.js" ]
4. Now, run the beneath docker construct command to construct the brand new Docker picture named app_traditional (arbitrary) towards the Dockerfile.conventional file.
docker construct -t app_traditional -f Dockerfile.conventional .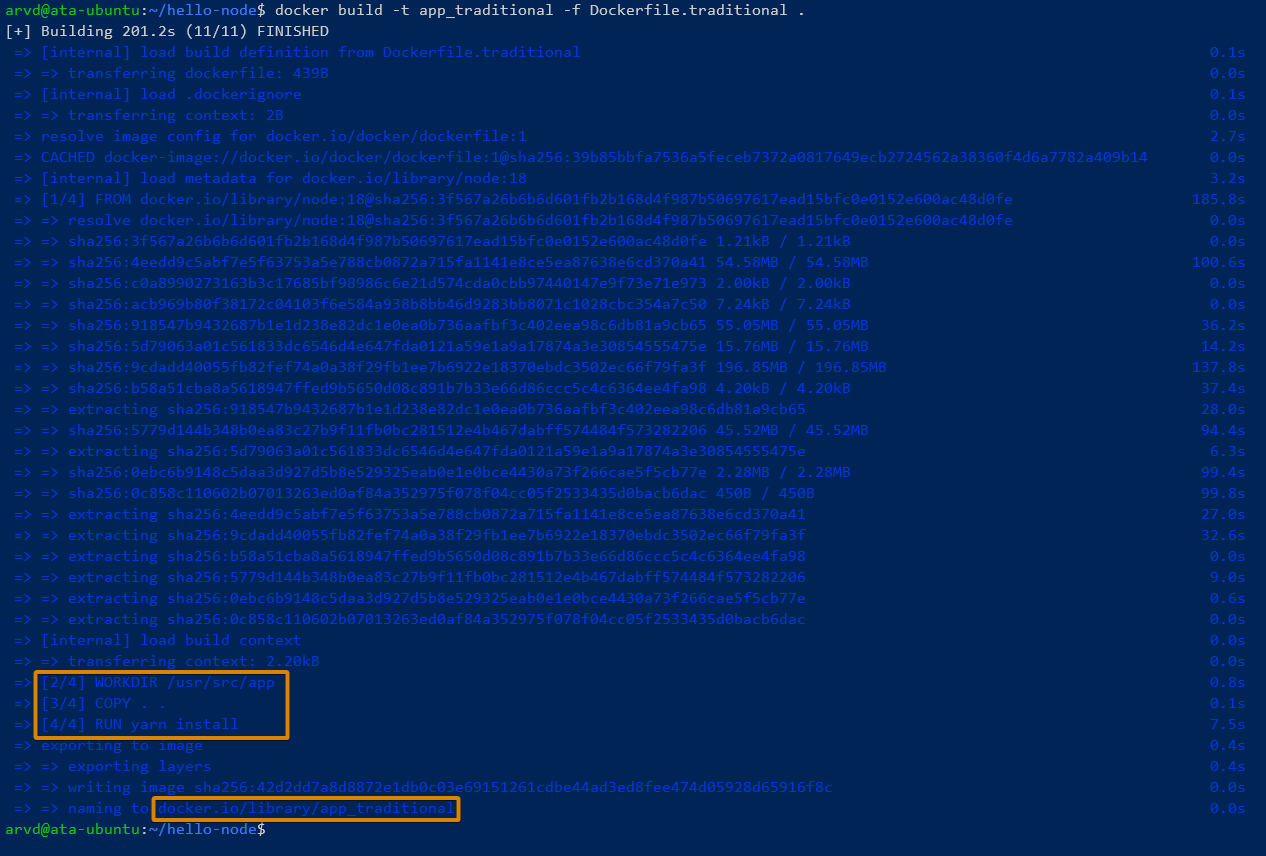
5. Now, execute the command beneath to listing all obtainable Docker photos.
The output beneath exhibits the app_traditional picture is created with a complete measurement of 1GB.

6. Execute the next command to run a brand new container known as app1 (arbitrary) within the background (-d) with the Docker picture app_traditional.
This command exposes port 8080 on each the Docker host and the container within the format of container:host.
docker run -d --name app1 -p 8080:8080 -t app_traditional
7. Run the next command to listing all operating containers.
As you may see from the output, the app1 container runs on port 8080 on the Docker host.

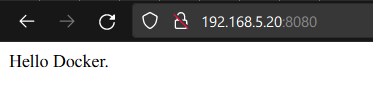
8. Now, execute the curl command beneath to entry the container by way of localhost.
curl http://localhost:8080/You will notice the output beneath if the method is profitable.

Alternatively, open your internet browser, and go to the server IP entry adopted by port 8080 (i.e., 192.168.5.20:8080) to entry the container.

9. Lastly, run the next docker rm command to forcibly (--force) delete the operating container app1 and clear up your surroundings.
This command doesn’t present output, however deleting the container is a crucial preparation as you’ll later use port 8080 to run a brand new model of the container.
Constructing a Docker Picture with Multi-Stage Construct
One of many important options within the BuildKit is a multi-stage. This function permits you to use a number of FROM parameters in your Dockerfile and title every stage by way of AS parameter. Furthermore, you should utilize totally different Docker photos in multi-stage builds.
To construct a Docker picture with the multi-stage construct, you’ll use Dockerfile.multi file as follows:
1. Open the file Dockerfile.multi, and you will notice two stage builds the place:
Stage 1 – Named build-env with Node.js 18 (node:18) as the bottom picture. This stage copies (COPY) the bundle.json file, set up software dependencies and COPY the app.js file.
Stage 2 – The ultimate construct of the applying with base picture Distroless. This stage copies the construct from build-env to the /app working listing and exposes port 8080 for the applying.
# syntax=docker/dockerfile:1

# Stage 1 - Utilizing node 18 as the bottom picture for the build-env
FROM node:18 AS build-env

# Create a working listing /app
WORKDIR /app

# Copy bundle.json and set up dependencies
COPY bundle.json bundle.json
RUN yarn set up

# Copy the app.js to /app listing
COPY app.js /app

# Stage 2 - Use the distroless Docker picture for the ultimate construct
FROM gcr.io/distroless/nodejs

# Setup working listing /app
WORKDIR /app

# Copy the applying with its dependencies right into a distroless picture
COPY --from=build-env /app /app

# Expose port 8080 for the app.js
EXPOSE 8080

# Begin the app.js
CMD ["app.js"]
2. Subsequent, run the next command to construct the brand new Docker picture known as app_multi_stage (arbitrary) within the present listing (.) by way of the Dockerfile.multi file.
docker construct -t app_multi_stage -f Dockerfile.multi .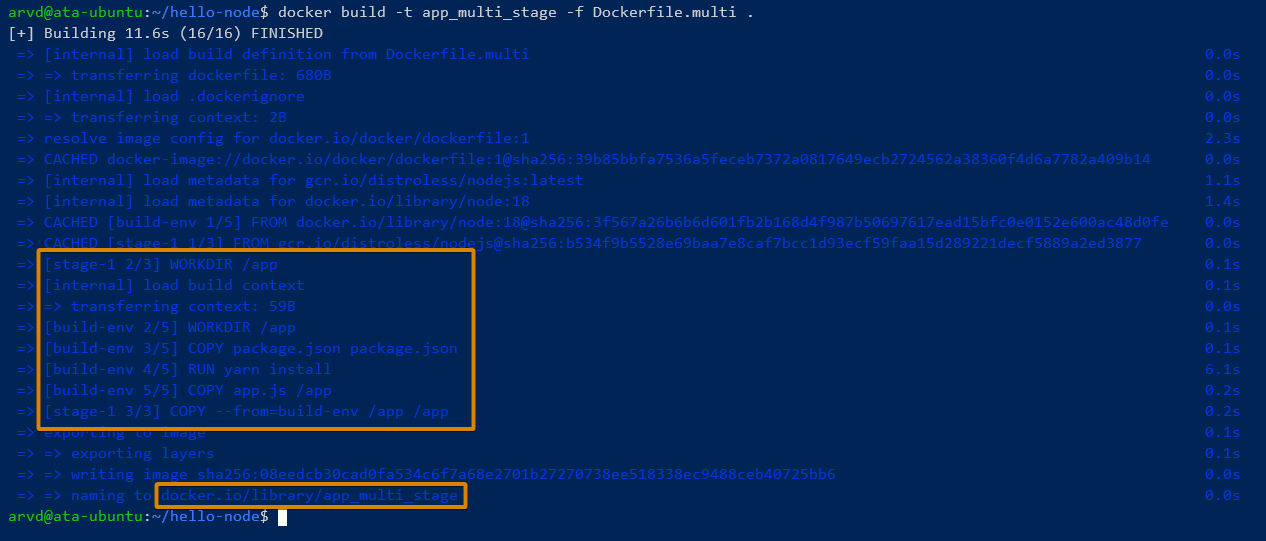
3. As soon as constructed, run the command beneath to confirm the listing of obtainable Docker photos.
As you may see, the output beneath exhibits the newly-built picture (app_multi_stage) with a measurement of 166MB, which is smaller than the app_traditional picture.

4. Now, execute the beneath instructions to run a brand new container (app2) with the app_multi_stage picture and confirm the operating container listing.
docker run -d --name app2 -p 8080:8080 -t app_multi_stage
docker ps
The output beneath exhibits confirms the app2 container is operating on port 8080.

5. With the brand new container operating, execute the curl command beneath to entry the container (app2) out of your terminal.
curl http://localhost:8080/
Or, navigate to the Docker host IP handle adopted by port 8080 (i.e., http://192.168.5.50:8080).
6. Subsequent, run the beneath command to delete (rm) the app2 container.
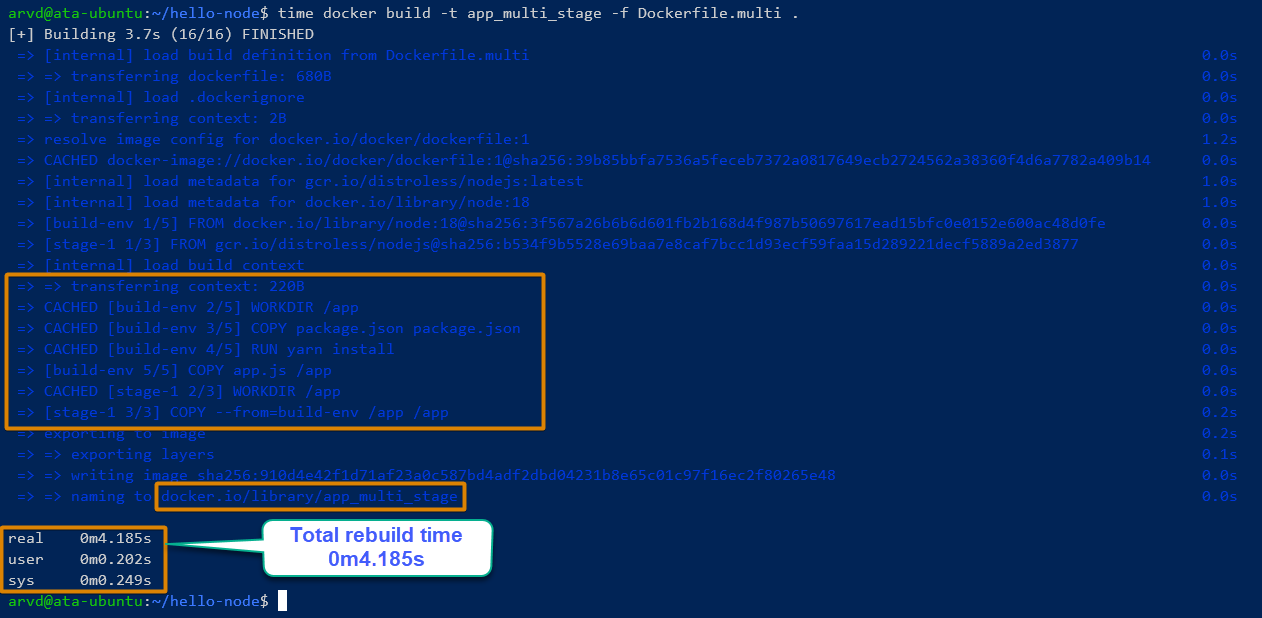
7. Lastly, run the beneath command to rebuild the app_multi_stage picture.
BuildKit creates caches for every construct that you’ve performed beforehand. Because of this, while you change the supply code, rebuilding the Docker picture turns into sooner.
time docker construct -t app_multi_stage -f Dockerfile.multi .As seen within the following output, rebuilding the Docker picture solely took 4 (4) seconds.
Constructing a Docker Picture for a Particular Construct Stage
Apart from a multi-stage construct, BuildKit allows you to create Docker photos from particular construct levels. This function may help debug every construct stage and arrange checks with extra instruments.
To construct a Docker picture for a selected construct stage in a Dockerfile:
1. Open the bundle.json, the place you will notice the beneath configuration, which installs one dependency, Categorical v4.18.2 ("specific": "^4.18.2").
{
  "title": "hello_node",
  "model": "0.1",
  "fundamental": "app.js",
  "dependencies": {
    "specific": "^4.18.2"
  }
}
2. Subsequent, run the next command to construct a brand new Docker picture (build-env1.0) for the build-env stage within the Dockerfile.multi file.
docker construct --target build-env -t build-env1.0 -f Dockerfile.multi .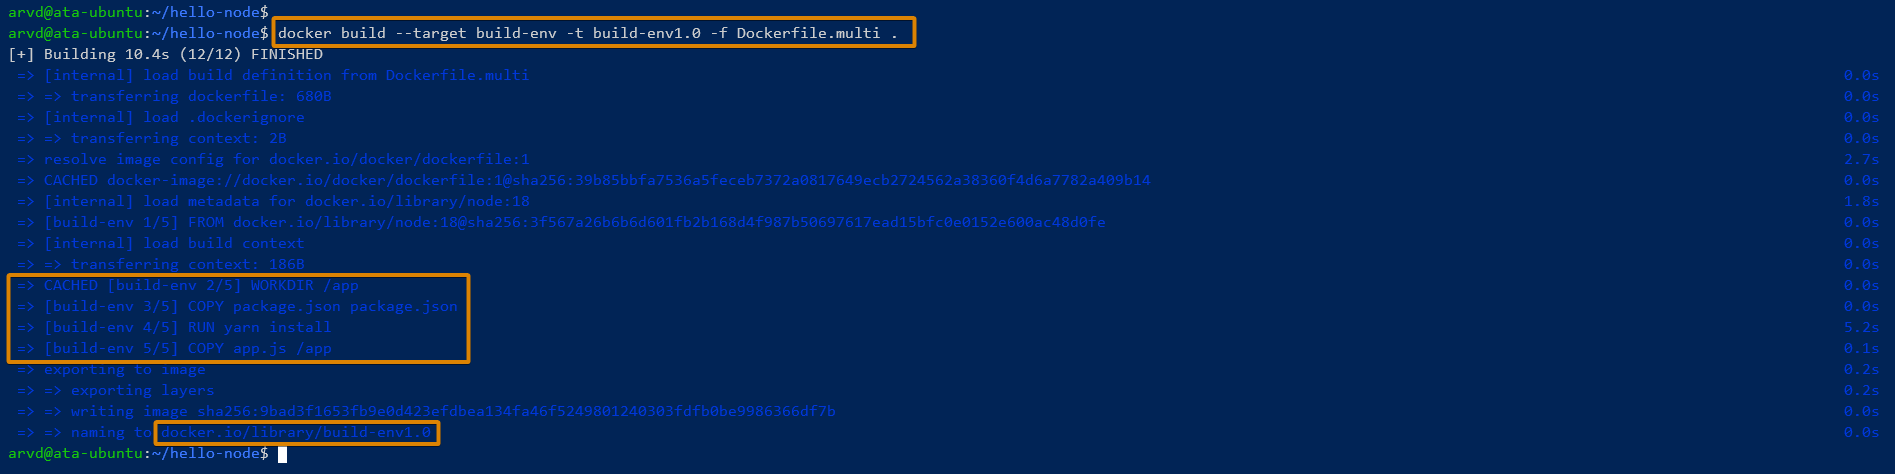
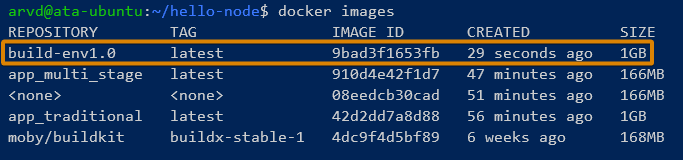
3. Now, run the command beneath to listing all Docker photos.
The output beneath confirms the build-env1.0 picture exists with a measurement of 1GB.
4. With the Docker picture created, execute the next command to run a brand new container with the build-env1.0 Docker picture.
docker run -it build-env1.0 /bin/sh
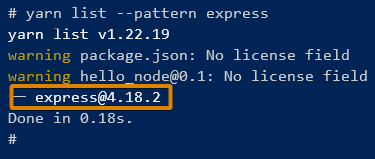
5. As soon as logged in to the container, run the next command to confirm the Categorical.js (specific) bundle.
yarn listing --pattern specificThe next outcomes present that Categorical.js v4.18.2 is put in on the build-env1.0 picture.
6. Lastly, run the exit command to exit out of the container.

Dashing Up the Construct Course of with Docker BuildKit Mount Cache
One other excellent function from BuildKit is rushing up constructing a picture by appending the --mount=kind=cache flag inside the RUN parameter. This flag permits you to cache the goal listing to be preserved between builds. Furthermore, most bundle managers like yarn, npm, pip, and apt can use this flag.
To see find out how to BuildKit quickens the construct course of:
1. Open the file Dockerfile.mount to see the next configurations.
The flag --mount=kind inside the RUN parameter caches the Node.js packages on the goal cache listing /root/.yarn.
# syntax=docker/dockerfile:1

# Stage 1 - Use the node 18 picture because the builder and set up dependencies
FROM node:18 AS build-env

# Create a working listing
WORKDIR /app

# Copy bundle.json
COPY bundle.json bundle.json

# Putting in dependencies by way of Yarn
# Utilizing the parameter to allow cache of the goal listing /root/.yarn
# to be preserved between builds
RUN --mount=kind=cache,goal=/root/.yarn,sharing=shared
ls -l --time-style=+"%b %d %Y %H:%M" /root/.yarn
&& YARN_CACHE_FOLDER=/root/.yarn yarn set up
&& ls -lt --time-style=+"%b %d %Y %H:%M" /root/.yarn/v6

# Copy app.js
COPY app.js /app

# Stage 2 - ultimate picture utilizing Distroless
FROM gcr.io/distroless/nodejs

# Create a working listing
WORKDIR /app

# Copy the /app from build-env stage 1
COPY --from=build-env /app /app

# Expose port 8080 for app.js
EXPOSE 8080

# Begin command
CMD ["app.js"]
2. Subsequent, run the next command to construct a brand new Docker picture (test_cache) towards the Dockerfile.mount file.
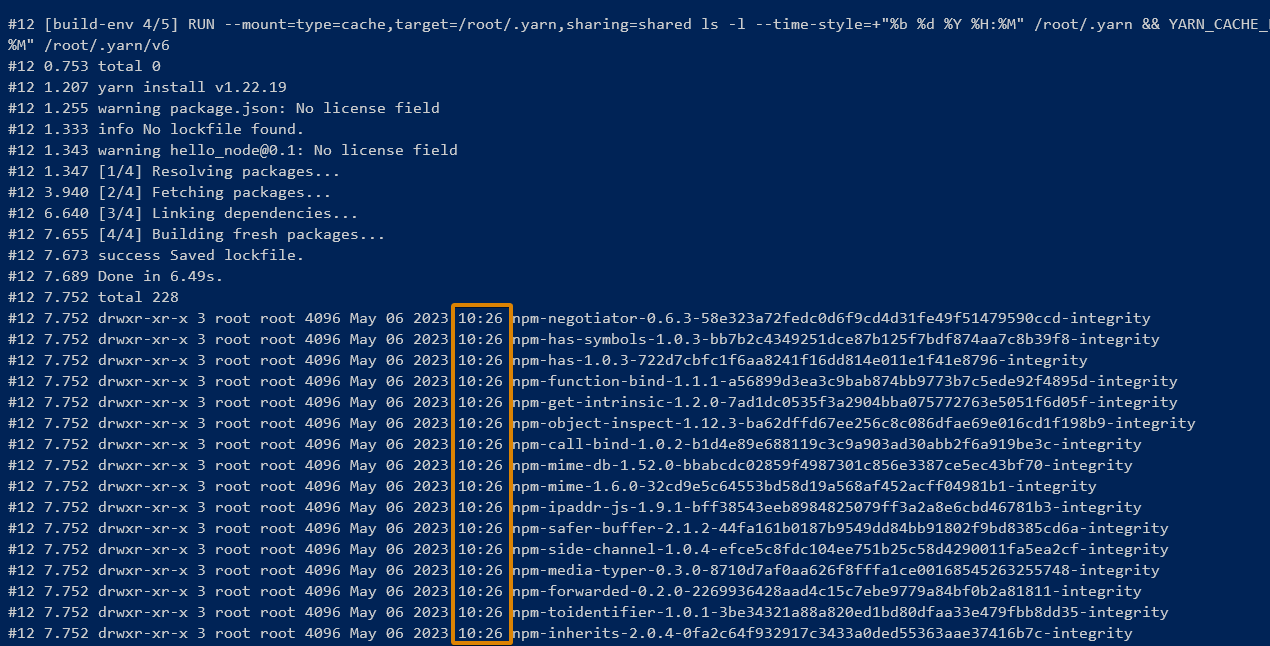
docker construct -t test_cache --progress=plain -f Dockerfile.mount .The outcomes beneath present the time (10:26) the Node.js packages are put in (not the length).
3. After you have created the picture, open the bundle.json file and add the brand new bundle express-validator, as proven beneath, and save the modifications.
"dependencies": {
"specific": "^4.18.2",
"express-validator": "^7.0.0"
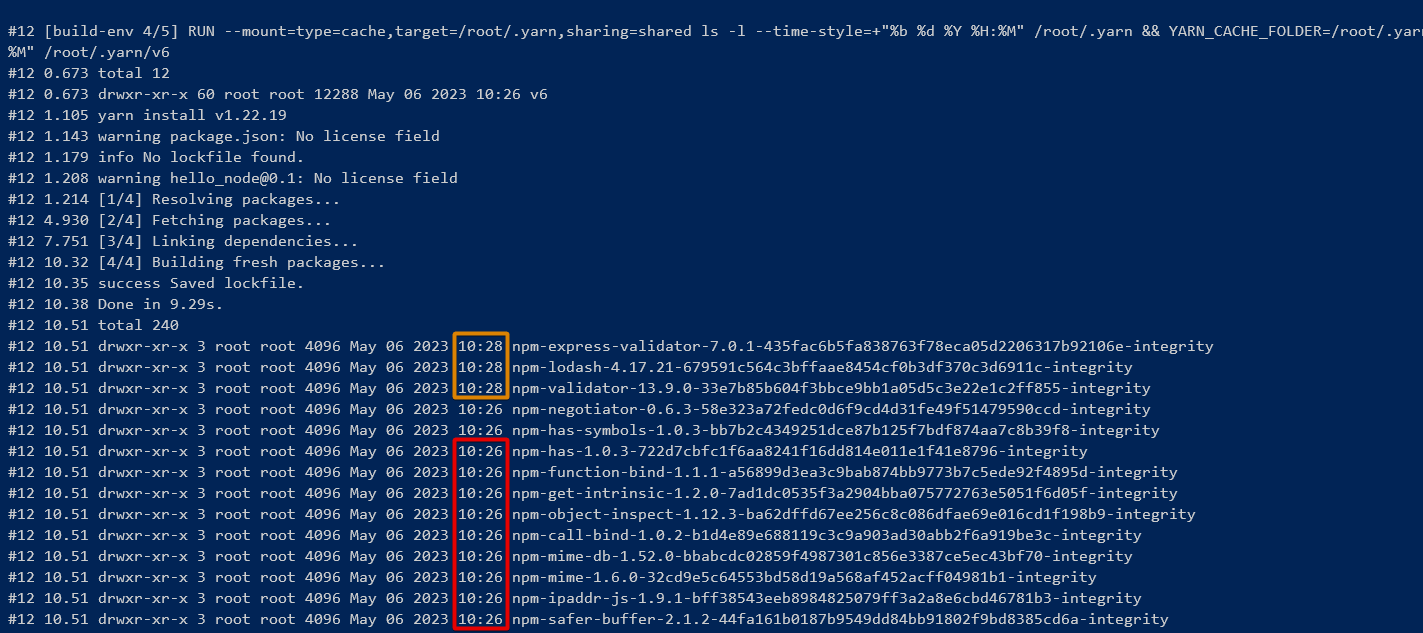
}4. Now, run the next command to rebuild the test_cache Docker picture to make sure that Node.js packages are cached between builds.
docker construct -t test_cache --progress=plain -f Dockerfile.mount .Have a look at when the brand new bundle express-validator was put in at 10:28 from the web, whereas different packages had been put in from the cache at 10:26.
Conclusion
Docker is already exceptional by itself as an answer for containerizing functions. However on this tutorial, you have got realized that along with Docker BuildKit, you may optimize Docker picture construct in some ways.
With multi-stage builds for testing and debugging dependencies, having the Docker BuildKit at your disposal is confirmed crucial. As well as, with the BuildKit mount cache, now you can velocity up your Docker picture construct course of, saving you time so you may concentrate on different essential duties.
Now, why not discover extra about BuildKit? Maybe strive constructing Docker photos for a number of system architectures?