


Are you seeking to combine ServiceNow into your workflow utilizing its API? This tutorial will stroll you thru the method of establishing a ServiceNow developer account, creating an OAuth software, and making your first API name utilizing PowerShell.
Step 1: Create a ServiceNow Developer Account
- Go to the ServiceNow Developer Portal and join an account.
- As soon as logged in, request a private developer occasion following the directions right here.
Step 2: Entry Your Developer Occasion
- Within the developer portal, click on in your profile after which on “Handle occasion password”.
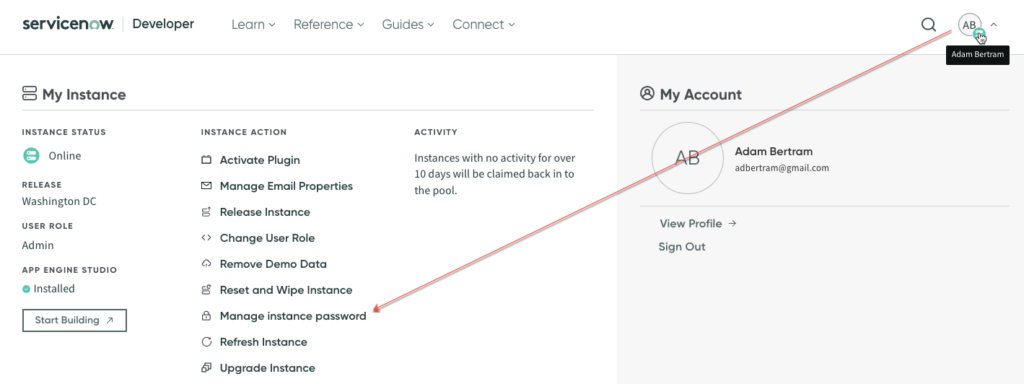
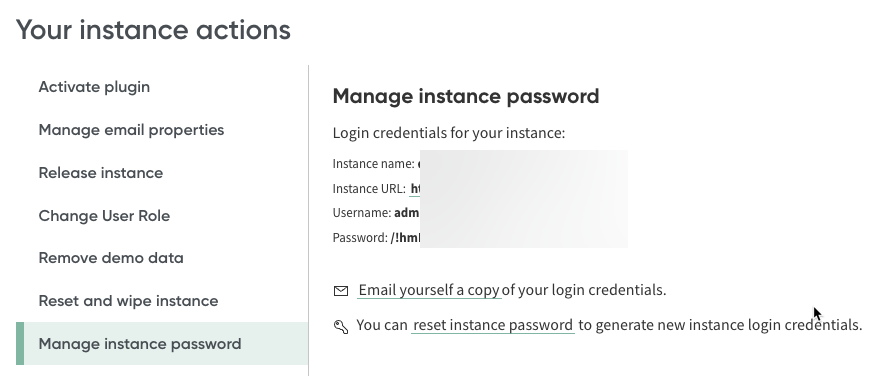
- Observe down your occasion title, username, and password.
- Log into your occasion utilizing the URL format:
https://[your-instance-name].service-now.com/login.do💡 Tip: Be sure that to incorporate login.do on the finish of the URL to keep away from seeing a clean web page.
Step 3: Create an OAuth Software
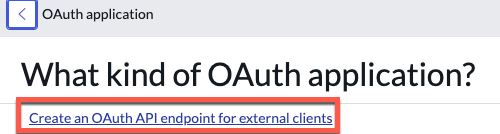
- In your ServiceNow occasion, navigate to System OAuth > Software Registry.

- Click on “New” and choose “Create an OAuth API endpoint for exterior shoppers”.

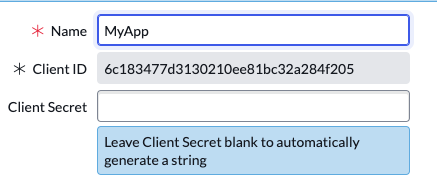
- Present the OAuth app a reputation and save the app. The app will create a shopper ID and shopper secret you’ll must authenticate to the API with.
Step 4: Create a Consumer Account
- Navigate to Consumer Administration > Customers.
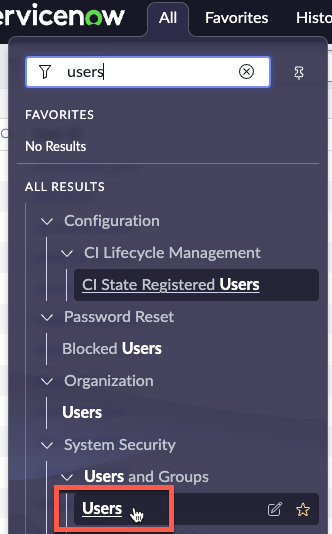
- Create a brand new consumer account that you will use for API entry.

Set the Consumer ID at a minimal and be sure you test on Net service entry solely. This feature will prohibit this consumer to solely the API.
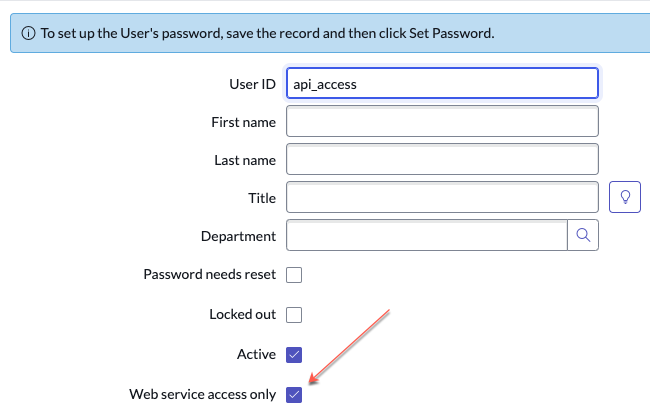
- Set a consumer password.
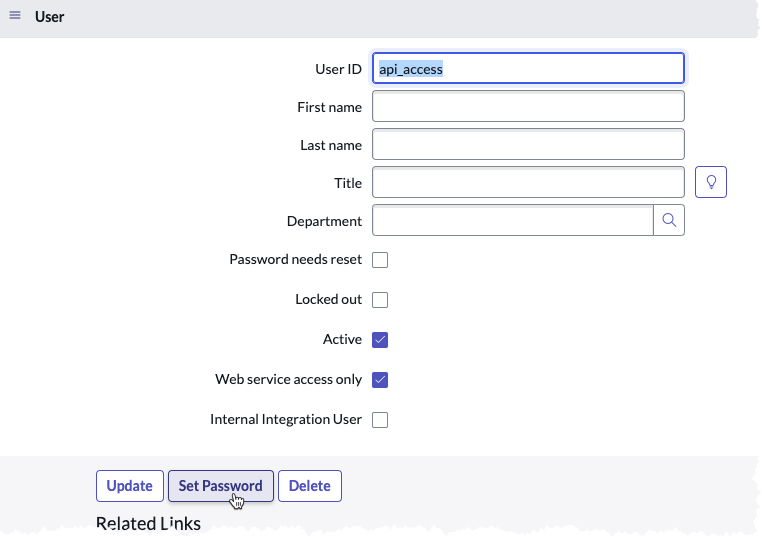
When you’ve saved the consumer account, open the consumer account and click on on Set Password.
When you’ve created the OAuth app and consumer account, it is best to have the next values:
- Occasion title
- Username
- Consumer password
- Consumer ID
- Consumer Secret
You’ll want these values to make use of in your PowerShell script.
Step 5: Get an OAuth Entry Token
At this level, it is best to now have a working ServiceNow occasion to check with. It’s now time to question the API. However first, you have to get an OAuth entry token. The entry token is what you’ll use to authenticate all future API requests.
Open up Visible Studio Code or no matter IDE you’re working with and first outline variables for every attribute you’ll want gathered above.
$serviceNowInstance = 'your-instance-name'
$apiUrl = "https://$ServiceNowInstance.service-now.com/oauth_token.do"
Right here, we’re establishing two vital variables:
$serviceNowInstance: This must be changed along with your precise ServiceNow occasion title.$apiUrl: This constructs the complete URL for the OAuth token endpoint. We’re utilizing string interpolation to incorporate the occasion title within the URL.
$oauthclientId = 'your-client-id'
$OAuthClientSecret = 'your-client-secret'
$Username = 'your-username'
$UserPassword = 'your-password'
On this part, we’re defining our OAuth credentials:
$oauthclientIdand$OAuthClientSecret: These must be changed with the Consumer ID and Consumer Secret you obtained when creating your OAuth software in ServiceNow.$Username: That is the username for the ServiceNow account you are utilizing for API entry.$UserPassword: The consumer password outlined when creating the consumer.
$params = @{
    Uri                = $apiUrl
    SkipHttpErrorCheck = $true
    Technique             = 'POST'
    StatusCodeVariable = 'StatusCode'
    Physique               = @{
        grant_type    = "password"
        client_id     = $OAuthClientId
        client_secret = $OAuthClientSecret
        username      = $Username
        password      = (New-Object PSCredential "consumer", $UserPassword).GetNetworkCredential().Password
    }
}
Right here, we’re making a hashtable $params that shall be used as arguments for our API name:
Uri: That is set to our$apiUrl, specifying the place we’re sending the request.SkipHttpErrorCheck: Set to$true, this tells PowerShell to not robotically throw an error if we get a non-200 standing code. We’ll deal with errors ourselves.Technique: We’re utilizing ‘POST’ as a result of we’re sending knowledge to the server to get our token.StatusCodeVariable: This can retailer the HTTP standing code in a variable named ‘StatusCode’, which we’ll use later to test if the request was profitable.Physique: This nested hashtable accommodates the info we’re sending to the server:grant_type: We’re utilizing “password” as our grant kind.client_idandclient_secret: These are our OAuth software credentials.username: The ServiceNow username.password: We’re extracting the password from our SecureString. This complex-looking code creates a brief PSCredential object after which extracts the password as plain textual content.
$response = Invoke-RestMethod @params
This line is the place we truly make the API name:
Invoke-RestMethodis a PowerShell cmdlet that sends HTTP and HTTPS requests to internet providers and returns structured knowledge.- By utilizing
@params, we’re splatting our parameters – primarily passing all of the key-value pairs in our$paramshashtable as particular person parameters toInvoke-RestMethod. - This name will ship a POST request to our ServiceNow occasion’s OAuth endpoint, together with our credentials within the physique of the request.
- The response from the server (which ought to embrace our entry token if profitable) is saved within the
$responsevariable.
if ($StatusCode -ne 200) {
    throw "Didn't generate entry token. Error: $($response.error_description)"
}
After the request, we test the standing code:
- HTTP standing code 200 signifies a profitable request.
- If the standing code is not 200, we throw an error, together with the error description from the response.
- This helps us shortly determine if one thing went flawed with our request.
Lastly, we output the response. If profitable, this could include our entry token together with different particulars just like the token kind and expiration time.

Step 6: Make Your First API Name
Now let’s break down the code for making an API name:
$serviceNowInstance = 'your-instance-name'
$endpoint = 'desk/incident'
$uri = "<https://$ServiceNowInstance.service-now.com/api/now/$Endpoint>"

$headers = @{
    'Authorization' = "Bearer $($response.access_token)"
}

$end result = Invoke-RestMethod -Uri $uri -Headers $headers -Technique Get
$end result.end result | Format-Desk
This is what’s occurring:
- We arrange our API endpoint URL.
- We create a
$headershashtable with our authorization token. The “Bearer” prefix is a part of the OAuth 2.0 specification. - We use
Invoke-RestMethodonce more, however this time with completely different parameters:Uri: The URL we’re sending the request to.Headers: Our authorization header.Technique: We’re utilizing ‘Get’ to retrieve knowledge.
- The response from the API is saved in
$end result. - We then pipe
$end result.end resulttoFormat-Deskto show the info in a neat desk format.
This Invoke-RestMethod name is easier than our earlier one as a result of we’re not sending a physique with our request – we’re simply retrieving knowledge.

Bonus: Utilizing Refresh Tokens
When your entry token expires, you should use a refresh token to get a brand new one with out requiring the consumer to log in once more:
$params = @{
    Uri                = $apiUrl
    SkipHttpErrorCheck = $true
    Technique             = 'POST'
    StatusCodeVariable = 'StatusCode'
    Physique               = @{
        grant_type    = "refresh_token"
        refresh_token = $response.refresh_token
    }
}

$newTokenResponse = Invoke-RestMethod @params
if ($StatusCode -ne 200) {
    throw "Didn't refresh entry token. Error: $($newTokenResponse.error_description)"
}

$newTokenResponse
Conclusion
You’ve got now arrange a ServiceNow developer account, created an OAuth software, and made your first API name. That is just the start of what you are able to do with the ServiceNow API. Experiment with completely different endpoints and begin integrating ServiceNow into your workflows!
For extra detailed info, try the official ServiceNow API documentation.
Comfortable coding!