

Hello everybody! 👋 I’ve at all times been fascinated by barcodes and QR codes. I’ve identified for a very long time about how they work in concept however I by no means did sufficient analysis on it. It appeared like I’d study so much from diving deeper and implementing a barcode generator from scratch. There is no such thing as a substitute for studying extra about one thing by creating it from scratch so that’s precisely what I did.
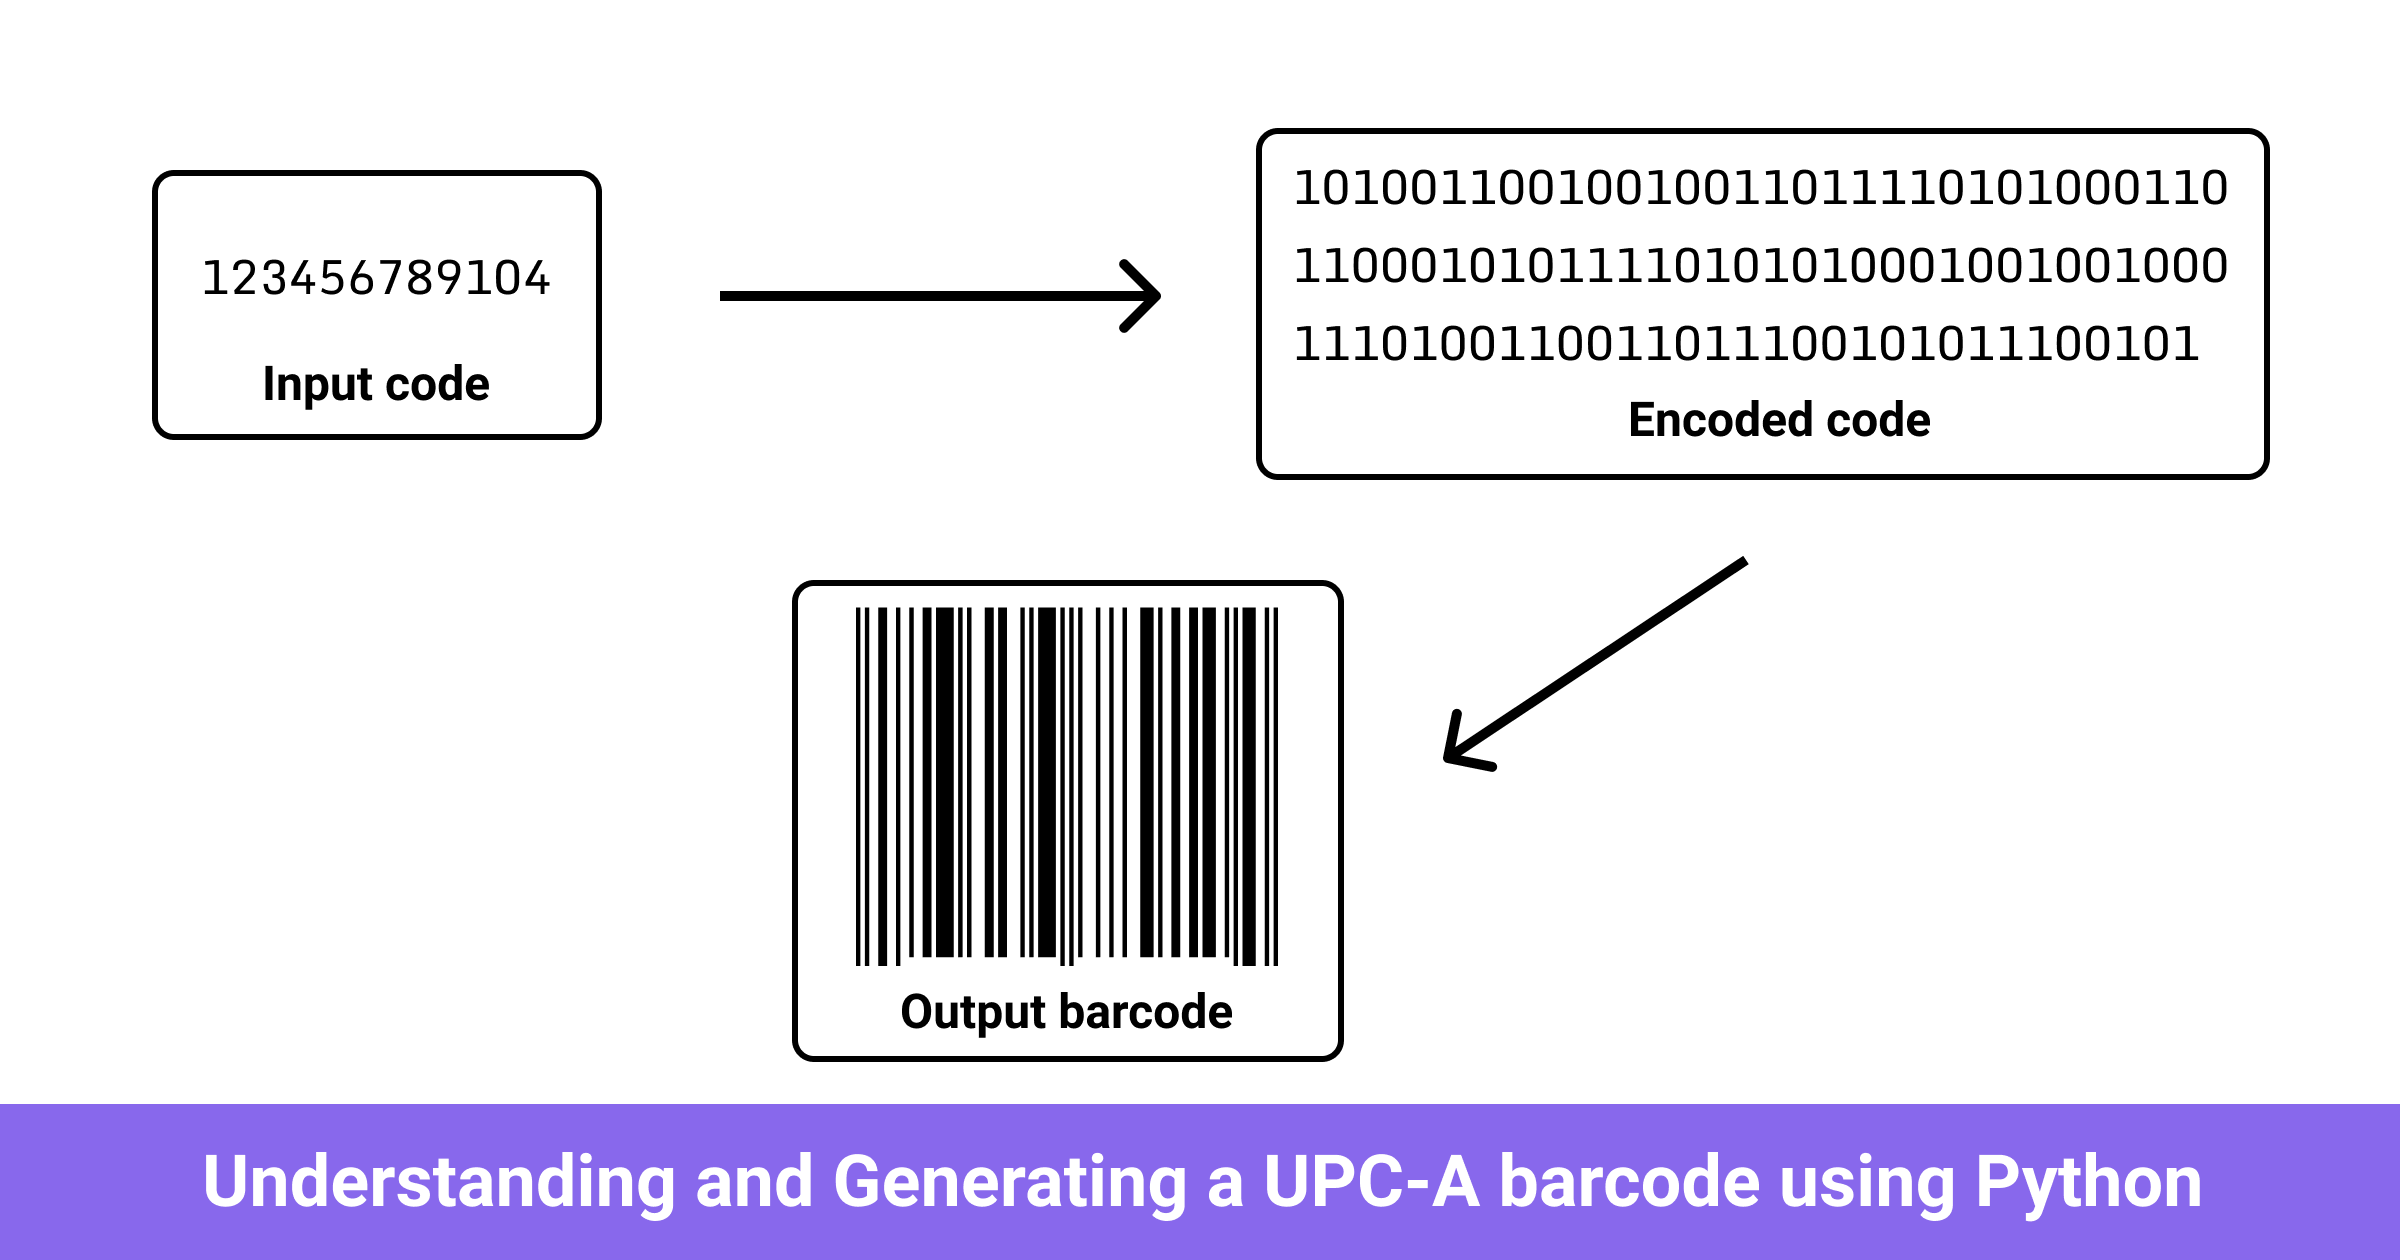
This text is in an identical vein as my “Understanding and Decoding a JPEG Picture utilizing Python” article. I’ll take you on a guided tour of how a barcode works and the way to create a brilliant easy barcode generator for the Common Product Code (UPC-A) utilizing pure Python.
Disclaimer: I’ve borrowed some code and concepts from Hugo for this text.
Historical past
It looks as if barcodes have been there even earlier than I used to be born. Seems that’s true. In accordance with Wikipedia:
The barcode was invented by Norman Joseph Woodland and Bernard Silver and patented within the US in 1951. The invention was based mostly on Morse code that was prolonged to skinny and thick bars. Nonetheless, it took over twenty years earlier than this invention turned commercially profitable.
The concept for an automatic entry system (barcode) originated when a Drexel pupil overheard a meals chain proprietor asking for a system to mechanically learn product info throughout checkout. Little question the barcode later discovered large industrial success within the retail business!
The concept for encoding this info within the type of bars originated from morse code. One of many early variations simply prolonged the dots to type vertical traces. The follow-up variations included a bunch of enjoyable sorts of barcodes. There was additionally a proposal for a round bullseye barcode within the early days. A significant cause they didn’t keep for lengthy is that the printers would typically smear the ink and that might render the code unreadable. Nonetheless, printing vertical bars meant that the smears would solely improve the bar peak and the code would nonetheless be readable.
Typical barcode
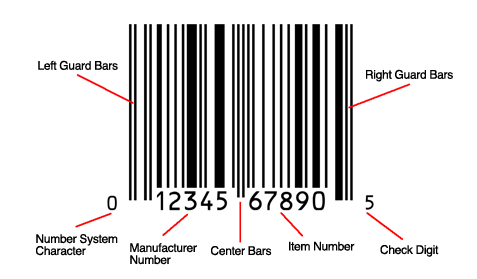
A typical barcode often incorporates:
- Left guard bars
- Heart bars
- Proper guard bars
- Verify digit
- Precise info between the guards
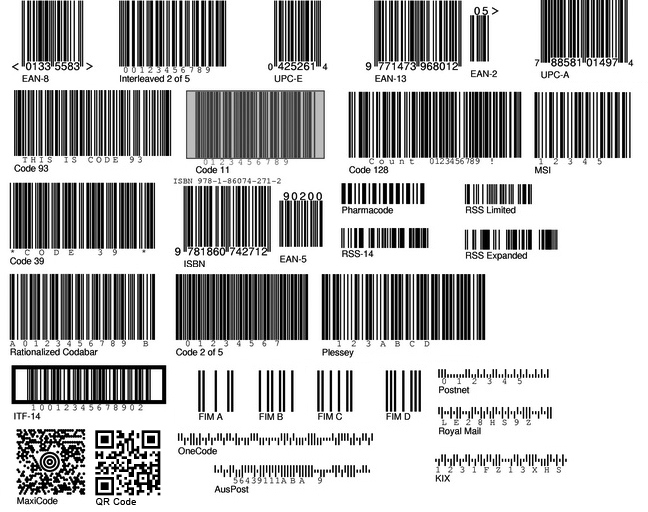
The way in which the knowledge is encoded in a barcode known as the symbology. Some symbologies enable storing alphabets however some solely enable storing digits. There are tons of various symbologies on the market and every is prevalent in a distinct business.
UPC-A
On this article, we can be specializing in the UPC-A barcode. That is kind A of the Common Product Code barcode. It solely permits storing digits (0-9) within the bars. I selected it for this text as a result of it’s tremendous easy and fairly just a few different codes are simply an extension of this.
The symbology for UPC-A solely permits storing 12 digits. The primary digit, Quantity System Character, decides how the remainder of the digits within the barcode can be interpreted. For instance, If it’s a 0, 1, 6, 7, or 8, it will be interpreted as a typical retail product. If it begins with a 2 then it will be interpreted as a produce merchandise that incorporates a weight or worth. The subsequent 10 digits symbolize product-specific info and the interpretation is determined by the NSC. The final digit is a examine digit and helps detect sure errors within the barcode.
We’ll attempt to create a UPC-A barcode utilizing pure Python. I cannot add the digits to the SVG however that might be a easy extension as soon as we’ve got the principle barcode era working.
You will get extra details about UPC and different types of barcodes from Wikipedia.
Verify digit calculation
The examine digit permits the barcode reader to detect sure errors which may have been launched into the barcode for numerous causes. Every symbology makes use of a particular system for calculating the examine digit. The examine digit equation for UPC-A appears to be like like this:

Right here x_1 is the primary digit of UPC and x_12 is the examine digit itself that’s unknown. The steps for calculating the examine digit are:
- Sum all odd-numbered positions (1,3,5…)
- Multiply the sum by 3
- Sum all even-numbered positions (2,4,6…) and add them to the outcome from step 2
- Calculate the outcome from step 3 modulo 10
- If the outcome from step 4 is 0 then the examine digit is 0. In any other case examine digit is 10 – outcome from step 4
This error-check algorithm is named the Luhn algorithm. It is likely one of the many various error detection algorithms on the market.
Barcode encoding

Wikipedia supplies excellent visualization for what the barcode encoding appears to be like like for UPC-A. There are two units of digits which can be divided by a center guard. Every digit is encoded by 7 vertical traces or modules. Every of those will be both black or white. For instance, 0 is encoded as WWWBBWB.
The digits from 0-9 are encoded barely in a different way on the left facet of M (center guard) vs the fitting facet. A enjoyable truth is that the fitting facet encoding of a digit is an optical inverse of its left facet encoding. For instance, the 1 on the left facet is encoded as WWBBWWB and the 1 on the fitting facet is encoded as BBWWBBW. A cause for that is that this permits barcode readers to determine if they’re scanning the barcode within the appropriate course or not. Some scanners would do two passes, as soon as studying from left to proper and as soon as from proper to left and a few would merely reverse the enter information with no second go if it began scanning from the improper course.
The entire visible illustration of the barcode is split into the next components and distinctive patterns of black and white vertical traces (also referred to as modules):
| Place | Component | Depend | Module width |
|---|---|---|---|
| 1 | Quiet zone | 1 | 9 modules (all white) |
| 2 | Begin guard bar | 1 | 3 modules (BWB) |
| 3 | Left digit | 6 | 7 modules (variable) |
| 4 | Mid guard bar | 1 | 5 modules (WBWBW) |
| 5 | Proper digit | 5 | 7 modules (variable) |
| 6 | Verify digit | 1 | 7 modules (variable) |
| 7 | Finish guard bar | 1 | 3 modules (BWB) |
| 8 | Quiet zone | 1 | 9 modules (all white) |
There are a complete of 113 modules or 113 black+white traces in a UPC-A barcode.
Defining encoding desk
The very first step in creating our customized barcode generator is to outline the encoding desk for the digits and the guard bars. Begin by creating a brand new barcode_generator.py file and including this code to it:
class UPC:
    """
    The all-in-one class that represents the UPC-A
    barcode.
    """

    EDGE = "101"
    MIDDLE = "01010"
    CODES = {
        "L": (
            "0001101",
            "0011001",
            "0010011",
            "0111101",
            "0100011",
            "0110001",
            "0101111",
            "0111011",
            "0110111",
            "0001011",
        ),
        "R": (
            "1110010",
            "1100110",
            "1101100",
            "1000010",
            "1011100",
            "1001110",
            "1010000",
            "1000100",
            "1001000",
            "1110100",
        ),
    }

    SIZE = "{0:.3f}mm"
    TOTAL_MODULES = 113
    MODULE_WIDTH = 0.33
    MODULE_HEIGHT = 25.9
    EXTENDED_MODULE_HEIGHT = MODULE_HEIGHT + 5*MODULE_WIDTH
		BARCODE_WIDTH = TOTAL_MODULES * MODULE_WIDTH
    BARCODE_HEIGHT = EXTENDED_MODULE_HEIGHT

    def __init__(self, upc):
        self.upc = listing(str(upc))[:11]
        if len(self.upc) < 11:
            increase Exception(f"The UPC needs to be of size 11 or 12 (with examine digit)")
Right here we’re creating an all-in-one class and defining some class variables and the mapping between digits and the black/white traces (modules). The 1 represents black and 0 represents white. EDGE represents the beginning and finish guards. MIDDLE represents the center guard. CODES dictionary incorporates two tuples mapped to L and R for the left and proper digits. The index place within the tuple represents the digit we’re mapping. For instance, the primary factor of the L tuple represents the 0 digit that’s encoded to WWWBBWB or 0001101.
The MODULE_WIDTH and the opposite sizes are all taken from Wikipedia. These are the size of a typical UPC-A barcode within the regular sizing. You may tweak these sizes to an extent and the barcode ought to nonetheless work nice. The EXTENDED_MODULE_HEIGHT refers back to the peak of the modules or bars for the three guards (L, M, R) and the primary and final digit (examine digit) of the UPC. These modules are usually taller than the opposite modules. This prolonged peak can be taken from Wikipedia. The barcode continues to be legitimate with out this peak distinction but it surely appears to be like good with this peak distinction and reveals a transparent separation of the left and proper digits. For instance, examine these two barcodes:
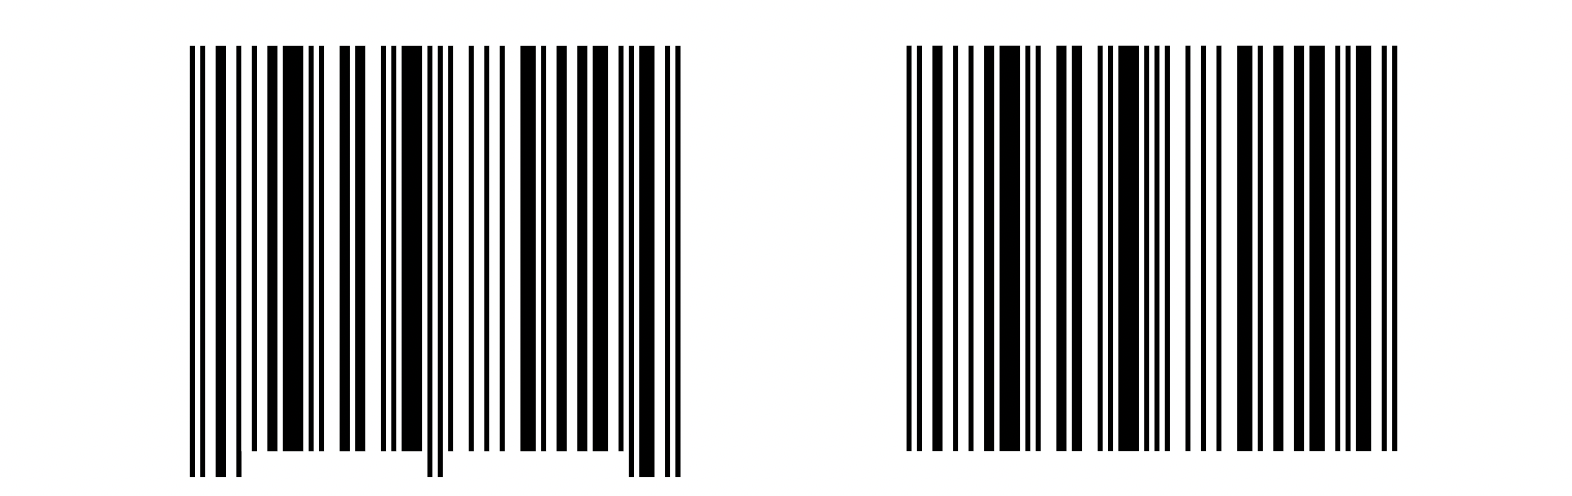
I discover the left barcode cleaner and nicer than the fitting one. I can clearly inform the place the digits are being divided by a center guard.
I additionally added an __init__ technique that takes the upc as enter and throws an Exception if the scale is smaller than 11. I haven’t added code for verifying the overall size as a result of I’m truncating it to the primary 11 digits. We’ll add the twelfth examine digit ourselves. The enter upc will be any integer as much as a size of 11 digits. We don’t care about NSC and what the code really represents.
Verify digit & error detection
Let’s implement the error detection and examine digit calculation to our class. We’ll use the identical system we talked about earlier:
class UPC:
		# ...

		def calculate_check_digit(self):
        """
        Calculate the examine digit
        """
        upc = [int(digit) for digit in self.upc[:11]]
        oddsum = sum(upc[::2])
        evensum = sum(upc[1::2])

        examine = (evensum + oddsum * 3) % 10
        if examine == 0:
            return [0]
        else:
            return [10 - check]
I’m utilizing listing slicing to get the even and odd digit positions after which doing a little arithmetic for the examine digit calculation. It might need been higher to let the consumer enter the examine digit after which examine that to our calculated examine digit and ensure the entered barcode is appropriate. It might have made the barcode entry extra sturdy however I’ll go away that error detection as much as you.
Encoding UPC
Let’s add a brand new technique to encode the UPC to the 01 mapping we outlined in our class. The code will look one thing like this:
class UPC:
		# ...

    def __init__(self, upc):
        self.upc = listing(str(upc))[:11]
        if len(self.upc) < 11:
            increase Exception(f"The UPC needs to be of size 11 or 12 (with examine digit)")
        self.upc = self.upc + self.calculate_check_digit()
        encoded_code = self.encode()

		def encode(self):
        """
        Encode the UPC based mostly on the mapping outlined above
        """
        code = self.EDGE[:]
        for _i, quantity in enumerate(self.upc[0:6]):
            code += self.CODES["L"][int(number)]
        code += self.MIDDLE
        for quantity in self.upc[6:]:
            code += self.CODES["R"][int(number)]
        code += self.EDGE
        self.encoded_upc = code
The encode technique merely loops over the UPC and creates a corresponding string containing a sample of 0 and 1 based mostly on every digit within the UPC. It appropriately makes use of the L and R mapping relying on whether or not the UPC digit being iterated on is within the first half of UPC or the second. It additionally provides the three guard bars on the appropriate locations.
For instance, it is going to flip 123456789104 into 10100110010010011011110101000110110001010111101010100010010010001110100110011011100101011100101
I additionally modified the __init__ technique to utilize the newly created encode technique.
Producing base SVG
We can be outputting an SVG from our code. The way in which SVGs work is considerably just like HTML. In addition they include a bunch of tags that you just might need seen in an HTML doc. An SVG will begin with an XML tag and a DOCTYPE. This can be adopted by an svg tag that incorporates all of the meat of our SVG. On this SVG we are going to group all the things in a g (group) tag. On this group tag, we are going to outline the completely different modules (vertical bars) as a rect.
Placing all the things in a gaggle simply makes vector graphic editors (Inkscape, Illustrator, and so forth) play properly with the generated SVGs.
A easy SVG appears to be like one thing like this:
<?xml model="1.0" encoding="UTF-8"?>
<!DOCTYPE svg
  PUBLIC '-//W3C//DTD SVG 1.1//EN'
  'http://www.w3.org/Graphics/SVG/1.1/DTD/svg11.dtd'>
<svg model="1.1" xmlns="http://www.w3.org/2000/svg" width="44.000mm" peak="23.000mm">
    <g id="barcode_group">
        <rect width="100%" peak="100%" model="fill:white"/>
        <rect x="6.500mm" y="1.000mm" width="0.330mm" peak="15.000mm" model="fill:black;"/>
        <rect x="6.830mm" y="1.000mm" width="0.330mm" peak="15.000mm" model="fill:white;"/>
        <rect x="7.160mm" y="1.000mm" width="0.330mm" peak="15.000mm" model="fill:black;"/>
        <!-- truncated -->
		</g>
</svg>
Even on a cursory look, it’s pretty simple to think about what this SVG code will visually seem like.
Let’s add some code to our class to generate a skeleton/boilerplate SVG that we will later fill in:
import xml.dom

class UPC:
		# ...

    def __init__(self, upc):
				# ...
        self.create_barcode()

    def create_barcode(self):
        self.prepare_svg()

    def prepare_svg(self):
        """
        Create the whole boilerplate SVG for the barcode
        """
        self._document = self.create_svg_object()
        self._root = self._document.documentElement

        group = self._document.createElement("g")
        group.setAttribute("id", "barcode_group")
        self._group = self._root.appendChild(group)

        background = self._document.createElement("rect")
        background.setAttribute("width", "100%")
        background.setAttribute("peak", "100%")
        background.setAttribute("model", "fill: white")
        self._group.appendChild(background)

    def create_svg_object(self):
        """
        Create an SVG object
        """
        imp = xml.dom.getDOMImplementation()
        doctype = imp.createDocumentType(
            "svg",
            "-//W3C//DTD SVG 1.1//EN",
            "http://www.w3.org/Graphics/SVG/1.1/DTD/svg11.dtd",
        )
        doc = imp.createDocument(None, "svg", doctype)
        doc.documentElement.setAttribute("model", "1.1")
        doc.documentElement.setAttribute("xmlns", "http://www.w3.org/2000/svg")
        doc.documentElement.setAttribute(
            "width", self.SIZE.format(self.BARCODE_WIDTH)
        )
        doc.documentElement.setAttribute(
            "peak", self.SIZE.format(self.BARCODE_HEIGHT)
        )
        return doc

    def create_module(self, xpos, ypos, width, peak, colour):
        """
        Create a module and append a corresponding rect to the SVG group
        """
        factor = self._document.createElement("rect")
        factor.setAttribute("x", self.SIZE.format(xpos))
        factor.setAttribute("y", self.SIZE.format(ypos))
        factor.setAttribute("width", self.SIZE.format(width))
        factor.setAttribute("peak", self.SIZE.format(peak))
        factor.setAttribute("model", "fill:{};".format(colour))
        self._group.appendChild(factor)
We’re doing a few issues right here. Let’s have a look at every technique one after the other.
__init__: I modified it to utilize thecreate_barcodetechniquecreate_barcode: For now it merely calls theprepare_svgtechnique. We’ll quickly replace it to do extra stuffprepare_svg: Callscreate_svg_objectto create a skeleton SVG object after which provides a gaggle to retailer our barcode and a white rectangle inside that stated group. This white rectangle will act because the background of our barcode.create_svg_object: Makes use of thexml.dombundle to arrange a DOM with correct doctype and attributescreate_module: I’m not at the moment utilizing it. It’s going to create arectfor every black/white bar with the suitable measurement and elegance and append that to our SVG.
Packing the encoded UPC
We will use the encoded UPC and the SVG era code we’ve got to this point to create an SVG however let’s create another technique to pack the encoded UPC. Packing means that it’ll flip a gaggle of 0s and 1s right into a single digit. For instance:
"001101" -> [-2, 2, -1, 1]
The digit worth tells us what number of similar characters it noticed earlier than coming throughout a distinct character. And if the digit is detrimental then we all know that it’s referring to a 0 and whether it is constructive then we all know it’s referring to a 1. It will assist us in determining what colour to make use of to create the corresponding rectangle (black vs white).
The advantage of packing is that as a substitute of making 6 rectangles for 001101, we will solely create 4 rectangles with various widths. In whole, we are going to solely need to make 59 rectangles or bars (3 + 3 + 5 for the guards and 4*12 for the 12 digits). The packing code would seem like this:
class UPC:
		# ...

		def packed(self, encoded_upc):
        """
        Pack the encoded UPC to an inventory. Ex:
            "001101" -> [-2, 2, -1, 1]
        """
        encoded_upc += " "
        extended_bars = [1,2,3, 4,5,6,7, 28,29,30,31,32, 53,54,55,56, 57,58,59]
        depend = 1
        bar_count = 1
        for i in vary(0, len(encoded_upc) - 1):
            if encoded_upc[i] == encoded_upc[i + 1]:
                depend += 1
            else:
                if encoded_upc[i] == "1":
                    yield depend, bar_count in extended_bars
                else:
                    yield -count, bar_count in extended_bars
                bar_count += 1
                depend = 1
I’ve additionally added an extended_bars listing. This incorporates the (1 numbered) indices of bars that ought to be prolonged (the three guards and the primary and final digit).
Creating the barcode SVG
Let’s edit the create_barcode technique to generate the total SVG code for our UPC-A barcode:
class UPC:
		# ...

		def create_barcode(self):
        self.prepare_svg()

        # Quiet zone is mechanically added because the background is white We'll
        # merely skip the area for 9 modules and begin the guard from there

        x_position = 9 * self.MODULE_WIDTH
        for depend, prolonged in self.packed(self.encoded_upc):
            if depend < 0:
                colour = "white"
            else:
                colour = "black"

            config = {
                "xpos": x_position,
                "ypos": 1,
                "colour": colour,
                "width": abs(depend) * self.MODULE_WIDTH,
                "peak": self.EXTENDED_MODULE_HEIGHT if prolonged else self.MODULE_HEIGHT,
            }
            self.create_module(**config)
            x_position += abs(depend) * self.MODULE_WIDTH
We first put together the skeleton of the SVG. Then we skip 9 module widths. That is the quiet zone that’s required for the barcode scanners to precisely establish a barcode. It’s not less than 9 module widths in accordance with Wikipedia and exists on both facet of the barcode. Our background is already white so we don’t have to attract any rectangle to symbolize the quiet zone.
Then we loop over the packed encoding. For every return worth from the packed technique, we calculate the width and peak of the rectangle. The calculation is easy. For the width, we take absolutely the worth of depend and multiply that with MODULE_WIDTH. For the peak, if prolonged is True we set it to EXTENDED_MODULE_HEIGHT, in any other case, we set it to MODULE_HEIGHT. After making a dictionary with this config, we go it to create_module. On the finish of every loop, we regulate the x place of the subsequent rectangle based mostly on how vast the present rectangle is.
Word: The ** in self.create_module(**config) converts the gadgets within the config dict into key phrase arguments.
Saving the SVG
The one two issues left now are a technique to dump the SVG code to a file and to tie all the things collectively within the __init__ technique. Let’s first add a save technique:
import os

class UPC:
		# ...

		def save(self, filename):
        """
        Dump the ultimate SVG XML code to a file
        """
        output = self._document.toprettyxml(
            indent=4 * " ", newl=os.linesep, encoding="UTF-8"
        )
        with open(filename, "wb") as f:
            f.write(output)
xml.dom supplies us with a pleasant toprettyxml technique to dump a properly formatted XML doc right into a string which we will then save to a file.
Let’s end the code by modifying the __init__ technique and including some driver code on the finish of the file:
class UPC:
		# ...

    def __init__(self, upc):
        self.upc = listing(str(upc))[:11]
        if len(self.upc) < 11:
            increase Exception(f"The UPC needs to be of size 11 or 12 (with examine digit)")
        self.upc = self.upc + self.calculate_check_digit()
        encoded_code = self.encode()
        self.create_barcode()
        self.save("upc_custom.svg")

		# ...

if __name__ == "__main__":
    upc = UPC(12345678910)
Save the file and take a look at operating it. It ought to generate a upc_custom.svg file in the identical listing as your Python code.
Full code
The whole code is obtainable under and on GitHub:
import xml.dom
import os


class UPC:
    """
    The all-in-one class that represents the UPC-A
    barcode.
    """

    QUIET = "000000000"
    EDGE = "101"
    MIDDLE = "01010"
    CODES = {
        "L": (
            "0001101",
            "0011001",
            "0010011",
            "0111101",
            "0100011",
            "0110001",
            "0101111",
            "0111011",
            "0110111",
            "0001011",
        ),
        "R": (
            "1110010",
            "1100110",
            "1101100",
            "1000010",
            "1011100",
            "1001110",
            "1010000",
            "1000100",
            "1001000",
            "1110100",
        ),
    }
    SIZE = "{0:.3f}mm"
    MODULE_WIDTH = 0.33
    MODULE_HEIGHT = 25.9
    EXTENDED_MODULE_HEIGHT = MODULE_HEIGHT + 5*MODULE_WIDTH
    BARCODE_HEIGHT = EXTENDED_MODULE_HEIGHT
    TOTAL_MODULES = 113

    def __init__(self, upc):
        self.upc = listing(str(upc))[:11]
        if len(self.upc) < 11:
            increase Exception(f"The UPC needs to be of size 11 or 12 (with examine digit)")
        self.upc = self.upc + self.calculate_check_digit()
        encoded_code = self.encode()
        self.create_barcode()
        self.save("upc_custom.svg")

    def calculate_check_digit(self):
        """
        Calculate the examine digit
        """
        upc = [int(digit) for digit in self.upc[:11]]
        oddsum = sum(upc[::2])
        evensum = sum(upc[1::2])

        examine = (evensum + oddsum * 3) % 10
        if examine == 0:
            return [0]
        else:
            return [10 - check]

    def encode(self):
        """
        Encode the UPC based mostly on the mapping outlined above
        """
        code = self.EDGE[:]
        for _i, quantity in enumerate(self.upc[0:6]):
            code += self.CODES["L"][int(number)]
        code += self.MIDDLE
        for quantity in self.upc[6:]:
            code += self.CODES["R"][int(number)]
        code += self.EDGE
        self.encoded_upc = code

    def create_barcode(self):
        self.prepare_svg()

        # Quiet zone is mechanically added because the background is white We'll
        # merely skip the area for 9 modules and begin the guard from there

        x_position = 9 * self.MODULE_WIDTH
        for depend, prolonged in self.packed(self.encoded_upc):
            if depend < 0:
                colour = "white"
            else:
                colour = "black"

            config = {
                "xpos": x_position,
                "ypos": 1,
                "colour": colour,
                "width": abs(depend) * self.MODULE_WIDTH,
                "peak": self.EXTENDED_MODULE_HEIGHT if prolonged else self.MODULE_HEIGHT,
            }
            self.create_module(**config)
            x_position += abs(depend) * self.MODULE_WIDTH

    def packed(self, encoded_upc):
        """
        Pack the encoded UPC to an inventory. Ex:
            "001101" -> [-2, 2, -1, 1]
        """
        encoded_upc += " "
        extended_bars = [1,2,3, 4,5,6,7, 28,29,30,31,32, 53,54,55,56, 57,58,59]
        depend = 1
        bar_count = 1
        for i in vary(0, len(encoded_upc) - 1):
            if encoded_upc[i] == encoded_upc[i + 1]:
                depend += 1
            else:
                if encoded_upc[i] == "1":
                    yield depend, bar_count in extended_bars
                else:
                    yield -count, bar_count in extended_bars
                bar_count += 1
                depend = 1

    def prepare_svg(self):
        """
        Create the whole boilerplate SVG for the barcode
        """
        self._document = self.create_svg_object()
        self._root = self._document.documentElement

        group = self._document.createElement("g")
        group.setAttribute("id", "barcode_group")
        self._group = self._root.appendChild(group)

        background = self._document.createElement("rect")
        background.setAttribute("width", "100%")
        background.setAttribute("peak", "100%")
        background.setAttribute("model", "fill: white")
        self._group.appendChild(background)

    def create_svg_object(self):
        """
        Create an SVG object
        """
        imp = xml.dom.getDOMImplementation()
        doctype = imp.createDocumentType(
            "svg",
            "-//W3C//DTD SVG 1.1//EN",
            "http://www.w3.org/Graphics/SVG/1.1/DTD/svg11.dtd",
        )
        doc = imp.createDocument(None, "svg", doctype)
        doc.documentElement.setAttribute("model", "1.1")
        doc.documentElement.setAttribute("xmlns", "http://www.w3.org/2000/svg")
        doc.documentElement.setAttribute(
            "width", self.SIZE.format(self.TOTAL_MODULES * self.MODULE_WIDTH)
        )
        doc.documentElement.setAttribute(
            "peak", self.SIZE.format(self.BARCODE_HEIGHT)
        )
        return doc

    def create_module(self, xpos, ypos, width, peak, colour):
        """
        Create a module and append a corresponding rect to the SVG group
        """
        factor = self._document.createElement("rect")
        factor.setAttribute("x", self.SIZE.format(xpos))
        factor.setAttribute("y", self.SIZE.format(ypos))
        factor.setAttribute("width", self.SIZE.format(width))
        factor.setAttribute("peak", self.SIZE.format(peak))
        factor.setAttribute("model", "fill:{};".format(colour))
        self._group.appendChild(factor)

    def save(self, filename):
        """
        Dump the ultimate SVG XML code to a file
        """
        output = self._document.toprettyxml(
            indent=4 * " ", newl=os.linesep, encoding="UTF-8"
        )
        with open(filename, "wb") as f:
            f.write(output)


if __name__ == "__main__":
    upc = UPC(12345678910)
Conclusion
Thanks a lot for studying this text. I do know it was pretty lengthy so thanks for sticking round. If you happen to loved this text and would like to see a way more cleaner implementation of barcode generator in Python, I like to recommend you take a look at this repo. I’ve shamelessly borrowed concepts and code from Hugo’s repo for this text. It incorporates implementations for different barcode codecs as nicely such because the EAN13 (EuropeanArticleNumber13) and JapanArticleNumber.
If you wish to learn extra about barcodes, Peter has written a beautiful publish about Spotify codes work.

I actually loved diving deeper into barcodes and studying extra about their historical past and implementation. It is a very fascinating discipline and I do plan on exploring it extra sooner or later. I’ll in all probability attempt to deal with QR codes subsequent as they’re slowly changing barcodes in all places and might encode much more info in a a lot smaller area. It might be enjoyable to try to implement a QR code generator in Python.
Subsequent steps
If you wish to proceed engaged on this, you’re greater than welcome to repeat and modify my code. I’m releasing it underneath the MIT license. A few issues you’ll be able to add are:
- Add assist for textual content beneath the barcode
- Add assist for extra symbology
- Add stricter error checking
- Add a PNG/JPG output
I hope you loved studying this text. If in case you have any questions, feedback, strategies, or suggestions, please write a remark under or ship me an electronic mail. I’d love to listen to from you.
Take care ❤️👋