

Ubiquiti has made organising a brand new UniFi Community extremely easy. You may get your new community up and working inside 5 minutes. However after the preliminary setup, what else do you have to configure? And the way do you get the most effective efficiency? We’re going to stroll by way of the entire UniFi Setup.
And in relation to organising an UniFi community, we additionally want to have a look at the most effective placement for our entry factors, to get the most effective efficiency all through your complete home.
On this article, we’re going by way of the entire UniFi setup. I’ll clarify the totally different settings, and provide you with ideas so that you get the most effective efficiency out of your community.
UniFi Setup
For this UniFi Setup walkthrough, I’m going to make use of a UniFi Categorical as a Cloud Controller and add an UniFi Lite entry level and UniFi Lite change to it. We’re going to configure the community for a typical residence community with a visitor community and one regular wi-fi community.
The UniFi Categorical doesn’t assist menace detection (Suspicious Exercise or IDS/IDP), so for that half, we’ll change over to the UDM Professional that I’ve working right here. Study extra concerning the distinction between UniFi Cloud Gateways on this comparability article.
We received’t are usually not going to configure VLANs on this article, however if you wish to use VLANs, then ensure you learn this text as soon as completed.
Step 1 – Preliminary Setup Course of
The preliminary setup of our UniFi Cloud Gateway or Console is finest completed utilizing a Bluetooth connection and the UniFi Community app. You’ll be able to obtain the app right here for Android and right here for Apple. Just be sure you have the app put in in your telephone.
Join the WAN port of your Cloud Gateway or console to the web and join the facility to begin the system. The system wants a few minutes to energy up, within the meantime open the app in your cellular.
Observe
In the event you don’t wan’t to make use of the app, then join a laptop computer to the community, open a browser and go to http://192.168.1.1 to finish the preliminary setup.
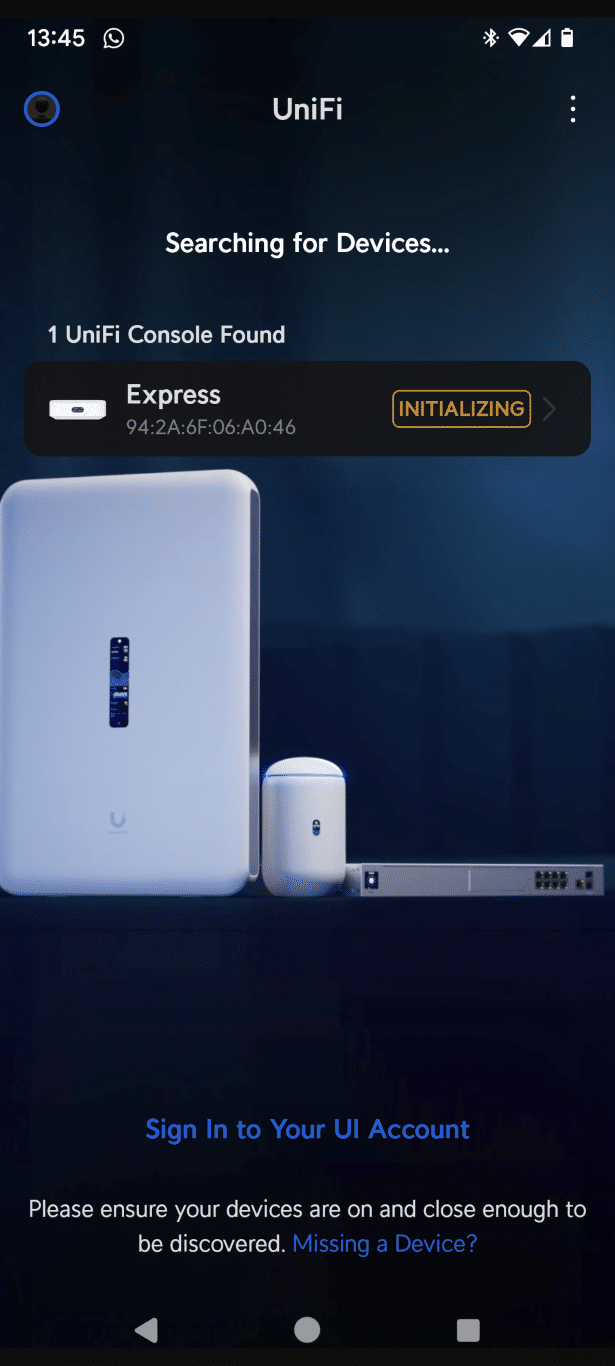
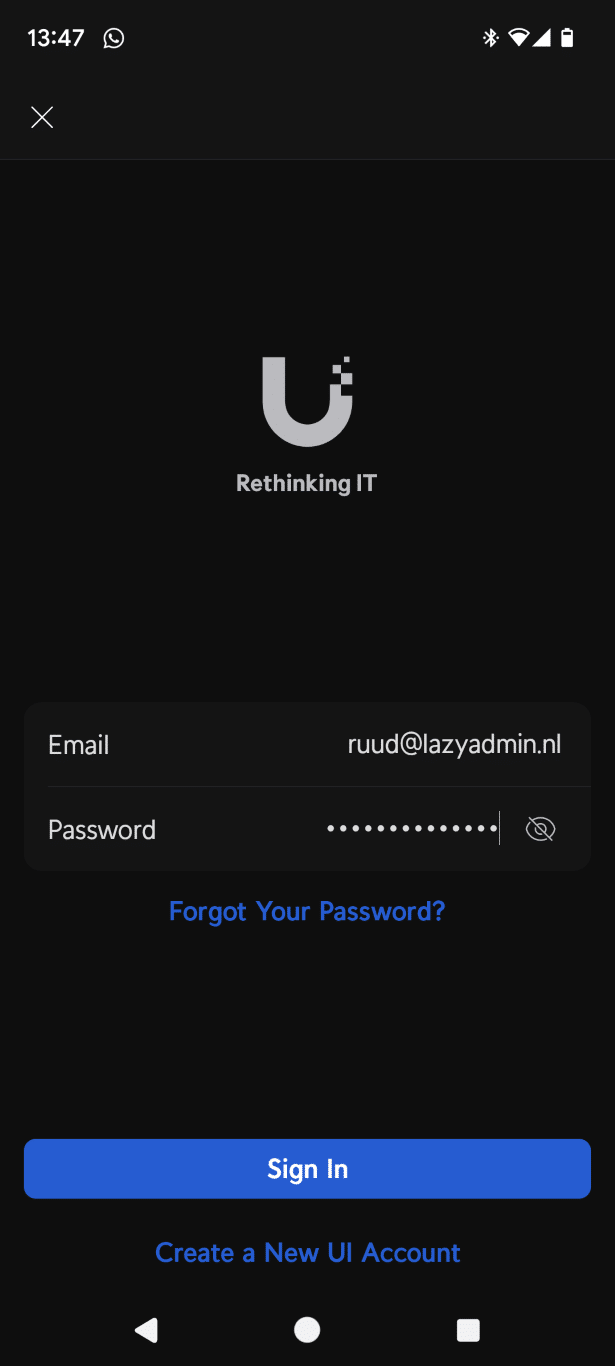

Whereas the console remains to be initializing, click on on Signal In to sign up to your UI Account or to create a brand new Ubiquiti account. This account lets you handle your community simply from the web and likewise lets you retailer computerized backups of your configuration within the cloud.
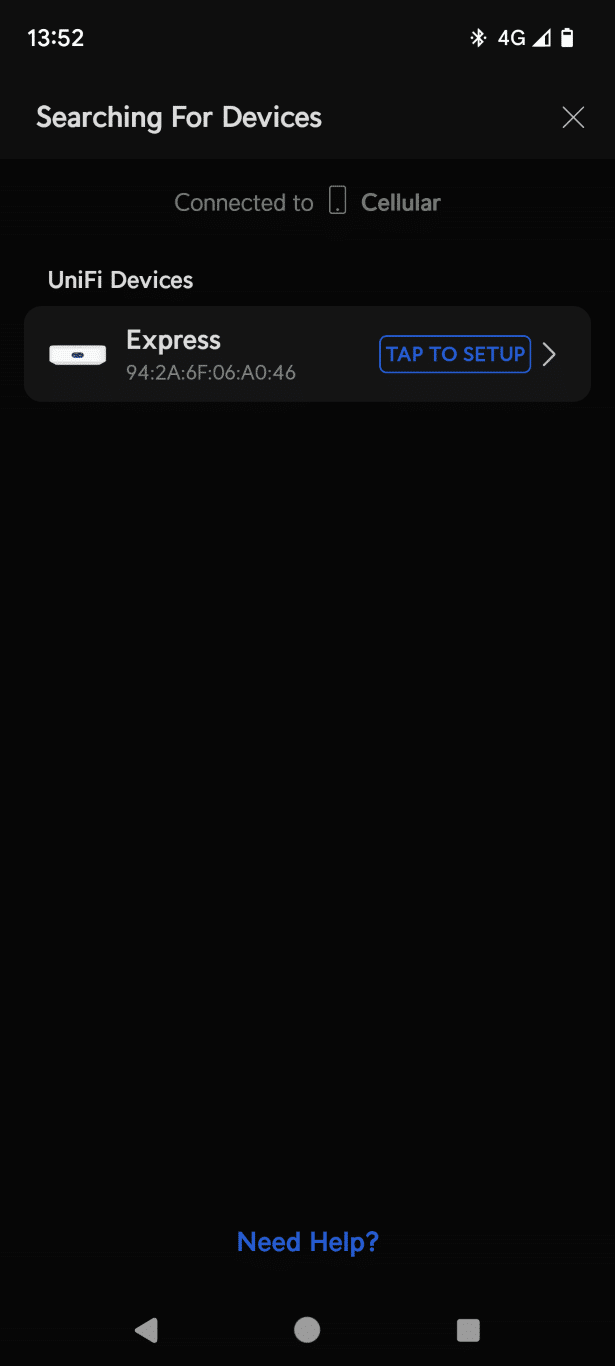
After you might have logged in, you would possibly have to click on on the Plus icon to search out the brand new console. As soon as it’s completed with initializing, click on on Faucet to Setup
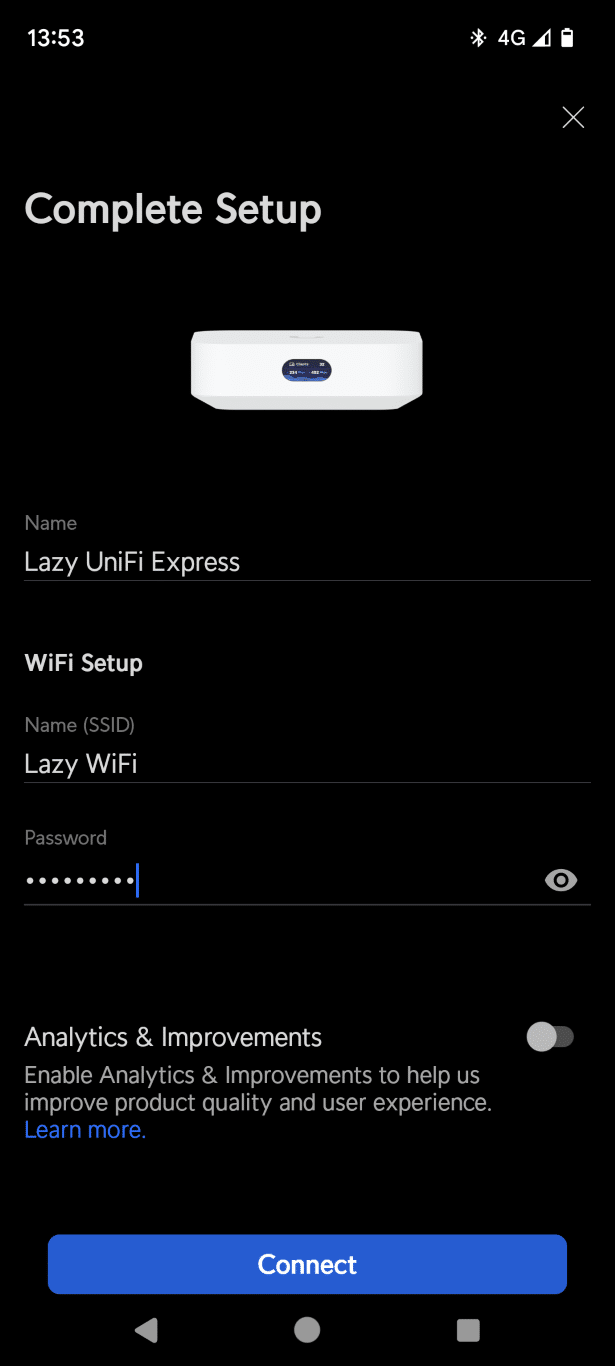
Within the preliminary setup strategy of our UniFi console, we may give the console a reputation (or go away it default). Relying on the console sort you possibly can configure a wi-fi community. We will change the community afterward, nevertheless it lets you rapidly hook up with your community as soon as the setup is accomplished.
Click on on Join when you find yourself completed and anticipate the setup course of to finish.
Step 2 – Replace UniFi Apps and UniFi OS Settings
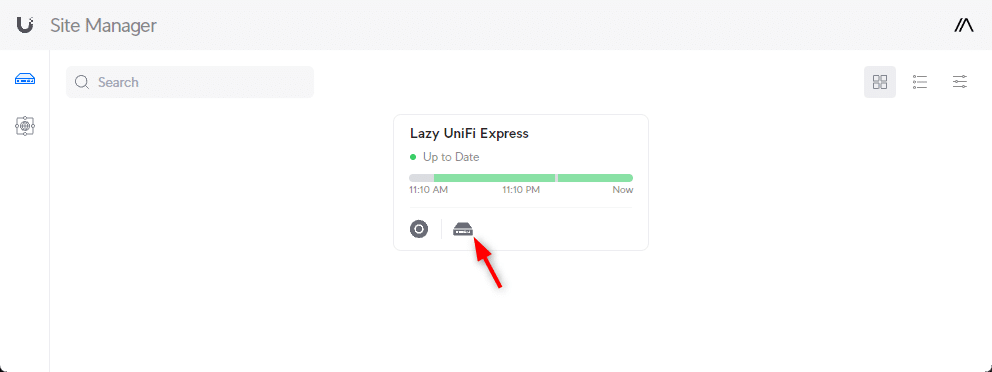
When you’ve got created or used a Ubiquiti account within the earlier step, then now you can log in on unifi.ui.com to entry your console. It will open the Website Supervisor the place you will notice your console
Now step one is to ensure that it’s totally up-to-date. In the meanwhile of writing, UniFi Community 8.0 is launched, however the console remains to be working on 7.x. Click on on the console icon to open the console settings (UniFi OS)
It could take a minute or two earlier than the console has checked if there are updates out there, however ensure that all of the purposes are up to date to the most recent model:
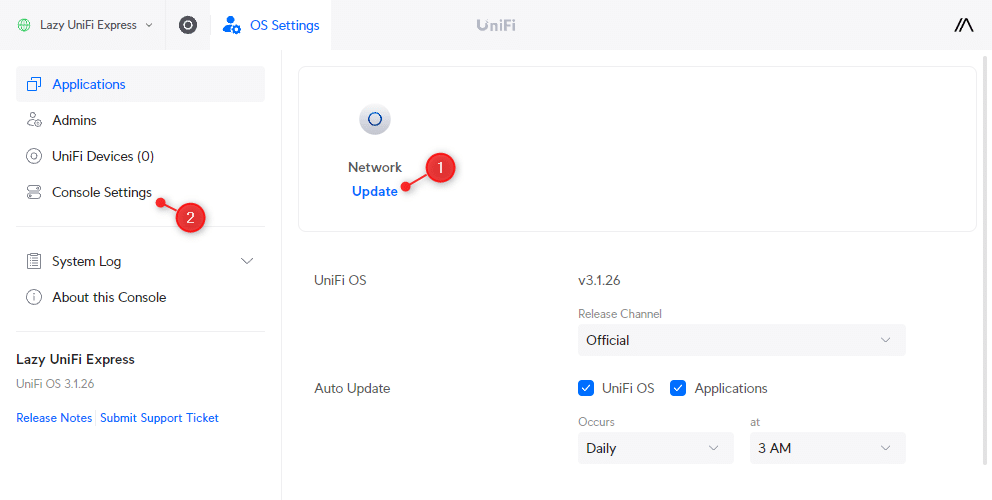
Whereas we’re within the UniFi OS Settings, open the console settings (2). Be sure that the System Config Backup is Enabled and examine if the placement/time zone is right. Right here you can even allow or disable the LED / LCM Display screen of the console.
Particularly with the UniFi Dream Router or UniFi Categorical, that you just usually place perception, you would possibly need to flip the display off at night time or decrease the brightness.
Step 3 – Undertake Gadgets
With UniFi Community totally up to date, we will begin with adopting our community gadgets:
- Open the UniFi Community App
- Click on on Gadgets
- Click on on Click on to Undertake for every system
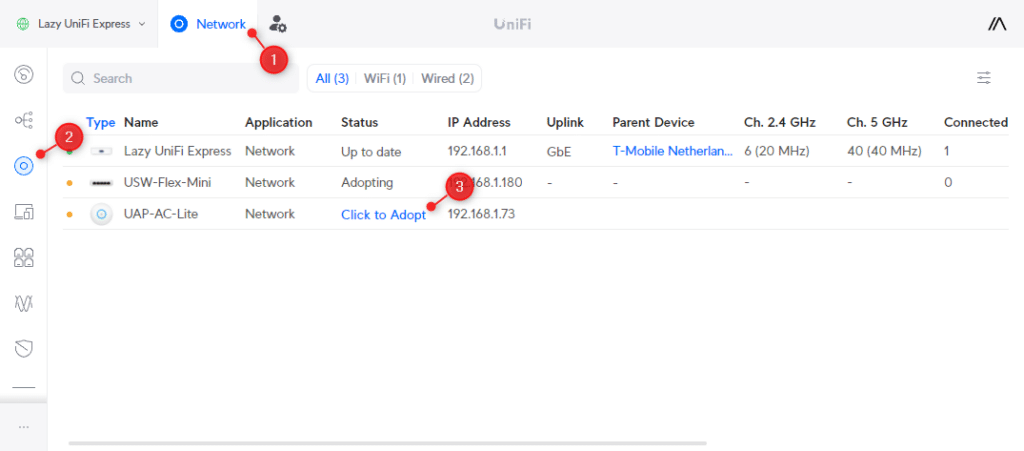
It could occur {that a} system received’t undertake. This occurs when for instance the firmware is simply too previous on the system or when it’s beforehand managed by one other UniFi Controller. Take a look at this text for extra data on methods to resolve adoption points.
Step 4 – Configure Wi-fi Networks
We’re first going to create and optimize the wi-fi networks in our UniFi setup. Relying on the console you might have, you would possibly have already got created a wi-fi community throughout the preliminary setup course of. In any other case, we’re going to create one first:
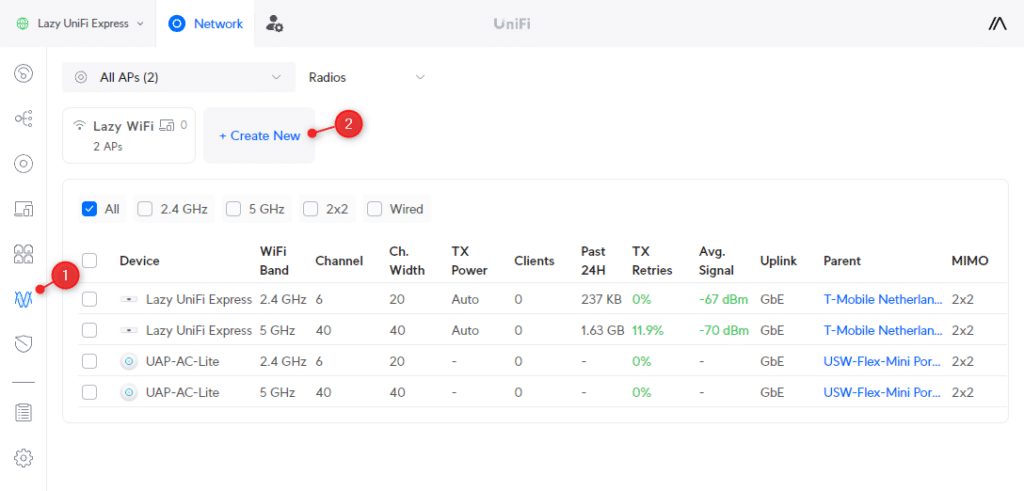
- Open the Radio Supervisor
- Click on on +Create new
- Enter a reputation in your wi-fi community and a password
- Click on on Add WiFi Community
- Return to the Radio Supervisor (1)
We’ll create the visitor community afterward, for now, we’ll concentrate on our essential wi-fi community.
Entry Level Places
There are a few issues that we have to consider in relation to getting the most effective wi-fi community efficiency. All of it begins with the location of the entry factors. Briefly, all partitions or different obstructions will scale back the power of your wi-fi community.
Most place the entry level out-of-sight in a closet, however the partitions and doorways will scale back the efficiency. Due to this fact it’s higher to position two smaller entry factors in your home than one highly effective one. Take a look at this text for extra in-depth data.
2.4 GHz Radio Settings
The two.4 GHz band is the spine of our wi-fi community. It’s supported by all wi-fi gadgets, together with sensible residence gadgets and older community gadgets. And the two.4 GHz band is best at penetrating by way of partitions than the 5 GHz band.
For the most effective efficiency, we need to hold the channel width at 20. The next channel width means a sooner connection, however the 2.4 GHz spectrum is absolutely crowded, so this can solely lead to an unstable community connection.
- Click on on 2.4 GHz
- Choose All Gadgets
- Be sure that the Channel Width is ready to 20
- Hold the Channel on Auto
- Transmit Energy additionally on Auto
- Hold Minimal RSSI Off
UniFi does a fairly respectable job of choosing the right Channels in your entry factors. You’ll be able to manually configure them, however remember that you possibly can solely use channels 1, 6, and 11. Assign the channels in such a approach that they’re as far-off from the opposite AP as attainable. For instance, channel 1 for the bottom flooring and 11 for the primary flooring.
Observe
Once you reside in an appartement constructing or configuring the community for an Workplace constructing with a variety of entry factors, then handbook configure the channels for the most effective efficiency.
Minimal RSSI will drop the connection of a consumer when it turns into beneath the edge. Now this would possibly appear to be an answer to enhance the roaming of the gadgets, however it’s going to usually solely lead to gadgets shedding the community connection.
A greater choice is to decrease the Transmit Energy of the entry level(s). For instance, hold the Transmit Energy of the entry level on the primary flooring at medium and on the bottom flooring at excessive.
Tip
For installations with a variety of entry factors, you need to set a customized transmit energy (you possibly can scroll down within the Transmit Energy dropdown. The two.4 GHz transmit energy ought to be 7 dB decrease then the 5 GHz transmit energy. This manner you’ll get the most effective roaming conduct of the purchasers.
5 Ghz Radio Settings
The 5GHz band permits for a better throughput, however can’t journey so far as the two.4 Ghz band. It isn’t very able to passing by way of obstruction, leading to roughly half the vary of the two.4 GHz community.
For the channel width, identical to with 2.4 Ghz, a decrease channel width will give a extra secure community connection. Whereas increased numbers will enable for extra throughput. Basically, it’s finest to maintain the channel width at 40 for the 5 GHz radio.
When choosing a better channel width, you mainly are stacking the channels collectively. So if you decide channel 36 with a bandwidth of 40 MHz, then channels 36 and 40 are used. This ends in the next useable, non-overlapping, channels:
| 40 Mhz | 80 Mhz | 160 Mhz |
|---|---|---|
| 36 (36/40) | 36 (36/40/44/48) | 36 (36/40/44/48/52/56/60/64) *makes use of DFS |
| 44 (44/48) | ||
| 48 (48/153) | 149 (149/153/157/161) | |
| 157 (157/161) |
There are extra choices if you use DFS, however the capacity to make use of DFS depends upon your location, and never all gadgets assist it. So if the 5 GHz spectrum isn’t too crowded, then attempt to use the traditional channels first.
- Choose the 5 GHz radio and all gadgets
- Set Channel width to 40
- Hold Channel on Auto
- Set Transmit Energy to Auto
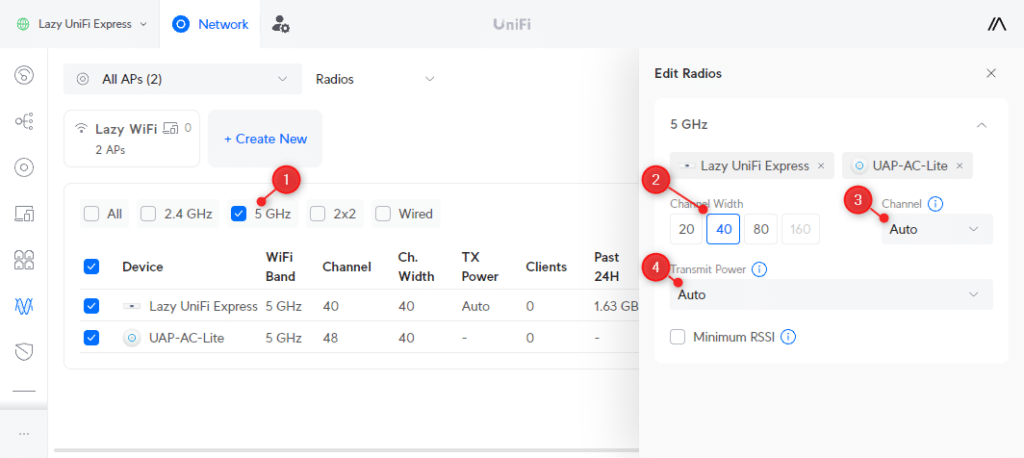
Once more, you possibly can set customized channels in your gadgets and decrease the transmit energy to enhance the roaming of the gadgets. However generally, the auto setting ought to be fantastic.
Superior Wi-fi Settings
Once you open the Settings > WiFi and choose your wi-fi community, then you should have the choice to allow the Superior settings.
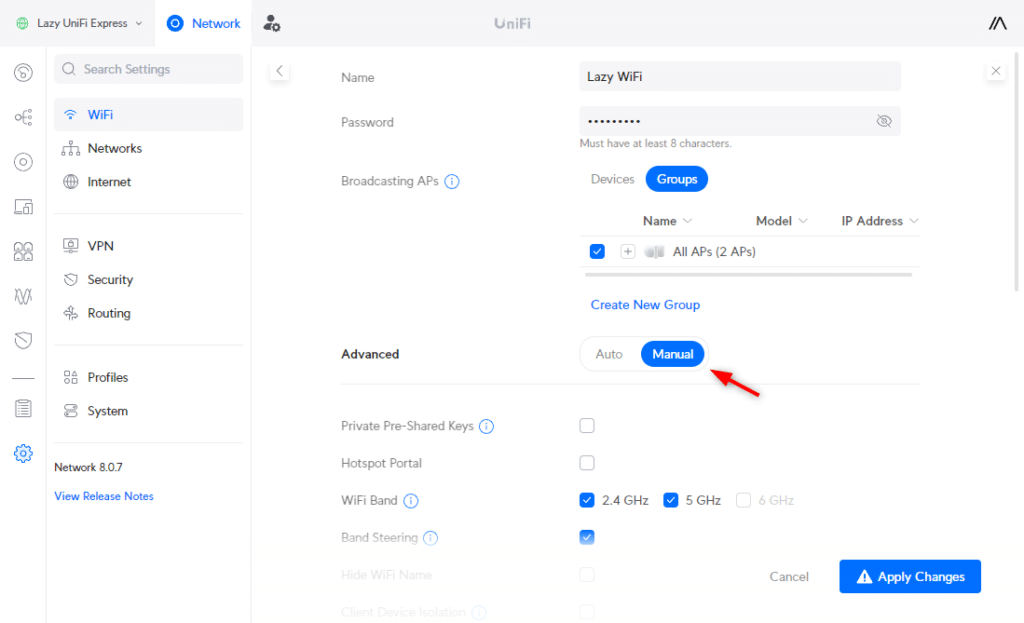
The default superior settings are for many wi-fi networks excellent. Solely when you might have a high-density community or a variety of visitor customers, you would possibly need to optimize a couple of settings. Additionally if in case you have connectivity issues with Sonos or Chromecast listed below are a couple of settings you possibly can change.
I’ll briefly clarify the settings, however you possibly can go away them default for regular networks and simply skip to the following step:
- Non-public Pre-Shared Keys – Permits you to use one wi-fi community for all of your VLANs. This manner you don’t have to create a separate wi-fi community in your cameras or IoT gadgets.
- Hotspot Portal – Used for quest networks. Permits you to present a branded login web page and use totally different authentication choices for friends, together with Vouchers or fee choices
- WiFi Band – You need to allow all WiFi bands in your community. When you’ve got an UniFi 6 Enterprise entry level you can even allow the 6 GHz band if allowed in your area.
- Band Steering – Encourages purchasers to make use of 5 GHz as a substitute of the slower 2.4 GHz. Depart it on, however flip it off for those who expertise a variety of connectivity points.
- Shopper Machine Isolation – Allow it for Visitor or IoT networks. Prevents related gadgets from speaking with one another.
- Proxy ARP – Solely utilized in high-density networks. Permits entry factors to proxy ARP requests which scale back broadcast visitors.
- BSS Transition – Permits entry factors to share community topology data with the purchasers. This reduces energy utilization for cellular gadgets and can assist with roaming.
- UAPSD – When enabled, purchasers can hold their WiFi longer in sleep mode. You would possibly need to allow this in an IoT community, the place it’s going to assist save battery consumption.
- Quick Roaming – Permits purchasers to roam sooner between entry factors. Allow this solely if you roam so much between entry factors throughout VoIP or Video convention calls.
- WiFi Pace Restrict – Limits the up and obtain bandwidth for purchasers. Helpful for high-density networks or visitor networks.
- Multicast Enhancement – Improves entry to register purchasers and converts multicast visitors to unicast. Can enhance efficiency for sensible residence merchandise like Chromecast or Airplay.
- Multicast and Broadcast Management – Restricts multi and broadcast visitors, apart from outlined gadgets. Can assist scale back overhead visitors on high-density networks
- 802.11 DTIM Interval – Depart at auto.
- Minimal Knowledge Charge Management – Units a minimal community velocity that purchasers have to have the ability to attain. Setting this too low may cause connection points. Solely utilized in high-density networks.
- MAC Handle Filter – Permits you to specify an enable or deny checklist based mostly on MAC handle with gadgets
- RADIUS MAC Authentication – Permits you to use a radius server for consumer authentication
- Safety Protocol – WPA2 ought to be used at the least. WPA3 is safer and wanted for six GHZ community. Depart it on WPA2/WPA3 to assist older gadgets as properly.
- PMF – Wanted for WPA3, however go away on optionally available when WPA3 is enabled to assist older gadgets.
- WiFi Scheduler – Permits you to set the instances when the wi-fi community ought to be turned on.
Step 5 – Networks
Within the community setting, we will create and configure networks. You all the time have the default community, which is mechanically created, however we will add extra digital networks to the environment.
Digital Networks are used if you need to create a separation between gadgets, in such a approach they will’t work together with one another. For instance, friends are allowed to make use of your web connection, however you don’t need them to have the ability to attain your community gadgets.
Or when you might have a variety of IoT gadgets, you them on a separate community for safety causes. So when a tool is compromised on account of a vulnerability, for instance, it received’t have the ability to entry different gadgets in your community.
Once you open the community settings (Networks), you will notice the World Community Settings. We will go away these settings on the default values in our UniFi setup. IGMP Snooping or Jumbro Frames, for instance, are solely wanted in particular conditions, however for many residence networks.
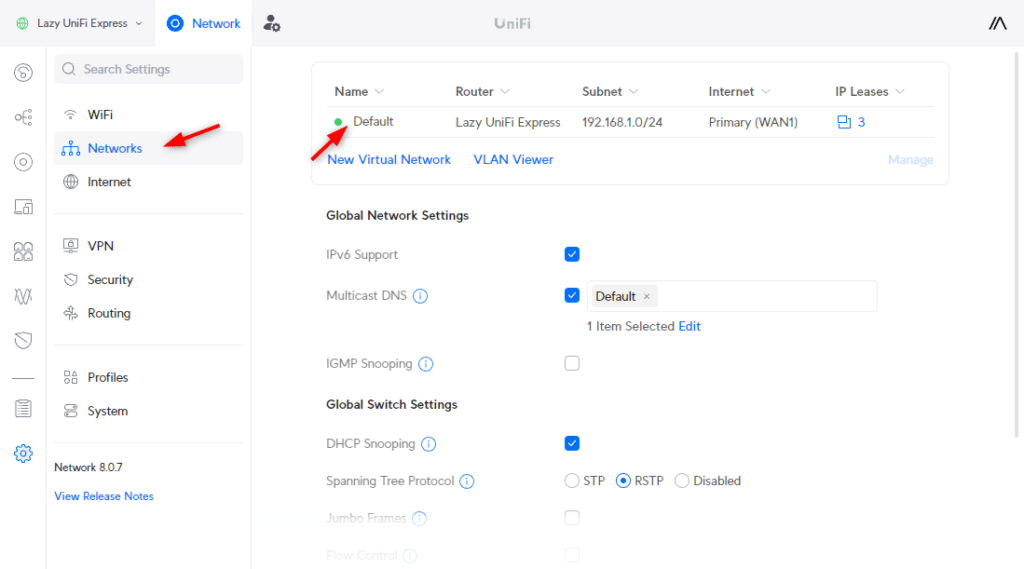
In the event you click on on the Default community, then you possibly can configure the community settings, like IP Vary, DHCP Scope, DNS, Content material Filtering and extra:
The default Gateway IP/Subnet configuration (1) is okay for many networks. It lets you use 249 IP Addresses by default, which is sufficient for many small networks.
Superior Community Settings
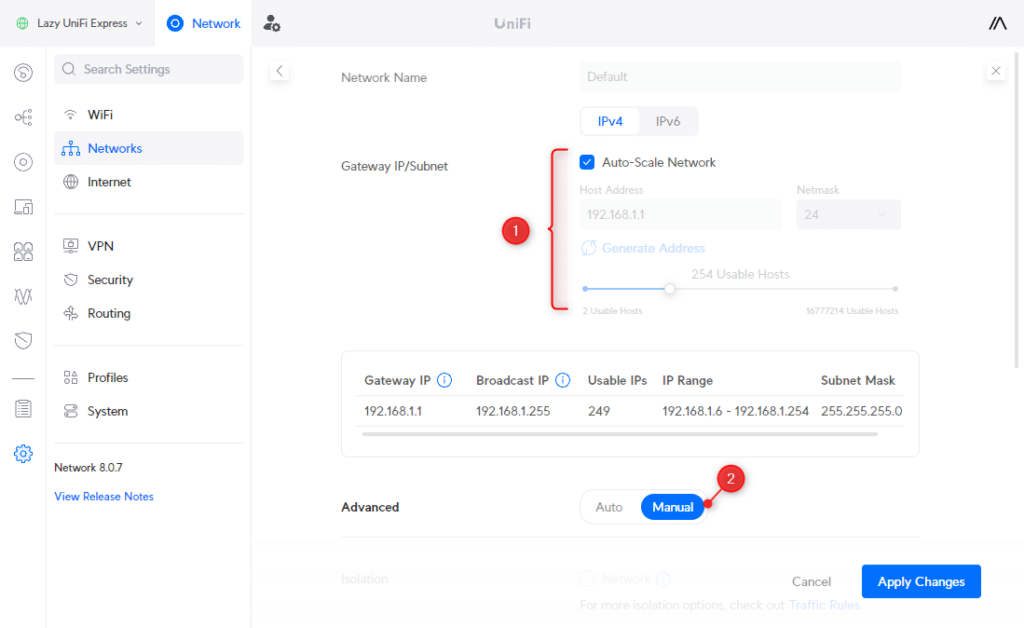
In the event you allow the Superior settings (2), then you possibly can change the DHCP and DNS Settings. In case your Cloud Gateway helps Suspicious Exercise detection, then you can even configure content material filtering for the community right here.
The default DHCP scope begins at 192.168.1.6 and ends at .254. This received’t provide you with a lot room for fastened IP Addresses. I choose to configure static (fastened) IP Addresses for identified community gadgets, like printers, sensible residence hub, or photo voltaic inverter. To do that, you’ll have to disable the Auto-Scale community (1), after which you’ll be able to customise the DHCP Vary (3)

Step 6 – Optimizing Web Settings
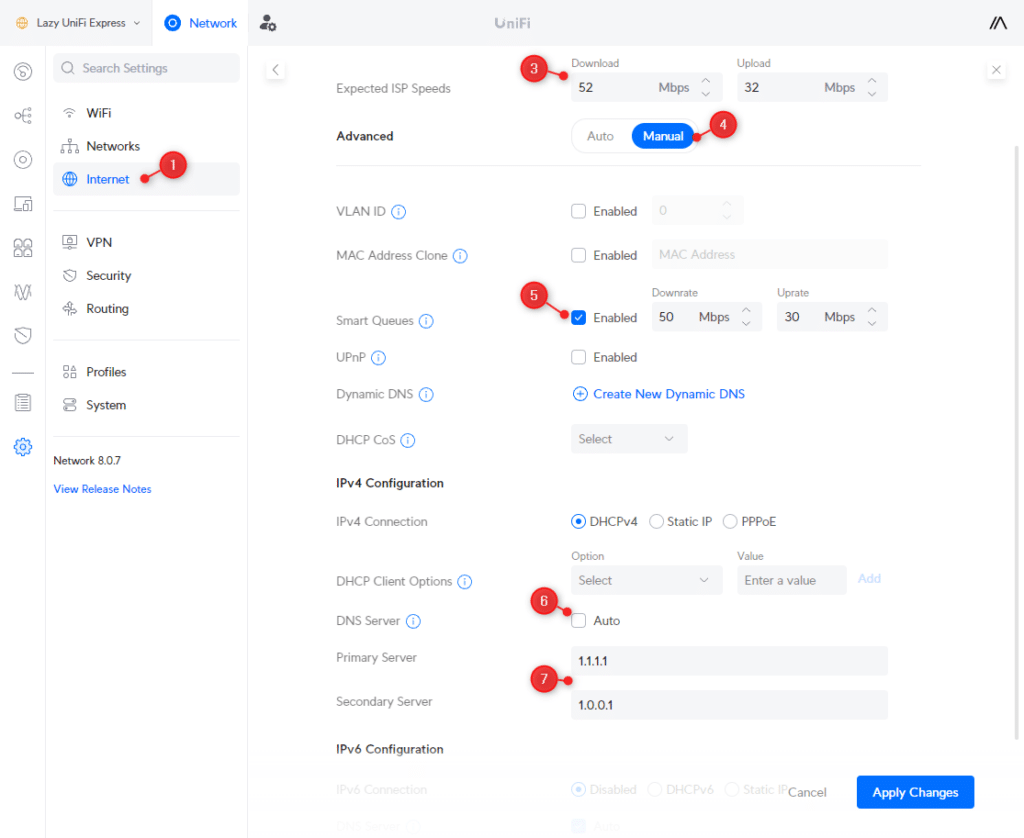
Though your web is already working, we have to optimize a couple of settings in our UniFi setup to get the most effective efficiency. In the event you open the Web Settings, you will notice the Major (WAN1) connection. When you might have a UDM Professional, for instance, you see additionally the choice to configure your main connection and arrange failover or load balancing.
There are some things we have to configure. Crucial one is to allow sensible queues in case your web connection velocity is decrease than 300Mbps. It will stop buffer bloat, which occurs when your router pushes extra knowledge on the web line than your connection can deal with.
Additionally, we need to use a great and quick DNS server, not the one out of your ISP, and configure the Anticipated ISP velocity:
- In Settings go to Web
- Open your Major (WAN1) connection by clicking on it.
- Enter the Anticipated ISP Speeds
- Set superior to Guide
- Allow Sensible Queues when your web connection velocity is beneath 300Mbps
- Set your Down and Uprate a couple of Mbit decrease than your connection velocity (extra data)
- Take a look at your connection right here
- Modify the speeds till you get an A+ for Bufferbloat within the check
- Beneath IPv4 Configuration, disable Auto for the DNS Server
- Enter the next DNS servers (extra data)
- Major: 1.1.1.1
- Secondary: 1.0.0.1
- Click on Apply Modifications
Step 7 – VPN (optionally available)
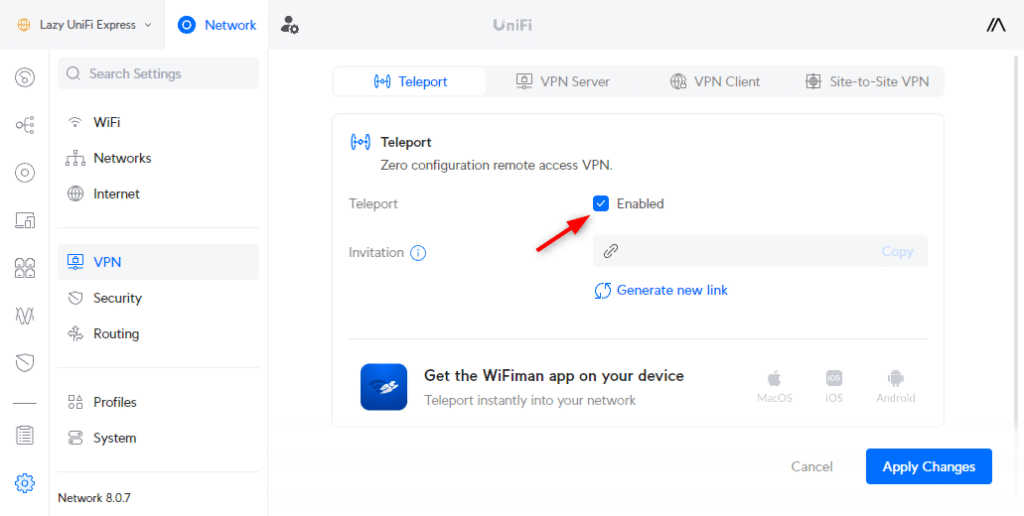
Your UniFi Cloud Gateway comes with a built-in VPN server that lets you join with your house community with only one click on. Now you would possibly suppose, when do I want this? However when you find yourself related to a public community and have to entry your checking account for instance, then it’s higher to make use of your personal web connection.
You’ll be able to learn extra data on Teleport and methods to use it on this article. To allow it, merely Allow Teleport within the VPN Settings:
Step 8 – Safety
When organising our UniFi community setup, we may even want to check out the safety settings. By default, the firewall will block all invalid incoming visitors. However relying on the kind of Cloud Gateway that you’ve got we will do much more to guard our community.
The fundamentals are Machine and Visitors identification. These two options help you view which gadgets are related to your community, and the kind of visitors goes by way of your community.
Visitors identification doesn’t solely present details about the kind of visitors, nevertheless it additionally lets you create app-based visitors guidelines (which we’ll have a look at in a bit).
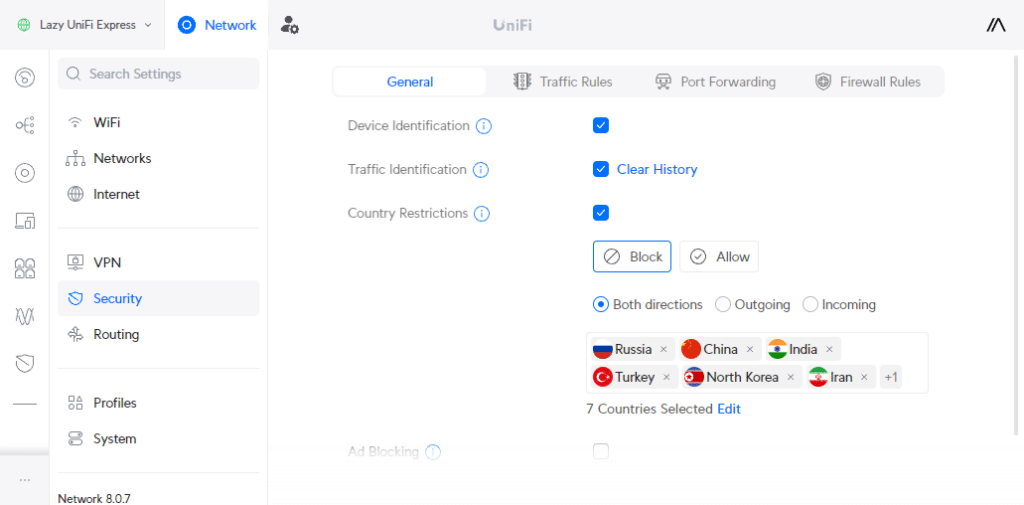
One other helpful choice that’s out there in all cloud gateways, is Nation Restrictions. All visitors to and from a rustic listed right here is blocked. Now a firewall will already block all incoming visitors. However an contaminated system can’t talk with a blocked nation.
For the Nation Restriction, you can even go together with an Enable-only method, the place you solely white-list visitors to trusted nations.
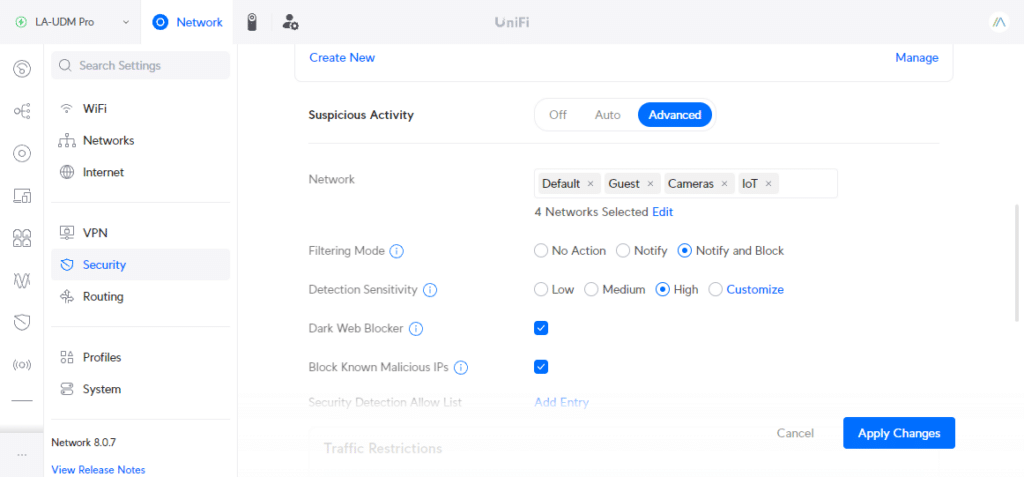
Suspicious Exercise
When you’ve got a UniFi Dream Machine, Dream Router, or UniFi Gateway, then additionally, you will should choice to allow suspicious exercise. This provides one other layer of safety to your web visitors. It should scan all incoming and outgoing visitors and examine for any suspicious exercise.
- Community – Choose the networks you need to allow suspicious exercise detection on. Choose all networks if in case you have a couple of
- Filtering mode – I like to recommend beginning with Notify, monitoring it for per week, after which switching over to Notify and Block. You’ll be able to few the detections within the System Log > Safety Detections.
- Detection Sensitivity – Begin with Excessive. If any visitors is blocked that you just want, then change to Customise and disable the chosen detection.
- Darkish Internet Blocker – Allow it
- Block Know Malicious IPs – Allow it
Visitors Guidelines
Visitors Guidelines help you apply guidelines on particular visitors in your community. Explaining all visitors rule choices is one thing for one more devoted article. However I need to present you two choices that may turn out to be useful in your UniFi community setup.
We will for instance block particular apps in our community. Let’s say you might have younger children and don’t need them to entry TikTok. With a visitors rule, we will fully block the app in our community or solely enable it throughout particular hours:
- Create a new Visitors Rule
- Motion > Block
- Class > App
- App > Tiktok
- Machine/Community > All Gadgets
- Schedule > All the time
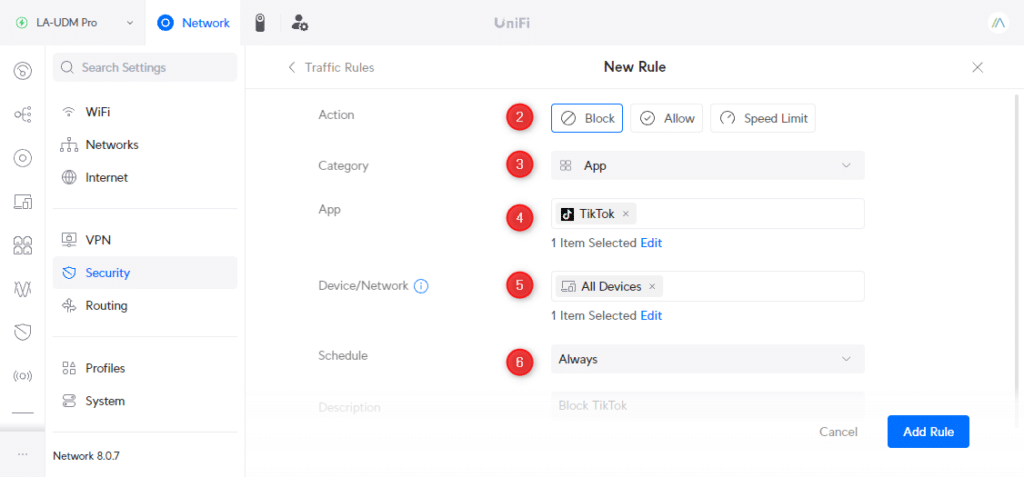
You may as well use the visitors rule to set a velocity restrict on a particular system, or for a particular software. Or we will block the web entry to particular gadgets throughout a customized time vary.
Step 9 – System Settings
The final step in our UniFi setup is to examine the system settings. There are only some settings we have to examine/change. In the event you open Settings, then ensure you examine the nation and time format settings first.
Click on on Backups and ensure that Auto Backup is enabled. I like to recommend altering the schedule to Weekly, so you possibly can all the time revert again to a current backup model of your UniFi Community setup.
If all of your entry factors are related with an ethernet cable, you then don’t want Wi-fi Meshing. Meshing permits entry factors to attach wirelessly collectively and lengthen your wi-fi community with out the necessity to pull additional ethernet cables.
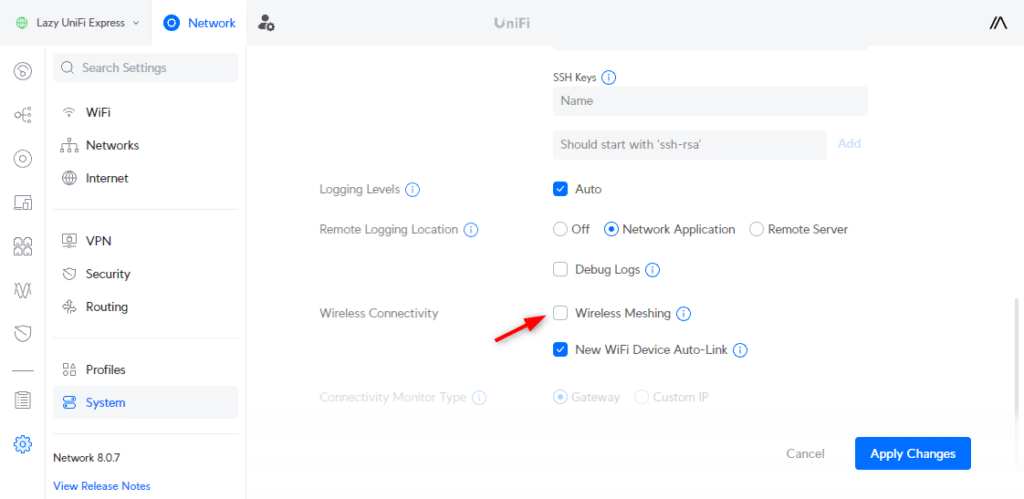
In the event you don’t use that, then disable the Wi-fi Meshing choice within the superior settings.
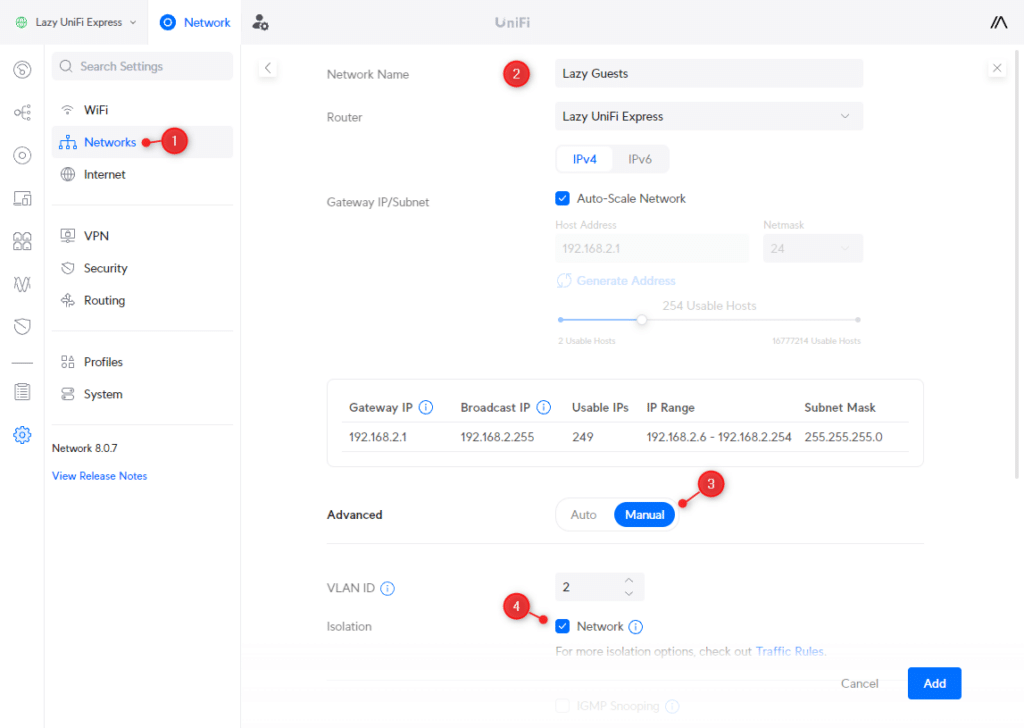
Visitor Community
As talked about at first, we’re additionally going to create a visitor community. To do that we might want to create a brand new community and a brand new wi-fi community.
- Open Networks and click on on New Digital Community
- Enter a community title, for instance, Friends
- Allow Superior settings
- Allow Isolation
- Click on on Add
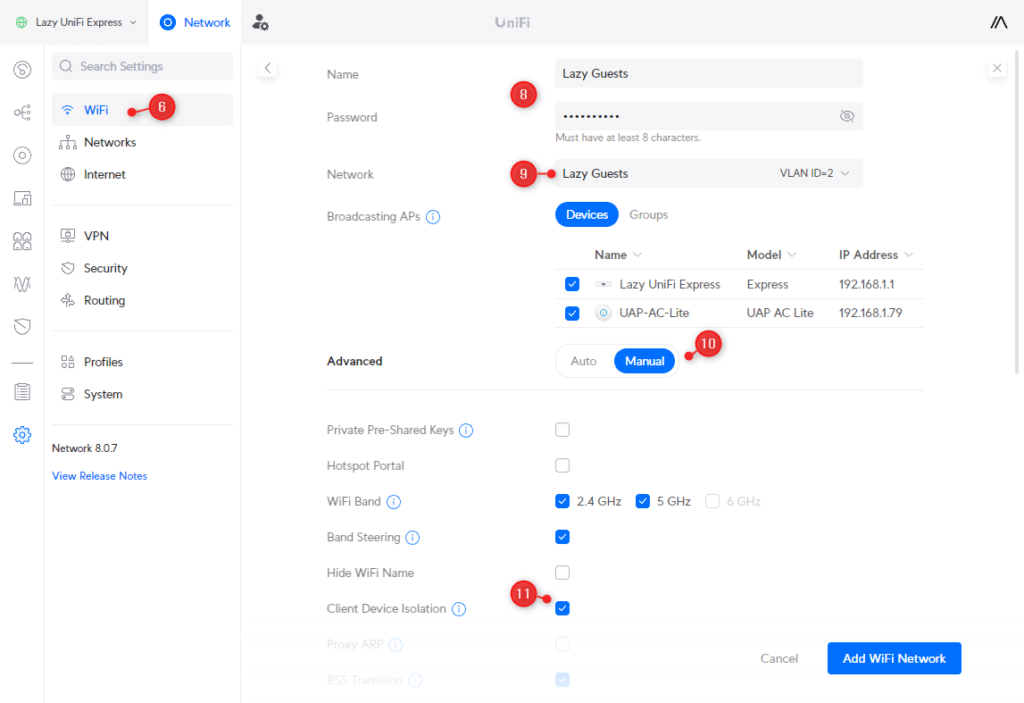
- Open the WiFi Settings
- Click on on Create New
- Enter a wi-fi community title and password
- Choose the Visitor community
- Allow Superior Settings
- Allow Shopper Machine Isolation (this can isolate the visitor’s gadgets from one another as properly)
- Click on on Add WiFi
Wrapping Up
On this information, we’ve got gone by way of each essential element to arrange our UniFi community and get the most effective efficiency. When you’ve got your community up and working, and need to use VLANs in your IoT gadgets or cameras, then ensure you learn this text as properly.
When you’ve got any questions simply drop a remark beneath.