


When it’s good to bulk add new customers to your Lively Listing, then the best methodology is to import them. To do that we are able to use a CSV file and import the customers in our Lively Listing with the assistance of PowerShell.
The benefit of utilizing a CSV file to import AD Customers is you can rapidly fill within the required fields (or let the HR division fill within the particulars) and simply create new person accounts.
On this article, I’ll present you the best way to import customers in your Lively Listing from a CSV file, and on the finish of the article, I’ve an entire script for you.
Import AD Customers from CSV
The simplest technique to import customers into the Lively Listing is to take a CSV file, the place you’ve set all of the headers precisely to match the New-ADUser cmdlet properties and use the Import-CSV and New-ADUser cmdlet.
To create the CSV file with the right headers, I like to recommend that you simply export a few of your present customers out of your AD with the wanted properties:
Get-Aduser -Filter * -SearchBase 'OU=Customers,OU=Oslo,DC=lazyadmin,DC=nl' -Properties DisplayName,EmailAddress,Title | Choose Identify,GivenName,SurName,DisplayName,Title,SamAccountName,UserPrincipalName,EmailAddress | Export-CSV "C:customers.csv"
You may in fact add extra properties to the export if you would like. Take away the present person accounts from the CSV file and add your new customers to it. Then merely import the CSV file and create the brand new customers:
Import-CSV c:customers.csv | New-ADUser -Enabled $True -Path 'OU=Customers,OU=Oslo,DC=lazyadmin,DC=nl' -AccountPassword (ConvertTo-SecureString 'Pass123!' -AsPlainText -force)
Tip
All the time check the actions earlier than really creating the brand new customers. You are able to do this by including the -WhatIf parameter behind the New-Consumer cmdlet
The tactic above is de facto primary and gained’t do any error checking for instance.
Creating an Import Script
When you’re going to create new person accounts in bulk there are some issues that you’ll want to take into accounts. For instance, you’ll a minimum of have to verify if the person account doesn’t exist already in your Lively Listing.
But additionally when you’re making a person, some fields are formatted primarily based on the title of the person. For instance, the e-mail deal with, login title, and the userprincipalname. I desire to format these contained in the PowerShell script to make sure they’re constant.
For instance, with the e-mail deal with, we are able to use the next small PowerShell perform to format the e-mail deal with of the person:
# Format the e-mail deal with
$emailAddressFormat = $givenName + "." + $surName

# Change hyphens, apostrophe and whitespace, format to lowercase.
return $emailAddressFormat.Change('-','').Change(' ','').Change("'",'').ToLower() + $area

## Enter: Mary-Ann O'Sullivan
## End result
[email protected]
One other frequent drawback that happens when utilizing a CSV to import customers within the Lively Listing is trailing whitespaces. These can lead to issues with the username or e-mail deal with should you don’t trim them.
Import AD Customers Script
Beneath you will discover an entire script that lets you simply bulk import customers into your Lively Listing. Within the script, we’ll first set a few default values:
- Path – That is the trail to the OU the place the brand new customers have to be saved
- Password – Default password for the brand new person
- Enabled – New accounts shall be enabled when created
- Area – That is the area that’s used for the e-mail deal with.
Within the script, additionally, you will discover a few capabilities. These capabilities are for instance used to create the samAccountName (which can be the login title), which is beneficial to maintain inside 20 characters, and the e-mail deal with perform. You may modify these in fact to your most popular format.
One other perform that you will discover within the script is to search for the supervisor of the person. Should you provide the supervisor’s title within the CSV file, then the script will search for the distinguished title of the supervisor.
param(
  [Parameter(
    Mandatory = $false,
    HelpMessage = "Enter the path to the CSV file"
  )]
  [string]$CSVpath
)

# ----
# Default values
# ----

# Default OU for brand spanking new customers
$path="OU=Customers,OU=Oslo,OU=Websites,DC=lazyadmin,DC=nl"

# Default password for brand spanking new customers
$password = 'welcome@lazyadmin2024'

# Allow new accounts
$enabled = $true

# Electronic mail area (you may as well use a column within the CSV file for this)
$area = '@lazyadmin.nl'

perform Get-SamAccountName{
  PARAM(
    [parameter(Mandatory=$true)]
    [string]$givenName,
    [parameter(Mandatory=$true)]
    [string]$surName
  )

  # Create SamAccountName from given- and surname
  return (($givenName.Substring(0,1)) + $surName).Change('-','').Change(' ','').Change("'",'').ToLower()
}

perform Get-EmailAddress{
  PARAM(
    [parameter(Mandatory=$true)]
    [string]$givenName,
    [parameter(Mandatory=$true)]
    [string]$surName
  )
  # Format the e-mail deal with
  $emailAddressFormat = $givenName + "." + $surName

  # Change hyphens and whitespace, format to lowercase.
  return $emailAddressFormat.Change('-','').Change(' ','').Change("'",'').ToLower() + $area
}

perform Get-Supervisor{
  PARAM(
    [parameter(Mandatory=$true)]
    [string]$title
  )

  # Get the supervisor
  Get-AdUser -Filter {title -like $title} -Properties * | choose -ExpandProperty DistinguishedName
}

# Import CSV file and create customers
ForEach ($person in (Import-Csv -Path $CSVpath)) {

  # Create the samAccountName and userPrincipalName
  $samAccountName = Get-SamAccountName -givenName $person.givenName -surName $person.surName
  $userPrincipalName = $samAccountName + $area

  # Set Show Identify
  $displayName = $person.givenName.Trim() + " " + $person.surName.Trim()

  # Guarantee that person would not already exists
  if ((Get-ADUser -Filter {UserPrincipalName -eq $userPrincipalName} -ErrorAction SilentlyContinue)) {
    Write-Host "Consumer $($displayName) already exists" -ForegroundColor Yellow
    proceed
  }

  # Get Electronic mail deal with
  $emailAddress = Get-EmailAddress -givenName $person.givenName -surName $person.surName

  # Create all of the person properties
  $newUser = @{
    AccountPassWord = (ConvertTo-SecureString -AsPlainText $password -force)
    ChangePasswordAtLogon = $true
    Metropolis = $person.metropolis
    Firm = $person.firm
    Nation = $person.nation
    Division = $person.division
    Description = $person.description
    DisplayName = $displayName
    EmailAddress = $emailAddress
    Enabled = $enabled
    GivenName = $person.givenName.Trim()
    Supervisor = if ($person.supervisor) {Get-Supervisor -name $person.supervisor} else {$null}
    Cellular = $person.cellular
    Identify = $displayName
    Workplace = $person.workplace
    OfficePhone = $person.cellphone
    Group = $person.group
    Path = $path
    PostalCode = $person.postalcode
    SamAccountName = $samAccountName
    StreetAddress = $person.streetAddress
    Surname = $person.surname.Trim()
    Title = $person.title
    UserPrincipalName = $userPrincipalName
  }

  # Create new person
  attempt {
    New-ADUser @newUser
    Write-Host "- $displayName account is created" -ForegroundColor Inexperienced
  }
  catch {
    Write-Host "Unable to create new account for $displayName" -ForegroundColor purple
    Write-Host "Error - $($_.Exception.Message)" -ForegroundColor purple
  }
}
To make use of the script, you should utilize this Excel file as a template, or create one utilizing the strategy described earlier. Just be sure you enter the default values on your atmosphere and run the script:
Import-ADUsers.ps1 -CSVpath c:tempusers.csv
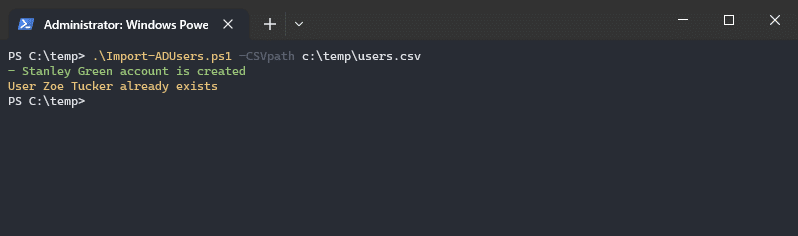
A great possibility earlier than you import the customers is to see what the outcomes are earlier than really creating the customers. You are able to do this by including the -WhatIf parameter behind the New-ADUser cmdlet on line 127.
I’ve additionally created a extra superior PowerShell script that you should utilize to create a single person. This script has a bit extra error checking in it, and also will e-mail the brand new account particulars to the supervisor for instance.
Wrapping Up
When it’s good to bulk create new AD customers, then the best methodology is to Import AD Customers from a CSV file. You should utilize a CSV file with the precise headers and fill in all the pieces in Excel, together with the SamAccountName, OU Path, and Electronic mail deal with.
However an alternative choice is to robotically format these utilizing PowerShell. The benefit of the latter is you can embrace some error checking whereas ensuring that each one the formatting is constant.
I hope this text helped you with Importing AD customers, when you’ve got any questions, simply drop a remark beneath.