


TL;DR: Discover ways to implement tree node actions and a context menu in a Quasar app utilizing Syncfusion Vue TreeView and Context Menu elements. Arrange a Quasar undertaking, set up Syncfusion Vue packages, and customise TreeView knowledge and menu choices. Add occasions to deal with node actions like including, renaming, and deleting, with dynamic menu gadgets enabled.
Quasar is a high-level Vue.js framework that simplifies the creation of responsive, feature-rich internet functions. Constructed on Vue.js, it gives a variety of pre-built elements, utilities, and themes, enabling builders to construct visually beautiful and practical interfaces rapidly. Its modular structure permits for simple integration of further functionalities, whereas its responsive design ensures seamless efficiency throughout varied gadgets and display sizes. With Quasar, builders can streamline their workflow, cut back improvement time, and create highly effective Vue.js apps with ease, making it a preferred alternative for each novices and skilled builders.
On this weblog, we’ll implement the tree node actions and context menu inside a Quasar app utilizing the Syncfusion Vue elements.
Let’s get began!
Conditions
Earlier than getting began with Quasar, guarantee the next necessities:
Arrange a Quasar app
To start, create a brand new Quasar app from scratch by executing the next command.
npm init quasar
Upon executing this command, you’ll be prompted with a number of queries, like beneath:
√ What would you wish to construct? » App with Quasar CLI, let's go!
√ Challenge folder: ... my-app
√ Choose Quasar model: » Quasar v2 (Vue 3 | newest and biggest)
√ Choose script sort: » Javascript
√ Choose Quasar App CLI variant: » Quasar App CLI with Vite 2 (steady | v1)
√ Package deal title: ... my-app
√ Challenge product title: (should begin with a letter if constructing cellular apps) ... Quasar App
√ Challenge description: ... A Quasar Challenge
× Set up undertaking dependencies? (advisable) » Sure, use npm
This setup lets you tailor the Quasar undertaking primarily based in your wants.
Set up the Syncfusion Vue packages within the Quasar app
Syncfusion Vue elements can be found at npmjs.com. For now, set up the Syncfusion Vue packages utilizing the next command.
npm set up --save @syncfusion/ej2-vue-navigations
Implementing tree node actions and context menu within the Quasar app
Let’s implement tree node actions and context menu within the Quasar app utilizing the Syncfusion Vue TreeView and Context Menu elements, respectively.
Step 1: Import the Vue TreeView element
Start by importing the Vue TreeView element and defining the fields and knowledge supply inside the script tag of the ~/src/App.vue file.
<script setup>
import { TreeViewComponent as EjsTreeview } from "@syncfusion/ej2-vue-navigations";
import { ContextMenuComponent as EjsContextmenu } from "@syncfusion/ej2-vue-navigations";
import { ref } from 'vue';
import { TreeViewComponent as EjsTreeview } from "@syncfusion/ej2-vue-navigations";
import { ContextMenuComponent as EjsContextmenu } from "@syncfusion/ej2-vue-navigations";

const treeObj = ref(null);
const contextObj = ref(null);
const dataSource = [
  {
    id: '01', name: 'Local Disk (C:)', expanded: true, hasAttribute: { class: 'remove rename' },
    subChild: [
      {
        id: '01-01', name: 'Program Files',
        subChild: [
          { id: '01-01-01', name: 'Windows NT' },
          { id: '01-01-02', name: 'Windows Mail' },
          { id: '01-01-03', name: 'Windows Photo Viewer' },
        ]
      },
      {
        id: '01-02', title: 'Customers', expanded: true,
        subChild: [
          { id: '01-02-01', name: 'Smith' },
          { id: '01-02-02', name: 'Public' },
          { id: '01-02-03', name: 'Admin' },
        ]
      }
    ]
  },
  {
    id: '02', title: 'Native Disk (D:)', hasAttribute: { class: 'rename' },
    subChild: [
      {
        id: '02-01', name: 'Personals',
        subChild: [
          { id: '02-01-01', name: 'My photo.png' },
          { id: '02-01-02', name: 'Rental document.docx' },
          { id: '02-01-03', name: 'Pay slip.pdf' },
        ]
      },
      {
        id: '02-02', title: 'Initiatives',
        subChild: [
          { id: '02-02-01', name: 'ASP Application' },
          { id: '02-02-02', name: 'TypeScript Application' },
          { id: '02-02-03', name: 'React Application' },
        ]
      }
    ]
  }
];
const fields = { dataSource: dataSource, id: 'id', textual content: 'title', youngster: 'subChild', htmlAttributes: 'hasAttribute' }
const menuItems = [
  { text: 'Add New Item' },
  { text: 'Rename Item' },
  { text: 'Remove Item' }
]
</script>
Step 2: Declare occasions for the Vue TreeView and Context Menu
Subsequent, declare the occasions for the Vue TreeView and Context Menu elements, as proven within the following code instance.
<template>
  <div id="app">
    <ejs-treeview ref="treeObj" id="treeview" :fields="fields" :nodeClicked='nodeclicked'>
      <ejs-contextmenu ref="contextObj" id="contentmenutree" goal="#treeview" :gadgets="menuItems"
        :beforeOpen='beforeopen' :choose="menuclick"></ejs-contextmenu>
    </ejs-treeview>
  </div>
</template>
<script setup>
const nodeclicked = operate (args) {
  if (args.occasion.which === 3) {
    var treeObj = treeObj.worth.ej2_instances[0];
    treeObj.selectedNodes = [args.node.getAttribute('data-uid')];
  }
}
const menuclick = operate (args) {
  var treevalidate = treeObj.worth.ej2_instances[0];
  var targetNodeId = treevalidate.selectedNodes[0];
  if (args.merchandise.textual content == "Add New Merchandise") {
    var nodeId = "tree_" + this.index;
    var merchandise = { id: nodeId, title: "New Folder" };
    treevalidate.addNodes([item], targetNodeId, null);
    this.index++;
    treevalidate.fields.dataSource.push(merchandise);
    treevalidate.beginEdit(nodeId);
  }
  else if (args.merchandise.textual content == "Take away Merchandise") {
    treevalidate.removeNodes([targetNodeId]);
  }
  else if (args.merchandise.textual content == "Rename Merchandise") {
    treevalidate.beginEdit(targetNodeId);
  }
}
const beforeopen = operate (args) {
  var treevalidate = treeObj.worth.ej2_instances[0];
  var targetNodeId = treevalidate.selectedNodes[0];
  var targetNode = doc.querySelector('[data-uid="' + targetNodeId + '"]');
  var contentmenutree = contextObj.worth.ej2_instances[0];
  if (targetNode.classList.comprises('take away')) {
    contentmenutree.enableItems(['Remove Item'], false);
  }
  else {
    contentmenutree.enableItems(['Remove Item'], true);
  }
  if (targetNode.classList.comprises('rename')) {
    contentmenutree.enableItems(['Rename Item'], false);
  }
  else {
    contentmenutree.enableItems(['Rename Item'], true);
  }
}
</script>
Step 3: Customise the element kinds
Lastly, customise the looks of the elements with the required kinds.
<model>
@import "@syncfusion/ej2-base/kinds/material3.css";
@import "@syncfusion/ej2-inputs/kinds/material3.css";
@import "@syncfusion/ej2-vue-navigations/kinds/material3.css";

#app {
  show: block;
  max-width: 400px;
  max-height: 320px;
  margin: auto;
  overflow: auto;
  border: 1px stable #dddddd;
  border-radius: 3px;
  margin: 0 auto;
}

#contentmenutree {
  padding: 0px;
  font-size: inherit;
}
</model>
Right here’s the summarized code for the above steps within the ~/src/App.vue file.
<template>
  <div id="app">
    <ejs-treeview ref="treeObj" id="treeview" :fields="fields" :nodeClicked='nodeclicked'>
      <ejs-contextmenu ref="contextObj" id="contentmenutree" goal="#treeview" :gadgets="menuItems"
        :beforeOpen='beforeopen' :choose="menuclick"></ejs-contextmenu>
    </ejs-treeview>
  </div>
</template>
<script setup>
import { ref } from 'vue';
import { TreeViewComponent as EjsTreeview } from "@syncfusion/ej2-vue-navigations";
import { ContextMenuComponent as EjsContextmenu } from "@syncfusion/ej2-vue-navigations";

const treeObj = ref(null);
const contextObj = ref(null);
const dataSource = [
  {
    id: '01', name: 'Local Disk (C:)', expanded: true, hasAttribute: { class: 'remove rename' },
    subChild: [
      {
        id: '01-01', name: 'Program Files',
        subChild: [
          { id: '01-01-01', name: 'Windows NT' },
          { id: '01-01-02', name: 'Windows Mail' },
          { id: '01-01-03', name: 'Windows Photo Viewer' },
        ]
      },
      {
        id: '01-02', title: 'Customers', expanded: true,
        subChild: [
          { id: '01-02-01', name: 'Smith' },
          { id: '01-02-02', name: 'Public' },
          { id: '01-02-03', name: 'Admin' },
        ]
      }
    ]
  },
  {
    id: '02', title: 'Native Disk (D:)', hasAttribute: { class: 'rename' },
    subChild: [
      {
        id: '02-01', name: 'Personals',
        subChild: [
          { id: '02-01-01', name: 'My photo.png' },
          { id: '02-01-02', name: 'Rental document.docx' },
          { id: '02-01-03', name: 'Pay slip.pdf' },
        ]
      },
      {
        id: '02-02', title: 'Initiatives',
        subChild: [
          { id: '02-02-01', name: 'ASP Application' },
          { id: '02-02-02', name: 'TypeScript Application' },
          { id: '02-02-03', name: 'React Application' },
        ]
      }
    ]
  }
];
const fields = { dataSource: dataSource, id: 'id', textual content: 'title', youngster: 'subChild', htmlAttributes: 'hasAttribute' }
const menuItems = [
  { text: 'Add New Item' },
  { text: 'Rename Item' },
  { text: 'Remove Item' }
]
const nodeclicked = operate (args) {
  if (args.occasion.which === 3) {
    var treeObj = treeObj.worth.ej2_instances[0];
    treeObj.selectedNodes = [args.node.getAttribute('data-uid')];
  }
}
const menuclick = operate (args) {
  var treevalidate = treeObj.worth.ej2_instances[0];
  var targetNodeId = treevalidate.selectedNodes[0];
  if (args.merchandise.textual content == "Add New Merchandise") {
    var nodeId = "tree_" + this.index;
    var merchandise = { id: nodeId, title: "New Folder" };
    treevalidate.addNodes([item], targetNodeId, null);
    this.index++;
    treevalidate.fields.dataSource.push(merchandise);
    treevalidate.beginEdit(nodeId);
  }
  else if (args.merchandise.textual content == "Take away Merchandise") {
    treevalidate.removeNodes([targetNodeId]);
  }
  else if (args.merchandise.textual content == "Rename Merchandise") {
    treevalidate.beginEdit(targetNodeId);
  }
}
const beforeopen = operate (args) {
  var treevalidate = treeObj.worth.ej2_instances[0];
  var targetNodeId = treevalidate.selectedNodes[0];
  var targetNode = doc.querySelector('[data-uid="' + targetNodeId + '"]');
  var contentmenutree = contextObj.worth.ej2_instances[0];
  if (targetNode.classList.comprises('take away')) {
    contentmenutree.enableItems(['Remove Item'], false);
  }
  else {
    contentmenutree.enableItems(['Remove Item'], true);
  }
  if (targetNode.classList.comprises('rename')) {
    contentmenutree.enableItems(['Rename Item'], false);
  }
  else {
    contentmenutree.enableItems(['Rename Item'], true);
  }
}

</script>
<model>
@import "@syncfusion/ej2-base/kinds/material3.css";
@import "@syncfusion/ej2-vue-navigations/kinds/material3.css";
@import "@syncfusion/ej2-inputs/kinds/material3.css";

#app {
  show: block;
  max-width: 400px;
  max-height: 320px;
  margin: auto;
  overflow: auto;
  border: 1px stable #dddddd;
  border-radius: 3px;
  margin: 0 auto;
}

#contentmenutree {
  padding: 0px;
  font-size: inherit;
}
</model>
Run the undertaking
To run the undertaking, execute the next command:
npm run dev
Then, navigate to http://localhost:9000/ in your most well-liked browser to view the rendered Syncfusion Vue elements inside your Quasar undertaking.
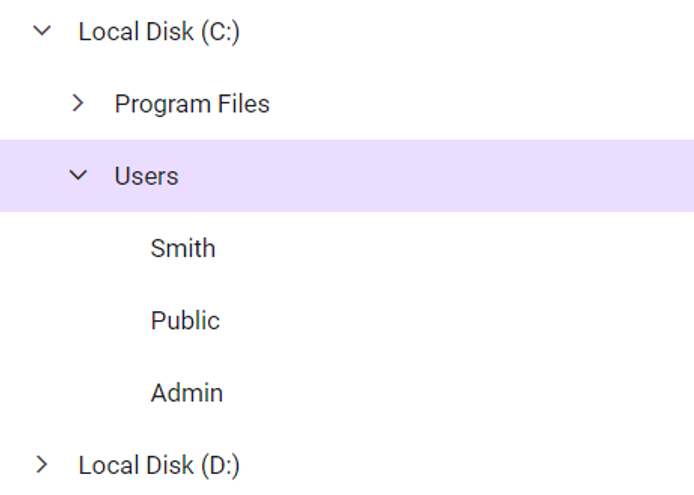
The output ought to appear to be the next picture.

Strive It Free
Conclusion
Thanks for studying this weblog! We explored the best way to combine Syncfusion Vue elements into the Quasar framework. Following these steps, you may as well make the most of different Syncfusion Vue elements in your Quasar apps. We encourage you to do this information and share your suggestions within the feedback beneath!
The newest model of Important Studio is on the market on the license and downloads web page for current clients. In case you are not a Syncfusion buyer, you can begin a 30-day free trial to discover our accessible options.
If in case you have any questions, be happy to achieve out by way of our help discussion board, help portal, and suggestions portal. We’re at all times right here to help you!