

Introduction
Once I redesigned my web site, I wanted a method to have the function picture play properly no matter the place it’s positioned or the viewport/container dimension.
That is the design I intention to implement:
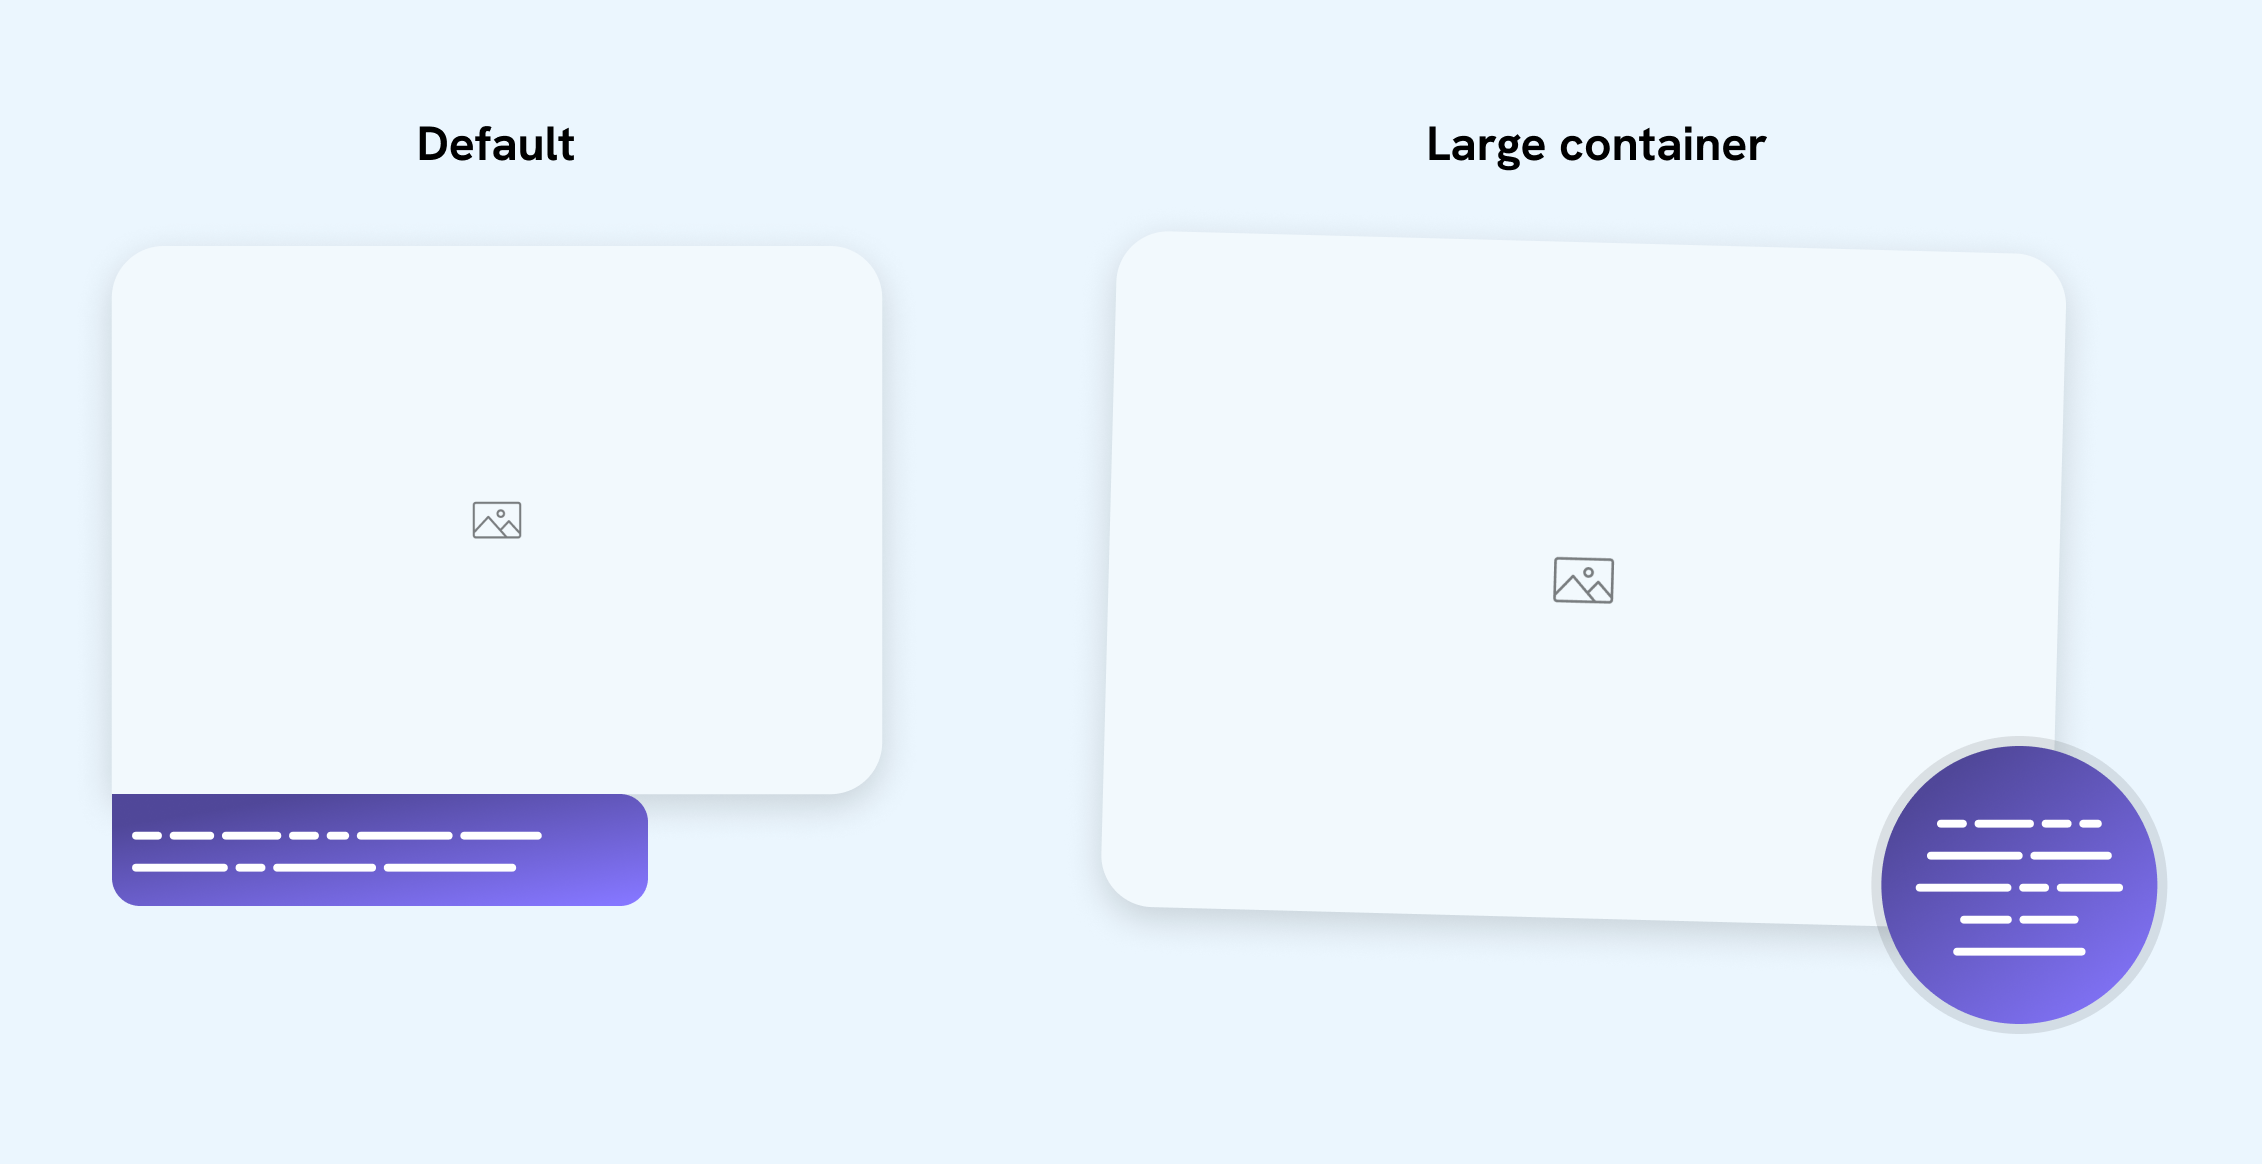
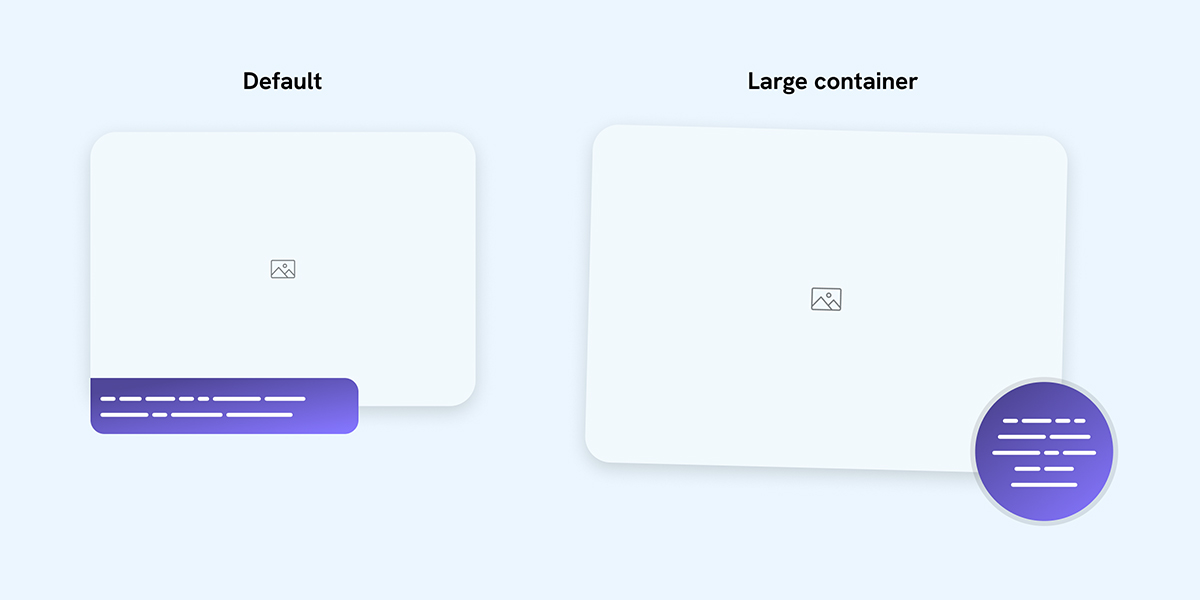
I’ve a picture and a caption. On small sizes, the caption is displayed in a traditional fashion. If the container is giant sufficient, I wish to rotate the picture and present the caption in a round fashion, positioned on the bottom-right nook.
How we will construct that in CSS?
Earlier than container queries, we may have constructed it like this:
.determine {
  figcaption {

  }

  @media (min-width: 600px) {
    figcaption {
      place: absolute;
      proper: 0;
      backside: 0;

    }
  }
}
Here’s a demo:
This can be a caption of the picture.
When the content material wraps to a brand new line, there may be sufficient area for the determine, however the determine stays with the traditional look. Can we do higher?
Utilizing container queries
Right here is identical demo however with container queries as an alternative. I highlighted 4 totally different viewport sizes so you may perceive the worth of utilizing CSS container queries.
Click on on the subsequent button and see what the part appears to be like like on totally different viewport sizes.
Small view, traditional fashion.
This can be a caption of the picture.
The part format is alternating between the stacked and the round design. This wouldn’t occur so easily with out container queries.

If we use media queries for this, the CSS will look one thing like this:
determine {


  @media (min-width: 400px) {

  }

  @media (min-width: 900px) {

  }

  @media (min-width: 1100px) {

  }
}
To not point out that this may simply fail if we alter the design or content material.
Let’s discover tips on how to construct that.
Constructing the part
Wrapping the part in an extra ingredient
For containment to work, it’s necessary to wrap the part in a container, after which question the part in accordance with that container. In any other case, it is not going to work and it’ll trigger an infinite loop (It can preserve querying itself).
<div class="figure-wrapper">
  <determine>
    <img src="photos/thumb.jpg" alt="" />
    <figcaption></figcaption>
  </determine>
</div>
Then, we have to outline the figure-wrapper as a container.
.figure-wrapper {
  container-type: inline-size;
  container-name: thumbWrapper;
}
Let’s check the above out to make sure it’s working as anticipated. If the container is larger than 240px, add an define to the <determine> ingredient.
@container thumbWrapper (min-width: 240px) {
  determine {
    define: dashed 2px deeppink;
    outline-offset: 2px;
  }
}
Attempt to resize the browser within the demo under and see how the define seems if the width is 240px or extra.
This can be a caption of the picture.
Conditional CSS with :has
By default, the design is within the stacked model. If the container width is giant sufficient, we’ll swap to the round fashion.
We have to examine if the determine has a <figcaption>. If sure, we have to: rotate the picture.
To construct that, we will use CSS :has() selector to examine if there’s a <figcaption> or not. I wrote an interactive information about CSS :has in case you have an interest.
determine {
  @container thumbWrapper (min-width: 250px) {
    &:has(figcaption) {

      img {
        rework: rotate(1.25deg);
      }
    }
  }
}
Now that the fundamental CSS is right here, let’s transfer to the format.
Constructing the format
Regardless that it’s a easy design, there are a few methods to construct it, and so they’re price contemplating.
Possibility 1: Absolute positioning for the whole lot
On this choice, the idea is to place each the picture and the caption out of the doc move.
determine {
  @container thumbWrapper (min-width:240px) {
    place: relative;

    img {
      place: absolute;
      left: 0;
      prime: 0;
      width: 90%;
    }
  }
}
Whereas the types are utilized to the picture, the container top is (nearly) zero because of not having any ingredient within the regular move.
See what the define appears to be like like under:
This can be a caption of the picture.
To repair that, we have to outline a dimension for the <determine> itself, after which go that to the picture.
determine {
  @container thumbWrapper (min-width:240px) {
    place: relative;
    aspect-ratio: 4/3;
    width: 100%;

    img {
      place: absolute;
      left: 0;
      prime: 0;

      width: 85%;
    }

    .caption.caption {
      proper: 0;
      backside: 0;
    }
  }
}
It really works, however for me, it’s not optimum, or not the answer that I may be comfortable about:
- An excessive amount of
place: absolute. I attempt to reduce its utilization wherever potential. - I don’t like limiting the picture dimension and defining a width in percentages (in any other case a hard and fast width in pixels received’t work for bigger containers)
This can be a caption of the picture.
Possibility 2: CSS grid overlapping
On this resolution, I would like to make use of CSS grid to overlap each the picture and caption. Let’s discover it.
In CSS grid, we will overlap objects by inserting them on the identical column and row.
determine {
  show: grid;

  > * {
    grid-area: 1 / -1;
  }
}
Right here is the consequence:
This can be a caption of the picture.
Subsequent, we have to make the picture dimension as per the design wanted. To do this, we will subtract half of the caption dimension.
determine {
  img {
    max-width: calc(100% - var(--caption-size) / 3);
    max-height: calc(100% - var(--caption-size) / 3);
  }
}
Right here is the consequence:
This can be a caption of the picture.
I like this resolution and don’t see any points in utilizing it. You possibly can learn my interactive information on CSS grid space to study extra.
Possibility 3: Padding on the determine
On this resolution, solely the caption can have place: absolute, and we’ll add padding on the proper and backside sides to push the picture a bit.
This can be a caption of the picture.
To imitate the impact of the picture intersecting with the caption, I added padding on the underside and proper sides of the determine container.
determine {
  @container thumbWrapper (min-width:240px) {
    place: relative;
    padding-inline-end: calc(var(--caption-size) / 3);
    padding-bottom: calc(var(--caption-size) / 3);

    figcaption {
      place: absolute;
      proper: 0;
      backside: 0;
    }
  }
}
In my weblog, I used this resolution as I preferred it probably the most. Nonetheless, that doesn’t imply that the grid overlapping isn’t good. Each are tremendous to me.
Making it fluid
To make it even higher, we will use fluid CSS to make the part work on any container or display screen dimension. We are able to outline fluid CSS on the next:
- Border radius
- Font dimension
- Caption dimension
- Padding
Because of container question items, we will obtain fluid sizing primarily based on the container width.
In our case, I’ll use the unit cqw which stands for “container question width”.
determine {

  --caption-size: clamp(6rem, 4.167rem + 13.33cqw, 10rem);

  img {
    border-radius: clamp(0.625rem, -0.625rem + 10cqw, 1.875rem);
  }

  @container thumbWrapper (min-width:240px) {
    padding-inline-end: calc(var(--caption-size) / 4 + 8cqw);
    padding-bottom: calc(var(--caption-size) / 4 + 8cqw);

    figcaption {
      width: var(--caption-size);
      top: var(--caption-size);
      font-size: clamp(0.813rem, 0.727rem + 0.63cqw, 1rem);
    }
  }
}
Within the following demo, attempt to resize and see how the border radius, font dimension, padding, and caption dimension are fluid.
This can be a caption of the picture.
Placing it below strain
On this interactive instance, my aim is to place the part to make use of inside totally different contexts and situations to ensure it’s working properly.
I explored the next situations:
- Default: two columns part
- Let the part take the full-width
- 3-cols grid
- 2-cols grid, with the primary merchandise spanning 66%
- Cellular dimension
Change the choices under to see it in motion.
This can be a caption of the picture.
Conclusion
As you’ve gotten seen, this may appear to be a reasonably easy part. When contemplating it in a number of contexts, further challenges come up. I loved constructing it and utilizing fashionable CSS to construct it out. I hope you realized one thing new!
Debugging CSS e-book
I wrote a e-book that can show you how to enhance your debugging CSS abilities and scale back the time you spend on bugs by exhibiting confirmed strategies and strategies.
This yr, I’ve diminished the e-book value to only $19.99. Get your copy and improve your debugging CSS abilities now.