


There are plenty of other ways so as to add WebGL results to web sites. Nonetheless, constructing it in a method that’s responsive, accessible, and simple to disable for cellular is difficult.
There are circumstances the place you would possibly wish to go all-in and outline your layouts in WebGL, however in our expertise, most initiatives want a extra versatile method. For example, shoppers would possibly favor a extra scaled again conventional cellular model, or the requirement to make use of WebGL would possibly change alongside the way in which.
At 14islands, we determined to base our method on Progressive Enhancement, and bundled our learnings right into a library referred to as r3f-scroll-rig. It permits us to make use of semantic markup and CSS to create responsive layouts, and simply improve them with WebGL.
What you’ll be taught
This tutorial will present you a straightforward strategy to prolong your React web site with WebGL (react-three-fiber) gadgets which are synched to your format throughout scroll. We’re going to use our open-source library r3f-scroll-rig.
We are going to:
- Add the r3f-scroll-rig library
- Improve DOM photos to be rendered utilizing WebGL
- Improve DOM textual content to be rendered utilizing WebGL
- Add a 3D mannequin that’s tied to the format and reacts to scroll occasions
- Spice it up utilizing a lens refraction part from the React-Three-Fiber ecosystem
Including the r3f-scroll-rig library
The scroll-rig library is suitable with most React frontend frameworks. We’ll be utilizing Create-React-App for the simplicity of this demo, though we largely use Subsequent.js on our consumer initiatives. It’s additionally suitable with Gatsby.js or Vite for example.
// import the scroll-rig canvas and scrollbar
import { GlobalCanvas, SmoothScrollbar } from '@14islands/r3f-scroll-rig'

// these international types are solely wanted if you wish to use the
// inbuilt lessons for hiding components. (see subsequent part)
import '@14islands/r3f-scroll-rig/css'

export default operate App() {
  return (
    <>
      <!-- Web page markup goes right here -->
      <article>
        <h1>Hi there World</h1>
      </article>

      <!-- This permits easy scrolling with Lenis -->
      <SmoothScrollbar />

      <!-- A place fastened canvas that covers the viewport -->
      <GlobalCanvas />
    </>
  )
}
The one strategy to completely sync WebGL objects shifting on the fastened canvas with DOM components is by animating scrolling on the principle thread. That is what the SmoothScrollbar is doing for us (in an accessible method) utilizing the wonderful Lenis library.
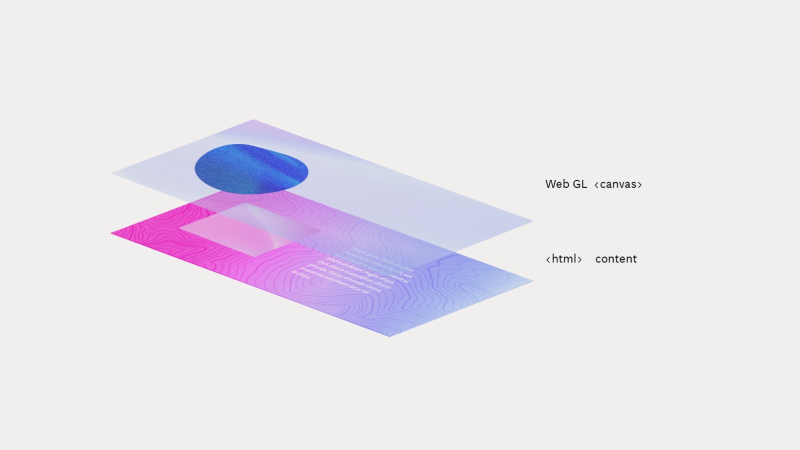
Enhancing photos to render with WebGL
The essential use case is to trace a DOM ingredient on the web page and render a Threejs mesh with the identical scale and place that updates in sync with the scrollbar.
The <UseCanvas> part acts as a tunnel to the GlobalCanvas. Something we add inside will probably be rendered on the worldwide canvas whereas this part stays mounted. It is usually mechanically faraway from the canvas when it unmounts. This enables us to bundle WebGL particular code contained in the UI elements they belong to.
For this use case we will even use the <ScrollScene> part which takes care of monitoring and measuring the dimensions of a single DOM reference. The kids of this part shall be positioned over the DOM ingredient and transfer after we scroll the web page.
import { ScrollScene, UseCanvas, types } from '@14islands/r3f-scroll-rig'

operate Picture({ src }) {
  const el = useRef()
  return (
    <>
      <img ref={el} className={types.hiddenWhenSmooth} src={src} />
      <UseCanvas>
        <ScrollScene monitor={el}>
          {({ scale }) => (
            <mesh scale={scale}>
              <planeGeometry />
              <meshBasicMaterial colour="pink" />
            </mesh>
          )}
        </ScrollScene>
      </UseCanvas>
    </>
  )
}
We must always now be rendering a pink WebGL airplane overlaying the picture. The ScrollScene takes care of shifting the airplane on scroll, and the scale property will match the precise dimensions of the DOM ingredient.
The category types.hiddenWhenSmooth will cover the HTML picture when the SmoothScrollbar is enabled since we solely wish to see one among them. In our demo we are going to toggle the enabled flag of the scrollbar to change between DOM/WebGL content material.
⚠️ Please word: Sizzling Module Reloading (HMR) doesn’t work for inline kids of UseCanvas. A workaround is to outline your kids as high stage capabilities as a substitute (broaden for instance).
// HMR will work on me since I am outlined right here!
const MyScrollScene = ({ el }) => <ScrollScene monitor={el}>/* ... */</ScrollScene>

operate MyHtmlComponent() {
  return (
    <UseCanvas>
      <MyScrollScene />
    </UseCanvas>
  )
}
Changing the airplane with an precise picture
With the intention to do that, we have to load the picture as a Three.js Texture. As an alternative of constructing a separate request, the scroll-rig has a hook referred to as useImageAsTexture() that allow’s you re-use the picture from the DOM that was already loaded by the browser. You may even use reponsive photos with srcset and sizes and the hook will be certain that to fetch the currentSrc.
Technically it’s nonetheless making a second request, however because the URL is an identical the browser will serve it instantly from its cache.
Let’s wrap this picture logic in a brand new part referred to as <WebGLImage> and cross it the ref to the DOM picture. On this case, we will re-use the identical ref because the ScrollScene is monitoring because it already factors to the <img> tag.
operate Picture({ src }) {
  const el = useRef()
  return (
    <>
      <img ref={el} className={types.hiddenWhenSmooth} src={src} />
      <UseCanvas>
        <ScrollScene monitor={el}>
          {(props) => (
            <WebGLImage imgRef={el} {...props} />
          )}
        </ScrollScene>
      </UseCanvas>
    </>
  )
}
The WebGLImage part masses the feel and passes it to the very useful Picture part from Drei. The Picture receives the proper scale as a part of the props handed down from the ScrollScene.
import { useImageAsTexture } from '@14islands/r3f-scroll-rig'
import { Picture } from '@react-three/drei'

operate WebGLImage({ imgRef, scrollState, dir, ...props }) {
  const ref = useRef()

  // Load texture from the <img/> and droop till it is prepared
  const texture = useImageAsTexture(imgRef)

  useFrame(({ clock }) => {
    // visibility is 0 when picture enters viewport and 1 when totally seen
    ref.present.materials.grayscale = clamp(1 - scrollState.visibility ** 3, 0, 1)
    // progress is 0 when picture enters viewport and 1 when picture has exited
    ref.present.materials.zoom = 1 + scrollState.progress * 0.66
    // viewport is 0 when picture enters and 1 when picture attain high of display screen
    ref.present.materials.opacity = clamp(scrollState.viewport * 3, 0, 1)
  })

  // Use the <Picture/> part from Drei
  return <Picture ref={ref} texture={texture} clear {...props} />
}
The scrollState property handed in from the ScrollScene comprises some usefull data on how far the tracked ingredient has travelled by the viewport. On this case we use it in an animation body to replace the shader uniforms.
The useImageAsTexture() hook makes use of the ImageBitmapLoader from Threejs if supported which uploads the picture to the GPU off the principle thread to keep away from jank.
Enhancing textual content with WebGL
Changing textual content with WebGL textual content works in an identical method, once more utilizing the ScrollScene to match the DOM ingredient’s place and scale. We will use the Textual content part from Drei to render WebGL textual content.
We created a helper part WebGLText which calculates the WebGL textual content measurement, letter spacing, line peak and colour from the calculated model of the HTML textual content. It’s out there from a separate powerups import goal because it’s not a core a part of the scroll-rig (and the method of getting a precise match is admittedly a bit fiddly).
On this demo we cross within the MeshDistortMaterial from Drei to make the textual content wobble, however this may be any customized materials. Right here’s the way it works:
import { ScrollScene, UseCanvas, useScrollRig, types } from '@14islands/r3f-scroll-rig'
import { WebGLText } from '@14islands/r3f-scroll-rig/powerups'
import { MeshDistortMaterial } from '@react-three/drei'

export operate Textual content({ kids, font, as: Tag = 'span' }) {
  const el = useRef()
  return (
    <>
      {/*
        That is the actual DOM textual content that we wish to exchange with WebGL
      */}
      <Tag ref={el} className={types.transparentColorWhenSmooth}>
        {kids}
      </Tag>

      <UseCanvas>
        <ScrollScene monitor={el}>
          {(props) => (
            // WebGLText makes use of getComputedStyle() to calculate font measurement,
            // letter spacing, line peak, colour and textual content align
            <WebGLText
              el={el} // getComputedStyle is named on this ingredient
              font={font} // path to the typeface (*.woff)
              glyphGeometryDetail={16} // wanted for distortion to look good
              {...props} // comprises scale from the ScrollScene
              >
                <MeshDistortMaterial pace={1.4} distort={0.14} />
                {kids}
              </WebGLText>
            )}
          </ScrollScene>
        </UseCanvas>
    </>
  )
}
Notice: It’s essential to match the precise font as used within the CSS if you would like the measurements to be right.
💡 The Textual content part makes use of Troika textual content beneath the hood and it solely helps the woff format for now. Ensure you additionally use woff as a substitute of woff2 within the CSS if you wish to keep away from loading two font recordsdata.
The category types.transparentColorWhenSmooth units the textual content to clear when SmoothScrollbar is enabled. The advantage of utilizing clear colour, as a substitute of visibility hidden, is that the actual DOM textual content continues to be selectable within the background.
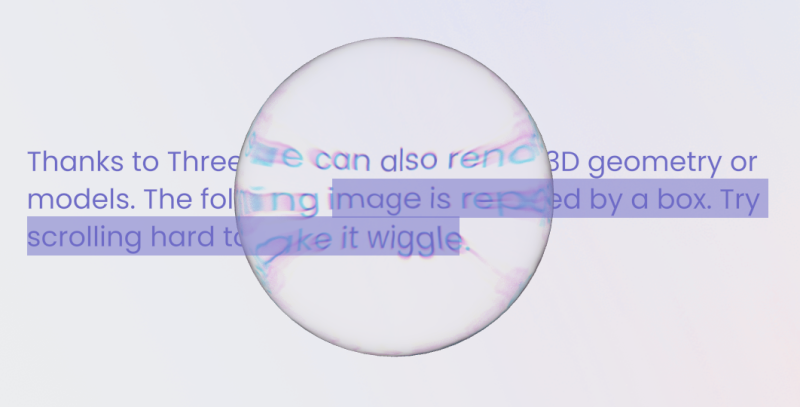
Including 3D geometries or fashions
You may add something contained in the UseCanvas or ScrollScene. Within the demo we create a BoxGeometry for the final picture and use picture as a texture on both sides of the field. However you too can use loaders like useGLTF to load fashions and alter their scale primarily based on the ScrollScene props.
Test it out to see how straightforward it’s to pair it up with `MeshWobbleMaterial` from Drei, the scroll velocity from the scroll-rig and React-spring for a wobbly enter animation.
💡The ScrollScene passes a reactive prop referred to as inViewport to its kids which is beneficial for kicking of viewport primarily based animations.
The best way to deal with contact units
In relation to contact units we principally have two choices: both disabling all of the scroll-bound results, successfully falling again to the unique DOM content material, or, if the positioning is a extra immersive WebGL expertise, we will inform the SmoothScrollbar to additionally hijack to the scroll on contact units.
Hijack scroll on contact units
This requires some additional settings on the underlying Lenis scrollbar because it’s not enabled by default. The reason being that almost all customers count on the native scroll expertise on these units and it’s arduous to make it really feel good.
In our demo we’re utilizing this method as strategy to showcase each approaches. In our expertise, the perfect feeling is obtained by enabling the syncTouch choice on Lenis:
<SmoothScrollbar config={{ syncTouch: true }} />The config property is a strategy to cross customized configuration on to the underlying Lenis occasion.
Disable scroll results on cellular
We normally go for disabling WebGL results on contact units like tablets and smartphones as a result of it’s arduous to make the scroll expertise good.
// hook in your logic right here, disable if contact machine or under a sure breakpoint?
const enabled = false

<SmoothScrollbar enabled={enabled} />
Bear in mind the lessons types.hiddenWhenSmooth and types.transparentColorWhenSmooth that we used to cover the DOM content material within the earlier sections? These are mechanically disabled when the SmoothScrollbar is disabled – permitting the DOM ingredient to be seen.
Moreover we’ll wish to disable the WebGL mesh from rendering as nicely. You are able to do this by accessing the worldwide state hasSmoothScrollbar from the useScrollRig() hook:
export operate Picture({ src }) {
  const { hasSmoothScrollbar } = useScrollRig()
  return (
    <>
      <img src={src} className={types.hiddenWhenSmooth} />

      {hasSmoothScrollbar && (
        <UseCanvas>
          ....
        </UseCanvas>
      )}
    </>
  )
}
And there you may have it. Flipping the enabled property on the <SmoohtScrollbar> will toggle visibility of all of your DOM and WebGL meshes – permitting you to simply swap between the 2.
We will nonetheless preserve WebGL content material that’s not scroll-bound, comparable to interactive fullscreen backgrounds and extra; they are going to render simply high-quality on the fastened canvas behind the scrollable content material.
Lens Refraction
The scroll rig is 100% suitable with the React Three Fiber ecosystem. Let’s strive including this Lens refraction part created by Paul Henschel.
You may management the place to render the <UseCanvas> kids for those who cross a render operate as the one youngster to the <GlobalCanvas>. This enables us to wrap all the kids within the <Lens> part:
<GlobalCanvas>
  {(globalChildren) => (
    <Lens>
      <WebGLBackground />
      {globalChildren}
    </Lens>
  )}
</GlobalCanvas>
The lens impact requires a background in WebGL to mix the content material with, so we cross in a persistent <WebGLBackground /> part that renders behind all of the canvas kids.
Massive because of the Poimandres collective for his or her contributions to the R3F ecosystem!
Wrapping up
We have now discovered this method very helpful when accessibility and website positioning is a high precedence. By defining the format utilizing CSS, some builders can deal with constructing a strong responsive format, and different can deal with the WebGL enhancements in parallel.
Extra documentation and customary pitfalls of the scroll rig may be discovered at https://github.com/14islands/r3f-scroll-rig
We’re excited to see what you construct with it!