


On this article, we’ll discover essentially the most notable new options and enhancements supplied by Nuxt 3, and we’ll additionally have a look at how most of them can be utilized in apply. It will present overview of what’s potential with Nuxt 3 and how one can implement its goodies in your initiatives.
An Overview of Nuxt
Nuxt is a high-level, open-source utility improvement framework constructed on high of Vue. Its intention is to hurry up, simplify, and facilitate the event of Vue-based apps.
It does this by offering the next:
- A lot of the finest net efficiency optimizations are integrated out of the field.
- Automated app scaffolding and improvement. Nuxt combines and integrates a curated set of better of its class instruments in a type of an optimized and fine-tuned starter mission.
- An opinionated set of listing construction conventions for managing pages and parts extra simply and effectively.
All these goodies makes Nuxt already an ideal selection for constructing Vue apps. However the excellent news is that, after a protracted delay, Nuxt 3 beta model was introduced in October, 2021. This fully re-architected model guarantees to be quicker, lighter, extra versatile and highly effective, providing top-notch DX (Developer Expertise). Nuxt is now higher than ever, and it brings to the desk some actually spectacular options. Let’s discover out what they’re.
What’s New in Nuxt 3 Beta
Nuxt 3 beta comes with a number of enhancements and thrilling new options. Let’s discover essentially the most notable of them.
Nitro is a brand new server engine construct for Nuxt on high of h3. It supplies the next advantages:
- API routes assist. Your server API and middleware are robotically generated by studying the recordsdata in
server/api/andserver/middleware/directories respectively. You’ll be able to create the specified API endpoints simply by inserting the corresponding recordsdata within theserver/api/listing. For instance, aduties.jsfile will generate anhttp://yourwebsite.com/api/dutiesendpoint. Features inserver/middleware/load robotically and run in each request — which is way comparable than how Categorical works. - Apps may be deployed to quite a lot of serverless platforms corresponding to Vercel, Netlify, AWS, Azure, and so forth. Plus, some platforms (Vercel, Netlify) are robotically detected when deploying, with out the necessity to add customized configuration.
- The constructed app may be deployed on any JavaScript supporting system together with Node, Deno, Serverless, Employees, and so forth.
- Incremental Static Technology. This permits for utilizing a hybrid mode for static plus serverless websites. The top result’s a mixture of SSR (server-side rendering) and SSG (static website era). (It is a deliberate characteristic, however it’s not carried out but.)
- A lot lighter app output. The constructed app is put right into a common
.output/listing. The construct is minified and any Node modules (besides polyfills) are eliminated. This technique targets fashionable browsers and it produces as much as 75x smaller bundles, each on shopper and server. - Optimized chilly begin with dynamic server code-splitting and async-loaded chunks.
- Sooner bundling and sizzling reloading.
Nuxi is a brand new Nuxt CLI. It supplies a zero-dependency expertise for simple scaffolding new initiatives and module integration.
Nuxt Equipment supplies a brand new versatile module improvement expertise with TypeScript assist and cross-version compatibility.
Nuxt Bridge permits you to use a few of the Nuxt 3 options in your current Nuxt 2 initiatives. Its intention is to make future migration smoother by providing to Nuxt 2 customers the power to incrementally replace/improve their initiatives. Listed below are the Nuxt 3 options which you’ll be able to embrace in your Nuxt 2 mission, as they’re acknowledged on Nuxt’s web site:
- Utilizing Nitro server with Nuxt 2
- Utilizing Composition API (similar as Nuxt 3) with Nuxt 2
- Utilizing new CLI and devtools with Nuxt 2
- Progressively improve to Nuxt 3
- Compatibility with Nuxt 2 module ecosystem
- Improve piece by piece (Nitro, Composition API, Nuxt Equipment)
Nuxt Bridge additionally goals to facilitate the upgrades for the entire Nuxt ecosystem. For that purpose, legacy plugins and modules will maintain working, the config file from Nuxt 2 shall be appropriate with Nuxt 3, and a few Nuxt 3 APIs (like Pages) will stay unchanged.
These had been the so-called “huge” options, however Nuxt 3 comes with tons extra small
options and enhancements. We’ll discover them within the following record:
- Vue 3 assist. Nuxt 3 model is aligned with Vue 3 so you may leverage all the nice options of Vue 3 corresponding to Composition API, composables, and extra. Nuxt already gives a few of its performance in a type of built-in composables like
useFetch(),useState(), anduseMeta(). For extra details about the Vue 3 Composition API, see Learn how to Create Reusable Parts with the Vue 3 Composition API. - Webpack 5 and Vite assist. Benefit from the newest variations of the most effective bundlers providing quicker construct instances and smaller bundle dimension, with no configuration required. Vite, as its title suggests, gives tremendous quick HMR (sizzling module alternative).
- TypeScript assist with sort checking, higher autocompletion and error detection, and auto-generated sorts. For those who don’t like or want TypeScript, you continue to can use Nuxt with out it.
- Native ESM Assist.
- Suspense assist which lets you fetch information in any element, earlier than or after navigation.
- Auto-import for world utilities and composable features. Inside a
<script setup>orsetup()perform you should use any of the composable features that Nuxt 3 gives, corresponding touseFetch(),useState(),useMeta(), and in addition Vue reactivity features corresponding toref(),reactive(),computed(), and so forth. Within the newcomposables/listing you may outline all of your performance in composition features, that are auto-imported as effectively. That is true even for the composables from the VueUse library, after a small configuration. - Optionally available Pages assist. Vue Router 4 is used solely when you have created a
pages/listing. This may produce lighter builds in the event you don’t use pages. - Nuxt Devtools, which gives seamlessly built-in debugging instruments proper from the browser. (It is a deliberate characteristic, however it’s not carried out but.)
Okay, now that we’ve seen how nice Nuxt is in its newest implementation, let’s see how we will use its tremendous powers in motion.
Within the following sections, we’ll discover how you can get began with Nuxt 3 and how you can use it to implement some minimal weblog performance. Significantly, we’ll look at the next:
- making a recent Nuxt 3 mission
- including Tailwind CSS assist to the mission
- creating and utilizing customized layouts
- creating weblog pages
- creating and utilizing customized parts
- utilizing the Nuxt 3 built-in composables
- creating and utilizing customized composables
Getting Began With Nuxt 3
Notice: earlier than we start, please be sure to have Node v14 or v16 put in in your machine.
We’ll begin by making a recent Nuxt 3 mission. To take action, run the next command in your terminal:
It will arrange a brand new mission for you with none dependencies put in, so it is advisable to run the next instructions to navigate to the mission and set up the dependencies:
cd nuxt3-blog
npm set up
And at last, to begin the dev server, run this command:
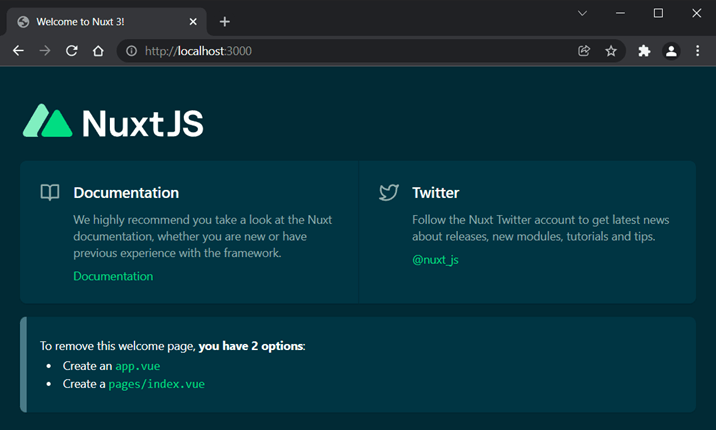
Open http://localhost:3000 in your browser. If every part works as anticipated, you must see the next welcome web page.
For those who’re aware of Nuxt 2, you’ll in all probability discover that the mission construction in Nuxt 3 has been a bit simplified.
Right here’s a brief record exploring essentially the most notable modifications within the mission construction in Nuxt 3 in comparison with Nuxt 2. In Nuxt 3:
- An
app.vuefile is added. It’s the primary element in your utility. No matter you set in it (CSS, JS, and so forth.) shall be globally out there and included in each web page. - Using the
pages/listing is elective. You’ll be able to construct your app solely withapp.vueas a important element and different parts positioned within theparts/folder. If that’s the case, vue-router gained’t be used and the app’s construct shall be a lot lighter. - A brand new
composables/listing is added. Every composable added right here is auto-imported so you should use it straight in your utility. - A brand new
.output/listing is added, as we talked about earlier than, producing smaller bundles.
Constructing a Minimal Weblog With Nuxt 3
Notice: you may discover the whole supply code for this mission within the Nuxt 3 Weblog Instance repo.
On this part, we’ll discover the fundamentals of Nuxt 3 by constructing a brilliant minimalist weblog. We’ll want a little bit of styling and Tailwind CSS is a good selection for that.
Together with Tailwind CSS within the mission
To put in Tailwind and its peer-dependencies, run the next:
npm set up -D tailwindcss@newest postcss@newest autoprefixer@newestNow we have to generate Tailwind and PostCSS configuration recordsdata. Run the next:
It will generate tailwind.config.js and postcss.config.js recordsdata within the root listing. Open the primary one and configure the content material choice to incorporate your whole mission’s recordsdata that include Tailwind utility courses:
module.exports = {
  content material: [
    "./components/**/*.{vue,js,ts}",
    "./layouts/**/*.vue",
    "./pages/**/*.vue",
    "./plugins/**/*.{js,ts}",
    "./app.vue",
  ],
  theme: {
    lengthen: {},
  },
  plugins: [],
}
Notice: from model 3, Tailwind not makes use of PurgeCSS underneath the hood and the purge choice has been renamed to content material. Please learn the Content material Configuration part of the Tailwind docs for extra details about the content material choice.
The postcss.config.js file doesn’t want any configuration. It already has Tailwind and Autoprefixer included as plugins:
module.exports = {
  plugins: {
    tailwindcss: {},
    autoprefixer: {},
  },
}
The subsequent step is so as to add Tailwind’s types. Create a brand new belongings listing and put a css folder in it. Within the belongings/css/ listing, create a types.css file and put the next content material in it:
@tailwind base;
@tailwind parts;
@tailwind utilities;
The ultimate step is to replace nuxt.config.ts with the next content material:
import { defineNuxtConfig } from 'nuxt3'


export default defineNuxtConfig({
  css: ["@/assets/css/styles.css"],
  construct: {
    postcss: {
      postcssOptions: require("./postcss.config.js"),
    },
  },
})
And now we will use all Tailwind’s utilities in our mission.
Creating the weblog’s format
We’ll begin creating our weblog with a easy format containing a header and a footer. Create a layouts listing and add a weblog.vue file in it with the next content material:
<template>
  <div>
    <header class="text-white bg-green-500 p-4">HEADER</header>
    <slot />
    <footer class="text-white bg-green-500 p-4">FOOTER</footer>
  </div>
</template>
Once we use this format, the <header> and <footer> parts shall be added as they seem right here. The <slot /> element defines the place the precise content material (which is able to differ relying on the place you’ve used the format) shall be loaded. Now we will reuse this format in each web page or element simply by offering the title of our customized format following this sample:
<script>
  export default {
    format: [custom_layout_name]
  }
</script>
We’ll see this in motion within the subsequent part.
Creating the weblog’s pages
We have already got a weblog format, and it’s time to create weblog’s pages which is able to make use of it. Earlier than we do this, we have to make a small correction within the app.vue file. Open it and change the <NuxtWelcome /> element with <NuxtPage />:
<template>
  <div>
    <NuxtPage />
  </div>
</template>
This tells Nuxt that we’re going to make use of pages in our utility.
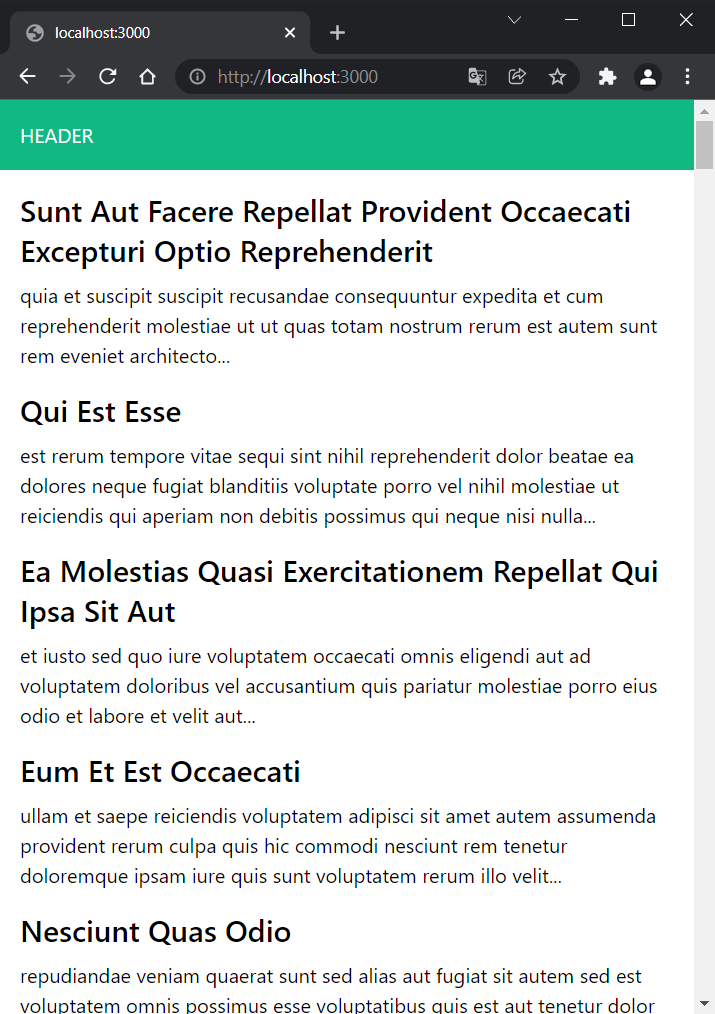
Let’s create the house web page, which is able to record the weblog’s posts. Create a brand new pages listing and put an index.vue file in it with the next content material:
<script>
  export default {
    format: "weblog"
  }
</script>

<script setup>
  const { information: posts } = await useFetch('https://jsonplaceholder.typicode.com/posts')
</script>

<template>
  <div>
    <article class="m-4 md:w-1/2 lg:w-1/3" v-for="submit in posts" :key="submit.id">
      <NuxtLink :to="`/post-${submit.id}`">
        <h2 class="mb-2 capitalize text-2xl font-semibold">{{ submit.title }}</h2>
      </NuxtLink>
      <p>{{ submit.physique }}...</p>
    </article>
  </div>
</template>
Right here, we first use a daily <script> component to outline that we need to use our customized weblog format. Then we use the script setup> syntactic sugar to create a setup perform. Then we use the Nuxt 3 useFetch() composable to fetch the posts. Within the template part, we iterate over the posts and create an <article> component for each. We use the <NuxtLink> component to create a hyperlink to every single submit. Every submit can have a URL following the post-[id] sample.
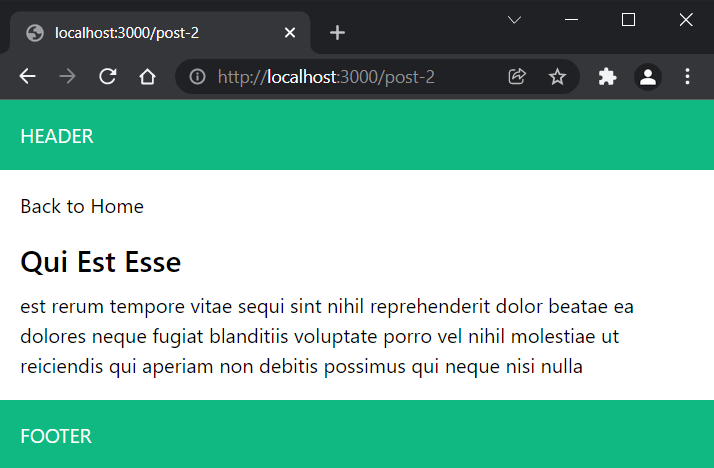
The job is half executed now. What’s left is to create a web page representing a single submit. Nuxt 3 gives a brand new brackets syntax for the pages/ listing, so we will make components of a web page’s title dynamic. Let’s check it.
Create a post-[id].vue web page with the next content material:
<script>
  export default {
    format: "weblog"
  }
</script>

<script setup>
  const route = useRoute()
  const { information: submit } = await useFetch(`https://jsonplaceholder.typicode.com/posts/${route.params.id}`, { choose: ['title', 'body'] })
</script>

<template>
  <div>
    <NuxtLink to="/">
      <h1 class="m-4 hover:underline">Again to Dwelling</h1>
    </NuxtLink>

    <article class="m-4 md:w-1/2 lg:w-1/3">
      <h2 class="mb-2 capitalize text-2xl font-semibold">{{ submit.title }}</h2>
      <p>{{ submit.physique }}</p>
    </article>
  </div>
</template>
Right here, we add the weblog format once more. Then we use the useRoute() composable to get the id parameter of the present URL, which we want within the useFetch(). We additionally use the choose choice, so we’ll fetch solely what we want (the title and the physique properties). Then, within the template part, we use the submit variable to render the submit’s title and physique. We additionally use the <NuxtLink> element to create a hyperlink to the house web page.
Nice. Now in the event you run the mission (if the server is already working you may have to restart it) you must see a listing of posts within the house web page.
And if you click on on a submit’s title, you’ll be redirected to the one submit web page displaying the submit with the corresponding ID.
Making a quote element
Other than pages, parts are essentially the most used parts in a Nuxt utility. Let’s see how we will create a easy quote element that may render a random quote of the day for every visited submit.
Create a brand new parts folder and put a quote.vue file in it with the next content material:
<script setup>
const quote = ref('')
const { information: qotd } = await useFetch('https://favqs.com/api/qotd')
quote.worth = qotd.worth.quote
</script>
<template>
<div class="p-4 md:w-1/2 lg:w-1/3">
<p class="p-2 font-bold bg-blue-400 text-white">Quote of the Day</p>
<div class="p-2 bg-blue-100 text-indigo-600">
<p class="italic">{{ quote.physique }}</p>
<p class="mt-2 italic text-sm font-medium">- {{ quote.creator }}</p>
</div>
</div>
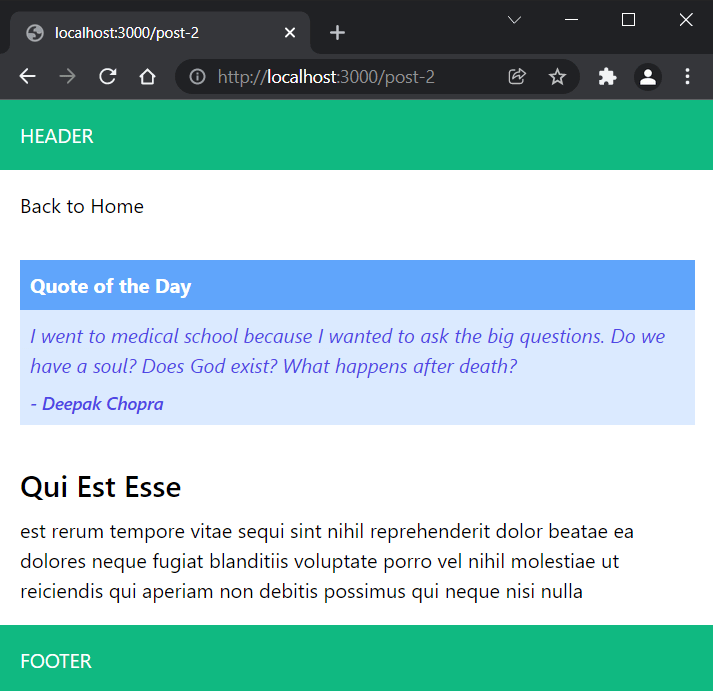
</template>Right here, we fetch a random quote of the day and assign it to the quote variable. We then use it within the template to render the physique and creator of the quote. To check our quote element, we have to embrace it contained in the post-[id].vue file proper above the <article> component:
...
<template>
  <div>
    <NuxtLink to="/">
      <h1 class="m-4 hover:underline">Again to Dwelling</h1>
    </NuxtLink>
    <quote />
    <article class="m-4 md:w-1/2 lg:w-1/3">
      <h1 class="mb-2 capitalize text-2xl font-semibold">{{ submit.title }}</h1>
      <p>{{ submit.physique }}</p>
    </article>
  </div>
</template>
Now, if you open a selected submit, a quote-of-the-day field ought to seem above the submit.
Creating and utilizing the useCounter() composable
The very last thing we’ll discover is how you can create and use a composable. We’ll use the well-known counter instance for this train. Create a brand new composables folder and put a useCounter.js file in it with the next content material:
export default () => {
  const counter = ref(0)
  const increment = () => counter.worth++
  const decrement = () => counter.worth--
  const counterDouble = computed(
    () => counter.worth * 2
  )
  return {
    counter,
    increment,
    decrement,
    counterDouble
  }
}
On this composable, we add a counter reactive property with worth set to zero and a computed property that doubles the counter’s worth. We additionally add two features to increment and decrement the counter’s worth. Then we return all properties and features to allow them to be out there to be used.
Now, to check it, let’s create one other web page named counter.vue with the next content material:
<script>
  export default {
    format: "weblog"
  }
</script>

<script setup>
  const { counter, increment, decrement, counterDouble } = useCounter()
</script>

<template>
  <div>
    <p class="m-2 text-3xl"><span class="font-semibold">Counter:</span> {{ counter }} x 2 = {{ counterDouble }}</p>
    <button @click on="increment" class="m-2 py-2 px-4 bg-blue-500 text-white font-semibold rounded-lg shadow-md hover:bg-blue-700">+ Increment</button>
    <button @click on="decrement" class="m-2 py-2 px-4 bg-blue-500 text-white font-semibold rounded-lg shadow-md hover:bg-blue-700">- Decrement</button>
  </div>
</template>
We will see right here that we use useCounter() straight as a result of it’s auto-imported by Nuxt. Then we use its variables and features within the template.
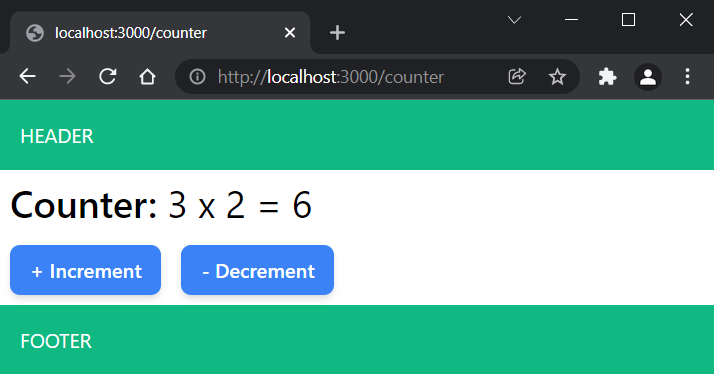
Restart the server and open http://localhost:3000/counter. You need to see the counter because it’s proven within the picture beneath.
Conclusion
On this tutorial, we explored essentially the most notable new Nuxt 3 options and enhancements, and demonstrated how most of them can be utilized in apply. I hope this has given to you overview of what’s potential with Nuxt 3 and how one can implement its goodies in your initiatives. Lastly, I need to warn you that Nuxt 3 remains to be in beta, which signifies that it may not be production-ready but. In fact, this shouldn’t cease us from studying and experimenting with it, proper? So let’s play!