

Hello everybody! 👋 I not too long ago launched the discharge candidate of my Sensible Python Tasks ebook. There have been a few distinctive points I used to be going through and I made a decision to write down about them and share how I received round most of them. This isn’t an end-to-end service implementation tutorial however quite a fast walk-through. I’ll present you many of the necessary bits and items of code for this service. If you’re pressed for time, you may go to no matter part sounds fascinating and begin studying from there.
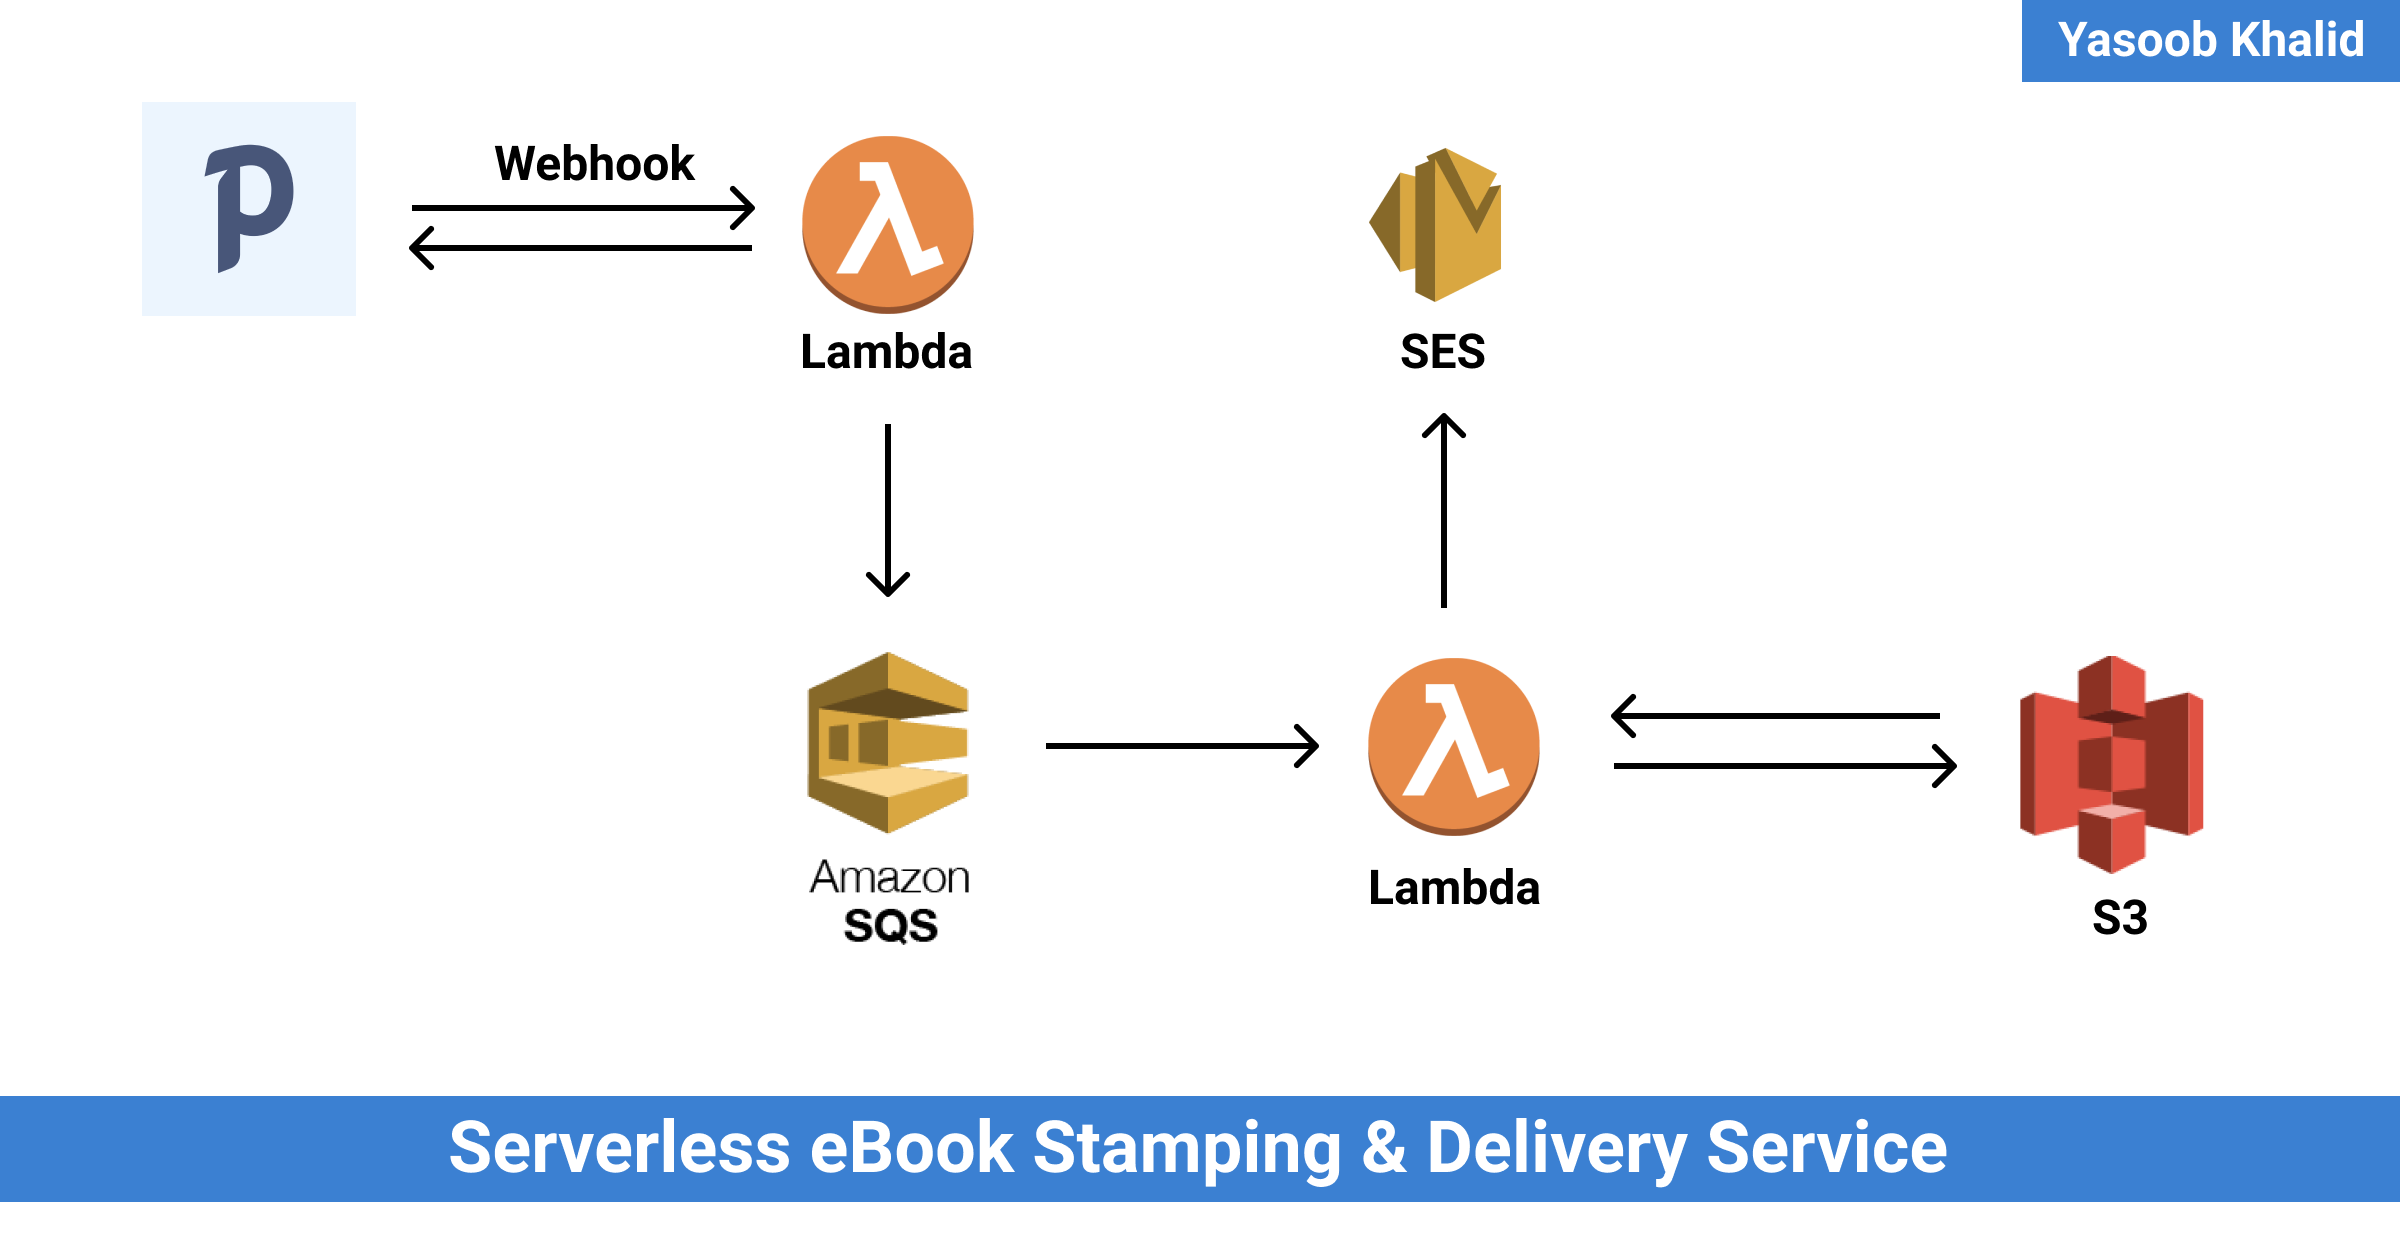
TLDR: I’m utilizing Paddle as my service provider. Paddle sends webhook requests to a service that’s hosted on AWS Lambda. This service stamps PDFs, saves them on S3 (Easy Storage Service), and emails a pre-signed URL to prospects utilizing Amazon SES (Easy Electronic mail Service).
Introduction
Sensible Python Tasks isn’t my first ebook however it’s the first one which I wished to promote. There are a few good choices for indie authors: Gumroad, SendOwl, and so on. Nonetheless, most of those companies aren’t a viable choice for individuals in a number of main international locations (together with Pakistan) as PayPal and Stripe are the one supported payout strategies they usually aren’t obtainable all through the world. As I couldn’t use any of those companies, I made a decision to go searching. I expanded the scope of my search by on the lookout for cost processors as properly and never merely eBook promoting choices.
After some time, I got here throughout Paddle. It supported direct financial institution deposits and Payoneer as payout choices. This meant that it could possibly be utilized in most international locations (together with Pakistan). Nonetheless, Paddle additionally had an issue which I discovered solely after making a product itemizing on the platform. Its eBook publishing options and mailing listing administration options have been severely restricted however contemplating that this was the one viable cost gateway, I nonetheless determined to maneuver ahead with it.
Points
Let’s discuss concerning the drawbacks of utilizing Paddle for promoting eBooks on-line. Paddle permits you to add a product as a digital obtain on the platform however the hyperlink to the product just isn’t scoped to a buyer. It’s accessible to whoever will get their fingers on the hyperlink. This is able to have been effective if there have been two different options obtainable:
- PDF stamping with buyer title
- Time based mostly or variety of accesses based mostly hyperlink expiry
Nonetheless, Paddle didn’t have any of those. The hyperlinks have been non-expiring and there was no PDF stamping. If you’re an indie creator, chances are high, you may already know why these options are necessary. These options assist curb piracy. If the hyperlinks are expiring, an individual can’t simply submit them to a web-based discussion board and have them keep obtainable for eternity. And if a PDF is stamped with a buyer’s title, the expectation and hope are that they’d not wish to put the ebook on-line with their title in-tact.
Fortunately, Paddle helps webhooks. Being a programmer, there was a chance for me to hack one thing collectively that generated stamped PDFs and emailed them to prospects utilizing Paddle’s webhooks assist. It gave the impression of a enjoyable side-project.
Have you ever ever spent a lot time doing meta hacking and micro-optimizations that you simply overlook the larger image? I’ve been down that rabbit gap earlier than and wished to steer clear of it this time. I promised myself that I’d do the least quantity of labor required to get a service up and working and begin promoting the ebook in every week max.
If I used to be to complete this mission inside every week, I had to determine the minimal necessities for this service earlier than diving into the code and this additionally meant I didn’t fall into this over-planning lure:

Necessities
These have been the necessities I managed to provide you with:
- File internet hosting: An inexpensive and handy file internet hosting service with a straightforward API and assist for expiring hyperlinks.
- Electronic mail supply: An inexpensive transactional e-mail service that doesn’t break the financial institution and has good and quick deliverability.
- Webhook service: An inexpensive managed server that doesn’t require fixed maintenance and must be a set & overlook kind state of affairs.
- Low cost: No laborious restrict on how a lot I can spend however the entire answer ought to ideally be free or as least costly as potential
- Studying: Bonus factors if I can study one thing new within the course of
Answer
There have been fairly a number of choices that match the invoice and it took me some time to make the ultimate choice.
Each main cloud supplier has a file internet hosting service and there are fairly a number of transactional e-mail supply companies. For file internet hosting, I ended up going with Amazon S3 (Easy Storage Service) because it had a beneficiant free tier and was pretty low cost even past the free quota. As for e-mail supply, I made a decision to go together with Amazon SES (Easy Electronic mail Service) for roughly the identical causes: low cost + beneficiant free quota.
For the webhook service, I thought of going the everyday route of organising an API utilizing Flask or an identical Python framework and host it on Digital Ocean. Nonetheless, there have been a few points with this. This wasn’t the most cost effective choice and my consideration was being attracted by “serverless” choices. By this level, I had been listening to about serverless computing a lot that it was form of laborious to disregard. It gave the impression of a great match for my scenario too. I’d not have to fret about updating the infrastructure on which the serverless operate can be working and I’d not be charged if there have been no ebook gross sales occurring. A win-win scenario. I made a decision to provide in to the serverless fad and go together with AWS lambda. This was a great choice as a result of it meant I’d be studying one thing new as properly. I had used lambda earlier than however that was round 2-3 years in the past at a hackathon. It was excessive time to provide it a re-examination.
The PDF stamping turned out to be tougher than I believed and led me to a few surprising edge instances. I seemed round for a Python library as a result of I wished to maintain all of my code in Python. I got here throughout PyPDF2 and reportlab. I made the preliminary model of the stamping program utilizing PyPDF2 however later changed it with pdfrw. I’ll share the explanations later.
Answer in a bit element
As a substitute of working with every service individually, I made a decision to make use of serverless. It permits you to launch serverless deployments tremendous rapidly and in addition helps make them reproducible. You solely want a serverless.yml file that defines all of the companies you wish to provision and another code you may wish to run on the server. If you’re planning on working some Python code on AWS Lambda then this may imply having a minimum of these three information:
serverless.yml: Declare the companies you wanthandler.py: Write the handler code for a Lambda operatenecessities.txt: Declare all of the dependencies your Python code depends on
Getting began with serverless
Serverless has respectable documentation. It’s very easy to get began and the CLI instrument units up the listing construction for you.
You’ll be able to set up serverless utilizing NPM by typing npm set up -g serverless after which set it up by working the serverless command within the terminal. Select the suitable choices and you’ll have it set it up for working with AWS very quickly.
Notice: You aren’t required to make use of AWS, serverless helps most different main cloud suppliers as properly
Let’s begin a brand new serverless mission by typing this within the terminal:
$ serverless create
  --template aws-python3
  --name automated-book-delivery
  --path automated-book-delivery
That is going to create a serverless mission contained in the automated-book-delivery path and title it automated-book-delivery. Now we are able to cd into the folder and arrange a digital surroundings to do native improvement.
$ cd automated-book-delivery
$ python -m venv vevn
$ supply venv/bin/activate
The listing construction ought to seem like this:
.
├── handler.py
├── serverless.yml
└── venv
    ├...
After stripping the feedback, the serverless.yml file ought to resemble this:
service: automated-book-delivery
frameworkVersion: '2'

supplier:
  title: aws
  runtime: python3.8
  lambdaHashingVersion: 20201221

capabilities:
  hi there:
    handler: handler.hi there
And the handler.py file ought to seem like this:
import json


def hi there(occasion, context):
    physique = {
        "message": "Go Serverless v1.0! Your operate executed efficiently!",
        "enter": occasion
    }

    response = {
        "statusCode": 200,
        "physique": json.dumps(physique)
    }

    return response

    # Use this code should you do not use the http occasion with the LAMBDA-PROXY
    # integration
    """
    return {
        "message": "Go Serverless v1.0! Your operate executed efficiently!",
        "occasion": occasion
    }
    """
Relying on how barebones your serverless infra goes to be, you may need to fret about solely these two information. You’ll be able to deploy the service through the use of this command:
$ sls deploy
Notice: sls is simply an alias for serverless
Exploring webhook information construction
Whereas exploring the response of the Paddle webhook, I made in depth use of on-line request bin web sites. These web sites offer you a public URL the place you may ship a webhook request and afterwards they help you examine what the request seemed like and what information it contained. The one I used was webhook.website. It made it straightforward to visualise what sort of information Paddle was going to ship.
Paddle docs do a great job of explaining it however I don’t suppose there’s any substitute for reside information. It simply offers every thing an entire lot extra context and makes it holistic. That is what the webhook request seemed like on webhook.website after I despatched a check request utilizing Paddle:
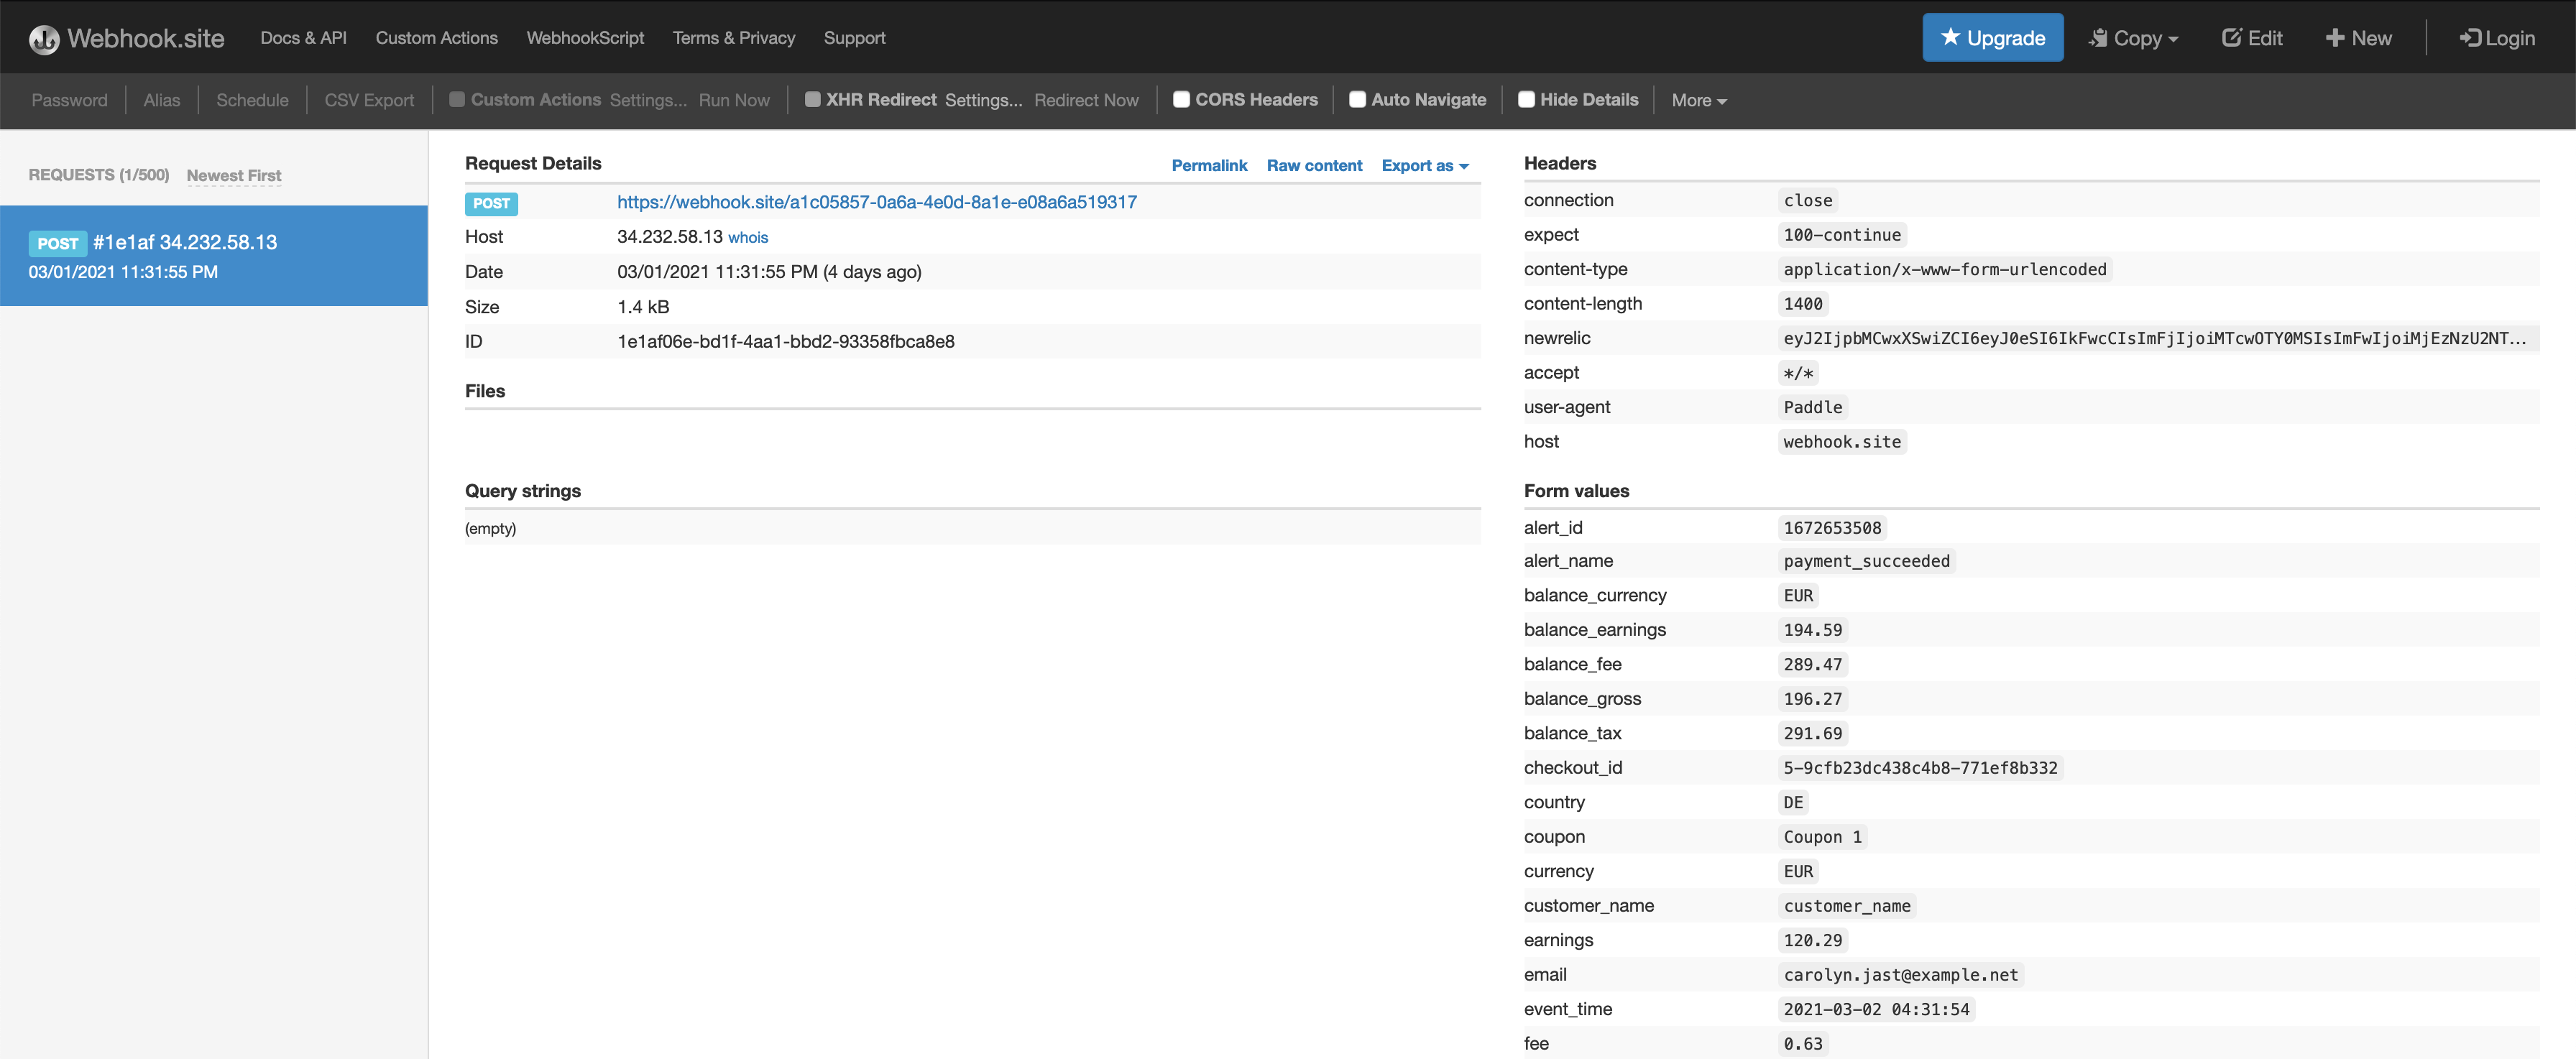
I took the uncooked information from the webhook.website and tried parsing it utilizing Python within the interpreter. I really like utilizing the interpreter for these duties because it makes the suggestions loop tremendous fast and I can iterate with out dropping quite a lot of valuable time.
Exterior API endpoint
That is the endpoint that receives the webhook request from Paddle. My exterior API endpoint dealing with code seems to be like this:
def hi there(occasion, context):
    paddle_data = dict(parse_qsl(occasion['body'], keep_blank_values=True))

    signature = paddle_data.get("p_signature")

    legitimate, information = verify_signature(paddle_data)

    if not legitimate:
        print("Signature verification failed")
        return

    title = information['customer_name']
    e-mail = information['email']
    order_no = information['p_order_id']

    sqs = boto3.useful resource('sqs', region_name="us-west-1")

    queue = sqs.get_queue_by_name(QueueName=os.environ["QUEUE_NAME"])
    response = queue.send_message(MessageBody=f'{title}::{e-mail}::{order_no}')
    return {
        "statusCode": 200,
        "physique": json.dumps({"Despatched Message":response})
    }
The occasion parameter accommodates the request that lambda acquired. occasion is a dictionary and the physique key accommodates the POST information that was despatched with the request. I take the physique and parse it utilizing parse_qsl from the urllib.parse bundle (that is all Python 3). parse_qsl turns the information into an inventory of key, worth pairs which I later flip right into a dictionary.
Somebody with a eager eye could be questioning why I’ve keep_blank_values=True as a part of the parse_qsl operate name. That is necessary as a result of Paddle may ship some empty values and the default conduct of parse_qsl is to simply omit them from the returned listing. Nonetheless, I wanted to retain these if I wished to precisely recalculate the signature of the entire payload.
When Paddle sends webhook requests, it features a p_signature area which is an encrypted signature of all of the values within the payload. It’s encrypted utilizing public-key crypto and Paddle offers distributors with a public key they will use to encrypt a recalculated signature, match it with the encrypted signature paddle despatched, and ensure the request was truly generated by Paddle. That is very helpful because it helps be certain that we solely reply to the webhooks which are truly generated by Paddle and never an impersonator. Most (if not all) webhook companies comprise a comparatively comparable characteristic for verifying the authenticity of webhook calls.
After parsing the payload information utilizing parse_qsl, I confirm the signature by making a name to the verify_signature operate. This can be a {custom} operate based mostly on the outline supplied over at Paddle docs.

Afterwards, I extract the title, e-mail, and order no from the payload, merge them right into a single string through the use of :: because the separator and push it to an SQS (Easy Queue Service) queue. I may have simply set these three (title, e-mail, order no) values as MessageAttributes however I appreciated merging them collectively and hold the message dimension and processing code shorter.
Lastly, I return a 200 standing code as anticipated by Paddle. I’ve simplified this code a little bit bit by eliminating error checking for brevity.
You could be questioning why I’m pushing a message to the SQS queue and never processing the PDF in the identical request. Properly, the preliminary PDF stamping code that I had written was taking nearer to 29s to run on lambda and the general public API endpoints have a most timeout of 30s. This was inflicting a few requests to day trip so I had to determine easy methods to decouple the exterior API from the precise PDF processing.
One answer to this drawback was to make use of SQS. The thought is that you simply ship a message to this queue and as quickly because the queue receives a brand new message, it triggers one other lambda operate. This second lambda operate just isn’t an exterior API endpoint and so it may well have a max timeout of quarter-hour. That was greater than sufficient for my case.
Getting SQS up and working
SQS was a bit difficult to rise up and working. I used to be getting a ton of errors that I’ve now forgotten. I first declared it as a useful resource in my serverless.yml file:
assets:
  Sources:
    # ...
    BookDelivery:
      Sort: "AWS::SQS::Queue"
      Properties:
        QueueName: automated-book-delivery
        VisibilityTimeout: 1800
Then I requested the next permissions for the IAM function:
- Impact: "Enable"
  Motion:
    - "sqs:ListQueues"
    - "sqs:GetQueueUrl"
    - "sqs:DeleteMessage"
    - "sqs:ReceiveMessage"
    - "sqs:SendMessage"
    - "sqs:SetQueueAttributes"
    - "sqs:GetQueueAttributes"
  Useful resource: "*"
I attempted making the Useful resource worth extra granular and goal solely the queue I made for this service but it surely was failing. I used to be getting a ton of entry denied errors:
ClientError An error occurred (AccessDenied) when calling the ListQueues operation: Entry to the useful resource https://us-west-1.queue.amazonaws.com/ is denied
I had given the IAM function, the ListQueues permission however the Useful resource scope was too slim. I used to be working out of time so I made a decision to make use of this bandaid answer and transfer on. The queue was efficiently sending and receiving messages at this level and that’s all that I wanted.
Lastly, I added this queue as a set off for a lambda operate:
capabilities:
    # --snip--
    course of:
        handler: handler.process_book
        surroundings:
            REGION: us-west-1
            QUEUE_NAME: automated-book-delivery
        occasions:
            - sqs:
                batchSize: 1
                arn:
                    Fn::GetAtt:
                    - BookDelivery
                    - Arn
The batchSize: 1 choice makes certain that our operate is named with just one queue message. This was helpful as a result of if a lambda operate is named with 10 messages (as an inventory of messages) and the operate fails whereas processing the ninth message, all messages are re-enqueued. We are able to both add correct error processing or simply use a batchSize of 1. There are precise value tradeoffs occurring however my service wasn’t going for use by a ton of individuals so I wasn’t too involved concerning the tradeoffs. Keep in mind, I used to be aiming to launch this as rapidly as potential.
The API for sending messages to the queue is pretty easy (boto3 SQS docs):
# Sending message
sqs = boto3.useful resource('sqs', region_name="us-west-1")
queue = sqs.get_queue_by_name(QueueName="queue-name")
response = queue.send_message(MessageBody=f'check message')
We don’t want to fret about receiving messages from the Queue as lambda will name our handler with the queue message as an argument if we set a queue as a set off for a lambda operate.
PDF processing
That is the operate that’s triggered by the queue message. It expects a few surroundings variables:
- BUCKET: title for vacation spot S3 bucket
- REGION: The area this service is working in
- SOURCE_BUCKET: S3 bucket that accommodates supply PDF and different supply information (EPUB and so on)
These variables are set within the serverless.yml file as proven within the earlier part. Just one S3 bucket is created as a useful resource with this service. The second S3 bucket is the place I’ll add the supply information and it’ll simply hold the unique unstamped information.
However earlier than we get into the precise operate code, let’s check out the PDF stamping.
PDF Stamping
Within the answer part I discussed that I began with PyPDF2. That is the form of PDF stamping I used to be aiming for:

There are two steps concerned in making this:
- Create the watermark
- Merge the watermark with supply PDF
I ended up utilizing this code for doing the stamping:
from PyPDF2 import PdfFileWriter, PdfFileReader
import io
from reportlab.pdfgen import canvas
from reportlab.platypus import SimpleDocTemplate
from reportlab.lib.pagesizes import letter

packet = io.BytesIO()

PAGE_WIDTH  = letter[0]

# Create a PDF utilizing Reportlab
caption = ("Ready solely for YASOOB KHALID "
                    "(hello@yasoob.me)  Transaction: 0068830245")
can = canvas.Canvas(packet, pagesize=letter)
can.setFont("Helvetica", 10)
can.setFillColorRGB(0.703125,0.703125,0.703125)
can.drawCentredString(PAGE_WIDTH/2, 20, caption)
can.save()

packet.search(0)

with open("ebook.pdf", "rb") as input_file:
    input_pdf = PdfFileReader(input_file)
    watermark_pdf = PdfFileReader(packet)

    watermark_page = watermark_pdf.getPage(0)
    output = PdfFileWriter()

    # Do not stamp the quilt web page
    pdf_page = input_pdf.getPage(0)
    output.addPage(pdf_page)

    for i in vary(1, input_pdf.getNumPages()):
        pdf_page = input_pdf.getPage(i)
        pdf_page.mergePage(watermark_page)
        output.addPage(pdf_page)

    with open("output.pdf", "wb") as merged_file:
        output.write(merged_file)
We first create a canvas object after which write “Ready solely for YASOOB KHALID (hello@yasoob.me) Transaction: 0068830245” as a centered string that’s 20 items from the underside. We then open the supply pdf (ebook.pdf) and the generated watermark PDF utilizing the PdfFileReader class of PyPDF2 and merge the watermark with the supply.
Whereas doing this, we skip over the primary web page (web page no 0) in order that the quilt of the ebook isn’t watermarked and course of the remainder of the pages usually by merging them with the watermark.
Lastly, we save the merged PDF as output.pdf.
This labored. A typical run of the 329 web page PDF took round 25-30 seconds. However there was an enormous difficulty. After sending out this merged model of the PDF to prospects, one particular person reached out to me and instructed me concerning the TOC hyperlinks not working. I used to be a bit confused as the unique PDF had working hyperlinks within the TOC.
The left picture is from the unique PDF and the fitting picture is from the stamped PDF. Have a look at the bookmark listing on the left PDF and the way it’s lacking from the fitting PDF.

It was solely after this difficulty that I began to search for different choices. I spent a very long time attempting to determine if PyPDF2 would assist me retain the bookmarks however I wasn’t ready to determine an answer. Furthermore, I had discovered about this difficulty whereas the ebook was already promoting so I had to determine an answer rapidly.
I did some analysis and got here throughout a pure Python PDF manipulation library pdfrw. Seems, it was tremendous straightforward to do the PDF stamping utilizing pdfrw and the library additionally retained the bookmarks with none particular instructions. Moreover, the stamping code was faster and shorter than earlier than. The ensuing script seemed like this:
from pdfrw import PdfReader, PdfWriter, PageMerge
import io
from reportlab.pdfgen import canvas
from reportlab.platypus import SimpleDocTemplate
from reportlab.lib.pagesizes import letter

packet = io.BytesIO()

PAGE_WIDTH  = letter[0]
PAGE_HEIGHT = letter[1]

# create a brand new PDF with Reportlab
caption = ("Ready solely for YASOOB KHALID "
                    "(hello@yasoob.me)  Transaction: 0068830245")
can = canvas.Canvas(packet, pagesize=letter)
can.setFont("Helvetica", 10)
can.setFillColorRGB(0.703125,0.703125,0.703125)
can.drawCentredString(PAGE_WIDTH/2, 20, caption)
can.save()

packet.search(0)

with open("book-bak.pdf", "rb") as input_file:
    input_pdf = PdfReader(input_file)
    watermark_pdf = PageMerge().add(PdfReader(packet).pages[0])[0]

    for web page in input_pdf.pages[6:]:
        PageMerge(web page).add(watermark_pdf).render()

    final_pdf = io.BytesIO()
    PdfWriter(final_pdf, trailer=input_pdf).write()
    final_pdf.search(0)
    with open("output.pdf", "wb") as merged_file:
        merged_file.write(final_pdf.learn())
The code was additionally surprisingly fast. I had by no means finished any automated PDF manipulation earlier than so I had no concept what sort of runtimes I ought to anticipate. However pdfrw code ended up taking solely 2-3 seconds to do the stamping as in comparison with 30 seconds taken by PyPDF2.
Turning PDF stamping right into a lambda operate
Lambda solely has entry to a /tmp listing and I used to be actually attempting to not use it if in any respect potential. This meant that I needed to obtain the supply PDF from S3 to reminiscence and put the rendered PDF in reminiscence earlier than importing it to S3 . This was pretty simple as I had finished comparable stuff earlier than the place I used the io.BytesIO() object as a file. I’m solely going to indicate you the stripped down operate code that makes use of pdfrw:
def process_book(occasion, context):
    for file in occasion['Records']:
       payload=file["body"]

    message = occasion['Records'][0]['body']
    title, e-mail, order_no = message.break up('::')
    client_ref=f"{title}_{e-mail}_{order_no}"

    packet = io.BytesIO()
    final_pdf = io.BytesIO()

    PAGE_WIDTH  = letter[0]

    # create a brand new PDF with Reportlab
    caption = (f"Ready solely for {title} ({e-mail}) "
                "Transaction: {order_no}")
    can = canvas.Canvas(packet, pagesize=letter)
    can.setFont("Helvetica", 10)
    can.setFillColorRGB(0.703125,0.703125,0.703125)
    can.drawCentredString(PAGE_WIDTH/2, 20, caption)
    can.save()

    packet.search(0)

    original_pdf = io.BytesIO()
    s3.download_fileobj(os.environ['SOURCE_BUCKET'],
        'PracticalPythonProjects.pdf', original_pdf)
    original_pdf.search(0)

    input_pdf = PdfReader(original_pdf)
    watermark_pdf = PageMerge().add(PdfReader(packet).pages[0])[0]

    for web page in input_pdf.pages[6:]:
        PageMerge(web page).add(watermark_pdf).render()

    PdfWriter(final_pdf, trailer=input_pdf).write()
    final_pdf.search(0)

    s3_resource = boto3.useful resource("s3")
    obj = s3_resource.Object(
        bucket_name=os.environ["BUCKET"],
        key=client_ref,
    )
    obj.put(Physique=final_pdf, ContentType="software/pdf")

    pdf_link, epub_link, mobi_link, kpf_link = generate_links(client_ref, s3_client=s3)

    email_info = {
        "title": title,
        "e-mail": e-mail,
        "order_no": order_no,
        "pdf_link": pdf_link,
        "epub_link": epub_link,
        "mobi_link": mobi_link,
        "kpf_link": kpf_link,
    }

    # Ship e-mail
    ses_client = boto3.shopper('ses', region_name=area)
    response = send_email(**email_info, ses_client=ses_client)
    print(f"SES response: {response}")
    return
I create a stamped PDF and add it to S3 with the title saved in client_ref variable. I name a generate_links operate that makes use of the client_ref and an s3 shopper to generate PDF, EPUB, MOBI, and KPF hyperlinks. And at last, I ship an e-mail utilizing a send_mail operate. The present handler code generates client_ref barely otherwise. I speak about it within the Renaming S3 bucket information part.
Producing S3 hyperlinks
The generate_links operate seems to be like this:
def generate_links(client_ref, s3_client):
    expiration_time = 604800
    pdf_link = s3_client.generate_presigned_url('get_object',
        Params={'Bucket': os.environ["BUCKET"],
                'Key': client_ref},
        ExpiresIn=expiration_time)

    epub_link = s3_client.generate_presigned_url('get_object',
        Params={'Bucket': os.environ["SOURCE_BUCKET"],
                'Key': "PracticalPythonProjects.epub"},
        ExpiresIn=expiration_time)

    mobi_link = s3_client.generate_presigned_url('get_object',
        Params={'Bucket': os.environ["SOURCE_BUCKET"],
                'Key': "PracticalPythonProjects.mobi"},
        ExpiresIn=expiration_time)

    kpf_link = s3_client.generate_presigned_url('get_object',
        Params={'Bucket': os.environ["SOURCE_BUCKET"],
                'Key': "PracticalPythonProjects.kpf"},
        ExpiresIn=expiration_time)

    return pdf_link, epub_link, mobi_link, kpf_link
This operate creates 4 hyperlinks. The PDF hyperlink is generated from the file that was only in the near past stamped and uploaded to S3 and the opposite hyperlinks are generated from the supply information bucket. The latter isn’t stamped so we are able to merely make use of the information from the supply bucket quite than regenerating them for every buyer.
I’m setting the expiration date for these pre-signed URLs to the utmost worth allowed by S3 which is 604800s. These equal 7 days or every week. (the ensuing hyperlinks have been nonetheless expiring in a few hours. I talk about this within the Expiring hyperlinks part)
I additionally needed to guarantee that the S3 shopper object was created with these parameters:
from botocore.shopper import Config
import boto3

# ...

area = "us-west-1"
s3 = boto3.shopper('s3',
    region_name=area,
    endpoint_url=f'https://s3.{area}.amazonaws.com',
    config=Config(signature_version='s3v4', s3={'addressing_style': 'digital'})
)
This was mandatory for me to make my pre-signed URLs work. I additionally needed to transfer my bucket from us-east-2 to us-west-1 as the previous area was inflicting some bizarre errors whereas accessing the pre-signed URLs.
I’ll cowl the send_email operate within the subsequent part.
Getting SES up and working
SES is pretty simple. You go to AWS SES console (assuming you have already got an AWS account) and confirm a brand new Area. That is required to ship emails by way of SES. You enter the area info and SES generates some TXT and CNAME information for you. You go and put them in your web site by way of the DNS administration interface of whichever host you’re utilizing.
That is what the SES console seems to be like when you have got a verified area.
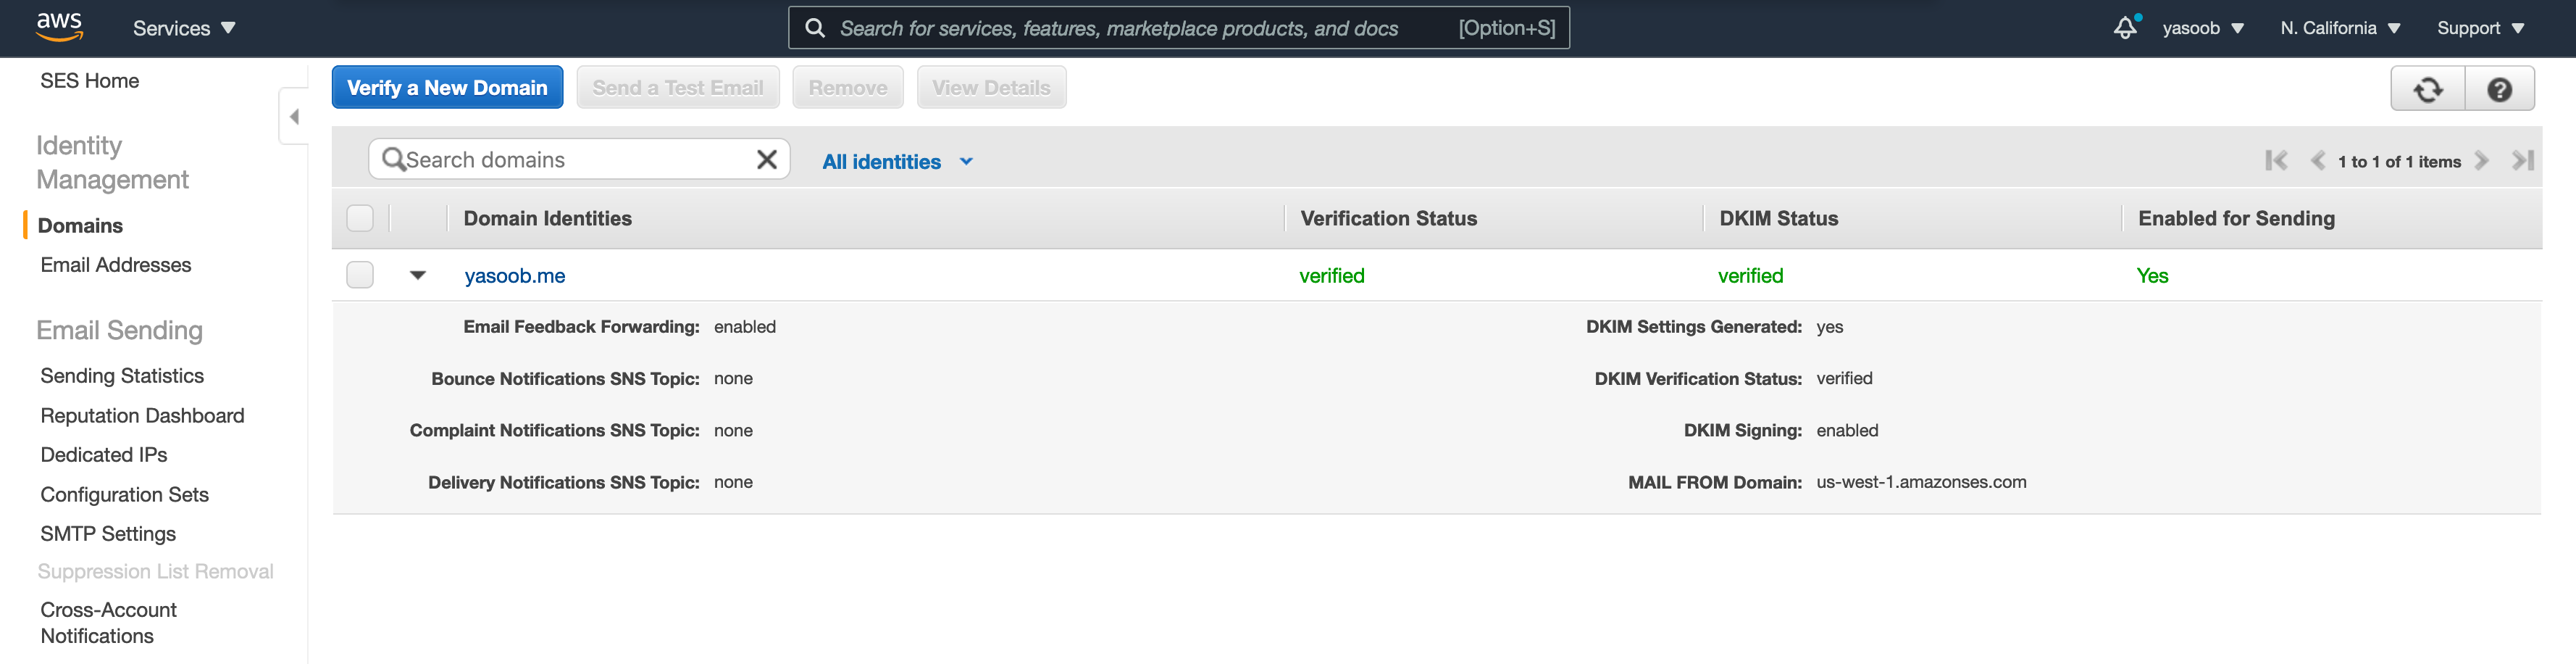
After you get a website verified, the preliminary SES sending quota is pretty restricted and your software remains to be in sandbox. This implies you could solely ship emails to individuals on the identical area because the one you verified or the individuals whose e-mail had been verified by way of the “Electronic mail Addresses tab” below “Identification Administration”. So as to enhance your sending quota and permission to ship to individuals exterior of verified domains, you should submit a request.
You must go to the “Sending Statistics” tab, click on on “Edit your account particulars” and enter info relating to how you’ll be utilizing SES in manufacturing. AWS individuals will evaluate your software and approve your request inside a day and enhance the variety of emails you may ship inside a second and inside a day.
The area verification takes wherever from a few minutes to a couple hours and the DKIM standing change normally takes longer than the conventional verification. In my case, each have been finished inside a number of hours. As for the manufacturing request software, mine received accepted in round a day.
As soon as I had SES all arrange, I may get the boto3 library and play with it. The code I take advantage of for sending an e-mail seems to be like this:
def send_email(title, e-mail, pdf_link, epub_link,
            mobi_link, kpf_link, order_no, ses_client):
    final_body = (f"Hello {title}!"
                    "Thanks a lot for ordering my ebook. I'm actually excited "
                    # ...
                    f"- PDF: {pdf_link}rn"
                    f"- EPUB: {epub_link}rn"
                    f"- MOBI: {mobi_link}rn"
                    f"- KPF: {kpf_link}rnn"
                    # ...
                    "Take care,rn"
                    "Yasoob")
    SENDER = "Yasoob Khalid <hello@yasoob.me>"
    CHARSET = "UTF-8"
    SUBJECT = f"Your copy of Sensible Python Tasks 🚀 | Order {order_no}"
    email_info = {
        "title": title,
        "e-mail": e-mail,
        "order_no": order_no,
        "pdf_link": pdf_link,
        "epub_link": epub_link,
        "mobi_link": mobi_link,
        "kpf_link": kpf_link,
    }
    response = ses_client.send_email(
        Vacation spot={
            'ToAddresses': [
                email,
            ],
        },
        Message={
            'Physique': {
                'Html': {
                    'Charset': CHARSET,
                    'Information': email_head + email_body.format(**email_info),
                },
                'Textual content': {
                    'Charset': CHARSET,
                    'Information': final_body,
                },
            },
            'Topic': {
                'Charset': CHARSET,
                'Information': SUBJECT,
            },
        },
        Supply=SENDER,
        ReplyToAddresses=[
            'hi@yasoob.me',
        ],
    )
    return response
The email_head and email_body are simply two multiline strings containing the HTML e-mail. The email_body accommodates a few placeholders that I fill in utilizing the email_info dict.
I name this operate like this:
import boto3

email_info = {
  "title": title,
  "e-mail": e-mail,
  "order_no": order_no,
  "pdf_link": pdf_link,
  "epub_link": epub_link,
  "mobi_link": mobi_link,
  "kpf_link": kpf_link,
}

ses_client = boto3.shopper('ses', region_name="us-west-1")
response = send_email(**email_info, ses_client=ses_client)
print(f"SES response: {response}")
The ensuing e-mail seems to be like this:
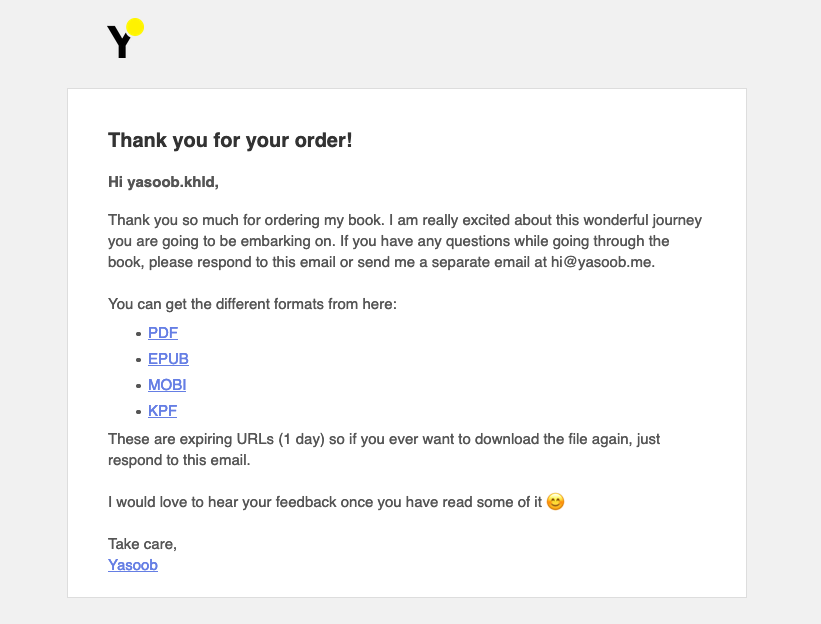
That is all that you should ship a {custom} e-mail utilizing SES and that is how I built-in SES with the course of operate.
Customized area
Now that I had all of the elements up and working, I had to determine easy methods to deploy the service on a {custom} area. All the unique serverless documentation pointed to both registering a brand new area with AWS Route 53 or switch the DNS of an current area to Route 53. I didn’t wish to do both as Route 53 is dear for a brand new area (+ I already owned 1 that I wished to make use of) and I had already custom-configured a ton of CNAME and TXT information for my previous area with my different area registrar (Namecheap) that I used to be in no temper to repeat over.
The answer was easier than I believed. I adopted the major serverless tutorial with a number of modifications. Listed below are the steps I adopted:
- Go to the AWS Certificates Supervisor and request a certificates for a pre-existing area
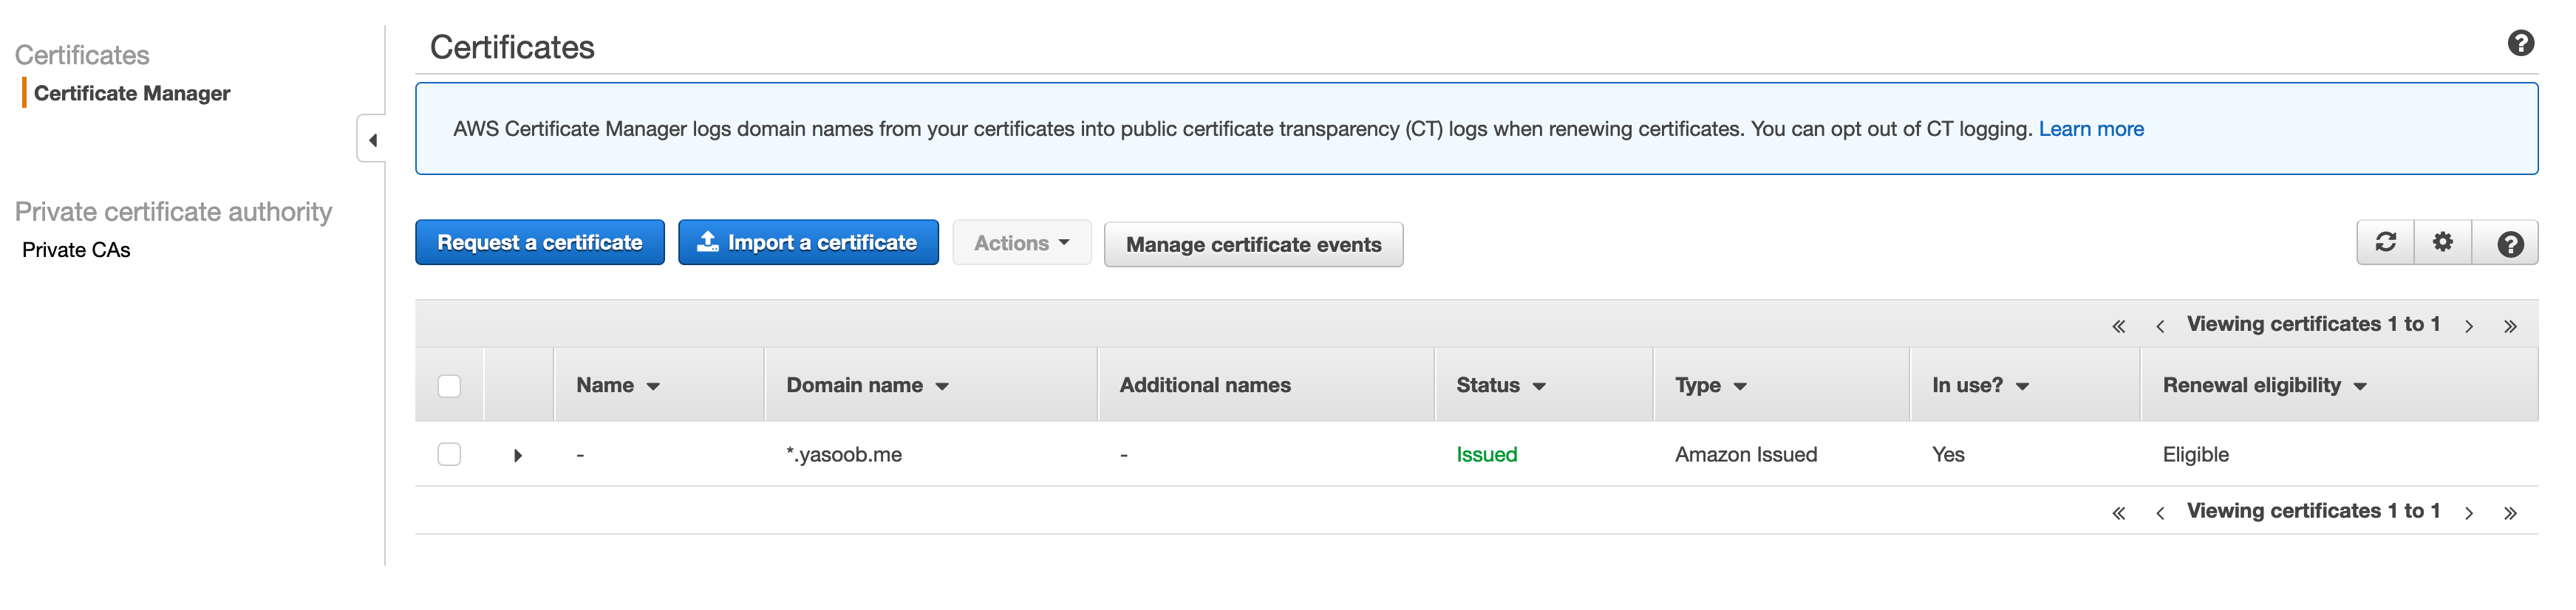
- Set up the serverless area supervisor utilizing NPM
$ npm set up serverless-domain-manager --save-dev - Edit the
serverless.ymlfile so as to add the area supervisor plugin and outline my area
plugins:
  - serverless-python-requirements
  - serverless-domain-manager

{custom}:
    # ...
  customDomain:
    domainName: ____.yasoob.me
    certificateName: "*.yasoob.me"
    basePath: ''
    stage: ${self:supplier.stage}
    endpointType: 'regional'
    createRoute53Record: false
(Substitute the _____ with the precise subdomain that will likely be pointing to this service)
- Run the area supervisor plugin
sls create_domain - Deploy
sls deploy
The deployment will present output just like this:
Serverless Area Supervisor Abstract
Area Title
  api.instance.com
Distribution Area Title
  a19cneopjuq1t1.cloudfront.internet
- Arrange a CNAME file within the DNS from the {custom} subdomain to the CloudFront URL the deploy command outputted.
This weblog by Stephen Owens was tremendous useful.
Enjoyable post-launch points
I’ve already shared fairly a number of points on this article however let me describe a pair extra.
Expiring hyperlinks
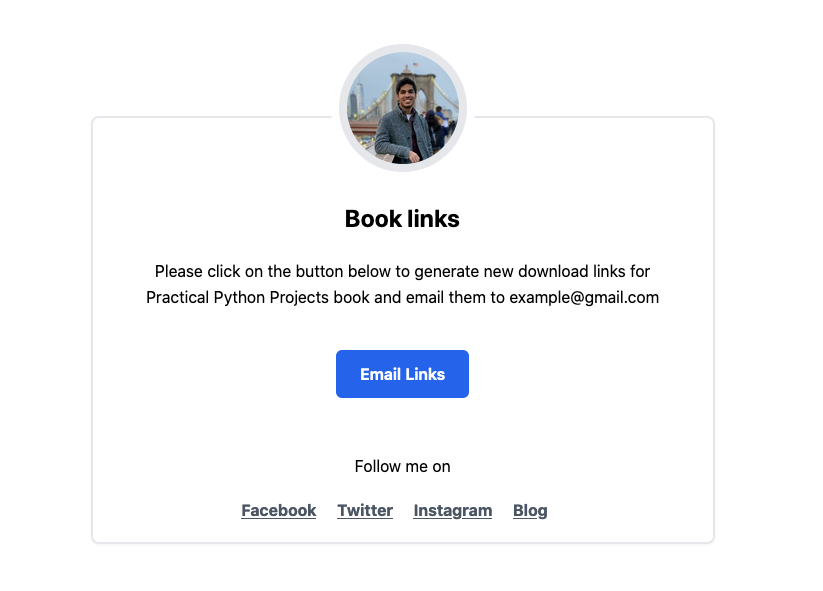
After releasing the ebook, I received an e-mail from a buyer that the hyperlinks I emailed them have been already expired after a day as in comparison with every week (that is what I had instructed them). Seems they have been proper. The pre-signed URL did comprise the X-Amz-Expires=604800 parameter however for some motive, Amazon was not respecting it. 604800 is in seconds and that equals every week. It took some looking round to seek out out that the AWS function that was producing these pre-signed URLs was tied to the Lambda operate id. It’s unattainable to generate pre-signed URLs that take greater than a few hours to run out through the use of this id.
If you’re a long-time AWS/Lambda consumer, you may need already recognized this however I’m a brand new consumer and this “characteristic” isn’t properly documented wherever. I needed to provide you with an answer to this drawback. I couldn’t simply manually generate the URLs every time a buyer desires to obtain their copy. Both the URLs shouldn’t expire or there must be a self-service system the place the shoppers can generate the URLs on demand. I made a decision to go together with the latter answer.
I arrange a brand new Lambda operate whose job was to solely generate pre-signed URLs for pre-existing assets and ship an e-mail to the shopper. The code is pretty just like the handler code I confirmed in one of many earlier sections.
That is what the general public web page for this seems to be like:
CORS difficulty
If you're seeing this error for the primary time, it's robust to wrap your head across the root trigger. [Mozilla](https://developer.mozilla.org/en-US/docs/Net/HTTP/CORS) does a great job at explaining it. For the brand new API endpoint for producing pre-signed URLs on demand, I had an identical difficulty and needed to arrange CORS.

That is required if you're serving your API from a distinct area and your front-end is at a distinct area. It's straightforward to repair this difficulty. I needed to modify my `serverless.yml` file like this:
occasions:
– http:
path: /
methodology: submit
cors: true
Discover the `cors: true` assertion within the occasion set off definition. I additionally needed to guarantee that after I was returning the response from my handler, I added the suitable headers as properly:
return {
“statusCode”: 200,
‘headers’: {
‘Content material-Sort’: ‘software/json’,
‘Entry-Management-Enable-Origin’: ‘*‘,
‘Entry-Management-Enable-Credentials’: True
},
“physique”: json.dumps(message)
}
Additionally it is necessary to notice that in case your handler operate's return worth would not embrace `statusCode`, you will note bizarre return responses which are laborious to debug. I'm an avid Flask consumer so I used to be merely getting back from the operate like this:
return message, 200
It took me some time to appreciate that lambda would not work the identical approach as Flask. The API gateway was unable to know my response and so as a substitute of returning a 200 standing, it was returning some 5xx error. I wasn't capable of monitor this error utilizing CloudWatch both. Fortunately that's all prior to now now.

### Rename S3 bucket information

In the course of the preliminary launch, I used to be saving the generated PDF information in S3 with the next naming conference:
Name_Email_OrderNo
This labored out properly initially however in a while, I discovered that the report that Paddle generates would not embrace the consumer's title. I wished a naming conference the place I can simply cross-reference a file towards the Paddle report. The primary motive for utilizing this naming conference was to guarantee that information have been distinctive. I spotted that even when I drop the `title`, the information would nonetheless be distinctive. I modified my new pre-signed URL era endpoint in such a approach that if a file with the important thing `Email_OrderNo` did not exist, it might copy the `Name_Email_OrderNo` to `Email_OrderNo`, delete the previous file, and generate pre-signed URLs for this new file (`Email_OrderNo`). The rationale for doing a replica as a substitute of a rename is that S3 would not assist renaming so you need to create a replica with a brand new title after which delete the previous file.

It appeared fairly simple. The `boto3` methodology requires copying and deleting the file roughly seem like this:
old_client_ref = “Name_Email_OrderNo”
client_ref = “Email_OrderNo”
BUCKET = “customer-files”
s3_resource.Object(BUCKET, client_ref).copy_from(
CopySource=“/”.be a part of([BUCKET, old_client_ref])
)
s3_resource.Object(BUCKET,old_client_ref).delete()
The IAM function coverage in `serverless.yml` seemed like this:
- Impact: “Enable”
Motion:- “s3:PutObject”
- “s3:ListBucket”
- “s3:GetObject”
- “s3:GetObjectAcl”
- “s3:DeleteObject”
Useful resource: “arn:aws:s3:::customer-files/*”
“`
I examined the boto3 code regionally and deployed the code. To my shock, the code failed in manufacturing. The logs confirmed this error:
I used to be a bit confused. The S3 coverage code seemed completely effective. I turned to Google and even Google wasn't capable of assist me. Seems, I had so as to add the next permissions to the IAM function as properly:
- Impact: “Enable”
Motion:- “s3:ListBucket”
- “s3:GetObject”
- “s3:GetObjectAcl”
Useful resource: “arn:aws:s3:::/“
“`
I’m not certain why S3 requires these additional permissions for copying information because the boto3 code shouldn’t be interfacing with every other S3 bucket. I’ll write a separate submit on how I debugged this coverage difficulty because it took me fairly some time.
Serverless monitoring
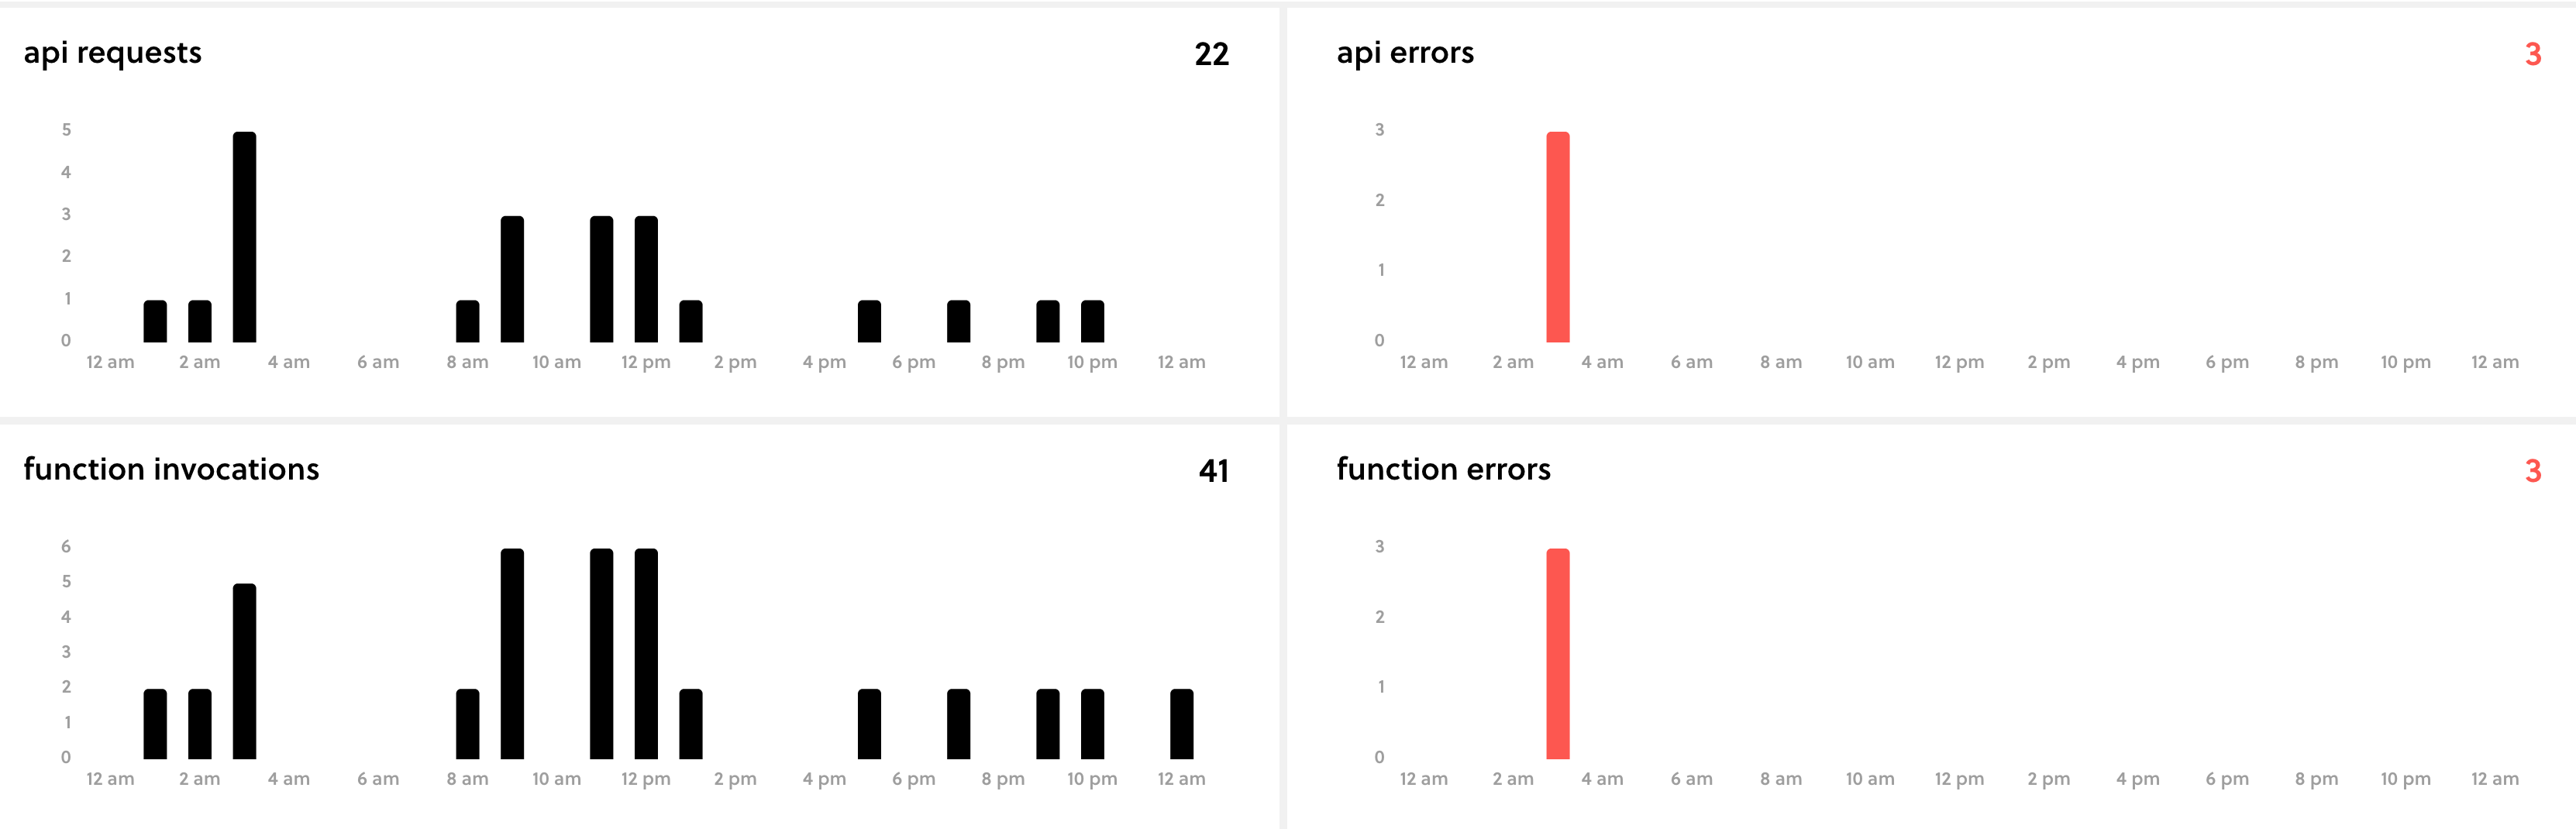
The most effective half about utilizing serverless is you could join a free serverless.com account. The serverless command will immediate you to enroll once you initially begin a model new serverless mission. This dashboard permits you to monitor your serverless capabilities simply and without cost. This has been actually useful throughout my preliminary and ongoing deployments. That is the principle dashboard that I control to ensure my capabilities aren’t failing for any motive.
Issues to be careful for
Listed below are a few issues that could be good to bear in mind:
- Lambda:
- Time restrict for public API endpoints is 30s
- Does a chilly begin if a operate isn’t used however not likely a problem because the chilly begin is tremendous fast
- May get costly if service is used tremendous incessantly
- S3
- pre-signed URLs have a max expiry of 1 week
- You’ll be able to allow file retention config to delete information after 30 days to stop additional value
- SES
- You must confirm the area in every zone you wish to ship e-mail from e.g
us-west-1vsus-east-2
- You must confirm the area in every zone you wish to ship e-mail from e.g
- PDF processing
- PyPDF2 is gradual and never maintained anymore
pdfrwis pure Python however not as full-featured- PDF spec doesn’t change incessantly so libraries don’t must be up to date tremendous usually
- Check totally different PDF processing libraries and use whichever one fits your use case as there is no such thing as a one dimension suits all
- Paddle
- Takes an enormous chunk from the sale however there aren’t too many viable choices for a significant group of individuals
Subsequent Steps
I plan on fleshing out this service so as to add a pair extra options. Perhaps flip it right into a full-fledged service like SendOwl.
I used to be all the time skeptical of self-hosted e-mail publication companies like Sendy as I had heard too many horror tales round deliverability points however this expertise and one other tangential expertise with SES has made me extra assured that Sendy is the way in which to go. I’m at the moment utilizing Mailchimp and that prices me $78 for the bottom bundle for 5000+ subscribers. Sendy can convey that right down to round $0-5 after preliminary cost for the software program. I additionally don’t ship sufficient emails to justify the $78 price ticket.
Conclusion
I used to be capable of check and launch this service inside 3 days. I began growing it on Monday and it was in manufacturing on Thursday. I did this all with none prior expertise with serverless.com or PDF stamping. Focus performed an enormous function on this and forcing myself to maintain my eye on the goal always helped me do that. Had been there a few points post-launch? Certain. Had been they large enough to stop the launch? Heck no.

So what was probably the most tiring+essential bug? The time when a buyer reached out and knowledgeable me concerning the bookmarks not working. That was a totally unexpected difficulty and the extra I looked for easy methods to repair the issue utilizing PyPDF2, the extra pissed off I turned. Discovering a brilliant fast answer utilizing pdfrw is a reminder that generally the library you’re utilizing won’t be the most effective for the job and it’s all the time okay to go searching a little bit bit.
One other necessary studying from this train is that prospects are sympathetic should you hold them up to date about a problem. I despatched an e-mail to all the shoppers after the hyperlink expiry and the PDF stamping difficulty and received a number of encouraging responses. There’s a motive individuals say: “simply ship it!”. You’ll be able to all the time repair the lingering bugs with time in the event that they aren’t too severe 🤞
I hope you realized one thing new from this text. When you have any questions, feedback, or issues, please write a remark beneath or ship me an e-mail. I really like listening to from you all! ❤️