


Some time again, you had been in all probability searching for an amazing resolution to create your weblog, and Gatsby was the preferred resolution floating round on the time.
Now that a while has handed, a brand new participant has risen to fame on the scene: Subsequent.js has taken developer blogs by storm.
No matter your causes for switching, we’ll clarify tips on how to swap from the Gatsby stack over to Subsequent.js on this put up.
Why Use Gatsby?
When Gatsby turned fashionable, it obtained marketed as the very best factor round. You get handy plugins, little to no setup, and the unbelievable energy of GraphQL. Plus, the phrase ‘velocity’ was stamped throughout it. Your static content material is certainly quick with Gatsby, because it hundreds solely important knowledge after which fetches different wanted assets.
What is great about Gatsby is you could jump-start an internet site with a few instructions in your terminal. There isn’t any extra must arrange Webpack, code break up, picture optimize, and all of the pesky particulars you often do. You’ll be able to select preexisting themes, customise them at your individual will and have a great-looking website. Plus, you get GraphQL to handle any knowledge fetching you may want.
In actuality, customers (like myself) don’t make the most of GraphQL in Gatsby for what it’s price. The true energy comes when you may have a number of knowledge sources to construct your web site. For instance, you load content material out of your native information, plus you may have some content material dwelling in some headless CMS. In that case, GraphQL could turn into very helpful. In different instances, it’s overkill, I imagine (until you wish to get the hold of GraphQL).
Aside from that, Gatsby generates HTML pages in construct time and allows you to host them wherever you want, which means that you simply don’t want a operating server in some instances.
So, what can compete in opposition to a JavaScript (React) framework for static website technology? What offers Subsequent.js the sting over Gatsby? Let’s discover out.
Why Swap to Subsequent.js?
Subsequent.js can be marketed as a React framework, however its focus is on Single Web page Functions. The thought is that you should utilize it for different issues than simply rendering static content material.
Highly effective Server-Facet Rendering with Subsequent.js
The facility of Subsequent.js lies in Server-Facet Rendering (SSR), which is changing into more and more fashionable within the React neighborhood. Subsequent.js is a hybrid device for server-side rendered pages and a static websites generator.
The principle advantage of SSR is that you simply get a sooner Time To First Draw (TTFD) as a result of the content material can function HTML instantly from the server. However, Time To First Byte (TTFB) could be one thing that it probably lacks. That signifies that all of the heavy lifting will get finished on the server, not like different frameworks that decrease TTFB by loading essential assets first after which engaged on the shopper, thus growing TTFD.
The principle motive why you’d select Subsequent.js is whenever you want some dynamic components of a web page versus plain static content material. An instance of this is usually a web site providing merchandise. You’ll be able to generate components of it as static content material after which render the product store dynamically. That is the benefit that Subsequent.js has over Gatsby.
So Subsequent.js affords extra whenever you want a combination of static and dynamic content material. However it’s best to take into account the type of web site you’re constructing. Keep in mind that Gatsby has many options that require little to no configuration if it is advisable to get began rapidly. In case you’re making a product and deciding between the 2, I imagine Subsequent.js is a winner. Additionally, in order for you extra fine-grain management over configuration, Subsequent.js offers you extra freedom there.
Now let’s work on a easy use case and present tips on how to migrate a easy Gatsby weblog to Subsequent.js.
Gatsby to Subsequent.js Migration Challenges
We wish to migrate an present Gatsby weblog to make use of Subsequent. The necessities are easy — we wish weblog readers to not discover that one thing has modified visually and content-wise. Additionally, we wish to maintain our search engine optimisation and efficiency on the identical ranges, if not higher.
To do that, we now have emigrate content material (our weblog posts) and all of the issues that include it — pictures, code highlighting, content material, and any potential hidden quirks there. Additionally, we wish our sitemap to operate appropriately in order that search indexes know our weblog’s pages. And, lastly, we wish to deploy our weblog to the web so others can learn it.
Laying Out the Groundwork
To start out, let’s generate a easy Subsequent.js app, so we now have a clear plate. Ranging from a easy app will assist us perceive each Subsequent.js and the method to observe.
Fortunately, we don’t have to write down the whole lot by hand. There’s a helpful create-next-app device at our disposal. We are going to begin by producing our Subsequent.js mission:
npx create-next-app nextjs-blog --use-npmWith the command above, we’ll get all of the important information wanted to begin and run our Subsequent.js app for now. In case you peek at bundle.json, you will note a easy setup the place we now have subsequent, react, and react-dom as dependencies. It appears fairly light-weight in comparison with Gatsby, the place you get lots of issues out of the field.
You’ll be able to verify whether or not the whole lot is working appropriately by operating npm run dev. It is best to get a “Welcome to Subsequent.js” web page on http://localhost:3000/.

Cool, now that we now have it operating, let’s analyze the content material of our new app. From the beginning, you will note that the file construction is stoic. Now we have the pages dir with _app.js and index.js. There’s additionally the api listing, however we gained’t contact it on this weblog put up.
The _app.js is the ‘root’ of our mission, and right here we will outline world kinds, search engine optimisation, and different site-wide shenanigans. What’s necessary is that each file you create in pages dir, will create a web page in your web site. That is just like what Gatsby does, however with one quirk that we’ll go into later. To check this out, let’s create pages/about.js:
import kinds from "../kinds/House.module.css"

export default operate About() {
  return (
    <fundamental className={kinds.fundamental}>
      <h1 className={kinds.title}>Hey, this is the about web page.</h1>
    </fundamental>
  )
}
Now, let’s go to http://localhost:3000/about, and we should always see the next:

Fairly cool! Now that we’ve figured that out, we’ll bounce into the following part and migrate content material into our model new Subsequent.js app.
Migrating Content material Into Subsequent.js
The guts of a weblog is its content material — with out it, our weblog gained’t be a real weblog, proper? So let’s examine how we will render weblog posts in our Subsequent.js weblog. In Gatsby, the content material is often saved within the root of the mission contained in the content material listing. We will create an identical construction right here as properly.
I went forward and created content material/weblog listing, and put two Markdown information there — first-post.md and second-post.md. Right here’s how they appear:
# content material/weblog/first-post.md

---

title: My first put up on Subsequent.js weblog
description: I attempted my finest.
date: 8 January 2021

---

Hey there, that is my first put up.
# content material/weblog/second-post.md
---
title: My second put up, with code examples
description: Greatest code isn't any code.
date: 21 February 2021
---
Here is some Ruby code:
```rb
def hey_there
places 'Hey there'
finish
```
And, here is some JavaScript code:
```javascript
const whats up() => {
console.log('Hey')
}
```Glorious, so how can we present these within the browser? Glad you requested. We have to by some means load these Markdown information to Subsequent.js. There are a number of methods, however my favourite is to learn file slugs from the posts listing and cargo them one after the other.
Load Posts on the Index Web page
In case you come from Gatsby, you can find this half a bit sudden. Gatsby means that you can add a plugin to make Markdown information obtainable and parses them to you with GraphQL. Sadly, we’re not in Gatsby, and we now have to take extra management in our fingers. So, let’s see how we will load and parse Markdown information in order that our React parts perceive them.
Let’s create a lib listing within the root of our mission and put a file named posts.js there. This file will include the logic for loading, parsing, and sorting our weblog posts. Right here’s how the file ought to look:
import fs from "fs"
import { be part of } from "path"
import matter from "gray-matter"

const postsDirectory = be part of(course of.cwd(), "content material/weblog")

export const posts = () => {
  const slugs = fs.readdirSync(postsDirectory)
  const allPosts = slugs
    .map((slug) => getPostBySlug(slug))
    .type((post1, post2) =>
      new Date(post1.frontmatter.date) > new Date(post2.frontmatter.date)
        ? -1
        : 1
    )

  return allPosts
}

export const getPostBySlug = (slug) => {
  const realSlug = slug.change(/.md$/, "")
  const fullPath = be part of(postsDirectory, `${realSlug}.md`)
  const fileContents = fs.readFileSync(fullPath, "utf8")
  const { knowledge: frontmatter, content material } = matter(fileContents)

  return { slug: realSlug, frontmatter, content material }
}
We use fs to load information and gray-matter library to parse its content material. For this, you’ll have to set up gray-matter within the mission with:
So, what occurs in lib/posts.js? We discover out our postsDirectory, then we get all of the file slugs and feed them one after the other into getPostBySlug. The getPostBySlug then reads the file and parses it utilizing the matter operate from the gray-matter lib. We wish to use matter to parse the frontmatter we added in our weblog posts (meta-information about our posts, like title, description, and date).
Cool, now that we obtained that out of the best way, let’s load our weblog posts on the index web page. We are going to go into pages/index.js, which serves our index web page, and modify it a bit to appear like this:
import kinds from "../kinds/House.module.css"
import { posts } from "../lib/posts"
import Structure from "../parts/format"

export default operate House({ allPosts }) {
  if (!allPosts || !allPosts.size) return

  return (
    <Structure>
      <h1 className={kinds.title}>
        Welcome to <a href="https://nextjs.org">Subsequent.js!</a>
      </h1>

      <p className={kinds.description}>
        Get began by modifying{" "}
        <code className={kinds.code}>pages/index.js</code>
      </p>

      {allPosts.map((put up) => (
        <div key={put up.slug} className={kinds.grid}>
          <a href={put up.slug} className={kinds.card}>
            <h2>{put up.frontmatter.title}</h2>
            <span>{put up.frontmatter.date}</span>
            <p>{put up.frontmatter.description}</p>
          </a>
        </div>
      ))}
    </Structure>
  )
}

export async operate getStaticProps() {
  const allPosts = posts()

  return {
    props: {
      allPosts,
    },
  }
}
We cleaned up the index.js a bit by making a Structure part that holds widespread rendering logic which we’ll later reuse. The necessary factor right here is the getStaticProps operate. getStaticProps is an async operate that will get picked up by Subsequent.js. In case you present this operate, Subsequent.js will pre-render this web page at construct time utilizing the props returned by getStaticProps. So we guarantee our posts are loaded at construct time, after which later, we will use them within the House part.
Within the House part, we obtain allPosts props and render them one after the other. I used and modified the styling a bit from the generated Subsequent.js app, however you possibly can go loopy and do no matter you want right here. You’ll be able to go with out kinds or usher in your individual. Styling and CSS are enormous matters and we will talk about them in one other weblog put up. Let’s maintain it easy for now.
Cool, now that we added the code above, we should always see one thing like this in our browser:

Seems to be fairly good to date. Now when customers come to our web site, they are going to see the weblog posts we now have. However there’s one downside. Once they click on on the weblog put up, they are going to get a 404 web page. So it’s time to implement rendering logic for every weblog put up.
Loading a Single Publish
To do that, let’s create a [slug].js file inside pages listing. In case you haven’t seen a file title like this earlier than, you is likely to be confused. Don’t fear, it is a Subsequent.js function. Our file resides in pages/[slug].js, which signifies that requests like /some-blog-post or /abc will likely be dealt with by the logic in pages/[slug].js. Subsequent.js calls it dynamic routing, and it’s a very elegant resolution.
Let’s add some logic to pages/[slug].js so it renders a weblog put up:
import Structure from "../parts/format"
import { posts, getPostBySlug } from "../lib/posts"

const Publish = ({ content material, frontmatter }) => {
  return (
    <Structure>
      <article>
        <h1>{frontmatter.title}</h1>
        <p>{frontmatter.date}</p>

        {content material}
      </article>
    </Structure>
  )
}

export default Publish

export async operate getStaticProps({ params }) {
  const { content material, frontmatter } = getPostBySlug(params.slug)

  return {
    props: {
      content material,
      frontmatter,
    },
  }
}

export async operate getStaticPaths() {
  const allPosts = posts()

  return {
    paths: allPosts.map((put up) => {
      return {
        params: {
          slug: put up.slug,
        },
      }
    }),
    fallback: false,
  }
}
In case you keep in mind the Structure part — I extracted it to lib/parts, and I’m calling it from there. Within the physique of Publish part, I render some frontmatter knowledge we set within the Markdown file. We get that knowledge from the beforehand talked about getStaticProps. However, no, we now have a brand new child on the block — getStaticPaths. The getStaticPaths operate ought to return paths, so Subsequent.js is aware of which paths to render to HTML at construct time.
All we do in getStaticPaths is fetch all our posts and let Subsequent.js know that every of these slugs must be rendered at construct time. Now we will open a weblog put up from our index web page, and we should always see one thing like this:

The title and the date are there, however the content material of the put up is slightly tousled. That’s as a result of we didn’t convert the uncooked Markdown to HTML. Let’s go forward and do this. We are going to use the ReactMarkdown part from the react-markdown library. Let’s set up it first with:
1npm set up react-markdownAfter react-markdown is put in, we will modify our pages/[slug].js to appear like this:
...

import ReactMarkdown from "react-markdown";

const Publish = ({ content material, frontmatter }) => {
  return (
    <Structure>
      <article>
        <h1>{frontmatter.title}</h1>
        <p>{frontmatter.date}</p>

        <ReactMarkdown>{content material}</ReactMarkdown>
      </article>
    </Structure>
  );
};

...
And with that, we should always see a better-looking weblog put up like this:

Now our weblog put up appears higher. However there’s one factor lacking — code highlighting. Let’s bounce in and spotlight code sections.
Add Code Highlighting
We are going to use spotlight.js library to spotlight code inside our weblog posts. First, let’s set up the library with:
1npm set up spotlight.jsNow, we will spotlight our code. To do it, we’ll cross a customized part to ReactMarkdown to render code blocks. Right here’s the way it ought to look:
...
import spotlight from "spotlight.js";

const Publish = ({ content material, frontmatter }) => {
  return (
    <Structure>
      <article>
        <h1>{frontmatter.title}</h1>
        <p>{frontmatter.date}</p>

        <ReactMarkdown
          parts={{
            code: ({ ...props }) => <Code {...props} />,
          }}
        >
          {content material}
        </ReactMarkdown>
      </article>
    </Structure>
  );
};

const Code = ({ kids, className, ...props }) => {
  const highlightedHtml = spotlight.highlightAuto(kids[0]).worth;

  return (
    <pre>
      <code
        className={`${className} hljs`}
        dangerouslySetInnerHTML={{ __html: highlightedHtml }}
      />
    </pre>
  );
};

...
Within the Code part, we obtain kids — the code we wish to spotlight, and a className — the title of the category we’ll set on the code factor. We name spotlight for kids[0] and render it as HTML with React’s dangerouslySetInnerHTML.
Now that we now have the highlighting half, we have to import the kinds wanted to spotlight languages. Fortunately, spotlight.js has some themes you possibly can take a look at. We’re going to load a Monokai theme within the _app.js like so:
import "../kinds/globals.css"
import "../node_modules/spotlight.js/kinds/monokai.css"

operate MyApp({ Part, pageProps }) {
  return <Part {...pageProps} />
}

export default MyApp
After these adjustments, we should always see our weblog put up like this:

Excellent, our weblog posts are good and readable now. Subsequent, we have to determine tips on how to load pictures on our weblog. Earlier than that, let’s talk about whether or not we may have gone the opposite method with rendering our weblog content material.
Markdown or MDX?
The recent subject for some time has been MDX. What’s MDX, you is likely to be asking? Its tagline is “Markdown for the part period.” However in brief, it means that you can import and render parts alongside markdown content material. It appears fairly nifty and useful, however I prefer to maintain my weblog easy. For now, I don’t want parts inside my weblog posts.
In case you are thinking about utilizing .mdx as a substitute of .md information, there are answers on the market. We gained’t talk about them on this weblog put up, possibly within the following ones. However simply in order that you realize, folks can use MDX with Subsequent.js. One of many fashionable options is @subsequent/mdx.
So we’ve determined to make use of plain Markdown for now. Let’s determine tips on how to present pictures correctly within the subsequent part.
Migrating Photos from Gatsby to Subsequent.js
Considered one of Gatsby’s cool issues is its automated picture gimmicks when you use the gatsby-image plugin in your setup. You’ll be able to obtain related outcomes when you make the most of subsequent/picture inside Subsequent.js tasks. Let’s examine the 2:
- Gatsby routinely optimizes pictures for you throughout construct time, whereas Subsequent.js does this on-demand.
- Gatsby integrates into the inner GraphQL you employ to load pictures, whereas Subsequent.js permits you to outline how you’ll load them.
- Each mean you can have a blurred picture preview, and they’ll maintain the house wanted for the picture earlier than it hundreds. Reserving house for the picture reduces format shift on the web page.
So that they have fairly related options, however the best way you employ them is completely different. In Gatsby, you attempt to configure the picture plugin from the next stage, whereas in Subsequent.js, lots of the configuration feels very guide and like you’re in management.
One easy technique to get pictures to load for our weblog is to place them within the public listing within the root of our mission. Let’s put a picture of a cat — cat.jpg – to the public/cat.jpg. Then, in our weblog put up, we will render it like this:
After we open the weblog put up, it’ll render the cat image, however not in essentially the most environment friendly method. Additionally, I don’t like storing pictures within the public listing. We may fine-tune this resolution to load the picture effectively, however let’s strive one other, extra easy strategy.
So, how can we load pictures correctly in our Subsequent.js weblog? As an alternative of placing pictures within the public dir, we will create a content material/pictures listing and put our cat.jpg (and future pics) there. Alongside the brand new listing, we will create a brand new part known as Picture that we’ll feed to ReactMarkdown. The code ought to appear like this:
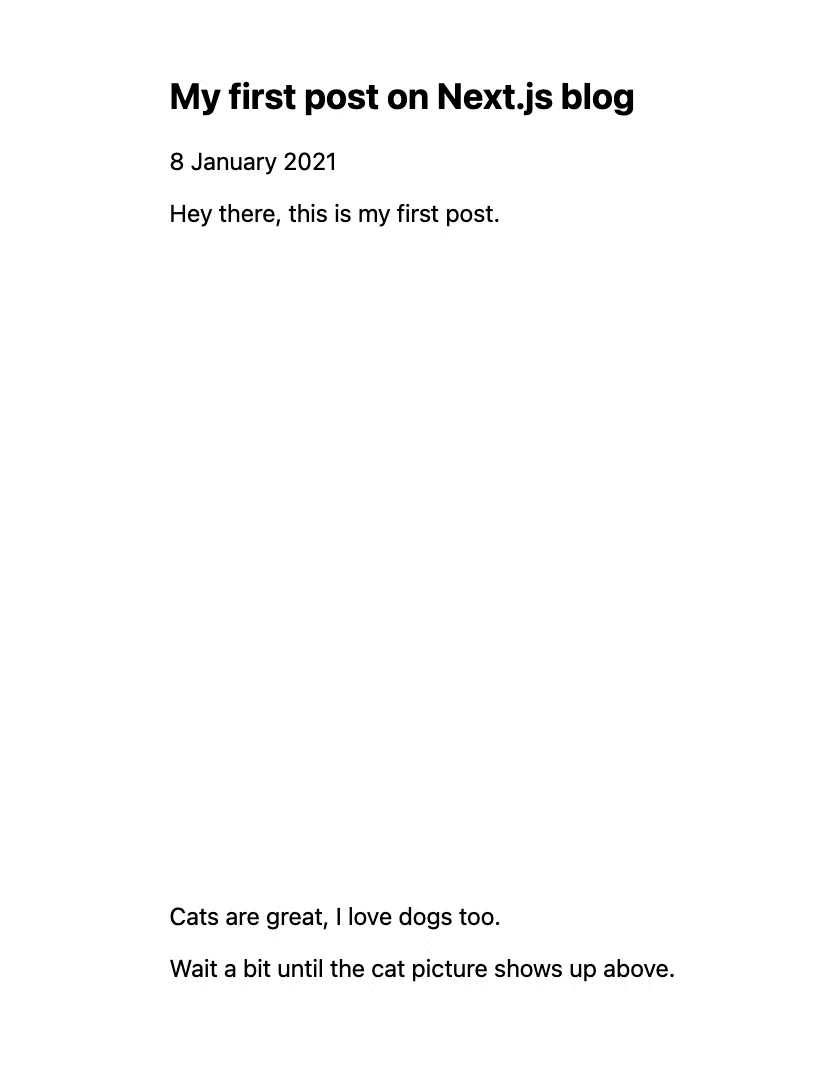
# content material/weblog/first-post.md
---
title: My first put up on Subsequent.js weblog
description: I attempted my finest.
date: 8 January 2021
---
Hey there, that is my first put up.

Cats are nice, I like canine too.
Wait a bit till the cat image exhibits up above.And we should always get the weblog put up to appear like this:

Photograph by Max Baskakov on Unsplash
Cool, however what simply occurred? We created a customized Picture part, and we informed ReactMarkdown to make use of it when it tries to render pictures. Then, within the Picture part, we require an area picture and inform subsequent/picture to blur it out earlier than it will get loaded. Right here’s the way it ought to look regionally:
Fortunately, we don’t must set width and peak in our situation. Subsequent.js will calculate it throughout construct time because it has entry to the image we’re making an attempt to load. In different situations, like loading a distant picture, it’s essential to set width and peak attributes to the subsequent/picture part. Once more, it is because Subsequent.js doesn’t have entry (or no less than doesn’t attempt to have it) within the construct time. The construct process is what units aside Gatsby and Subsequent.js.
Yet one more factor we did is ready format to responsive. You’ll be able to check out completely different choices that include subsequent/picture right here. The responsive format will scale the picture dimensions down for smaller viewports and scale up for bigger viewports.
Now that we’ve loaded pictures correctly let’s do yet one more factor earlier than deploying our web site. Let’s arrange a sitemap so search engines like google are conscious of the pages on our weblog.
Setting Up the Sitemap for Your Subsequent.js Weblog
With Gatsby, you’d set up a plugin, configure it a bit, and voila, you’d get a sitemap prepared. As with the whole lot else in Subsequent.js, the method of forming a sitemap is a bit completely different. You’re inspired to do that by yourself for extra management. So that is precisely what we’re going to do.
We are going to create a Node script that may run after the construct is full. Arrange a scripts listing and add a file named generate-sitemap.mjs. Don’t get freaked out by the .mjs extension — it’s a technique to outline and use ECMAScript modules in a Node script. The logic contained in the file ought to appear like this:
import { writeFileSync } from "fs"
import { globby } from "globby"
import prettier from "prettier"

async operate generate() {
  const prettierConfig = await prettier.resolveConfig("./.prettierrc.js")
  const pages = await globby([
    "pages/*.js",
    "content/**/*.md",
    "!content/*.md",
    "!pages/_*.js",
    "!pages/[*.js",
    "!pages/api",
    "!pages/404.js",
  ])

  const sitemap = `
    <?xml model="1.0" encoding="UTF-8"?>
    <urlset xmlns="http://www.sitemaps.org/schemas/sitemap/0.9">
        ${pages
          .map((web page) => {
            const path = web page
              .change("pages", "")
              .change("content material/weblog", "")
              .change(".js", "")
              .change(".md", "")
            const route = path === "/index" ? "" : path

            return `
              <url>
                  <loc>${`https://DOMAIN_NAME_HERE${route}`}</loc>
                  <changefreq>each day</changefreq>
                  <precedence>1.0</precedence>
              </url>
            `
          })
          .be part of("")}
    </urlset>
    `

  const formatted = prettier.format(sitemap, {
    ...prettierConfig,
    parser: "html",
  })

  writeFileSync("public/sitemap.xml", formatted)
}

generate()
Within the script, we decide up the filenames of Markdown information inside content material/ and filenames of sure information in pages/ utilizing the globby library. We ignore information that begin with [ and _ in pages/, together with the pages/api/ and the 404.js. Then, we remove excess data from the filenames to get paths (pages) on our website. Iterate over pages and add them as entries in the sitemap, with priority and change frequency attributes.
Finally, use prettier to format the sitemap properly, and write the sitemap to public/sitemap.xml so it’s available there.
To run this script, we need to install two packages:
1npm install -D globby prettierAnd, we will run this script after the build by defining it in the package.json:
{
  ...
  "scripts": {
    "dev": "next dev",
    "build": "next build",
    "postbuild": "node ./scripts/generate-sitemap.mjs",
    "start": "next start",
    "lint": "next lint"
  },
  ...
}
So, when we run npm run build, our script will create a new file in public/sitemap.xml. We can add this file to the .gitignore so it doesn’t get committed.
And that’s it — we’re ready to roll and publish our website!
Next.js Blog Deployment Options
What good is a blog if only you can read it? Probably not very good, so let’s figure out how to deploy it and have other people read it. There are a few options for deployment — Netlify, Heroku, Vercel, and many others. In this post, we will look into Netlify and Vercel.
Both Netlify and Vercel offer free plans where you can deploy and host your website. But one important thing is that Vercel doesn’t support commercial websites like eCommerce ones. If you plan to host something like this, you’d better check with Vercel if it’s fine to do it on the free plan or you need to upgrade to their Pro plan.
Other than that, the two services are pretty similar in what they offer, but to me, it feels natural to deploy Next.js to Vercel since the company Vercel builds and supports Next.js. So, let’s start with Vercel and see how we can deploy and host our website there.
Before we do it, let’s push our website to GitHub to automate builds and deploys from there. I created a nextjs-blog-starter repo here that you can use. Then, you need to log in or sign up at Vercel. After that, you should be able to create a new project from GitHub and get a page similar to this one:

After clicking deploy and waiting for a bit, your blog should be online.

Here’s mine — https://nextjs-blog-starter-nikolalsvk.vercel.app/ — and you should get a similar URL when you deploy yours. Congrats for making it this far, yay!
Wrapping Up
Thank you for following along: now you should, hopefully, be able to migrate your blog post from Gatsby to Next.js. There was a lot of information covered in this blog post, and it might be too much to ingest in one sitting. The good thing is that you can always come back to it later.
But there’s also a lot of ground we didn’t manage to cover here. To ‘complete’ our blog, we need features like:
- MDX (if we want components in Markdown)
- auto-linking blog headers
- scrolling to a page ID
- an RSS feed
- an email subscription box
- a Tweet embedding solution for Twitter
and so on. If we did include all of these, this would be a mini-book instead of a blog post, so don’t worry about it. We will cover these in future blog posts.
What is important is that you have a solid foundation to go and build whatever you want on your Next.js blog. You managed to get through the initial learning curve and how Next.js works. The things you add later should be a breeze.
I wish you good luck in building your blog with Next.js. If you have any questions or comments, feel free to reach me through the link in the bio below.
Cheers, and see you in the next one.