

If you happen to’ve been used to managing databases through the command-line interface, that’s adequate. However admit it, that methodology requires a whole lot of typing, and remembering all of the completely different instructions could be difficult. Fortunately, with Azure Information Studio, you’ll be able to handle your databases in a GUI.
Azure Information Studio is without doubt one of the hottest options for information professionals working with native and cloud platforms on Home windows, macOS, and Linux. And on this tutorial, you’ll learn to set up Azure Information Studio and create a connection to your database.
Learn on and get began with the fundamental duties in Azure Information Studio’s database administration!
Stipulations
This tutorial will likely be a hands-on demonstration. If you happen to’d wish to observe alongside, make certain you have got the next.
- A Linux pc – This tutorial makes use of Ubuntu 20.04, however different Linux distributions will work.
- SSH entry to your Linux system.
- A non-root account with sudo privileges – This tutorial makes use of a root account for simplicity. However utilizing a non-root consumer with sudo entry is all the time beneficial.
Downloading and Putting in Azure Information Studio on Home windows
Azure Information Studio is a cross-platform database device. This device allows you to handle SQL Server, Azure SQL Database, and Azure SQL Information Warehouse on Home windows, macOS, and Linux.
Azure Information Studio supplies you with a number of options, together with all SSMS (SQL Server Administration Studio) options you’re acquainted with. As well as, a contemporary consumer interface, IntelliSense code-completion help, built-in supply management, built-in collaboration instruments, and many others.
To make the most of Azure Information Studio on Home windows, you’ll first have to put in this device:
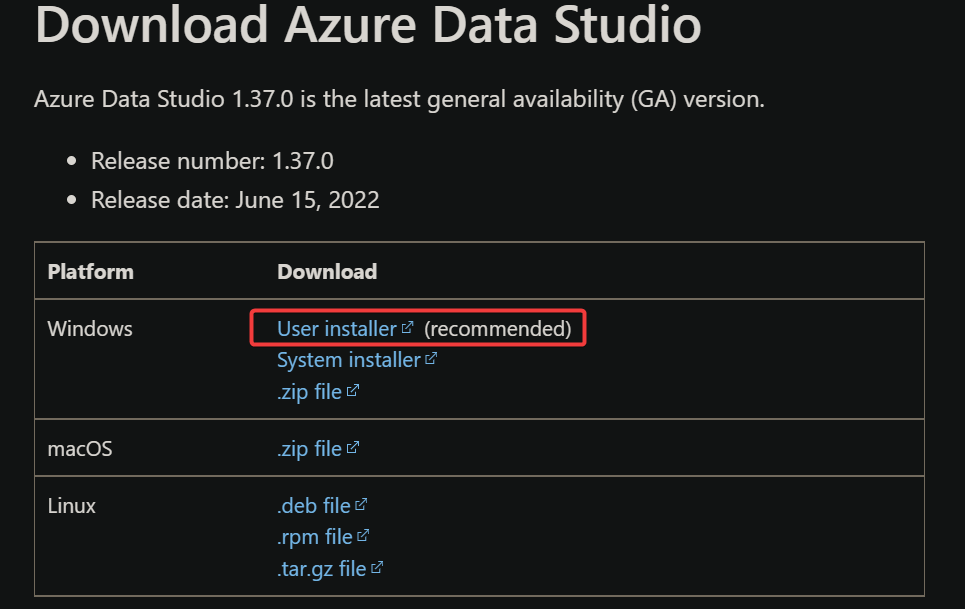
1. Open your favourite internet browser and navigate the Azure Information Studio obtain web page.
2. Subsequent, click on the Person installer (beneficial) hyperlink to obtain the Person installer.
This bundle installs Azure Information Studio for the present consumer solely. No admin rights are required, and there’s no want to fret about affecting different instruments put in on the identical machine.
3. Double-click the Azure Information Studio executable you downloaded in step two to launch the setup wizard (step 4).
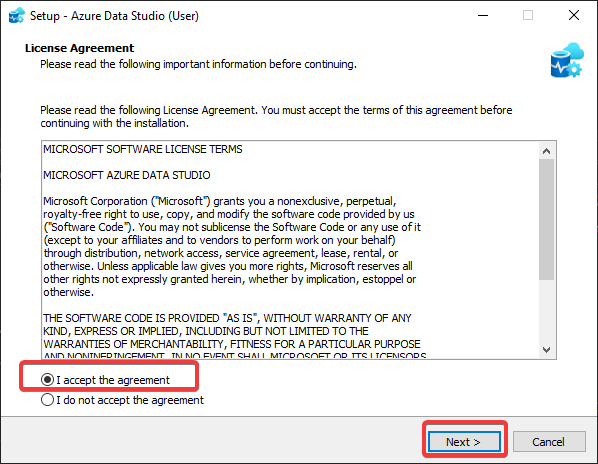
4. When the setup wizard opens, choose the I settle for the settlement choice to just accept the license phrases and click on Subsequent.
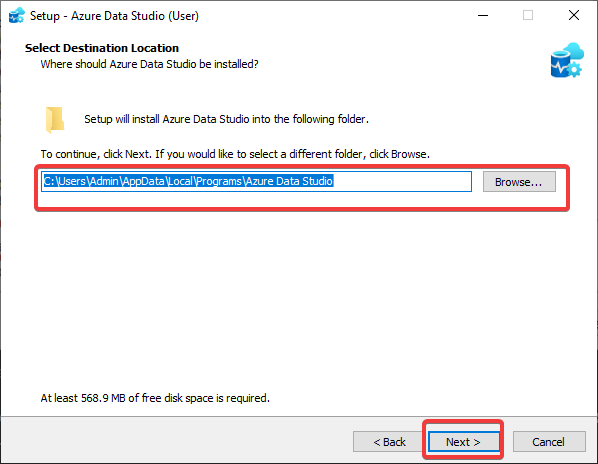
5. Now, maintain the default set up location, and click on Subsequent.
However should you like, it’s also possible to click on on Browse to set a special location to put in Azure Information Studio.
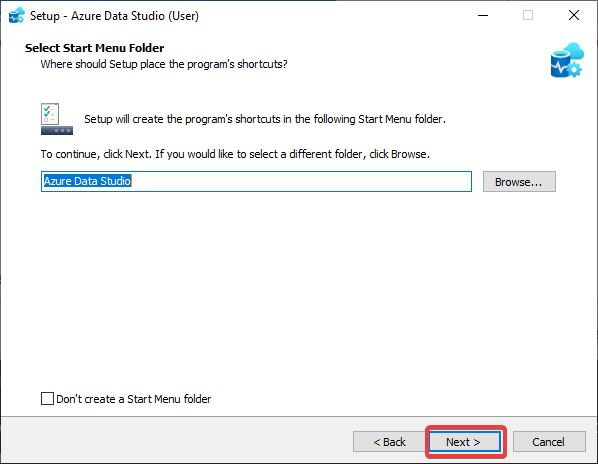
6. Click on Subsequent or click on on Browse to set a location for Azure Information Studio’s shortcut.
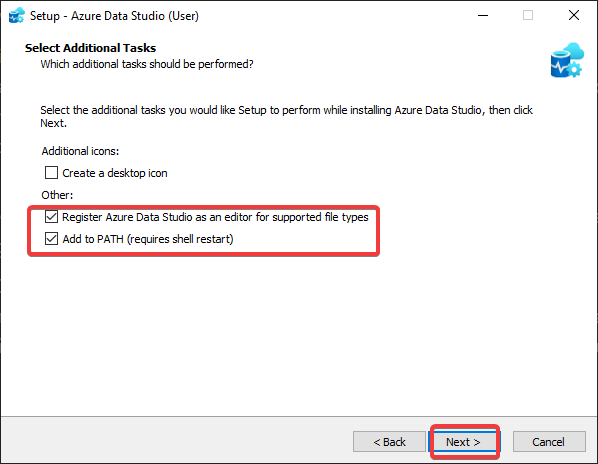
7. Choose extra duties for the setup to carry out as follows, and click on Subsequent:
- Tick the Register Azure Information Studio as editor for supported filetypes field. This selection units Azure Information Studio because the default editor for information with supported extensions, equivalent to .sql and .json.
Why is this selection essential? Having a constant editor could be useful for all of the completely different file sorts you’re employed with.
- Tick the Add to path field so as to add Azure Information Studio to your PATH surroundings variable. Doing so allows you to launch Azure Information Studio from the command line. This conduct turns out to be useful everytime you get in a scenario the place the GUI is unavailable.
Like Ubuntu, Home windows has an surroundings variable known as PATH that specifies the place the working system ought to search for executables.
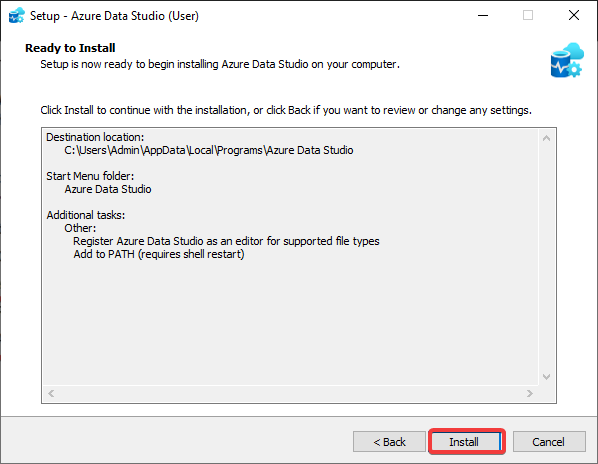
8. Subsequent, click on Set up to put in Azure Information Studio.
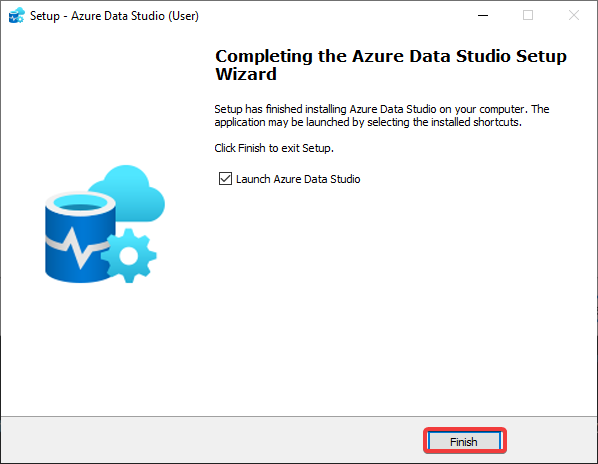
9. Lastly, click on End as soon as the set up completes closing the setup wizard.
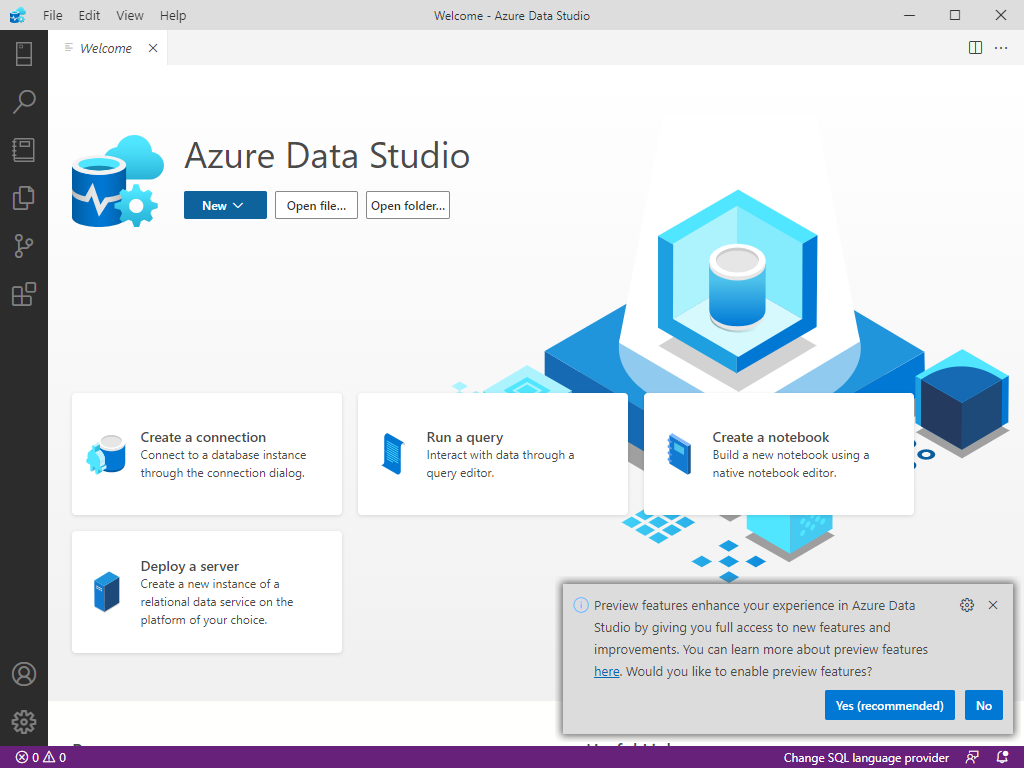
Optionally, tick on the Launch Azure Information Studio choice, and click on on End. When you do, Azure Information Studio opens for the primary time.
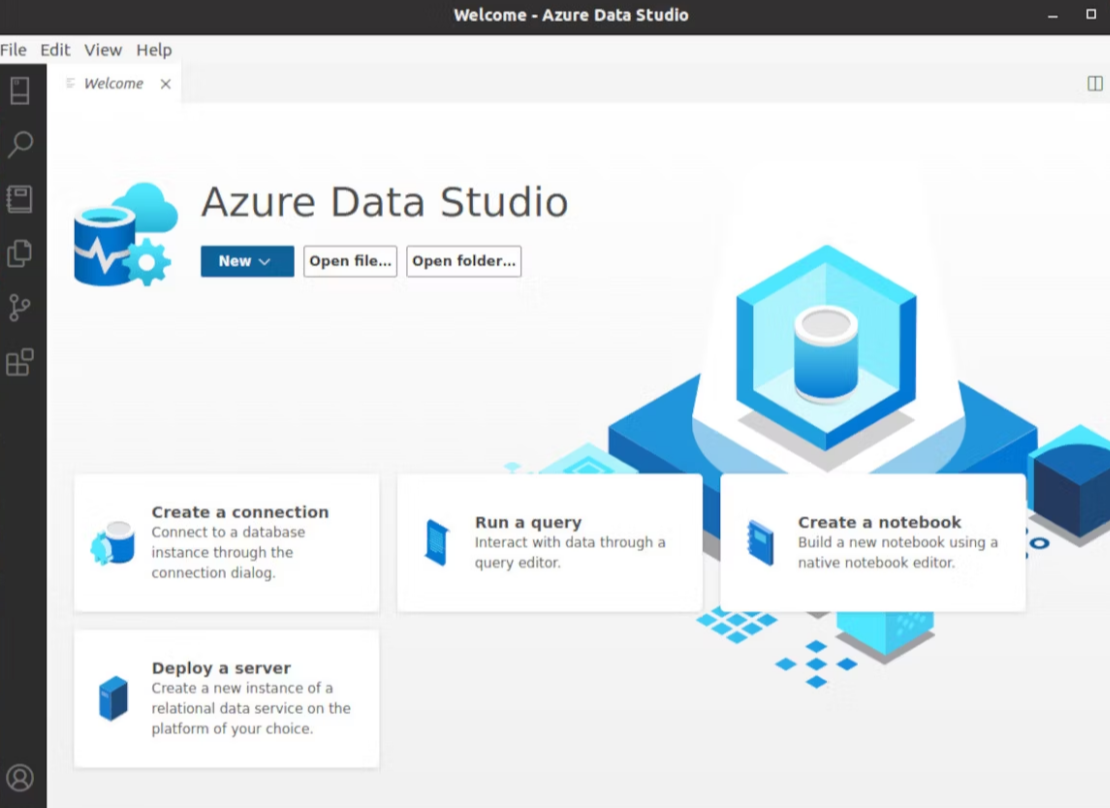
You will note the primary Azure Information Studio window, as proven under. From this level on, you’ll be able to connect with the database you wish to handle.
Downloading and Putting in Azure Information Studio on Linux
Linux, by far, is the most well-liked platform after Home windows for operating Azure Information Studio. However like in Home windows, you need to first set up Azure Information Studio on Linux.
The beneficial approach to set up Azure Information Studio on Ubuntu is to make use of the .deb bundle. The .deb bundle is a container format that packages an utility and all its dependencies.
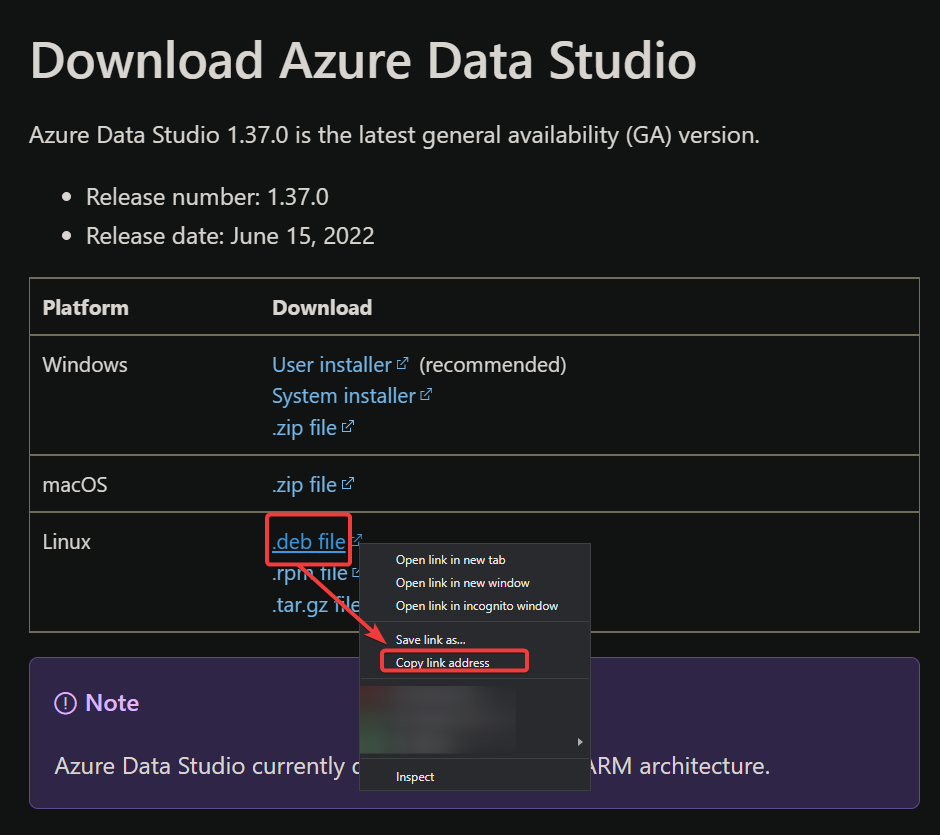
1. Login to your Linux machine, and open your favourite internet browser.
2. Navigate to the Azure Information Studio obtain web page, as you probably did in step one of many “Downloading and Putting in Azure Information Studio on Home windows” part.
3. Subsequent, right-click the .deb file hyperlink and choose Copy hyperlink tackle to repeat the obtain tackle.
4. Open your Terminal, and run the wget command under to obtain the Azure Information Studio .deb file. Guarantee to switch the URL under with the obtain hyperlink you copied in step three.
If you happen to’re on a non-root consumer, all the time prepend sudo once you run instructions that require elevated privileges all through this tutorial.
wget https://sqlopsbuilds.azureedge.web/steady/d904740d93d7df76a0ba361f20e4351813b57645/azuredatastudio-linux-1.37.0.deb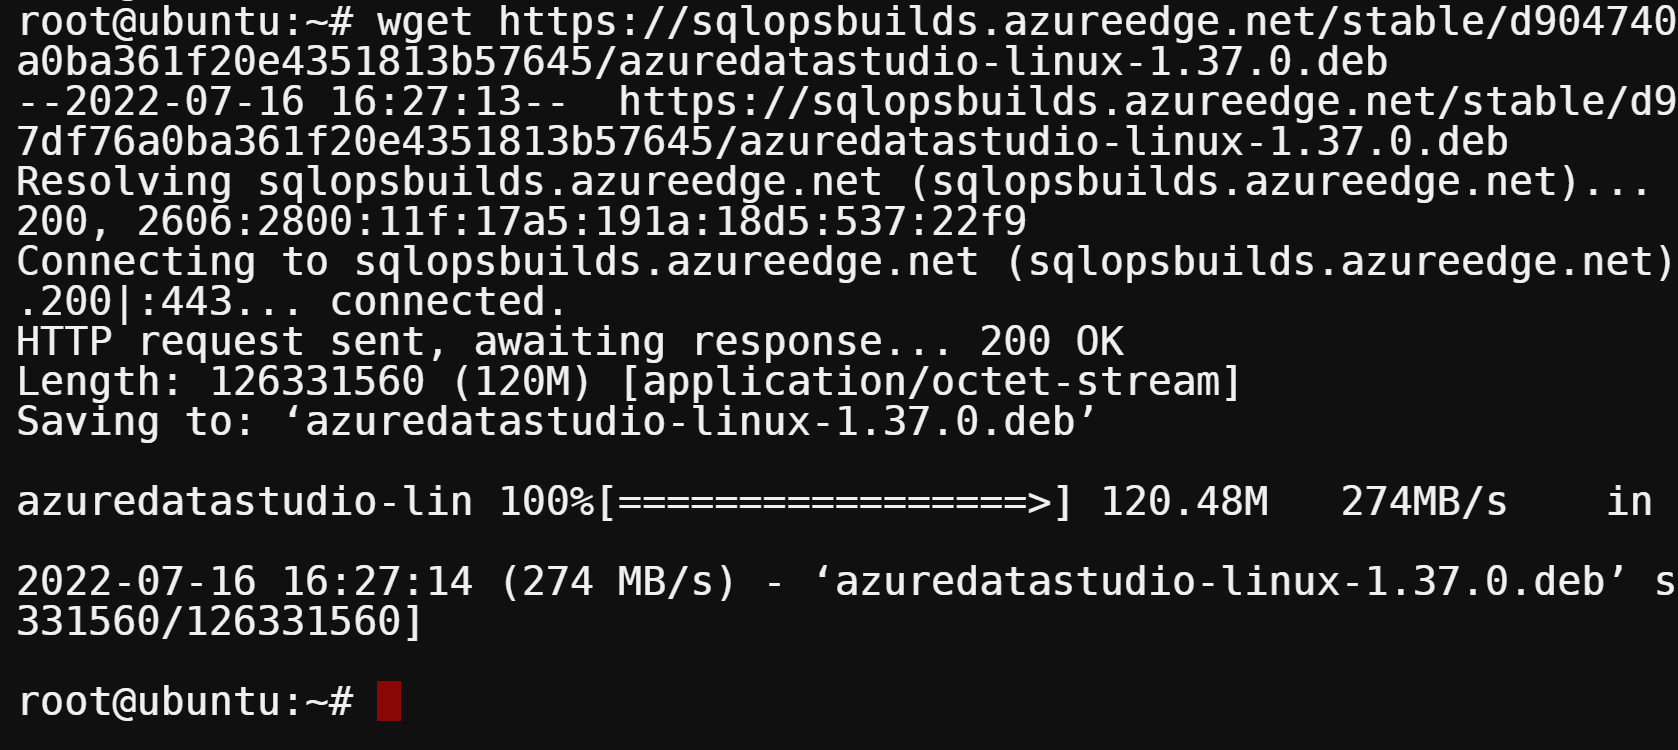
5. Now, run the next ls command to confirm that the Azure Information Studio .deb file has been downloaded.
Change azuredatastudio-linux-1.37.0.deb to the title of the .deb file you downloaded once you discuss with the .deb file all through the tutorial.
ls -la azuredatastudio-linux-1.37.0.debBeneath, you’ll be able to see the .deb file exists. However, should you get an HTML file as a substitute, repeat step 4 to redownload the .deb file.

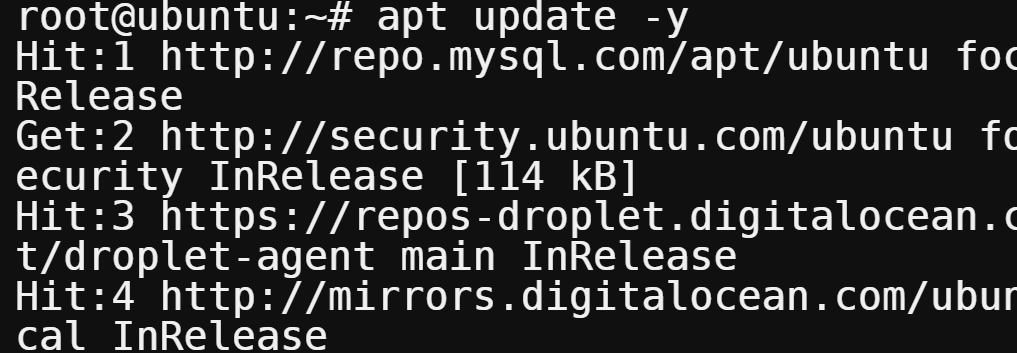
6. Run the apt replace command under to replace the record of accessible packages and their variations.
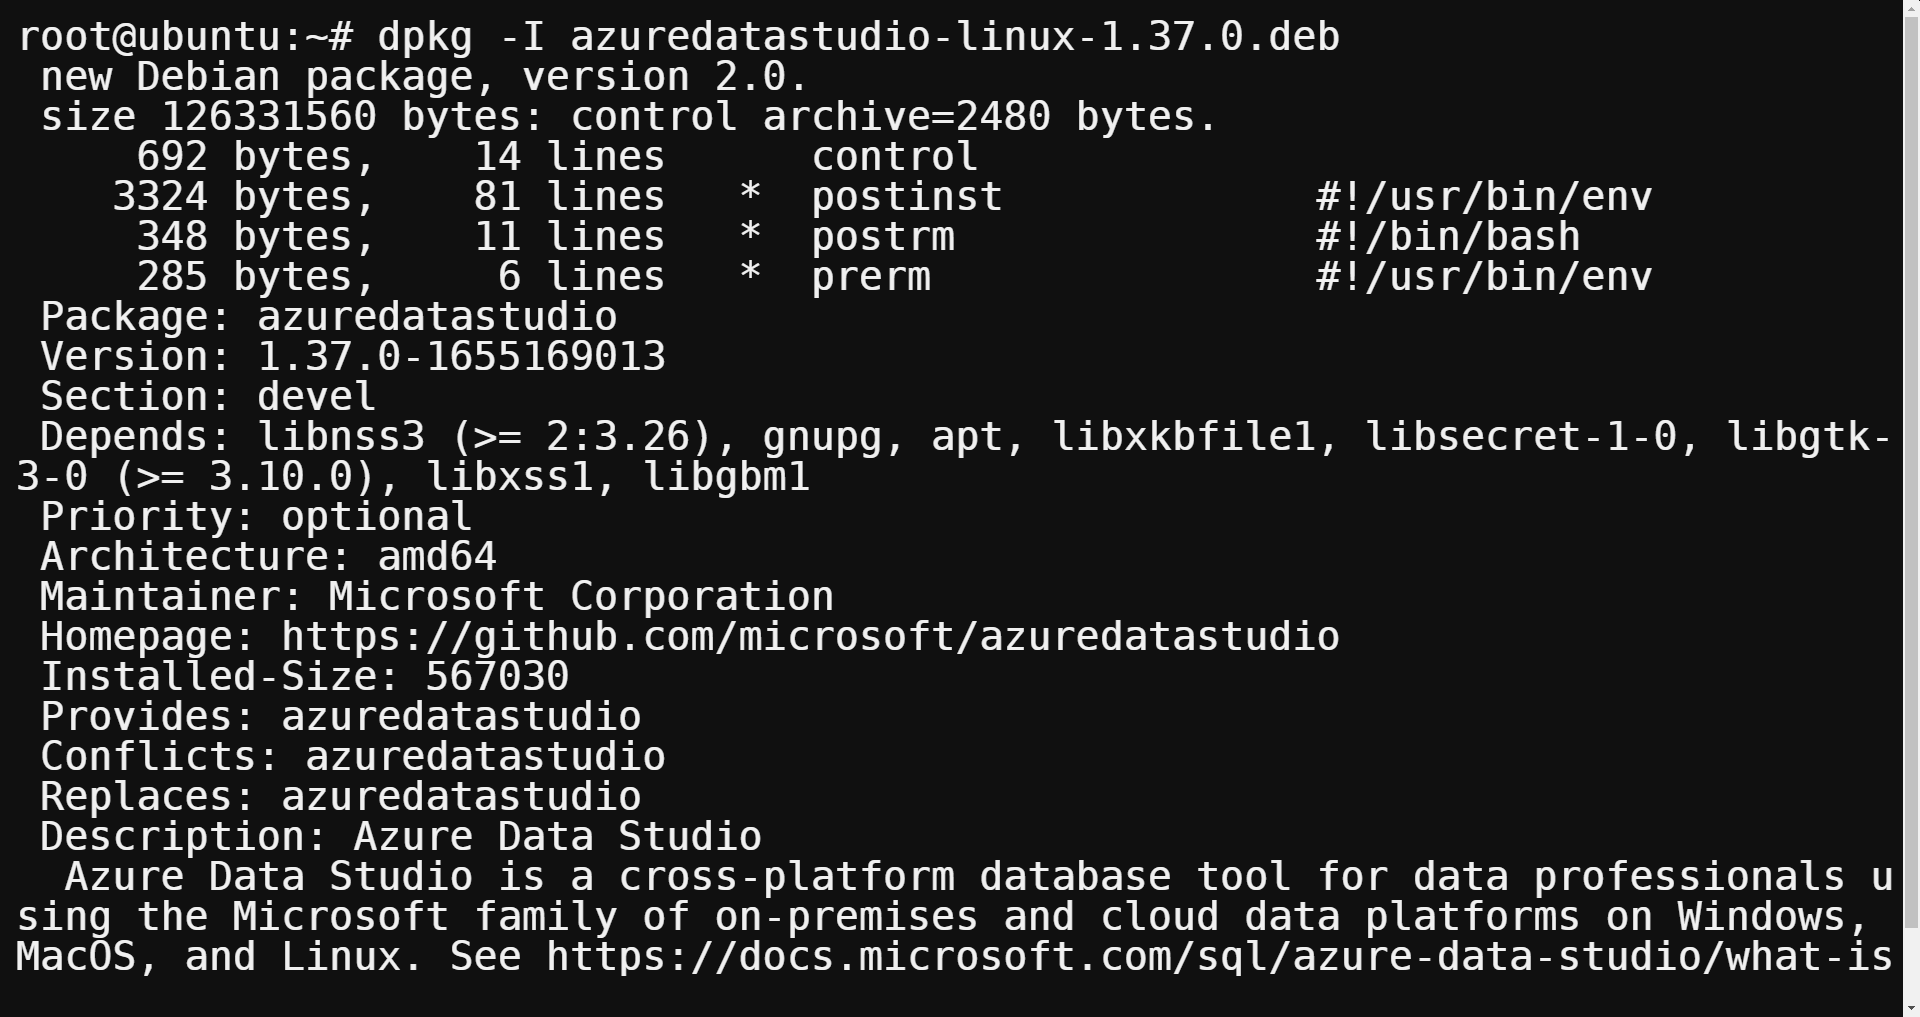
7. As soon as up to date, run the dpkg command under to view the contents (-I) of the Azure Information Studio .deb file. Earlier than putting in any software program in your pc, it is best to confirm the file’s contents.
dpkg -I azuredatastudio-linux-1.37.0.debSee the Relies upon part? Beneath is a listing of dependencies required to run Azure Information Studio.
8. Now, run the under command to put in (-i) Azure Information Studio in your Linux pc.
dpkg -i azuredatastudio-linux-1.37.0.deb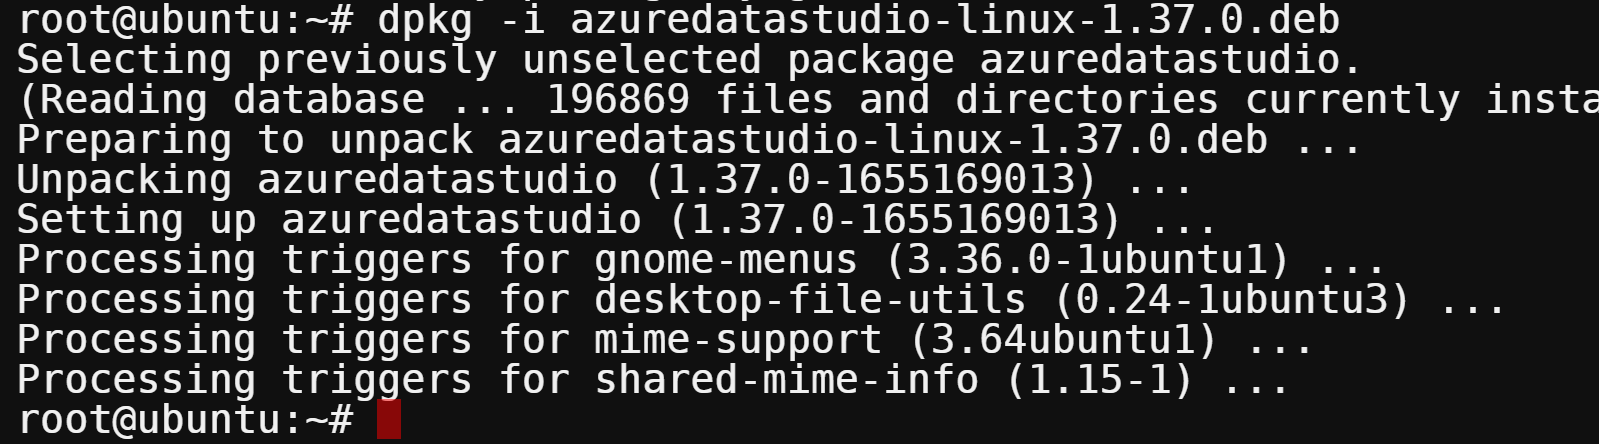
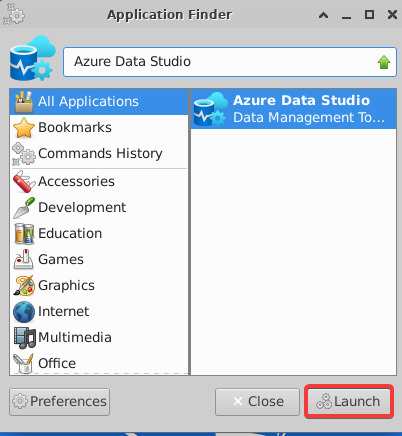
9. Lastly, launch the Azure Information Studio out of your Utility Finder, as proven under.
Like once you put in Azure Information Studio in your Home windows pc, you’ll get the identical principal window proven under.
Verifying the SQL Server Occasion is Working
After putting in Azure Information Studio, it’s time to discover find out how to handle databases with Azure Information Studio. However first, you need to be certain that the SQL Server occasion you wish to join is operating and accessible.
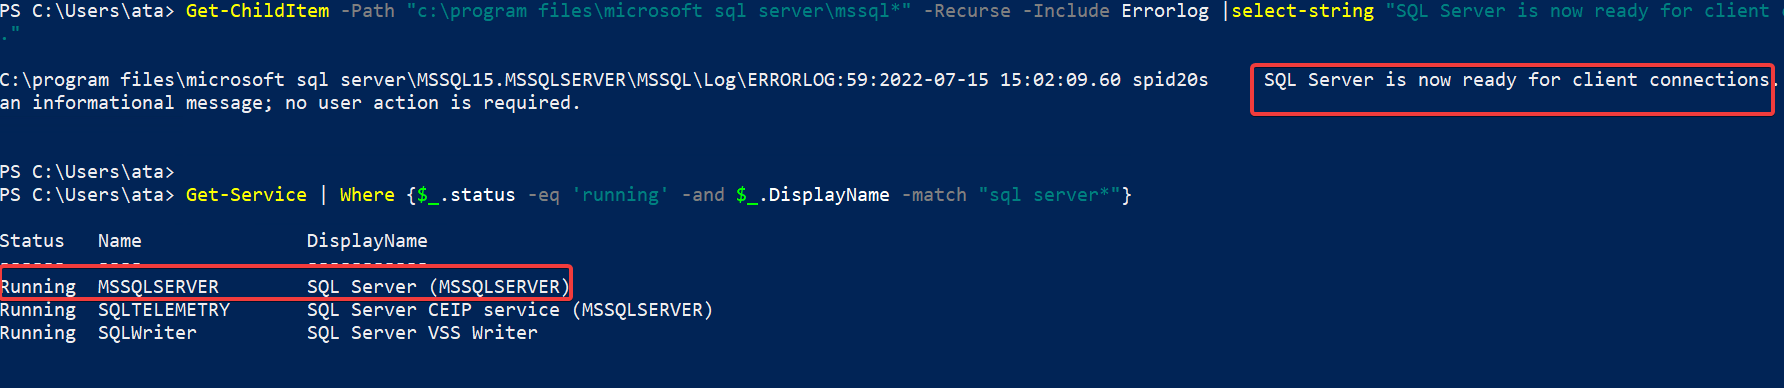
Open PowerShell as administrator, and run every command under to confirm the SQL Server occasion is operating in your machine with the next:
- Queries all information in your pc for the string SQL Server is now prepared for consumer connections. This string is written to the SQL Server Error Log when the SQL Server occasion begins.
- Will get a listing of all providers (Get-Service) operating in your pc. The The place-Object cmdlet filters the output to incorporate solely providers which have SQL Server of their title and are operating.
Get-ChildItem -Path "c:program informationmicrosoft sql servermssql*" -Recurse -Embrace Errorlog |select-string "SQL Server is now prepared for consumer connections."
Get-Service | The place {$_.standing -eq 'operating' -and $_.DisplayName -match "sql server*"}
Beneath, you’ll be able to see the MSSQLSERVER is operating, which signifies now you can connect with your SQL Server occasion.
Connecting Azure Information Studio to the SQL Server Occasion
Now that you’ve got verified that the SQL Server occasion is operating, you’re only some steps away from managing your databases on Azure Information Studio. However first, you might want to connect with your SQL Server occasion.
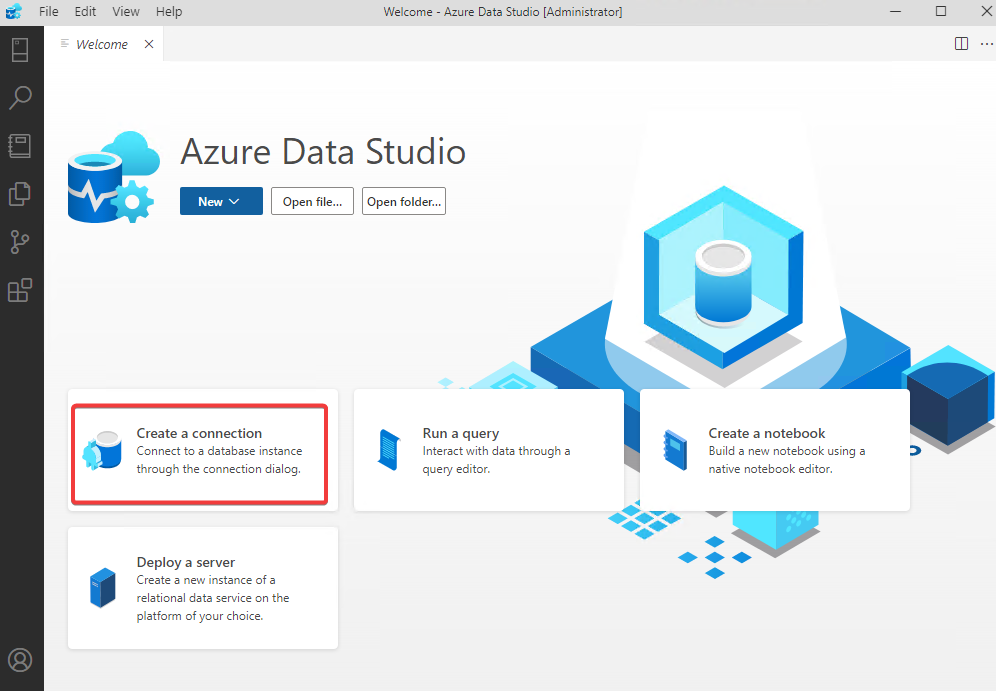
1. Launch Azure Information Studio from the Begin menu.
2. Click on on Create a brand new connection on the primary window to open the Connection Particulars window.
3. Configure the Connection Particulars with the next:
- Connection sort – Choose the Parameters choice, which is acquainted to customers of SQL Server Administration Studio (SSMS).
If you happen to select the Connection String radio button, you’ll want to offer a connection string, which is out of scope for this text.
- Server – Enter the title of the pc operating the SQL Server. On this case, it’s localhost because you’re connecting to an area occasion.
- Authentication sort – Choose Home windows Authentication from the dropdown area to make use of your Home windows credentials to authenticate to SQL Server (beneficial).
- Hold all different default choices, and click on Join to connect with your SQL Server. A brand new tab opens in Azure Information Studio.

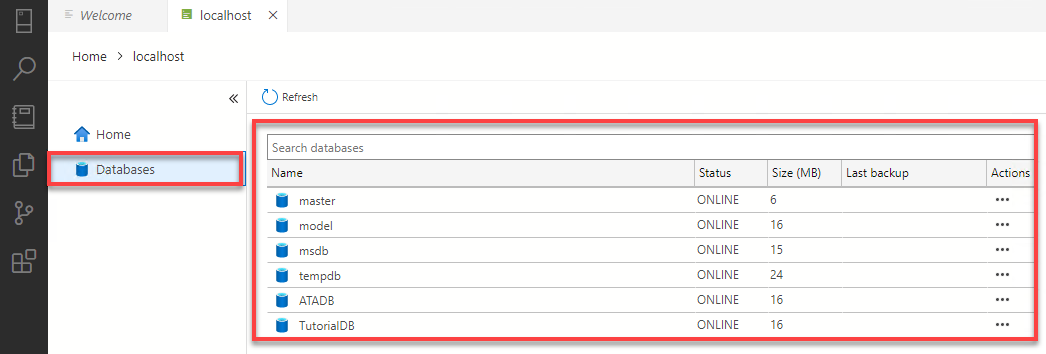
4. Lastly, click on Databases (left-panel) beneath the localhost tab to see a listing of databases of the linked SQL Server occasion.
At this level, now you can run queries and carry out different duties in Azure Information Studio.
Making a New Database
After connecting to your SQL Server occasion, you’ll be able to freely handle databases with Azure Information Studio. And what higher approach to get began with this device than by creating a brand new database?
To handle a database, you want a database first. So your first job is to create a brand new database in Azure Information Studio.
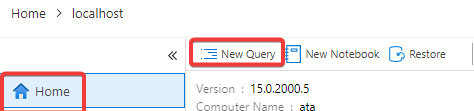
1. On Azure Information Studio, click on Dwelling → New Question to open a brand new question editor.
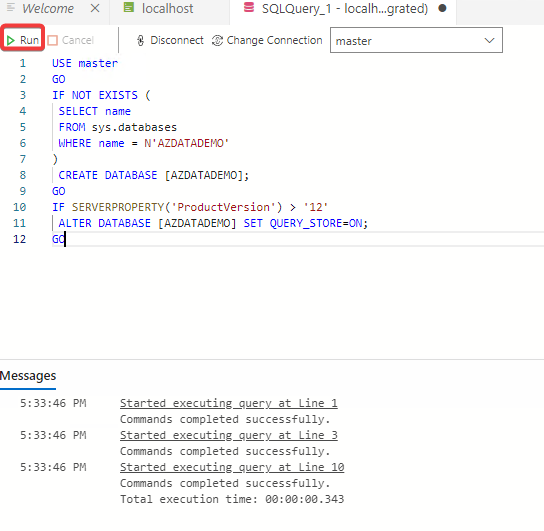
2. Subsequent, copy and paste the under T-SQL snippet into the question editor. This T-SQL snippet checks if a database named AZDATADEMO exists on the linked SQL Server occasion.
Azure Information Studio creates the database and units the Question Retailer characteristic to ON if the database doesn’t exist. This characteristic captures question execution plans and runtime statistics, which could be useful when troubleshooting efficiency points.
The Question Retailer characteristic is offered in SQL Server 2016 and better.
USE grasp
GO

-- Checks if the AZDATADEMO database exists
IF NOT EXISTS (
 SELECT title
 FROM sys.databases
 WHERE title = N'AZDATADEMO'
)
 -- Create the AZDATADEMO database if it would not exist
 CREATE DATABASE [AZDATADEMO];
GO

-- Units the Question Retailer characteristic ON
IF SERVERPROPERTY('ProductVersion') > '12'
 ALTER DATABASE [AZDATADEMO] SET QUERY_STORE=ON;
GO
3. Now, click on Run to execute the question.
You’ll see a message that claims, ” Instructions accomplished efficiently, ” indicating the database has been created.
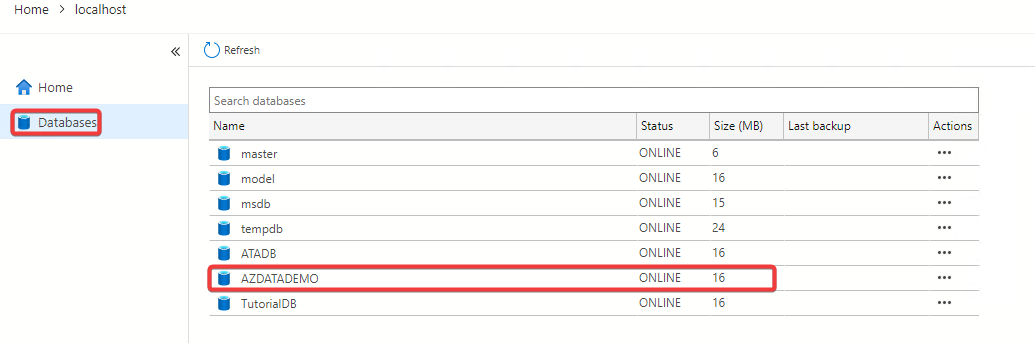
4. Lastly, click on on Databases once more (left-panel) beneath the localhost tab, and also you’ll see the newly-created database within the record.
Making a Desk and Inserting Information
You’ve simply created a database, and that’s a good way to start out getting used to managing databases in Azure Information Studio. However as you understand, a database is ineffective when it’s empty. So why not use Azure Information Studio to create a desk and insert information into the desk?
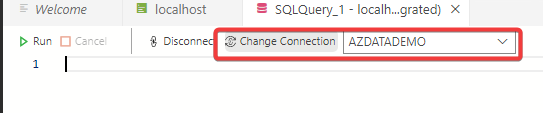
1. In your question editor, click on on the database title within the Change Connection dropdown and alter the connection to the newly-created database (AZDATADEMO).
2. Subsequent, substitute the present snippet within the question editor with the under T-SQL snippet, and click on Run to execute the brand new question.
The snippet under creates a desk named Customers within the present database (AZDATADEMO). The desk contains 4 columns: CustomerId, Title, Location, and E-mail, the place the CustomerId column is the first key column.
-- Examine if the Customers desk exists
IF OBJECT_ID('dbo.Customers', 'U') IS NOT NULL
 -- If the Customers desk exists, delete the desk
 DROP TABLE dbo.Customers;
GO
-- If the Customers desk would not exist, create the desk with 4 columns
CREATE TABLE dbo.Customers
(
 CustomerId int NOT NULL PRIMARY KEY, -- main key column
 Title nvarchar(50) NOT NULL,
 Location nvarchar(50) NOT NULL,
 E-mail nvarchar(50) NOT NULL
);
GO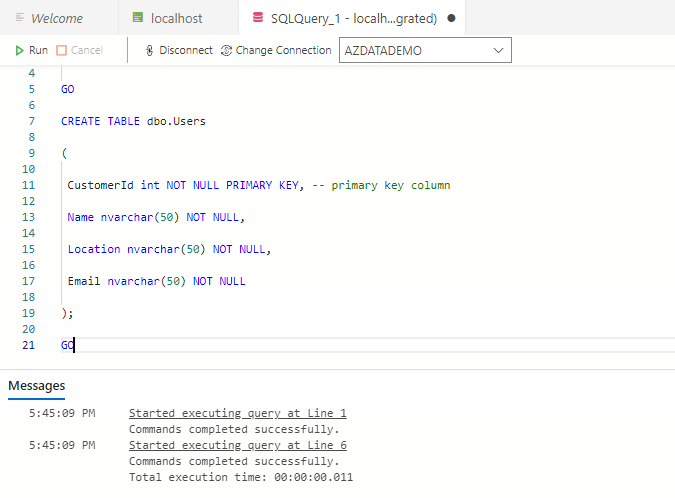
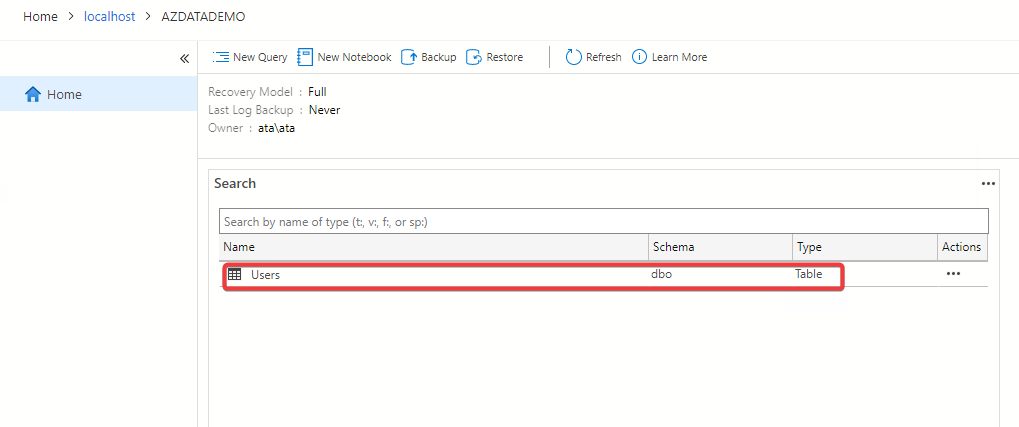
3. Navigate to the Databases web page and double-click in your new database (AZDATADEMO) database to see all information within the database.

Beneath, you’ll be able to see the newly created Customers desk.
4. Lastly, substitute the snippet within the question editor with the under T-SQL snippet, and click on Run to execute the brand new question.
The snippet under inserts 4 rows into the Customers desk.
INSERT INTO dbo.Customers

VALUES

 ( 1, N'Adam', N'US', N''),
 ( 2, N'Listek', N'US', N'[email protected]'),
 ( 3, N'Donna', N'US', N'[email protected]'),
 ( 4, N'Janet', N'US', N'[email protected]')

GO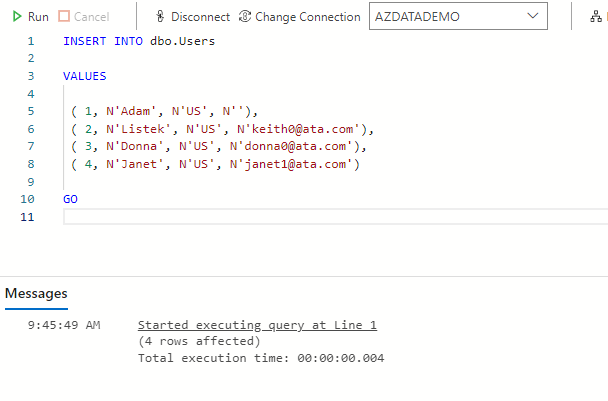
Querying Desk Information
Yay! Your database is now not empty after including information to the Customers desk. However how positive are you that the info went via? Fortunately, querying desk information in Azure Information Studio isn’t as complicated as it could sound. How?
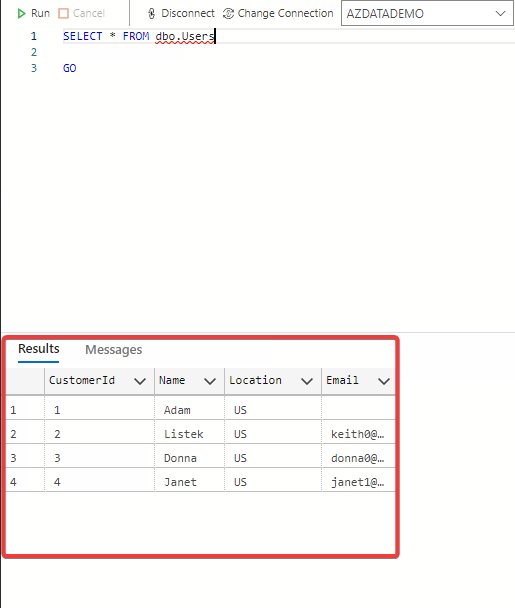
Change the snippet within the question editor with the one under, and click on Run to SELECT and return all (*) rows FROM the Customers desk (dbo.Customers).
SELECT * FROM dbo.Customers

GO
If profitable, you’ll see all rows of knowledge from the Customers desk displayed beneath the Outcomes pane under.
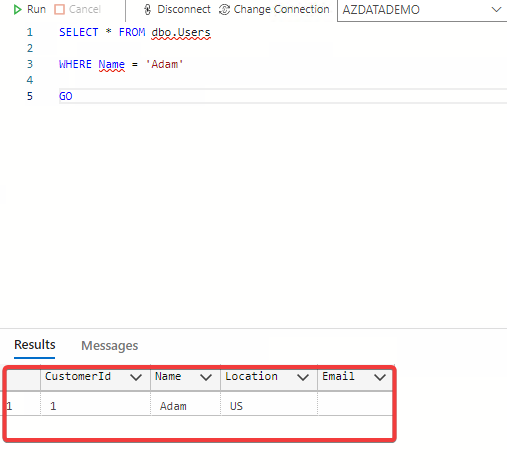
Maybe you intend to run extra particular queries. In that case, execute the snippet under as a substitute to question information of the rows solely from the Customers desk (dbo.Customers), WHERE the consumer’s Title is Adam.
SELECT * FROM dbo.Customers

WHERE Title="Adam"

GO
As you’ll be able to see under, just one merchandise returns with the title Adam.
Conclusion
You’ve skilled firsthand how highly effective Azure Information Studio is in managing your SQL Server databases. And on this tutorial, you’ve discovered find out how to set up Azure Information Studio and begin with fundamental duties in managing your databases. Like creating a brand new database, desk and inserting information.
What you’ve seen on this tutorial is simply the tip of the iceberg. Azure Information Studio can do rather more. Why not discover extra and create a Jupyter pocket book in Azure Information Studio to run your Python code?