


This was a visitor submit by Mike Driscoll.
Lately I’ve began studying about Kivy, a Python Pure Person Interface (NUI) toolkit. As I perceive it, Kivy is form of a religious successor to pyMT, which you’ll learn extra about right here. On this article, we can be studying how Kivy handles format administration. Whilst you can place widgets utilizing x/y coordinates, in each GUI toolkit I’ve used, it’s nearly all the time higher to make use of some form of format administration that the toolkit gives. This enables the widgets to resize and transfer appropriately because the consumer modifications the window’s dimension. In Kivy, this stuff Layouts. Should you’ve used wxPython, they’re analogous to wxPython’s sizers.
I must also notice that Kivy can do layouts in two other ways. The primary manner is to do Layouts with Python code solely. The second manner is to make use of a combination of Python and Kv language. That is to advertise the model-view-controller manner of doing issues. It appears to be like form of like CSS and jogs my memory a bit of of wxPython and XRC. We’ll have a look at easy methods to use each strategies on this article. Whereas Kivy helps a number of kinds of Layouts, this text can be focusing solely on the BoxLayout. We’ll present easy methods to nest BoxLayouts.
Kivy, Python and BoxLayout

Making a BoxLayout in Kivy utilizing Python is definitely fairly straightforward and fairly intuitive. We’ll begin out with a code instance after which observe the code with an evidence. Let’s get began!
import kivy
import random

from kivy.app import App
from kivy.uix.button import Button
from kivy.uix.boxlayout import BoxLayout

pink = [1,0,0,1]
inexperienced = [0,1,0,1]
blue =  [0,0,1,1]
purple = [1,0,1,1]

########################################################################
class HBoxLayoutExample(App):
    """
    Horizontally oriented BoxLayout instance class
    """

    #----------------------------------------------------------------------
    def construct(self):
        """
        Horizontal BoxLayout instance
        """
        format = BoxLayout(padding=10)
        colours = [red, green, blue, purple]

        for i in vary(5):
            btn = Button(textual content="Button #%s" % (i+1),
                         background_color=random.alternative(colours)
                         )

            format.add_widget(btn)
        return format

########################################################################
class VBoxLayoutExample(App):
    """
    Vertical oriented BoxLayout instance class
    """

    #----------------------------------------------------------------------
    def setOrientation(self, orient):
        """"""
        self.orient = orient

    #----------------------------------------------------------------------
    def construct(self):
        """"""
        format = BoxLayout(padding=10, orientation=self.orient)

        for i in vary(5):
            btn = Button(textual content="Button #%s" % (i+1) )
            format.add_widget(btn)
        return format

#----------------------------------------------------------------------
if __name__ == "__main__":
    app = HBoxLayoutExample()
    #app = VBoxLayoutExample()
    #app.setOrientation(orient="vertical")
    app.run()
Right here we’ve got created a vertically oriented BoxLayout class and a horizontally oriented BoxLayout class. Every class accommodates 5 buttons with random background colours. The colours observe RGBA, however can have particular person values which might be between zero and one. Oddly sufficient, should you use numbers larger than one, the colour turns into brighter. I occurred to make use of 255 as an alternative of 1 after I created the screenshot above, so should you occur to run this code and see a extra muted set of colours, that’s why.
To make the examples very simple, we solely import Kivy’s App, Button and BoxLayout lessons. The BoxLayout class accepts a number of arguments, however we’ll deal with the next 3: orientation, padding and spacing. As a result of BoxLayout is a sub-class of Format and Widget, it inherits many different strategies and key phrase arguments that aren’t coated right here. However again to the arguments we at present care about. The padding argument tells Kivy how a lot area there needs to be between the Format and its kids, whereas the spacing arguments tells it how a lot spacing there needs to be between the kids.
To create the buttons, we use a easy loop that loops over a small vary of numbers. Every iteration creates a button with a random background shade and provides that button to the Format occasion. Then we return the format on the finish.
The vertical BoxLayout instance within the VBoxLayoutExample class is barely completely different in that I assumed it might be enjoyable to have the ability to set the orientation programmatically. The code is just about the identical besides that I added a setOrientation methodology. Be aware that should you name setOrientation once more, it is going to haven’t any impact. As certainly one of my commenters so kindly identified, you would wish to bind the orientation to the App orient property or use the Kv language to attain this.
Should you remark out the decision to HBoxLayoutExample on the finish of the script and un-comment out the opposite two traces, then you must find yourself seeing one thing like this:
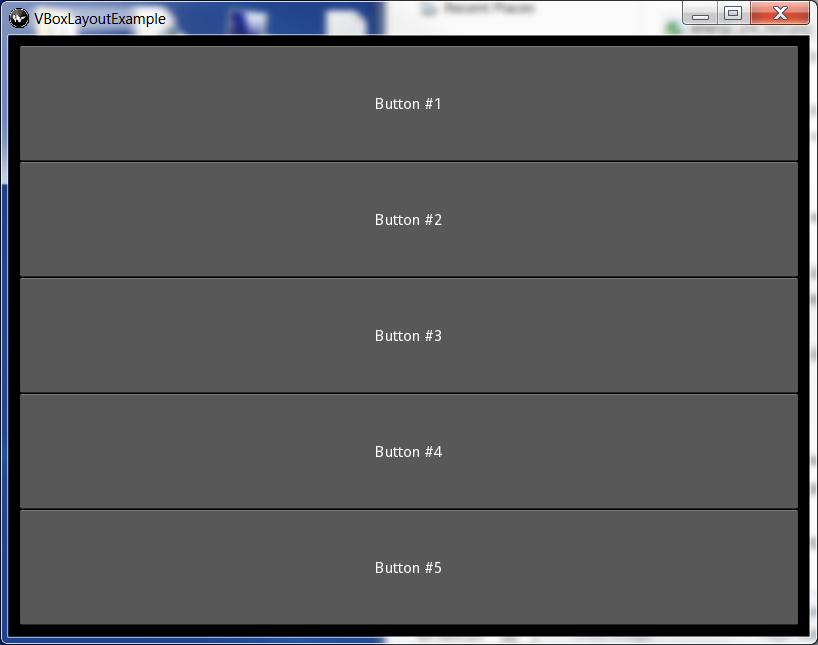
Discover that once you don’t set a background shade, Kivy defaults to a darkish gray. Kivy doesn’t attempt to appear to be a local utility. This will or is probably not an enormous deal to you relying on what kind of program you’re making an attempt to attain, but it surely needs to be famous. Now we’re able to study nesting!
Nesting BoxLayouts
Nesting BoxLayouts within one another is fairly straightforward with Kivy too. Everytime you go to create an utility with a sophisticated interface that may want nested sizers, you must take a while to sketch the format out with pencil and paper. Then you possibly can draw bins across the widgets in several methods that will help you visualize which Layouts you’ll want and easy methods to nest them in one another. I’ve discovered this fairly useful with wxPython and I believe it applies to every other GUI toolkit that doesn’t have a WYSIWYG editor. By the way in which, BoxLayouts are very highly effective. If you already know what you’re doing, you can also make nearly any interface with them alone simply be utilizing intelligent nesting.
Sufficient discuss, let’s have a look at some code!
import kivy
import random

from kivy.app import App
from kivy.uix.button import Button
from kivy.uix.boxlayout import BoxLayout

pink = [1,0,0,1]
inexperienced = [0,1,0,1]
blue =  [0,0,1,1]
purple = [1,0,1,1]

########################################################################
class NestedLayoutExample(App):
    """
    An instance of nesting three horizontally oriented BoxLayouts inside
    of 1 vertically oriented BoxLayout
    """

    #----------------------------------------------------------------------
    def construct(self):
        """
        Horizontal BoxLayout instance
        """
        main_layout = BoxLayout(padding=10, orientation="vertical")

        colours = [red, green, blue, purple]

        for i in vary(3):
            h_layout = BoxLayout(padding=10)
            for i in vary(5):
                btn = Button(textual content="Button #%s" % (i+1),
                             background_color=random.alternative(colours)
                             )

                h_layout.add_widget(btn)
            main_layout.add_widget(h_layout)

        return main_layout

#----------------------------------------------------------------------
if __name__ == "__main__":
    app = NestedLayoutExample()
    app.run()
This instance is similar to the final one. The satan is within the particulars although. Right here we’ve got a nested for loop that creates 3 BoxLayouts that include 5 buttons a bit. Every Format is then inserted into the highest stage Format on the finish of every iteration within the outdoors loop. In case you missed it, scroll again as much as see the way it turned out. The trick is to create one top-level or foremost Format and add different Layouts to it. Now let’s flip our consideration to studying easy methods to do this stuff with the Kv language.
Kv+Python and BoxLayout
It’s nearly all the time a bit of painful to be taught a brand new language. Happily, the Kv language really follows Python fairly intently, together with Python’s requirement of utilizing indentation ranges to indicate when a piece of code begins and ends. You might need to spend a couple of minutes studying concerning the Kv language on the Kivy web site. Everytime you’re prepared, we are able to proceed. First we’ll begin off with the Python code:
# kvboxlayout.py

from kivy.app import App
from kivy.uix.boxlayout import BoxLayout

########################################################################
class KVMyHBoxLayout(BoxLayout):
    go

########################################################################
class KVBoxLayoutApp(App):
    """"""

    #----------------------------------------------------------------------
    def construct(self):
        """"""
        return KVMyHBoxLayout()

#----------------------------------------------------------------------
if __name__ == "__main__":
    app = KVBoxLayoutApp()
    app.run()
This code is way less complicated than our earlier examples, but it surely’s additionally reasonably mysterious. To begin with, we create an empty sub-class of BoxLayout. Then we create our App class which has a construct methodology that simply returns an occasion of the empty BoxLayout class. What’s occurring right here? Properly we’ve got to have a look at the Kv file to seek out out!
<MyButton@Button>:
    shade: .8,.9,0,1
    font_size: 32

<MyButton@Button>:
    orientation: 'horizontal'
    MyButton:
        textual content: "Btn1"
        background_color: 1,0,0,1
    MyButton:
        textual content: "Btn2"
        background_color: 0,1,0,1
    MyButton:
        textual content: "Btn3"
        background_color: 0,0,1,1
    MyButton:
        textual content: "Btn4"
        background_color: 1,0,1,1
    MyButton:
        textual content: "Btn5"
        background_color: 1,0,0,1
Whenever you save the code above, you’ll have to call it to be the identical because the App class, however with a .kv as an alternative of a .py and in lowercase. Meaning the identify of this Kv file must be kvboxlayout.kv. You’ll notice that you just additionally must strip off the App a part of the category identify such that KVBoxLayoutApp turns into kvboxlayout. Sure, it’s a bit of complicated. Should you don’t observe the naming conventions appropriately, the file will run however you should have an empty black window.
Anyway, first off within the Kv file, we’ve got a piece that begins with :. This tells Kivy that we’re sub-classing the Button class and calling our sub-class MyButton. Then we indent the required 4 areas and set the button’s label shade and font dimension. Subsequent we create a BoxLayout part. Discover that we didn’t create a sub-class this time. Then we inform it what orientation it needs to be and add 5 MyButton cases, each having its personal particular person label and shade.
One of many core Kivy builders identified that by creating the BoxLayout on this method, I’m redefining the BoxLayout for all usages. That is not an excellent factor, even when it does make the instance less complicated. Thus within the subsequent instance, we’ll cease doing that and do it the fitting manner as an alternative!
Nesting BoxLayouts with Kv
Nesting BoxLayouts in Kv is a bit of complicated at first, however when you get the hold of it, you’ll discover that it’s actually fairly straightforward. We’ll begin out with the Python code, check out the way it works after which have a look at the Kv code.
from kivy.app import App
from kivy.uix.boxlayout import BoxLayout
from kivy.uix.widget import Widget

########################################################################
class HBoxWidget(Widget):
    go

########################################################################
class VBoxWidget(Widget):
    go

########################################################################
class KVNestedBoxLayoutApp(App):
    """"""

    #----------------------------------------------------------------------
    def construct(self):
        """"""
        return VBoxWidget()

#----------------------------------------------------------------------
if __name__ == "__main__":
    app = KVNestedBoxLayoutApp()
    app.run()
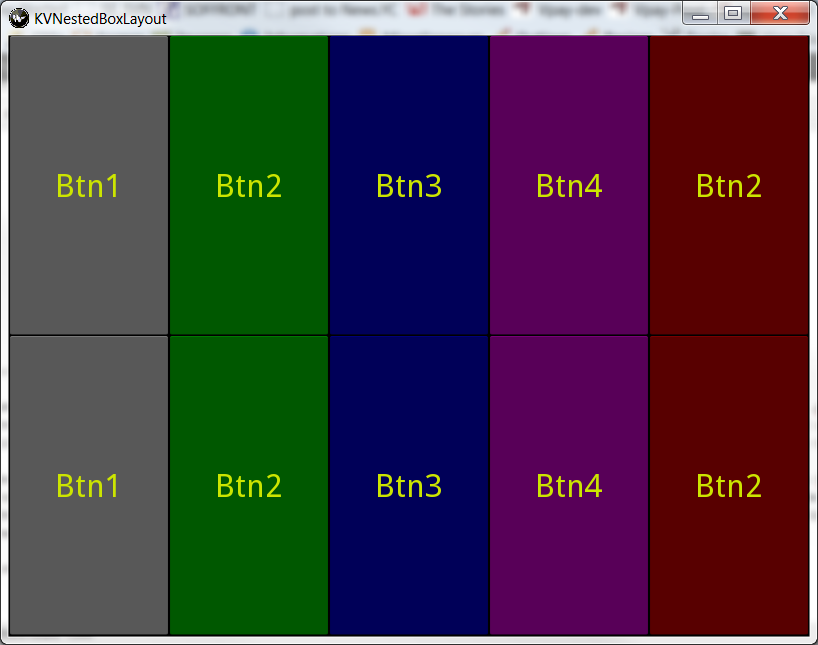
This time round, we have to create two generic Widget lessons: HBoxWidget and VBoxWidget. These are literally dummy lessons that grow to be BoxLayouts within the Kv code. Talking of which, let’s check out that now. Be aware that you just’ll want to call the Kv file kvnestedboxlayout.kv, which you’ll notice, is a lowercase model of KVNestedBoxLayoutApp.
:
    shade: .8,.9,0,1
    font_size: 32

:
    BoxLayout:
        dimension: root.dimension
        pos: root.pos
        orientation: 'horizontal'
        MyButton:
            textual content: "Btn1"
            background_color: 1,1,1,1
        MyButton:
            textual content: "Btn2"
            background_color: 0,1,0,1
        MyButton:
            textual content: "Btn3"
            background_color: 0,0,1,1
        MyButton:
            textual content: "Btn4"
            background_color: 1,0,1,1
        MyButton:
            textual content: "Btn2"
            background_color: 1,0,0,1

:
    BoxLayout:
        dimension: root.dimension
        pos: root.pos
        id: foo_bar
        orientation: 'vertical'
        HBoxWidget:
        HBoxWidget:
The button code is identical as earlier than. Subsequent we’ve got the HBoxWidget which we outline as a horizontal BoxLayout with 5 buttons in it. Then we create an occasion of VBoxWidget that may be a vertical BoxLayout, however this Format accommodates two cases of the HBoxWidget. You’ll notice that within the Python code’s construct methodology, we’re returning the VBoxWidget, in order that’s the place the motion is. Should you take away these two HBoxWidget calls, the consequence can be an empty black window.
There’s one other manner to make use of Kv information in Kivy. It’s by means of the kivy.lang.Builder.load_file (or load_string) API, which provides you the power to load Kv information with no need to recollect to call the Kv file in some particular manner. You may learn concerning the API on their web site and see an instance of it in motion within the Kivy examples on github. The one caveat to utilizing this methodology is that you could watch out to not load the identical file twice or your UI might get tousled.
Wrapping Up
This simply scratches the floor of Kivy’s Format system. There are 6 different Format varieties out there. Nonetheless, I believe you’ll discover that the examples on this article will get you began down the street of efficiently creating cool Kivy functions of your very personal. Should you need assistance studying Kivy, there’s a fairly good set of documentation on their web site. Additionally they have a Google Group and a #kivy channel on freenode.
Obtain the Supply
Be aware: That is an official cross-posting of an article from the Mouse Vs Python weblog. You may learn the unique right here.