


Builders like your self have lots on their plate and sometimes want a standard place to plan, collaborate, check, and deploy codes. Save your self the frustration; contemplate the Bitbucket API to ease the administration of your Bitbucket setting!
The Bitbucket API allows you to automate organising authentication, creating repositories, managing person teams, and pull requests. And on this tutorial, you’ll find out how the Bitbucket REST API takes care of administrative duties for you.
Learn on and begin enhancing your GIT DevOps productiveness!
Stipulations
This tutorial contains hands-demonstrations. To comply with, guarantee you may have the next:
- Postman desktop utility put in. This information used Postman v10.5.6.
Authenticating Bitbucket with an App Password
Since REST APIs can be found all around the web, anybody could make a name to change delicate data. How do you mitigate this threat? An authentication examine allows you to decide the entry stage, permitting solely directors to put in and consider apps.
Bitbucket Relaxation API gives numerous strategies for authentication, together with OAuth 2.0 Authentication and App passwords. However for a begin, you’ll create an App password to authenticate Bitbucket.
To create an App password, comply with these steps:
1. Open your favourite internet browser, and log in to Bitbucket.
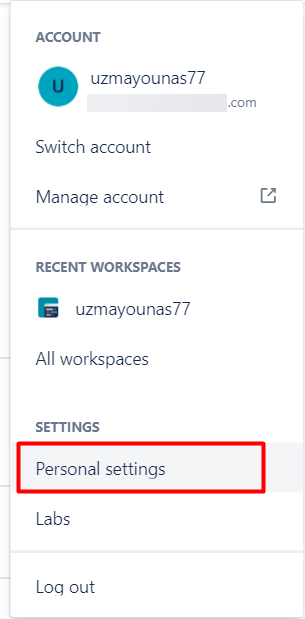
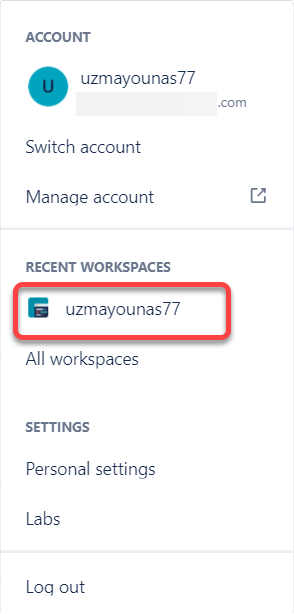
2. As soon as logged in, click on in your account profile (top-right), and choose Private settings. Your browser redirects to your Private settings web page (step three).
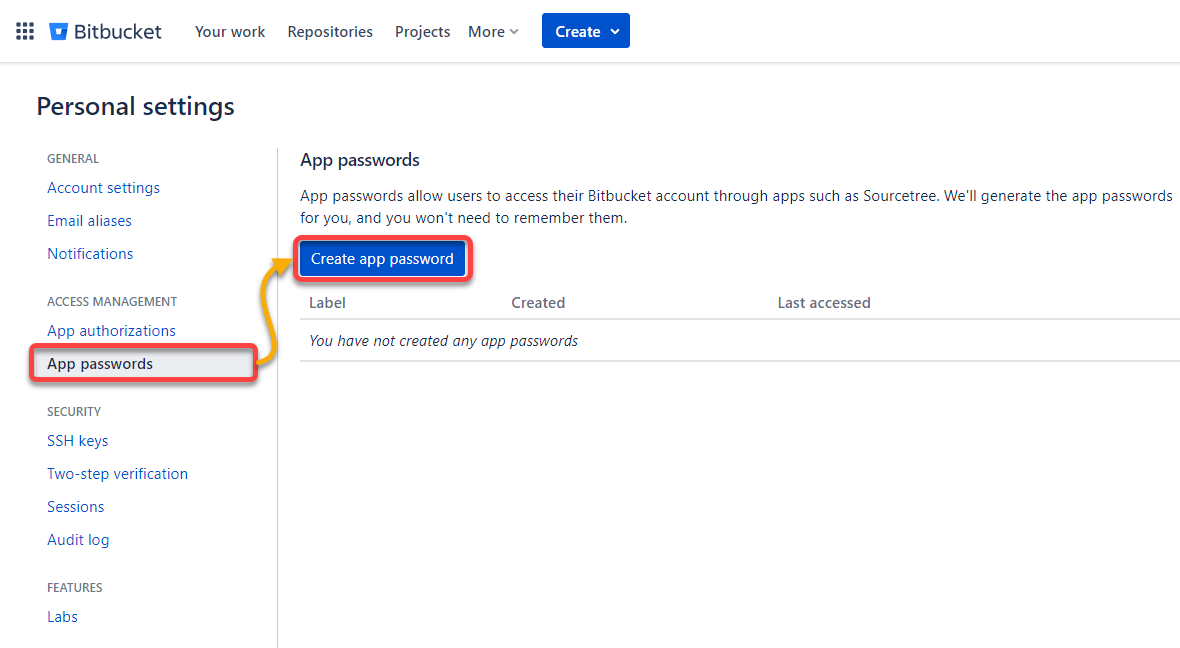
3. Subsequent, click on App passwords (left panel) to entry the App passwords supervisor web page, and click on Create app password to provoke creating an App password.
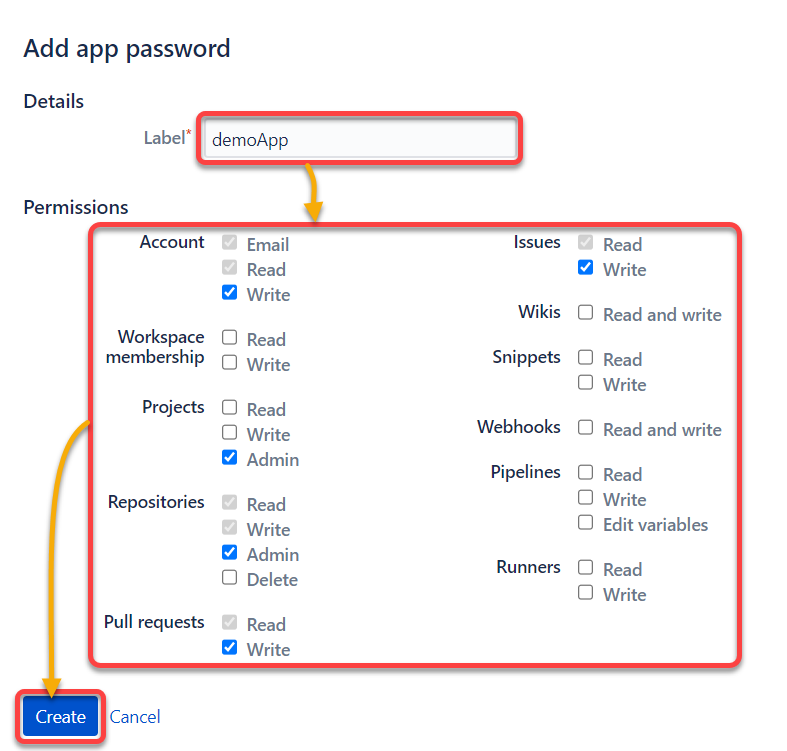
💡 App passwords are tied to a person account’s credentials. These passwords are helpful to directors to supervise Bitbucket-connected app testing whereas in improvement.
4. Now, configure the App password with the next:
- Present a Label (i.e., demoApp), which serves because the title of the App password.Allow various kinds of Permissions relying in your mission necessities.Click on on the Create button to finalize creating your App password.
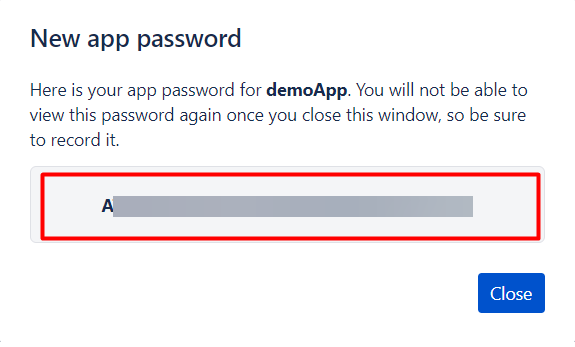
5. Lastly, copy the generated password from the New app password pop-up window, and put it aside someplace secure for later use.
Authenticating Bitbucket through OAuth 2.0
OAuth 2.0 is taken into account a safer methodology to authenticate if you find yourself uncomfortable utilizing an App password. OAuth protocol for Bitbucket makes use of third-party OAuth/OIDC suppliers to authenticate API calls.
With OAuth 2.0, the supplier points an entry token, which serves as proof of identification for an API name. Because of this, you wouldn’t have to share password knowledge as this conduct restricts the entry stage, and the token must be revoked after a while.
To arrange OAuth 2.0, you’ll create a shopper who will likely be answerable for making API calls:
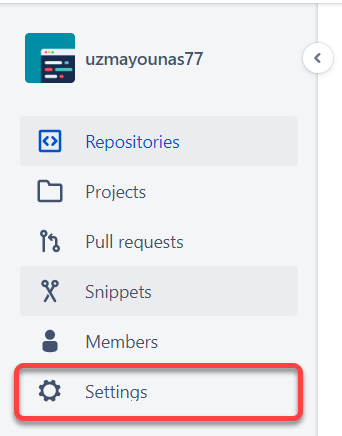
1. On Bitbucket, click on your profile (top-right), and choose your workspace.
2. Subsequent, click on Settings (left panel) in your workspace web page to entry your workspace Settings.
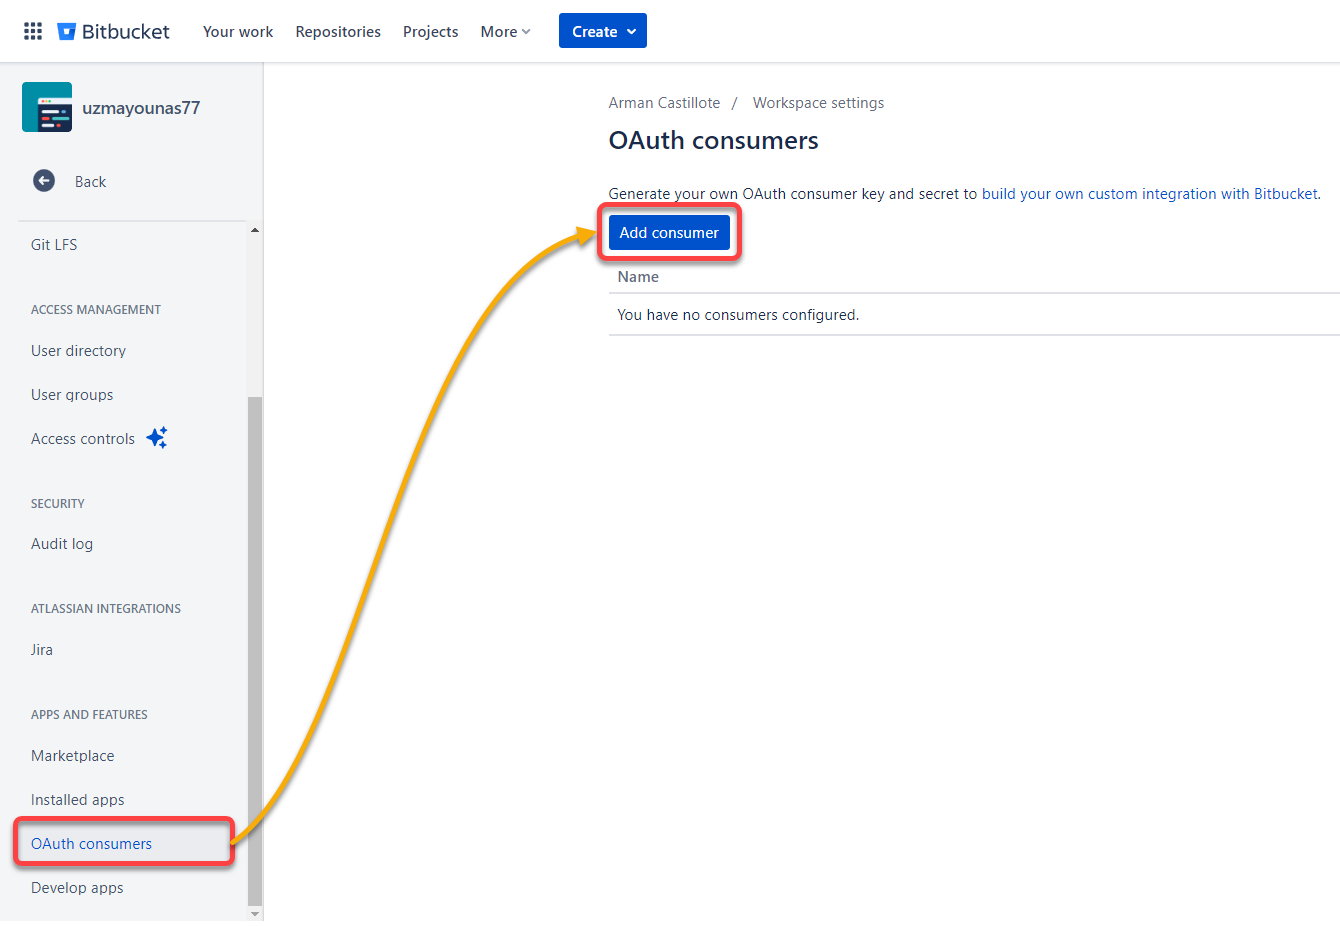
3. Navigate to OAuth customers below the Apps and options part, and click on Add shopper to provoke including a brand new shopper. Your browser redirects to a web page the place you’ll be able to fill in shopper data (step 4).
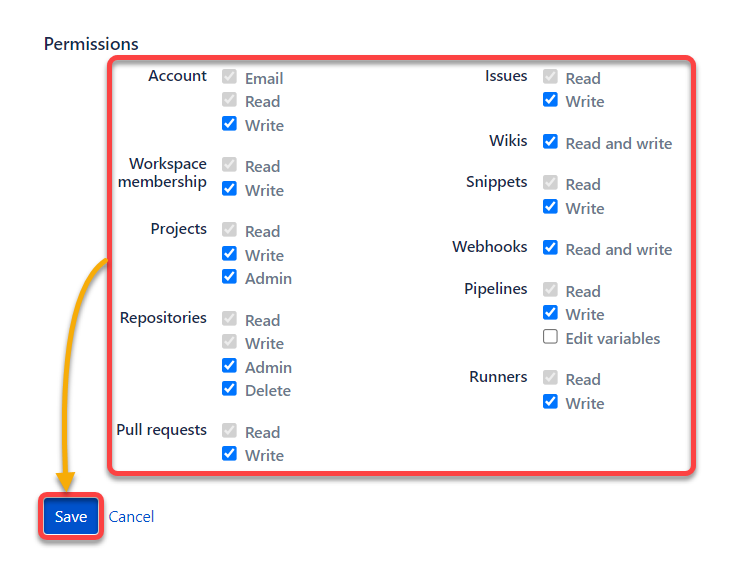
4. Now, configure the brand new OAuth shopper as follows:
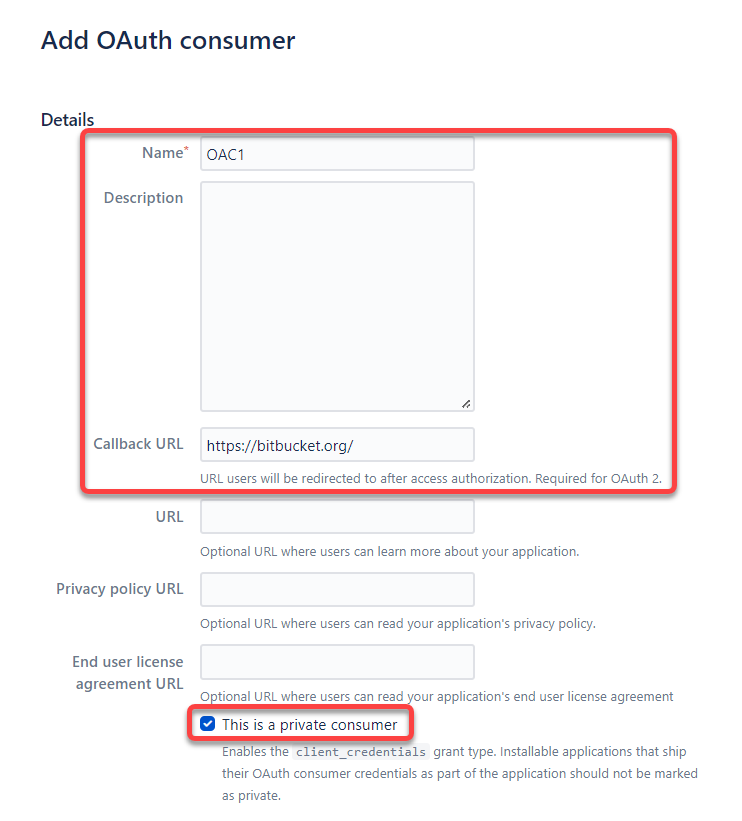
5. Select which Permissions to offer, just like creating an App password, and click on Save to finalize creating the brand new OAuth shopper.
As soon as created, your browser redirects to the OAuth customers web page (step six).
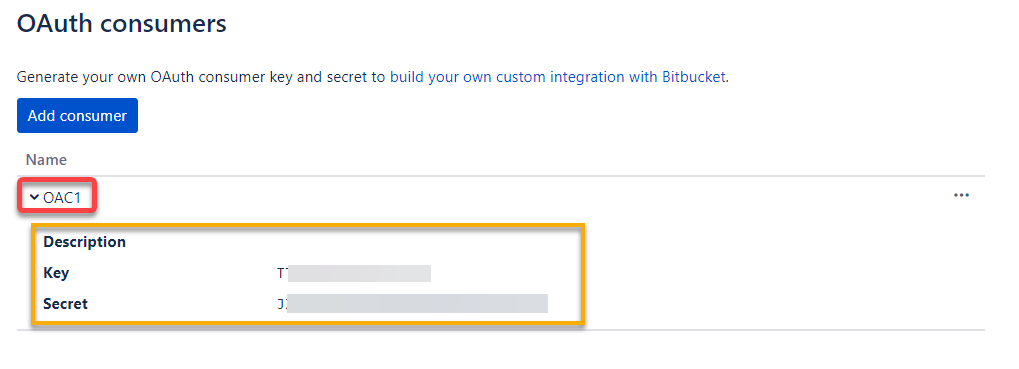
6. Subsequent, click on on the buyer’s title to broaden its data.
Observe the generated Key and Secret worth for the buyer, as you’ll need them to work together with the Bitbucket API.
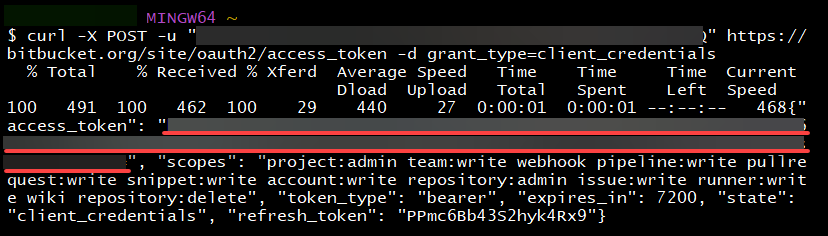
Lastly, open your terminal, and run the under curl command to amass an entry token utilizing your key and secret values to work together with Bitbucket API. The request is made to the Bitbucket API endpoint reserved for producing an entry token.
Make sure you substitute client_id and secret together with your OAuth shopper’s key and secret worth, respectively.
curl -X POST -u "client_id:secret" https://bitbucket.org/website/oauth2/access_token -d grant_type=client_credentialsBe aware of the access_token, as proven under. You should use this entry token to ship requests to the initiatives/repositories related together with your shopper workspace.
Making a Git Repository to Work together with Bitbucket API
Because you now have an entry token, you’re able to work together with the Bitbucket API. How? You’ll create a repository as digital mission storage to save lots of variations of your code.
A Git repository allows you to observe and handle the historical past of all modifications made to repositories that belong to a selected workspace.
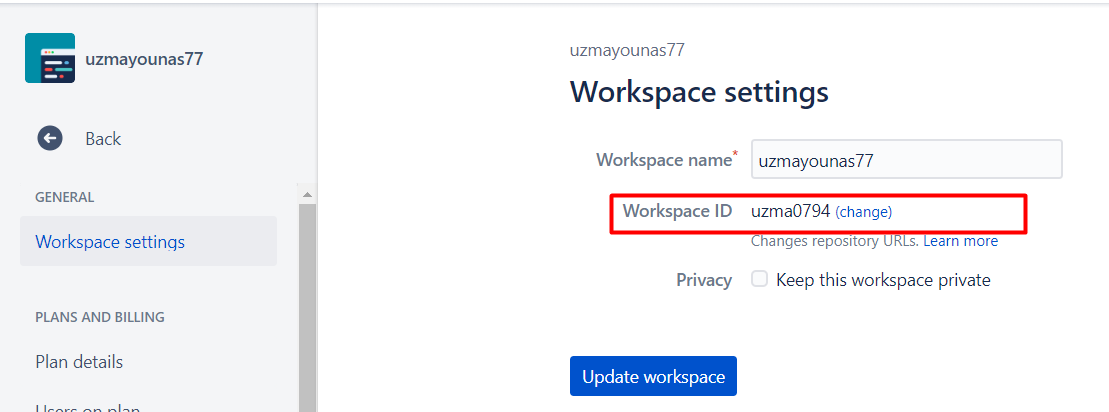
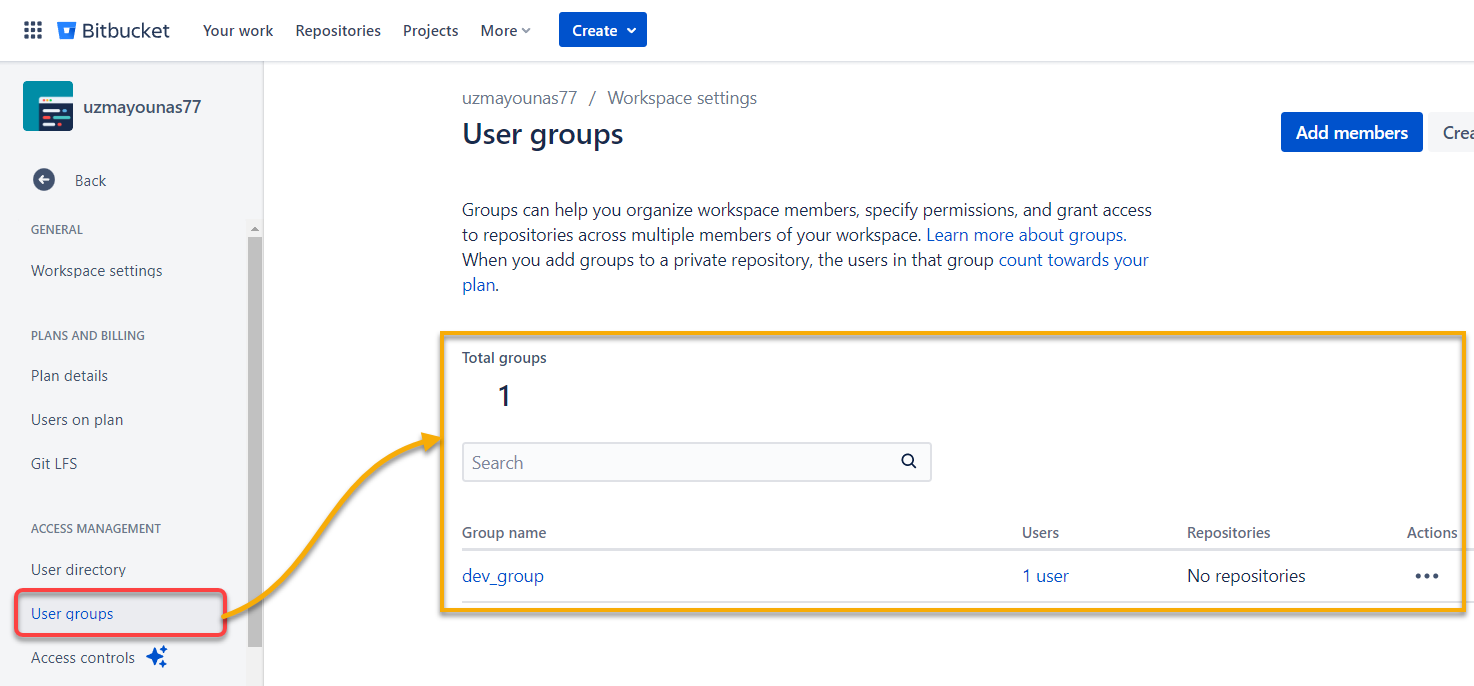
Retrieve your workspace ID first, which could be seen on the Workspace settings web page.
Now, run the under command to create a repository, however make sure you substitute the next:
XXXX– An identifier in your mission inside the workspace.{access_token}– The entry token you famous within the final step of the “Authenticating OAuth 2.0” part.{workspace_id}– The ID of the workspace the place you want to create the brand new repository.{repo_name}– A reputation to set in your repository.
curl -X POST -H "Content material-Sort: utility/json"-H "Authorization:Bearer {access_token}" -d '{
          "scm": "git",
           "mission": {
                "key": "XXXX"
                }
     }' https://api.bitbucket.org/2.0/repositories/{workspace_id}/{repo_name}
💡 Bitbucket relaxation API helps the next endpoint for repositories.
POST /2.0/repositories/{*workspace_id*}/{repo_name}

Making a Consumer Group and Including Customers
For firms with many initiatives and workers, applicable person entry could be managed by creating person teams. All customers belonging to a specific group share the identical entry privileges.
The two.0 REST API model depends on 1.0 API assets for customers and group administration, as endpoints for two.0 should not accessible but.
💡 Bitbucket Cloud REST API model 1.0 is deprecated, however Bitbucket helps the
/1.0/teamsendpoint to handle teams. The present working model is 2.0, however 1.0 nonetheless helps restricted 1.0 API assets, which embody group and invitation endpoints.
Run the next curl command to create a brand new group through API name.
The teams endpoint is beneficial for querying details about Bitbucket person teams, creating new ones, updating memberships, and deleting them. The caller must authenticate with administrative rights on an account to entry its teams.
Make sure you substitute the next accordingly, in every command, all through this tutorial:
| Placeholder | Worth |
|---|---|
| username:password | Your key and secret values if you’re utilizing OAuth2. However if you’re utilizing an App password, present your username and the password you obtained from App password creation |
| {workspace_id} | Your workspace ID. |
| group_name or group_slug | Your group’s title. |
curl --request POST --user username:password https://api.bitbucket.org/1.0/teams/{workspace_id} --data "title=group_name"
Now, run the under command so as to add members to the newly-created group.
Substitute {group_slug} with the group’s title and {username} with both the member’s distinctive account title or electronic mail. Members will obtain an electronic mail notification of the invitation.
curl --request PUT --user username:password --header "Content material-Sort: utility/json" https://api.bitbucket.org/1.0/teams/{workspace_id}/{group_slug}/members/{username}/ --data '{}'If executed efficiently, the response physique accommodates particulars concerning the newly added person, together with person show title and Consumer ID (UUID), as proven under.

Beneath, you’ll be able to see a member is efficiently added to the group (dev_group) in Bitbucket and now has entry to all of the repositories within the assigned workspace.
Itemizing All Pull Requests
Since Git is a model management system (VCS), your repository can have totally different variations of modifications. How do you place these variations collectively? You want a pull request to merge the native repository modifications to the primary or developer department.
Thoughts you, although, that pull requests have to be accepted by an administrative person after correct overview. So, you first must get a listing of all of the pull requests utilizing Postman, an API testing utility that presents the API response in a readable kind.
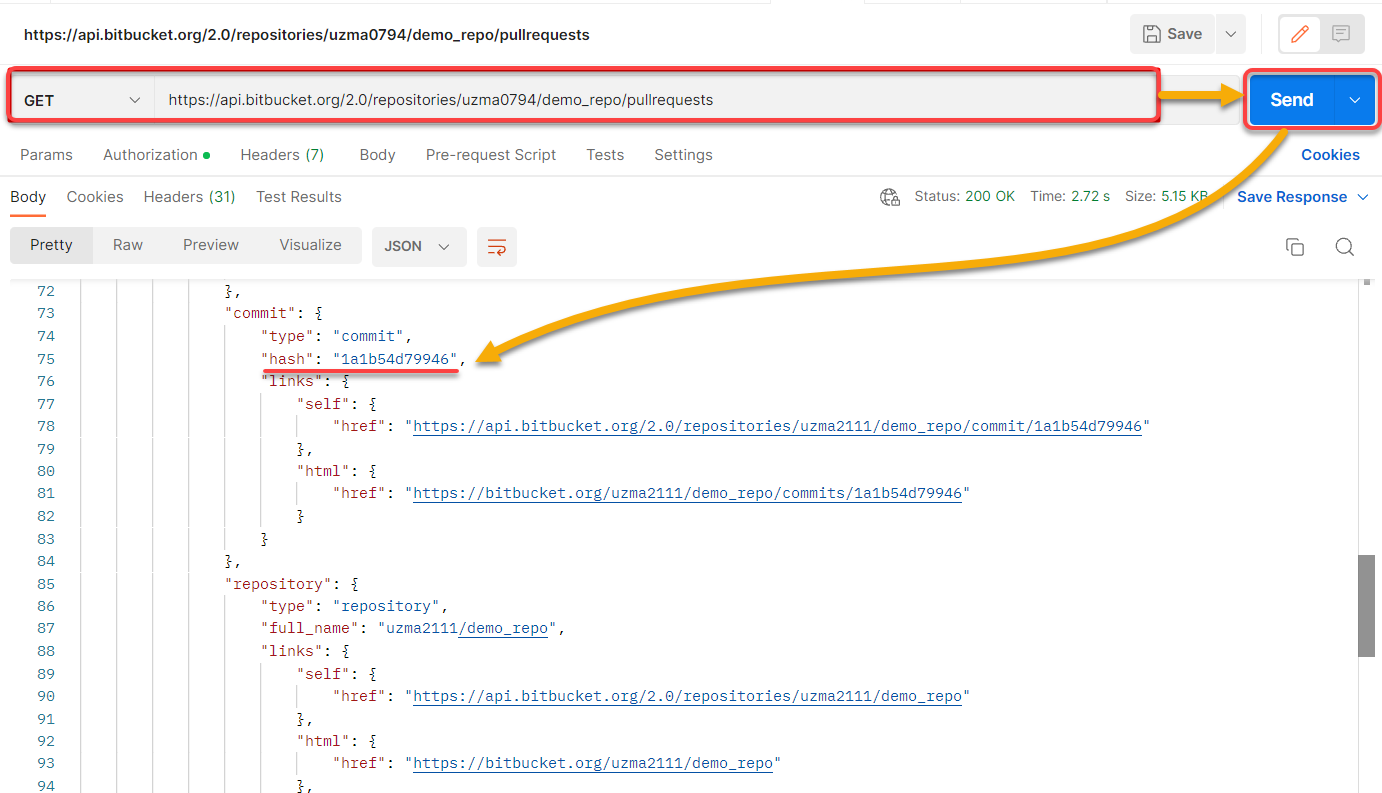
Launch Postman, select the GET possibility from the dropdown discipline, and run the under URL to listing all pull requests for a specified repository.
https://api.bitbucket.org/2.0/repositories/{workspace_id}/{repo_name}/pullrequestsBeneath, you’ll be able to see that Postman is like cURL’s GUI model. cURL affords a command line utility to switch knowledge over URLs. Postman does the identical job however gives an interactive UI.
Be aware of the commit ID within the hash, as proven under, which you (an admin) will use to approve the pull request.
However if you happen to want cURL, run the under curl command as an alternative to listing all of the pull requests for a specified repository. However from this level all through the tutorial, make sure you substitute {workspace_id}, {repo_name}, and {access_token} in every endpoint URL and command.
curl --request GET --url 'https://api.bitbucket.org/2.0/repositories/{workspace_id}/{repo_name}/pullrequests' --header 'Authorization: Bearer {access_token}' --header 'Settle for: utility/json'Reviewing and Responding to Commits (Approve/Unapprove)
A commit is an motion that sends the newest supply code to the repository utilizing a pull request. However a pull request will simply be mendacity round with out an admin’s commit approval.
The up to date code must be revised earlier than it’s merged into the primary repository. As an admin person with entry privileges, you’ll be able to approve or reject specified commits utilizing Bitbucket API.
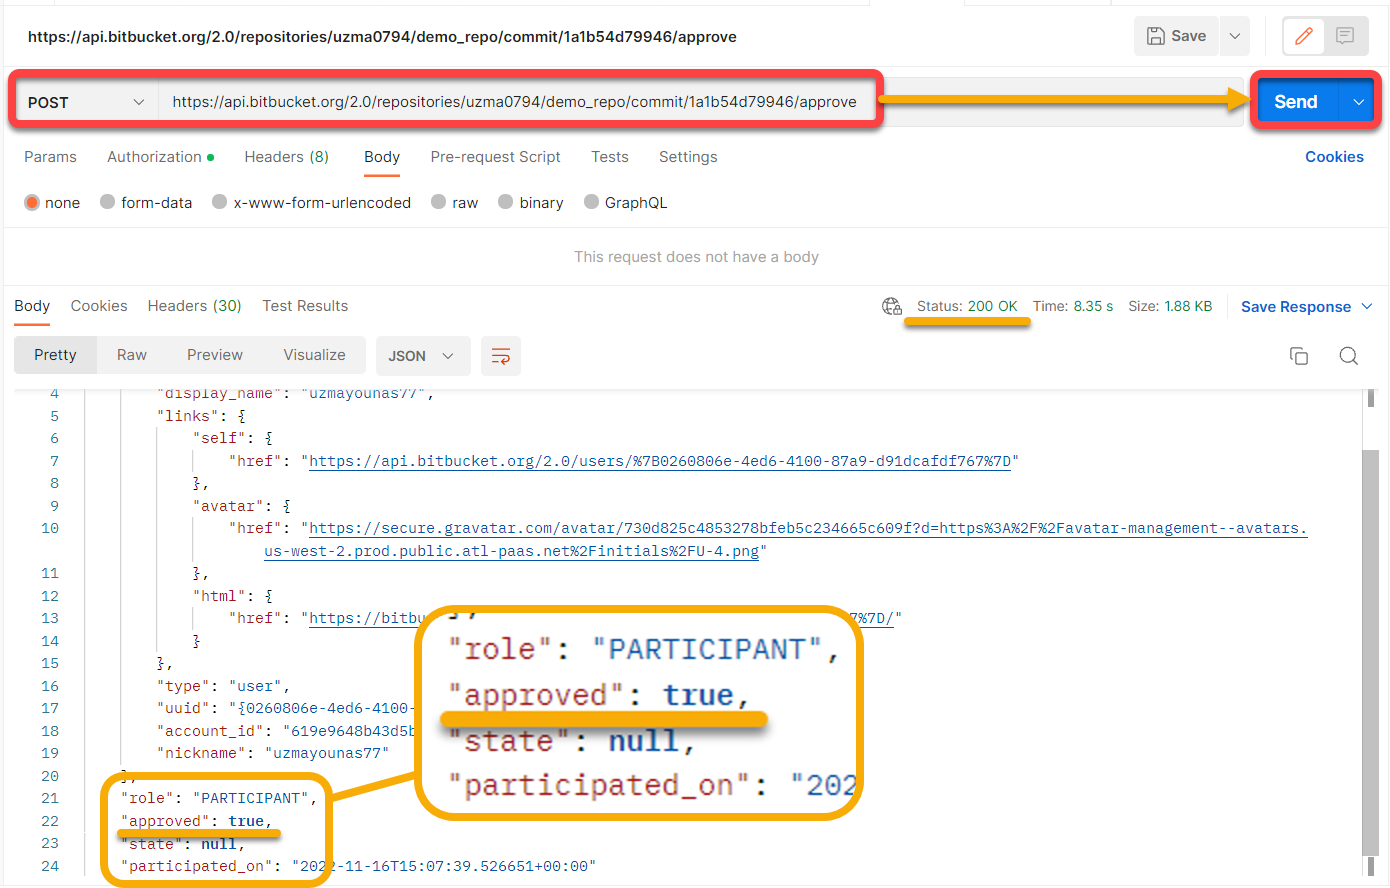
Select the POST possibility from the dropdown discipline in Postman, and run the next URL to approve a commit. Make sure you substitute {commit_ID} with the commit ID you famous within the final step of the “Itemizing All Pull Requests” part.
https://api.bitbucket.org/2.0/repositories/{workspace_id}/{repo_name}/commit/{commit_ID}/approveYou’ll be able to see under that the commit has the accepted standing (”accepted”: true or 200 OK).
For cURL, run the under command to approve a selected commit, changing {commit_ID} with the commit ID you propose to approve.
curl --request POST --url 'https://api.bitbucket.org/2.0/repositories/{workspace_id}/{repo_name}/commit/{commit_ID}/approve' --header 'Authorization: Bearer {access_token}' --header 'Settle for: utility/json'💡 Equally, customers with express entry to the repository can Redact specified commits utilizing the next command.
curl --request DELETE --url 'https://api.bitbucket.org/2.0/repositories/{workspace}/{repo_name}/commit/{commit}/approve' --header 'Authorization: Bearer {access_token}Deleting Teams and Repositories
Cleansing your workspace is a method of enhancing productiveness. Who wouldn’t desire a clutter-free setting? However how? Delete teams and repositories that don’t serve any objective.
As long as you’re the root person with admin rights to delete a gaggle of customers, cleansing your workspace is only a few steps away.
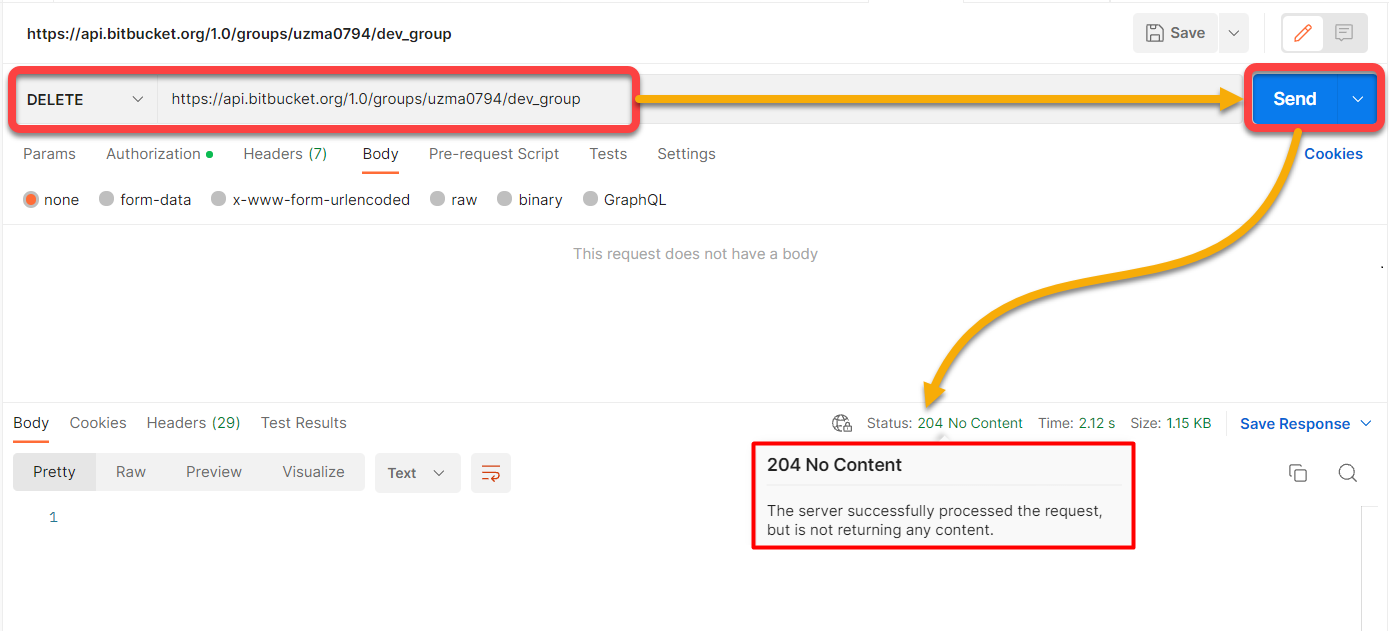
Swap to the DELETE possibility, and run the next URL to delete a selected group
https://api.bitbucket.org/1.0/teams/{workspace_id}/{group_slug}You’ll be able to see under that the standing is 204 No Content material, which signifies the group not exists.
For cURL, run the under command to delete a selected group.
curl --request DELETE --user username:password --header "Content material-Sort: utility/json" https://api.bitbucket.org/1.0/teams/{workspace_id}/{group_slug}/Now, run the under URL to delete a selected repository.
https://api.bitbucket.org/2.0/repositories/{workspace_id}/{repo_name}Beneath, you’ll be able to see the identical 204 No Content material standing, which tells you the repository not exists.
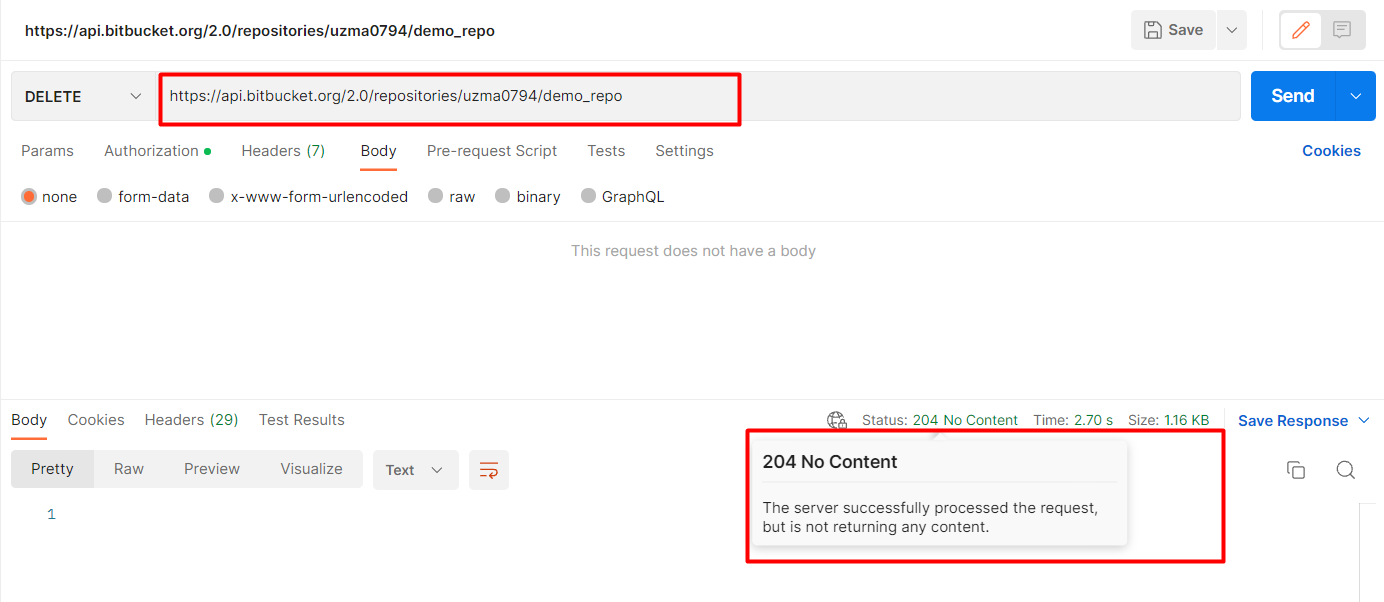
However for cURL, run the next command to delete a repository completely.
curl --request DELETE --url 'https://api.bitbucket.org/2.0/repositories/{workspace}/{repo_slug}' --header 'Authorization: Bearer {access_token}'Conclusion
This tutorial has walked you thru all the mandatory practices carried out by a Bitbucket administrator person. Particularly, you may have discovered to create, handle and management entry to Bitbucket workspaces utilizing Bitbucket API calls.
APIs are the quickest and best methods to handle numerous Bitbucket operations with out going via the guide setup. Bitbucket makes use of customary HTTP requests to entry and use knowledge, making it suitable with any programming language or framework.
The API is of nice assist to streamline workflows and preserve high-quality code. Why not transfer forward with organising Bitbucket Pipelines? Carry steady supply by synchronizing Bitbucket API occasions!