

Introduction
This publish has been sitting in my drafts folder for a very long time. Someday earlier this yr I noticed a job posting the place somebody needed to make use of Apple’s imaginative and prescient framework to do textual content recognition. I wasn’t within the job however I used to be curious concerning the Imaginative and prescient framework as I had by no means used it earlier than.
On this article, I’ll take you thru how I used PyObjC to interface with the Apple Imaginative and prescient Framework and create a script to detect textual content in photographs. Within the course of, you’ll find out how PyObjC works and the way it maps features and strategies from Goal C to Python.
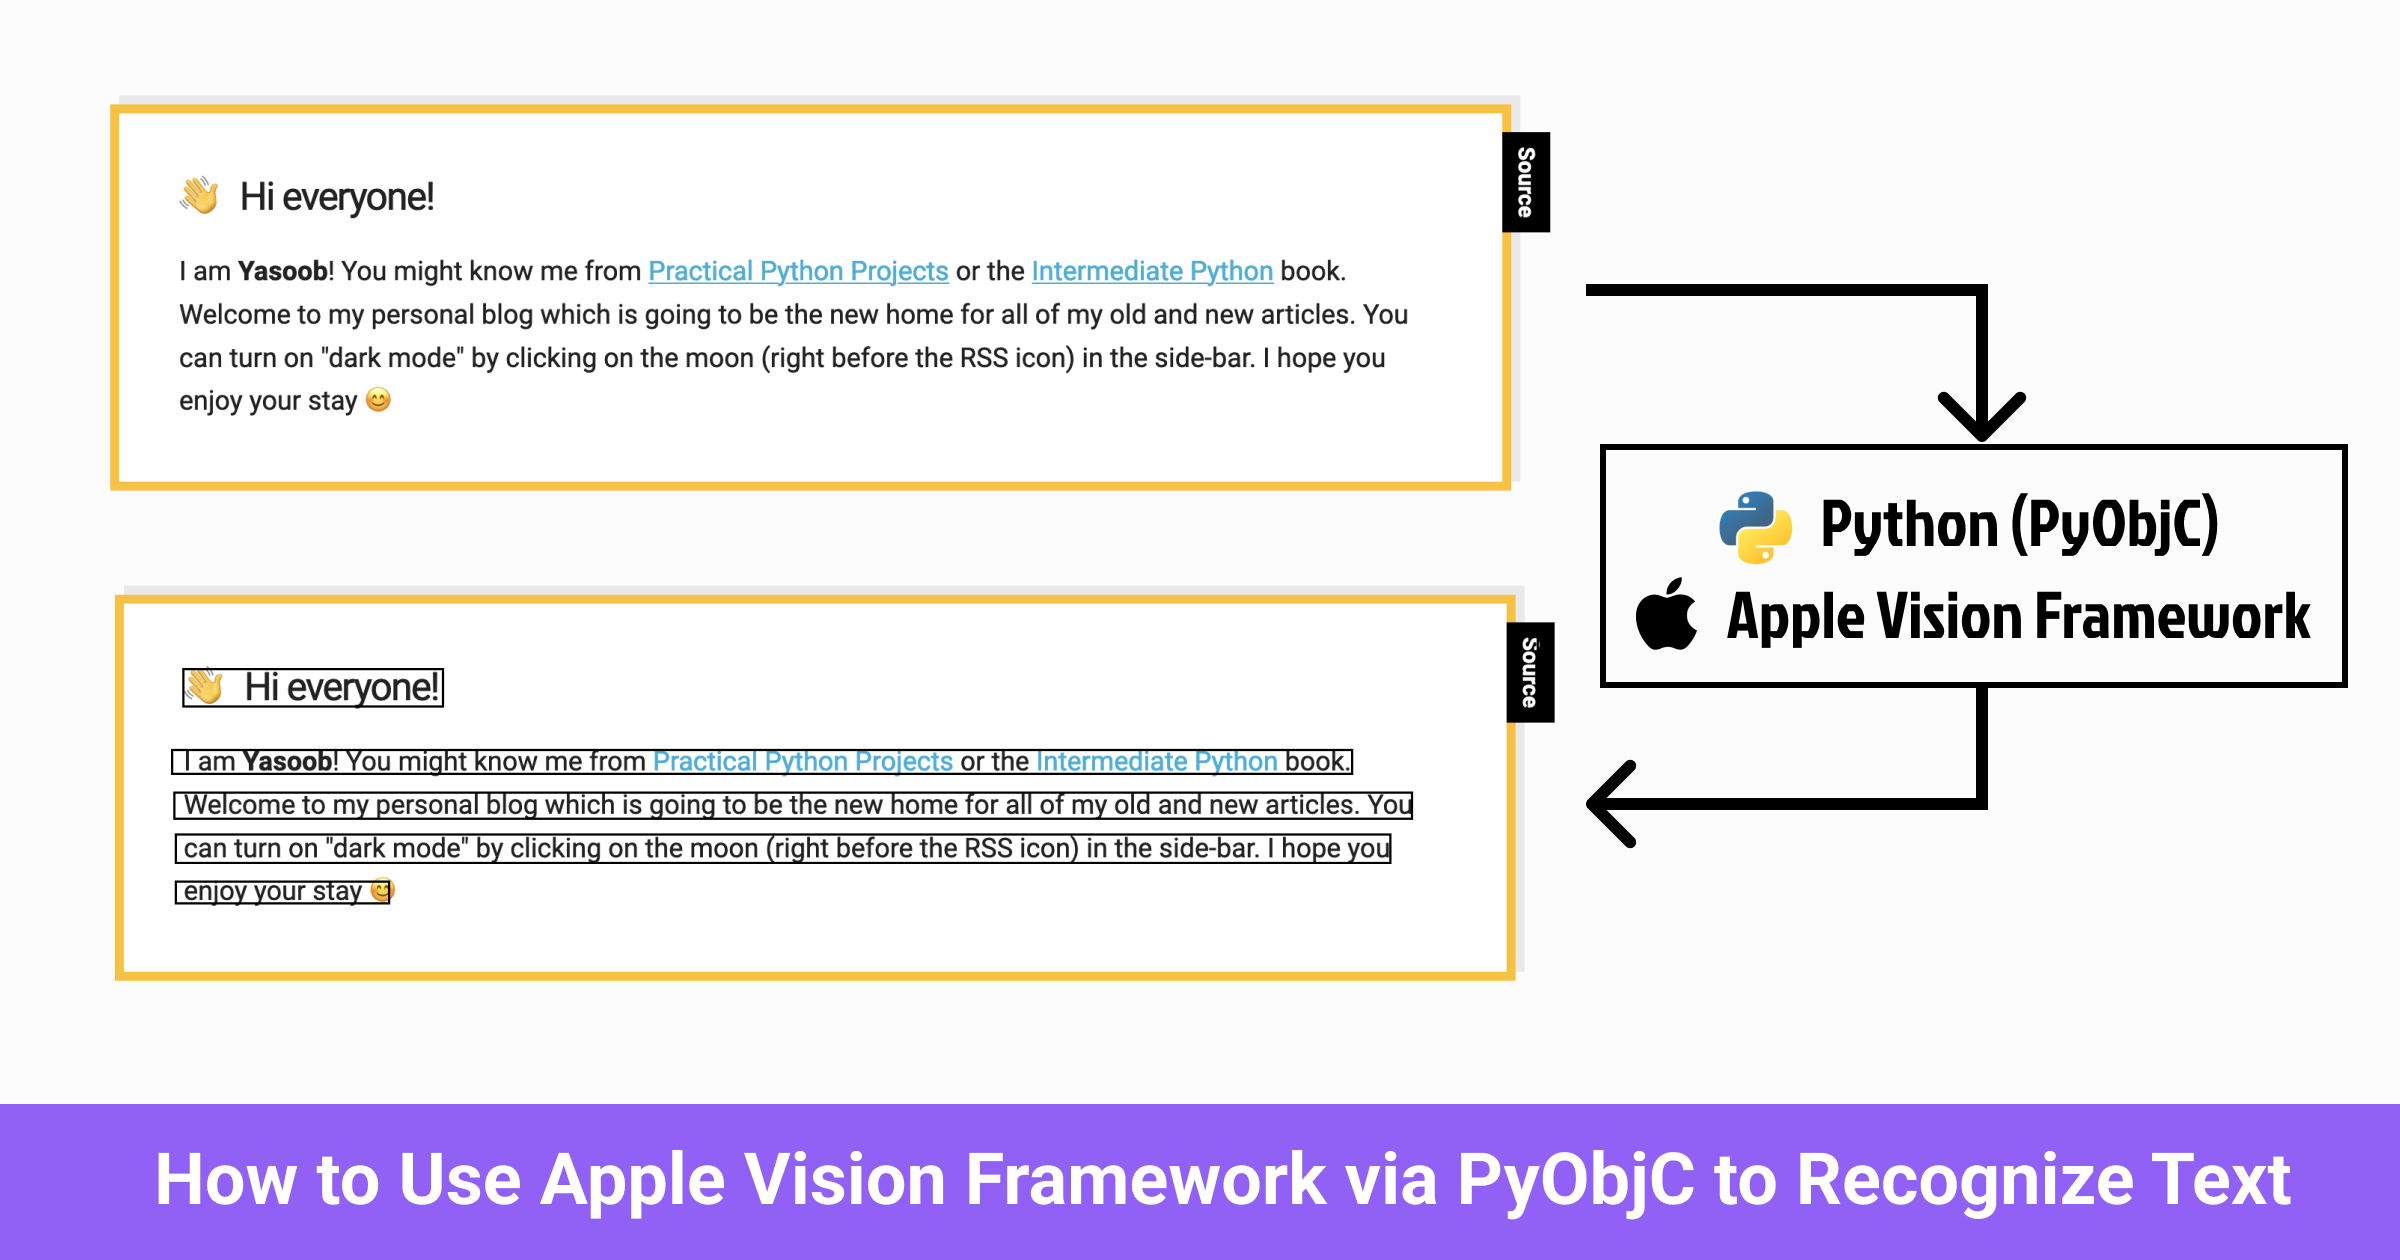
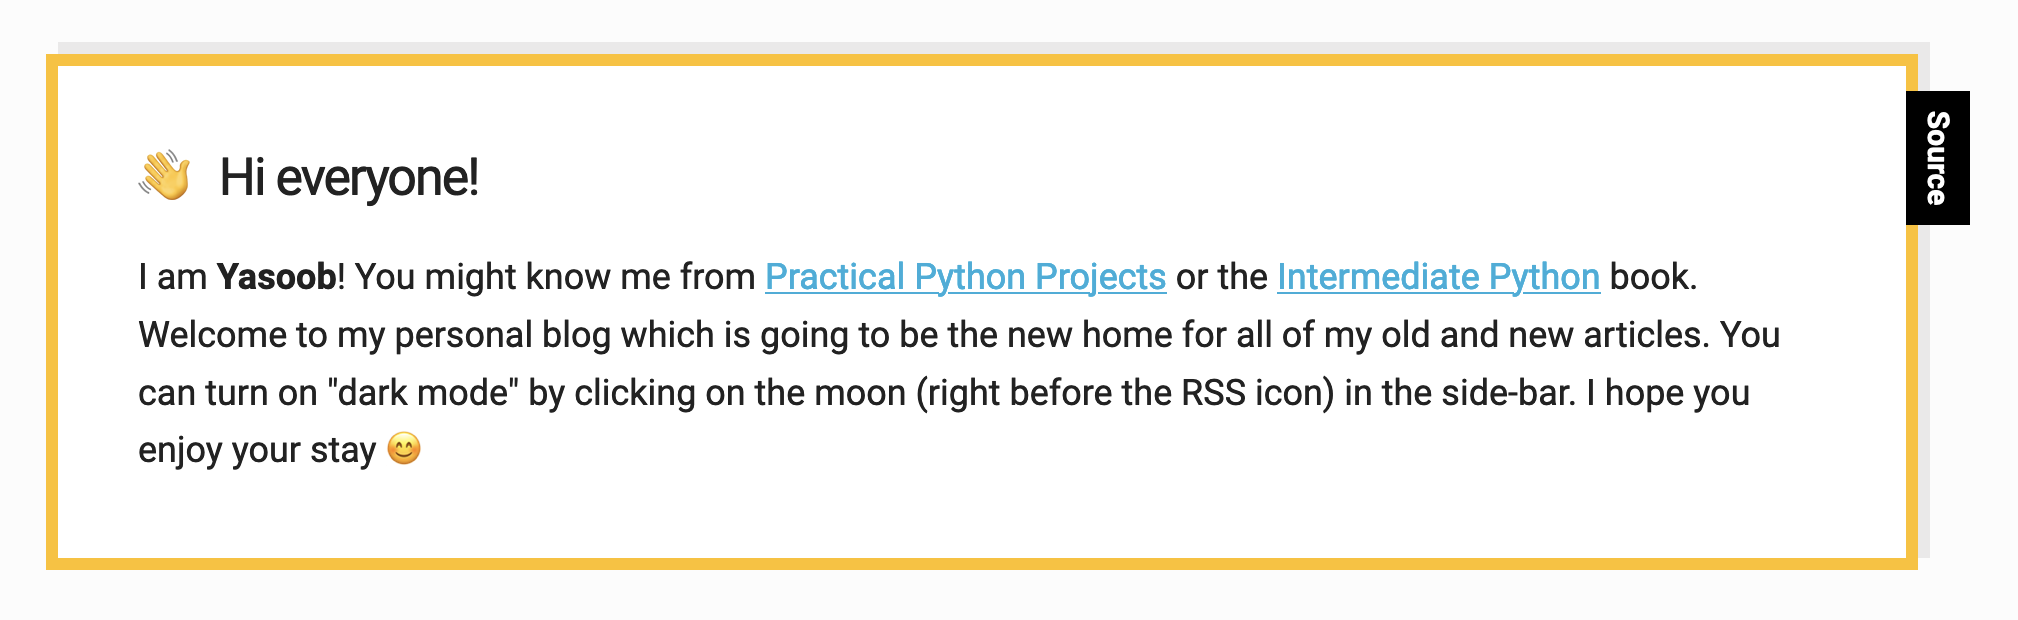
By the tip of this text, you’ll know sufficient to have the ability to write a script that takes such a picture as enter:
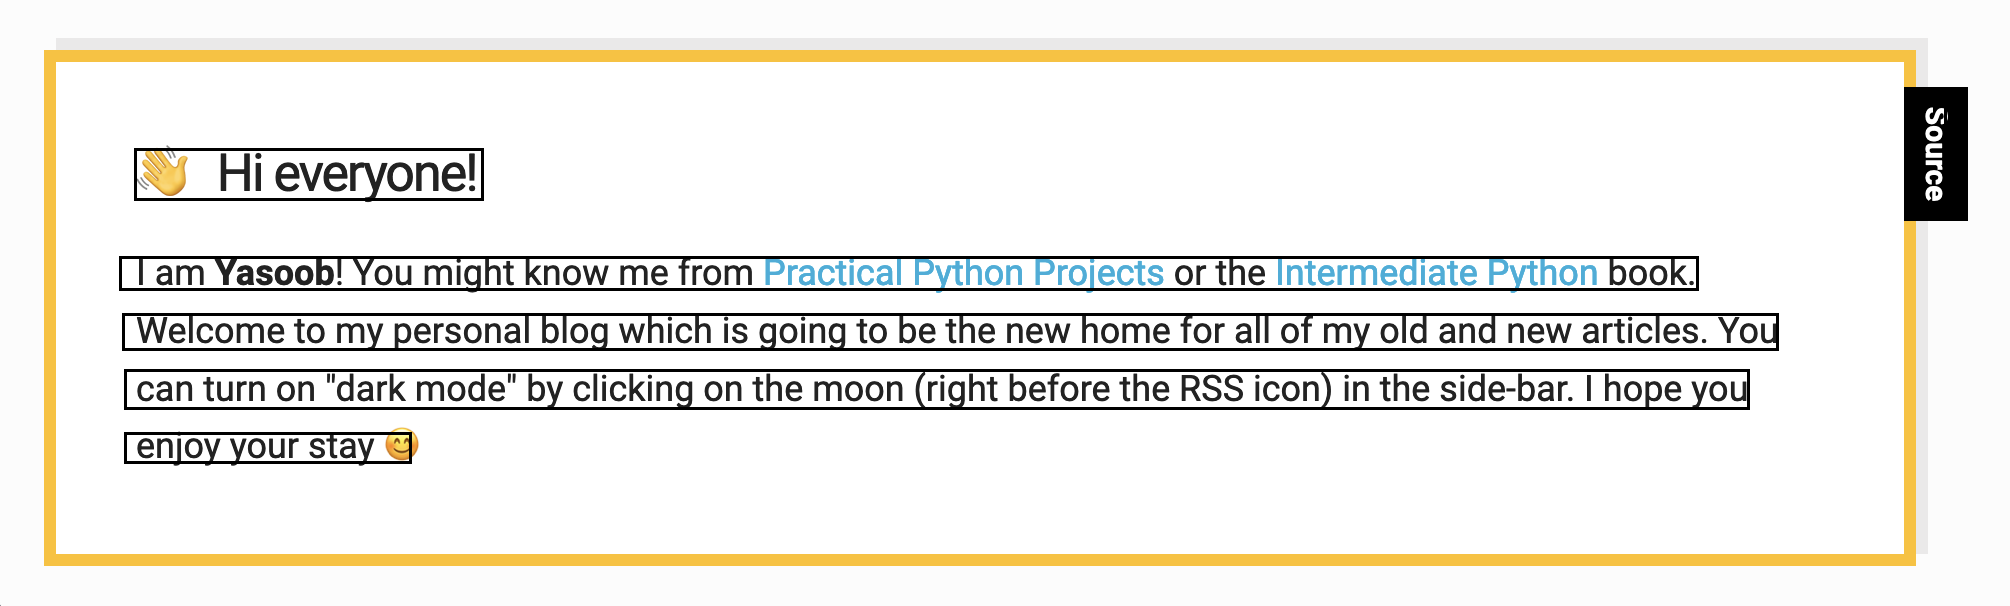
And makes use of Imaginative and prescient Framework to run OCR over it and produce an output picture with overlayed bounding containers:
And likewise print the detected textual content within the terminal:
• Hello everybody!
I'm Yasoob! You may know me from Sensible Python Tasks or the Intermediate Python ebook.
Welcome to my private weblog which goes to be the brand new dwelling for all of my previous and new articles. You
can activate "darkish mode" by clicking on the moon (proper earlier than the RSS icon) within the side-bar. I hope you
get pleasure from your keep g
Supply
So with none additional ado, let’s start!
Disclaimer: Whereas I used to be midway by this venture, I found the great osxphotos venture on GitHub that additionally interfaces with the Imaginative and prescient Framework. I developed a lot of the code on this article independently however I did take a number of inspiration from the osxphotos venture as soon as I discovered about it.
What’s Apple Imaginative and prescient Framework
It’s a proprietary framework from Apple that’s particularly designed to be used with iOS and macOS. It gives a spread of pre-trained fashions and APIs that can be utilized to shortly and simply add picture evaluation and laptop imaginative and prescient capabilities to an app.
I’m not an Goal C or Swift programmer so after I heard about this framework, my very subsequent query was whether or not I may use it from Python. Seems, the framework will not be uncovered by a devoted Python library. Nonetheless, I may use it by way of PyObjC. If in case you have by no means used or heard about PyObjC, it gives a bridge between Python and Goal C and likewise gives bindings to most Apple frameworks on macOS.
How you can use Apple Imaginative and prescient Framework with Python
We can be counting on the next libraries on this tutorial:
You may set up each of those utilizing the next PIP command:
$ pip set up Pillow pyobjc
As I already talked about, PyObjC is a bridge between Python and Goal-C. It permits full-featured Cocoa purposes to be written in pure Python. It gives wrappers for a lot of the Goal C courses and frameworks on Apple machines. We can be counting on it to utilize native Apple frameworks and courses by way of Python.
Create a new Python file and add the next imports:
import Quartz
from Basis import NSURL, NSRange
import Imaginative and prescient
from PIL import Picture, ImageDraw
The Quartz, Imaginative and prescient, and Basis packages all come from the pyobjc library. They supply entry to the next options:
- Quartz (gives instruments for working with graphics on Macs)
- Basis (gives entry to totally different core knowledge varieties)
- Imaginative and prescient (gives entry to the imaginative and prescient framework)
I can be basing this complete tutorial across the official Apple tutorial for recognizing textual content in photographs utilizing Imaginative and prescient Framework. The one distinction can be that the official docs use Swift whereas I’ll use Python.
The textual content recognition course of broadly entails utilizing VNRecognizeTextRequest and VNImageRequestHandler. The VNRecognizeTextRequest takes in an image-based enter and finds and extracts textual content from that picture and the VNImageRequestHandler performs this request.
In response to Apple docs, the code for doing textual content recognition seems to be like this:
// Get the CGImage on which to carry out requests.
guard let cgImage = UIImage(named: "snapshot")?.cgImage else { return }

// Create a brand new image-request handler.
let requestHandler = VNImageRequestHandler(cgImage: cgImage)

// Create a brand new request to acknowledge textual content.
let request = VNRecognizeTextRequest(completionHandler: recognizeTextHandler)

do {
    // Carry out the text-recognition request.
    attempt requestHandler.carry out([request])
} catch {
    print("Unable to carry out the requests: (error).")
}
and the recognizeTextHandler (for processing the response) seems to be one thing like this:
func recognizeTextHandler(request: VNRequest, error: Error?) {
    guard let observations =
            request.outcomes as? [VNRecognizedTextObservation] else {
        return
    }
    let recognizedStrings = observations.compactMap { statement in
        // Return the string of the highest VNRecognizedText occasion.
        return statement.topCandidates(1).first?.string
    }

    // Course of the acknowledged strings.
    processResults(recognizedStrings)
}
Our aim is to copy all of those steps utilizing PyObjC. The primary situation is that the Apple docs make use of UIImage which is part of UIKit. Nonetheless, pyobjc doesn’t presently present a wrapper for this framework. I needed to do some digging to discover a dependable supply for this declare. The official pyobjc docs point out it but it surely took me some time to search out this web page:

Because of this I’ve to search out one other option to get a CGImage occasion from a file on the disc.
After some analysis, I discovered that I can initialize a VNImageRequestHandler utilizing a CIImage after which create a CIImage from a file on disc. The code seems to be one thing like this:
# Get the CIImage on which to carry out requests.
input_url = NSURL.fileURLWithPath_(img_path)
input_image = Quartz.CIImage.imageWithContentsOfURL_(input_url)

# Create a brand new image-request handler.
request_handler = Imaginative and prescient.VNImageRequestHandler.alloc().initWithCIImage_options_(
        input_image, None
)
This code may look pretty verbose in comparison with the Swift instance however in the event you attempt to perceive how pyobjc works, it can begin making sense. Learn this web page of the pyobjc docs after which come again. Now let’s discover the above code step-by-step.
I begin by creating an NSURL by passing it a path to the picture file I wish to carry out the OCR on. PyObjC appends a trailing _ on all technique calls (not operate calls) that take an argument. Subsequent, I move the NSURL into the imageWithContentsOfURL_ technique of CIImage. Lastly, I move this CIImage to the initWithCIImage_options_ technique of VNImageRequestHandler.
Goal C does object initialization in two phases. In step one, it allocates some area after which it initializes an object. Swift masks this complete course of. PyObjC permits us to observe the identical two-step process by first calling alloc() after which calling a modified type of init relying on our wants.
In response to the official docs, VNImageRequestHandler has fairly just a few initializers:
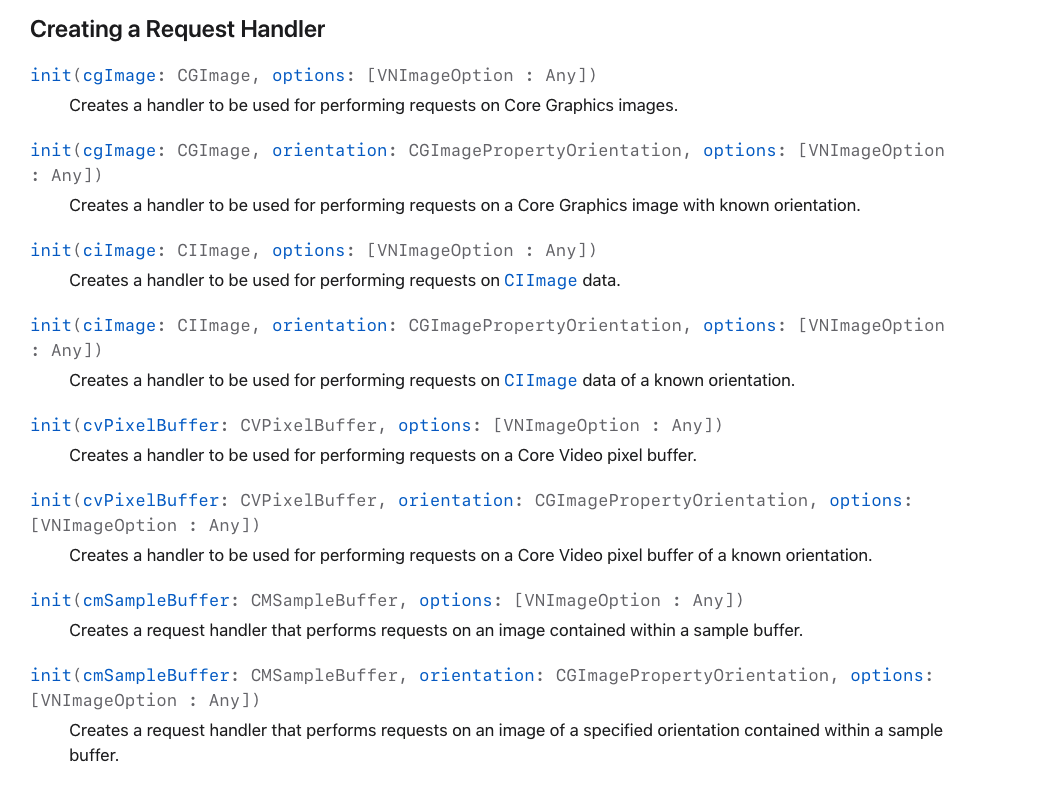
PyObjC permits us to make use of any of those initializers by appending With to init after which following that with the argument names and appending a _ to every argument title. As an illustration, if I wish to name init with ciImage and choices arguments, I can use initWithCIImage_options_ and if I wish to name init with ciImage, orientation and choices arguments, I can use initWithCIImage_orientation_options_. When you internalize this format, it is possible for you to to transform any Goal C technique/operate name to pyobjc format with little to no effort.
Subsequent, I must create a Python-based recognizeTextHandler operate. That is what I ended up with:
def recognize_text_handler(request, error):
    observations = request.outcomes()
    outcomes = []
    for statement in observations:
        recognized_text = statement.topCandidates_(1)[0]
        outcomes.append([recognized_text.string(), recognized_text.confidence()])
    print(outcomes)
Now I must create a brand new Imaginative and prescient request and move recognizeTextHandler to it:
# Create a brand new request to acknowledge textual content.
request = Imaginative and prescient.VNRecognizeTextRequest.alloc().initWithCompletionHandler_(recognize_text_handler)
I do know I can use initWithCompletionHandler as a result of VNRecognizeTextRequest inherits from the VNRequest superclass and that superclass has a init technique that takes a completionHandler argument.
The one factor left to do is to provoke the request. I can do this by calling the Python equal of carry out technique:
# Carry out the text-recognition request.
error = request_handler.performRequests_error_([vision_request], None)
Right here is the entire Python code to this point:
import Quartz
from Basis import NSURL
import Imaginative and prescient


def recognize_text_handler(request, error):
    observations = request.outcomes()
    outcomes = []
    for statement in observations:
        # Return the string of the highest VNRecognizedText occasion.
        recognized_text = statement.topCandidates_(1)[0]
        outcomes.append([recognized_text.string(), recognized_text.confidence()])
    for consequence in outcomes:
        print(consequence)
    # TODO Course of the acknowledged strings.

img_path = "./screenshot.png"

# Get the CIImage on which to carry out requests.
input_url = NSURL.fileURLWithPath_(img_path)
input_image = Quartz.CIImage.imageWithContentsOfURL_(input_url)

# Create a brand new image-request handler.
request_handler = Imaginative and prescient.VNImageRequestHandler.alloc().initWithCIImage_options_(
        input_image, None
)

# Create a brand new request to acknowledge textual content.
request = Imaginative and prescient.VNRecognizeTextRequest.alloc().initWithCompletionHandler_(recognize_text_handler)

# Carry out the text-recognition request.
error = request_handler.performRequests_error_([request], None)
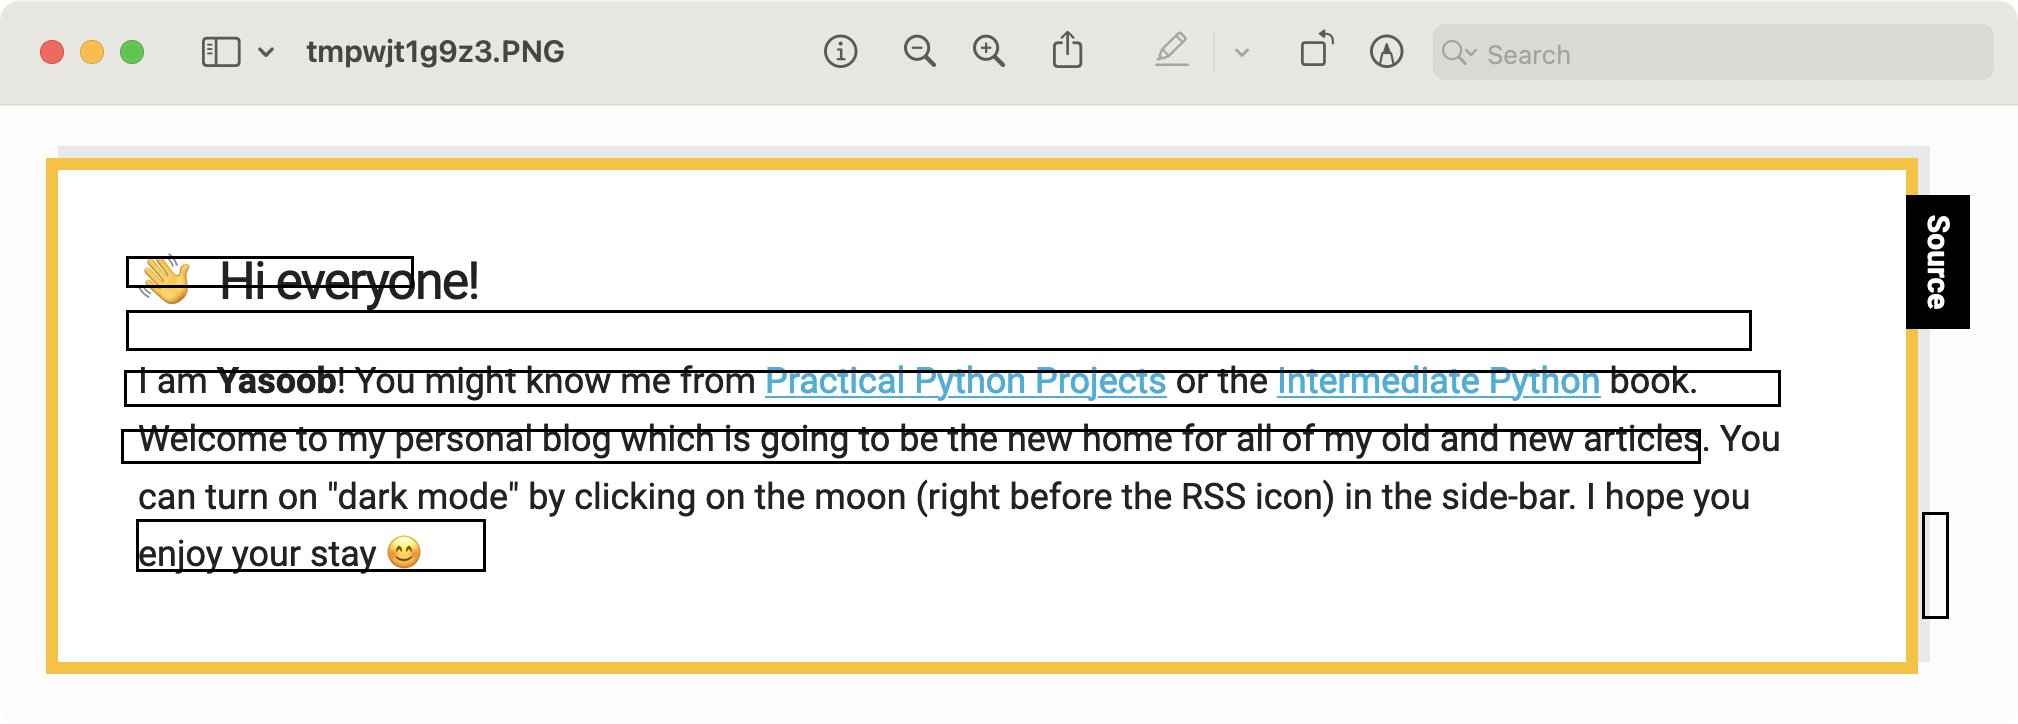
When you run this code, it is best to see the detected strings within the terminal. I used the next picture for testing (taken from my homepage):
And that is the output I noticed within the terminal:
['• Hi everyone!', 0.5]
['I am Yasoob! You might know me from Practical Python Projects or the Intermediate Python book.', 1.0]
['Welcome to my personal blog which is going to be the new home for all of my old and new articles. You', 1.0]
['can turn on "dark mode" by clicking on the moon (right before the RSS icon) in the side-bar. I hope you', 0.5]
['enjoy your stay g', 1.0]
['Source', 1.0]
Displaying detected bounding containers utilizing Pillow
I’ve been capable of efficiently detect textual content in a picture utilizing Imaginative and prescient Framework however it is extremely arduous to visualise the place Imaginative and prescient detected the mentioned textual content within the picture. I can repair that by overlaying the detected bounding containers on the unique picture. Pillow](https://pillow.readthedocs.io/en/steady/index.html) makes this overlaying job very handy.
It seems, the statement.topCandidates_ technique name returns a VNRecognizedText object and these objects have a boundingBoxForRange technique that returns the bounding field across the vary of characters in an statement. That is precisely what I would like.
That is what I used to get the bounding field:
from Basis import NSRange

# ...

box_range = NSRange(0, len(recognized_text.string()))
boxObservation = recognized_text.boundingBoxForRange_error_(box_range, None)
The boxObservation is of sort CGRect. Nonetheless, I cannot use these coordinates straight as they’re within the normalized coordinates area. Because of this they vary from -1 to 1. I must convert them to picture coordinates first. That is attainable by way of the VNImageRectForNormalizedRect operate. This operate takes within the normalized coordinates and the scale of a picture and maps the normalized coordinates within the picture coordinate area.
# Convert the rectangle from normalized coordinates to picture coordinates.
image_width, image_height = input_image.extent().dimension.width, input_image.extent().dimension.top
rect = Imaginative and prescient.VNImageRectForNormalizedRect(boundingBox, image_width, image_height)
Let’s put this rect within the outcomes array and create a brand new operate to course of all the outcomes and overlay them on the enter picture:
def recognize_text_handler(request, error):
    # --snip--
    for statement in observations:
        # --snip--
        outcomes.append([recognized_text.string(), recognized_text.confidence(), rect])
    visualize_results(outcomes)

def visualize_results(outcomes):
    picture = Picture.open(img_path)
    draw=ImageDraw.Draw(picture)

    for consequence in outcomes:
        # TODO: Draw the consequence bounding field

    picture.present()
After doing a bit digging, it seems that I can get the x, and y coordinates of the rect by way of the next features:
CGRectGetMinXCGRectGetMinYCGRectGetMaxXCGRectGetMaxY
I can replace the visualization code to get the suitable x, and y coordinates and draw them over the picture. I changed the TODO remark with this code:
rect = consequence[-1]
min_x = Quartz.CGRectGetMinX(rect)
min_y = Quartz.CGRectGetMinY(rect)
max_x = Quartz.CGRectGetMaxX(rect)
max_y = Quartz.CGRectGetMaxY(rect)
draw.rectangle([(min_x, min_y),(max_x, max_y)],define="black", width=3)
After saving and operating the code, I bought this output:
This doesn’t appear proper! Upon nearer inspection, I noticed that the y coordinates are the wrong way up. Took me some time to determine that I may simply repair that by subtracting the y-coordinates from the picture top:
min_y = input_image.extent().dimension.top - Quartz.CGRectGetMinY(rect)
max_y = input_image.extent().dimension.top - Quartz.CGRectGetMaxY(rect)
I’m not fully sure why the coordinates are flipped. I did some analysis and it simply seems that the Core Graphics library merely returns flipped Y coordinates and we have to compensate for it ourselves.
That is the entire code to this point (with some minor modifications):
import Quartz
from Basis import NSURL, NSRange
import Imaginative and prescient
from PIL import Picture, ImageDraw


def recognize_text_handler(request, error):
    observations = request.outcomes()
    outcomes = []
    for statement in observations:
        # Return the string of the highest VNRecognizedText occasion.
        recognized_text = statement.topCandidates_(1)[0]

        # Discover the bounding-box statement for the string vary.
        box_range = NSRange(0, len(recognized_text.string()))
        boxObservation = recognized_text.boundingBoxForRange_error_(box_range, None)

        # Get the normalized CGRect worth.
        boundingBox = boxObservation[0].boundingBox()

        # Convert the rectangle from normalized coordinates to picture coordinates.
        image_width, image_height = input_image.extent().dimension.width, input_image.extent().dimension.top
        rect = Imaginative and prescient.VNImageRectForNormalizedRect(boundingBox, image_width, image_height)

        outcomes.append([recognized_text.string(), recognized_text.confidence(), rect])

    # Print out the ends in the terminal for inspection
    for consequence in outcomes:
        print(consequence[0])

    visualize_results(outcomes)

def visualize_results(outcomes):
    picture = Picture.open(img_path)
    draw=ImageDraw.Draw(picture)
    for consequence in outcomes:
        rect = consequence[-1]
        min_x = Quartz.CGRectGetMinX(rect)
        max_x = Quartz.CGRectGetMaxX(rect)

        # The y coordinates must be flipped
        min_y = input_image.extent().dimension.top - Quartz.CGRectGetMinY(rect)
        max_y = input_image.extent().dimension.top - Quartz.CGRectGetMaxY(rect)

        # Draw the statement rect on the picture
        draw.rectangle([(min_x, min_y),(max_x, max_y)],define="black", width=3)

    # Show the ultimate picture with all of the observations overlayed
    picture.present()

img_path = "./screenshot.png"

# Get the CIImage on which to carry out requests.
input_url = NSURL.fileURLWithPath_(img_path)
input_image = Quartz.CIImage.imageWithContentsOfURL_(input_url)

# Create a brand new image-request handler.
request_handler = Imaginative and prescient.VNImageRequestHandler.alloc().initWithCIImage_options_(
    input_image, None
)

# Create a brand new request to acknowledge textual content.
request = Imaginative and prescient.VNRecognizeTextRequest.alloc().initWithCompletionHandler_(recognize_text_handler)

# Carry out the text-recognition request.
error = request_handler.performRequests_error_([request], None)

# Deallocate reminiscence
request_handler.dealloc()
request.dealloc()
Save and run the code and it is best to see one thing much like this:
Conclusion
I hope you realized a bit bit about use PyObjC and work together with the native Goal C courses, features, and frameworks. It was a really attention-grabbing journey for me as I had by no means labored with Quartz, Imaginative and prescient, and Core Graphics libraries earlier than. I had no clue about how PyObjC labored both. I simply had a imaginative and prescient (no pun meant) of having the ability to use the Imaginative and prescient framework for textual content detection and realized every thing else on the fly.
Would I take advantage of PyObjC for programming in opposition to Goal C frameworks once more? It relies upon. If I’ve to develop a really complicated utility that’s fully primarily based on the Goal C frameworks then I would simply use Swift because the tooling is a lot better. Nonetheless, if the Goal C frameworks are only a small a part of the applying then I would simply go forward and use PyObjC. An enormous purpose for this aside from the devoted tooling is that typically it may be arduous to debug errors in PyObjC-based code. I needed to pull my hair fairly a bit whereas creating this pattern utility and I might not wish to undergo that very same expertise on an even bigger venture with significantly extra complicated PyObjC code.