


Are you on the lookout for methods so as to add one other layer of safety to your native laptop or throughout a website? Contemplate stepping up your sport with the Home windows 10 AppLocker!
AppLocker provides you the facility to manage which apps and recordsdata customers can run. And on this tutorial, you’ll learn to arrange AppLocker and safe your Home windows 10 working system.
Really feel such as you want extra privateness? Learn on and begin securing your system!
Stipulations
This tutorial might be a hands-on demonstration. In the event you’d prefer to observe alongside, be certain you might have the next:
- A Home windows 10 Schooling or Enterprise laptop – This tutorial makes use of Home windows 10 Enterprise 21H2.
- An administrator consumer account to arrange domestically or entry a website controller for an organizational setup.
- A area controller server for a multi-computer setup – This tutorial makes use of Home windows Server 2019 Datacenter.
Configuring the Utility Identification Service to Begin on Bootup
Earlier than you even start to arrange AppLocker guidelines and apply them to your native laptop, you first must tweak the Utility Identification Service. Setting the Utility Identification Service to begin routinely on bootup enforces Home windows 10 AppLocker guidelines.
Open a PowerShell console as an administrator, and run the beneath command to begin the Utility Identification service on bootup routinely.
sc.exe config appidsvc begin= auto
The output beneath reveals that the configuration was profitable.

Subsequent, run the next Get-Service command to confirm the Utility Identification service begins routinely and runs.
Get-Service AppIDSvc | choose -Property Title, Standing, StartType
Beneath, you may see the AppIDSvc standing is Operating with the beginning kind set to Computerized.

In the event you see a stopped standing, run the Begin-Service command beneath to begin the Utility Identification Service (AppIDSvc).
Begin-Service -Title “AppIDSvc”
Creating Default Home windows 10 AppLocker Guidelines
Now that you’ve configured the Utility Identification service, the subsequent step is to create default AppLocker guidelines. Creating AppLocker guidelines enables you to management which apps are allowed and denied.
You’ll be able to set Home windows 10 AppLocker guidelines for 4 classes of merchandise, as follows:
- Executable Guidelines – Executable recordsdata (.exe, and the much less frequent .com).
- Home windows Installer Guidelines – Home windows installer recordsdata (.msi, .msp, and .mst).
- Script Guidelines – Script recordsdata (.bat, .cmd, .js, .ps1, and .vbs).
- Packaged app Guidelines – Packaged apps and Packaged app installers (.appx).
The rule of thumb is to create default guidelines to permit all of the permitted apps that fall in any of the classes already working on an area laptop.
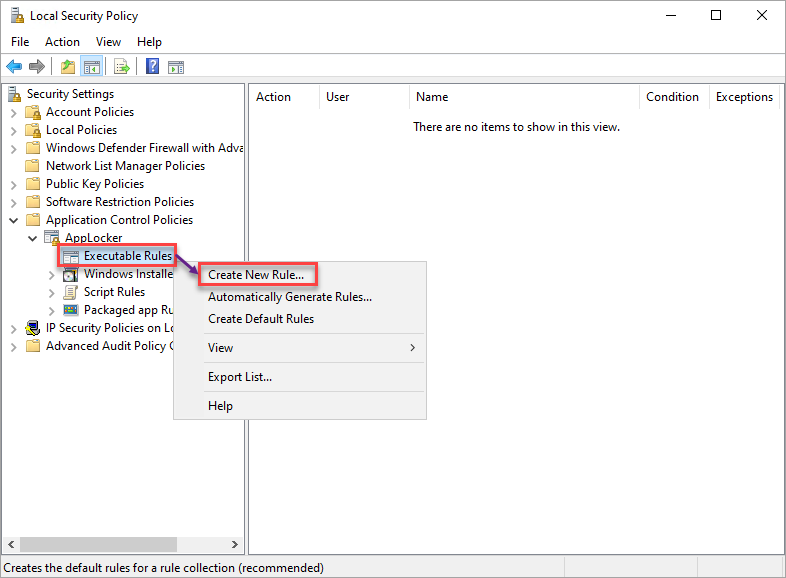
To create default AppLocker guidelines, you’ll first want entry to the Native Safety Coverage instrument:
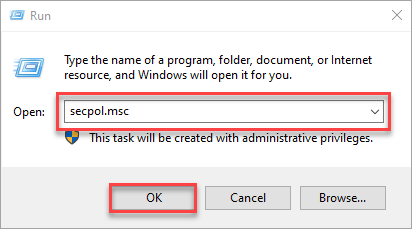
1. Open the Run dialog field, kind secpol.msc, and click on OK (or press Enter) to entry the Native Safety Coverage.
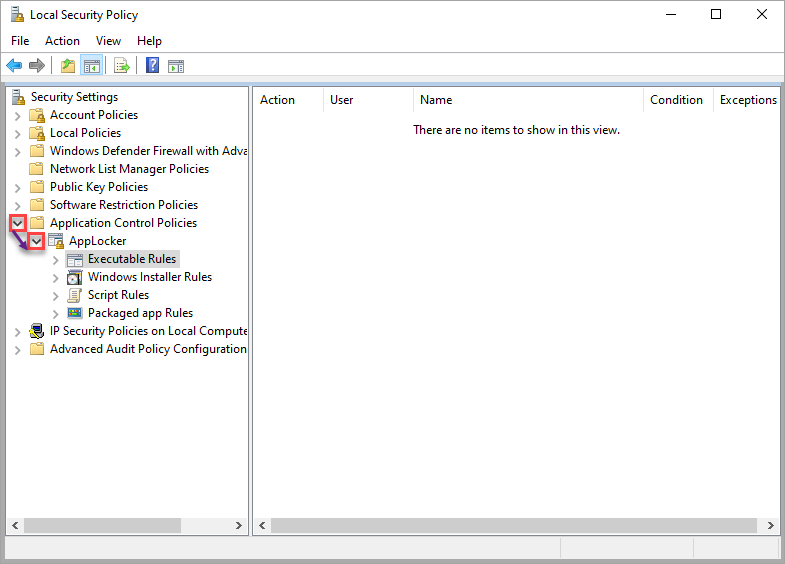
2. On the Native Safety Coverage window, broaden the Utility Management Insurance policies and AppLocker.
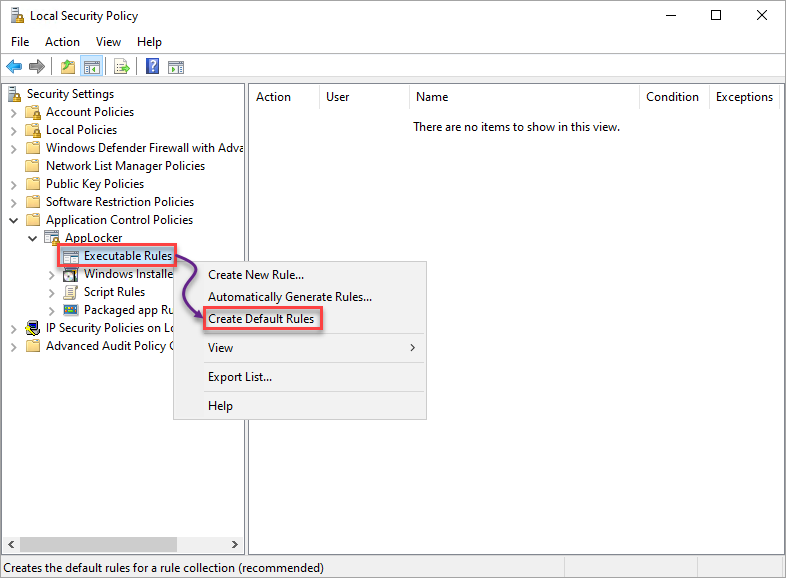
3. Choose, and right-click on Executable Guidelines → choose Create Default Guidelines to create the default AppLocker guidelines for the chosen class.
Repeat this step for the remainder classes (Home windows Installer, Script Guidelines, and Packaged app Guidelines).
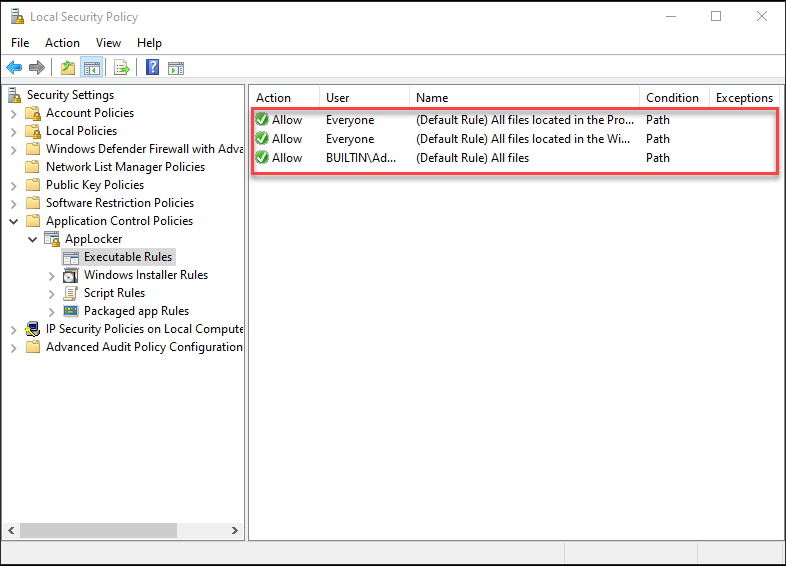
4. Lastly, choose every class and confirm the default AppLocker guidelines exist, as proven beneath.
Beneath, you may see a gaggle of three default guidelines, much like others aside from Packaged app Guidelines, which has just one.
Creating Guidelines to Deny Purposes
Now that your default AppLocker guidelines are in place, you can begin creating guidelines to disclaim apps. Denying apps provides safety to your machine because you get to disclaim entry to malicious apps. The Native Safety Coverage additionally performs a component in creating guidelines to disclaim apps in your system.
On this tutorial, you’ll create guidelines for the Executable Guidelines class and take a look at if they really work. However when you’re assured in creating guidelines, you may create guidelines for different classes and see their variations.
Notice that the steps in creating guidelines for every class are comparable aside from the Packaged app Rule.
Denying Purposes through the Writer Circumstances
While you launch an app, you’re granting the writer permissions to make adjustments to your system, particularly if the app is continually related to the web. Sounds too dangerous?
Creating guidelines to disclaim purposes through the Writer circumstances will do the trick in the event you don’t belief a selected writer.
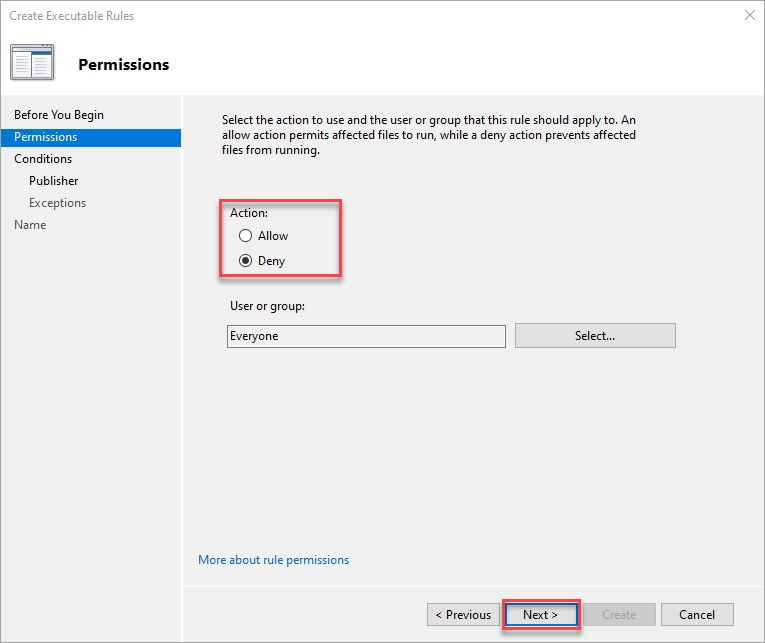
1. Choose and right-click on the class of your alternative (Executable Guidelines) → select Create New Rule to provoke creating a brand new rule.
2. Subsequent, click on Subsequent once you see the Earlier than You Start web page because it’s simply an introductory web page.
3. On the Permissions tab, select the Deny possibility, which is the Motion the rule will take.
Make sure you outline the customers affected by this rule. However go away Everybody chosen for this tutorial, and click on Subsequent.
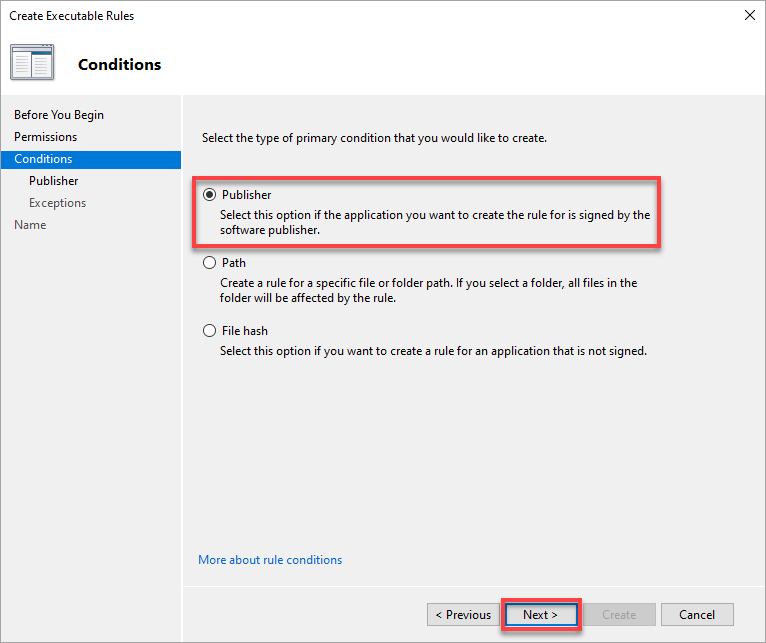
4. Now, select from three choices for making a rule (besides Packaged app):
- Writer – For an software that the software program writer indicators.
- Path – For a selected file or folder.
- File hash – For a file that isn’t signed.
However on this tutorial, choose the Writer possibility, and click on Subsequent.
Creating an AppLocker rule with the Writer situation permits you to set a roughly particular rule a few file.
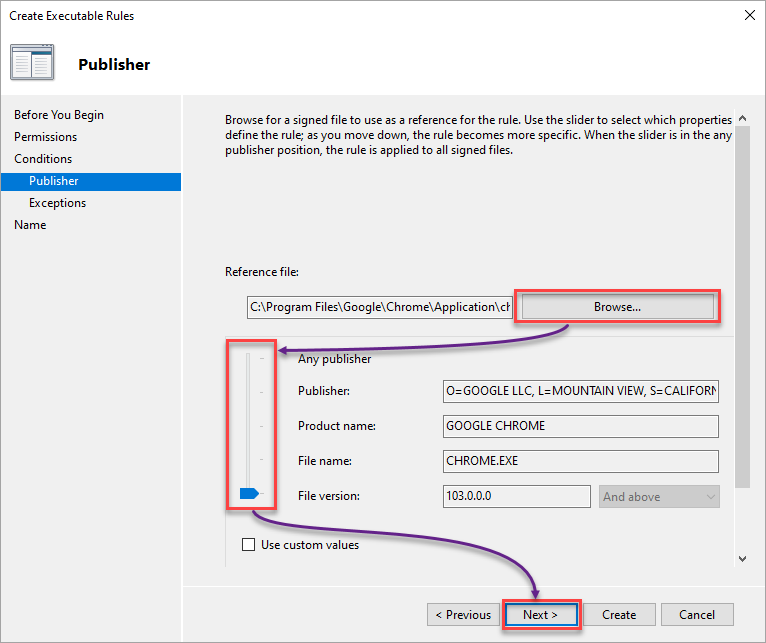
5. Configure the Writer circumstances with the next:
Selecting the Any writer possibility may not be a smart resolution in any respect. A few of your apps from the identical writer might not work, so take warning when selecting this feature.
- Browse your native laptop for the file that you must make a deny rule for.
- Regulate the slider in keeping with your want to pick which properties outline the rule; it might be as detailed because the file model or the writer.
On this instance, the chosen property is Google Chrome’s File model.
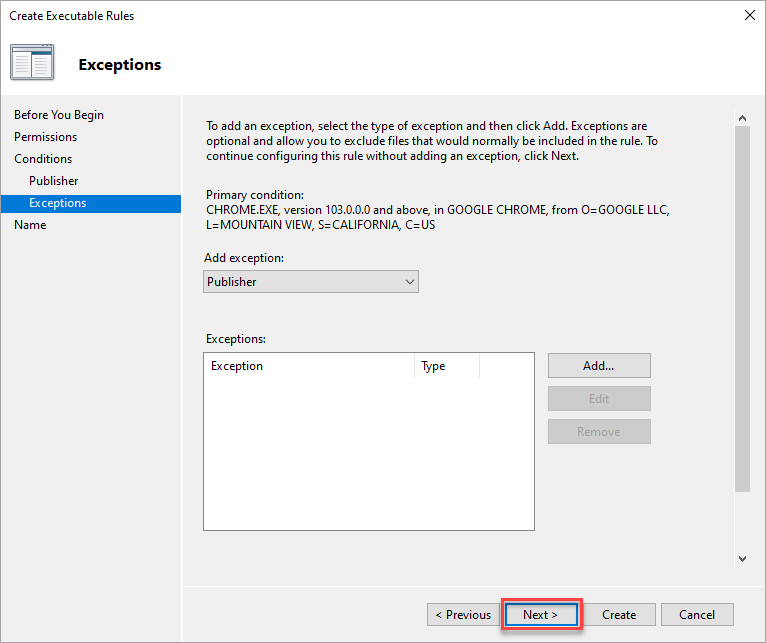
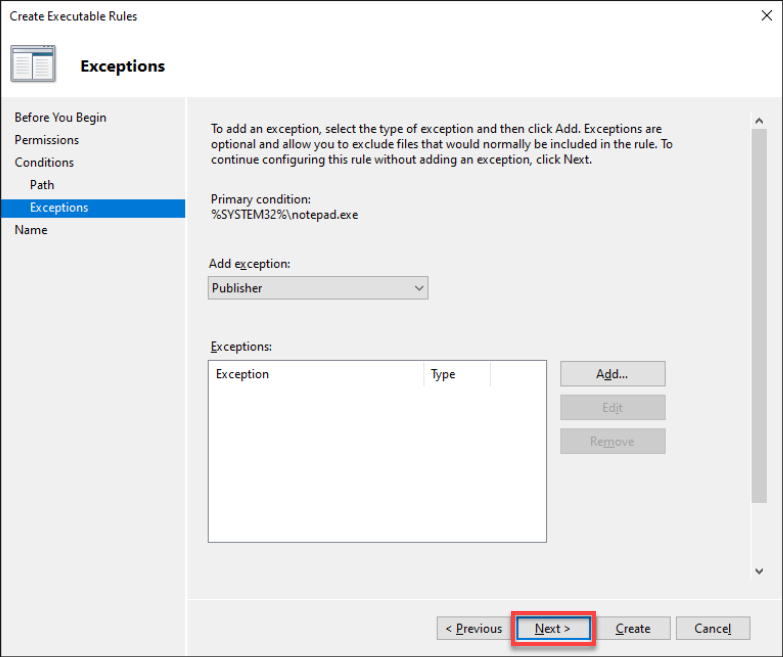
- Click on Subsequent to proceed setting exceptions to the rule circumstances.
6. At this level, click on Subsequent, as there is no such thing as a must make exceptions for the deny rule.
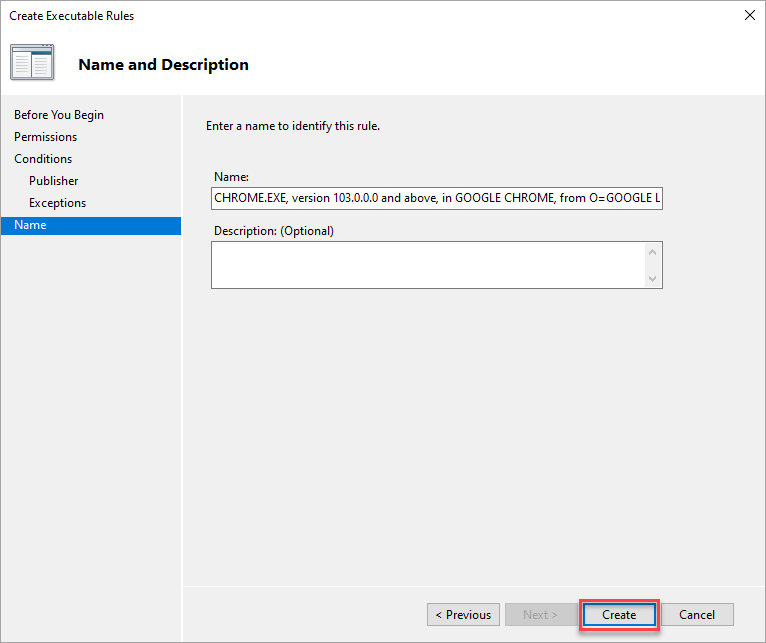
7. Present a descriptive title for the rule, and click on Create to create the rule with the Writer situation.
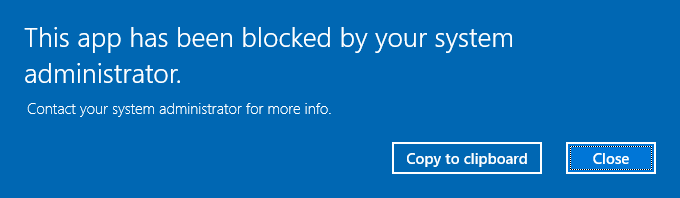
8. In the end, strive accessing purposes from the writer you set the deny rule for. If the deny rule works, you’ll get the next message.
No matter your chosen situation, you’ll get the identical message beneath once you launch an app denied beneath the Executable Guidelines class.

Denying Purposes through the Path Circumstances
Suppose you belief a writer however are skeptical about certainly one of their purposes. In that case, your best option is to create guidelines to disclaim particular purposes or folder paths.
1. Create one other rule as you probably did in steps one to 4 of the “Denying Purposes through the Writer Circumstances” part.
However this time, select the Path situation for a selected file or folder path.
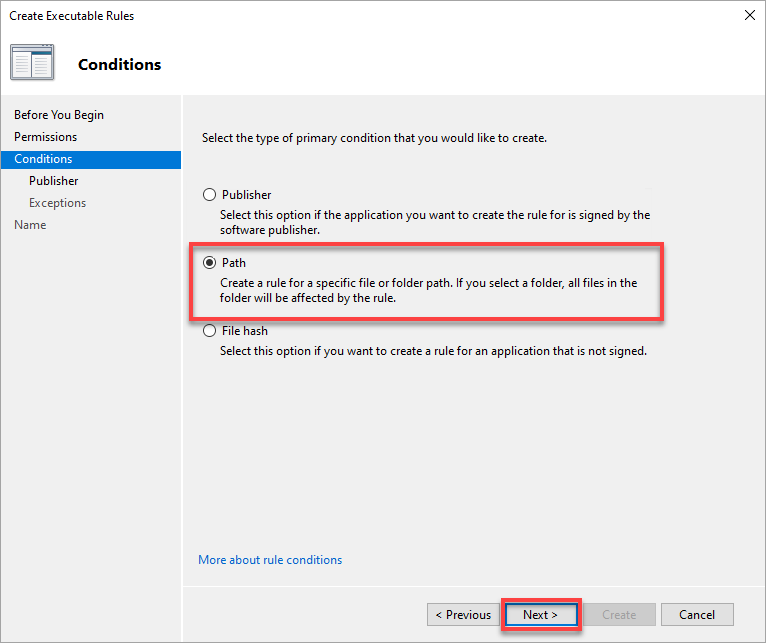
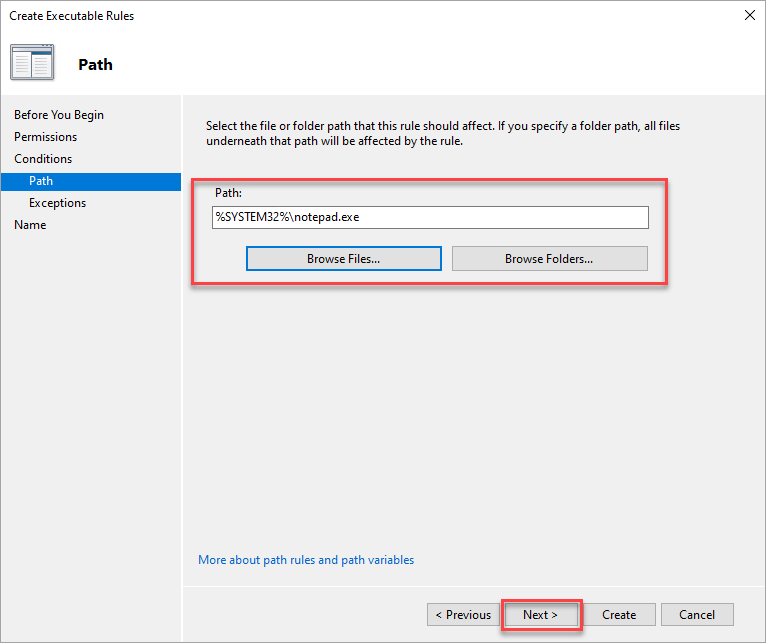
2. On the Path tab, select the file or folder path to which you need to apply the rule, and click on Subsequent.
As an example, you need to prohibit customers from pulling up Notepad. In that case, specify or browse Notepad’s full path.
Notice that selecting a folder applies the AppLocker rule to all of the recordsdata in that folder.
3. Skip including exceptions within the Exceptions tab and click on Subsequent.
4. Lastly, change the rule’s Title and Description, and click on Create to finalize the deny rule.

Denying Purposes through the File Hash
As , a malicious app can disguise itself as certainly one of your every day instruments that controls your system’s habits. Stumbling upon an app (unsigned or from an unverified writer) can wreak havoc in your machine.
Learn how to keep away from unintentionally working these malicious apps? Apart from having a strong anti-virus, creating guidelines to disclaim purposes through file hash is a large assist.
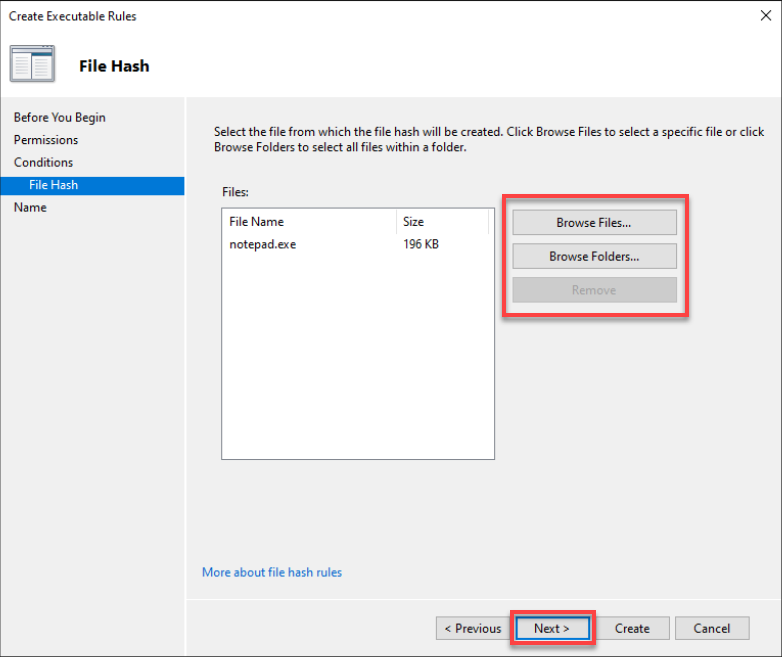
1. Create a brand new deny rule, and select the File hash situation this time.
2. Subsequent, browse, choose the file or folder that you must set a rule, and click on Subsequent.
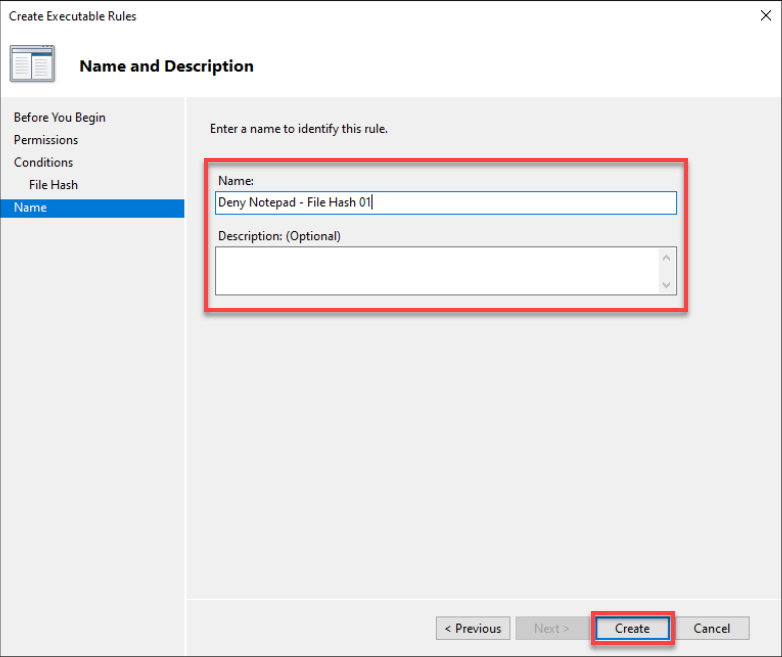
3. Lastly, change the deny rule’s Title and Description (non-obligatory), and click on Create to create the brand new deny rule.
Deploying Home windows 10 AppLocker Guidelines Utilizing a Group Coverage Object (GPO)
By now, you already know the right way to deny purposes in your laptop. However what if that you must apply AppLocker guidelines to multiple laptop or for a corporation? Utilizing a GPO, you may deploy AppLocker guidelines to computer systems in a corporation’s area.
Making a GPO enables you to deploy AppLocker to a number of Home windows 10 computer systems concurrently with out manually doing so on every laptop.
To create an AppLocker GPO, you’ll first must create an OU:
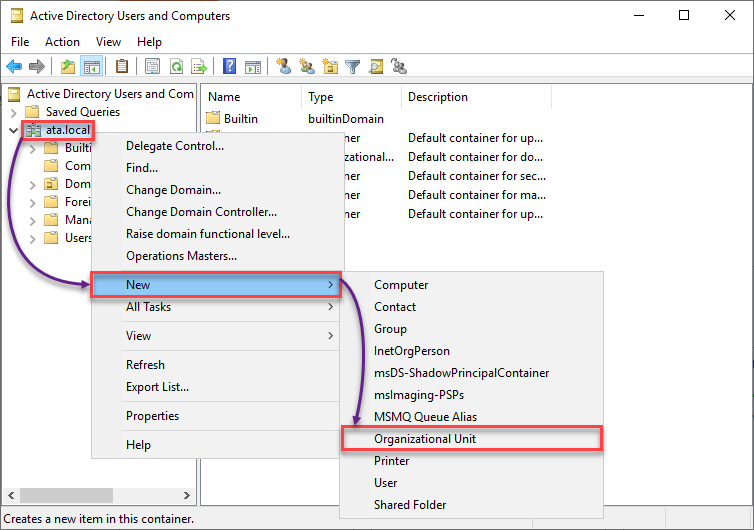
Notice that it’s finest observe to initially deploy a GPO in a “take a look at organizational unit” (OU) to keep away from messing issues up in your AD construction.
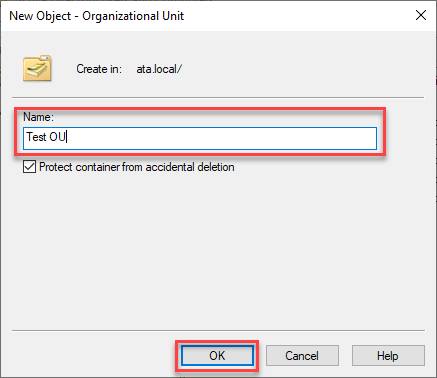
1. Launch Lively Listing Customers and Computer systems, right-click your area (left panel) → New → Organizational Unit to provoke including a brand new OU.
2. Subsequent, present a reputation you like in your take a look at OU. Hold the unintended deletion safety checked and click on OK to create the brand new OU.
3. Add a pc to your take a look at OU with the next:
- Click on Computer systems (left panel) to entry the checklist of accessible computer systems in your area controller.
- Drag and drop a pc to your take a look at OU.
- Click on Sure to proceed including the chosen laptop to your take a look at OU once you get the warning message field.

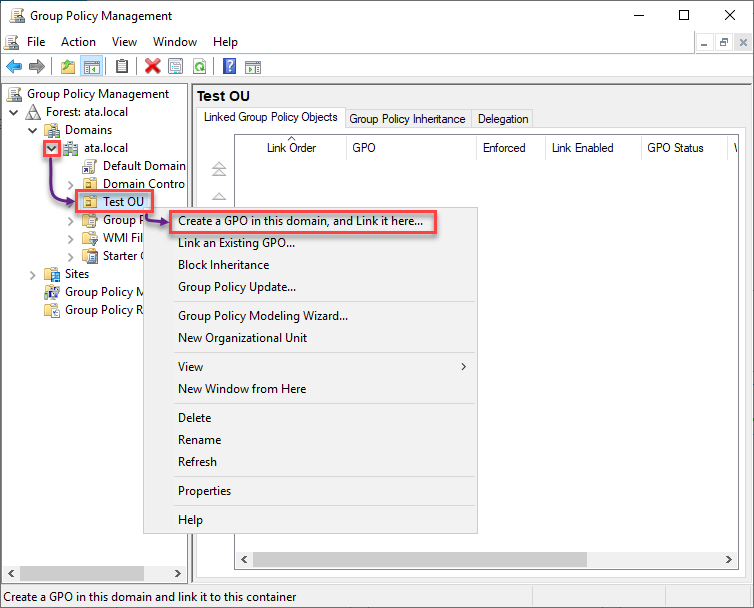
4. Now, launch Group Coverage Administration, the place you’ll create a GPO.
Develop your area (left panel) → right-click in your take a look at OU → Create a GPO on this area, and Hyperlink it right here… to provoke making a GPO.
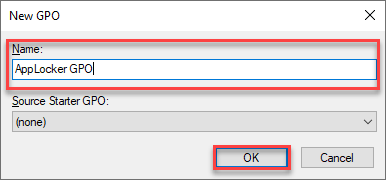
5. Title the GPO as you want, and click on OK to finalize creating the GPO.
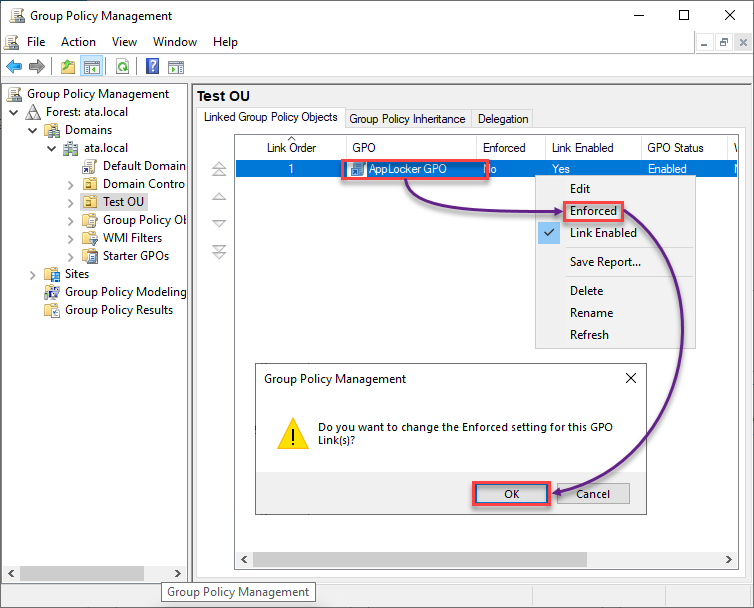
6. As soon as created, right-click in your AppLocker GPO, choose Enforced within the context menu, and click on OK within the message field.
Altering the Enforced setting for the GPO applies the settings within the GPO to the item (a Native System, Area, Web site, or Organizational Unit).
7. Subsequent, right-click on the AppLocker GPO and select Edit to open the Group Coverage Administration Editor.
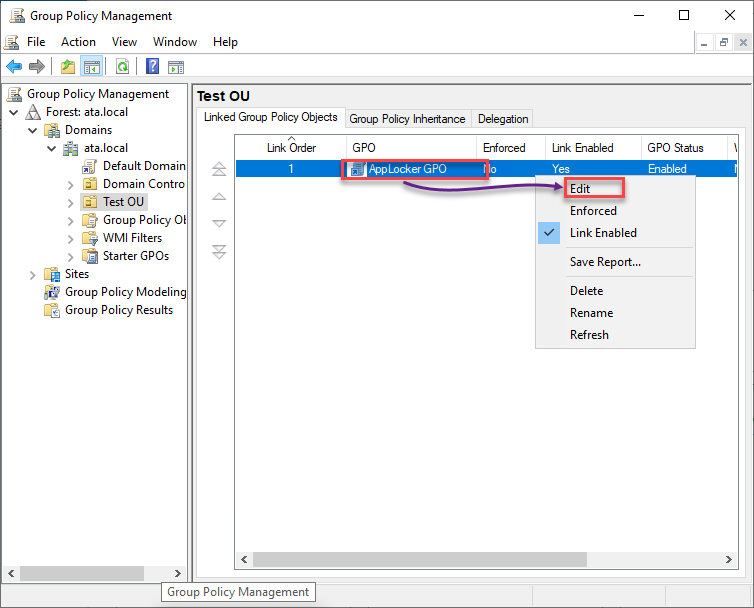
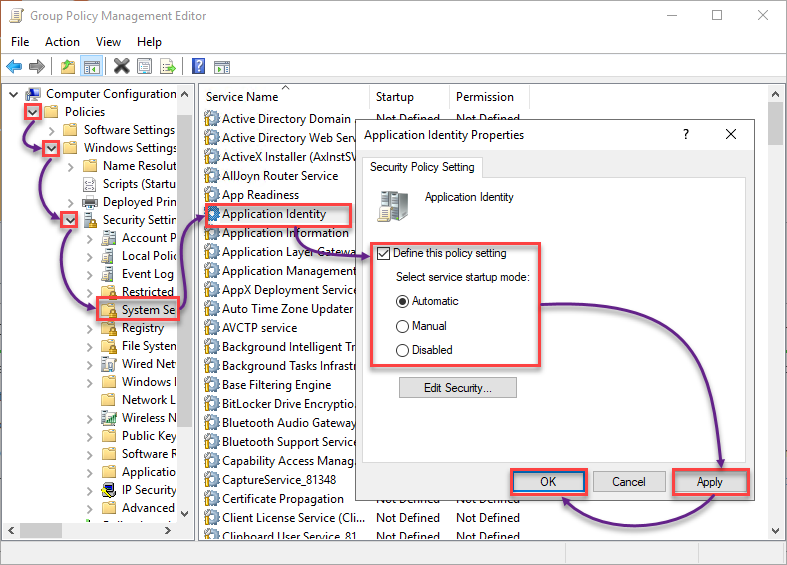
8. Configure the Utility Identification properties with the next:
- Underneath Laptop Configuration, broaden Insurance policies → Home windows Settings → Safety Settings.
- Choose System Settings and double-click on Utility Identification to entry its properties.
- Tick the Outline this coverage setting field, and select Computerized to set the Utility Identification to begin routinely on bootup.
Routinely beginning Utility Identification is essential because it acts as a swap for AppLocker to work.
- Click on Apply and OK to avoid wasting the adjustments to the Utility Identification properties.
9. Scroll down and broaden Utility Management Insurance policies (left panel) → broaden AppLocker.
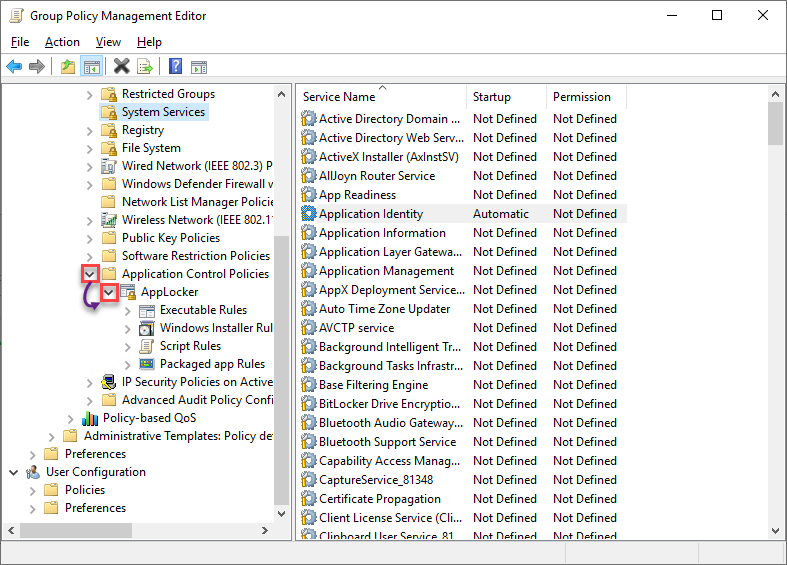
10. Now, create your default AppLocker guidelines by replicating all of the steps from the Creating Default AppLocker Guidelines part.
11. Lastly, observe the steps within the Creating AppLocker Deny Guidelines part to create your deny guidelines.
Verifying Utility Identification and AppLocker GPO Standing
After deploying your AppLocker guidelines through a GPO, verify the standing of AppIDSvc on the pc you added to the take a look at OU. You’ll additionally confirm in the event you efficiently utilized your AppLocker GPO to the take a look at OU.
1. Log in to the pc you added to the take a look at OU.
2. Subsequent, run the beneath command to verify the AppIDSvc standing.
Get-Service AppIDSvc | choose -Property Title, Standing, StartType
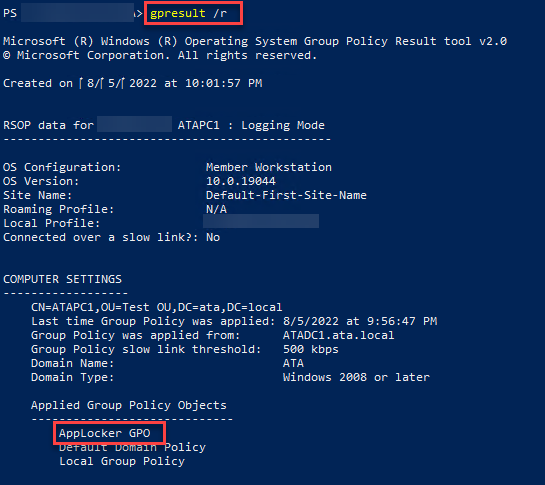
3. Now, run the gpresult command beneath to verify the utilized GPOs
Search for the AppLocker GPO beneath Laptop Settings, which confirms the GPO has been utilized.
4. Lastly, take a look at your AppLocker deny guidelines once more. And in the event that they work, you will notice a message field much like the one beneath.
Nice job! You are actually prepared to duplicate these steps and deploy your AppLocker to a dwell organizational unit.
Conclusion
Whether or not an software, bundle, or script, AppLocker enables you to management which to permit or deny making adjustments in your system. And on this tutorial, you discovered the right way to create Home windows 10 AppLocker guidelines to safe your system to an area laptop and deploy these guidelines to a number of machines with a GPO.
With this newfound data, will you think about AppLocker to guard your system from malicious assaults?