


You’re the system-slash-database admin and have to construct a database administration system (DBMS) for a brand new venture. Should you select to put in MySQL on Ubuntu, then you definately’re in luck. MySQL is quick, dependable, versatile, and free — a sensible choice!
This tutorial will stroll you thru putting in a MySQL server on Ubuntu, make it safe, and create a devoted consumer with restricted permissions to keep away from exposing the foundation account. By the top, you’ll have constructed a MySQL server that you need to use in your venture to host databases!
Conditions
This tutorial will likely be a hands-on demonstration. Should you’d wish to observe alongside, be certain you’ve gotten an Ubuntu Server 20.04 or later with a non-root consumer account with sudo privileges.
Set up MySQL on Ubuntu (From the Repository)
The Ubuntu APT package deal repository contains the MySQL package deal by default, making it handy to put in MySQL Ubuntu in a single command.
NOTE: The default Ubuntu APT repository could not at all times have the newest MySQL model.
To put in MySQL Ubuntu, proceed as follows.
1. Open your most popular SSH shopper and log in to your Ubuntu server.
2. Be certain that your package deal listing is current by operating the beneath command. This command updates the listing of obtainable packages within the APT package deal repository.
3. Now, set up the mysql-server package deal by executing the next command. Watch for the set up to complete.
sudo apt set up mysql-server -yAs you may see beneath, the newest MySQL model from the APT repository is 8.0.28.
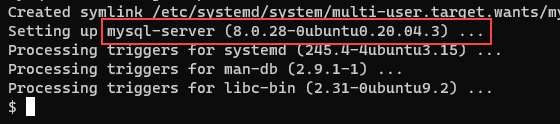
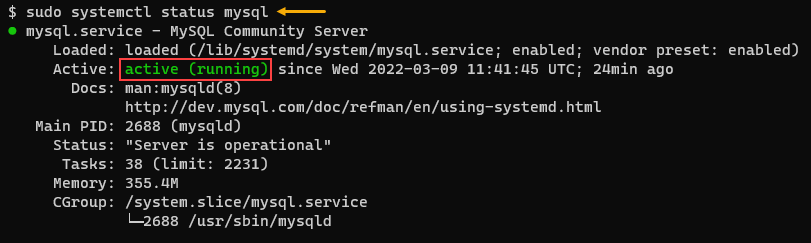
4. Lastly, run the beneath command to verify and ensure whether or not the mysql service is now operating.
sudo systemctl standing mysql
Putting in MySQL from the Official Repository
Should you don’t like ready to your Linux distro repository to catch up, downloading and putting in the DEB package deal is one of the best ways to get the newest options and bug fixes.
The MySQL builders present their software program repository to put in the newest model of MySQL, however Ubuntu doesn’t know the place to seek out that repository (but). Comply with the beneath steps to obtain and set up MySQL from the official repository.
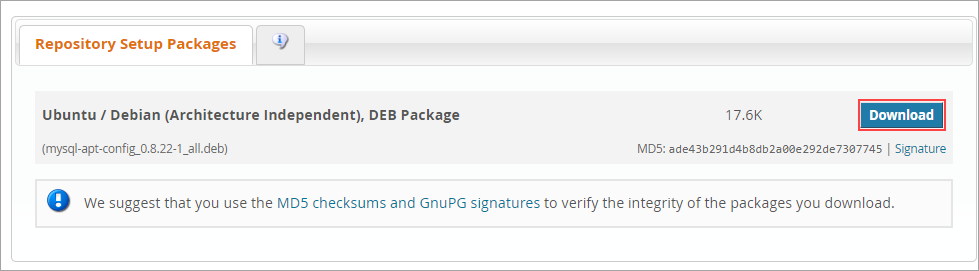
1. Open the net browser in your pc and navigate to the MySQL APT Repository web page.
2. As soon as on the obtain web page, click on the Obtain button, as you may see beneath.
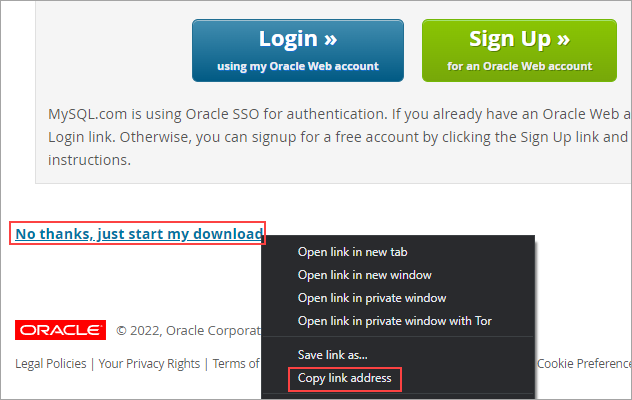
3. On the following web page, right-click the No thanks, simply begin my obtain hyperlink and click on Copy hyperlink tackle.
4. Return to your SSH terminal session and obtain the MySQL package deal to the /tmp listing house listing by operating the curl command beneath. Be certain that to alter the URL worth after the -OL parameter with the URL you copied within the earlier step.
cd /tmp && curl -OL https://dev.mysql.com/get/mysql-apt-config_0.8.22-1_all.deb
5. After downloading the package deal, run the dpkg command beneath to put in the MySQL package deal file.
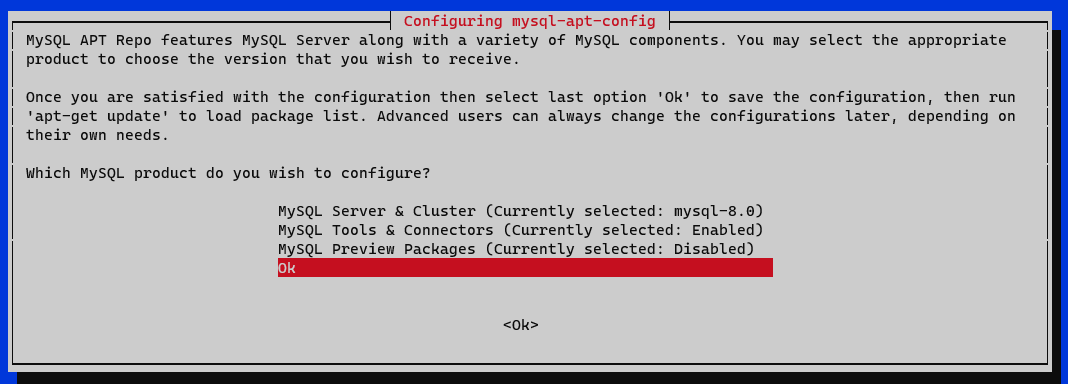
sudo dpkg -i mysql-apt-config*6. On the configuration web page, that reveals up asking Which MySQL product do you want to configure? – Press the down arrow till you choose Okay, and press Enter.
7. Now, run the beneath command to replace your package deal listing in order that APT can discover the brand new MySQL packages.
8. Now that APT is aware of the place to seek out the newest MySQL model, run the beneath command to put in the mysql-server package deal.
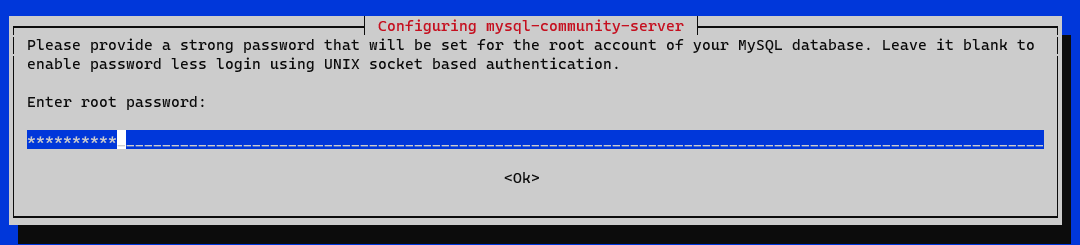
sudo apt set up mysql-server -y9. Sort within the new robust password for the MySQL database root account on the configuration immediate and press Enter.
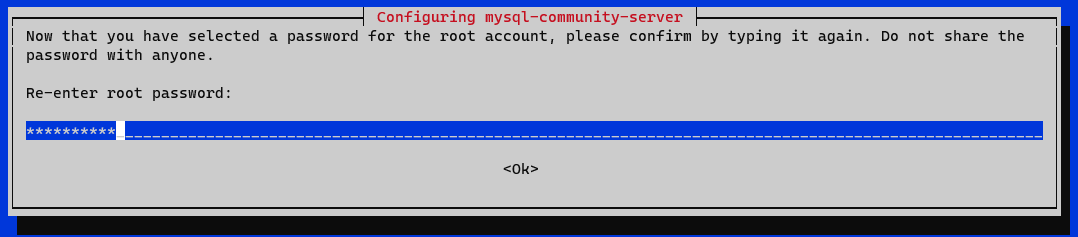
Re-enter the password and press Enter to substantiate.
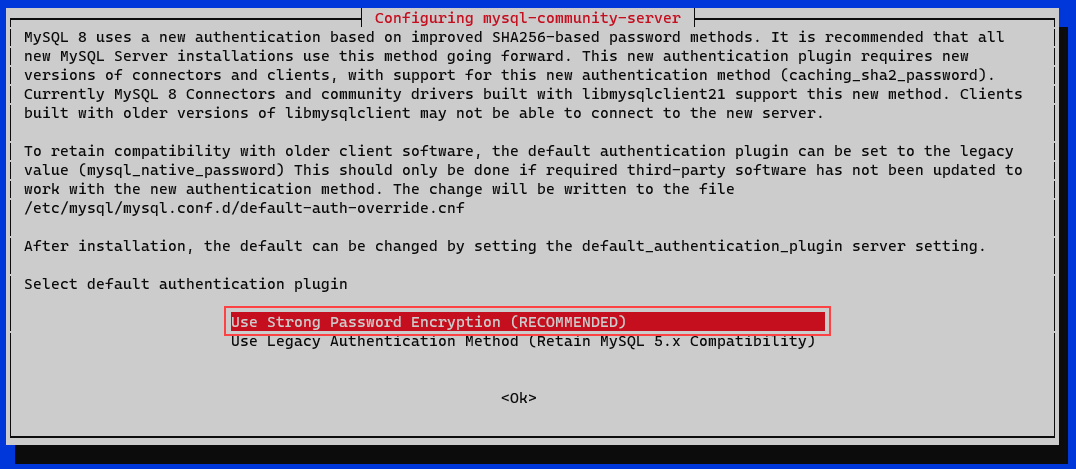
10. Choose Use Robust Password Encryption (RECOMMENDED), and press Enter on the default authentication plugin choice.
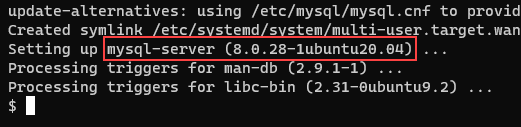
Watch for the set up to finish. The screenshot beneath reveals the MySQL server model you put in. On this instance, the newest model is 8.0.28.
11. Run the systemctl command beneath to confirm that the MySQL service is operating.
sudo systemctl standing mysqlYou will note the next output. This output reveals that the service is lively (operating) and enabled.
Securing Your MySQL Server
The MySQL server default set up is just not secured out-of-the-box, and you might want to carry out some extra steps to safe your MySQL server. Fortunately, the MySQL builders have created a configuration script that does many of the be just right for you.
The safety script is known as mysql_secure_installation, which you could find underneath the /usr/bin listing. The script modifies much less protected defaults, akin to distant root logins and pattern customers.
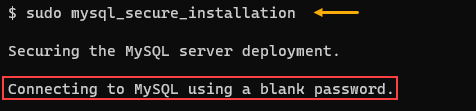
1. Run the next command beneath to begin the safety script on the terminal. This script will ask you many Sure/No inquiries to configure the MySQL server safety.
sudo mysql_secure_installationShould you put in MySQL from the default Ubuntu repository, you’d see the next message saying that you just’re connecting to MySQL with a clean password! Don’t fear; you’ll be fixing that problem within the succeeding steps.
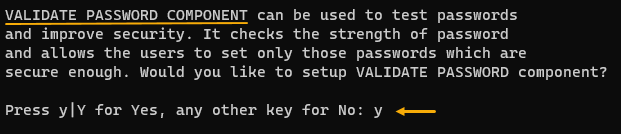
2. On the subsequent immediate asking to arrange the VALIDATE PASSWORD COMPONENT, kind y and press Enter. This part validates whether or not MySQL consumer passwords adjust to the complexity requirement.
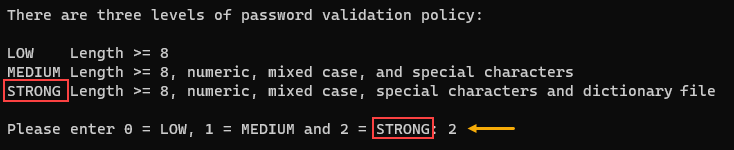
3. Subsequent, choose the password validation coverage stage to implement. The choices are:
LOW– requires a password with eight characters minimal.
MEDIUM– requires a password with eight or extra characters, together with numbers, blended case, and particular characters.
STRONG– identical asMEDIUMhowever checks the password in opposition to a dictionary file for validation.
On this instance, kind 2 to pick STRONG and press Enter.
MySQL doesn’t have a default dictionary file. As such, you’ll have to create a dictionary file and modify the validate_password_dictionary_file system variable worth to the dictionary file path. Creating and configuring the password dictionary file is just not within the scope of this tutorial.
4. To make sure that the foundation password complies with the password complexity necessities, set the foundation password once more and re-enter. The script will then present you the password energy rating. Press y to substantiate saving the password and press Enter.

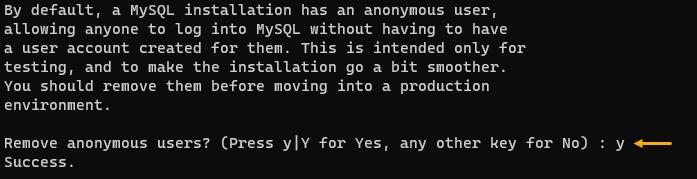
5. Subsequent, the script asks if it ought to take away the nameless consumer that the MySQL set up created. This consumer is protected to take away, so kind y and press Enter to take away the nameless consumer.
6. To additional lock down MySQL, kind y and press Enter to disallow distant login for root. After this step, the foundation account can solely log in to MySQL from the server and never from distant purchasers.

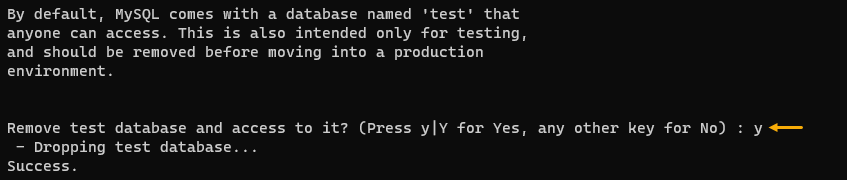
7. Subsequent, take away the check database. This database is just for testing and shouldn’t go into manufacturing. To take away (drop) the check database, kind y, and press Enter.
8. Lastly, reload the privilege tables for all of the adjustments to take impact instantly. Sort y and press Enter to reload.
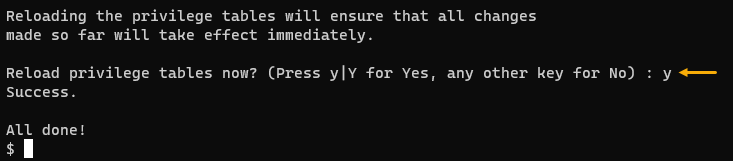
You might have now efficiently secured your MySQL server.
Making a New MySQL Consumer and Granting Restricted Permissions
At this level, there’s just one consumer account in your MySQL server, which is the root consumer. Because the title implies, the foundation account has full entry to the MySQL server and each useful resource inside.
Always utilizing the foundation consumer account is just not a finest follow and could be a safety threat. It is best to reserve the foundation account for administrative duties that want its permissions. In any other case, try to be utilizing an account with restricted privileges, and beneath are the directions for creating one.
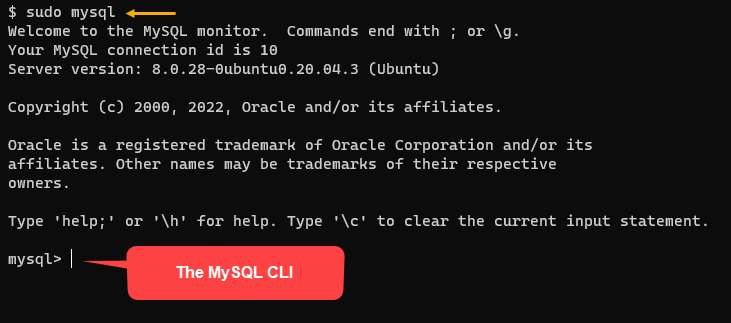
1. Log in to MySQL as the foundation consumer on the terminal by executing the beneath command.
2. Subsequent, run the CREATE USER assertion to create a brand new consumer. The beneath instance creates a brand new consumer account named ata which may solely log in from the localhost. Be certain that to supply a robust password that complies with the password coverage you configured earlier.
CREATE USER 'ata'@'localhost' IDENTIFIED BY 'password';Suppose you create a consumer who can log in from a particular distant pc, run the beneath command as a substitute. This command replaces localhost with the distant pc’s ip_address.
CREATE USER 'ata'@'ip_address' IDENTIFIED BY 'password';To create a consumer that may log in to MySQL from anyplace, change the localhost or ip_address with % as a substitute.
CREATE USER 'ata'@'%' IDENTIFIED BY 'password';All the time finish your MySQL statements with a semi-colon (;). Additionally, enclosing the values in single quotes (‘) helps stop SQL syntax errors.
The end result beneath reveals the profitable consumer creation

3. Now that you just’ve created the consumer run the GRANT assertion subsequent to grant permissions. There are lots of MySQL privileges which you could assign to the consumer. However on this instance, the command will grant the next privileges to the consumer 'ata'@'localhost’ to all (*.*) databases and tables.
ALTER– provides the consumer permission to change the buildings of tables.
SELECT– provides the consumer entry to theSELECTassertion, which permits studying the database contents.
CREATE– provides the consumer permission to create databases and tables.
INSERT– permits the consumer to insert rows into the desk.
DELETE– permits the consumer to delete rows from the desk.
UPDATE– the consumer can replace rows on the desk.
REFERENCES– allow international key creation.
RELOAD– the consumer can run theFLUSHassertion and instructions.
GRANT CREATE, ALTER, INSERT, UPDATE, DELETE, SELECT, REFERENCES, RELOAD on *.* TO ‘ata'@'localhost’;Check with the Privileges Offered by MySQL documentation for a whole listing of all privileges. Chances are you’ll add, take away, mix permissions as you would like.
The end result beneath reveals granting permissions was profitable.

4. Subsequent, run the beneath command to reload the privilege tables. Doing so will make sure that all of the adjustments you’ve gotten made to date instantly take impact.
5. Lastly, sign off from MySQL.
Testing Your MySQL Server
So that you’ve put in and secured your MySQL server and configured a brand new restricted consumer account. Now’s the time to check whether or not the whole lot works as you anticipated.
1. Log in to MySQL because the ata consumer. This manner, you may check whether or not this restricted consumer account works as deliberate. The -u flag specifies the account to log in, whereas the -p flag invokes the password immediate.
If you don’t append the -p flag, the mysql account will attempt to log in with out a password — which is able to fail for the reason that login account has a password.

2. Subsequent, check the consumer privilege by operating the beneath CREATE assertion to create a brand new database named ata_db.
It is best to see the Question OK message, indicating a profitable database creation.

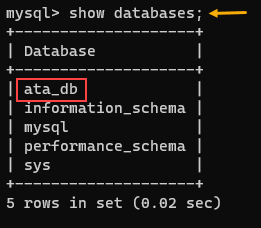
3. Run the present databases; assertion to see a listing of all of the databases which are obtainable to make use of.
It is best to see the ata_db database you created earlier, as proven beneath.
Conclusion
On this article, you’ve gotten discovered tips on how to set up the MySQL Ubuntu server and configure the server safety settings. You additionally discovered tips on how to create a brand new consumer account with restricted privileges and check the brand new consumer’s permissions by creating a brand new database.
At this level, it is best to have a totally practical MySQL Ubuntu server that you need to use to your growth and manufacturing wants. And in case you want managing MySQL with a GUI, maybe you possibly can set up an online front-end subsequent?