

Right here we’re going to be doing a pure, primary make-up software on a lady with mild pores and skin, and hopefully you may study to have the ability to recreate it and observe alongside at residence.
1. Exfoliate
Our mannequin has a standard/dry mixture pores and skin. Understanding that, first I will apply a light-weight exfoliator throughout their complexion. It will do away with any of the useless pores and skin that is sitting on the floor of the pores and skin. If in case you have any dryness, particularly across the nostril, that is the step that can take that every one away.


2. Moisturize
For the subsequent step, I will apply a primary moisturizer that can hydrate the pores and skin. You should utilize your fingers or a brush to use, however I sometimes like to make use of a brush because it’s a bit of bit extra hygienic.
The kind of brush that I’m utilizing to use the moisturizer is only a primary flat brush. It would not actually matter whether or not it’s artificial or a pure hair, so long as it is only a flat brush it would deposit the moisture onto the pores and skin.


3. Face Primer
After moisturizing the pores and skin, I will use a face primer. My favorite is a silicone base as a result of it should transfer very well with the pores and skin. To use the silicone-based primer, once more you need to use your fingers or a brush. I will use the identical brush that I used to use the moisturizer.
Begin from the within of the cheek space and calmly mix out in the direction of the perimeter of the complexion.
As a result of our mannequin has a mix pores and skin, liquid or cream foundations are going to be her finest buddy. Make-up powders are sometimes going to dry up across the nostril space and so they would possibly look a bit of bit extra textured, so after I do lastly apply powder, I will be very cautious of the nostril space.
4. Basis
Within the meantime, you possibly can apply the muse to the again of your hand. Choose it up with a magnificence blender, and simply calmly brush and pat it onto the complexion. Permitting the wonder blender to be damp goes to create a smoother texture and a softer end. It is not going to use the muse very closely, and it’ll assist you to construct up the protection in skinny layers in order that the muse seems actually pure and really skinlike.


Flip the wonder blender round for any harder-to-reach areas. The inspiration that I am utilizing is Graftobian basis. It is available in a package with an entire assortment of pores and skin tones, so it’s totally straightforward to match pores and skin tones at any time of the yr.
5. Below the Eyes
For the under-eye space, what’s sometimes finest is to make use of one thing that corrects and conceals all-in-one. We will use a purple-toned color corrector to brighten beneath the eyes.
Brushes might be multifunctional, and for this I am really going to make use of a cream eyeshadow brush. I like this one particularly as a result of it is a artificial brush. It is not going to use a heavy quantity of product, and it type of buffs the product proper into the pores and skin due to its dome form. It is a very smooth software.


A very vital step with regards to color correcting beneath the attention is mixing. To do that correctly, I simply preserve pushing the product thinner and thinner beneath the attention, and I preserve mixing it additional down into the cheek and up the cheekbone. This manner, the under-eye space would not look too heavy, dry, or filled with nice traces from the product seeping into any creases. This method makes it look good and clean.
For the under-eye space, I might recommend utilizing a translucent powder to set your concealer. It will assist you to keep away from any creasing all through the day, and it provides a pleasant, brilliant, and clean look to the under-eye.
Take your ring finger, and utilizing the heat of your pores and skin, press out what is likely to be any nice traces from the product setting in. Use a stippling movement, not a pulling and dragging movement. Then, utilizing a smooth, fluffy, longhaired brush that is sufficiently small for the under-eye space, apply the translucent powder.
Basically, we’ll do that to the entire complexion as soon as we’re executed, however to do it to the under-eye space proper after you apply your corrector or concealer goes to permit for a smoother, longer put on.
6. Complexion
Now, we’re going to add a little bit of spotlight, contour, and dimension to the complexion. If you find yourself contouring or including dimension to the complexion, you need there to be a shadow, not essentially only a darkish smudge within the hole of the cheekbone.


I am utilizing a domed brush, and it matches properly into the little crevices of her complexion. It’s a natural-haired brush, so it’ll choose up the product a bit extra closely, and particularly as a result of she is on digital camera, I need to apply a bit greater than I might if she was simply going out.
7. Bronzer
Now, to remove a bit of little bit of that shadow colouring or any greyness, I will apply a light-weight bronzer simply to heat up her complexion and provides her a wholesome look. I am additionally going so as to add a little bit of bronzer to the upper planes of the face, which is able to enable for a extremely pure look. It would not harm to mix a bit of bit additional down the neck as nicely, in order that you do not have a floating head impact or a mask-like look.
8. Mix
At this stage, I will use my magnificence blender with none extra product to do some mild mixing. I will simply calmly mix the powder and soften it into the liquid or cream basis that I initially used. That is going to permit for a extremely pure pores and skin end.


I will take any extra product that the wonder blender picked up, and rub proper onto the ear. It will enable for the face to look absolutely the identical color, so when you’re shifting your head round, you may seem as one tone all the best way round.
9. Blush
Subsequent, I will use a cream blush as a result of she has a drier pores and skin sort across the centre of her face. Utilizing a cream slightly than a powder goes to offer the pores and skin a extra hydrated look.
For the cream blush, I’m utilizing a basis airbrush. You should utilize this for cream merchandise, whether or not that be any contour merchandise or only a blush. For powder blushes, I might recommend utilizing one thing a bit fluffier and never so dense.


10. Eye Primer
For the eyes, I will begin off with an eye fixed primer, which goes to be like a glue. That can enable for the shadow to remain on all through the shoot, and even all day. This product is totally clear. They do are available in some skintone shades when you wished to even out the skintone on the eyelid, however we’ll be making use of a shadow, so clear is finest.
11. Brows
Whereas the attention primer dries, I am simply going to use a forehead pencil to the brows. She already has good brows right here, however I simply need to fill them in a bit, making them a bit of extra pronounced for video. When working with a pencil, you need to use mild strokes. You do not need simply go in and attract full traces of forehead.


The forehead pencil that I am utilizing particularly is from the road Anastasia. I completely love these forehead pencils! The colors are actually pure, and so they match pure hair colors nicely. Additionally they buff out into virtually a powdered end, so it actually would not look as when you’re sporting any forehead product.
12. Eyeshadow
For the eyeshadow, I will be utilizing a natural-haired all-over eyeshadow brush. You may actually simply use a light-weight or a darkish shade—you do not have to have a full palette of colors.
First, I will apply a lighter shadow all around the eye, and that is going to dilute the stickiness of the attention primer in order that if you put in your darker shadow, it would not go on too darkish or muddy. Generally, it’s kind of more durable to mix darker shadows when you put them straight onto the attention primer.


I all the time faucet the surplus of the product onto my hand in order that it would not fall into the under-eye space that we have already executed. Utilizing the identical brush, I am working proper into the crease of her eye. Even when she’s trying straight forward, it should enable for a bit of bit extra depth, and placing the lighter color on the lid goes to convey the centre of the attention ahead.


Our mannequin has an attractive eye color and a extremely nice eye form. In the event you or someone that you simply’re engaged on has bigger eyes and also you wished to make them seem a bit of bit smaller, you possibly can use liner on each the highest and the underside water traces.
I am simply going to make use of a fragile eyeshadow right here, simply to offer her a little bit of a line beneath the attention. Generally liner on the underside might be barely heavy, so utilizing some shadow can do the trick as a substitute.


You may go all the best way beneath the attention, or you possibly can go midway—it will depend on the attention form.
13. Eye Liner
Subsequent, I will be making use of some liner onto the lash line. I’m very calmly, in brief strokes, making use of a brown pencil that I will smudge out for a extremely pure look. In an effort to smudge the look and make it a bit of bit extra smoky and smooth, I am simply utilizing an angled eyeliner brush and just about mixing out and eradicating what I place down.


For an extended shoot, I might recommend utilizing a water-resistant liner. That manner, there isn’t any want to fret that it may transfer on you.
14. Mascara
Now I will apply mascara to outline, lengthen, and add quantity to her lashes. The objective of mascara is to reinforce the lashes, so we needn’t undergo with layers and create a false lash look. If you’d like, you possibly can, however for pure make-up, only a mild software is okay.
Additionally, sometimes protecting mascara on the highest lashes goes to create a pure look greater than including it to the underside. Including mascara to the underside goes to make the eyes seem a bit greater, and it is likely to be extra of a dramatic look.
15. Lip Liner
Ending up right here, I selected a pure colored lip liner. This one is from the road Make-up Without end that are waterproof, so you possibly can speak as a lot as you need and so they will not transfer.
For a pure lip, following precisely the place your lip line ends goes to be the very best place to information you. If in case you have any unevenness or your lips aren’t symmetrical, that is the place you possibly can undergo and proper that. I am simply colouring within the lip a bit with the pencil, which permits for an excellent longer put on.


A semi-matte lip balm goes to convey moisture to the lip. You might simply apply the chapstick proper with the applicator—you do not have to make use of a brush—however a brush is best used for an precise lip. If you’d like a pleasant exact software, then positively I might go for a lip brush.
16. Mattifying Powder
Final however not least, I will use a mattifying powder to seal the product in. If the primer is your first piece of bread, that is the second piece of bread, sandwiching in all the opposite layers that we already utilized.
For this software, I might extremely recommend utilizing a fluffier, artificial brush. As a result of her nostril is a bit of bit on the drier facet, I am going very calmly across the nostril. I do not need the powder to cake an excessive amount of onto the drier areas of the pores and skin.


And there may be your primary pure make-up look!
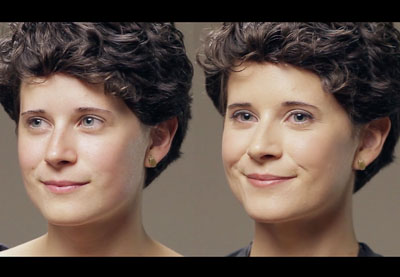
Earlier than / After


Conclusion
Now that you’ve got seen product utilized and you have discovered a number of methods, you are prepared to maneuver on. Within the subsequent tutorial, we’ll kick it up a notch and create a extra superior magnificence look with our mannequin. You will study some extra superior methods for creating drama within the eyes, chiseling out the cheekbones, and creating large, beautiful-looking lips.