


TL;DR: This weblog guides you on tips on how to handle and edit Phrase paperwork in a React utility utilizing Azure Blob Storage and ASP.NET Core Internet API. It covers configuring the storage, organising the backend, and integrating Syncfusion’s Doc Editor within the frontend to allow doc enhancing and auto-saving to the cloud.
Managing and enhancing Phrase paperwork inside a React utility has by no means been extra environment friendly! On this weblog, we’ll stroll you thru the complete technique of integrating Azure Blob Storage, configuring an ASP.NET Core Internet API backend, and growing a React frontend to allow easy doc enhancing and storage.
With Syncfusion’s React Doc Editor, you possibly can effortlessly open, edit, and auto-save Phrase paperwork inside your utility. We’ll discover tips on how to construct a feature-rich doc enhancing expertise with key functionalities akin to:
- Auto-save for seamless doc preservation
- Utility-level file administration utilizing Azure Blob Storage
- A customizable toolbar to reinforce the doc enhancing workflow
The Syncfusion FileManager element enhances the expertise by enabling customers to interactively open and save paperwork on to and from Azure storage. This integration offers a structured and intuitive approach to handle paperwork inside a React utility, making certain scalability, safety, and effectivity.

Discover Now
Organising Azure Blob Storage
Azure Blob Storage is a scalable and safe cloud-based object storage answer from Microsoft, ideally suited for internet purposes, backups, and content material supply.
Organising Azure Blob Storage includes just a few key steps, together with making a storage account, configuring a container, and managing entry. Right here’s a step-by-step information:
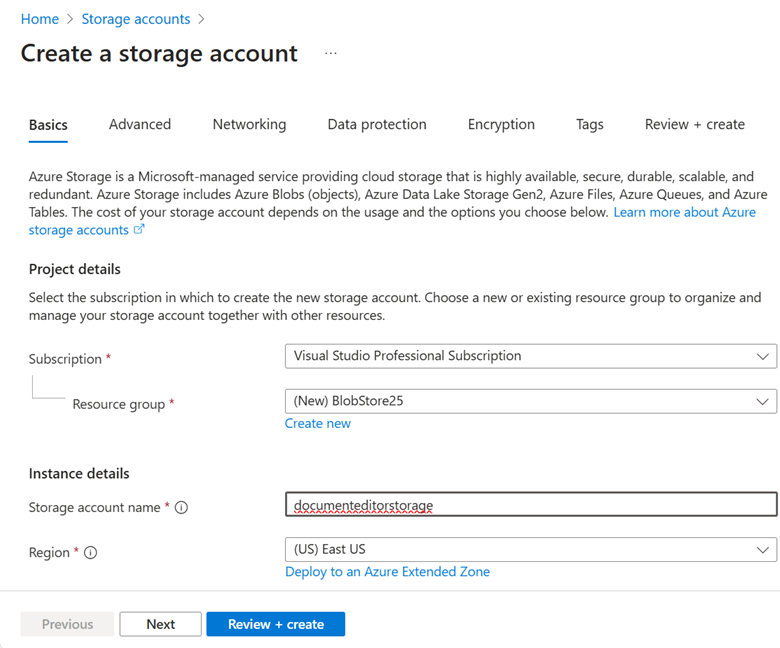
Step 1: Create a storage account
Sign up to the Azure portal, navigate to Storage Accounts, and create a brand new storage account.
Step 2: Create a blob container
Open the Storage Account, go to Containers underneath Knowledge Storage, and create a Blob Container to retailer your information (e.g., paperwork).

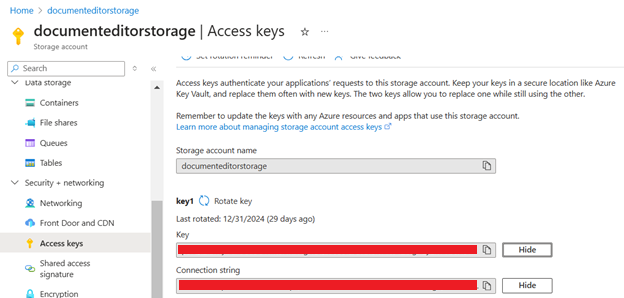
Step 3: Retrieve storage account particulars
To entry and combine Blob Storage with the backend, you’ll want the Entry Key and Connection String, which will be discovered underneath the Entry Keys part within the Storage Account settings.
Organising ASP.NET Core backend (Server-Aspect)
Step 1: Create a brand new ASP.NET Core Internet API mission
Create an ASP.NET Core Internet API mission utilizing Visible Studio or the .NET CLI. Then, set up Azure.Storage.Blobs NuGet package deal to work together with Azure Blob Storage, enabling file uploads, downloads, and storage administration.
Step 2: Add a configuration entry in appsettings.json
Add the Azure Storage Account particulars to the appsettings.json file. Embrace the Account Title, Account Key, Connection String, and Container Title as proven under:
appsettings.json
{
  "Logging": {
    "LogLevel": {
      "Default": "Warning"
    }
  },
  "AllowedHosts": "*",
  "accountName": "<YOUR STORAGE ACCOUNT NAME>",
  "accountKey": "<YOUR ACCOUNT KEY>",
  "connectionString": "<YOUR CONNECTION STRING>",
  "containerName": "<YOUR CONTAINER NAME>"
}
Step 3: Implement Blob Storage Service
Create a service class (AzureDocumentStorageService.cs) to deal with file operations. This service consists of two key strategies:
- FetchDocumentAsync – Retrieves a Phrase doc from Azure Blob Storage.
- UploadDocumentAsync – Saves and uploads a doc file to Azure Blob Storage.
Observe: The service class additionally comprises extra strategies for the file supervisor operations. You’ll be able to discover these within the GitHub mission.
AzureDocumentStorageService.cs
/// <abstract>
/// Service for dealing with Azure storage operations utilizing Syncfusion parts
/// </abstract>
public class AzureDocumentStorageService : IAzureDocumentStorageService
{
    personal readonly string _storageConnectionString;
    personal readonly string _accountName;
    personal readonly string _accountKey;
    personal readonly string _containerName;
    personal readonly ILogger<AzureDocumentStorageService> _logger;
    personal readonly AzureDocumentManager _fileProvider;

    /// <abstract>
    /// Initializes Azure storage configuration and file supplier
    /// </abstract>
    /// <param identify="configuration">Utility configuration settings</param>
    /// <param identify="logger">Logger occasion for error monitoring</param>
    public AzureDocumentStorageService(
        IConfiguration configuration,
        ILogger<AzureDocumentStorageService> logger)
    {
        // Retrieve needed configuration values for connecting to Azure storage.
        _storageConnectionString = configuration["connectionString"];
        _accountName = configuration["accountName"];
        _accountKey = configuration["accountKey"];
        _containerName = configuration["containerName"];
        _logger = logger;

        // Initialize Syncfusion Azure File Supplier occasion.
        _fileProvider = new AzureDocumentManager();

        // Outline the bottom path and file path for the blob storage.
        var basePath = $"https://documenteditorstorage.blob.core.home windows.internet/{_containerName}";
        var filePath = $"{basePath}/Information";

        // Set the bottom blob container path for the file supplier.
        _fileProvider.SetBlobContainer(basePath, filePath);
        // Register the Azure storage credentials and container identify.
        _fileProvider.RegisterAzure(_accountName, _accountKey, _containerName);
    }

    /// <abstract>
    /// Retrieves a Phrase doc from Azure and converts it to JSON format
    /// </abstract>
    /// <param identify="jsonObject">Incorporates doc identify for lookup</param>
    /// <returns>Phrase doc content material in JSON format</returns>
    public async Activity<IActionResult> FetchDocumentAsync(Dictionary<string, string> jsonObject)
    {
        MemoryStream stream = new MemoryStream();
        attempt
        {
            // Extract the doc identify from the offered JSON object.
            var documentName = jsonObject["documentName"];
            // Construct the blob path for the doc.
            var blobPath = GenerateDocumentBlobPath(documentName);
            // Get a reference to the blob shopper for the required doc.
            var blobClient = CreateBlobClient(blobPath);
            // Test if the blob exists within the container.
            if (await blobClient.ExistsAsync())
            {
                // Obtain the blob content material into the reminiscence stream.
                await blobClient.DownloadToAsync(stream);
                stream.Place = 0;
                // Load the WordDocument from the stream.
                WordDocument doc = WordDocument.Load(stream, FormatType.Docx);
                // Serialize the doc to JSON utilizing Newtonsoft.Json.
                string json = JsonConvert.SerializeObject(doc);
                // Get rid of the doc after serialization.
                doc.Dispose();
                // Return the JSON content material with an OK (200) standing.
                return new OkObjectResult(json);
            }
            // If the blob does not exist, return a 404 Not Discovered response.
            return new NotFoundResult();
        }
        catch (Exception ex)
        {
            // Log any exceptions and return a 500 Inner Server Error.
            _logger.LogError(ex, "Doc retrieval failed");
            return new StatusCodeResult(500);
        }
        lastly
        {
            stream.Dispose();
        }
    }

    /// <abstract>
    /// Saves and uploads a doc file to Azure storage
    /// </abstract>
    /// <param identify="information">Type information containing the file to save lots of</param>
    /// <exception cref="Exception">Thrown for save failures</exception>
    public async Activity UploadDocumentAsync(IFormCollection information)
    {
        attempt
        {
            // Retrieve the primary file from the shape information.
            var file = information.Information[0];
            // Get the doc identify from the shape assortment.
            var documentName = ExtractFormValue(information, "documentName");
            // Assemble the blob path based mostly on the doc identify.
            var blobPath = GenerateDocumentBlobPath(documentName);
            // Test if the blob already exists.
            var blobClient = CreateBlobClient(blobPath);
            if (blobClient.Exists())
            {
                // Add the file content material to the prevailing blob.
                utilizing var stream = new MemoryStream();
                await file.CopyToAsync(stream);
                stream.Place = 0;
                await blobClient.UploadAsync(stream);
            }
            else
            {
                // If the blob doesn't exist, importing an empty stream
                utilizing var stream = new MemoryStream();
                await blobClient.UploadAsync(stream);
            }

        }
        catch (Exception ex)
        {
            // Log errors throughout file add and rethrow the exception.
            _logger.LogError(ex, "File add failed");
            throw;
        }
    }
}
Step 4: Create API endpoints in a controller
Create an API controller (Controllers/AzureDocumentStorageController.cs) to deal with file operations. This controller consists of two key strategies, which internally invoke the corresponding service strategies:
- FetchDocument – Calls the service technique to retrieve a Phrase doc from Azure Blob Storage.
- UploadDocument – Calls the service technique to save lots of and add a doc file to Azure Blob Storage.
Observe: This controller additionally comprises extra strategies for file operations. Please discover the GitHub instance mission for extra particulars.
AzureDocumentStorageController.cs
/// <abstract>
/// Controller for dealing with Azure file operations and doc administration
/// </abstract>
[Route("api/[controller]")]
[EnableCors("AllowAllOrigins")]
public class AzureDocumentStorageController : ControllerBase
{
    personal readonly IAzureDocumentStorageService _documentStorageService;

    /// <abstract>
    /// Constructor injecting the file supplier service dependency.
    /// </abstract>
    /// <param identify="documentStorageService">Service for performing file operations</param>
    public AzureDocumentStorageController(IAzureDocumentStorageService documentStorageService)
    {
        _documentStorageService = documentStorageService;
    }

    /// <abstract>
    /// Retrieves a doc from Azure storage in JSON format
    /// </abstract>
    /// <param identify="jsonObject">Incorporates doc identify and metadata</param>
    /// <returns>Doc content material as JSON or error response</returns>
    [HttpPost("FetchDocument")]
    public async Activity<IActionResult> FetchDocument([FromBody] Dictionary<string, string> jsonObject)
    {
        return await _documentStorageService.FetchDocumentAsync(jsonObject);
    }

    /// <abstract>
    /// Downloads chosen information or folders from the Azure file supervisor
    /// </abstract>
    /// <param identify="downloadInput">JSON string containing obtain parameters</param>
    /// <returns>File content material stream or error response</returns>
    [HttpPost("DownloadDocument")]
    public object DownloadDocument(string downloadInput)
    {
        if (downloadInput != null)
        {
            // Set serializer choices to make use of camelCase naming coverage.
            var choices = new JsonSerializerOptions
            {
                PropertyNamingPolicy = JsonNamingPolicy.CamelCase,
            };
            // Deserialize the JSON string to a FileManagerDirectoryContent object
            FileManagerDirectoryContent args = JsonSerializer.Deserialize<FileManagerDirectoryContent>(downloadInput, choices);
            return _documentStorageService.DownloadDocument(args);
        }
        // Return null if enter will not be offered
        return null;
    }

    /// <abstract>
    /// Saves and uploads a doc to Azure storage
    /// </abstract>
    /// <param identify="information">Type information containing file and doc identify</param>
    [HttpPost("UploadDocument")]
    public async Activity UploadDocument(IFormCollection information)
    {
        await _documentStorageService.UploadDocumentAsync(information);
    }
}
Learn Now
Organising React frontend (Consumer-Aspect)
Step 1: Create a React app and add dependencies
Create a React app and combine the Syncfusion parts, Phrase Doc Editor, and File Supervisor , to work together with Azure Blob Storage. This integration permits file uploads, downloads, and storage administration inside your utility.
- Phrase Doc Editor is used to open, edit, and auto-save paperwork.
- File Supervisor is used to browse and handle information saved in Azure Blob Storage interactively.
Step 2: Implement File Supervisor operations
Create a brand new TypeScript JSX file (AzureFileManager.tsx) to implement the File Supervisor, which permits customers to show, browse, and handle the information saved in Azure Blob Storage.
AzureFileManager.tsx
import * as React from 'react';
import { FileManagerComponent, Inject, NavigationPane, DetailsView, Toolbar } from '@syncfusion/ej2-react-filemanager';
import { DialogComponent } from '@syncfusion/ej2-react-popups';

interface AzureProps {
    // Callback operate triggered when a file is chosen within the file supervisor
    onFileSelect: (filePath: string, fileType: string, fileName: string) => void;
}

// AzureFileManager Element - Gives a file administration interface for Azure storage
const AzureFileManager: React.FC<AzureProps> = ({ onFileSelect }) => {
    // Base URL for backend API dealing with Azure file operations
    const hostUrl: string = "http://localhost:62869/";
    // State administration for file supervisor dialog visibility
    const [showFileManager, setShowFileManager] = React.useState(true);
    // Reference to entry the FileManager element strategies
    let fileManagerRef = React.useRef<FileManagerComponent>(null);

    // Reveals the file supervisor when the open button is clicked and clears the earlier choice merchandise
    const handleOpenButtonClick = () => {
        // Clear the earlier choice
        if (fileManagerRef.present) {
            fileManagerRef.present.clearSelection();
        }
        setShowFileManager(true);
    };

    // Handles file open occasion from file supervisor
    const handleFileOpen = (args: any) => {
        if (args.fileDetails.isFile)  args.fileDetails.filterPath + args.fileDetails.identify;
            const fileType = args.fileDetails.sort;
            const fileName = args.fileDetails.identify;

            onFileSelect(selectedPath, fileType, fileName); // Cross the file path and file sort to load within the Doc Editor
            setShowFileManager(false); // Shut the File Supervisor Dialog

    };

    return (
        <div>
            <button id="openAzureFileManager" onClick={handleOpenButtonClick}>
                Open the Azure file supervisor
            </button>

            {/* File Supervisor Dialog */}
            <DialogComponent
                id="dialog-component-sample"
                header="File Supervisor"
                seen={showFileManager}
                width="80%"
                peak="80%"
                showCloseIcon={true}
                closeOnEscape={true}
                goal="physique"
                beforeClose={() => setShowFileManager(false)}
                onClose={() => setShowFileManager(false)} // Shut the dialog when closed
            >
                <FileManagerComponent
                    id="azure-file"
                    ref={fileManagerRef}
                    ajaxSettings={{
                        url: hostUrl + 'api/ AzureDocumentStorage/ ManageDocument',
                        downloadUrl: hostUrl + 'api/ AzureDocumentStorage/ DownloadDocument'
                    }}
                    toolbarSettings={{
                        objects: ['SortBy', 'Copy', 'Paste', 'Delete', 'Refresh', 'Download', 'Selection', 'View', 'Details']
                    }}
                    contextMenuSettings={',  '}
                    fileOpen={handleFileOpen} // Connect the fileOpen occasion
                >
                    <Inject companies={[NavigationPane, DetailsView, Toolbar]} />
                </FileManagerComponent>
            </DialogComponent>
        </div>
    );
};

export default AzureFileManager;
Step 3: Implement Doc Editor operations
Create a brand new TypeScript JSX file (DocumentEditor.tsx) to implement the Phrase Doc Editor functionalities, together with creating, opening, enhancing, and saving paperwork.
1. Customized toolbar choices: Import the mandatory dependencies and add the next customized toolbar objects:
- New – Creates a brand new doc.
- Open – Shows the File Supervisor to load a particular doc.
- Obtain – Downloads the present doc domestically.
Check with the next code instance.
import React, { useRef, useState } from 'react';
import {
    DocumentEditorContainerComponent, Toolbar, CustomToolbarItemModel
} from '@syncfusion/ej2-react-documenteditor';
import AzureFileManager from './AzureFileManager.tsx';
import { ClickEventArgs } from '@syncfusion/ej2-navigations/src/toolbar/toolbar';
import { DialogUtility } from '@syncfusion/ej2-react-popups';

// Inject Doc Editor toolbar dependencies
DocumentEditorContainerComponent.Inject(Toolbar);

operate DocumentEditor() {

    // Backend API host URL for doc operations
    const hostUrl: string = "http://localhost:62869/";
    // Reference to doc editor container element
    const containerRef = useRef<DocumentEditorContainerComponent>(null);
    // Reference for the dialog element
    let dialogObj: any;
    // State to carry the present doc identify
    const [currentDocName, setCurrentDocName] = useState<string>('None');
    // Observe doc modifications for auto-save performance
    const contentChanged = React.useRef(false);

    // Customized toolbar button configuration for "New" doc
    const newToolItem: CustomToolbarItemModel = {
        prefixIcon: "e-de-ctnr-new",
        tooltipText: "New",
        textual content: "New",
        id: "CreateNewDoc"
    };

    // Customized toolbar button configuration for opening the Azure file supervisor
    const openToolItem: CustomToolbarItemModel = {
        prefixIcon: "e-de-ctnr-open",
        tooltipText: "Open Azure file supervisor",
        textual content: "Open",
        id: "OpenAzureFileManager"
    };

    // Customized toolbar button configuration for downloading the doc
    const downloadToolItem: CustomToolbarItemModel = {
        prefixIcon: "e-de-ctnr-download",
        tooltipText: "Obtain",
        textual content: "Obtain",
        id: "DownloadToLocal"
    };

    // Customise the SystemClipboard API identify
    let settings = { systemClipboard: 'ProcessClipboardContent' }

    // Mixed toolbar objects together with customized buttons and built-in options
    const toolbarItems = [
        newToolItem, openToolItem, downloadToolItem, 'Separator', 'Undo', 'Redo', 'Separator', 'Image', 'Table',
        'Hyperlink', 'Bookmark', 'TableOfContents', 'Separator', 'Header', 'Footer', 'PageSetup', 'PageNumber',
        'Break', 'InsertFootnote', 'InsertEndnote', 'Separator', 'Find', 'Separator', 'Comments', 'TrackChanges',
        'Separator', 'LocalClipboard', 'RestrictEditing', 'Separator', 'FormFields', 'UpdateFields', 'ContentControl'
    ];

    return (
        <div>
            <div>
                <AzureFileManager onFileSelect={loadFileFromFileManager} />
            </div>
            <div id="document-editor-div" type={{ show: "block" }}>
                <div id="document-header">

                </div>
                <DocumentEditorContainerComponent
                    ref={containerRef}
                    id="container"
                    peak={'650px'}
                    serviceUrl={hostUrl + 'api/ AzureDocumentStorage/'}
                    enableToolbar={true}
                    toolbarItems={toolbarItems}
                    toolbarClick={handleToolbarItemClick}
                    contentChange={handleContentChange} // Take heed to content material modifications
                    serverActionSettings={settings}
                />
            </div>
        </div>
    );
}

export default DocumentEditor;
2. Open a doc from the File Supervisor (Azure Blob Storage):
Check with the next code instance.
    // Callback operate to load the file chosen within the file supervisor
    const loadFileFromFileManager = (filePath: string, fileType: string, fileName: string): void => {
        if (!containerRef.present) {
            console.error('Doc Editor will not be loaded but.');
            return;
        }
        containerRef.present.documentEditor.documentName = fileName;
        // Replace state with the present doc identify
        setCurrentDocName(fileName);

        if (fileType === '.docx' || fileType === '.doc' || fileType === '.txt' || fileType === '.rtf') {
            // Deal with doc information
            fetch(hostUrl + 'api/AzureDocumentStorage/FetchDocument', {
                technique: 'POST',
                headers: { 'Content material-Sort': 'utility/json;charset=UTF-8' },
                physique: JSON.stringify({ documentName: fileName })
            })
                .then(response => {
                    if (response.standing === 200 || response.standing === 304) {
                        return response.json();
                    } else {
                        throw new Error('Error loading doc');
                    }
                })
                .then(json => {
                    const documentEditorDiv = doc.getElementById("document-editor-div");
                    if (documentEditorDiv) {
                        documentEditorDiv.type.show = "block";
                    }
                    // Open the doc utilizing the JSON information obtained
                    containerRef.present.documentEditor.open(JSON.stringify(json));
                })
                .catch(error => {
                    console.error('Error loading doc:', error);
                });
        } else {
            alert('The chosen file sort will not be supported for the doc editor.');
        }
    };
3. Robotically save the doc to Azure Blob Storage: The edited doc will likely be routinely saved each 1000 milliseconds.
Check with the next code instance.
// Robotically saves doc to Azure storage
const autoSaveDocument = (): void => {
    if (!containerRef.present) return;
    // Save as Blob utilizing Docx format
    containerRef.present.documentEditor.saveAsBlob('Docx').then((blob: Blob) => {
        let exportedDocument = blob;
        let formData: FormData = new FormData();
        formData.append('documentName', containerRef.present.documentEditor.documentName);
        formData.append('information', exportedDocument);
        let req = new XMLHttpRequest();
        // Ship doc to backend API for Azure storage
        req.open(
            'POST',
            hostUrl + 'api/ AzureDocumentStorage/ UploadDocument',
            true
        );
        req.onreadystatechange = () => {
            if (req.readyState === 4 && (req.standing === 200 || req.standing === 304)) {
                // Auto save accomplished
                // Success handler will be added right here if wanted
            }
        };
        req.ship(formData);
    });
};

// Runs auto-save each second when content material modifications are detected
React.useEffect(() => {
    const intervalId = setInterval(() => {
        if (contentChanged.present) {
            autoSaveDocument();
            contentChanged.present = false;
        }
    }, 1000);
    return () => clearInterval(intervalId);
});

// Handles doc content material change detection
const handleContentChange = (): void => {
    contentChanged.present = true; // Set the ref's present worth
};
Attempt Now
4. Obtain a replica of the doc to native storage: When the Obtain button within the toolbar is clicked, a replica of the doc at present open within the editor will likely be downloaded or saved to the native storage.
Check with the next code instance.
// Handles doc editor toolbar button click on occasions
const handleToolbarItemClick = (args: ClickEventArgs): void => {
    // Get a reference to the file supervisor open button
    const openButton = doc.getElementById('openAzureFileManager');
    // Get the present doc identify from the editor
    let documentName = containerRef.present.documentEditor.documentName;
    // Take away any extension from the doc identify utilizing regex
    const baseDocName = documentName.change(/.[^/.]+$/, '');
    // All the time examine if containerRef.present exists earlier than utilizing it
    if (!containerRef.present) return;

    change (args.merchandise.id) {
        case 'OpenAzureFileManager':
            // Programmatically set off Azure file supervisor
            if (openButton) {
                // save the modifications earlier than opening a brand new doc
                autoSaveDocument();
                openButton.click on();
                // Units the main target to the doc editor throughout the present container reference
                containerRef.present.documentEditor.focusIn();
            }
            break;

        case 'DownloadToLocal':
            // Provoke client-side obtain
            containerRef.present.documentEditor.save(baseDocName, 'Docx');
            // Units the main target to the doc editor throughout the present container reference
            containerRef.present.documentEditor.focusIn();
            break;

        case 'CreateNewDoc':
            // Create new doc workflow
            showFileNamePrompt();
            break;

        default:
            break;
    }
};
5. Create and add a brand new doc: When the New toolbar merchandise is clicked, a immediate dialog will seem requesting the doc identify. As soon as confirmed, the doc will open within the Phrase Doc Editor and routinely be saved and uploaded to Azure Blob Storage inside a second.
Check with the next code instance.
// Immediate dialog for coming into a brand new doc filename
const showFileNamePrompt = (errorMessage?: string) => {
    const randomDefaultName = getRandomDefaultName();
    dialogObj = DialogUtility.affirm({
        title: 'New Doc',
        width: '350px',
        content material: `
            <p>Enter doc identify:</p>
            <div id="errorContainer" type="colour: purple; margin-top: 4px;">
            ${errorMessage ? errorMessage : ''}
            </div>
            <enter id="inputEle" sort="textual content" class="e-input" worth="${randomDefaultName}"/>
        `,
        okButton: { click on: handleFileNamePromptOk },
        cancelButton: { click on: handleFileNamePromptCancel },
    });

    // After the dialog is rendered, focus and choose the enter textual content.
    setTimeout(() => {
        const enter = doc.getElementById("inputEle") as HTMLInputElement;
        if (enter) {
            enter.focus();
            enter.choose();
        }
    }, 100);
};

// Handler for the OK button within the file identify immediate dialog with file existence examine and save
// The brand new file will likely be routinely saved to Azure Storage by the auto-save performance, which is managed throughout the setInterval technique.
const handleFileNamePromptOk = async () => {
    const inputElement = doc.getElementById("inputEle") as HTMLInputElement;
    let userFilename = inputElement?.worth.trim() || "Untitled";
    const baseFilename = `${userFilename}.docx`;

    // Test if the doc already exists on the backend
    const exists = await validateFileExistence(baseFilename);
    if (exists) {
        // If the doc exists, show an error message within the dialog
        const errorContainer = doc.getElementById("errorContainer");
        if (errorContainer) {
            errorContainer.innerHTML = 'Doc already exists. Please select a special identify.';
        }
        // Re-focus the enter for correction
        if (inputElement) {
            inputElement.focus();
            inputElement.choose();
        }
        return;
    }

    // Proceed with a brand new doc
    if (dialogObj) dialogObj.disguise();
    containerRef.present.documentEditor.documentName = baseFilename;
    setCurrentDocName(baseFilename);
    containerRef.present.documentEditor.openBlank();
};

// Handler for the Cancel button within the file identify immediate dialog
const handleFileNamePromptCancel = () => {
    if (dialogObj) {
        dialogObj.disguise();
    }
};
Working the tasks
First, begin the server-side (ASP.NET Core API), then run the client-side (React) utility to check its functionalities. The output for file operations on the shopper facet will likely be displayed, as proven within the picture under.
GitHub reference
Attempt It Free
Conclusion
Thanks for studying! On this weblog, we’ve explored tips on how to open, edit, and auto-save Phrase paperwork effectively in Azure Blob Storage utilizing Syncfusion’s Doc Editor. By following these steps, you possibly can construct a scalable and safe doc administration system, enabling customers to create, open, edit, and retailer information within the cloud.
Moreover, this strategy will be tailored to combine with different cloud storage options, offering flexibility based mostly in your utility’s wants. Attempt implementing these options in your mission and improve doc dealing with with Azure’s highly effective storage capabilities!
In case you are an current buyer, you possibly can obtain the brand new model of Important Studio on the License and Downloads web page. In case you are not a Syncfusion buyer, attempt our 30-day free trial to take a look at our unimaginable options.
You can too contact us by our help boards, help portal, or suggestions portal. We’re all the time comfortable to help you!