

This tutorial appears at tips on how to implement a Django REST-based authentication system with the django-allauth and dj-rest-auth packages. Moreover, it demonstrates tips on how to arrange social authentication with Google when utilizing Django REST Framework.
How do I add authentication and registration endpoints to Django Relaxation Framework?
Introduction
Django’s default authentication system is a wonderful out-of-the-box answer for full-stack Django tasks. That mentioned, it may be fairly troublesome to make the most of Django’s built-in authentication when utilizing Django REST Framework with client-server structure. On high of that, Django does not natively assist social authentication.
Fortuitously, the django-allauth and dj-rest-auth packages resolve these two issues:
- django-allauth addresses authentication, registration, person administration in addition to social authentication. It goals to bridge the hole between native authentication and social authentication.
- dj-rest-auth, alternatively, supplies a set of REST API endpoints for dealing with person registration and different authentication duties.
Combining these two packages may not be as simple because it sounds. In the event you’re studying this tutorial you have most likely already came upon that the packages’ documentation will not be that well-structured or newbie pleasant.
Because of this, I’ve determined to put in writing this tutorial, which goals to elucidate one of many attainable approaches to configuring these two packages to work collectively. The tutorial is cut up into three important components:
- Credentials-based authentication
- E mail verification and password reset
- Social authentication
On the finish of every half, you may have a working authentication system. Be at liberty to peruse solely the components which are related to your venture necessities.
Mission Setup
On this part of the tutorial, we’ll create a brand new Django venture and begin a devoted app for authentication.
Be at liberty to skip the Django setup and observe alongside along with your venture.
Django Setup
Begin by creating a brand new listing to your venture and a digital setting:
$ mkdir django-rest-allauth && cd django-rest-allauth
$ python3.11 -m venv env
$ supply env/bin/activate
(env)$
Be at liberty to swap out virtualenv and Pip for Poetry or Pipenv. For extra, evaluate Fashionable Python Environments.
Subsequent, set up Django and bootstrap a brand new venture:
(env)$ pip set up Django==4.2.1
(env)$ django-admin startproject core .
Migrate the database and run the server:
(env)$ python handle.py migrate
(env)$ python handle.py runserver
Lastly, open your favourite internet browser and navigate to http://localhost:8000. It’s best to have the ability to see the default Django touchdown web page.
Authentication App
To make our venture a bit extra organized we’ll begin a devoted app for authentication. The app will probably be used to outline the authentication URLs and views.
Create a brand new app by working the next command:
(env)$ python handle.py startapp authentication
Subsequent, navigate to core/settings.py and add it to INSTALLED_APPS:
# core/settings.py

INSTALLED_APPS = [
    # ...
    "authentication.apps.AuthenticationConfig",
]
Create an app-level urls.py file within the authentication app:
# authentication/urls.py

from django.urls import path

from . import views


urlpatterns = [
    # URLs will come here
]
Lastly, replace the worldwide urls.py with the authentication app:
# core/urls.py

from django.contrib import admin
from django.urls import path, embrace


urlpatterns = [
    path('api/auth/', include('authentication.urls')),
    path("admin/", admin.site.urls),
]
Nice. That is it for the preliminary setup.
Credentials-based Authentication
On this part, we’ll set up and configure Django REST Framework, django-allauth, and dj-rest-auth to allow credentials-based authentication.
Django REST Framework
Begin by putting in Django REST Framework:
(env)$ pip set up djangorestframework==3.14.0
Subsequent, navigate to core/settings.py and add it to INSTALLED_APPS together with authtoken:
# core/settings.py

INSTALLED_APPS = [
    # ...
    "rest_framework",
    "rest_framework.authtoken",
]
The authtoken app is required since we’ll use TokenAuthentication as an alternative of Django’s default SessionAuthentication. Token authentication is a straightforward token-based HTTP authentication scheme that’s applicable for client-server setups.
Subsequent, add the next to the underside of the settings file to outline the default authentication courses:
# settings/core.py

REST_FRAMEWORK = {
    "DEFAULT_AUTHENTICATION_CLASSES": [
        "rest_framework.authentication.TokenAuthentication",
    ]
}
Migrate the database:
(env)$ python handle.py migrate
django-allauth
First, set up django-allauth:
(env)$ pip set up django-allauth==0.52.0
Subsequent, navigate to settings.py, and add it to INSTALLED_APPS together with the account and socialaccount apps:
# core/settings.py

INSTALLED_APPS = [
    "django.contrib.sites",  # make sure 'django.contrib.sites' is installed
    # ...
    "allauth",
    "allauth.account",
    "allauth.socialaccount",  # add if you want social authentication
]
django-allauth relies on Django’s “websites” framework so ensure you have it put in. On high of that, just remember to have the SITE_ID set:
# core/settings.py

SITE_ID = 1  # ensure that SITE_ID is about
Lastly, migrate the database as soon as once more:
(env)$ python handle.py migrate
dj-rest-auth
Begin by putting in the dj-rest-auth bundle:
(env)$ pip set up "dj-rest-auth[with_social]==4.0.0"
We have to use the with_social specifier since we wish to allow the usual registration course of. Moreover, we’ll make the most of this bundle later once we allow social authentication.
Subsequent, navigate to core/settings.py add it to INSTALLED_APPS:
# core/settings.py

INSTALLED_APPS = [
    # ...
    "dj_rest_auth",
    "dj_rest_auth.registration",
]
On the time of writing, the official set up information tells you to register the dj_rest_auth.urls. I do not suggest you try this because the default URLs comprise URLs which are damaged if not correctly configured (e.g., password reset, e-mail verification).
As a substitute let’s check out the dj-rest-auth supply code and handpick the URLs we want:
Replace authentication/urls.py like so:
# authentication/urls.py

from dj_rest_auth.registration.views import RegisterView
from dj_rest_auth.views import LoginView, LogoutView, UserDetailsView
from django.urls import path


urlpatterns = [
    path("register/", RegisterView.as_view(), name="rest_register"),
    path("login/", LoginView.as_view(), name="rest_login"),
    path("logout/", LogoutView.as_view(), name="rest_logout"),
    path("user/", UserDetailsView.as_view(), name="rest_user_details"),
]
That is it. The essential authentication move ought to now be working. Let’s check it.
Testing
To check the API we’ll use cURL. We’ll additionally pipe the responses into jq to routinely format and colour spotlight them.
Begin by working the Django growth server:
(env)$ python handle.py runserver
Register
Then, to create an account run the next in a brand new terminal window:
$ curl -XPOST -H "Content material-type: software/json" -d '{
      "username": "user1",
      "password1": "complexpassword123",
      "password2": "complexpassword123"
  }' 'http://localhost:8000/api/auth/register/' | jq
By default, you may get an empty response.
Login
Now you can use the created account to acquire an authentication token:
$ curl -XPOST -H "Content material-type: software/json" -d '{
      "username": "user1",
      "password": "complexpassword123"
  }' 'http://localhost:8000/api/auth/login/' | jq
The response will probably be much like this one:
{
    "key": "<your_token>"
}
Consumer Particulars
Now cross the token within the Authorization header to fetch the person particulars:
$ curl -XGET -H 'Authorization: Token <your_token>'
    -H "Content material-type: software/json" 'http://localhost:8000/api/auth/person/' | jq
Response:
{
    "pk": 1,
    "username": "user1",
    "e-mail": "[email protected]",
    "first_name": "",
    "last_name": ""
}
Logout
As you may need guessed, sending a POST request to the logout endpoint destroys the token:
$ curl -XPOST -H 'Authorization: Token <your_token>'
    -H "Content material-type: software/json" 'http://localhost:8000/api/auth/logout/' | jq
Response:
{
    "element": "Efficiently logged out."
}
E mail Verification and Password Reset
On this part, we’ll have a look at tips on how to configure Django SMTP settings and allow e-mail verification together with the password resetting performance.
SMTP Settings
As talked about above, a number of the authentication endpoints depend on sending emails (e.g., password reset, e-mail verification, and so forth). For Django to have the ability to ship emails you may must configure the SMTP settings.
In case your SMTP settings are already configured be at liberty to skip this part.
For testing functions you need to use Django’s Console E mail Backend:
EMAIL_BACKEND = "django.core.mail.backends.console.EmailBackend"This backend prints out the emails in your console as an alternative of sending actual emails.
You should use your personal SMTP server or make the most of Brevo (previously SendInBlue), Mailgun, SendGrid, or an analogous service. I counsel you go together with Brevo since they’re comparatively low-cost and will let you ship a good quantity of emails each day (free of charge).
To configure SMTP, add the next to core/settings.py:
# core/settings.py

EMAIL_BACKEND = "django.core.mail.backends.smtp.EmailBackend"
EMAIL_HOST = "<your e-mail host>"                    # smtp-relay.sendinblue.com
EMAIL_USE_TLS = False                               # False
EMAIL_PORT = "<your e-mail port>"                    # 587
EMAIL_HOST_USER = "<your e-mail person>"               # your e-mail deal with
EMAIL_HOST_PASSWORD = "<your e-mail password>"       # your password
DEFAULT_FROM_EMAIL = "<your default from e-mail>"    # e-mail ending with @sendinblue.com
Code and Configuration
Now that we now have SMTP configured, we are able to make e-mail verification obligatory on sign-up and allow password resetting. To take action, add the next django-allauth settings to core/settings.py:
# core/settings.py

ACCOUNT_EMAIL_REQUIRED = True
ACCOUNT_EMAIL_VERIFICATION = "obligatory"
Subsequent, let’s maintain the URLs discovered within the affirmation and password reset e-mail templates. The {{ password_reset_url }} and {{ activate_url }} get changed with the next values:
http://localhost:8000/api/auth/register/account-confirm-email/<str:key>/
http://localhost:8000/api/auth/password/reset/verify/<str:uidb64>/<str:token>/
By default, django-allauth takes care of those URLs. It renders a kind and submits a request again to the backend. Since we’re constructing a REST-based API we do not need that to occur; as an alternative, we wish to redirect these two URLs to our frontend from the place we are able to POST the keys again to the backend.
This tutorial doesn’t present a consumer facet app. The URL
http://localhost:3000is used merely as a placeholder. In the event you resolve to check the app with your personal frontend, ensure that to configure django-cors-headers for dealing with cross origin requests.
To arrange the redirects, first outline the next two settings in core/settings.py:
# core/settings.py

# <EMAIL_CONFIRM_REDIRECT_BASE_URL>/<key>
EMAIL_CONFIRM_REDIRECT_BASE_URL =
    "http://localhost:3000/e-mail/verify/"

# <PASSWORD_RESET_CONFIRM_REDIRECT_BASE_URL>/<uidb64>/<token>/
PASSWORD_RESET_CONFIRM_REDIRECT_BASE_URL =
    "http://localhost:3000/password-reset/verify/"
Be sure to incorporate the trailing slash
/on the finish of the URLs.
Subsequent, add the next two views to authentication/views.py:
# authentication/views.py

from django.conf import settings
from django.http import HttpResponseRedirect


def email_confirm_redirect(request, key):
    return HttpResponseRedirect(
        f"{settings.EMAIL_CONFIRM_REDIRECT_BASE_URL}{key}/"
    )


def password_reset_confirm_redirect(request, uidb64, token):
    return HttpResponseRedirect(
        f"{settings.PASSWORD_RESET_CONFIRM_REDIRECT_BASE_URL}{uidb64}/{token}/"
    )
Lastly, register the newly created views in authentication/urls.py:
# authentication/urls.py

from dj_rest_auth.registration.views import (
    ResendEmailVerificationView,
    VerifyEmailView,
)
from dj_rest_auth.views import (
    PasswordResetConfirmView,
    PasswordResetView,
)
from authentication.views import email_confirm_redirect, password_reset_confirm_redirect
from dj_rest_auth.registration.views import RegisterView
from dj_rest_auth.views import LoginView, LogoutView, UserDetailsView
from django.urls import path


urlpatterns = [
    # ...
    path("register/verify-email/", VerifyEmailView.as_view(), name="rest_verify_email"),
    path("register/resend-email/", ResendEmailVerificationView.as_view(), name="rest_resend_email"),
    path("account-confirm-email/<str:key>/", email_confirm_redirect, name="account_confirm_email"),
    path("account-confirm-email/", VerifyEmailView.as_view(), name="account_email_verification_sent"),
    path("password/reset/", PasswordResetView.as_view(), name="rest_password_reset"),
    path(
        "password/reset/confirm/<str:uidb64>/<str:token>/",
        password_reset_confirm_redirect,
        name="password_reset_confirm",
    ),
    path("password/reset/confirm/", PasswordResetConfirmView.as_view(), name="password_reset_confirm"),
]
Do not forget to import all of the required views from dj_rest_auth.
Nice! That is it. We now have a fully-working authentication system with e-mail verification and password reset performance.
Testing
Let’s check the API.
Register
Creating a brand new person now requires you to offer a sound e-mail deal with:
$ curl -XPOST -H "Content material-type: software/json" -d '{
      "username": "user2",
      "e-mail": "<your e-mail deal with>",
      "password1": "complexpassword123",
      "password2": "complexpassword123"
  }' 'http://localhost:8000/api/auth/register/' | jq
Be sure to switch
<your e-mail deal with>along with your precise e-mail deal with.
Response:
{
    "element": "Verification e-mail despatched."
}
As you register a verification e-mail will probably be despatched to your e-mail. Go forward and examine your inbox:
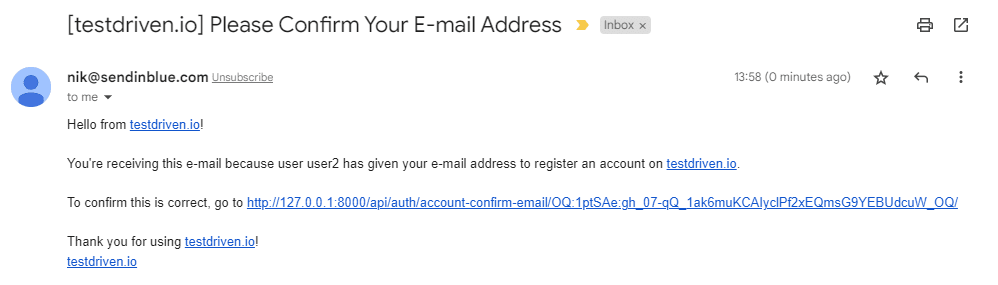
By clicking on the hyperlink you need to get redirected to your frontend:
http://localhost:3000/e-mail/verify/<key>
Confirm E mail
From the frontend you may then POST the important thing again to the backend to confirm the e-mail deal with:
$ curl -XPOST -H "Content material-type: software/json" -d '{
      "key": "OQ:1ptSAe:gh_07-gQ_1ak6muKCAly..."
  }' 'http://localhost:8000/api/auth/register/verify-email/' | jq
Response:
As soon as you have efficiently verified your e-mail deal with you’ll log in.
Password Reset
To request a brand new password, it’s worthwhile to POST to /api/auth/password/reset/ like so:
$ curl -XPOST -H "Content material-type: software/json" -d '{
      "e-mail": "<your e-mail deal with>"
  }' 'http://localhost:8000/api/auth/password/reset/' | jq
After you ship the request you may obtain an analogous e-mail:
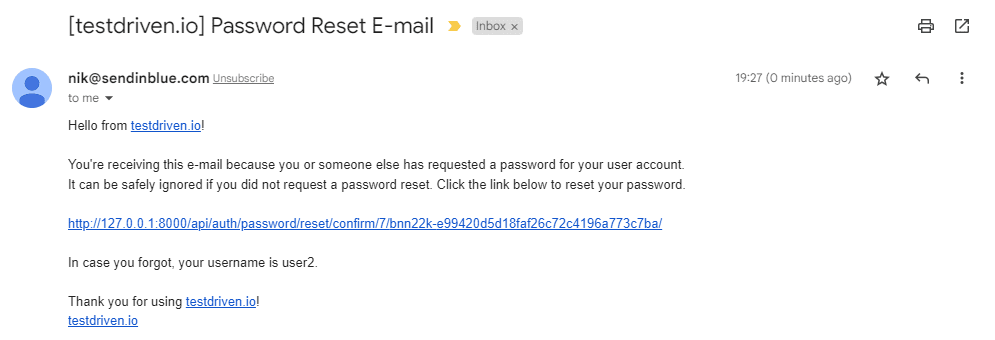
By clicking on the hyperlink you may get redirected to your frontend:
http://localhost:3000/password-reset/verify/<uidb64>/<token>/
From there you need to use the uid and token to vary the password:
$ curl -XPOST -H "Content material-type: software/json" -d '{
      "uid": "7",
      "token": "bn8cnn-6a1bcbebf3a54cc48c064113e6b97d9f",
      "new_password1": "differentpassword123",
      "new_password2": "differentpassword123",
  }' 'http://localhost:8000/api/auth/password/reset/' | jq
Social Authentication
On this part, we’ll check out tips on how to arrange social authentication. I am going to information you thru the method of establishing social authentication with Google, however you need to use related steps for some other social supplier.
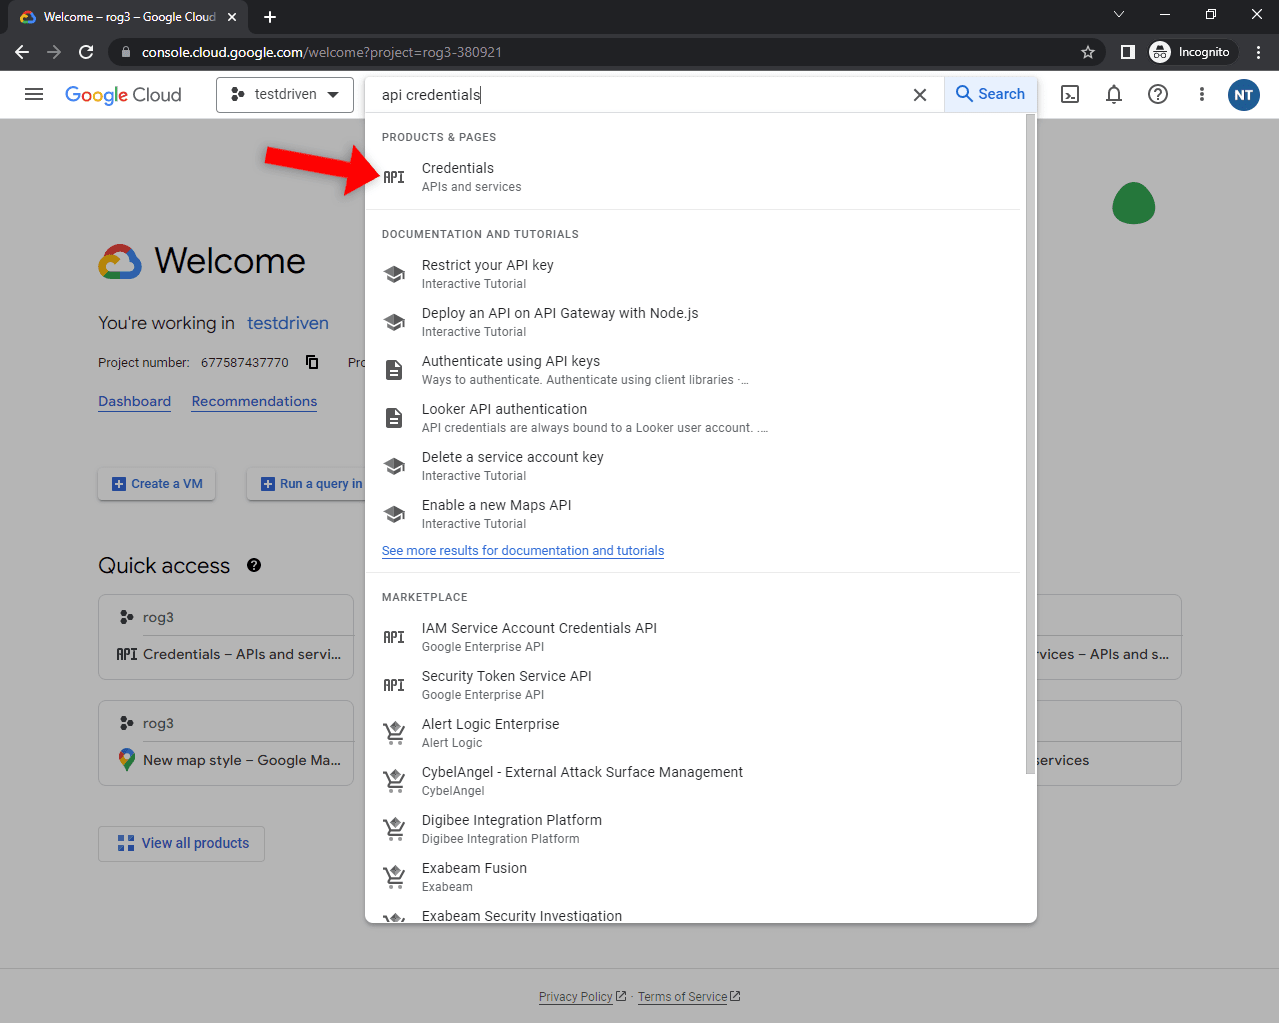
To allow Google enroll you first must create an OAuth Consumer key. Go forward and navigate to your Google Cloud Console, choose the venture you need to make use of, and seek for “API Credentials”:
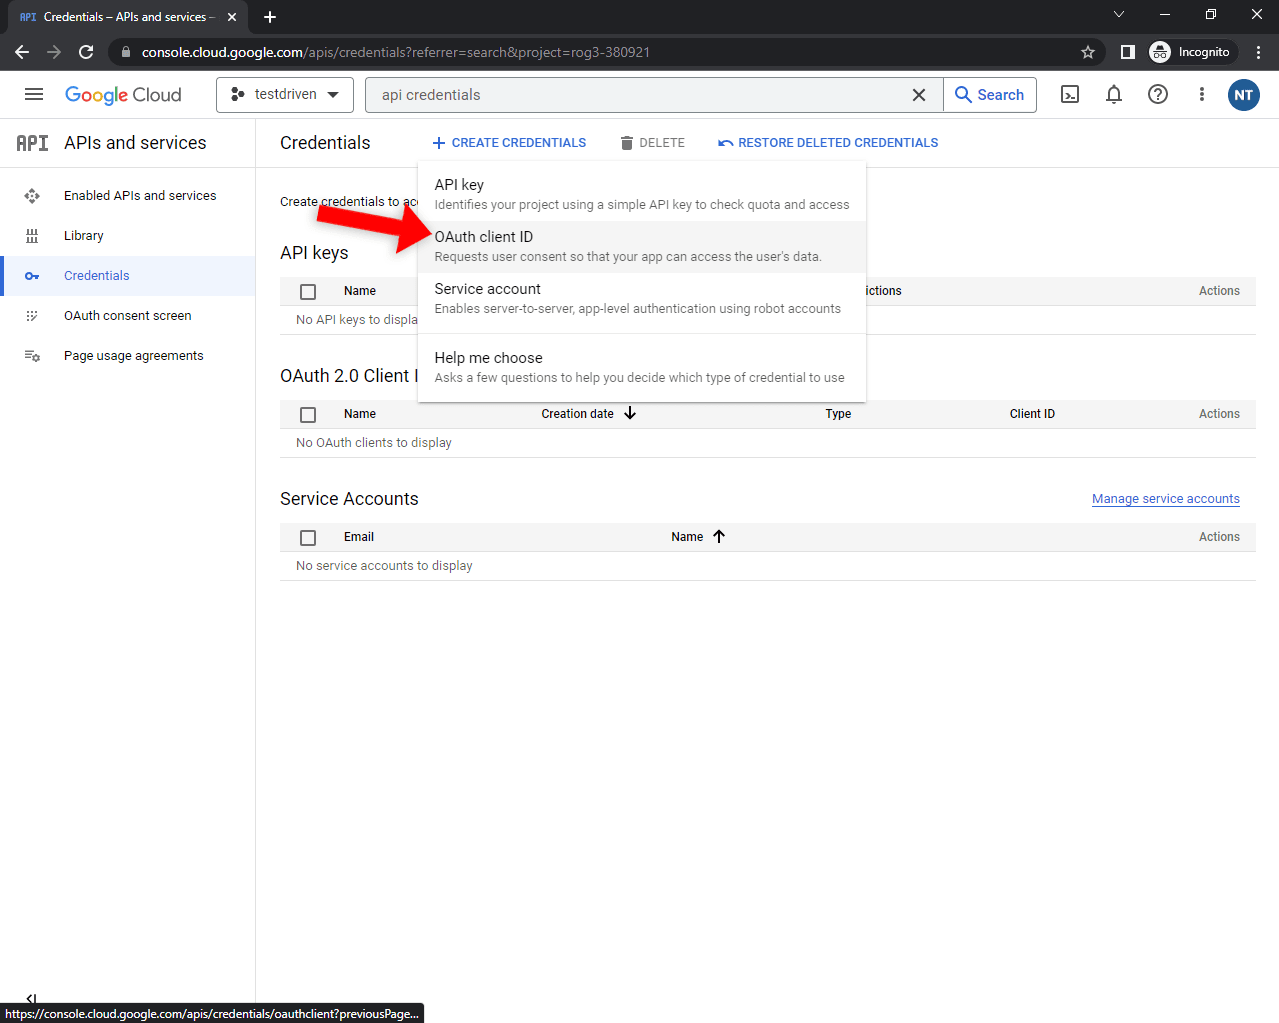
Subsequent, click on on the “Create credentials” button and choose “OAuth Consumer ID” within the dropdown:
Choose “Internet software”, decide a customized title, and add your frontend URL because the approved redirect URI. For simpler testing, I like to recommend you additionally add:
Lastly, click on “Create” to generate the credentials.
You will be offered along with your “Consumer ID” and “Consumer secret”. Pay attention to them since we’ll want them within the subsequent step.
Shifting alongside, head again to your Django venture and the next app to INSTALLED_APPS:
# core/settings.py

INSTALLED_APPS = [
    # ...
    "allauth.socialaccount.providers.google",
]
Subsequent, add the SOCIALACCOUNT_PROVIDERS setting to core/settings.py like so:
# core/settings.py

SOCIALACCOUNT_PROVIDERS = {
    "google": {
        "APP": {
            "client_id": "<your google consumer id>",  # exchange me
            "secret": "<your google secret>",        # exchange me
            "key": "",                               # go away empty
        },
        "SCOPE": [
            "profile",
            "email",
        ],
        "AUTH_PARAMS": {
            "access_type": "on-line",
        },
        "VERIFIED_EMAIL": True,
    },
}
Be sure to switch
<your google consumer id>and<your google secret>along with your precise keys. Go away thekeyproperty empty because it is not required for Google social authentication.
Add a brand new view in authentication/views.py that inherits from SocialLoginView:
# authentication/views.py

from dj_rest_auth.registration.views import SocialLoginView
from allauth.socialaccount.suppliers.google.views import GoogleOAuth2Adapter
from allauth.socialaccount.suppliers.oauth2.consumer import OAuth2Client


class GoogleLogin(SocialLoginView):
    adapter_class = GoogleOAuth2Adapter
    callback_url = "http://localhost:3000/"
    client_class = OAuth2Client
Lastly, add the next two URLs to authentication/urls.py:
# authentication/urls.py

from allauth.socialaccount.views import signup
from authentication.views import GoogleLogin

urlpatterns = [
    # ...
    path("signup/", signup, name="socialaccount_signup"),
    path("google/", GoogleLogin.as_view(), name="google_login"),
]
That is it!
Testing
To check if the API endpoint works, you first must acquire an id_token after which POST it to the backend’s endpoint. The best solution to get the id_token is by way of Google’s OAuth 2.0 Playground.
To get the token you may observe this great article.
Subsequent, cross the id_token because the access_token within the cURL request physique:
$ curl -XPOST -H "Content material-type: software/json" -d '{
    "access_token": "<your_id_token>"
  }' 'http://localhost:8000/api/auth/google/'
It’s best to get an analogous response:
{
    "key": "3a67e32d6fbc043b29b64fafc6f79c5e94af94a9"
}
Now you can use the key to authenticate your self.
Conclusion
We have now efficiently created a fully-fledged authentication API that helps credentials-based authentication and social authentication. The applied API additionally has e-mail verification and password reset performance.
The ultimate supply code is accessible on the django-rest-allauth GitHub repo.
Future steps
- Take into account swapping token authentication with djangorestframework-simplejwt or django-rest-knox. They supply additional configuration choices and are safer.
- So as to add one other social supplier comparable to Twitter or GitHub, have a look the at dj-rest-auth docs.
- To allow social account linking performance, look into “Social Join Views”.
- To make use of the backend with a JavaScript-based frontend you may almost certainly wish to arrange CORS headers by way of django-cors-headers.