

Within the design world, masking is a well-liked method to attain distinctive design results. As a designer, I’ve used it many instances, however my utilization of it on the internet is uncommon. I feel that the explanation that saved me from not utilizing a CSS masks is the browser assist, they’re partially supported in blink browsers (Chrome and Edge) and absolutely supported in Safari and Firefox.
The good information is that CSS masking might be a part of Interop 2023, which implies we must always count on cross-browser assist (Yay!!).
On this article, I’ll undergo what CSS masking is, the way it works, and some use circumstances and examples for it.
Let’s dive in.
Desk of contents
What’s masking?
In easy phrases, masking works in a means that hides a part of a component with out erasing it.
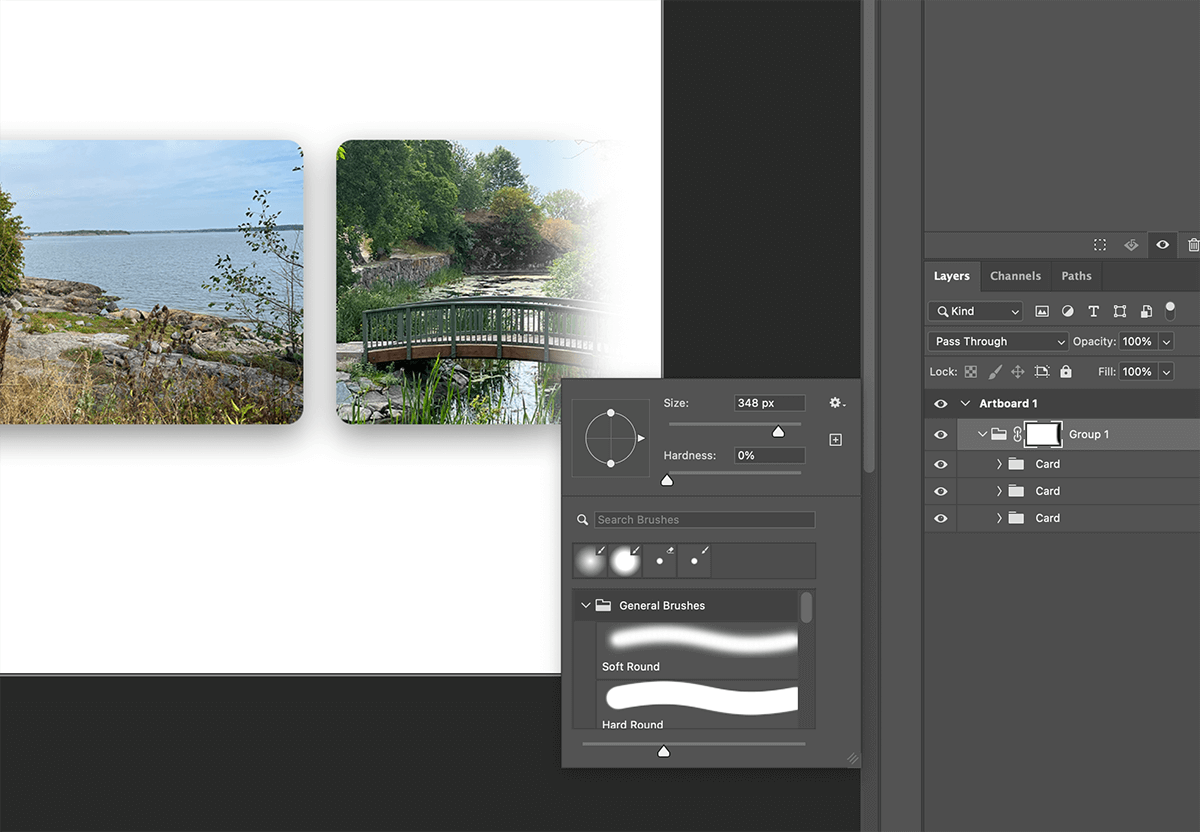
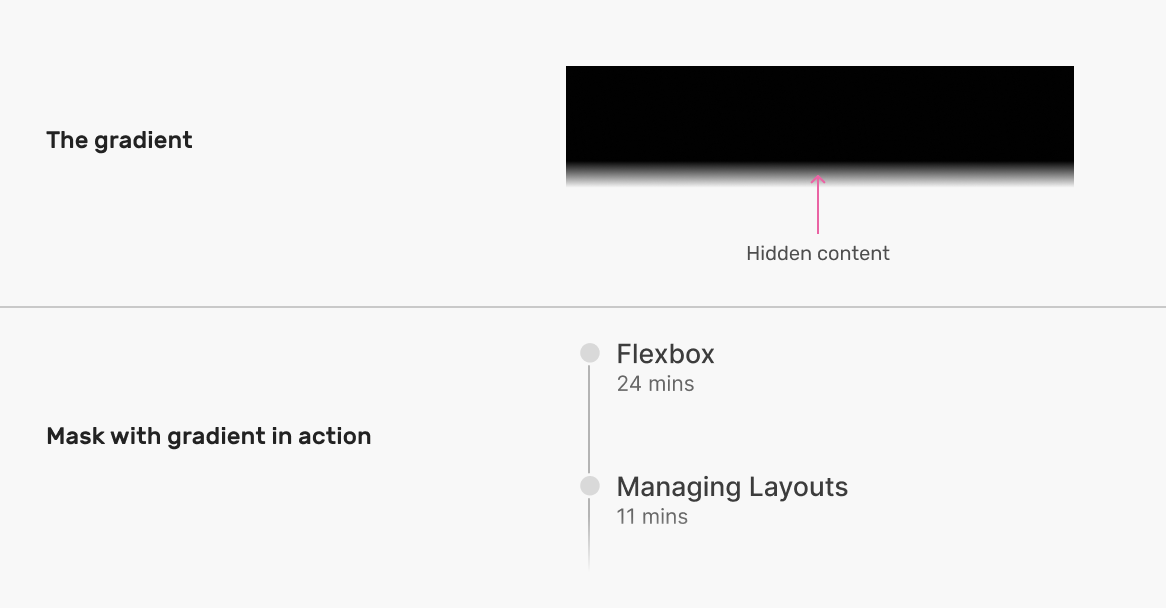
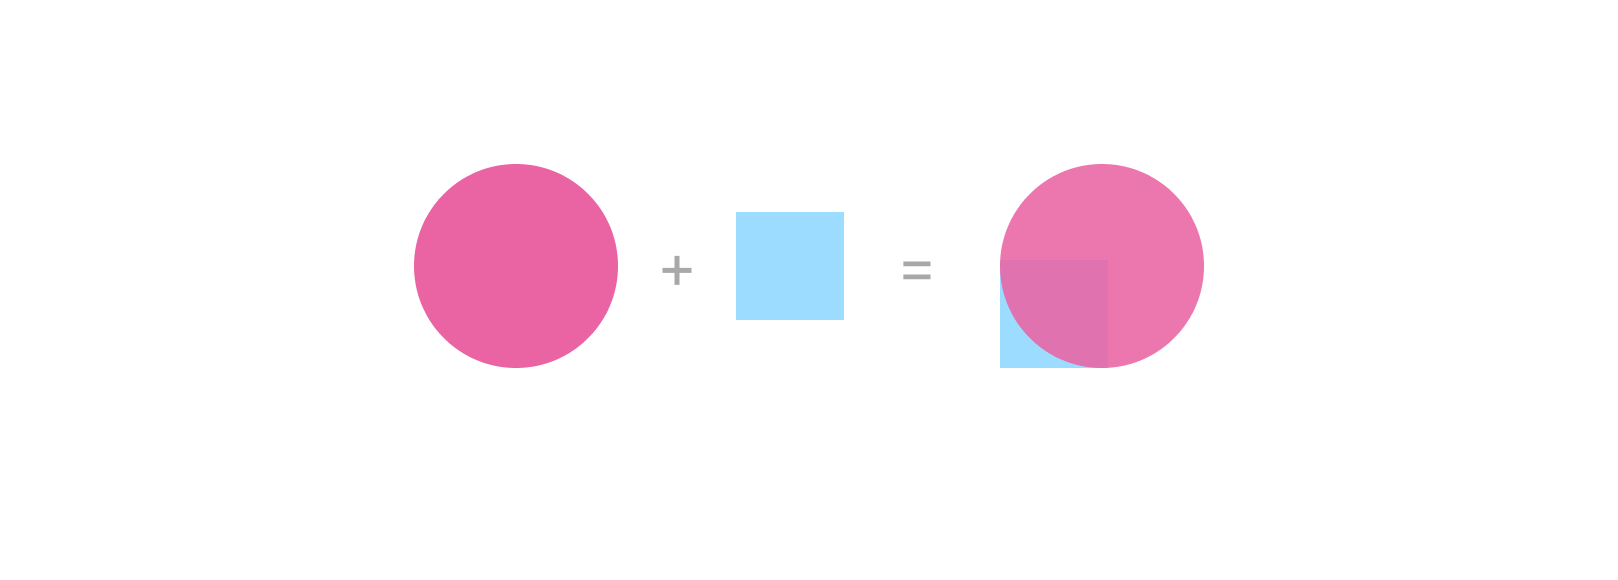
Think about the next determine:
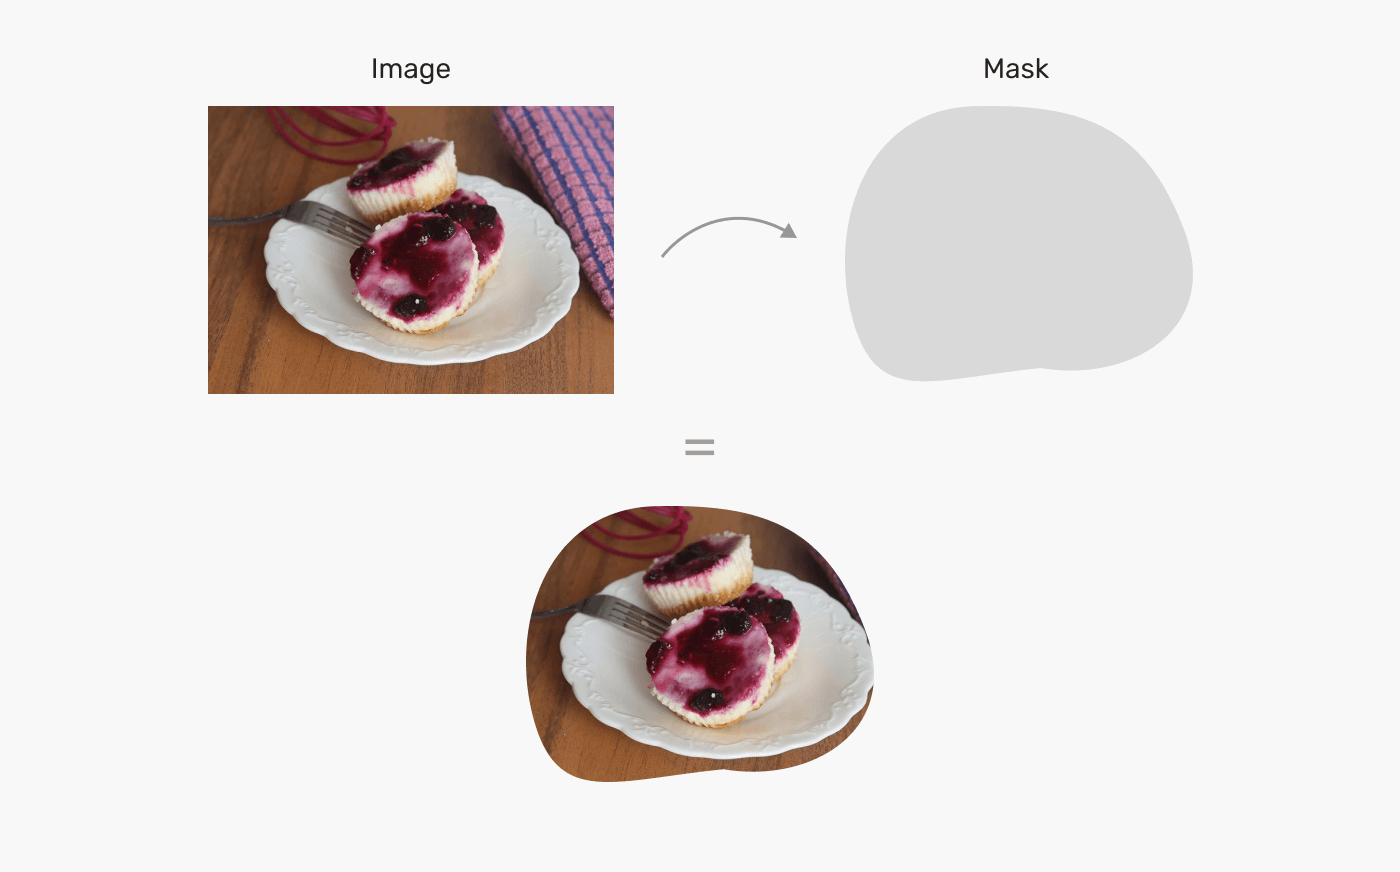
We’ve a picture, and we now have a masks. In design apps like Photoshop, we are able to insert the picture contained in the gray form, and it’ll end in a masked picture.
The way in which that works is that it hides some elements of the picture with out erasing it (They’re nonetheless there, however hidden).

That is the core idea of masking, which is to make use of a form to present and conceal elements of a component. We are able to take that additional and discover even additional and extra distinctive methods to masks content material.
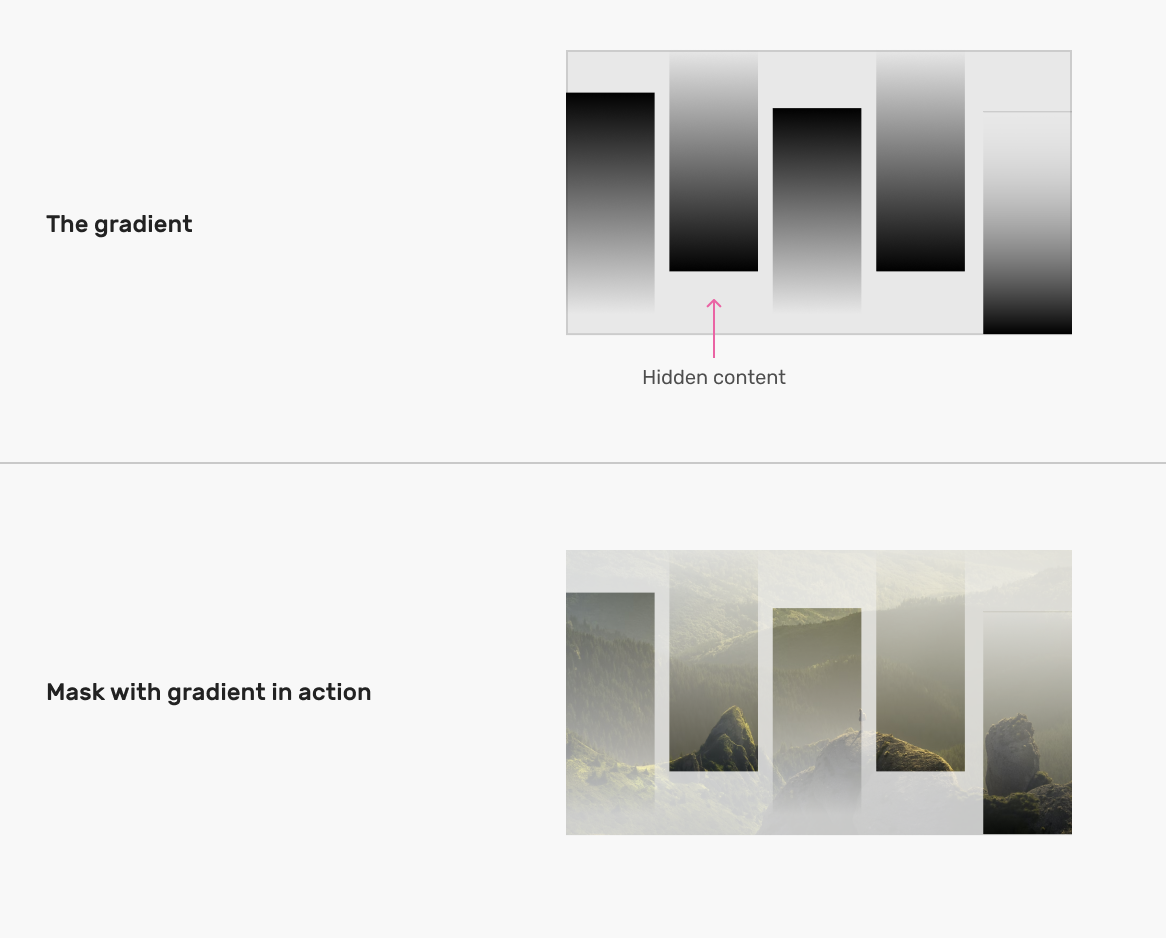
For instance, we are able to create a gradient masks like the next one.
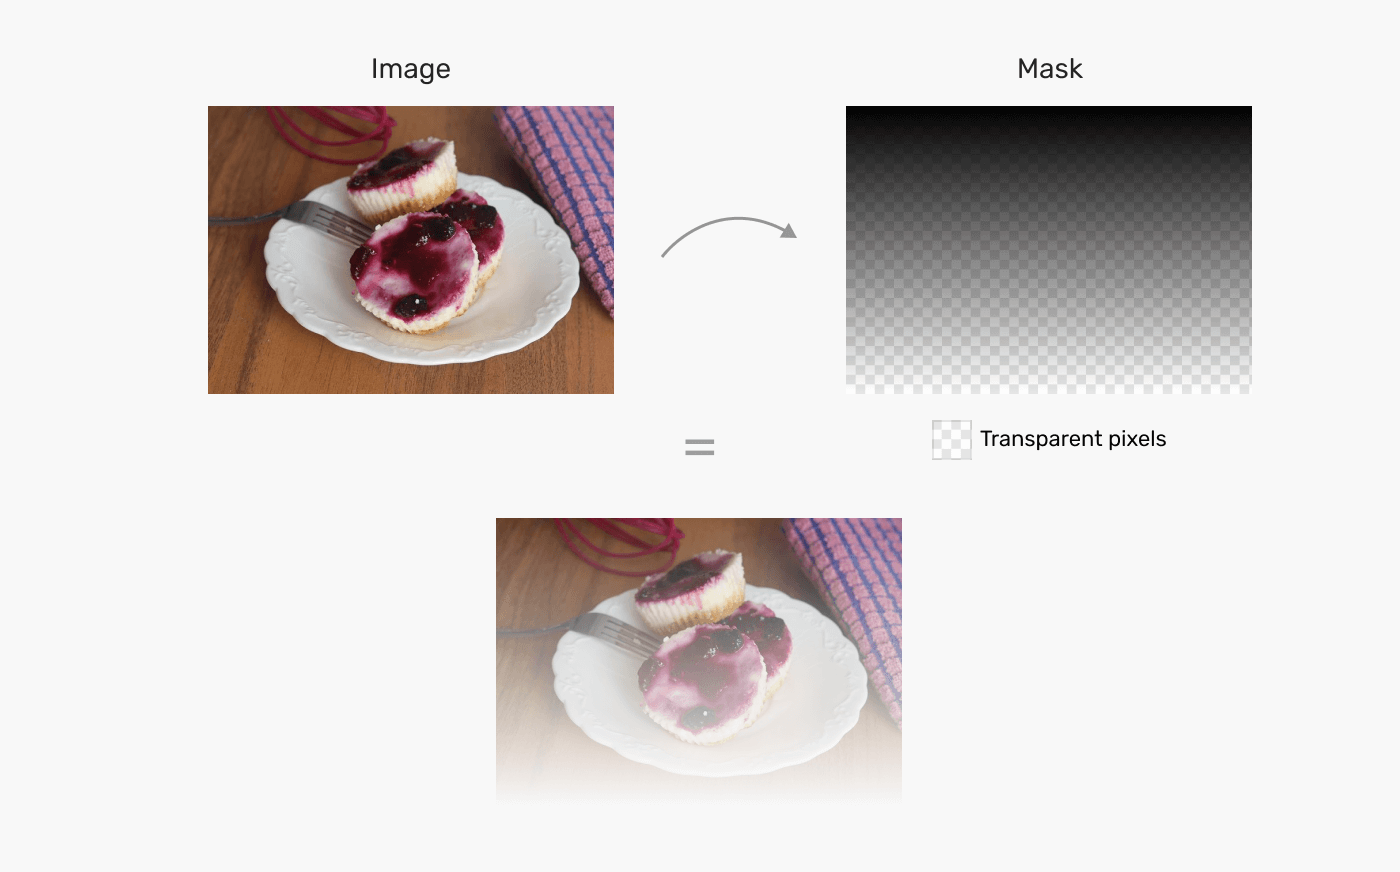
In a gradient, there are stuffed and clear pixels. The stuffed ones are the place the component’s half might be seen, and the clear one is the place the hidden elements are.
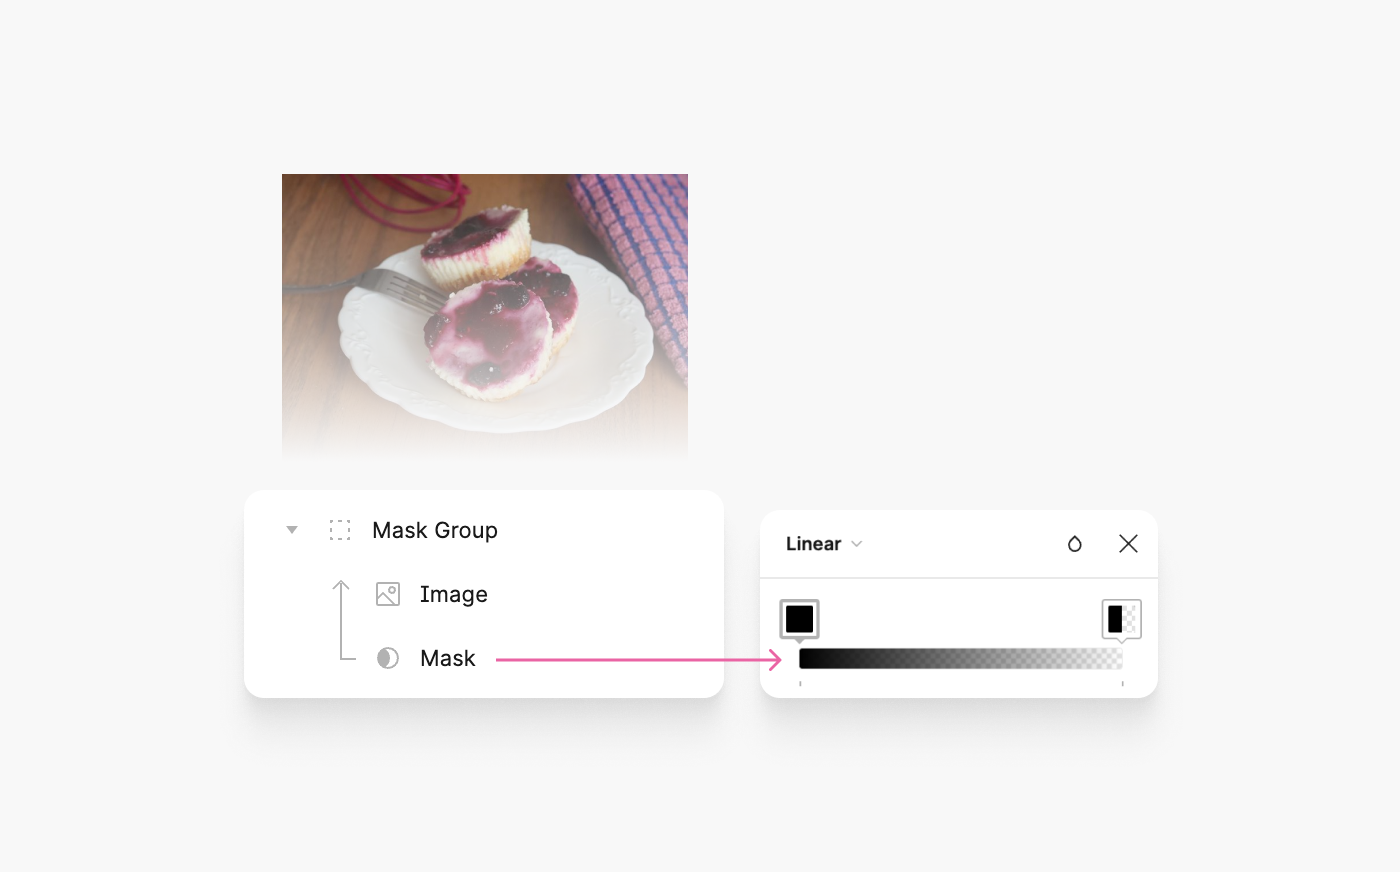
In Photoshop, we are able to add a layer masks to a gaggle of layers, and the content material inside that group might be masked inside it. The way in which it really works is through the use of the comb device to cover part of the group, and it’ll get masked.
The content material that’s masked isn’t erased, it’s simply hidden (Discover the group gadgets).
Alright, sufficient concept. Within the following sections, I’ll look into the CSS methods of masking.
The best way to masks in CSS
In CSS, there are a number of methods to masks components:
- The
masksproperty - The
clip-pathproperty - SVG
<masks>
The principle distinction between the masks property and clip-path is that the primary is used for photographs and gradients, and the latter is used for paths. For this text, the main focus might be on the masks property.
In CSS, we now have the shorthand property masks, which has similarities to the background property. YES, you learn that proper. That’s why I feel it’s simple to recollect the syntax, as a result of it’s literarily the identical because the background property, however with few further properties.
As an alternative of itemizing all of the CSS masking properties, I’ll stroll by an instance that provides a masks characteristic step by step so you’ll be able to spot the distinction visually.
A CSS background appear like this:
.card__thumb {
  background-image: url("hero-cool.png");
}
..and a CSS masks appear like this:
.card__thumb {
  mask-image: url("hero-cool.png");
}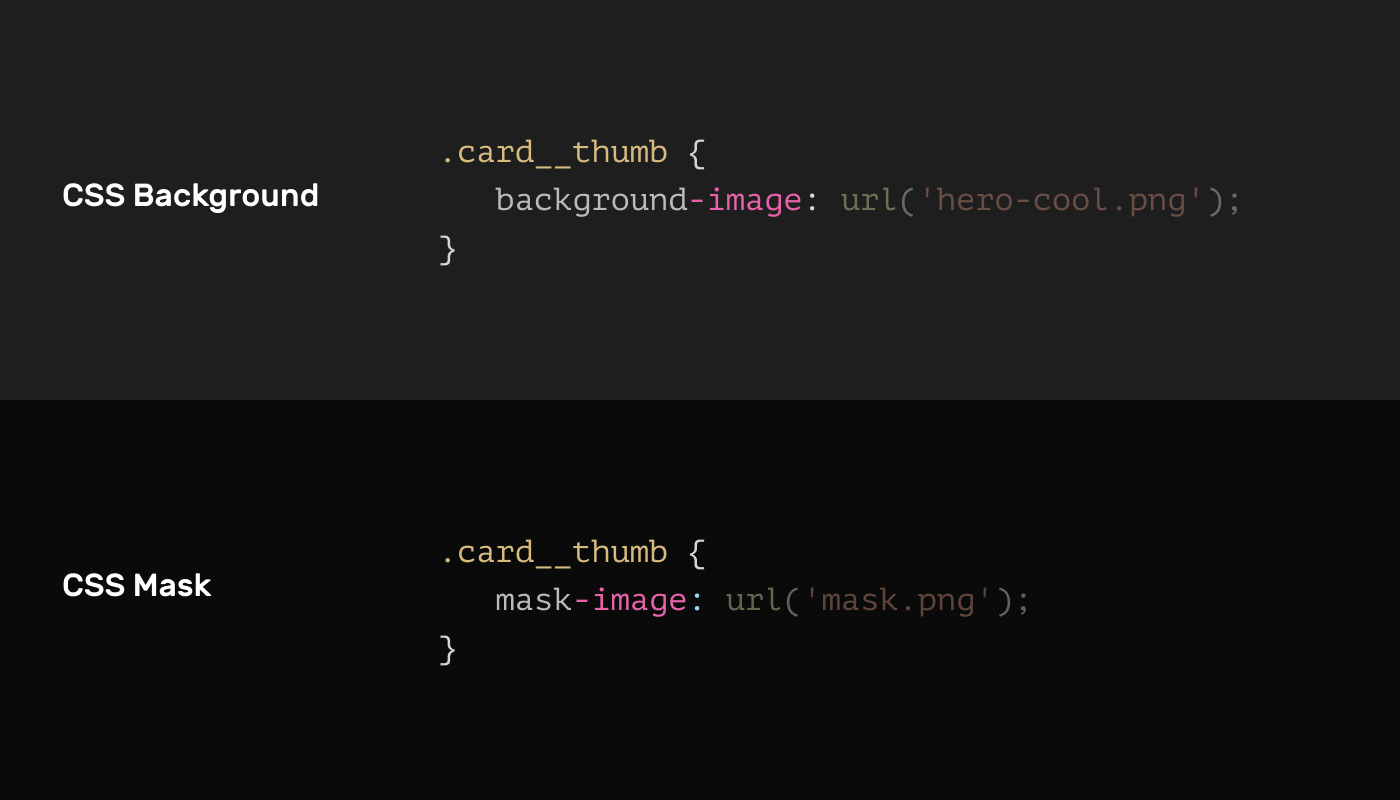
That’s cool, proper? It’ll make understanding and memorizing CSS masks a lot simpler.
Let’s redo the preliminary instance with CSS.
First, I must export the form as a png picture.
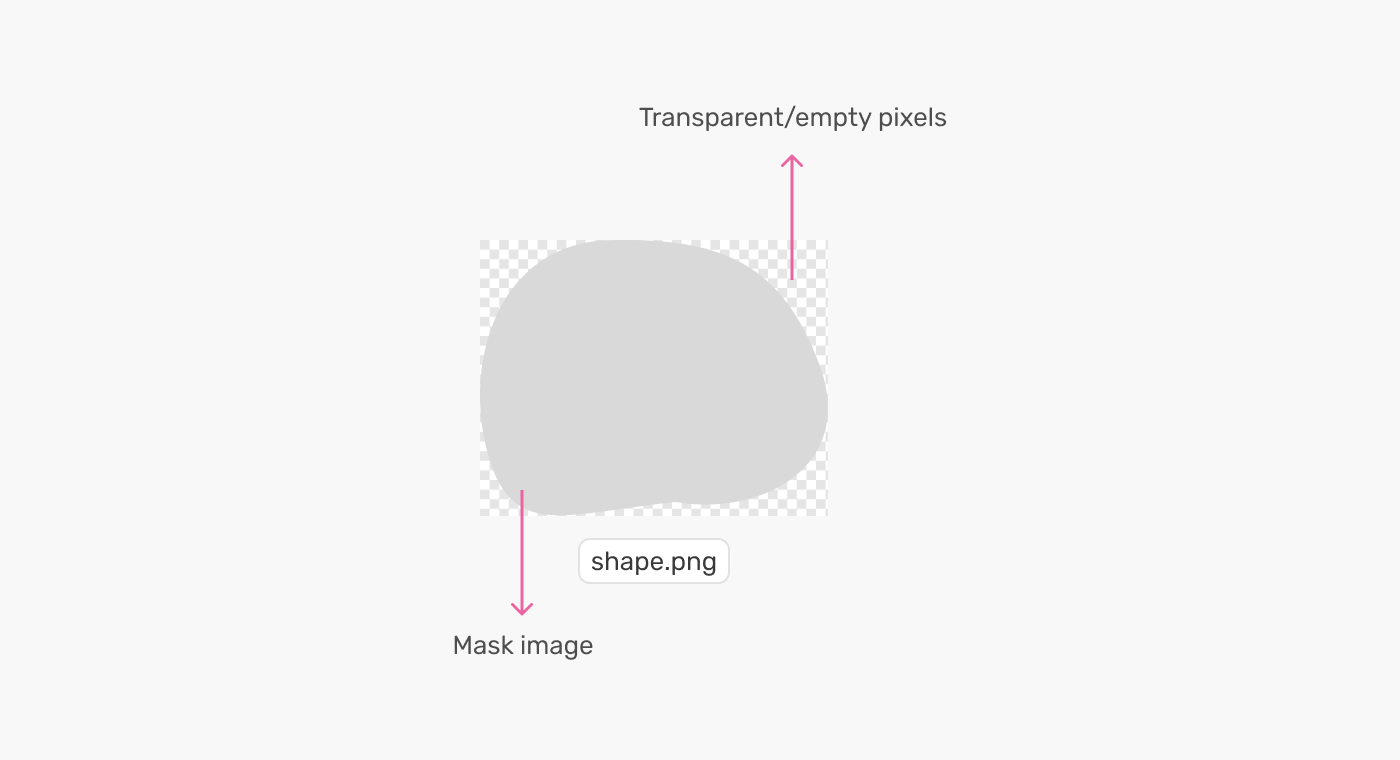
Let’s assume that I wish to apply the masks to a picture.
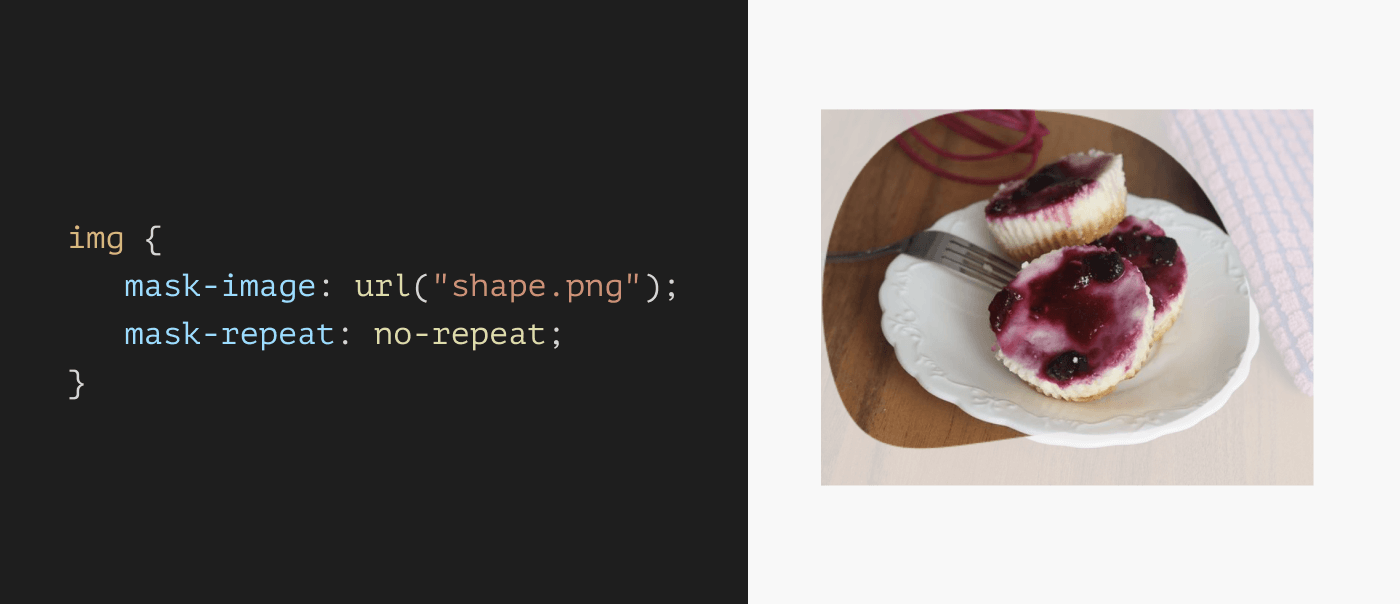
<img src="ahmad-shadeed-web-directions.jpg" alt="" />img {
mask-image: url("form.png");
}Are you able to count on the end result? By default, a masks will repeat and its measurement might be equal to the masks picture itself. At present, the end result appears to be like like this:
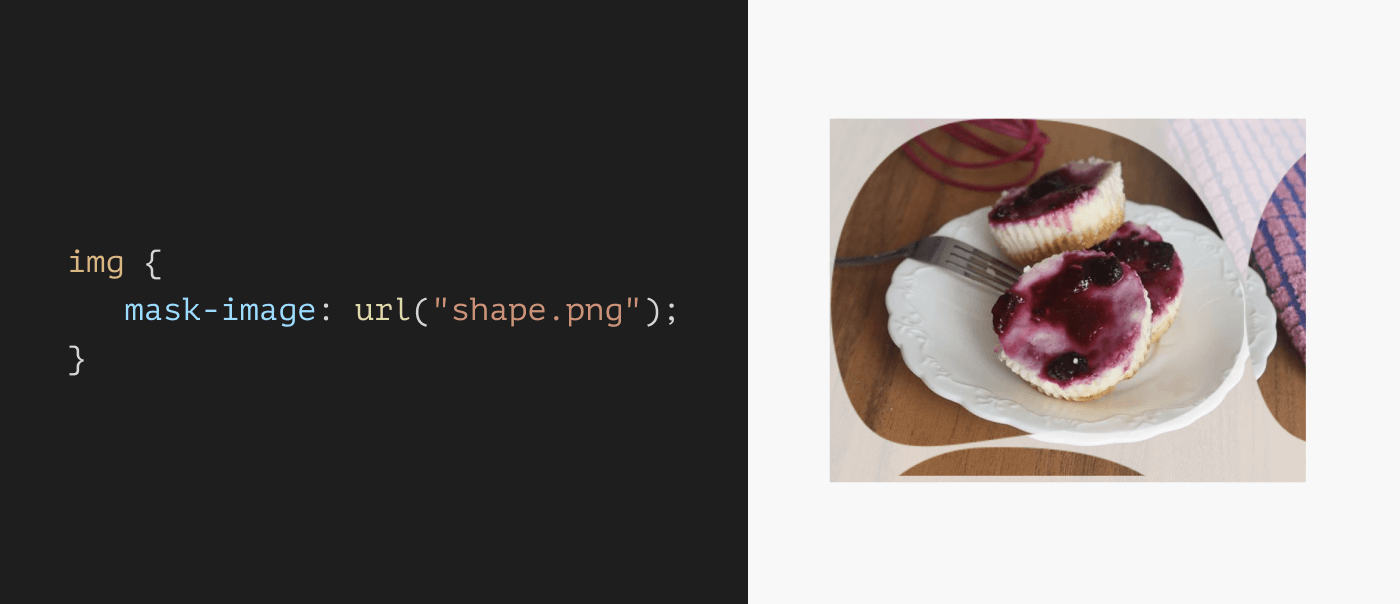
To revert that, we have to set the mask-repeat to no-repeat, identical to CSS background photographs.
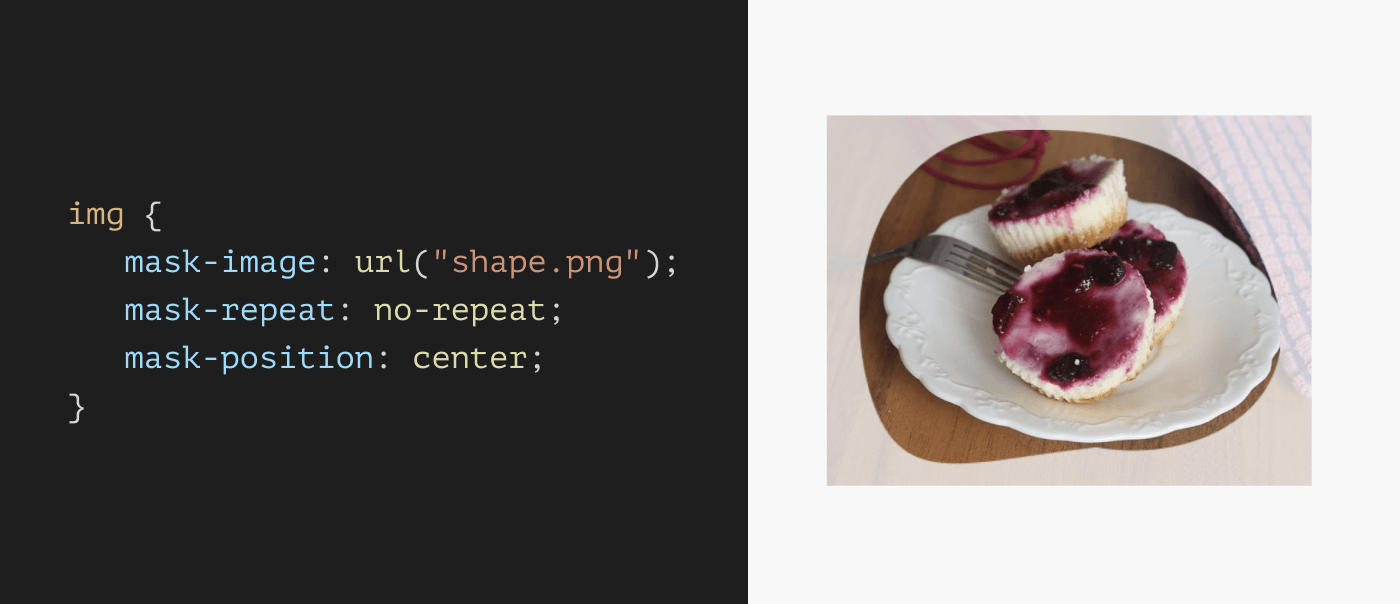
img {
  mask-image: url("form.png");
  mask-repeat: no-repeat;
}
Superior! Discover that the masks is positioned on the prime left nook. We are able to change that through mask-position. Once more, discover how the syntax is equivalent to CSS background photographs!
img {
  mask-image: url("form.png");
  mask-repeat: no-repeat;
  mask-position: heart;
}
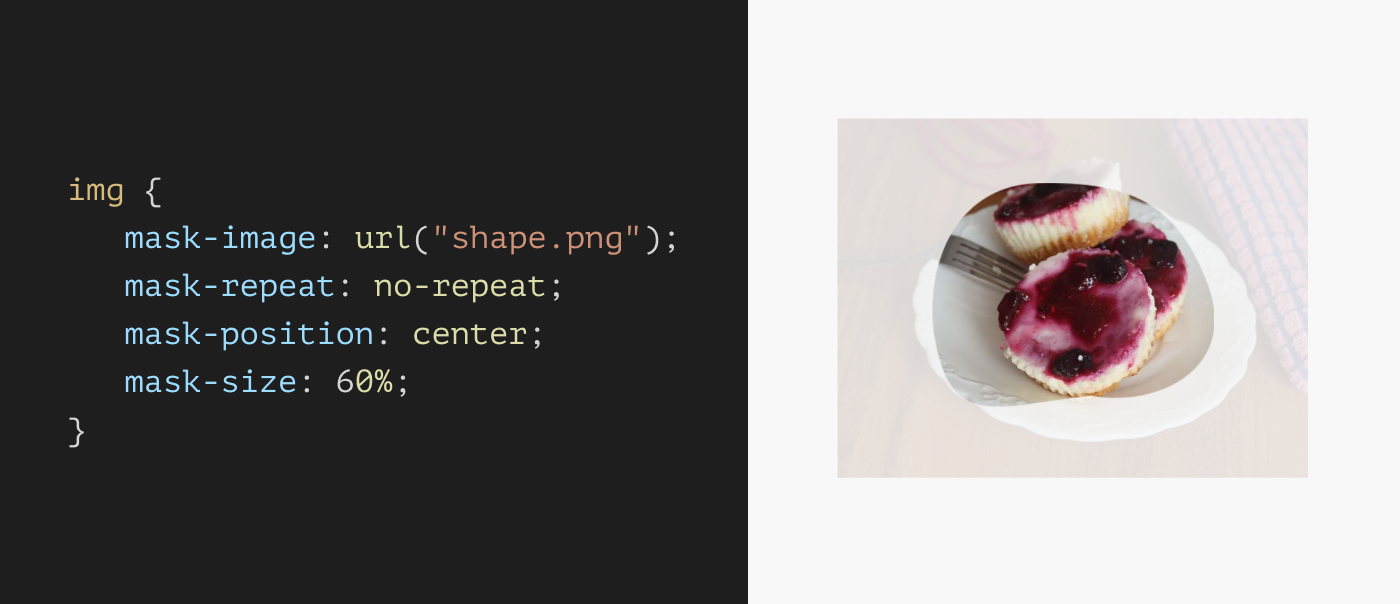
Along with the place, we are able to additionally change the masks measurement. That is helpful in making a masks picture attentive to the component’s measurement.
img {
  mask-image: url("form.png");
  mask-repeat: no-repeat;
  mask-position: heart;
  mask-size: 60%;
}
There are just a few extra masks properties however I don’t wish to overwhelm you with them now, I’ll come to them later with actual use circumstances.
Masking with CSS gradients
CSS masking isn’t nearly utilizing a picture, we are able to additionally leverage gradients to create highly effective and helpful masking results.
I’ll present just a few helpful use circumstances in a while, however for now, I wish to deal with the core elementary of how gradients work with masking.
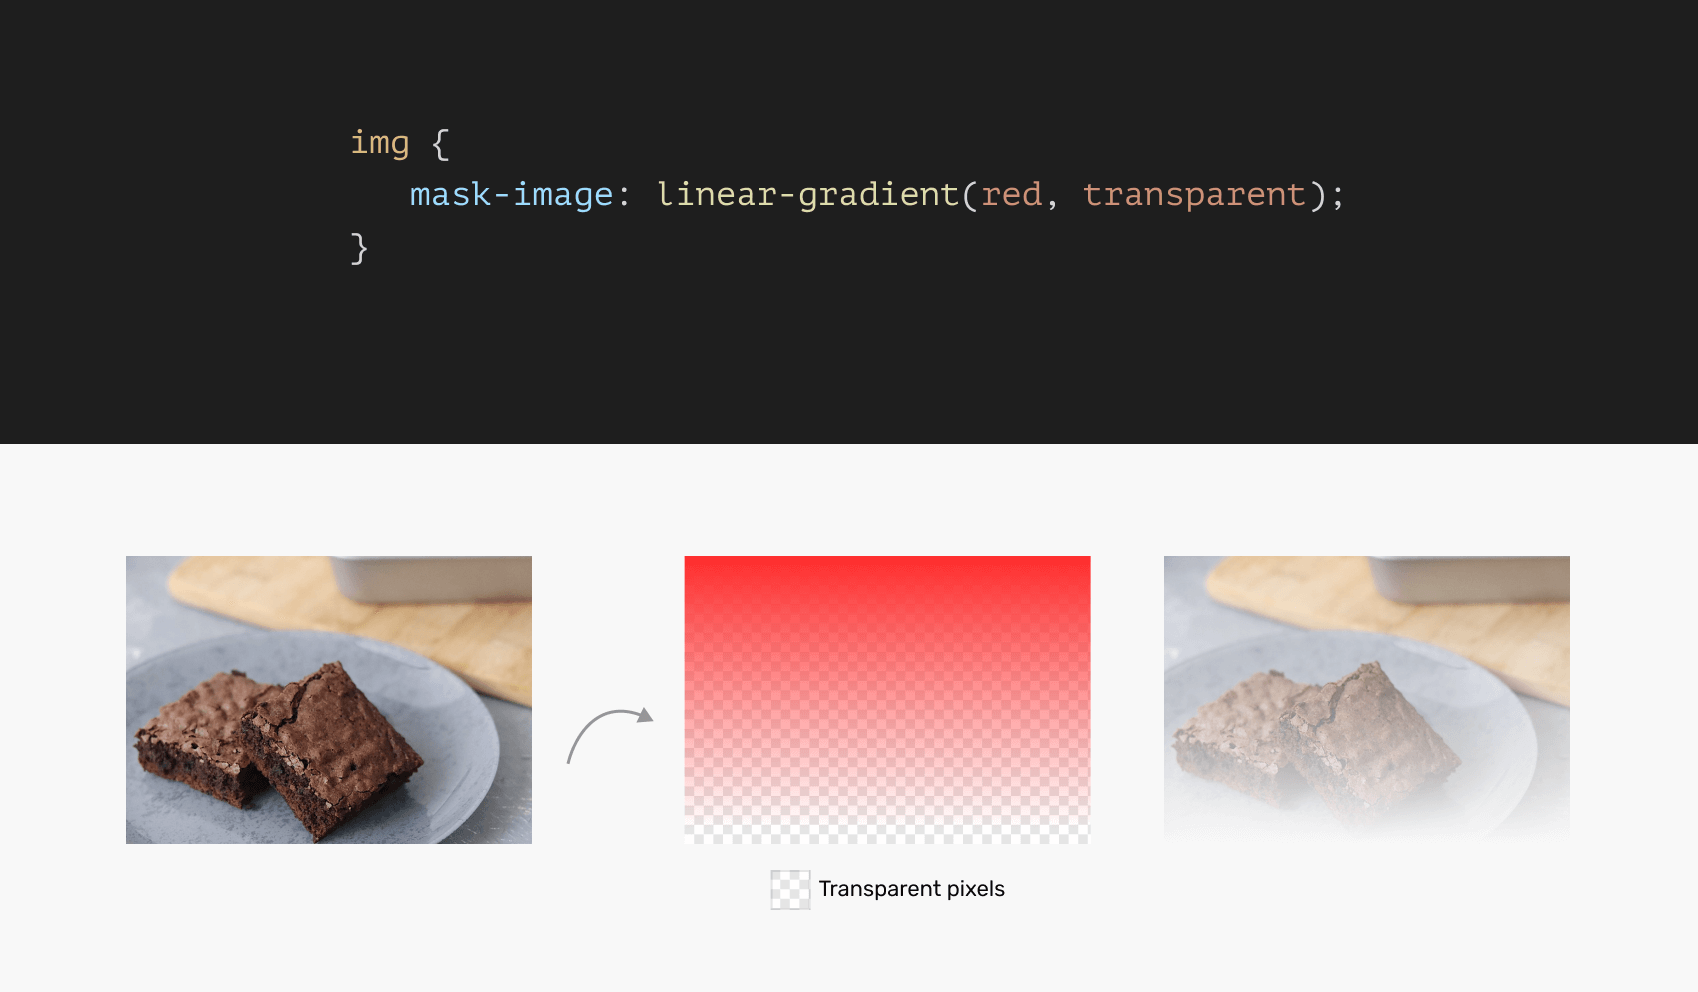
Within the following instance, the mask-image consists of a CSS linear gradient from full black to clear.
img {
  mask-image: linear-gradient(#000, clear);
}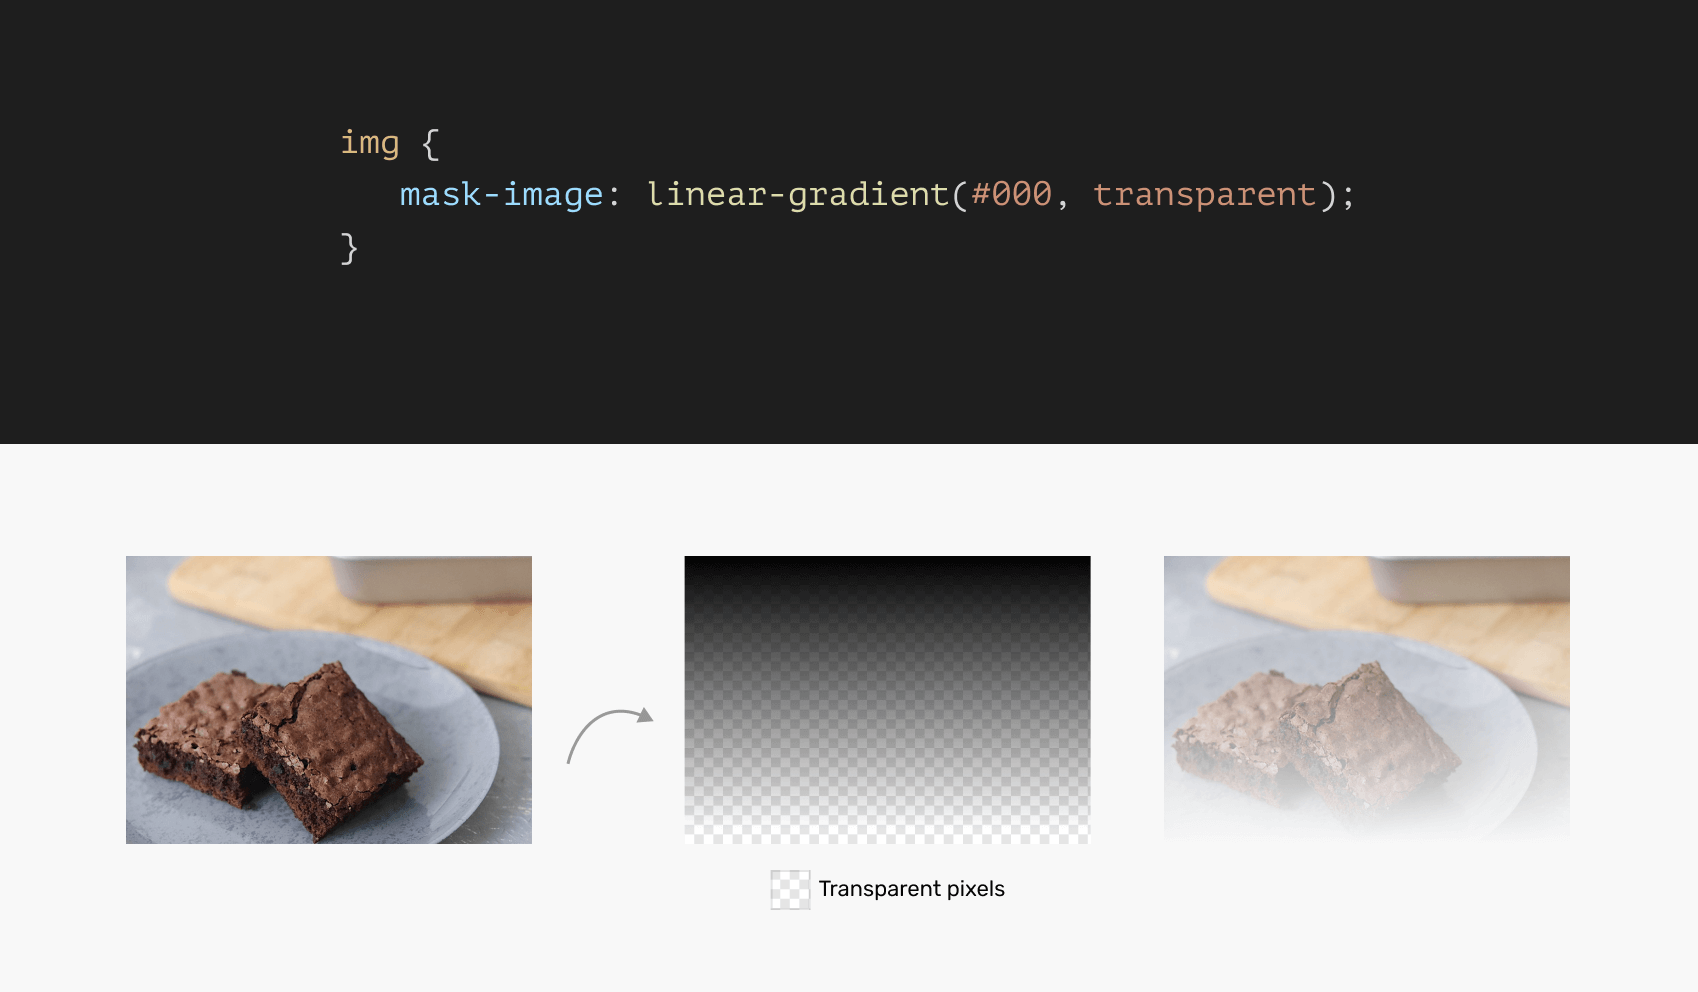
In keeping with MDN:
By default this implies the alpha channel of the masks picture might be multiplied by the alpha channel of the component. This may be managed with the mask-mode property.
Meaning, you should utilize any shade apart from black, and the masks will nonetheless work as a result of the default masking mode is about to alpha (I’ll come again later to this intimately).
img {
  mask-image: linear-gradient(crimson, clear);
}
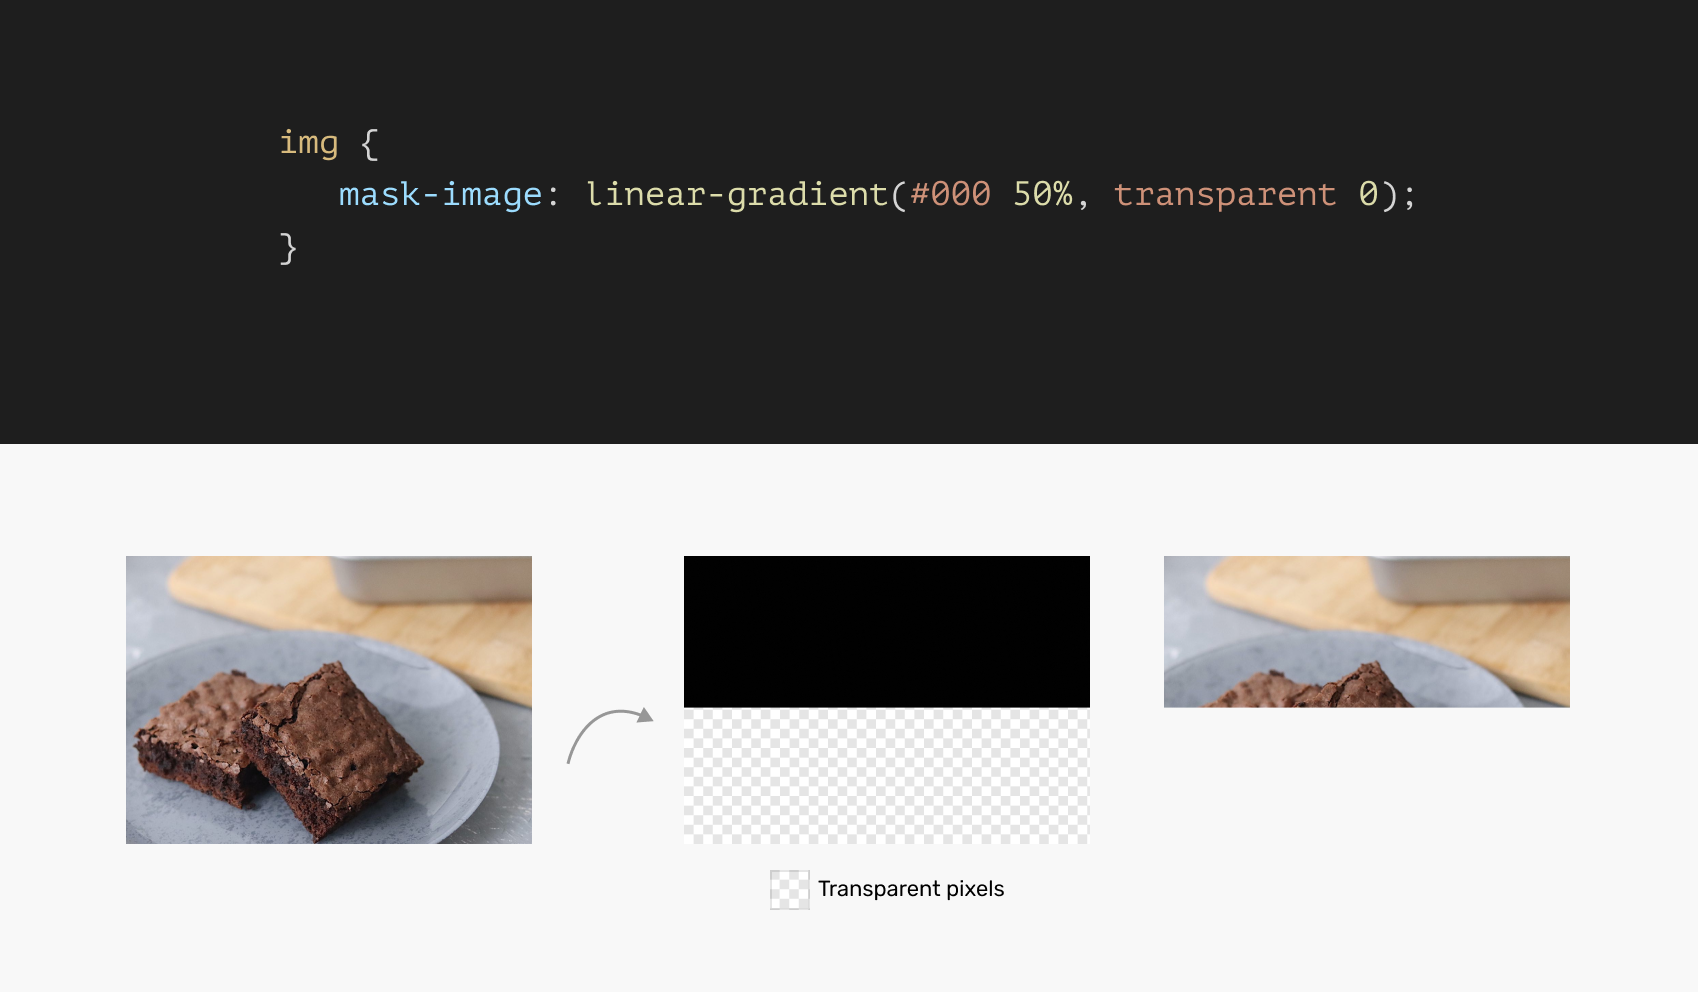
Once more, the idea of masking is {that a} clear pixel might be hidden. Here’s a simplified instance of a gradient with onerous shade stops:
img {
  mask-image: linear-gradient(#000 50%, clear 0);
}
Cool! Now that the core masking ideas are clear (I hope so), let’s discover just a few sensible use circumstances for CSS masks.
Sensible use circumstances & examples
Fading a picture
An attention-grabbing utilization of masking is once we wish to fade a picture and make it mix with the background beneath it.
Think about the next determine:
css-masking-use-case-fade-image-light.png
On the first look, you would possibly take into consideration including a gradient with the identical shade because the background. One thing like this:
.hero__thumb:after {
  place: absolute;
  inset: 0;
  background: linear-gradient(to prime, #f1f1f1, clear);
}
Whereas this would possibly work, it’ll fail when the primary background shade is modified. Discover how the hero picture has a tough cease now:

With CSS masking, we are able to masks the hero picture and make it work with any background shade.
.hero__thumb {
  mask-image: linear-gradient(#000, clear);
}
That’s it! Now the fade-out impact is actual, and gained’t fail when the primary web page background is modified. See the next instance:
Masking textual content content material: instance 1
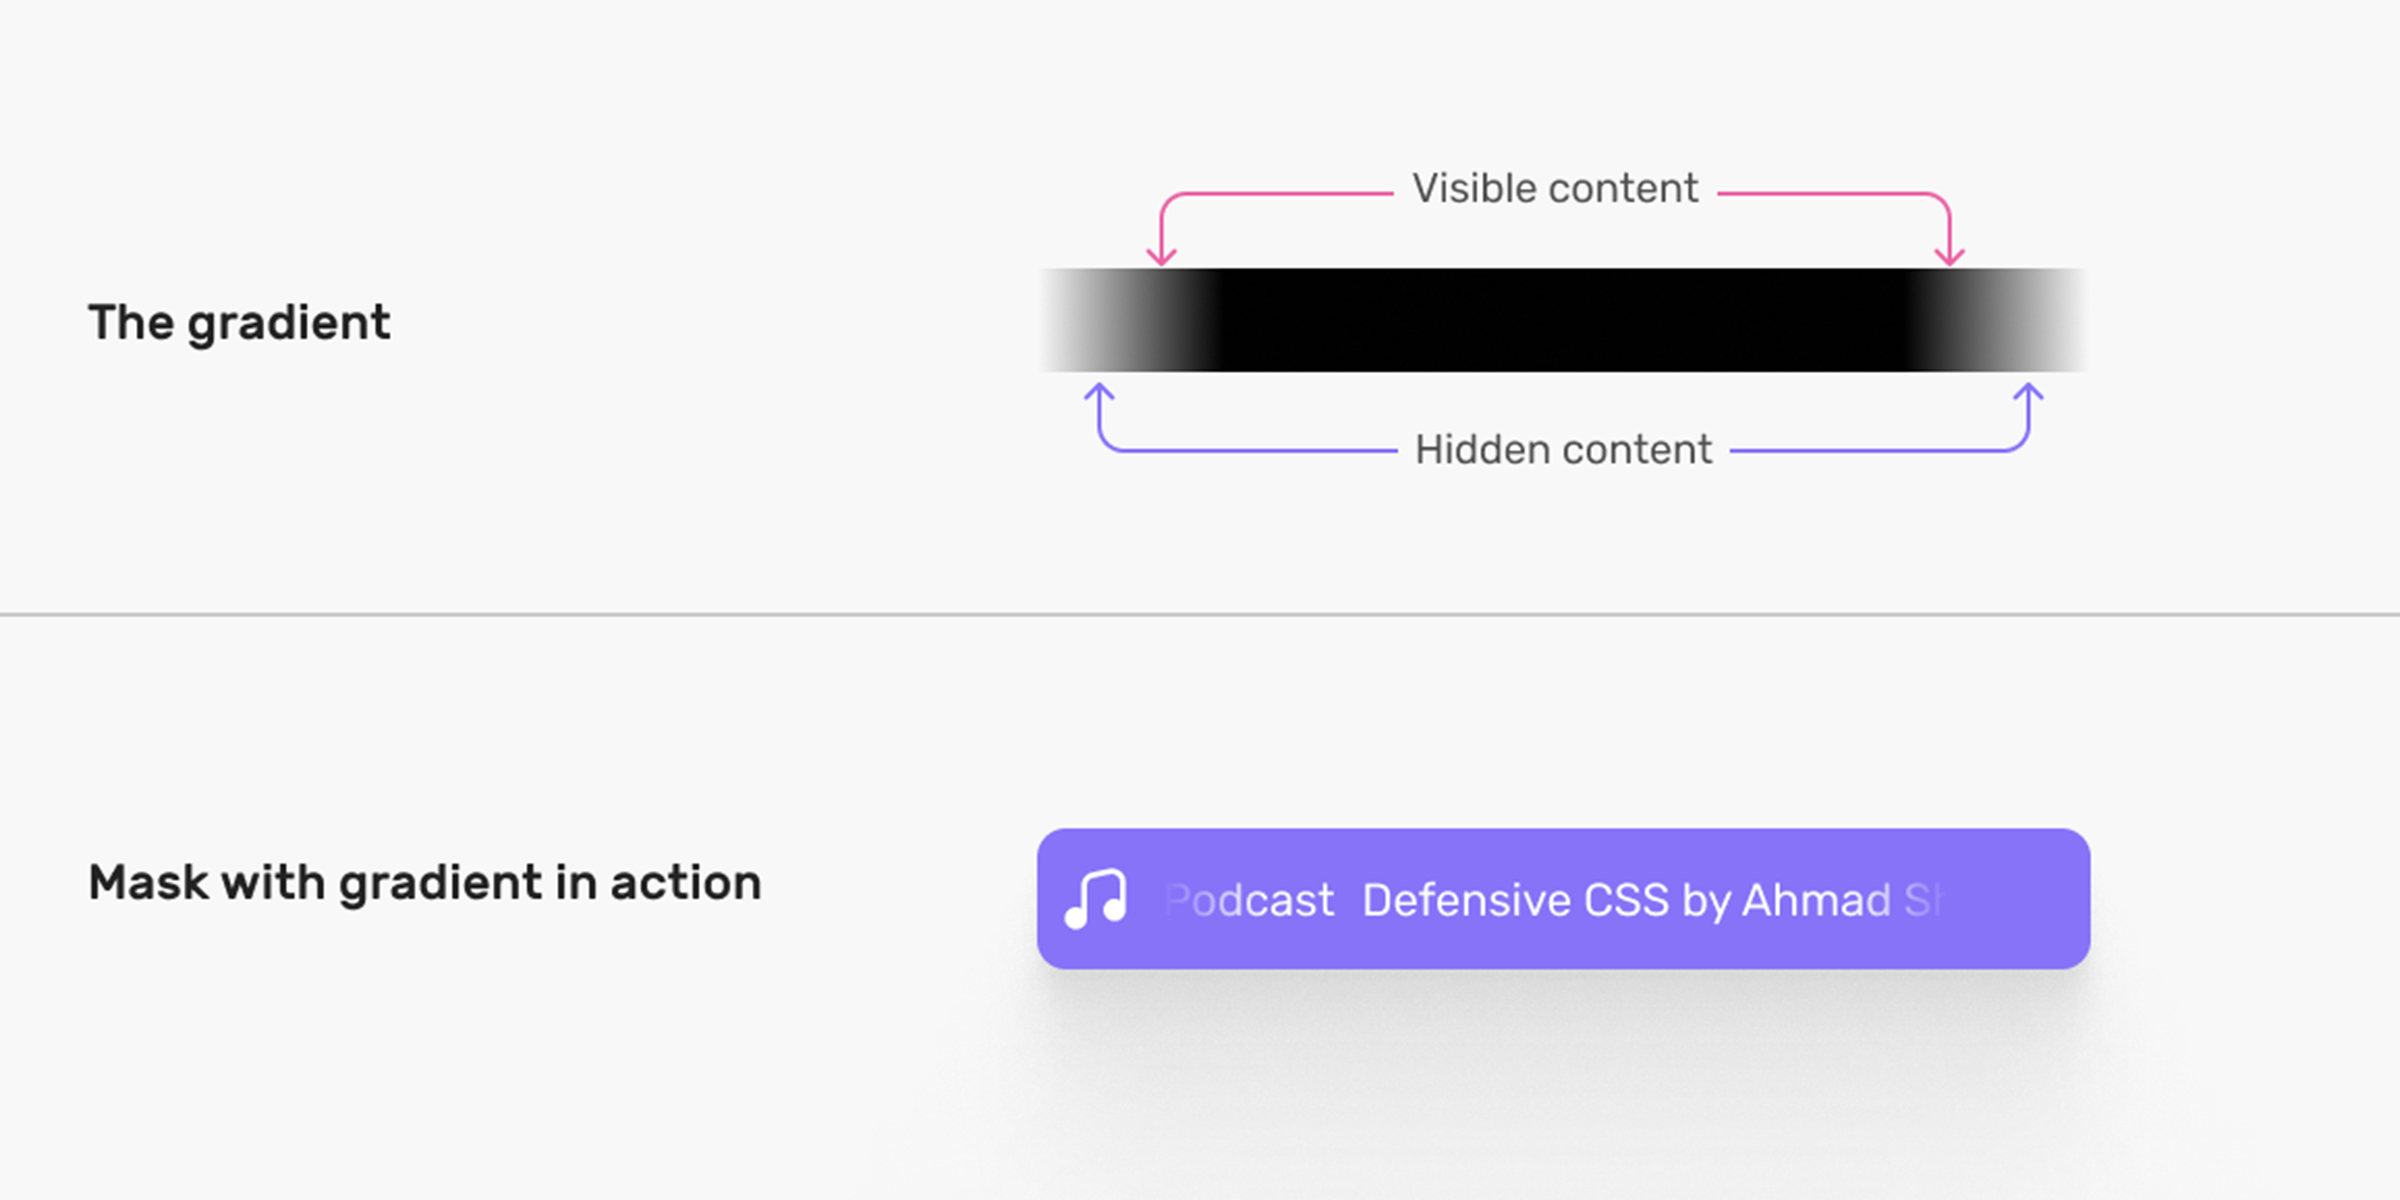
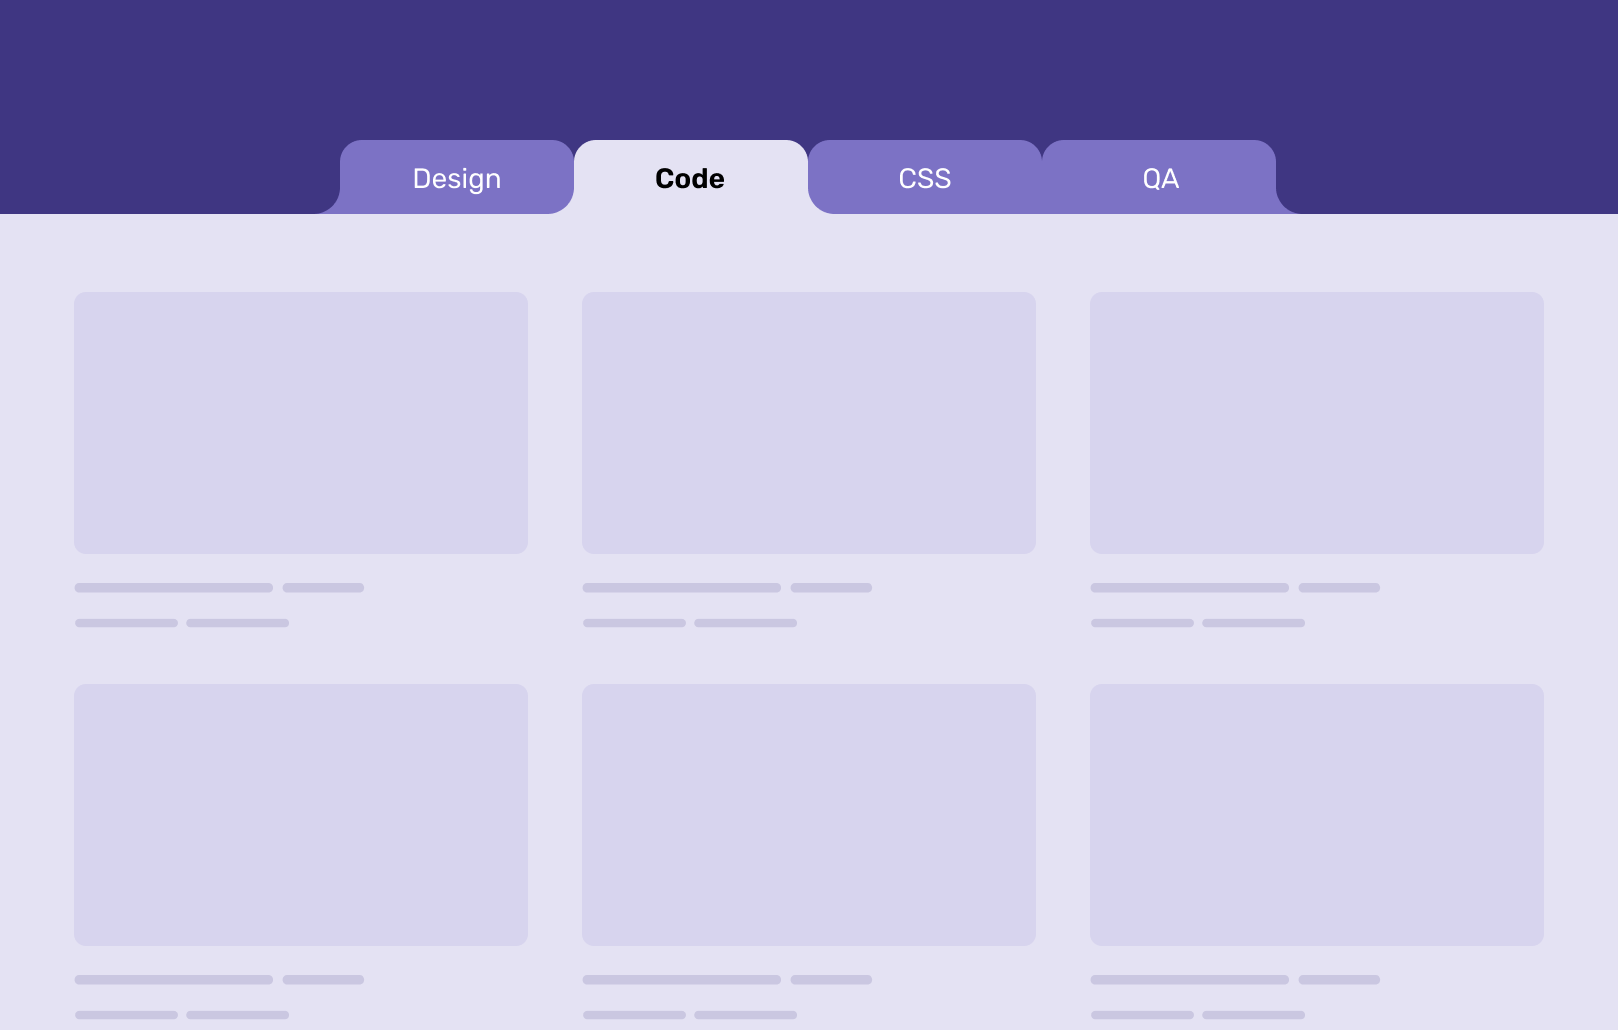
After we wish to show a protracted textual content however the house isn’t sufficient to show it in full, an answer can be to fade out the textual content at each the start and finish. Then, the textual content will animate in both course to point out the remaining content material.
Think about the next determine:
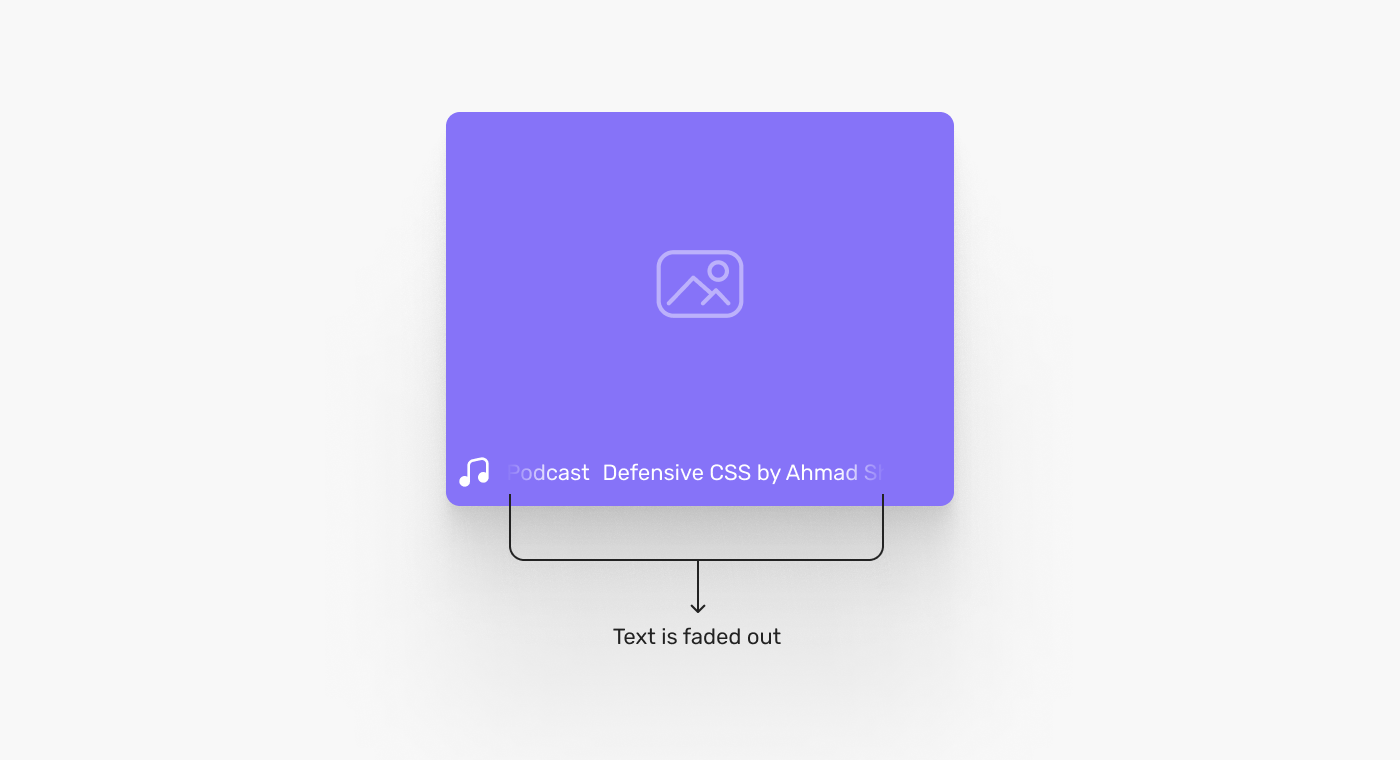
Once more, utilizing the hack of a gradient gained’t work as a result of the background beneath the content material will change. It may be a strong shade or a picture.
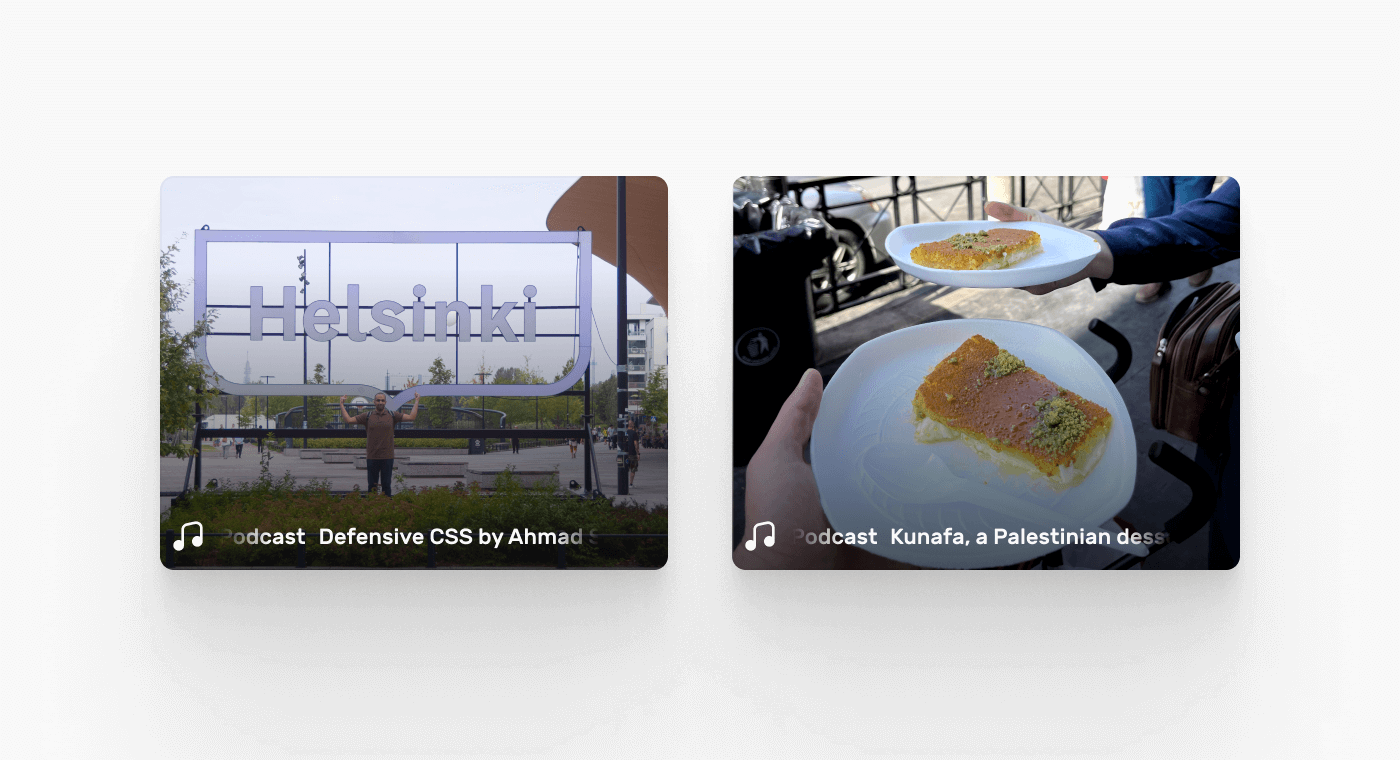
To implement that in CSS, we have to add a gradient masks that fades out the content material firstly and the tip.
I like to try this in CSS gradients first and see the end result, then apply it as a masks. That helps in visualizing the gradient earlier than utilizing it as a masks.
.c-card__footer {
  background-image: linear-gradient(
    90deg,
    clear,
    #000 15%,
    #000 85%,
    clear 100%
  );
}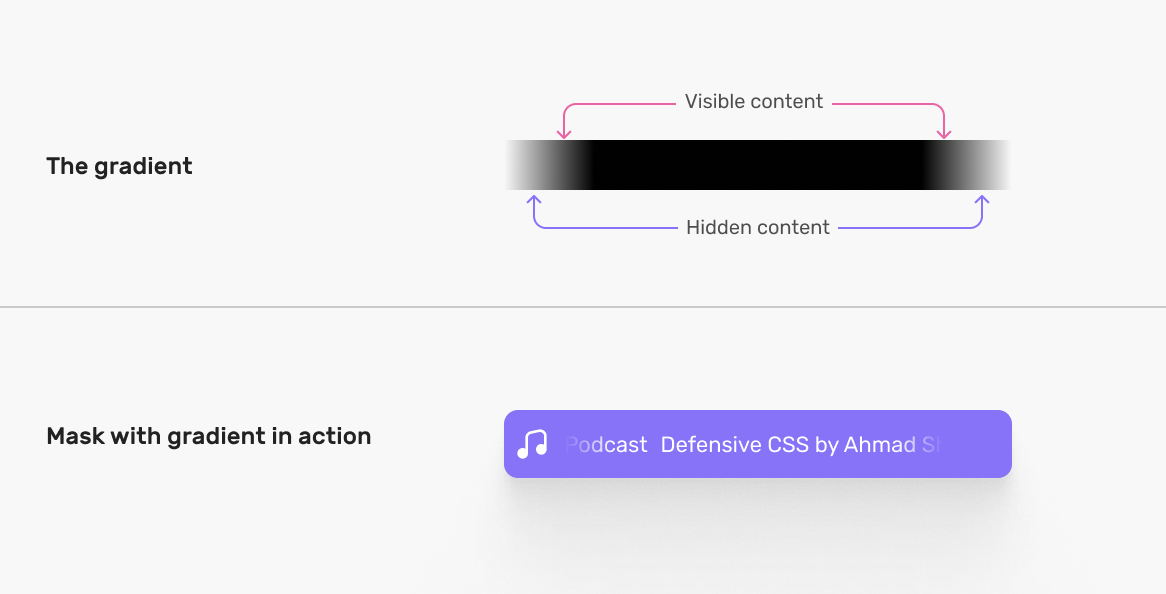
With the above in hand, we are able to apply it as masks.
.c-card__footer {
  mask-image: linear-gradient(
    90deg,
    clear,
    #000 15%,
    #000 85%,
    clear 100%
  );
}
Nonetheless not excellent? We are able to tinker with the gradient values till the result’s excellent.
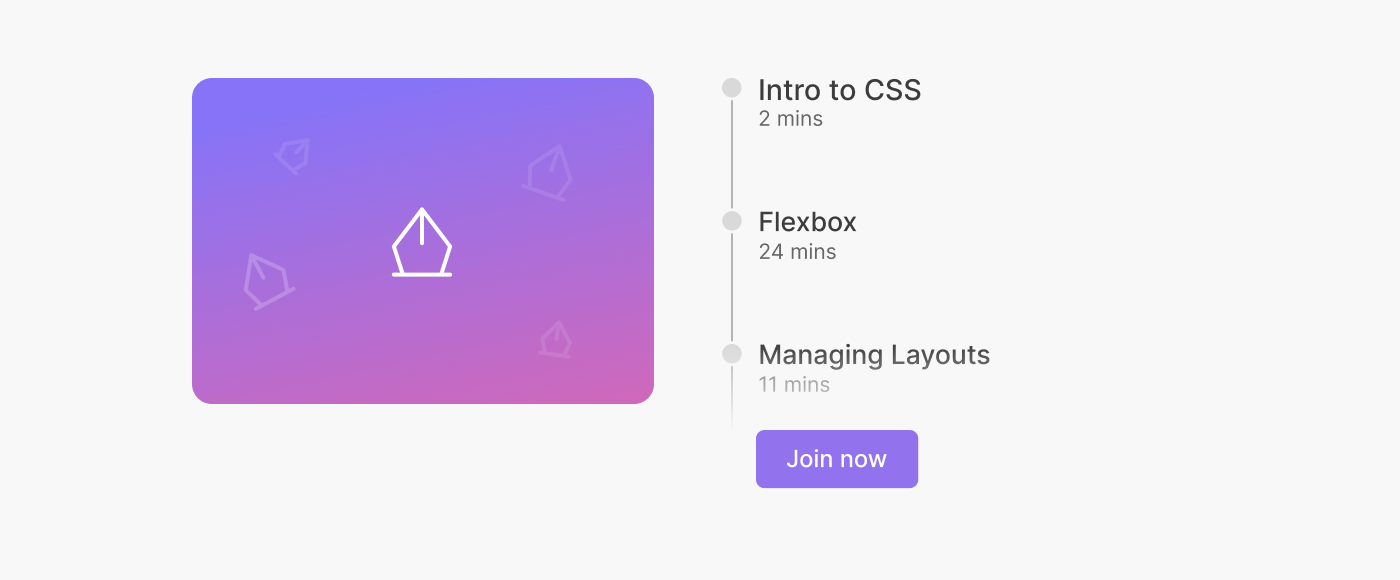
Masking textual content content material: instance 2
This is identical because the earlier instance however utilized vertically. I’ve seen this in reside movies on Instagram.
Think about the next determine:
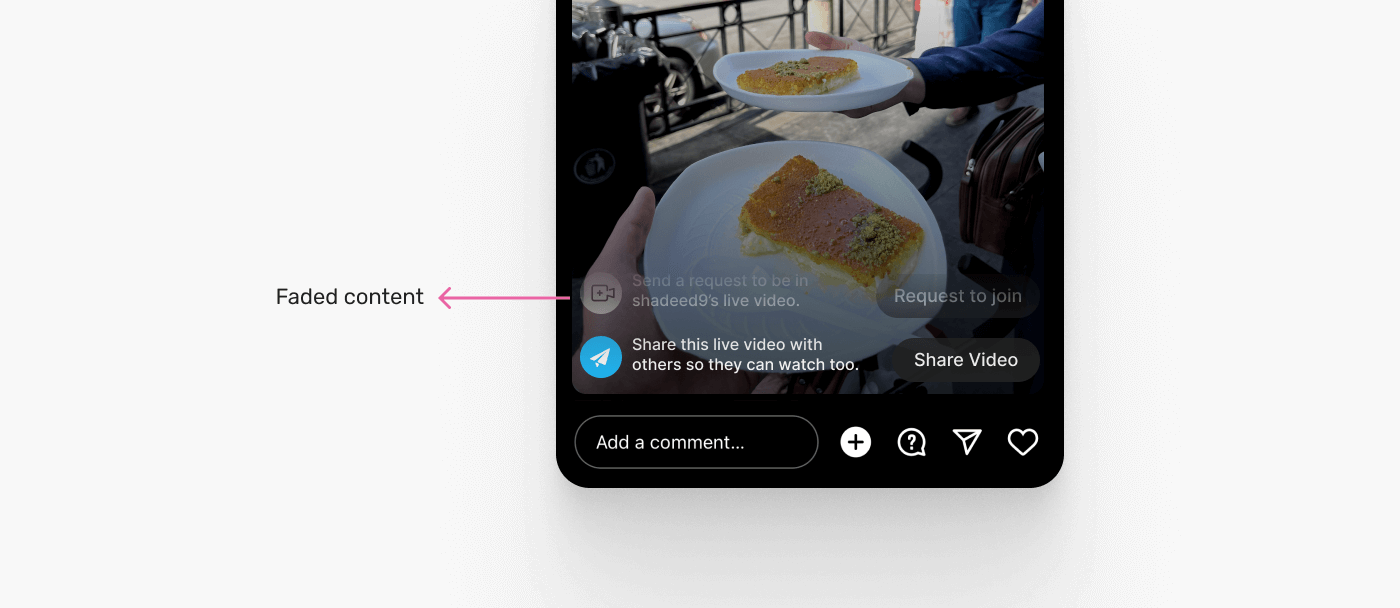
Discover how the content material is being washed out from the highest? This little place can have the feed feedback, actions, and different issues. Utilizing a CSS masks is ideal for that.
First, let’s check out the gradient.
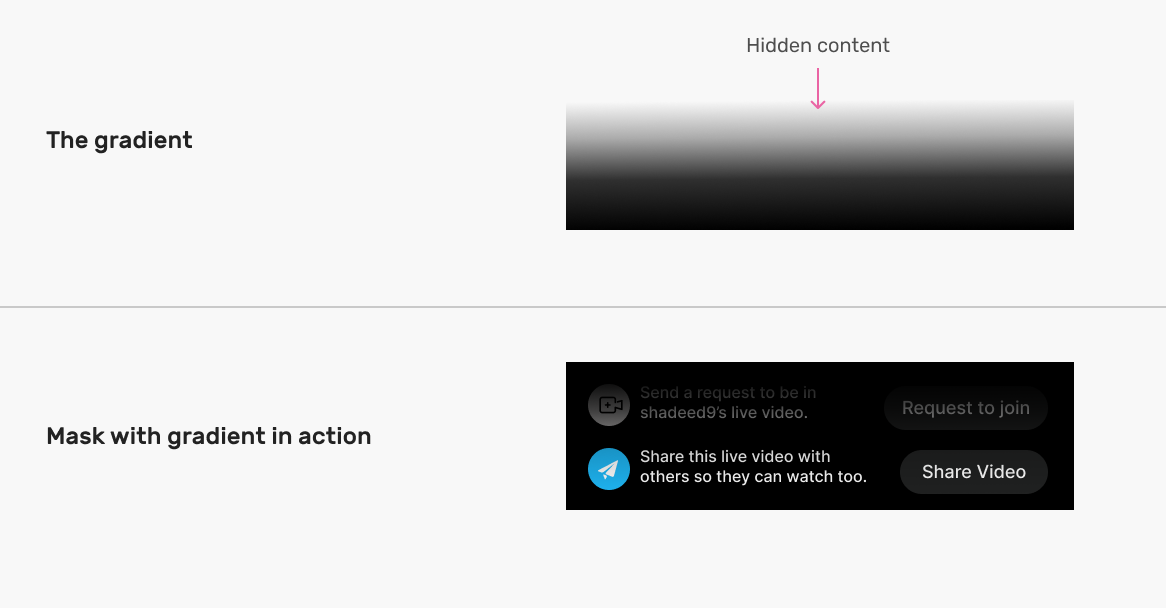
In CSS, it may be one thing like this:
.whatever-the-class-name {
  mask-image: linear-gradient(to backside, clear, #000);
}
Masking lists
I noticed this cool instance by Scott Tolinski whereas doing my analysis on CSS masks. The concept is that we now have a listing of options, classes, or no matter it’s. We wish to fade out the textual content to make the person extra interested in what’s in there.
Think about the next instance:
As you see on the left, we now have a listing, and on the very backside, it’s light out. Utilizing CSS masking for that’s excellent, as it might mix with the beneath background, be it a picture, or a darkish background.
Let’s check out the masks gradient to grasp the way it works.
In CSS, it appears to be like like this:
.listing {
  mask-image: linear-gradient(to backside, #000, clear 95%);
}
Fascinating picture results
With CSS masking and gradients, the probabilities to create visible results are limitless. This can be a easy instance of how we are able to create a visible impact for a picture.
Here’s a fast design that I made for this demo.

The picture impact you see consists of 5 linear gradients. By including completely different positions to every one, we are able to one thing related.
Let’s take a more in-depth take a look at the gradient:
.thumb {
  mask-image: linear-gradient(to backside, #000, #000), linear-gradient(
      to backside,
      #000,
      #000
    ), linear-gradient(to backside, #000, #000), linear-gradient(
      to backside,
      #000,
      #000
    ), linear-gradient(to backside, #000, #000);
  mask-size: 18% 70%;
  mask-position: 0 100%, 25% 25%, 50% 50%, 75% 0, 100% 50%;
  mask-repeat: no-repeat;
}
Visually, the masks appears to be like like this:

To create the fading impact on every rectangle of the masks, we have to replace every gradient and embrace the clear key phrase.
.thumb {
  mask-image: linear-gradient(to backside, clear, #000),
    linear-gradient(to backside, #000, clear), linear-gradient(
      to backside,
      clear,
      #000
    ), linear-gradient(to backside, #000, clear), linear-gradient(to
        backside, clear, #000);
  mask-size: 18% 70%;
  mask-position: 0 100%, 25% 25%, 50% 50%, 75% 0, 100% 50%;
  mask-repeat: no-repeat;
}
We are able to additionally animate the masks measurement or place on hover.
That is highly effective. Think about combing that with a scroll-based animation. Issues can go uncontrolled (in a pleasant means, although).
Spherical out tabs
I considered making an attempt CSS masks for a UI deal with referred to as Spherical out corners.
The concept is that we wish to spherical out the perimeters of a component in a means that mix with the border-radius the component has.
On this weblog put up, Chris Coyier defined a trick for reaching that through the use of a number of pseudo-elements. A extra dynamic resolution can be through the use of a CSS masks.
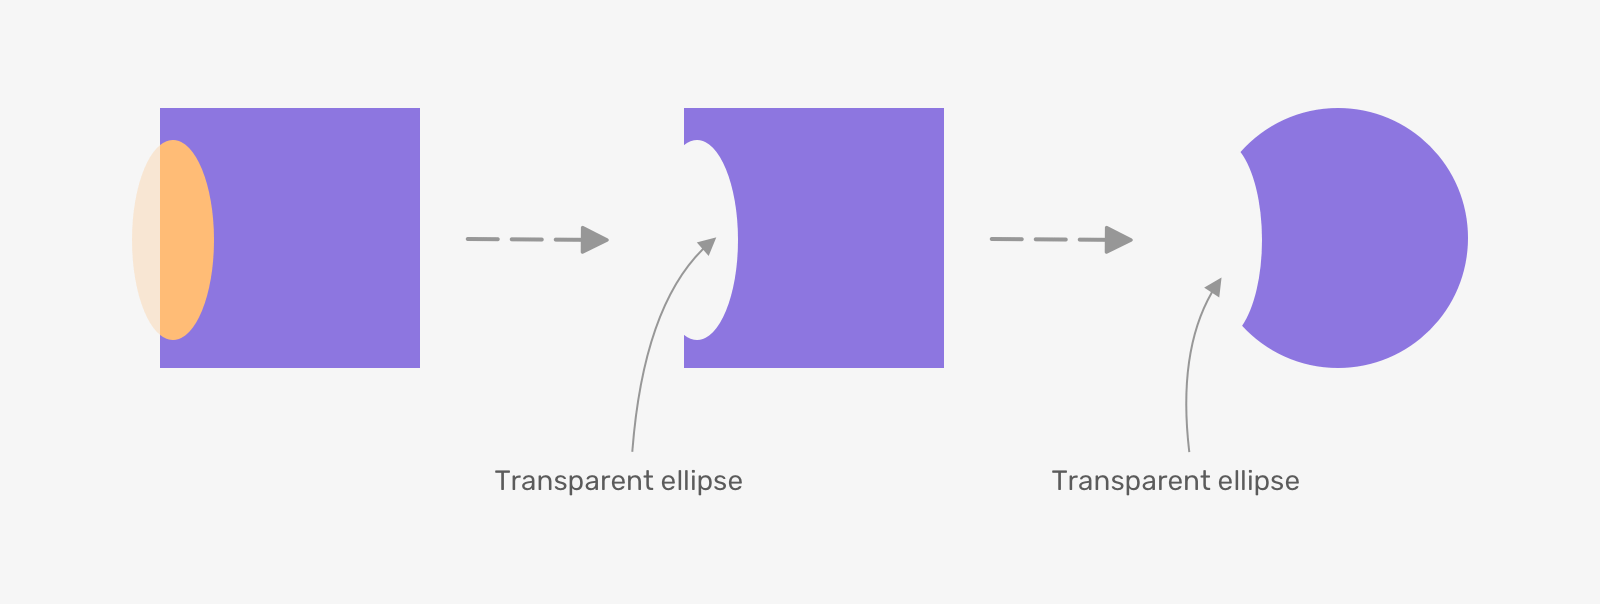
First, let’s take a more in-depth take a look at the form that I wish to obtain.
The form consists of a sq. and a circle. What we want is the intersection of them.
The best way to obtain that? We are able to use multiple-layer masks together with the mask-composite property to carry out a composting operation on them.
First, we have to create a component to carry the masks.
.nav-item.lively:earlier than {
  content material: "";
  place: absolute;
  left: 100%;
  backside: 0;
  width: 24px;
  peak: 24px;
  background-color: var(--active-bg);
}
Inside that house, we have to draw a circle and a sq. to composite them. Fortunately, we are able to do this by mixing linear and radial gradients.
.nav-item.lively:earlier than {
  content material: "";
  place: absolute;
  left: 100%;
  backside: 0;
  width: 24px;
  peak: 24px;
  background-color: var(--active-bg);
  background-image: linear-gradient(to prime, #000, #000),
    radial-gradient(circle 15px at heart, #000 80%, clear 81%);
  background-size: 12px 12px, 100%;
  background-position: backside left, heart;
  background-repeat: no-repeat, repeat;
}
Discover the next:
- I added
12px 12pxas a measurement for the sq.. - The sq. is positioned on the
backside leftnook. - No background-repeat is required for the sq. form.

The above is simply to visually illustrate how the 2 gradients will appear like. The following step is to make them! In CSS masking, we are able to use the mask-composite property to composite two shapes.
.nav-item.lively:earlier than {
  content material: "";
  place: absolute;
  left: 100%;
  backside: 0;
  width: 24px;
  peak: 24px;
  background-color: var(--active-bg);
  mask-image: linear-gradient(to prime, crimson, crimson), radial-gradient(circle
        15px at heart, inexperienced 80%, clear 81%);
  mask-size: 12px 12px, 100%;
  mask-position: backside left, heart;
  mask-repeat: no-repeat, repeat;
  mask-composite: subtract;
}
Right here is the results of the above:
The above was the CSS for the form on the best aspect. For the opposite one, we are able to merely change the mask-position and it’ll flip.
.nav-item.lively:after {

  mask-position: backside proper, heart;
}A number of avatars cut-out
In my article concerning the cut-out impact, I explored other ways to create a cut-out in CSS.
One of many examples was good for CSS masking.
With CSS masking, we are able to use a radial gradient to attain that impact.
.avatar {
  -webkit-mask-image: radial-gradient(
    ellipse 54px 135px at 11px heart,
    #0000 30px,
    #000 0
  );
}
I extremely advocate giving the article a learn as there are loads of detailed examples like that one.
Outro
Once I began studying extra about masking in CSS, the assets have been restricted. Extra importantly, there have been only a few sensible use circumstances that we are able to use in our day-to-day workflow. I hope that by the tip of this text, you now have an thought of the place to make use of CSS masking in your subsequent challenge.
By the best way, I didn’t go deep into properties like mask-mode, as a result of I actually didn’t discover an issue to unravel with them (till now). I’ll replace the article when I’ve a extra convincing instance of utilizing such a property.
Additional assets
If you wish to sharpen your expertise in much more examples of CSS masking, then you need to take a look on the following:
Thanks for studying.