

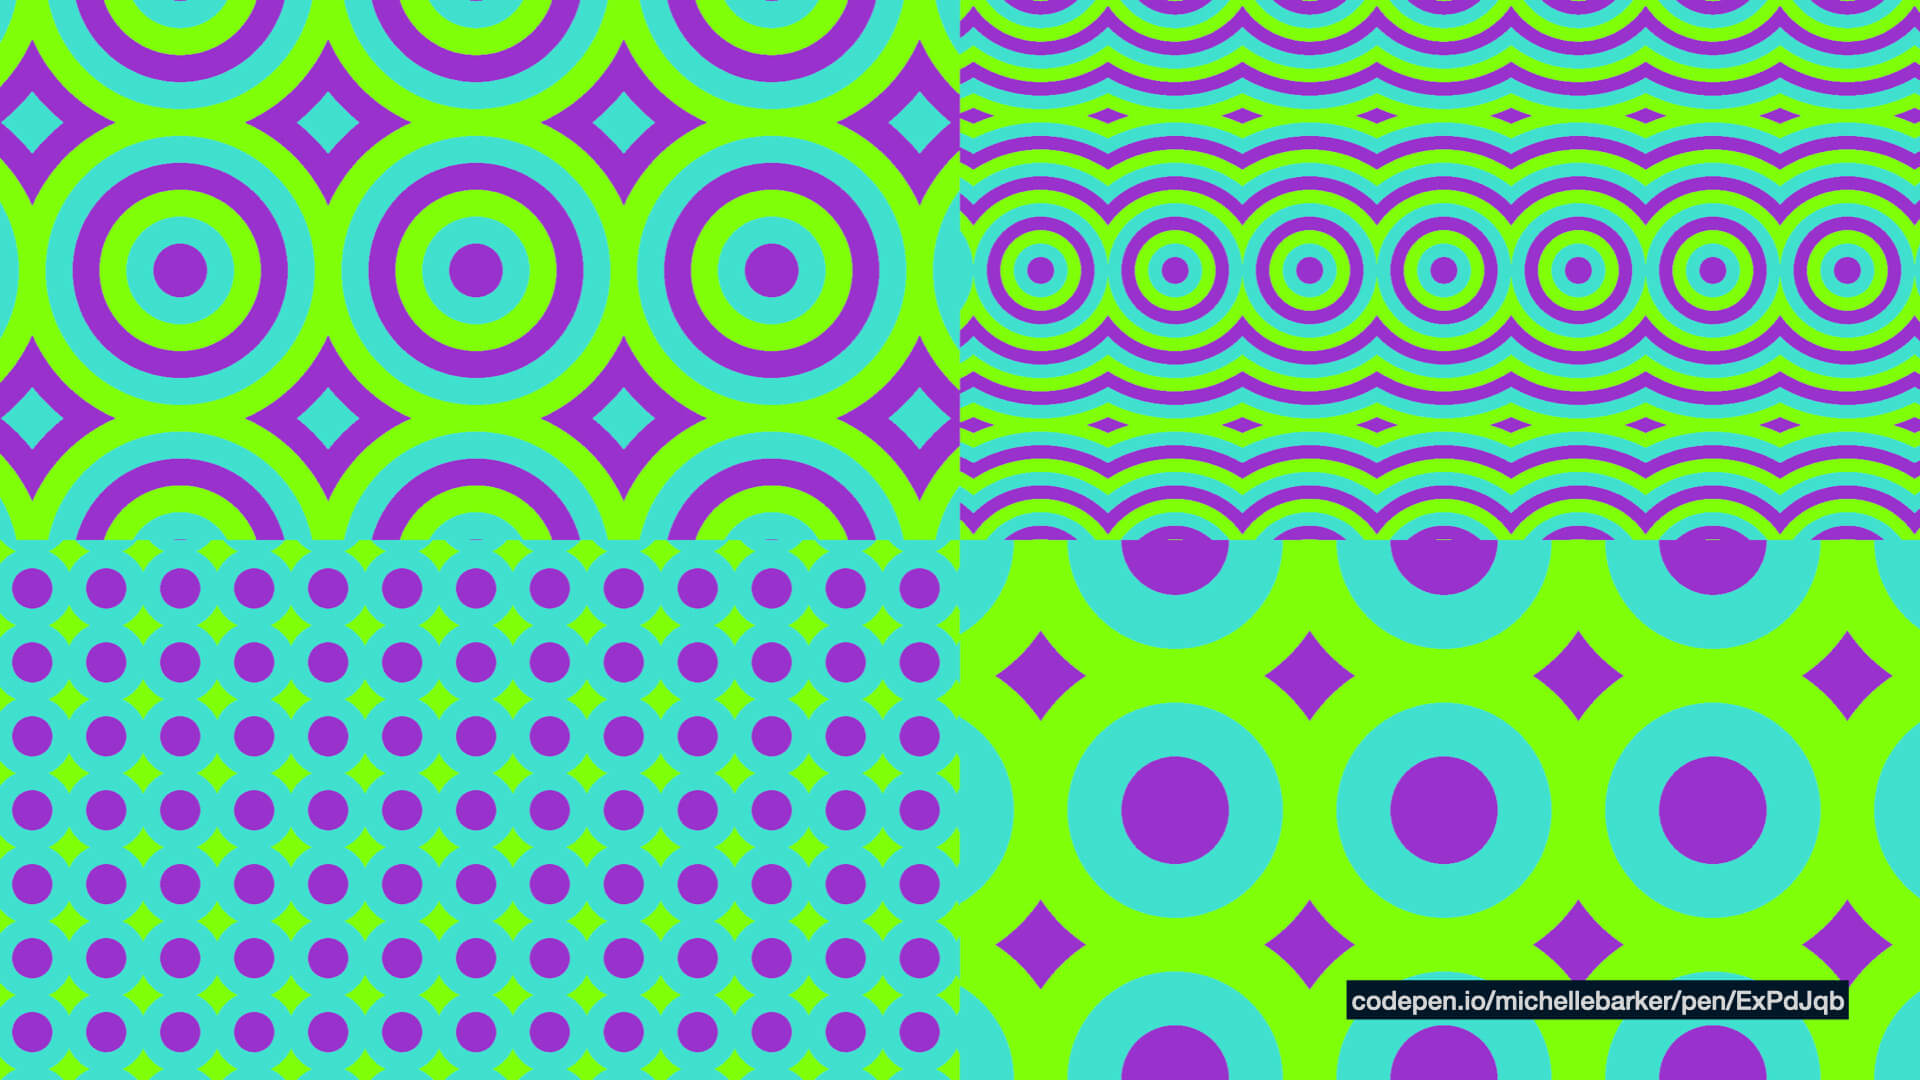
Final month I had the priviledge of giving a chat at Vienna Calling, the net meetup organised by CSS-In-Vienna and Webclerks. Alongside incredible talks by Cassie, Andy, Ramón and Carie, I spoke about how I constructed a current Codepen demo, the Zig-Zag Gradient Lab:
You’ll be able to watch the total speak right here, or learn the transcript (together with some slides and code examples) beneath.
Transcript
Hello, I’m Michelle, I’m a entrance finish developer, and my important passion is messing about with CSS on Codepen and creating pointless demos. I assume that the majority of you understand what Codepen is, however in case you don’t, it’s a entrance finish playground the place you may go all out making enjoyable issues with out worrying about purchasers, or browser assist, all of the issues we love about our jobs. At this time I wish to inform you the story of how I created a current Codepen demo…and all of it begins with gradients.
Lots of people have been redesigning their private web sites just lately. Cassie is one among them – in case you haven’t seen her private web site, it’s unbelievable, go and test it out. And this impressed me, I began eager about methods I may redesign my private web site and convey a bit extra creativity, a bit extra persona. And one of many methods I considered doing this was utilizing background gradients in CSS to make some geometric patterns.
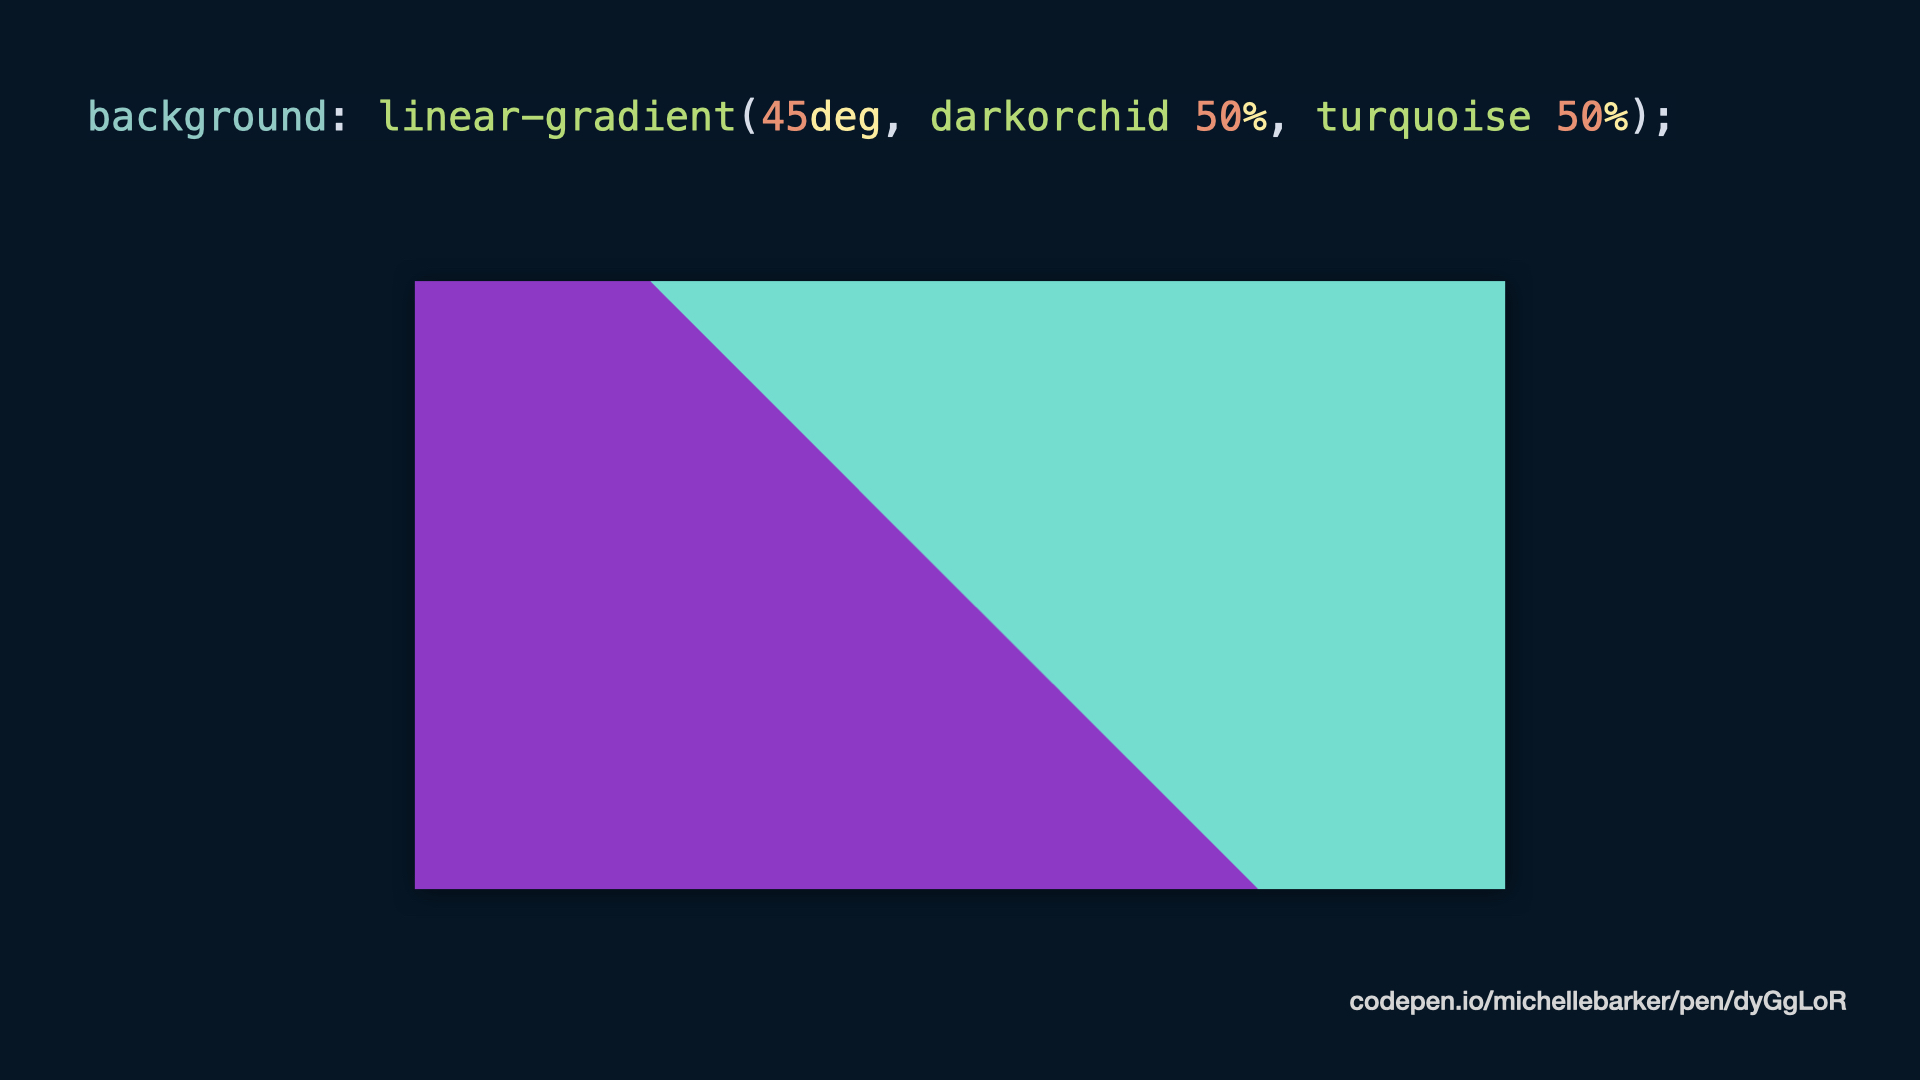
You would possibly already know you could create clear traces with CSS gradients by utilizing arduous color stops. So if we wish to transition between one color and one other with out a fade you should utilize two consecutive color stops with the identical worth. (Fig 01)
.ingredient {
background: linear-gradient(45deg, darkorchid 50%, turquoise 50%);
}
If we set the background-size to a set worth, then that gradient sample goes to repeat, and canopy our background. (Fig 02)
.ingredient {
background: linear-gradient(45deg, darkorchid 50%, turquoise 50%);
background-size: 5rem 5rem;
}
We may do an identical factor with radial gradients to created a noticed sample. Or we may overlay a number of backgrounds [to make more complex patterns]. This demo makes use of a number of gradient backgrounds:
So you will get actually artistic and make some cool patterns simply with gradients.
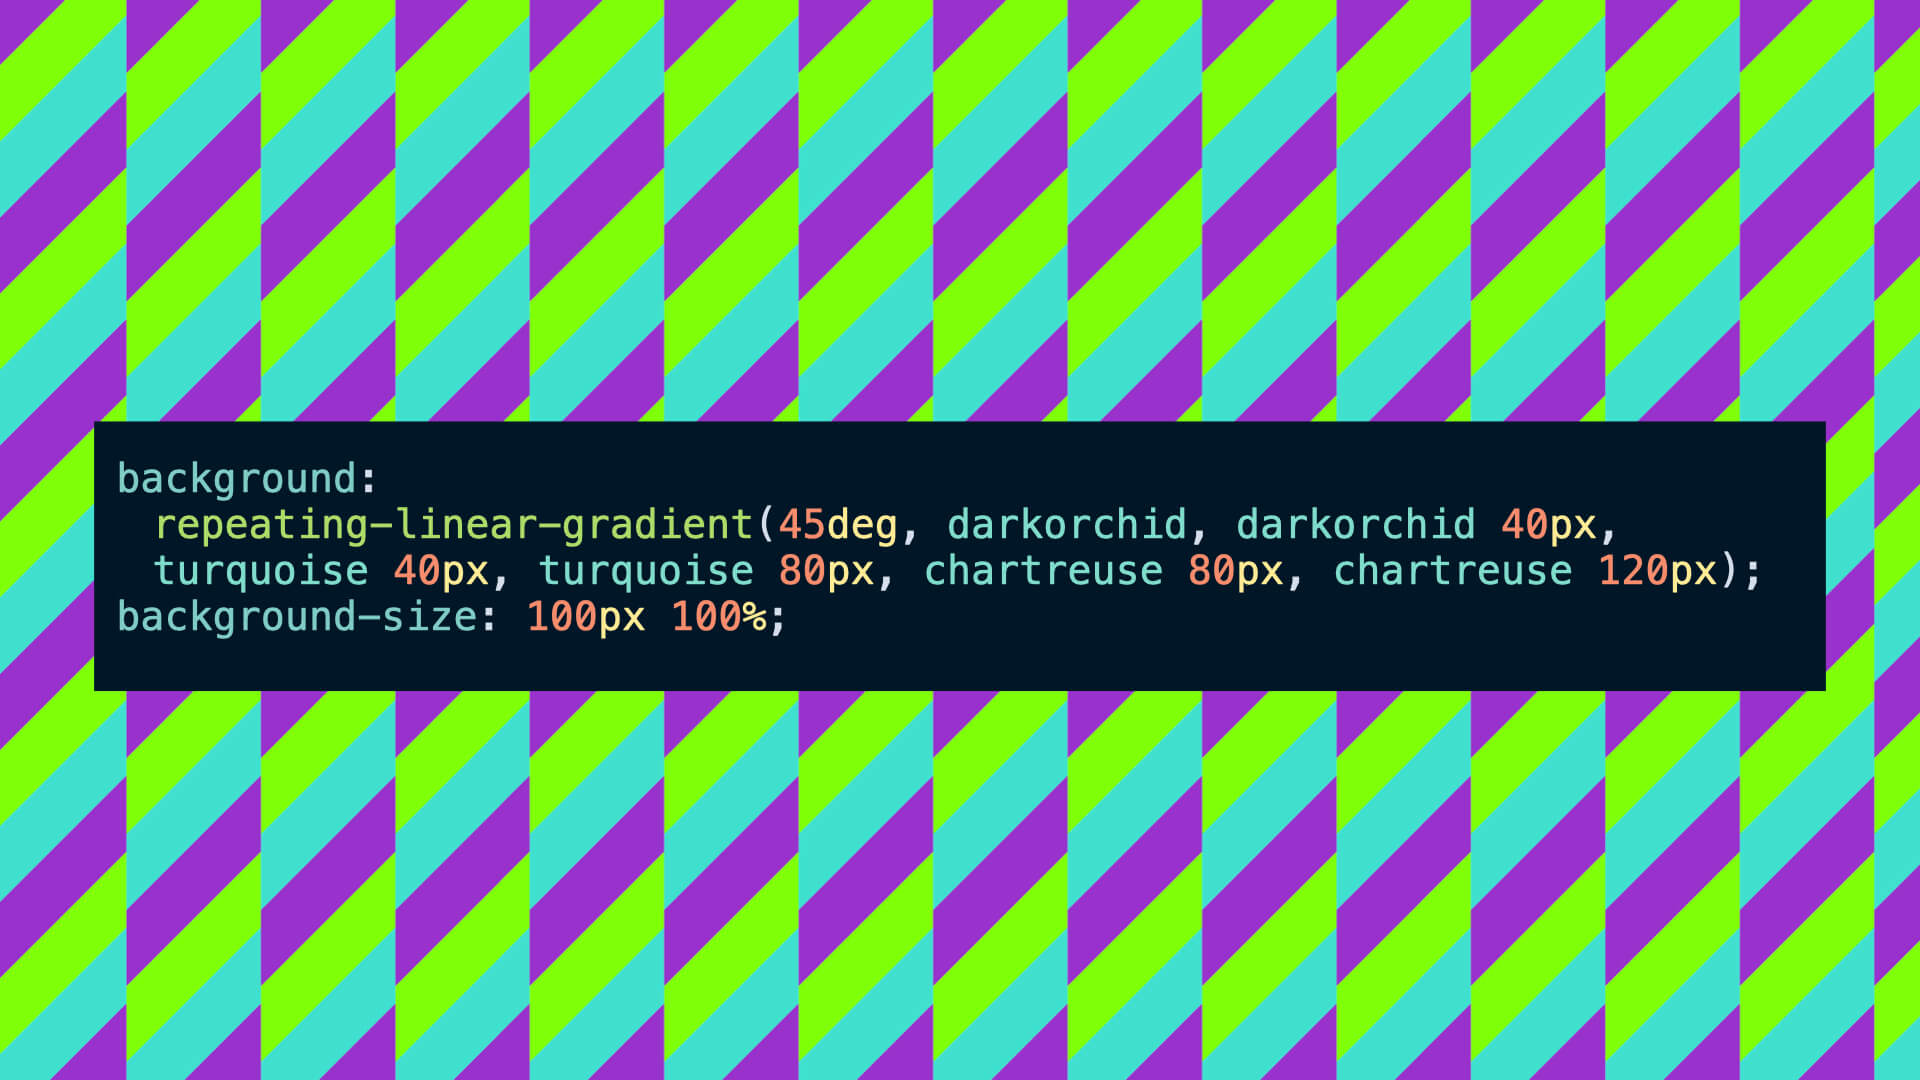
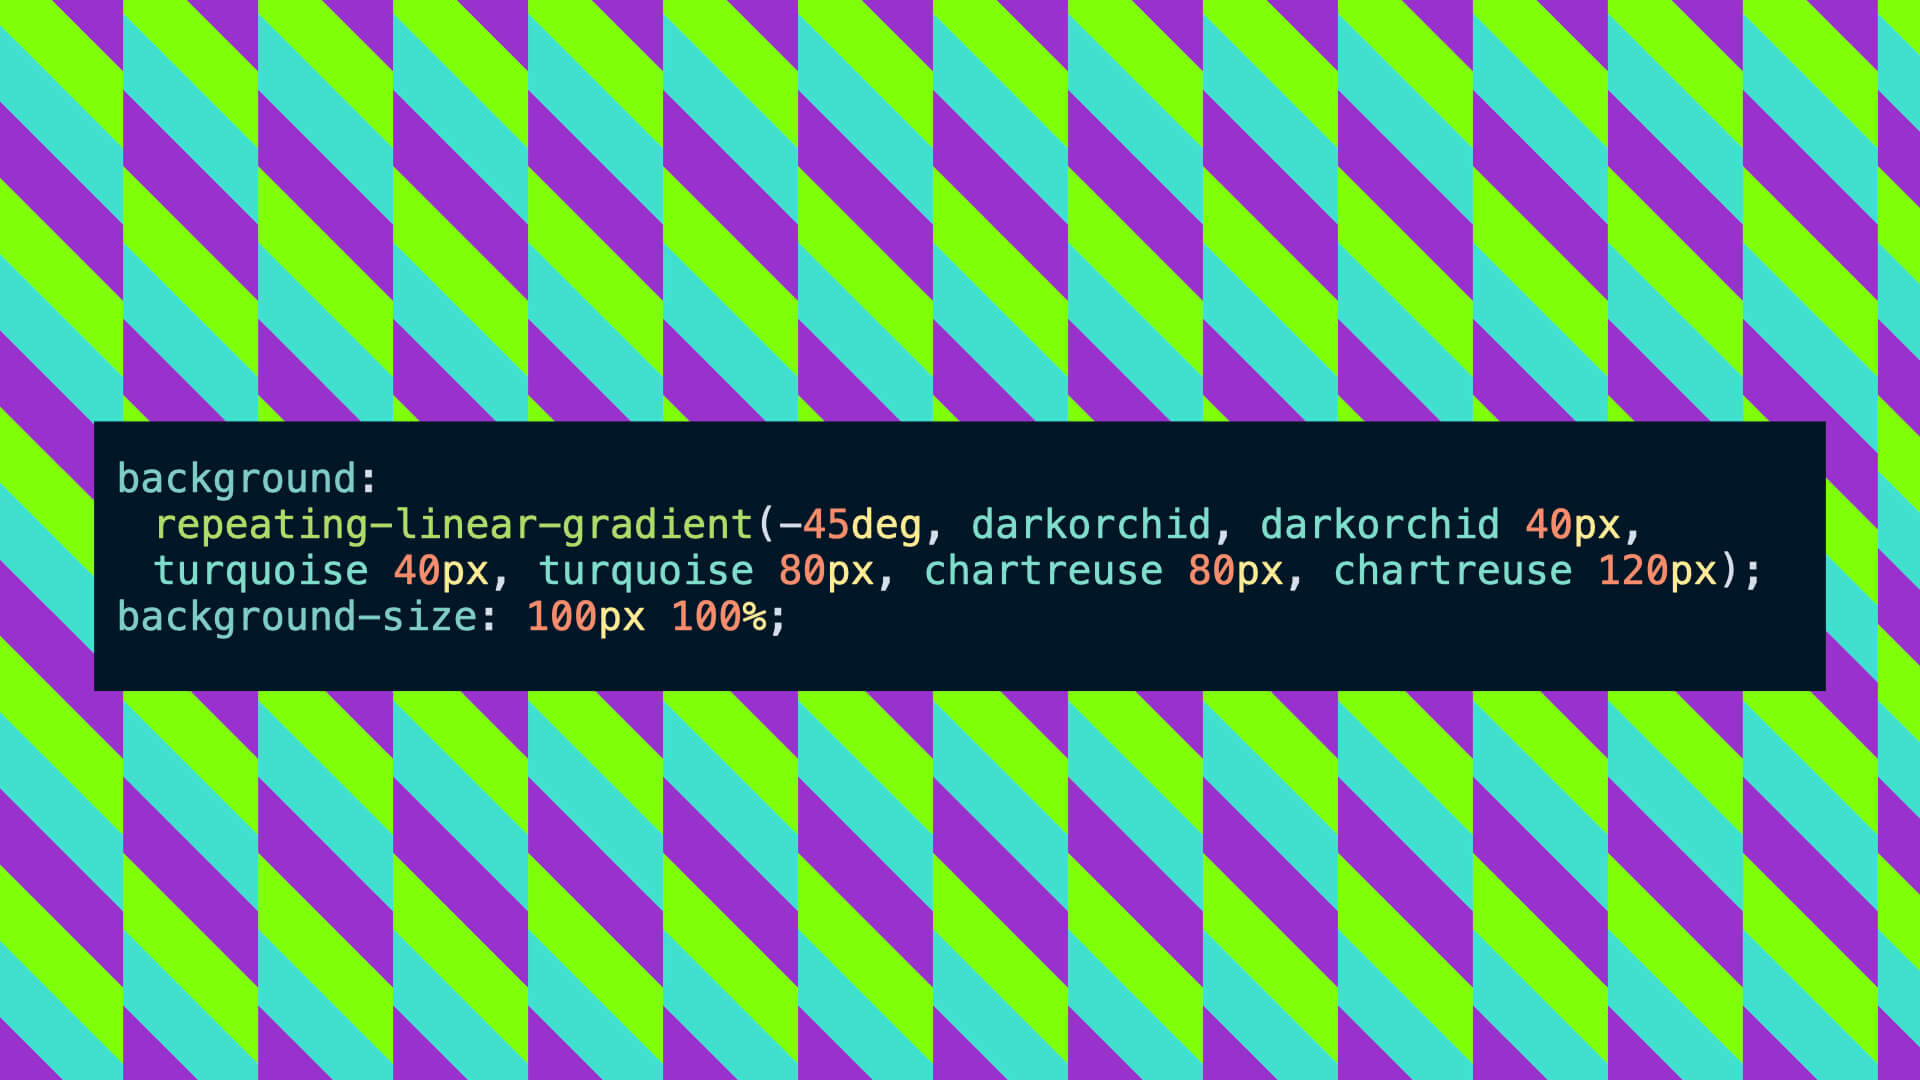
Repeating gradients
Utilizing repeating gradients additionally permit us to supply some actually cool results. So we may have a striped background, with three colors, which simply repeats, we don’t need to set each stripe.
.ingredient {
background: repeating-linear-gradient(
45deg,
darkorchid,
darkorchid 40px,
turquoise 40px,
turquoise 80px,
chartreuse 80px,
chartreuse 120px
);
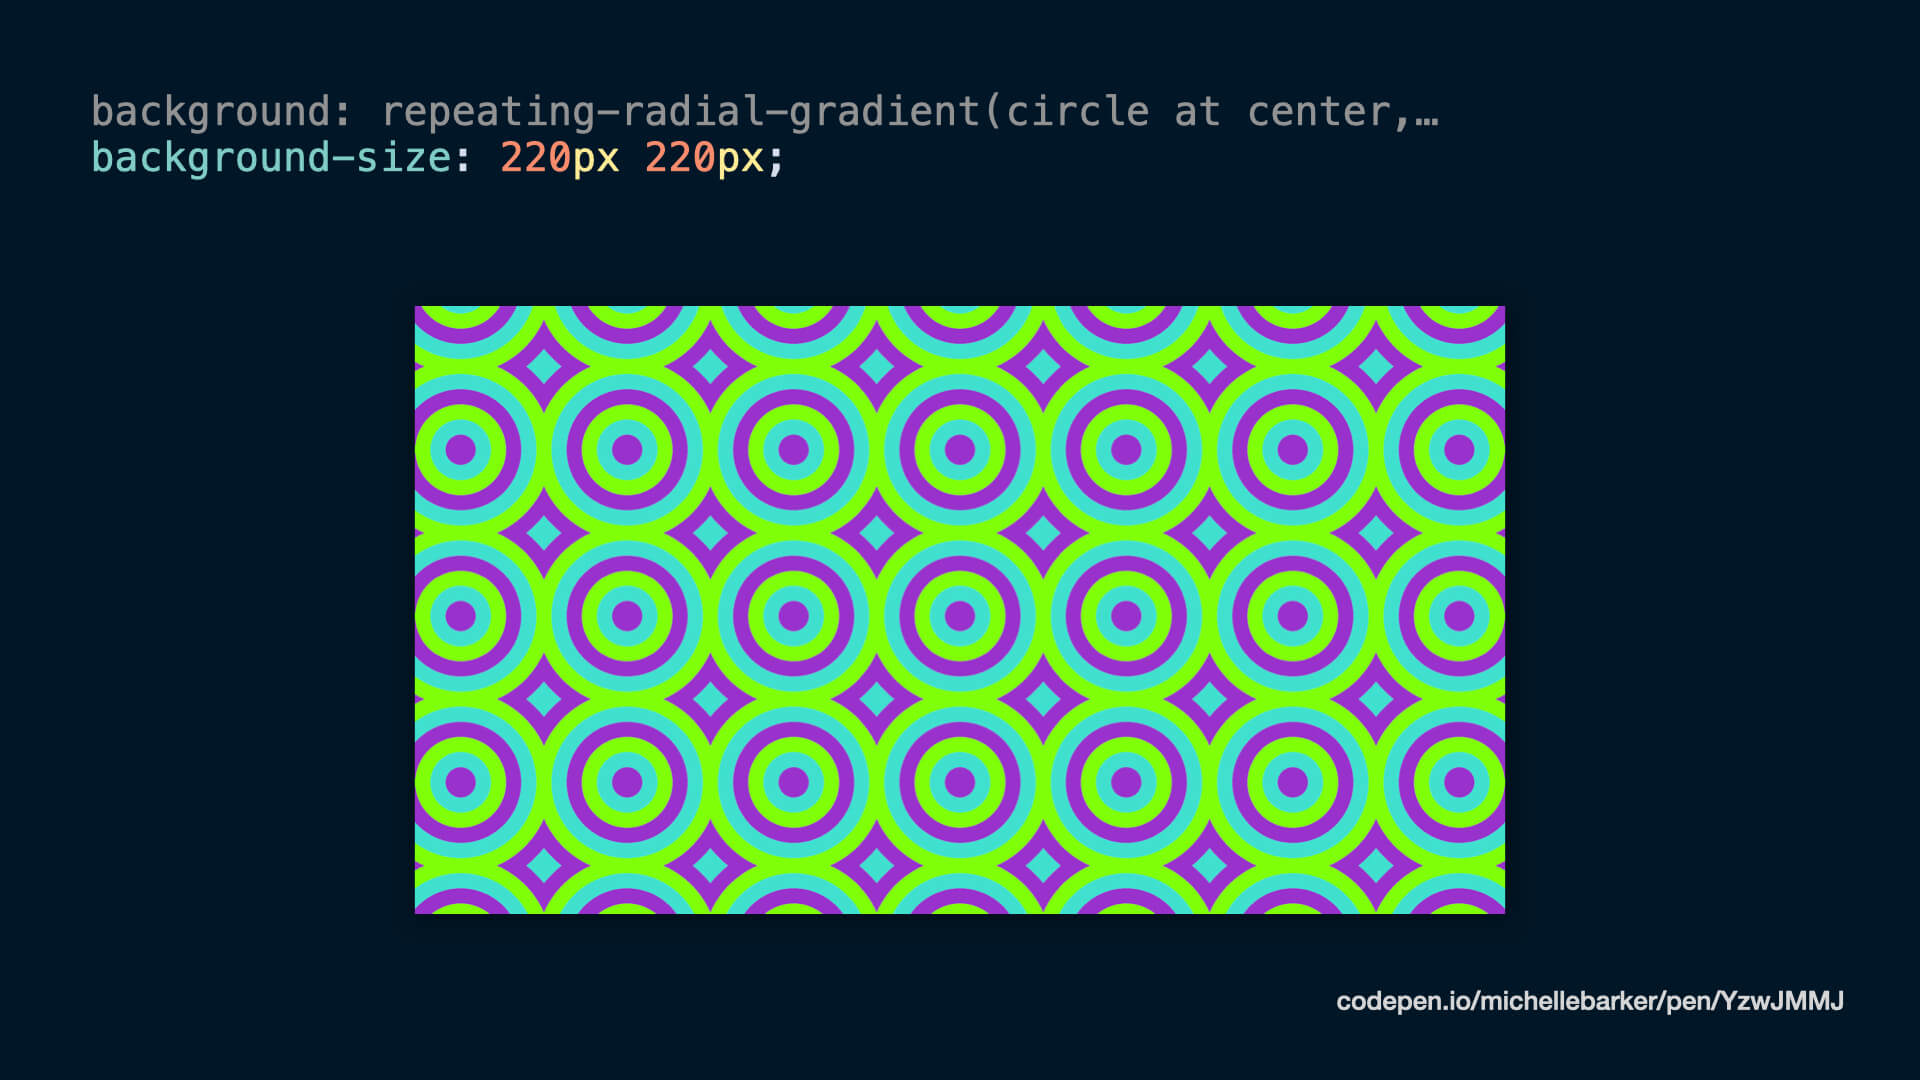
}Or we may use repeating-radial-gradient, which supplies us these concentric circles.
.ingredient {
background: repeating-radial-gradient(
circle at middle,
darkorchid,
darkorchid 40px,
turquoise 40px,
turquoise 80px,
chartreuse 80px,
chartreuse 120px
);
}
Setting a set measurement once more offers us some fairly cool results – our stripes be a part of collectively, and we get this attention-grabbing sample. (Fig 03)
And totally different variations within the background measurement and the thickness of the stripes produce totally different patterns. (Fig 04)
Up to now so good, there are many cool methods I can create geometric patterned backgrounds for my private web site. However there’s one factor I’m actually good at, and that’s procrastination! I nonetheless haven’t even began my private web site. However I believed to myself, “I’d fairly prefer to create a zig-zag background sample”. And I figured somebody, someplace has already carried out this, however this can be a studying train – I wished to work out how I would do it, after which see if there was a greater manner. So how would I do it?
Making a zig-zag gradient sample
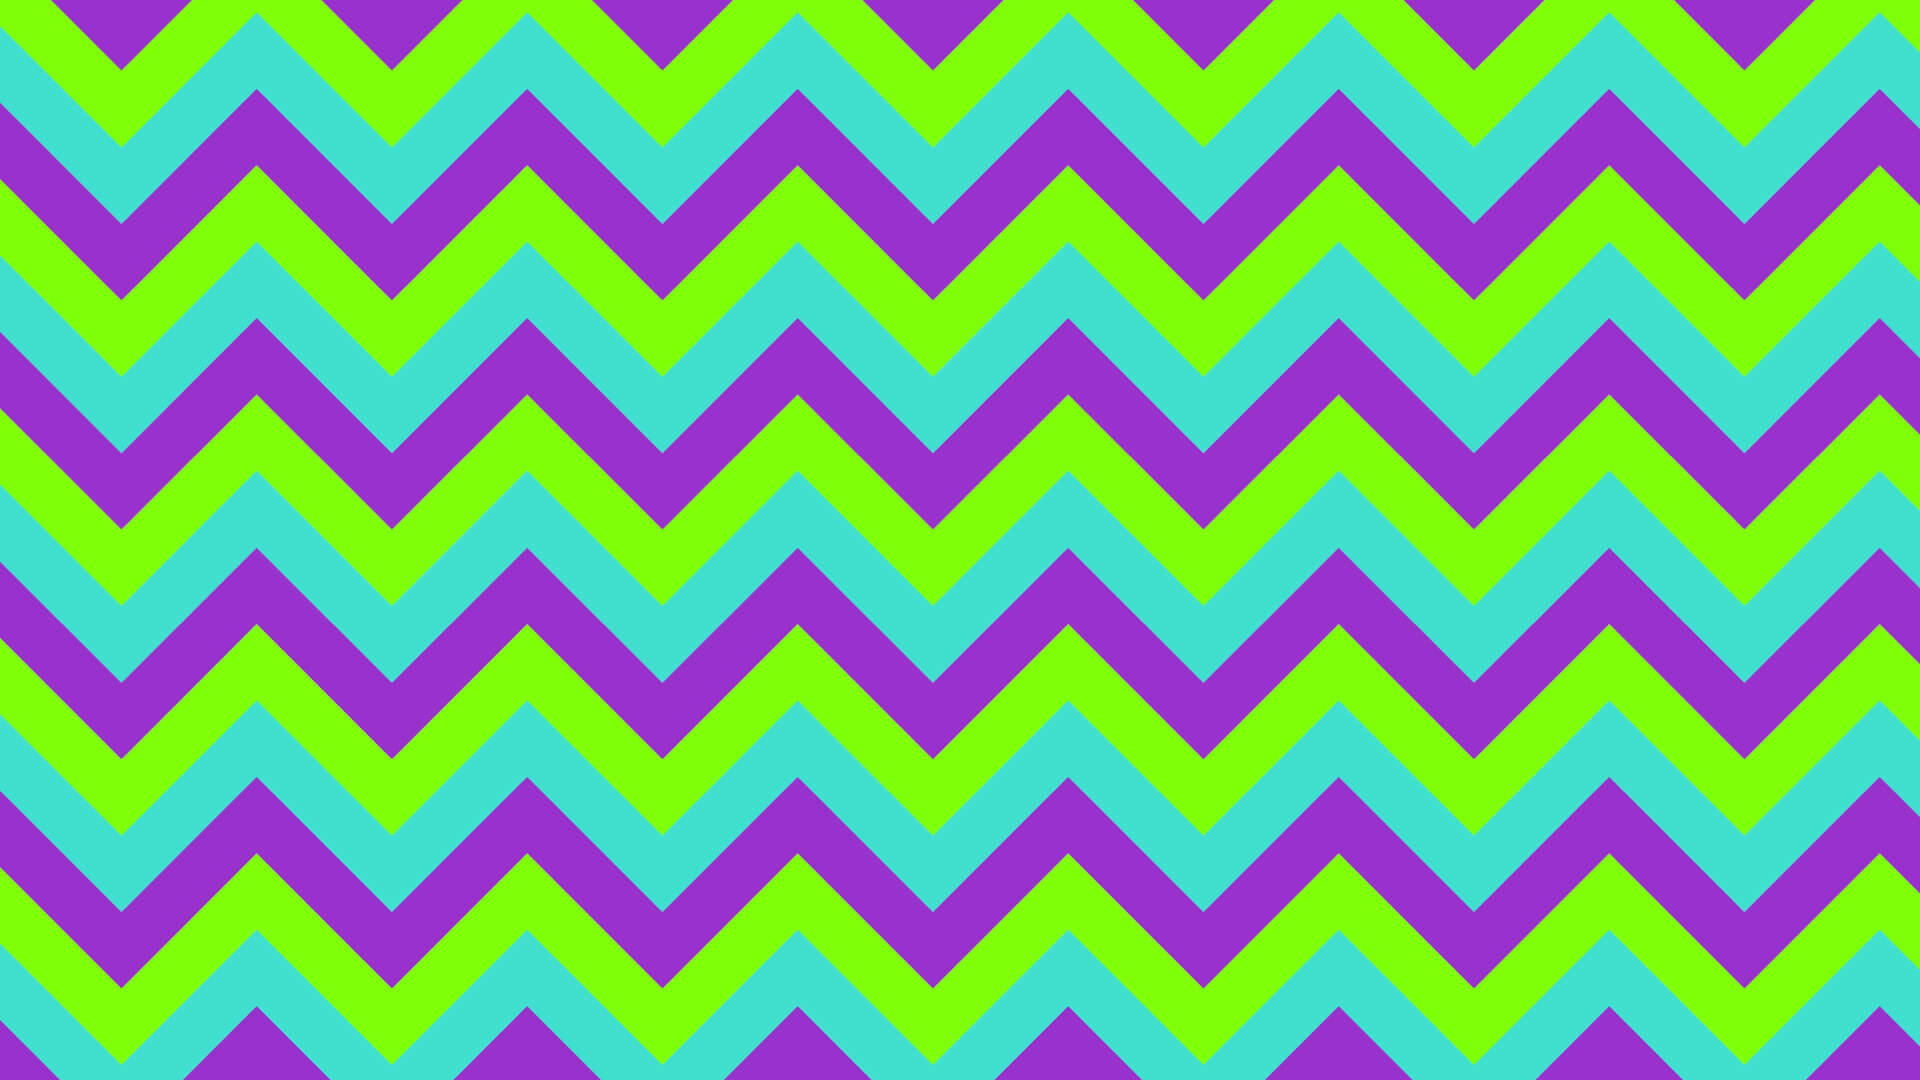
I began off making a striped background with a forty five diploma angle and a set background measurement, so we get this type of sweet stripe sample. (Fig 05)
.ingredient {
background: repeating-linear-gradient(
45deg,
darkorchid,
darkorchid 40px,
turquoise 40px,
turquoise 80px,
chartreuse 80px,
chartreuse 120px
);
background-size: 100px 100%;
}
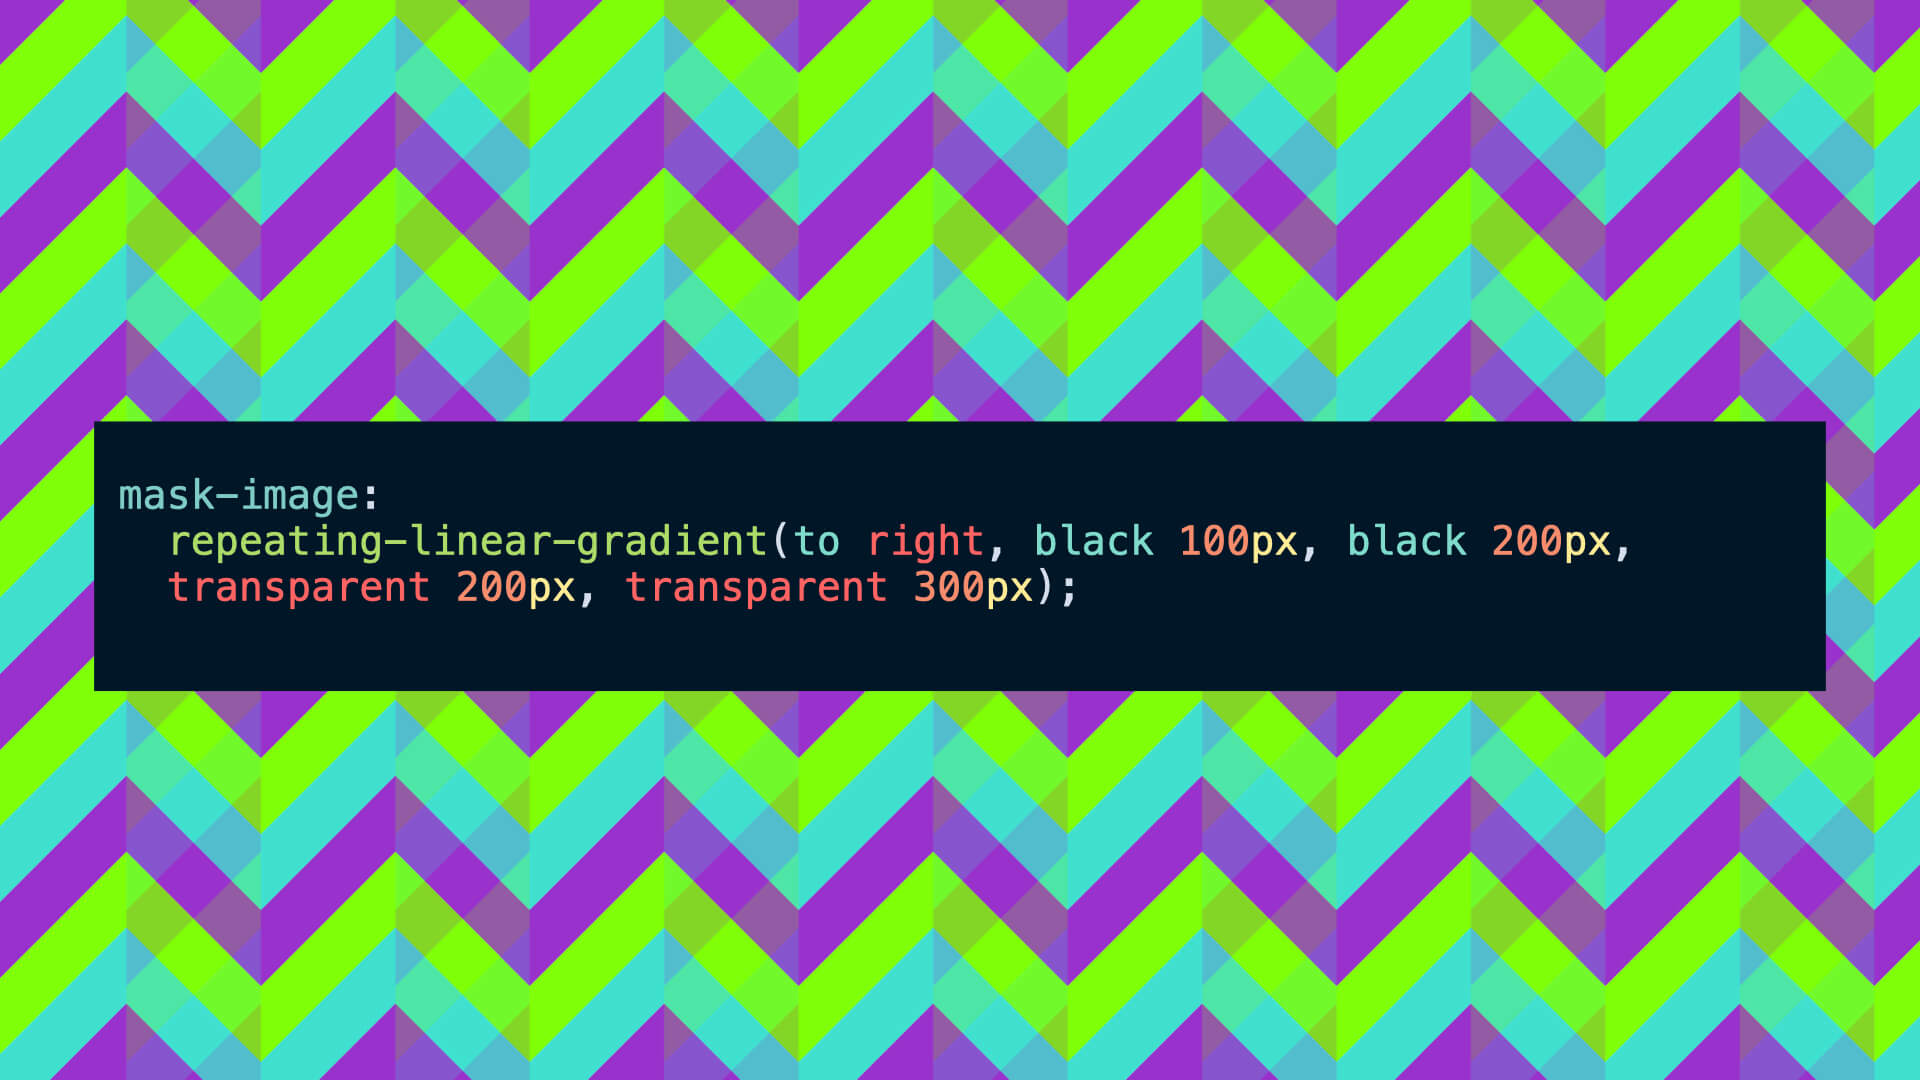
Then I used an absolute-positioned pseudo-element with the identical background on the reverse angle. (Fig 06)
Then I used the mask-image property with a repeating linear gradient to masks the pseudo ingredient with vertical stripes,so the unique ingredient is seen by means of the pseudo ingredient. I’ve left a little bit of an overlay [in this image] so you may see the place these hidden stripes could be. (Fig 07)
.ingredient {
mask-image: repeating-linear-gradient(
to proper,
black 100px,
black 200px,
clear 200px,
clear 300px
);
}
That is the precise outcome. (Fig 08)
Different options
Now, I don’t fully love this resolution, as is makes use of a pseudo-element – I type of wished this to be potential with a single ingredient background. I did a little bit of looking out to see if anybody had an answer that was higher than mine, and one of many outcomes that got here up was Lea Verou’s CSS Patterns Gallery, from just a few years again. After all, if anybody has an answer to this, it’s Lea Verou. And there is a zig-zag sample on the positioning, however with one essential distinction: it’s solely two colors. I wished my sample to be three or extra colors. I searched a bit extra, however I couldn’t discover an instance anyplace that was greater than two colors. That’s to not say it isn’t potential, however figuring it out was a bit greater than my tiny mind can deal with. So I made a decision to stay with my resolution for now.
Customized properties
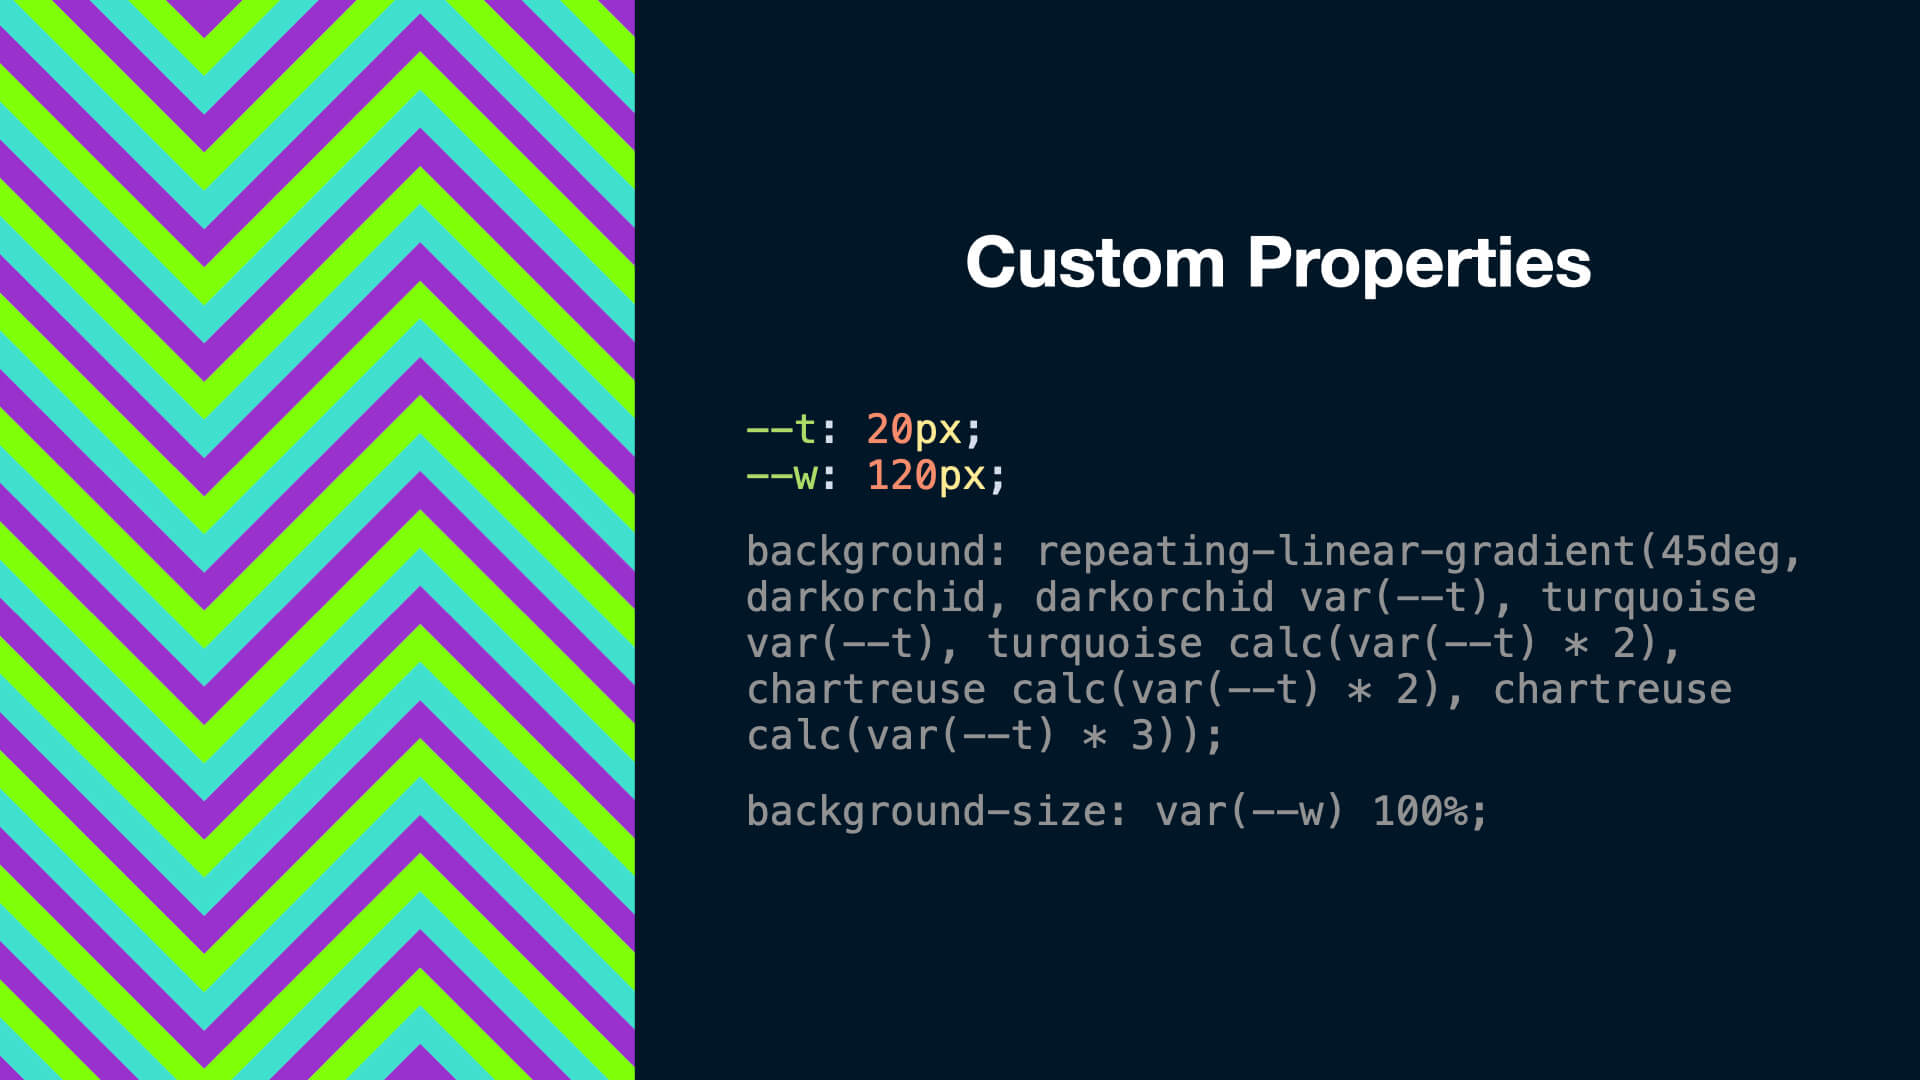
So, as soon as I had my zig-zag gradient, I wished to experiment a bit with colors, the thickness of the stripes, and the dimensions of the zig-zags. Enter customized properties. CSS customized properties are amongst my favorite issues in CSS – I exploit them in so many locations. They’re good for when you may have a price repeating in numerous locations, and also you simply wish to tweak that worth and have it replace in every single place. So I can substitute the gradient stops with a customized property, which represents the thickness of the stripes, and one other that represents the background width. I want to do that within the pseudo-element too, however for brevity I’m not exhibiting all of the code right here.
.ingredient {
--t: 40px;
--w: 100px;background: repeating-linear-gradient(
45deg,
darkorchid,
darkorchid var(--t),
turquoise var(--t),
turquoise calc(var(--t) * 2),
chartreuse calc(var(--t) * 2),
chartreuse calc(var(--t) * 3)
);
background-size: var(--w) 100%;
}
I can simply replace that worth to get totally different outcomes with out altering the rest within the code. (Fig 9)
.ingredient {
--t: 20px;
--w: 120px;
}
And we are able to substitute another values with customized properties too. We are able to regulate the angle of the zig-zags [for example], by tweaking a single customized property.
.ingredient {
--t: 40px;
--w: 40px;
--angle: 40deg;background: repeating-linear-gradient(
var(--angle),
darkorchid,
darkorchid var(--t),
turquoise var(--t),
turquoise calc(var(--t) * 2),
chartreuse calc(var(--t) * 2),
chartreuse calc(var(--t) * 3)
);
background-size: var(--w) 100%;
}
These values are wanted for the preliminary ingredient’s background and the pseudo ingredient, however by setting a customized property I solely want to alter it in a single place, as a result of the pseudo ingredient will inherit the brand new worth.
So we are able to replace these customized properties and have an infinite variety of variations, however what could be even cooler than that? If we may edit these values with a GUI and have our gradient sample change earlier than our eyes.
Effectively, if we add some inputs and a little bit of Javascript, then we are able to! With these vary sliders, I can replace the customized property each time the worth modifications (see demo). That is okay, as a result of the sliders have a step increment of 1, however the change just isn’t that clean as a result of sadly gradients should not animatable inside CSS.
Houdini
However, not so quick! We can animate customized properties utilizing Houdini. I at all times wrestle to clarify precisely what Houdini is, so I’m going to cite proper off MDN:
Houdini is a set of low-level APIs that exposes components of the CSS engine, giving builders the ability to increase CSS by hooking into the styling and structure technique of a browser’s rendering engine
Houdini consists of a bunch of APIs, however the one which’s vital for us right here is the Properties & Values API. That permits us to register the property in Javascript after which animate or transition that customized property in precisely the identical manner you’d a standard animatable CSS property.
transition: --angle 200ms, --t 200ms, --w 200ms;And that makes that gradient transition a lot smoother. Help is at present restricted to Chromium browsers, so it’s not going to work in Firefox or Safari. This web site tells you ways effectively supported the totally different APIs are. However in Chrome, the gradient transition is simply that little bit nicer.
Color
There’s one half that I haven’t actually coated but, and that’s the color. I may have three color inputs and permit customers to totally customise the color of the gradient stripes. However I fairly favored the concept of customers with the ability to regulate the color by way of a slider, reasonably than dropdown or color pickers, that appeared a bit of clunky.
I like to make use of HSL once I’m working with customized properties and color. HSL stands for Hue Saturation Lightness. HSL is very nice to work with utilizing customized properties as a result of it means that you can tweak color values actually simply. Within the gradient lab I’m utilizing a customized property for the hue worth – the primary worth within the HSL perform:
.ingredient {
--color1: hsl(var(--h1), 90%, 50%);
}
The consumer can choose the first hue utilizing the slider, and the 2 different hues are calculated as adjoining colors from the other aspect of the color wheel. (Fig 10)
.ingredient {
--h1: 0deg;
--h2: calc(var(--h1) + calc(180deg - 30deg));
--h3: calc(var(--h1) + calc(180deg + 30deg));--color1: hsl(var(--h1), 90%, 50%);
--color2: hsl(var(--h2), 90%, var(--l, 70%));
--color3: hsl(var(--h3), 60%, var(--d, 40%));
}
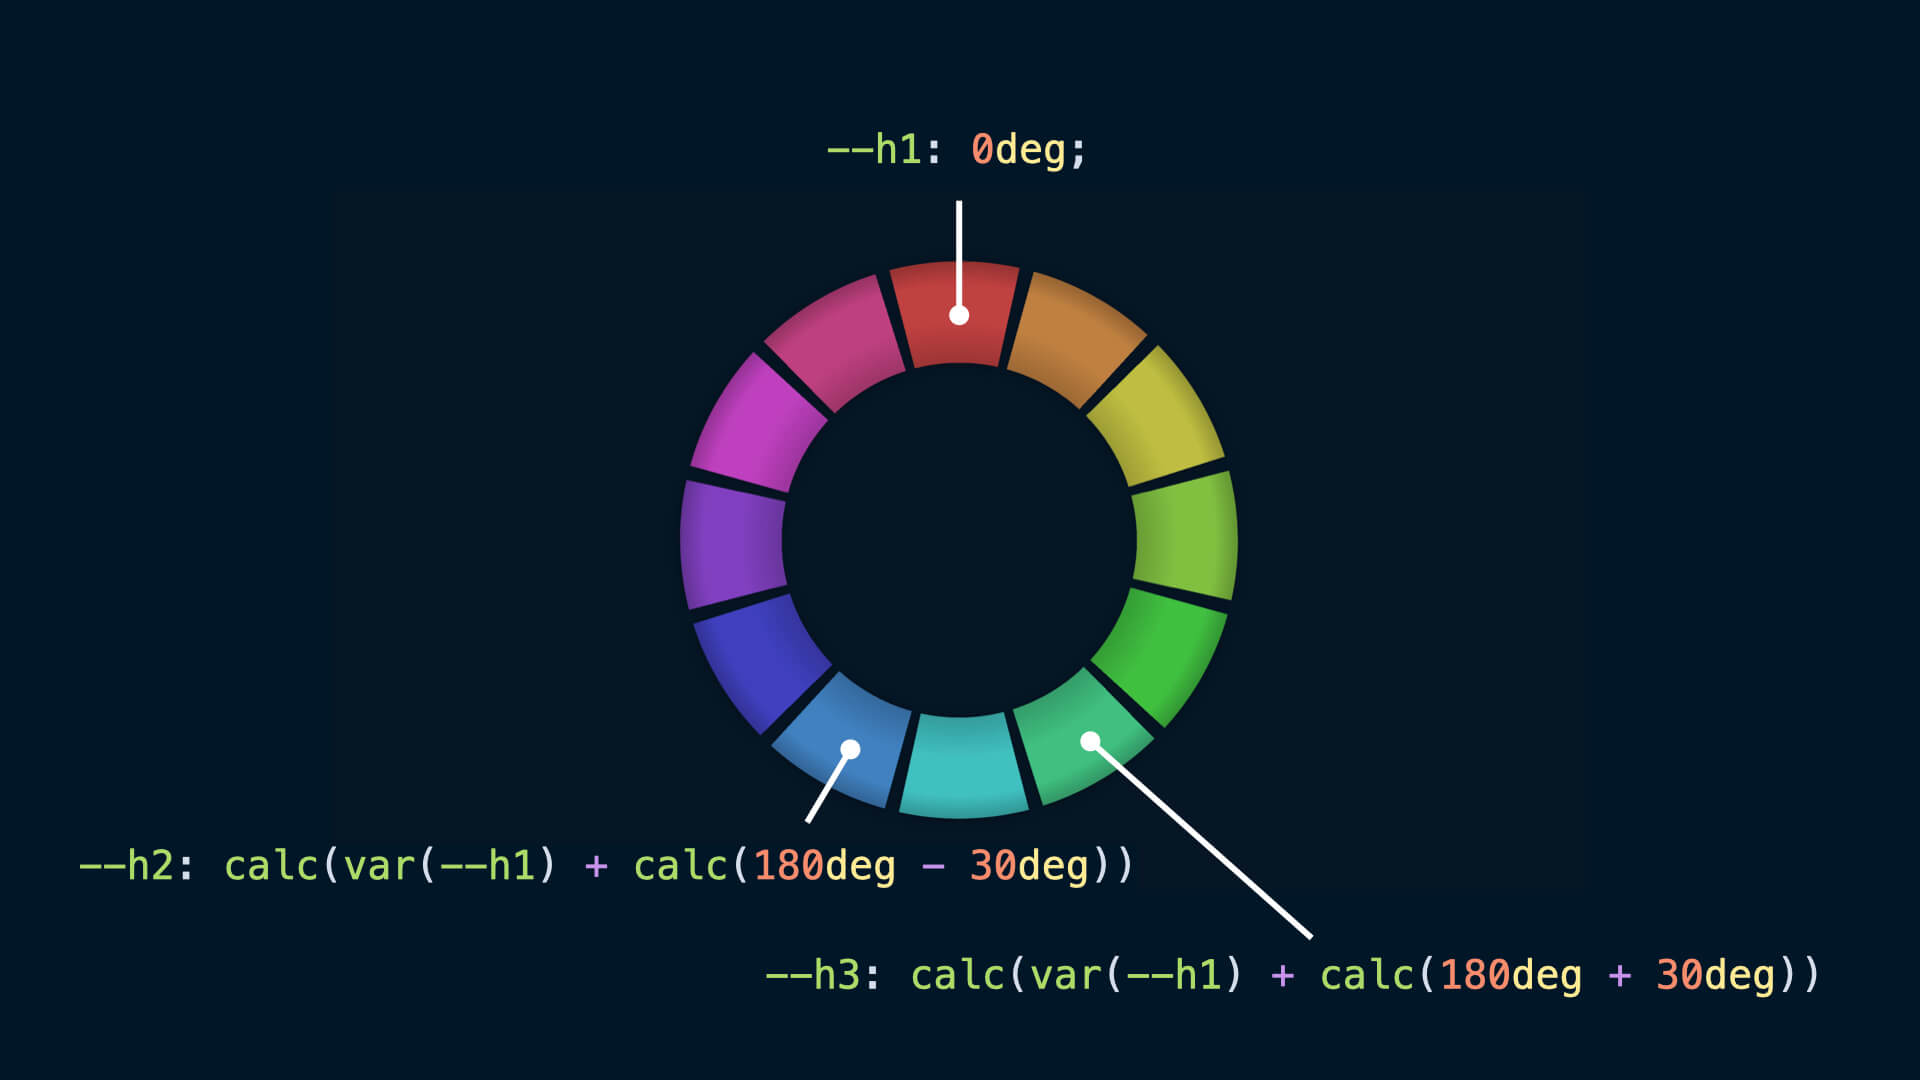
That’s often called a break up complementary color scheme. So if the consumer modifications the first hue utilizing the slider, these different two colors are adjusted accordingly.
By the way, the color wheel illustration is constructed with CSS gradients and customized properties too!
Storing the values
Lastly, it might be fairly helpful if, as soon as we now have a gradient we like, it didn’t reset the second we navigate away from the web page, or shut our browser window. We are able to use localStorage to retailer the values domestically within the consumer’s browser:
localStorage.setItem('angle', '45')Then retrieve them and apply them as quickly because the web page is loaded:
localStorage.getItem('angle')In order that’s the story of how I made this little device. I don’t know if anybody will use it for something actual, however it was enjoyable to make and has given me numerous inspiration for my private web site.
Reference