

Just a few weeks in the past, Adobe launched a internet model of Photoshop that’s constructed with the online applied sciences like WebAssembly, internet elements, P3 colours, and much more.
Photoshop was the primary skilled design app that I realized once I was 14 years outdated. It was one of many causes that I turned a designer, and finally a front-end developer. Due to that, I assumed it might be attention-grabbing to see how the CSS was written for such an enormous app like Photoshop.
On this article, I’ll share the CSS findings that I discover attention-grabbing. Let’s do it!
Photoshop outdated brand
The very first thing that I observed is utilizing an outdated brand of Photoshop (1990-1991) within the browser console.
![]()
Such a pleasant little element. If you happen to’re interested by how such a factor is made, right here is the code:
console.data(
  "%c %cAdobe %cPhotoshop Internetpercentc  %c2023.20.0.0percentc  %c1bba617e276",
  "padding-left: 36px; line-height: 36px; background-image: url('information:picture/gif;base64,R0lGODlhIAAgAPEBAAAAAPw==');"
)
The physique factor
To make an app like Photoshop really feel like an actual app on the internet, the very first thing is to stop scrolling. To attain that, the <physique> factor has place: mounted together with overflow: hidden.
physique,
html {
  peak: 100%;
}

physique {
  font-family: adobe-clean, sans-serif;
  margin: 0;
  overflow: hidden;
  place: mounted;
  width: 100%;
}
That is the essential step. Contained in the <physique> factor, there are a number of root components, too.
<psw-app>
<psw-app-context>
<ue-video-surface>
<ue-drawer>
<div id="appView">
<psw-app-navbar></psw-app-navbar>
<psw-document-page></psw-document-page>
</div>
</ue-drawer>
</ue-video-surface>
</psw-app-context>
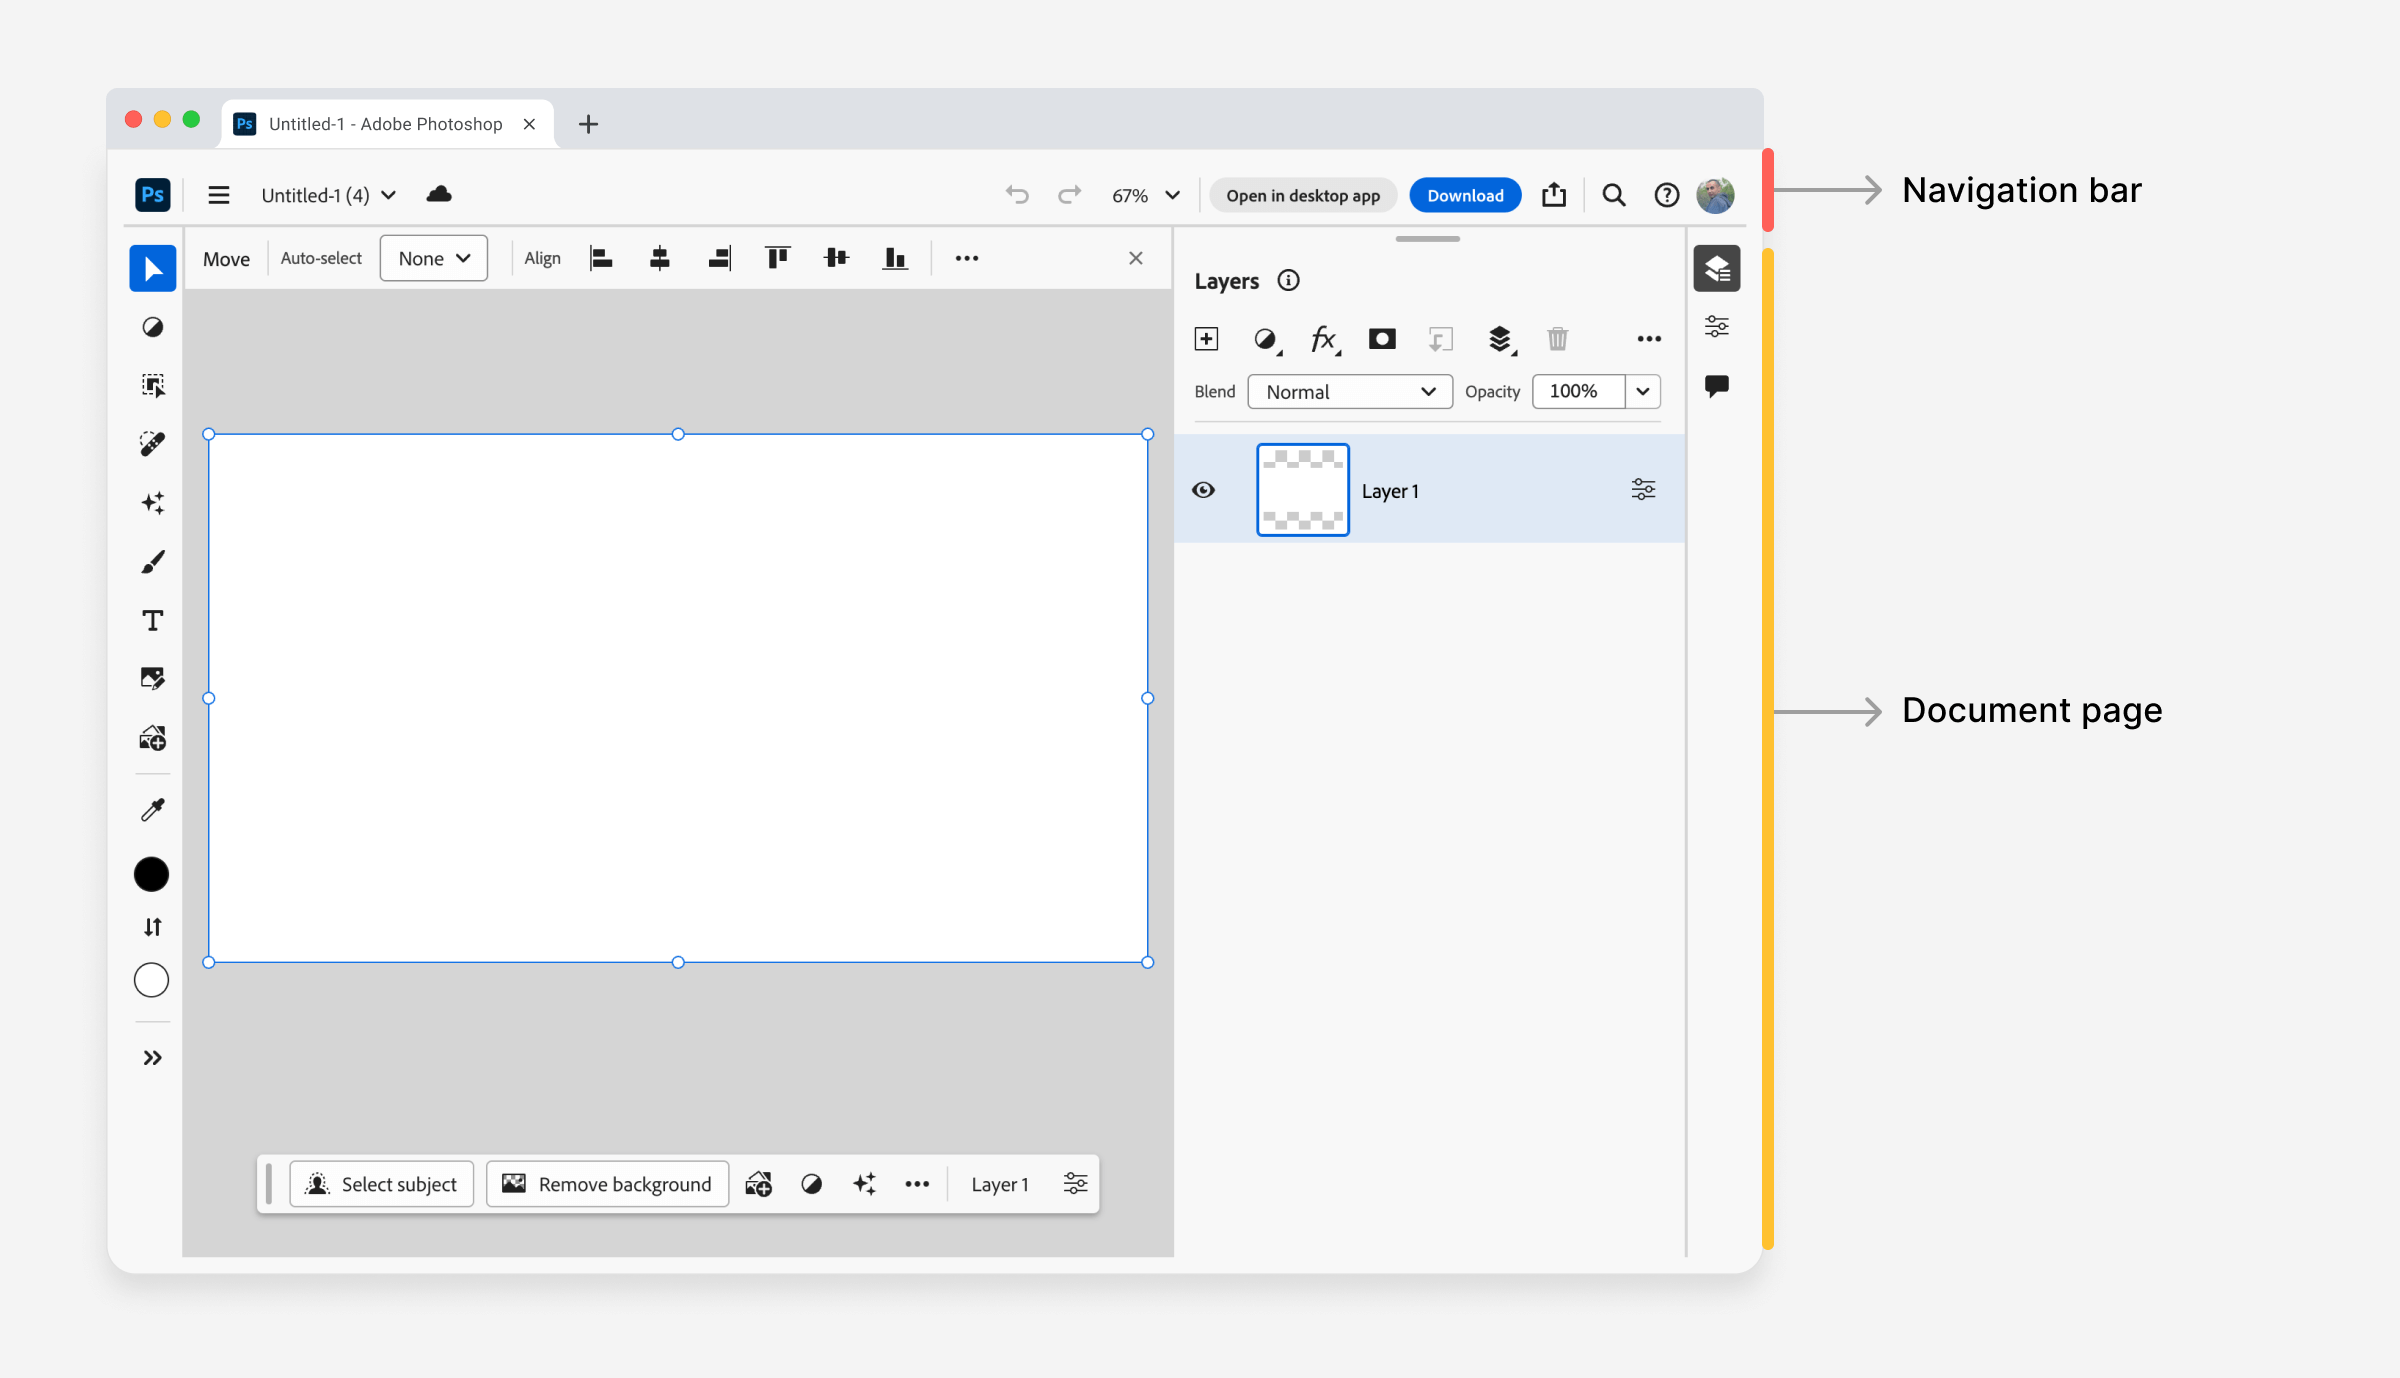
</psw-app>Lastly, there’s the factor that incorporates the navigation and the doc web page.
#appView {
  background-color: var(--editor-background-color);
  coloration: var(--spectrum-global-color-gray-800);
  show: flex;
  flex-direction: column;
}
* {
  touch-action: manipulation;
}

:host {
  place: relative;
}
Flexbox for all of the issues (Virtually)
When constructing an online app as of late, utilizing flexbox may be very useful for a lot of causes. I’ve combined emotions once I take into consideration Flexbox and Photoshop.
Photoshop is a well known design app that was the way in which many individuals entered the design subject. However, Flexbox made it simpler to construct elements and made CSS a bit simpler for newcomers.
As an alternative of utilizing the clearfix hack, merely add show: flex after which fashion the kid objects as you need. Let’s discover the numerous flexbox use instances in Photoshop.
Let’s discover a couple of examples of utilizing flexbox.
Navbar
I just like the naming of the sections right here. As an alternative of utilizing “left, heart, proper”, they used “begin”, “heart”, and “finish”.
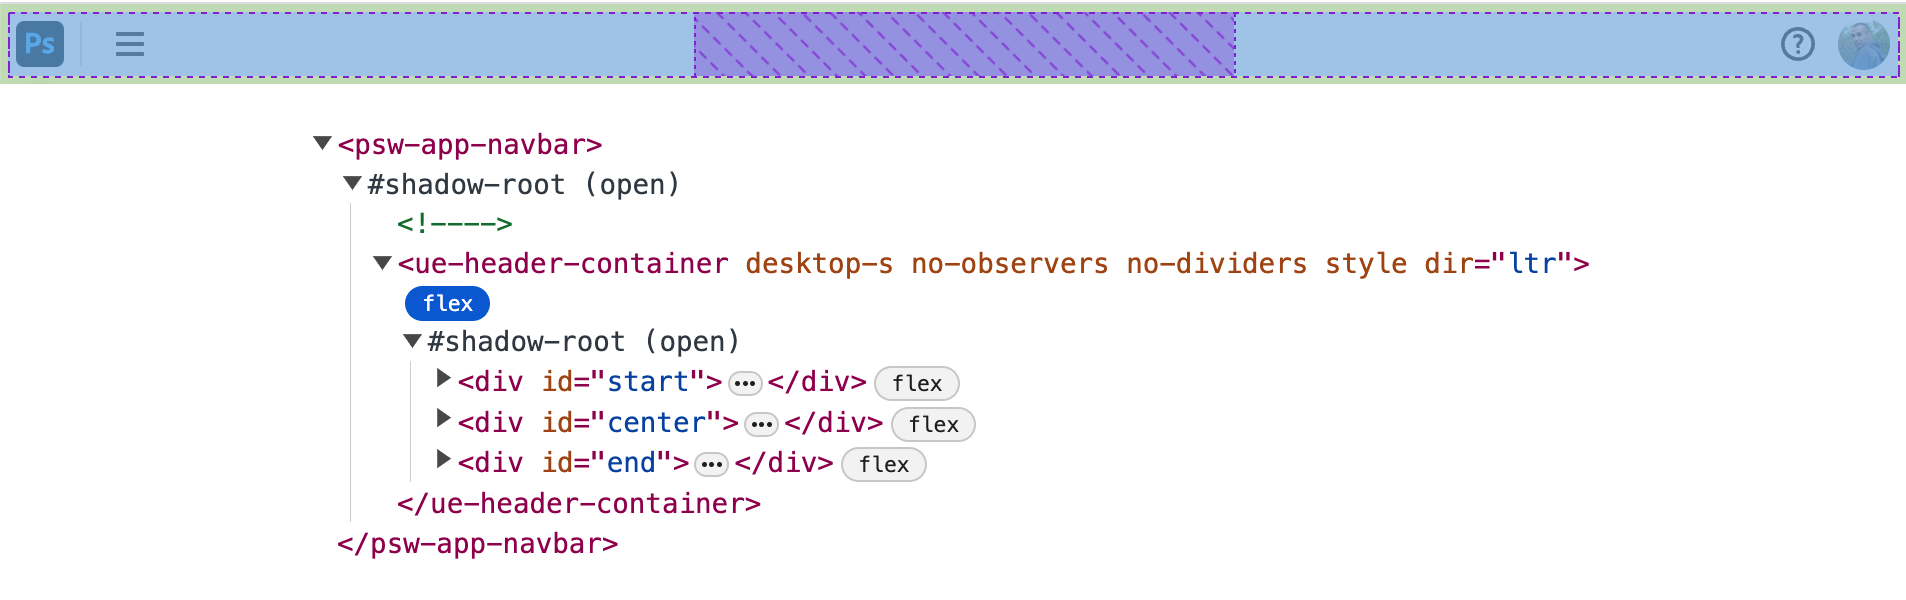
That logical naming is the correct factor to do for an app that may work from left-to-right (LTR) or right-to-left (RTL).
I defined about this precise method in my RTL Styling 101 information.
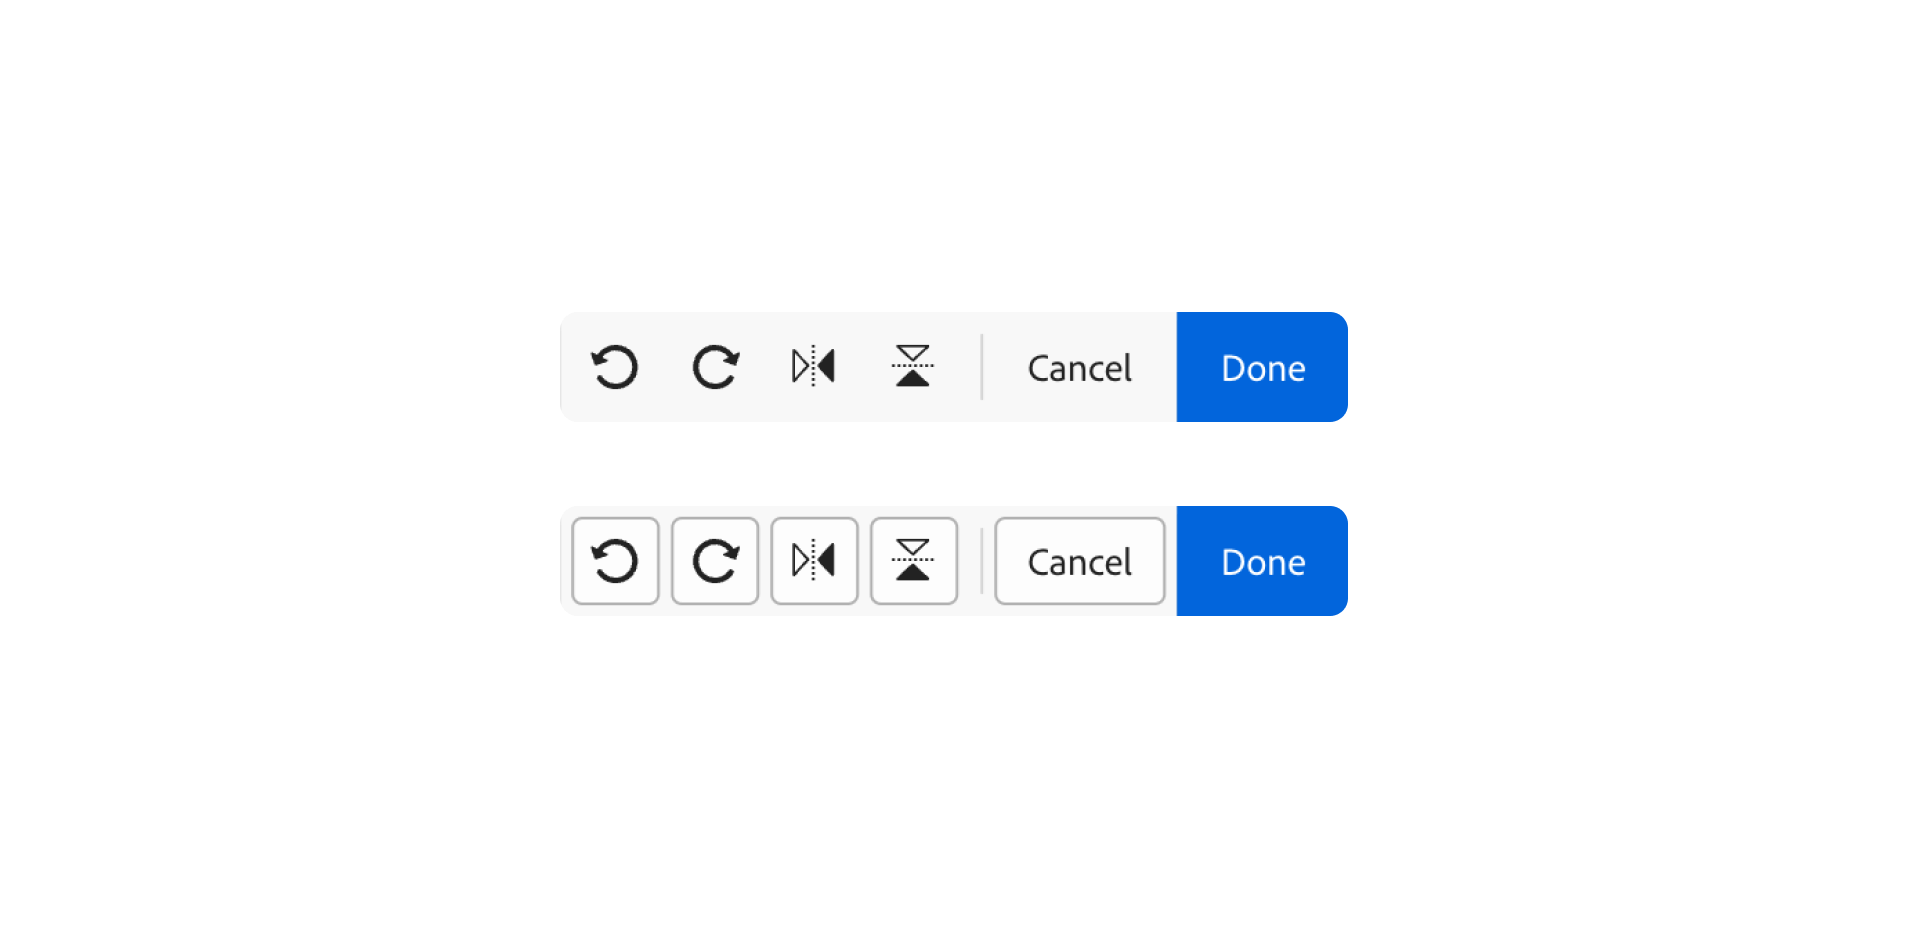
Context bar
Nested flexbox containers are obligatory when constructing a fancy app like Photoshop. Within the following determine, I highlighted the 2 containers within the context bar.
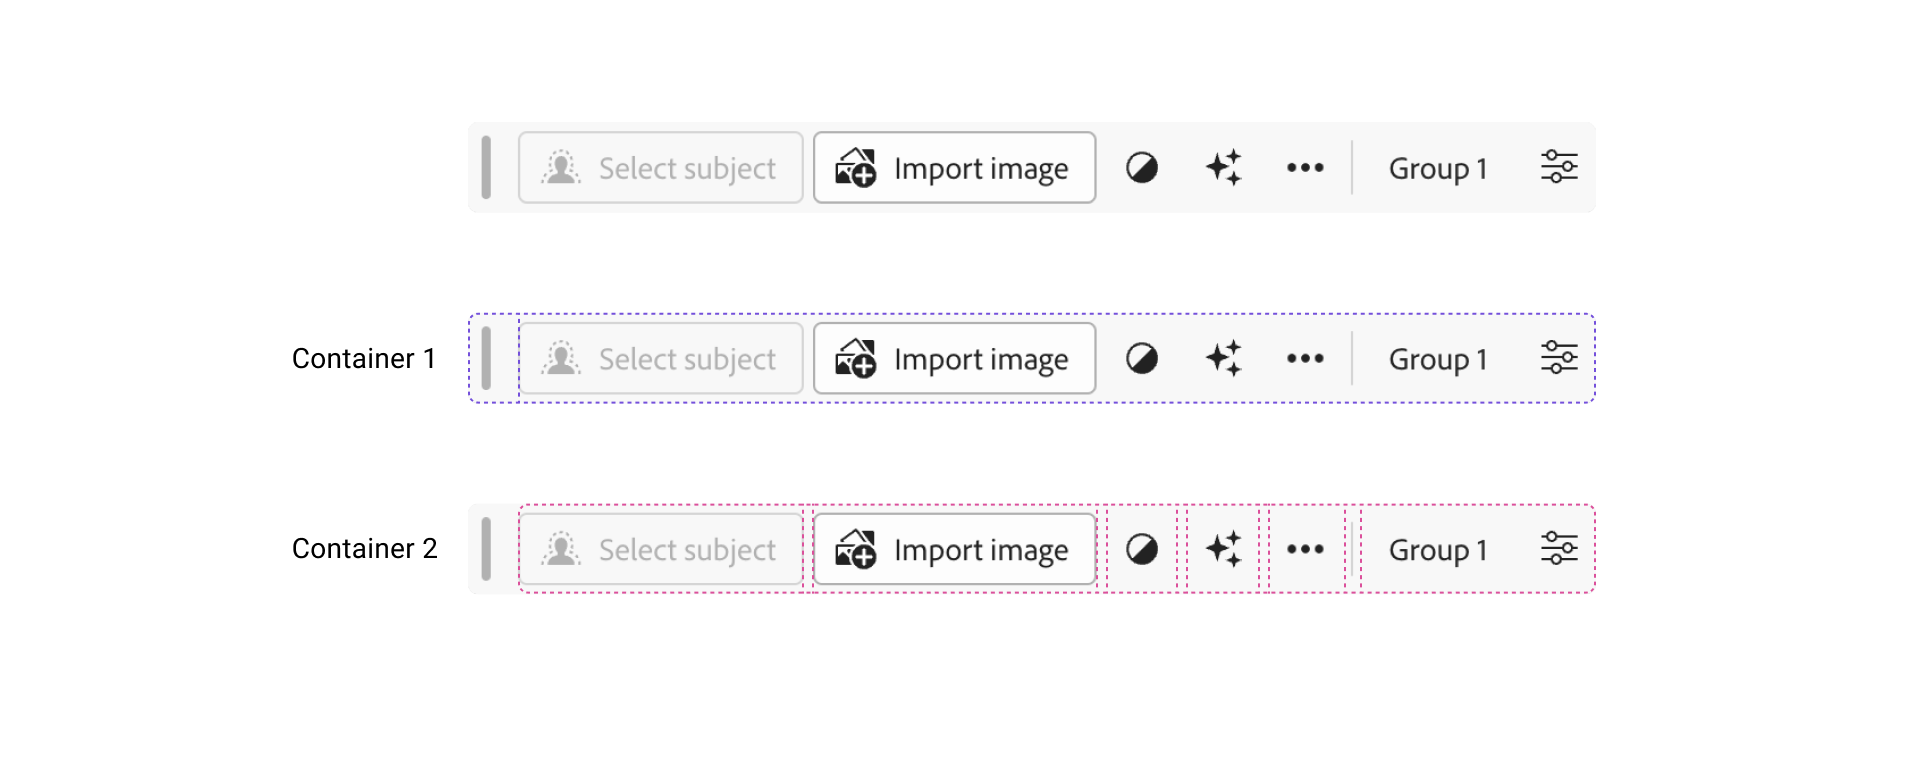
The primary container is used for the seize deal with and the remainder of the content material. The second container incorporates all of the actions and buttons.
.container {
  show: flex;
  flex-wrap: nowrap;
  align-items: heart;
  hole: var(--spectrum-global-dimension-size-50);
}- The usage of
holehelped quite a bit to outline the spacing. I couldn’t think about utilizingmarginorpaddingfor this. - The title
.containeris simply too generic however it works very properly right here, since it is a internet part, so all types are encapsulated.
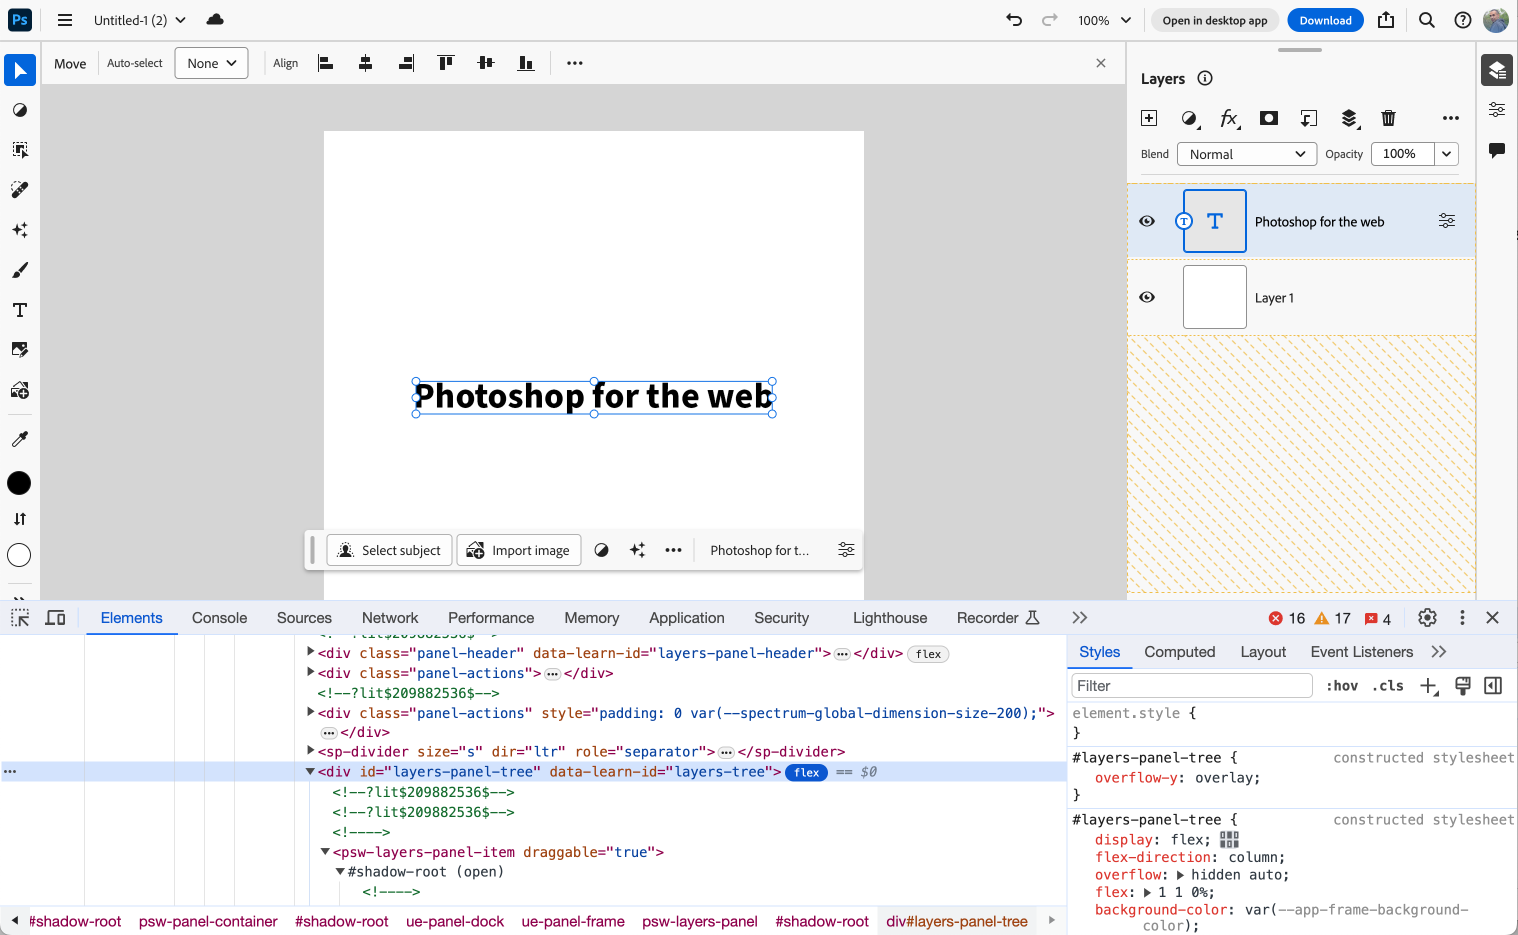
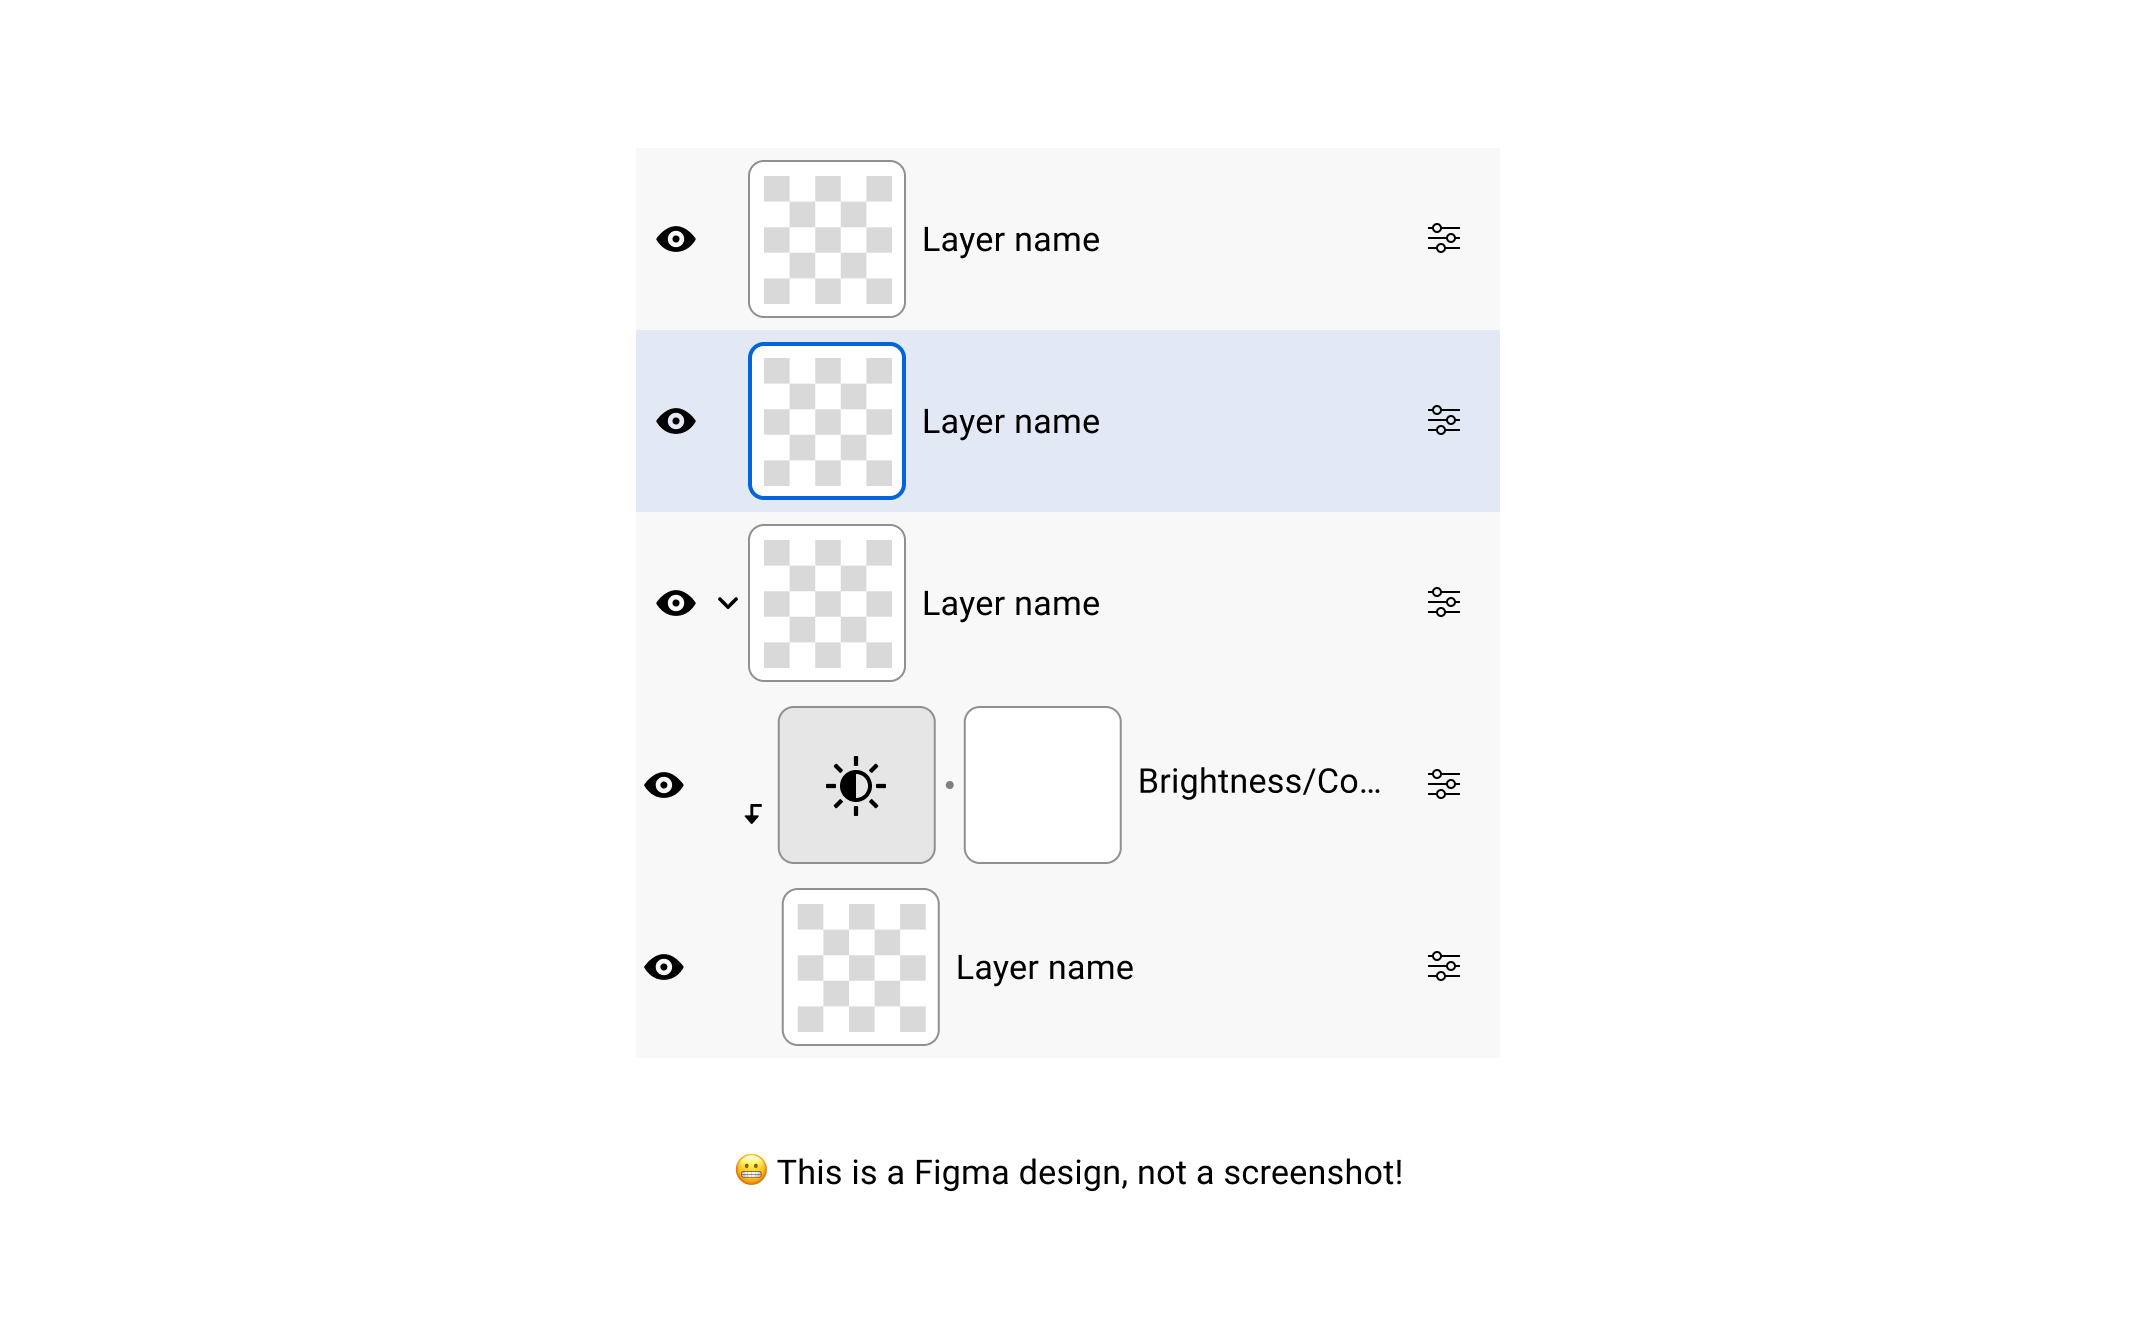
Layers
Because the layers function is a vital a part of Photoshop, it’s in all probability one of many first few issues {that a} newcomer will study. I acquired curious to verify the CSS behind them.
I appeared carefully on the CSS and it was all flexbox. To make my life simpler, I replicated the design in Figma so I may spotlight stuff for the article.
Digging deeper, right here is the HTML markup for the layer part:
<psw-tree-view-item indent="0" layer-visible can-open dir="ltr" open>
  <div id="hyperlink">
    <span id="first-column"></span>
    <span id="second-column"></span>
    <span id="label"></span>
  </div>
</psw-tree-view-item>
I’m not a fan of the naming right here, however do you see how utilizing IDs is completely effective right here? Since it is a internet part, it doesn’t matter what number of occasions the #first-column ID is current on the web page.
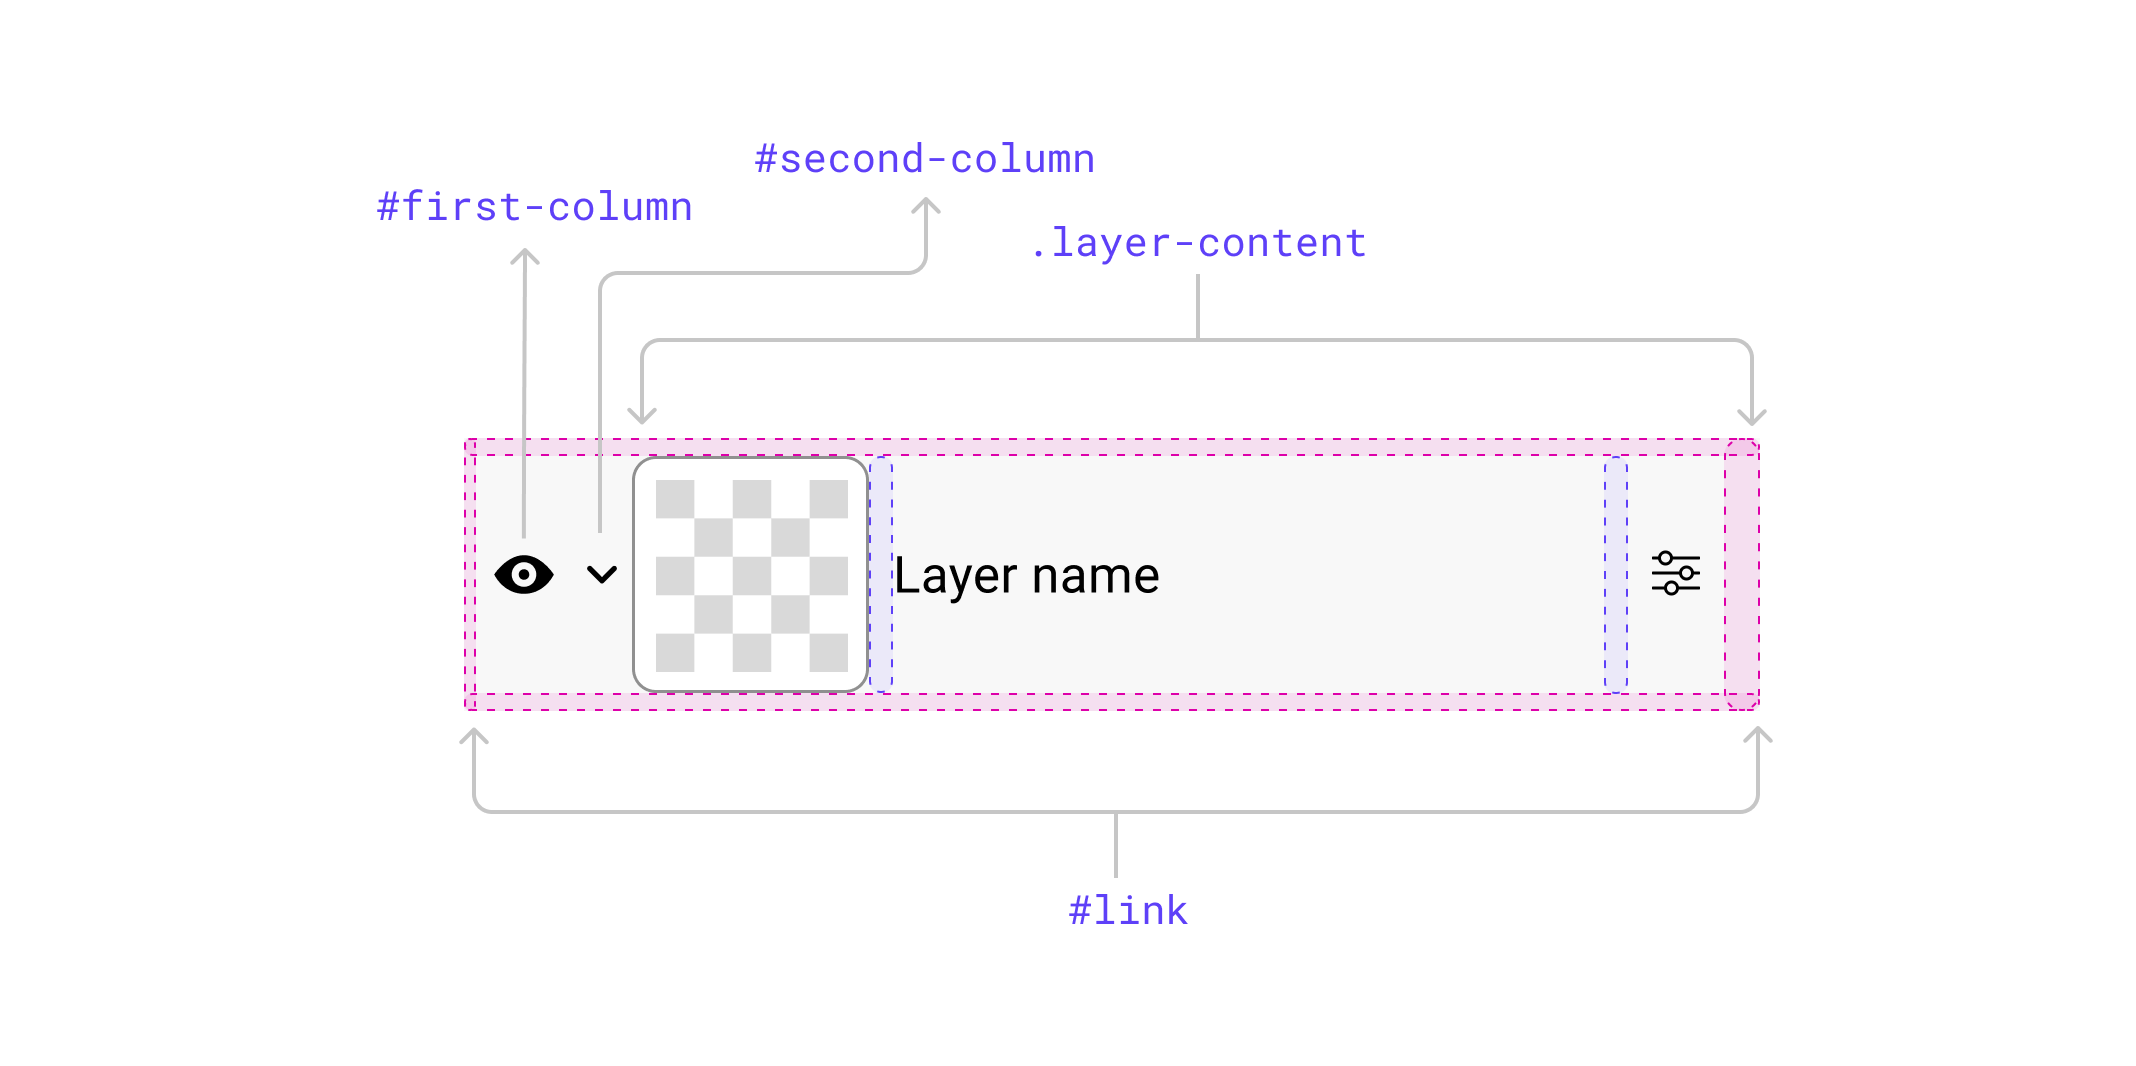
The #hyperlink factor is the principle flexbox wrapper, and the factor throughout the #label is a flexbox wrapper, too.
<div class="layer-content layer-wrapper chosen">
  <psw-layer-thumbnail></psw-layer-thumbnail>
  <div class="title" title="Layer title">Layer title</div>
  <div class="actions"></div>
  <overlay-trigger></overlay-trigger>
</div>
Let’s take an instance of how indentation of kid layers is finished.

- The
:host()represents the layer part - It looks like conditional CSS. If the
indent=1HTML attribute is there, then change thepadding-rightfor the primary column.
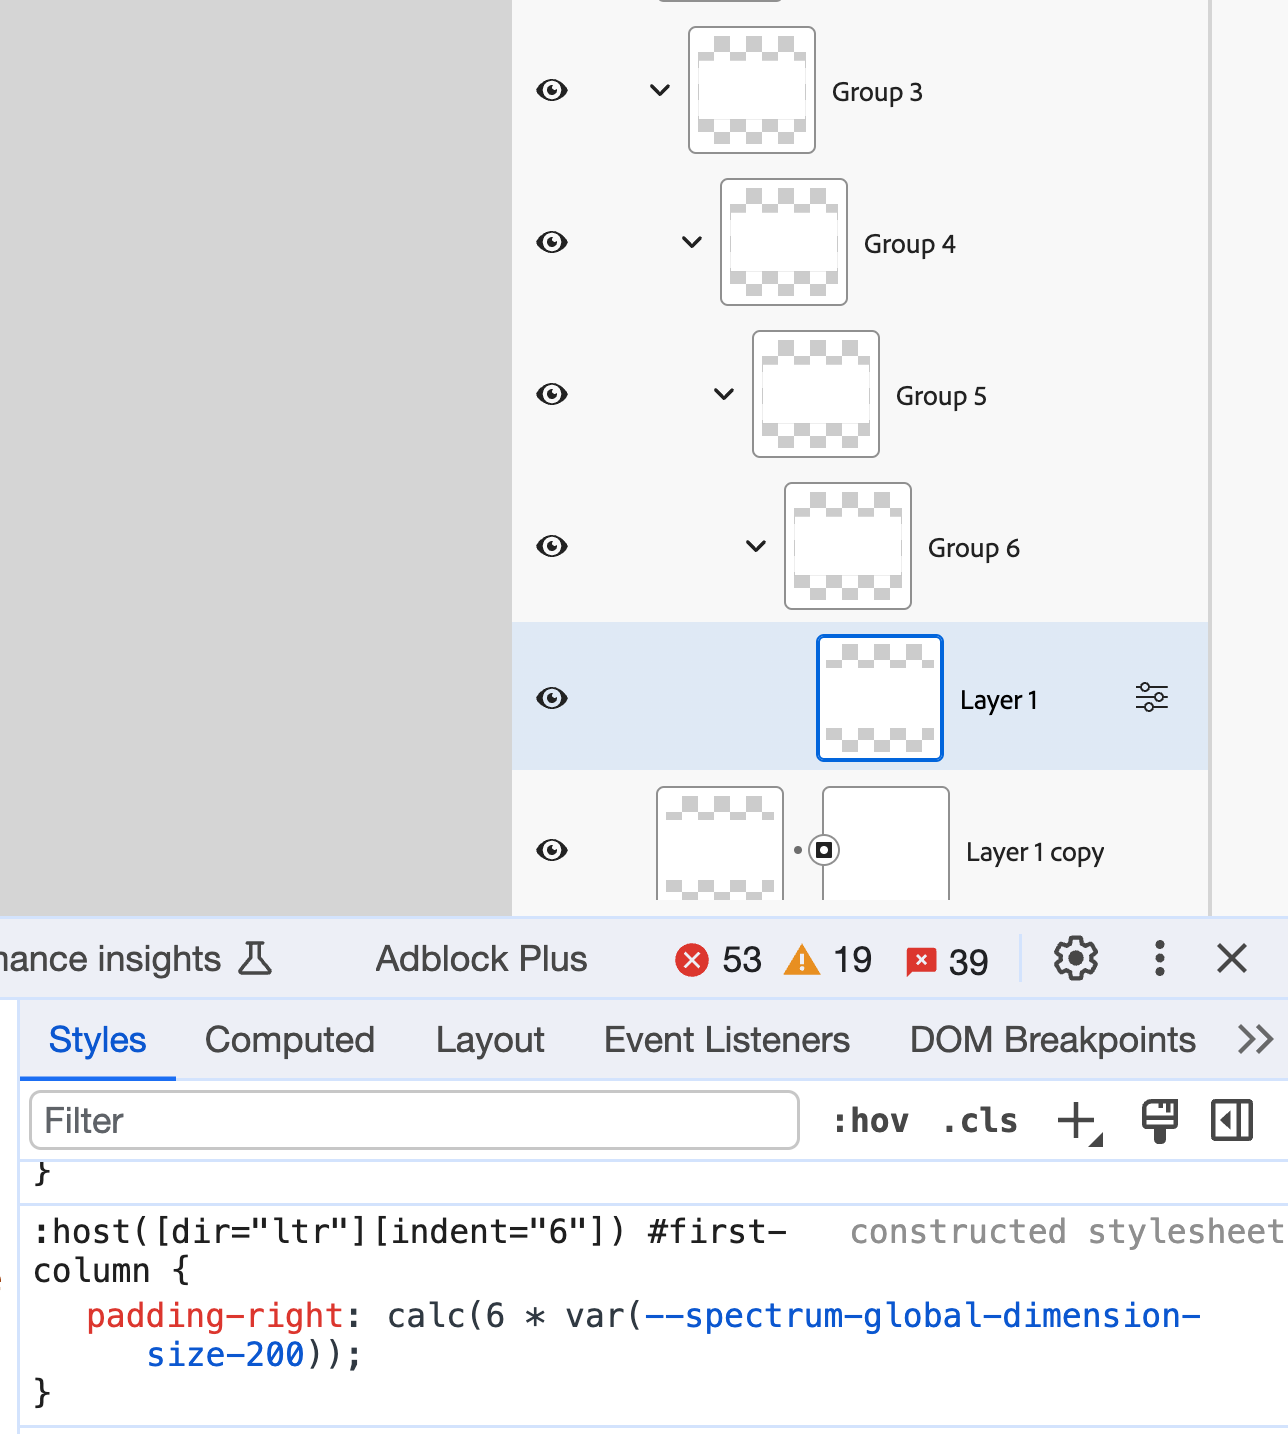
:host([dir="ltr"][indent="1"]) #first-column {
  padding-right: var(--spectrum-global-dimension-size-200);
}
If the indent is 2 ranges, then the padding-right worth is multiplied by 2 through CSS calc() operate.
:host([dir="ltr"][indent="2"]) #first-column {
  padding-right: calc(2 * var(--spectrum-global-dimension-size-200));
}
Within the browser, I attempted nesting until stage 6. Here’s a actual screenshot:
Whereas this, I remembered once I inspected the CSS behind Figma. They used a spacer part so as to add spacing for nested layers.
![]()
It’s attention-grabbing to see how two main design apps use completely different methods for a similar aim.
CSS grid for a few of the issues
New file modal
When creating a brand new Photoshop file, you may have the choice to pick out a pre-defined listing of sizes. To attain that, there’s a format that incorporates a number of tabs and an lively panel.
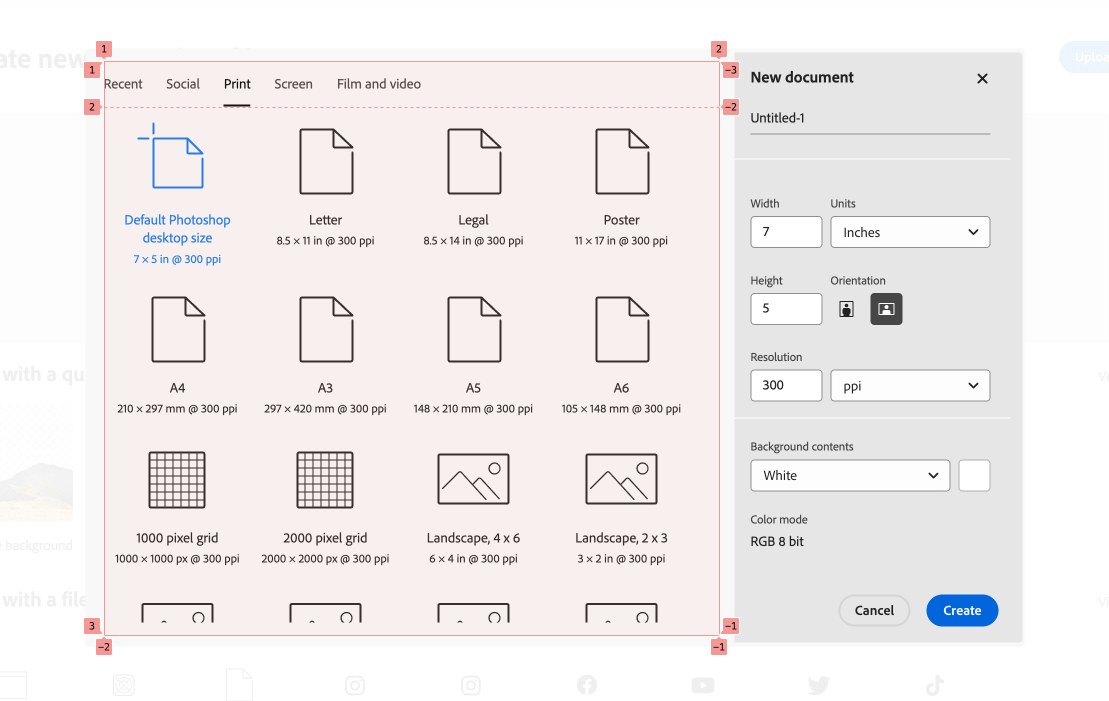
Here’s what the HTML appears to be like like:
<sp-tabs
  id="tabs"
  quiet=""
  chosen="2"
  dimension="m"
  route="horizontal"
  dir="ltr"
  focusable=""
>
  <div id="listing"></div>
  <slot title="tab-panel"></slot>
</sp-tabs>
In CSS, there’s a foremost grid with 1 column and a pair of rows. The primary row is auto and the second spans the obtainable area.
:host {
  show: grid;
  grid-template-columns: 100%;
}

:host(:not([direction^="vertical"])) {
  grid-template-rows: auto 1fr;
}
There are some things happening right here:
- Utilizing CSS
:not()selector - Utilizing the
[attr^=value]selector to exclude HTML components which have the attributeroutewith a worth that begins withvertical.
I think about this as a conditional CSS method.
I attempted altering the route attribute to vertical, and it labored as anticipated.
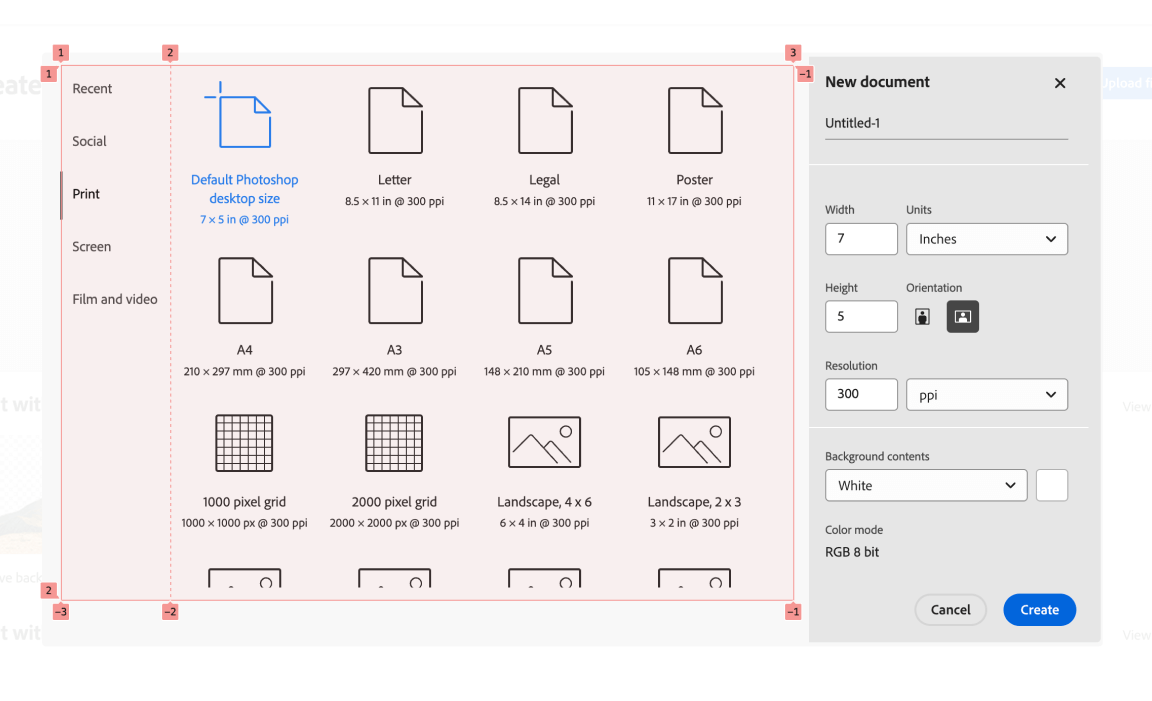
Right here is the CSS based mostly on the attribute change:
:host([direction^="vertical"]) {
  grid-template-columns: auto 1fr;
}

:host([direction^="vertical-right"]) #listing #selection-indicator,
:host([direction^="vertical"]) #listing #selection-indicator {
  inline-size: var(
    --mod-tabs-divider-size,
    var(--spectrum-tabs-divider-size)
  );
  inset-block-start: 0px;
  inset-inline-start: 0px;
  place: absolute;
}
To spotlight which tab merchandise is lively, there’s a #selection-indicator factor that’s positioned relative to the tabs listing.
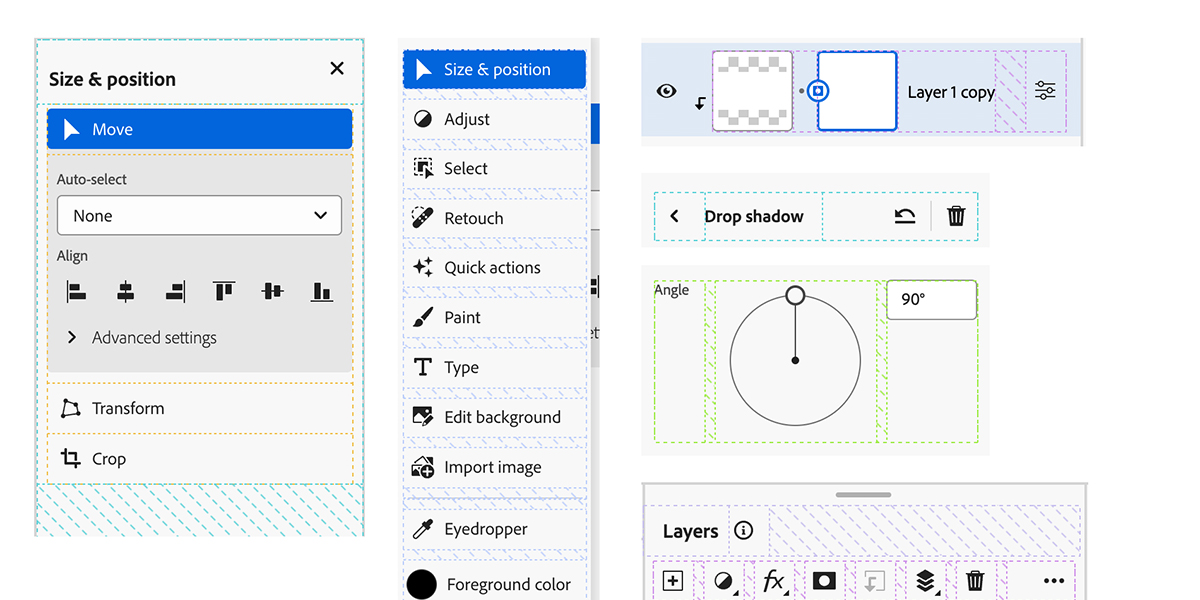
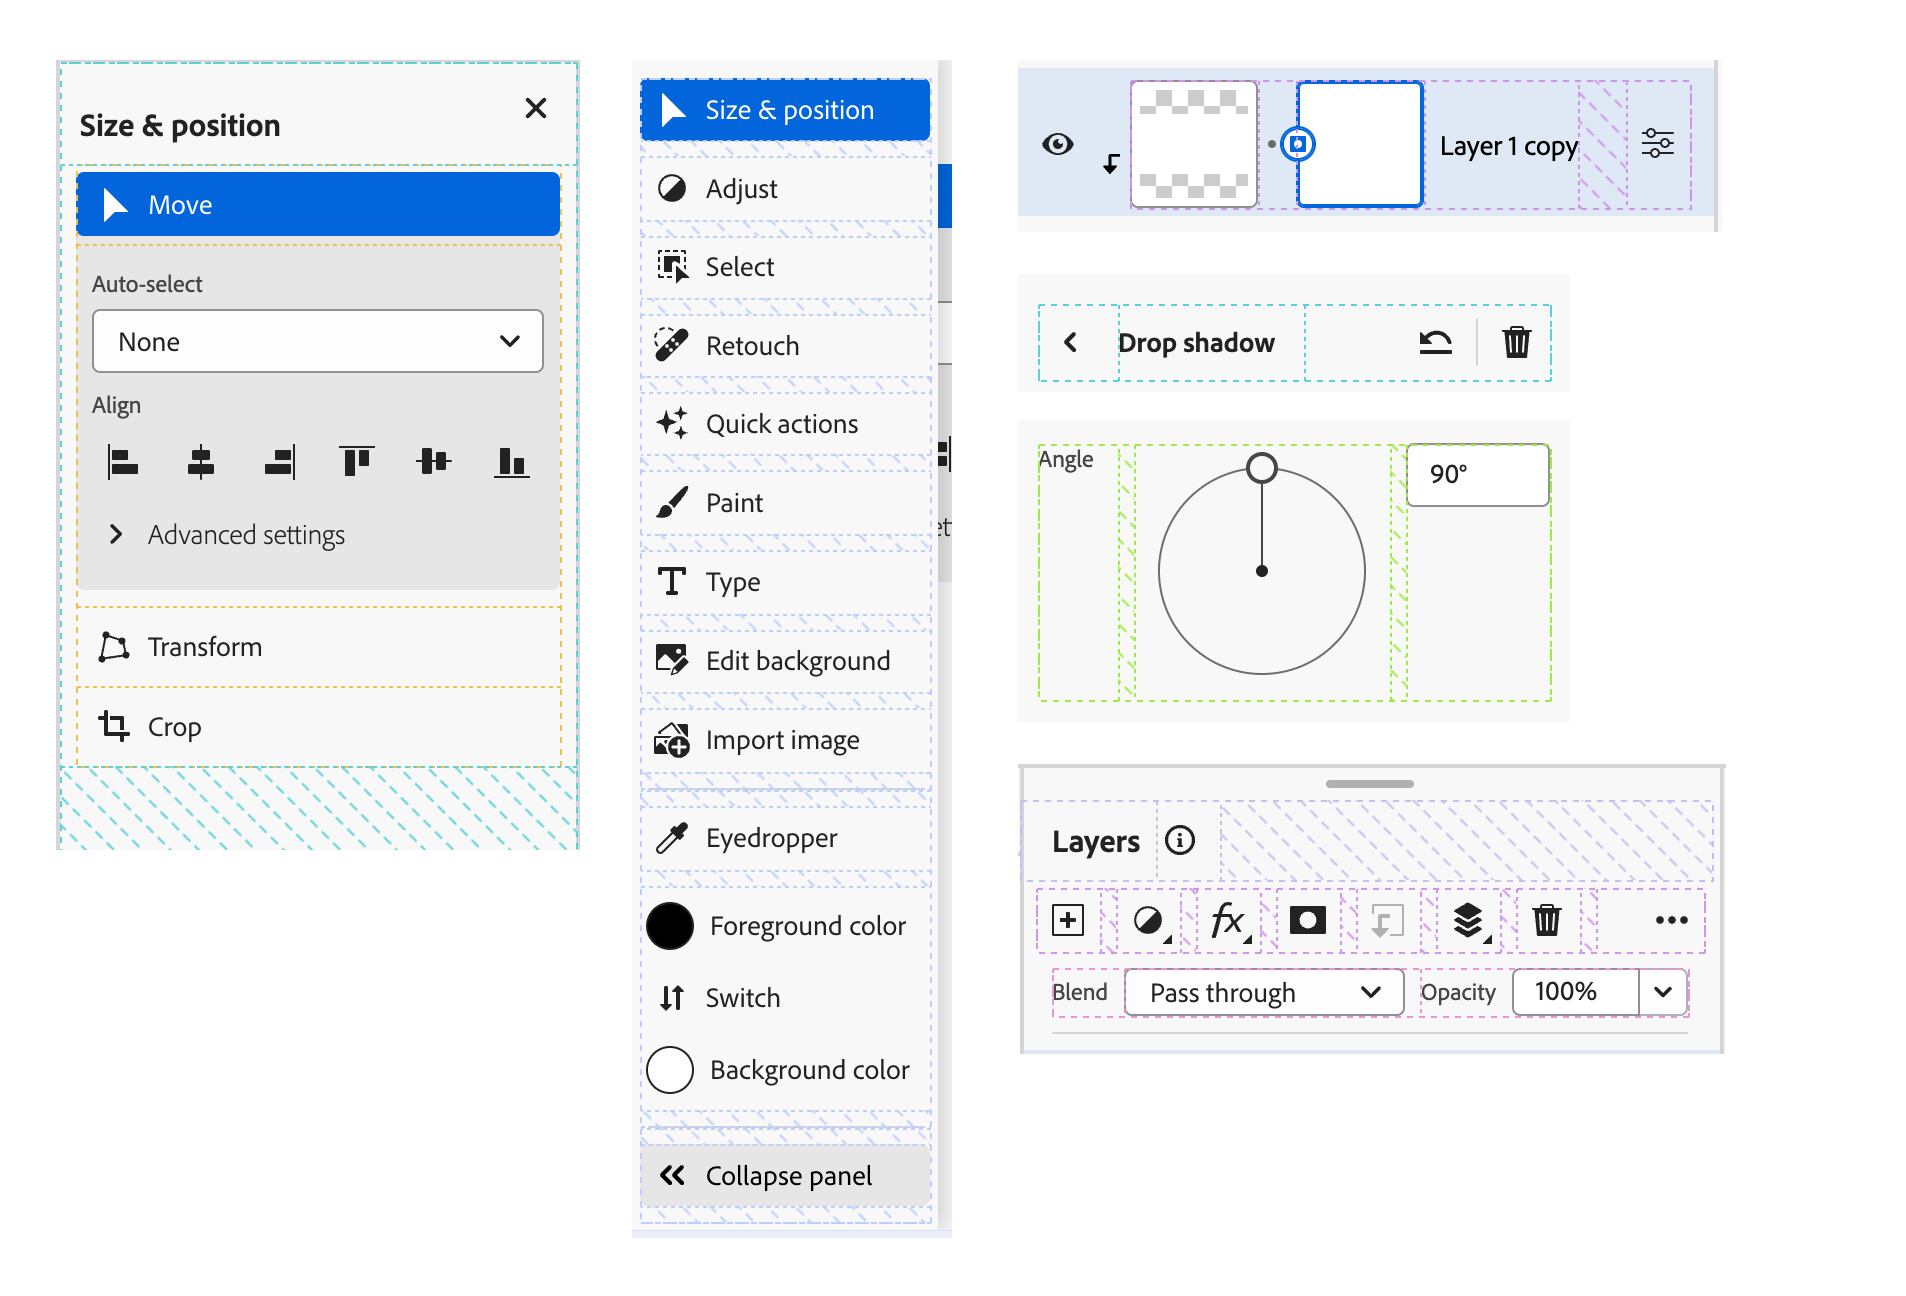
Layer properties
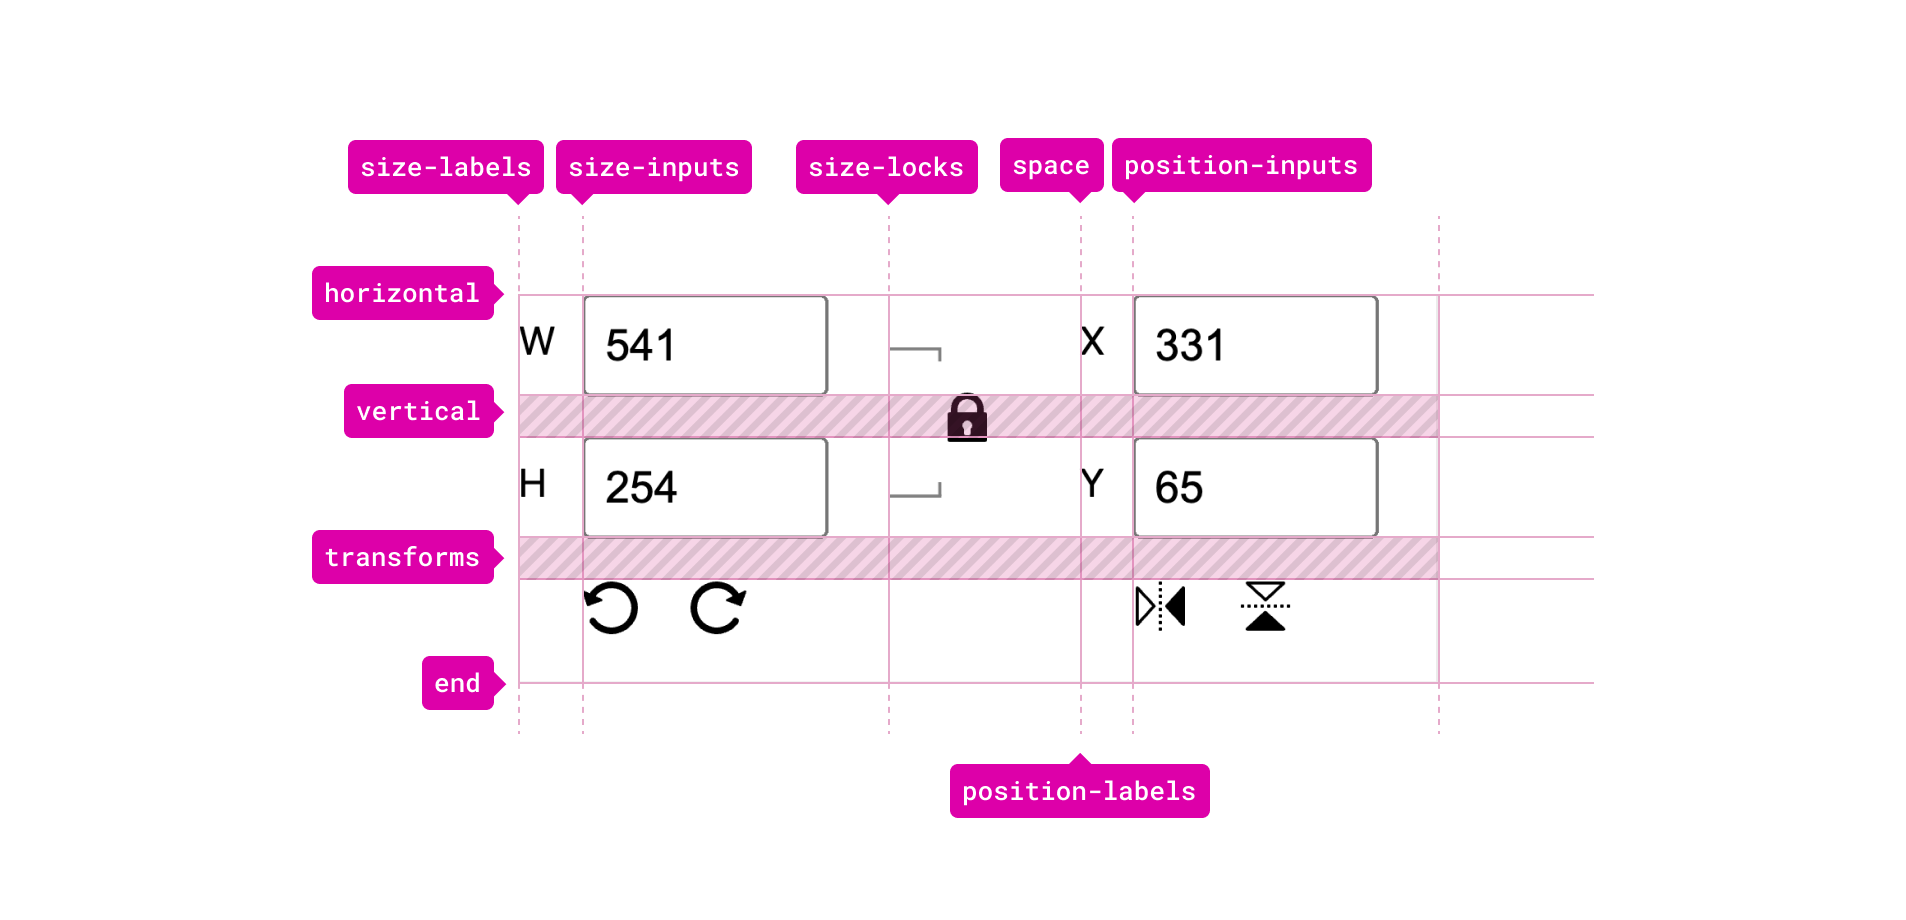
I like this utilization of CSS grid right here. It’s appropriate for the issue, which is to align many components in a grid.
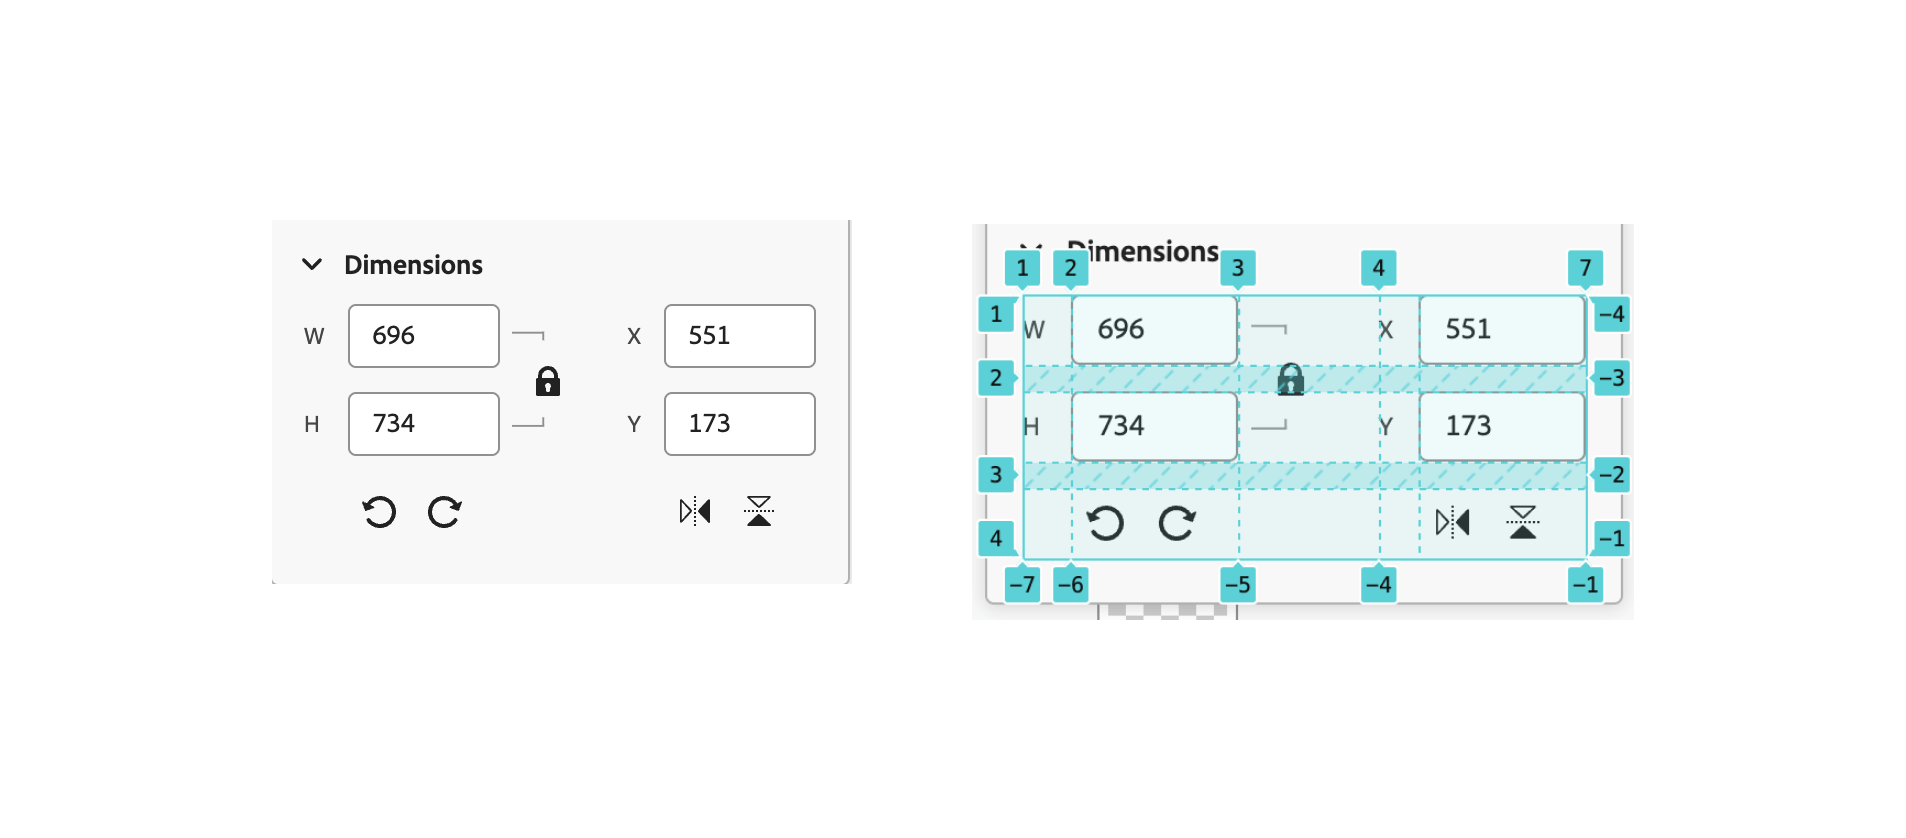
Digging into the CSS, I observed this:
.content material {
  place: relative;
  show: grid;
  grid-template-rows: [horizontal] min-content [vertical] min-content [transforms] min-content [end];
  grid-template-columns: [size-labels] min-content [size-inputs] auto [size-locks] min-content [space] min-content [position-labels] min-content [position-inputs] auto [end];
  row-gap: var(--spectrum-global-dimension-size-150);
}
I couldn’t resist however to rebuild the grid myself so I may get a greater thought of the way it works.
Right here is the grid in Firefox. I like how the DevTools right here generate a mimic grid format. When highlighting a rectangle, it would present the precise grid merchandise that’s positioned inside it.
See the next video:
The method used right here known as named grid traces. The thought is that you just title every column or grid after which outline its width. The width of the column and rows is both auto or min-content. This can be a nice method to make a dynamic grid.
With that, every grid merchandise ought to be positioned throughout the grid. Listed below are a couple of examples:
.horizontal-size-label {
  grid-area: horizontal / size-labels / horizontal / size-labels;
}

.vertical-position-input {
  grid-area: vertical / position-inputs / vertical / position-inputs;
}

.horizontal-position-input {
  grid-area: horizontal / position-inputs / horizontal /
    position-inputs;
}
One other element that caught my consideration is the usage of place: absolute for a grid merchandise. The lock button is positioned on the heart of the grid, however it wants a slight inset from the left and prime positions.
.lock-button {
  grid-area: horizontal / size-locks / horizontal / size-locks;
  place: absolute;
  left: 8px;
  prime: 22px;
}
I in all probability will write one other write-up nearly this CSS grid method and its numerous use instances.
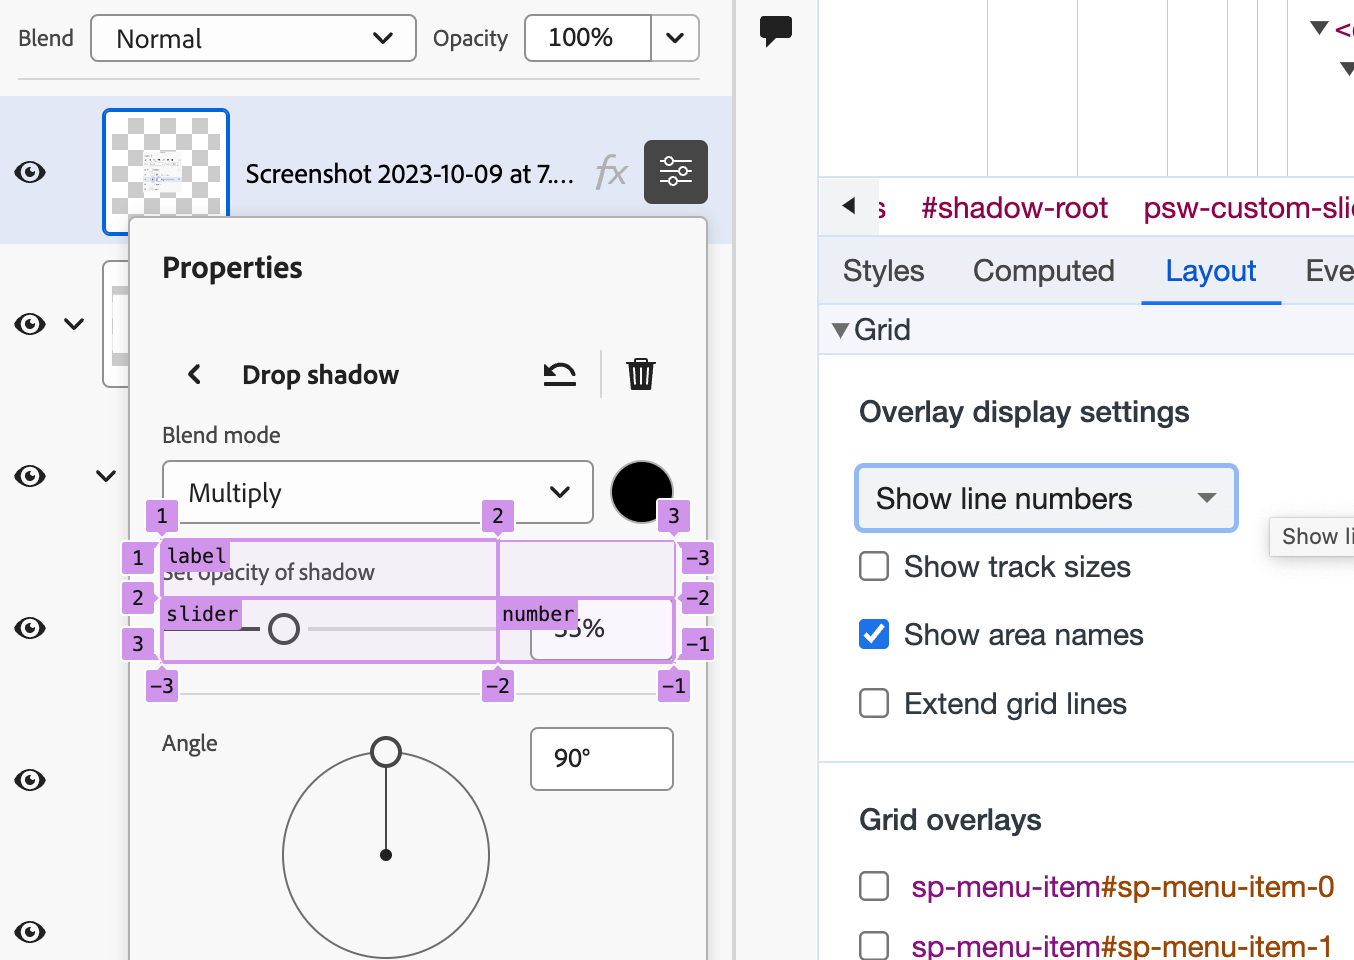
Drop-shadow enter subject
That is an instance of many the place CSS grid is getting used for the format of an enter subject.
:host([editable]) {
  show: grid;
  grid-template-areas:
    "label ."
    "slider quantity";
  grid-template-columns: 1fr auto;
}

:host([editable]) #label-container {
  grid-area: label / label / label / label;
}

:host([editable]) #label-container + div {
  grid-area: slider / slider / slider / slider;
}

:host([editable]) sp-number-field {
  grid-area: quantity / quantity / quantity / quantity;
}
When inspecting this within the browser, you possibly can both see the grid line names or grid space names. Listed below are two figures that present the distinction.
Grid space names
Grid line names

I like you can view the format in two other ways. Very helpful for debugging or understanding the format that you just’re making an attempt to construct/repair.
CSS grid ought to be used extra in our internet apps, however undoubtedly not like the next instance.
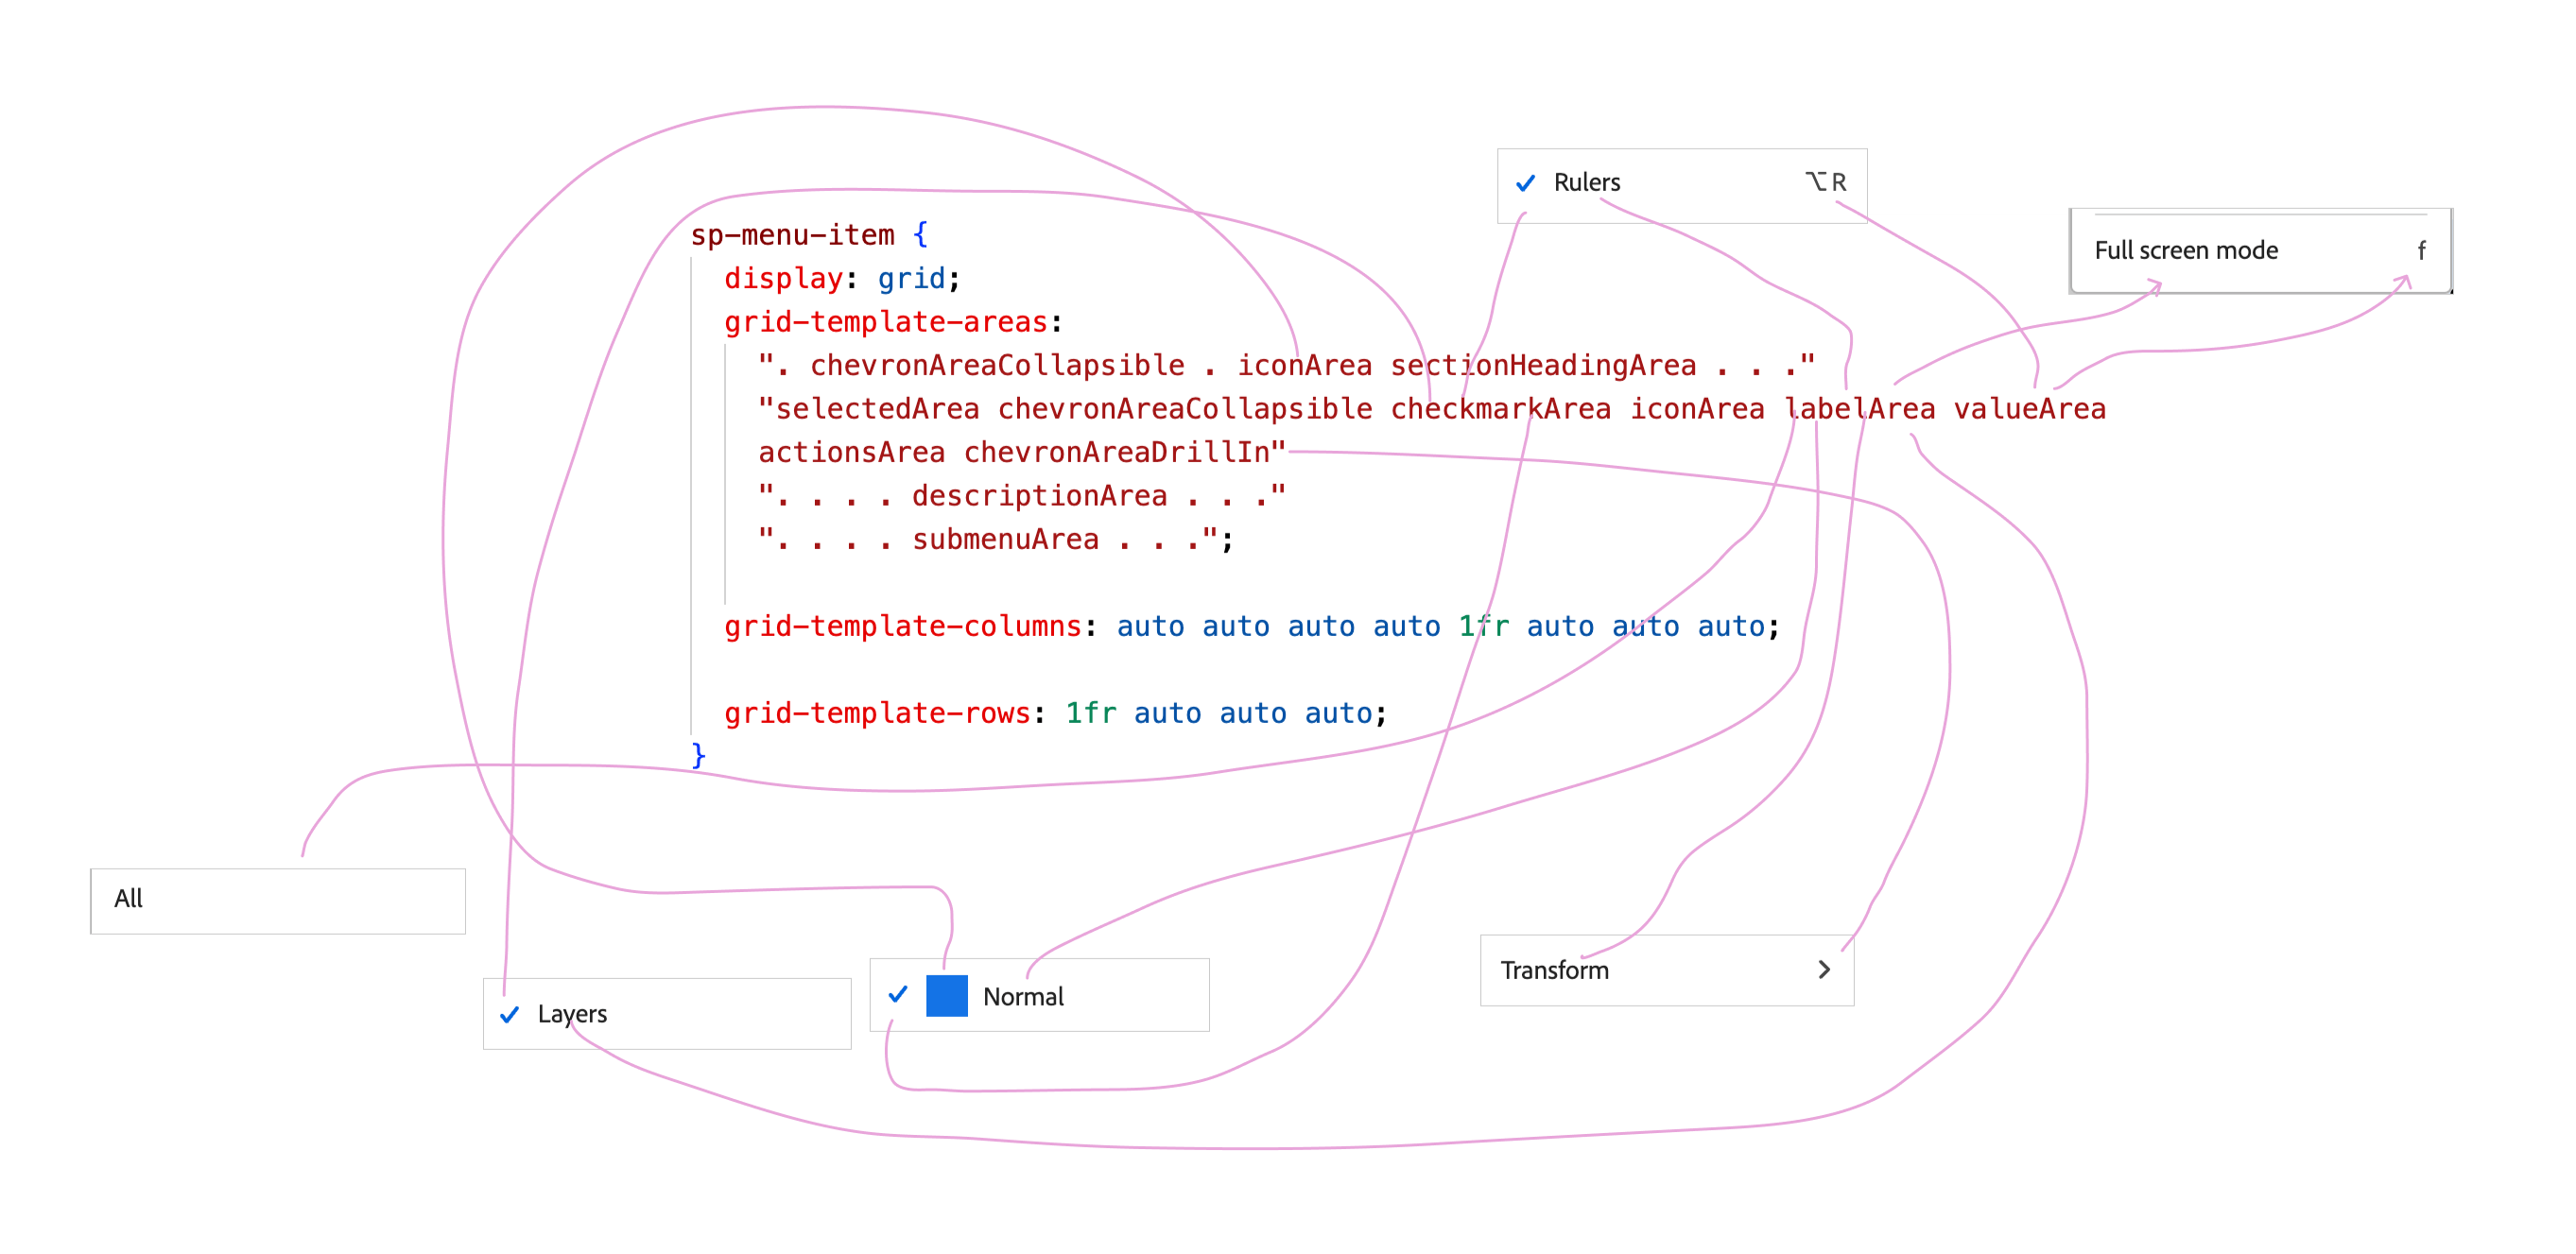
The usage of CSS grid right here is an overkill in my view. Let me present you what I imply.
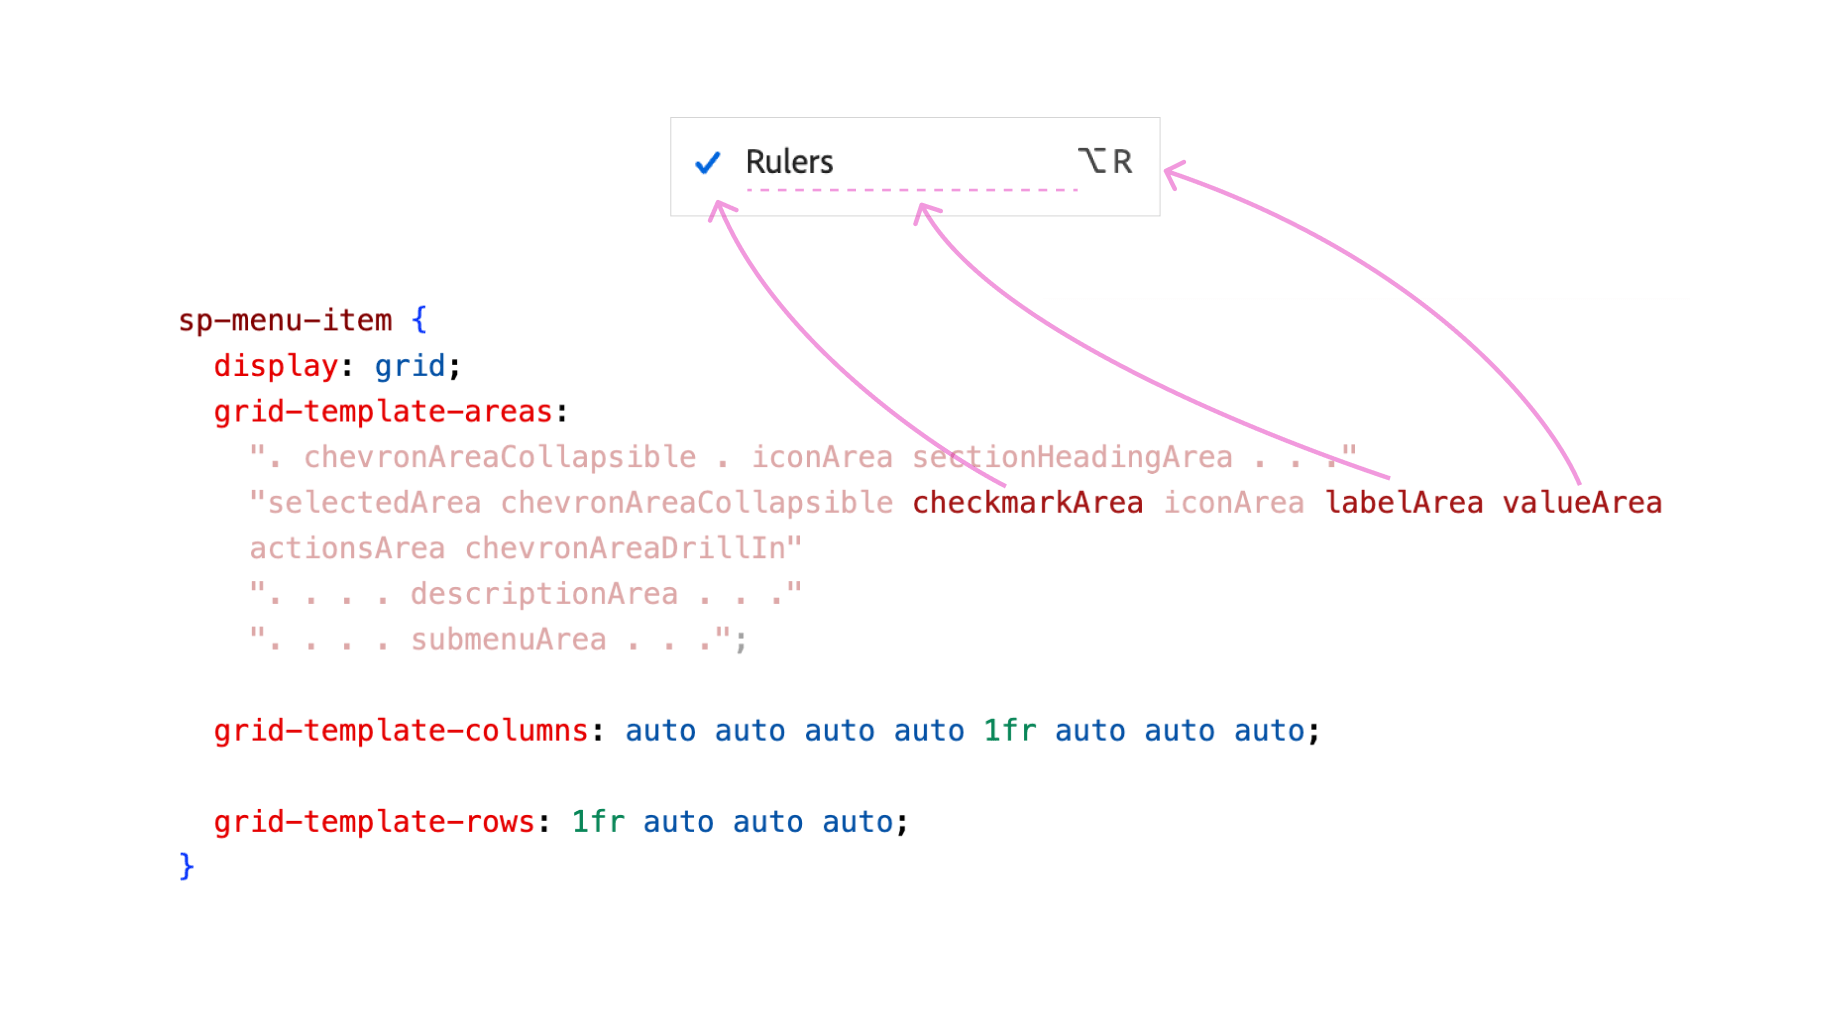
sp-menu-item {
  show: grid;
  grid-template-areas:
    ". chevronAreaCollapsible . iconArea sectionHeadingArea . . ."
    "selectedArea chevronAreaCollapsible checkmarkArea iconArea labelArea valueArea actionsArea chevronAreaDrillIn"
    ". . . . descriptionArea . . ."
    ". . . . submenuArea . . .";
  grid-template-columns: auto auto auto auto 1fr auto auto auto;
  grid-template-rows: 1fr auto auto auto;
}
This can be a grid that incorporates 8 columns * 4 rows. From the time I spent on understanding why they did this, it looks like one grid row is lively at a time, the opposite rows will collapse resulting from empty content material, or the absence of HTML components.
Enjoyable truth, the CSS above is after I simplified it. The unique model appeared like this. The group used grid-template shorthand.
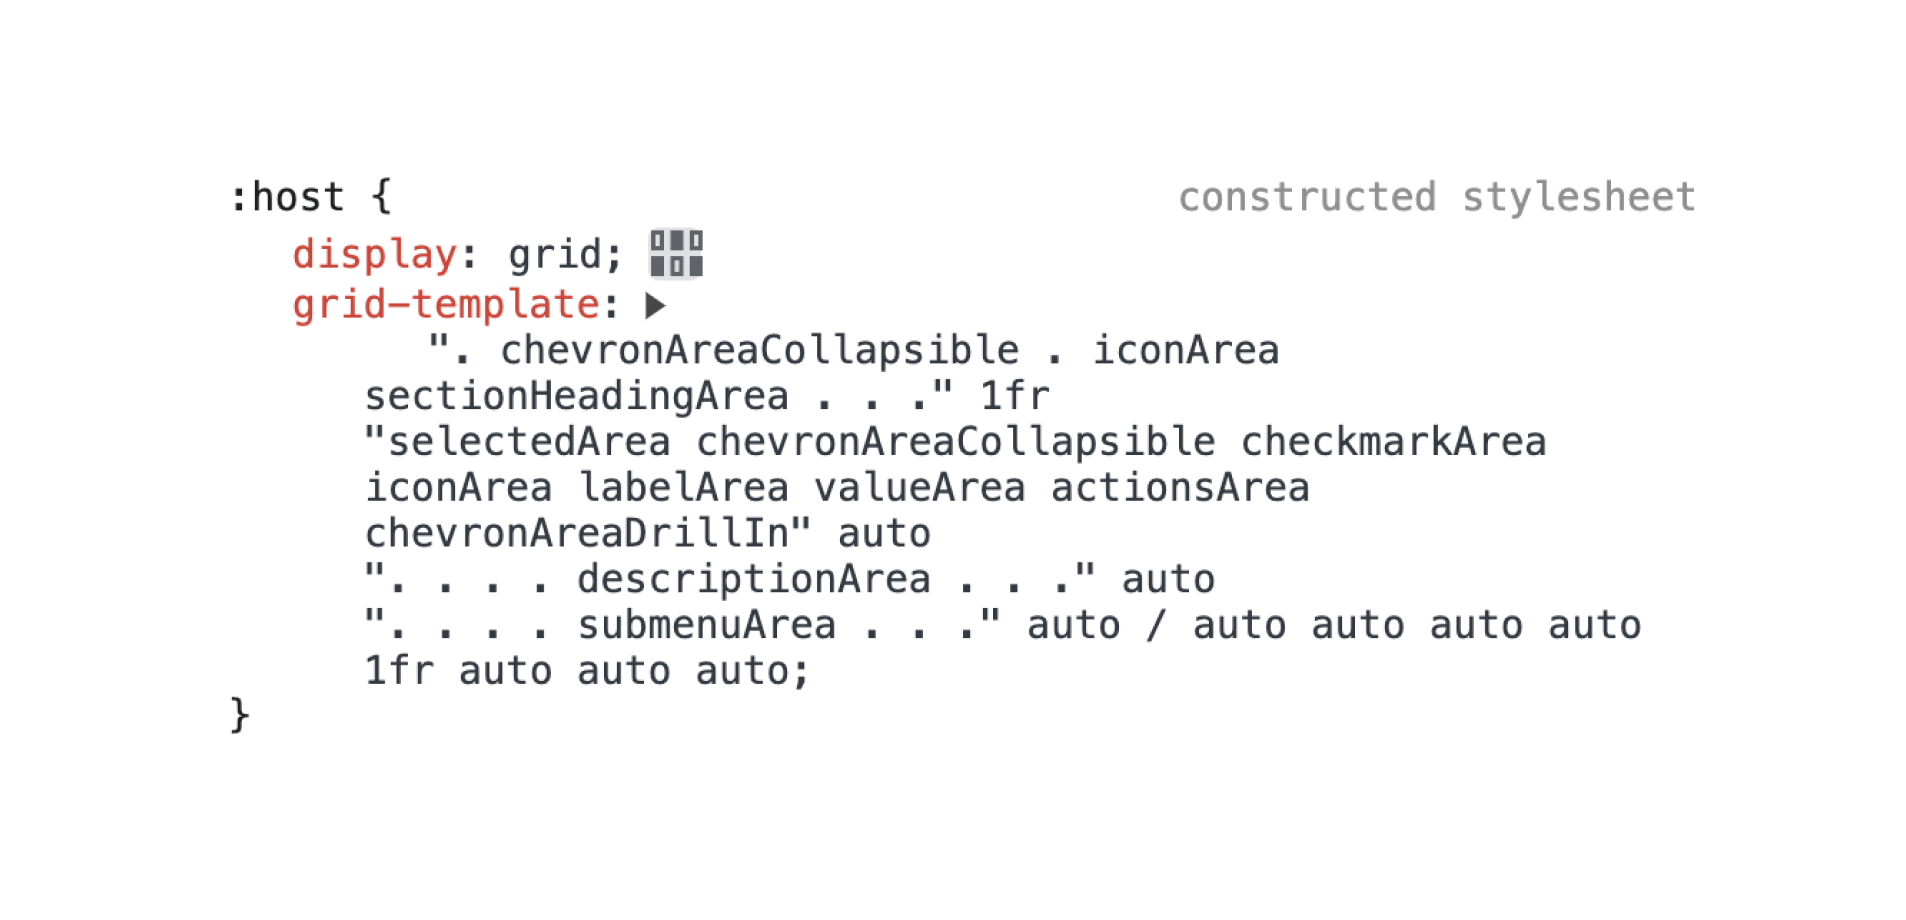
Listed below are the menu merchandise variations that I may discover throughout the app.
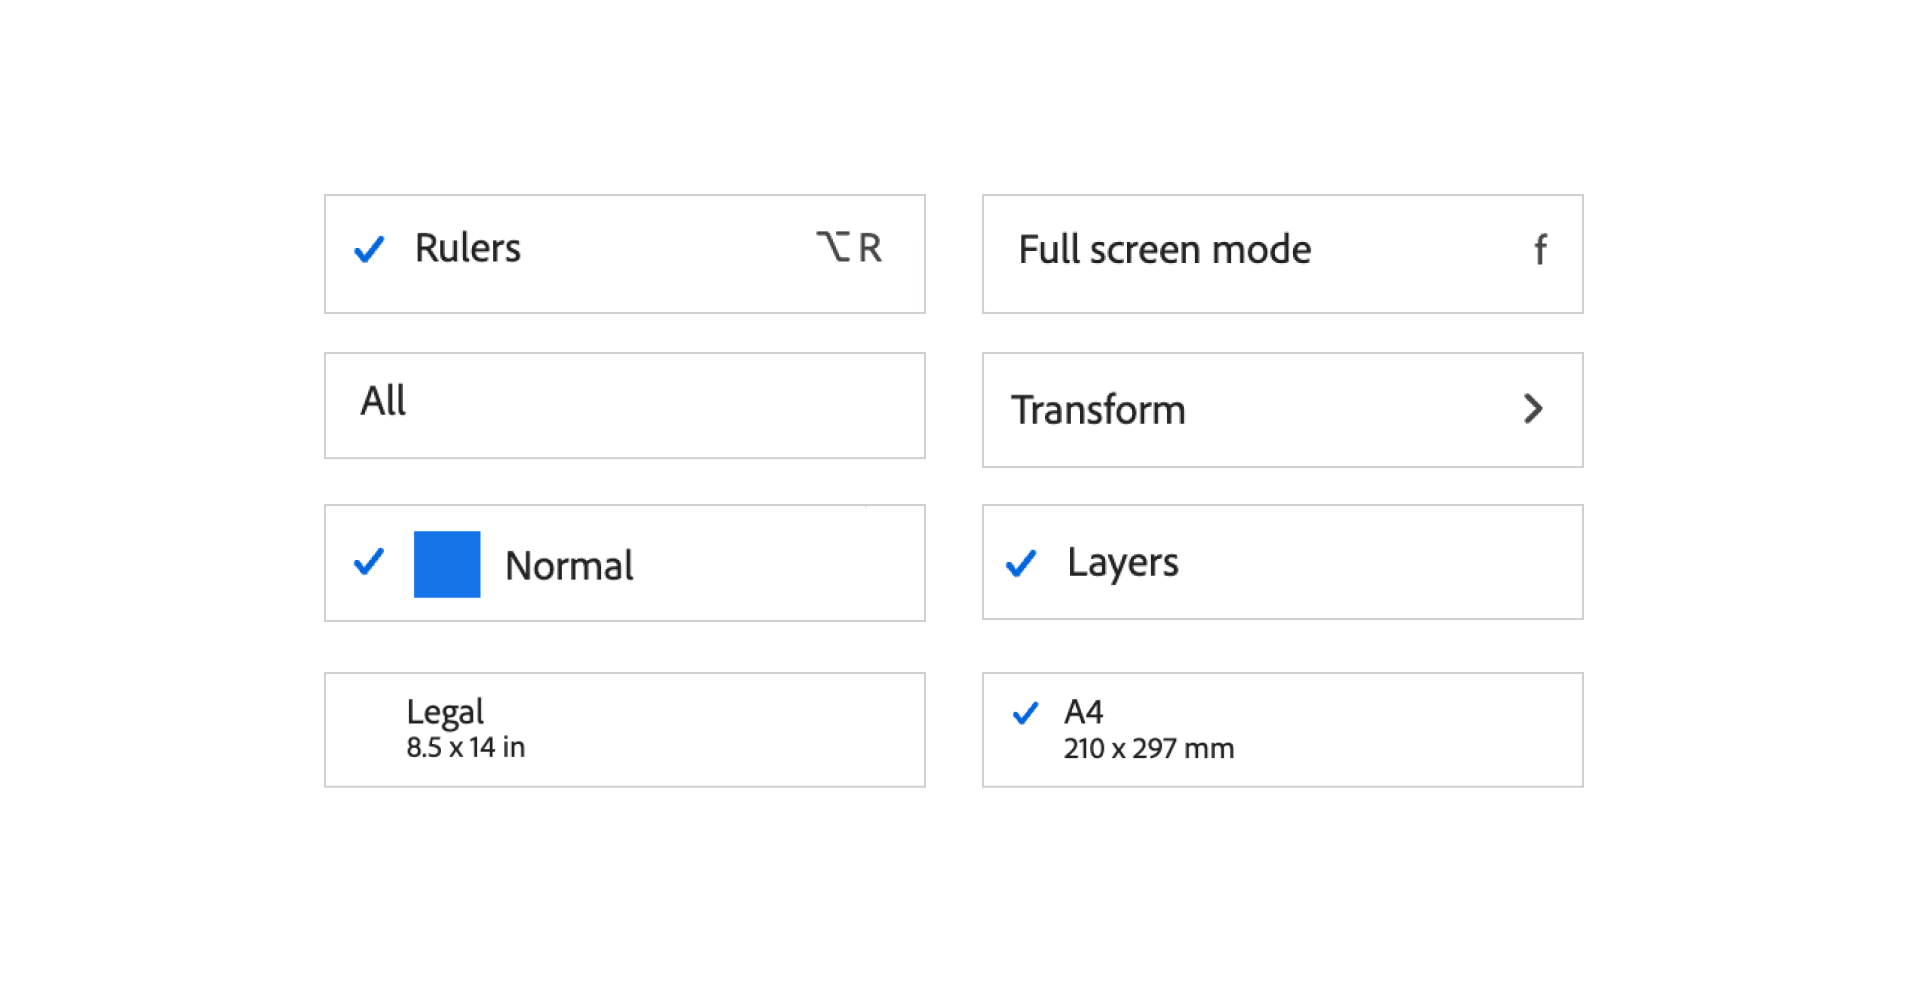
Sure, that CSS grid is for this tiny part. I’m not satisfied about utilizing CSS grid right here in any respect. Once more, it’s an overkill.
Right here is an instance of utilizing the grid.
.checkmark {
  align-self: begin;
  grid-area: checkmarkArea / checkmarkArea / checkmarkArea /
    checkmarkArea;
}

#label {
  grid-area: labelArea / labelArea / labelArea / labelArea;
}

::slotted([slot="value"]) {
  grid-area: valueArea / valueArea / valueArea / valueArea;
}
Discover how the dimmed a part of the CSS grid is inactive. They collapsed since there was no content material. For this particular instance, the creator can do that too:
.checkmark {
  align-self: begin;
  grid-area: checkmarkArea;
}

#label {
  grid-area: labelArea;
}

::slotted([slot="value"]) {
  grid-area: valueArea;
}
No must outline the beginning and finish of every column and row when they’re the identical worth.
In depth use of CSS variables
I actually like how CSS variables are used to vary the UI. There are a number of examples of this that I’ll spotlight.
Altering the scale of the layer thumbnails
In case you are aware of Photoshop, it’s doable to manage the thumbnail dimension and make them smaller. That is helpful when you may have quite a lot of layers, and need to view extra layers in much less area.
See the next determine:
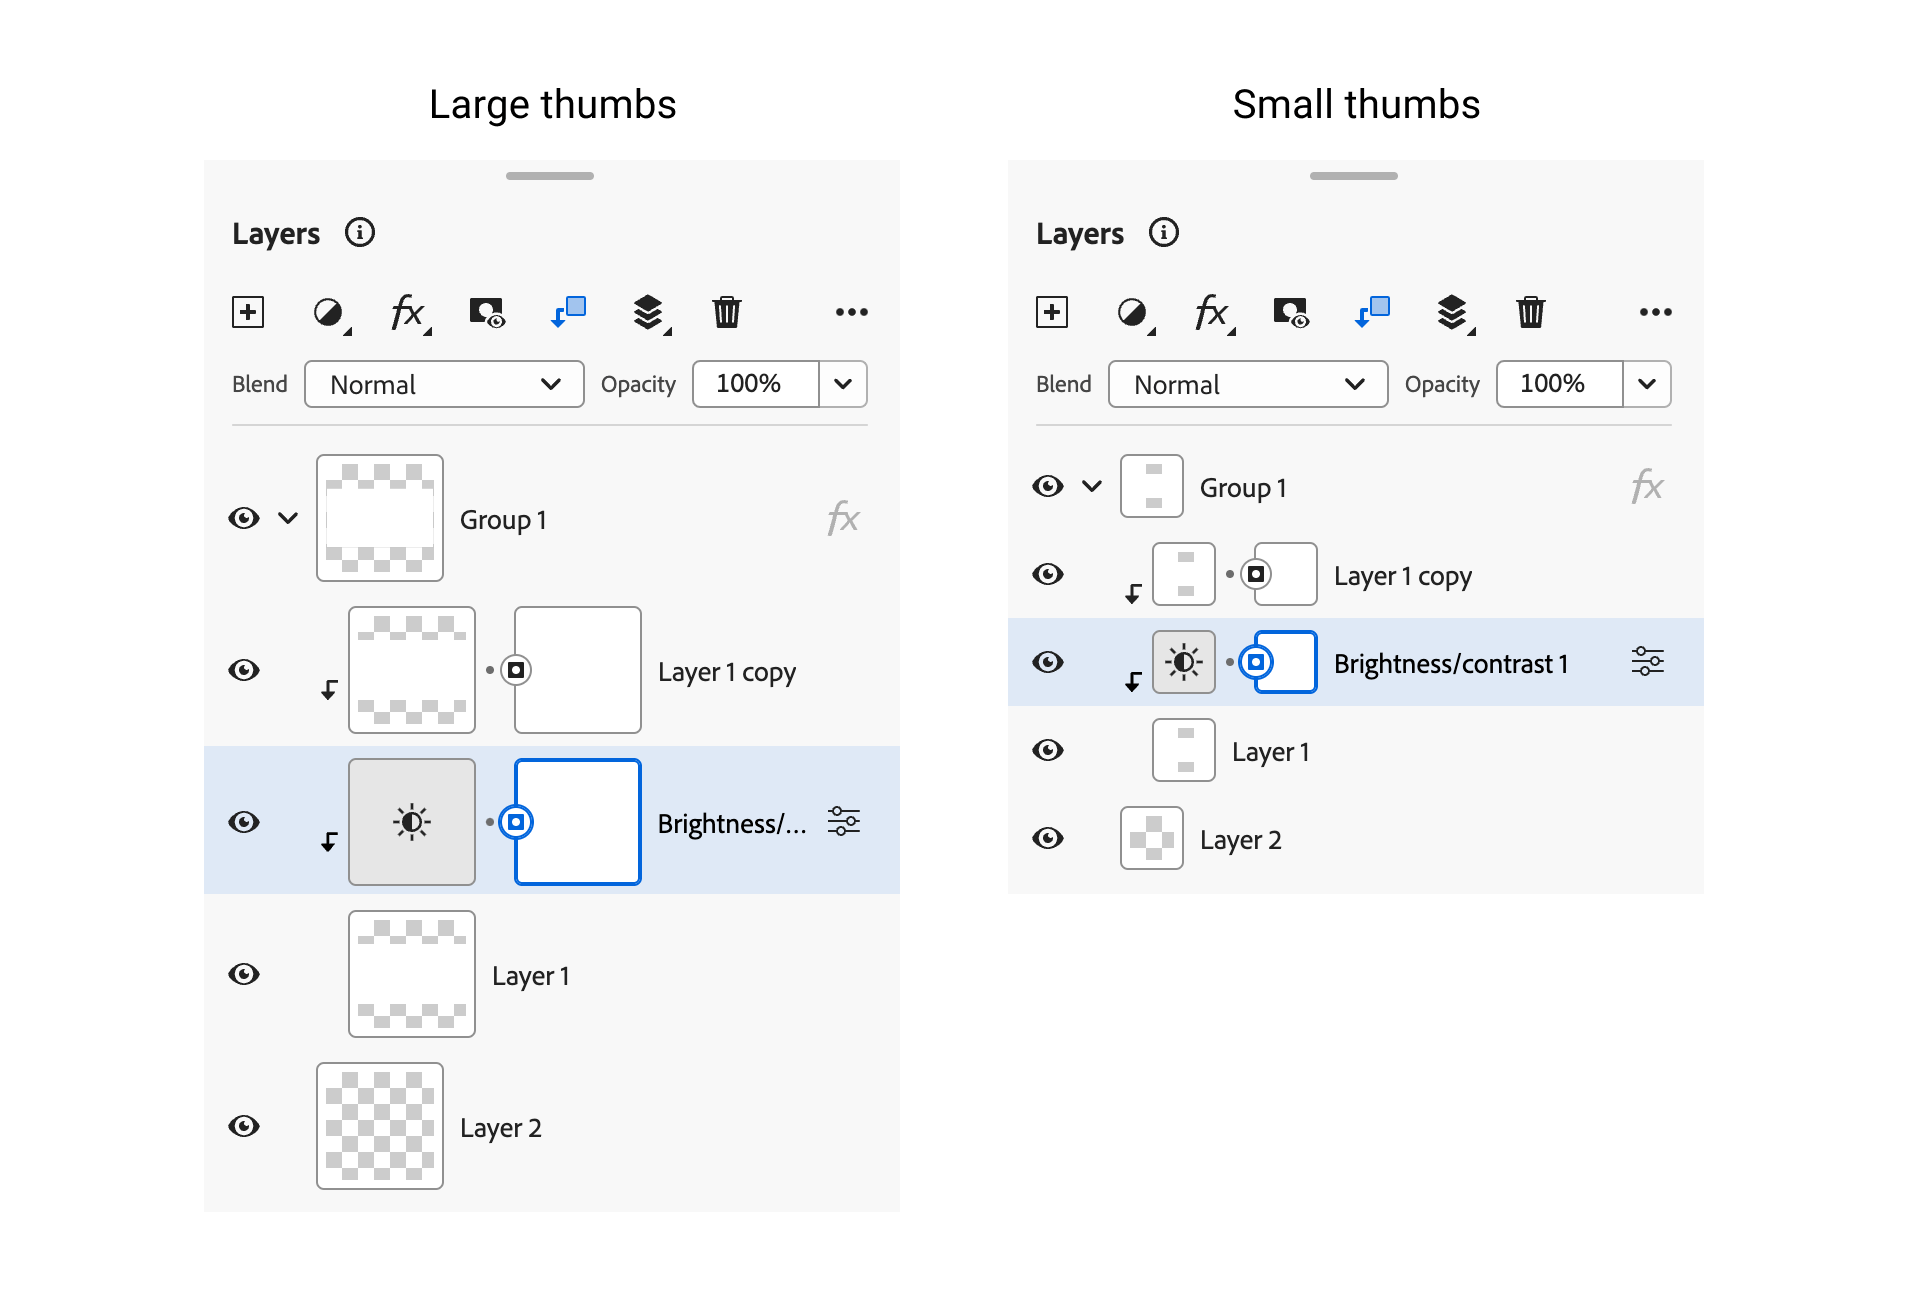
I like how the Adobe group constructed that. First, there’s an HTML attribute large-thumbs on the principle container for the layers panel.
<psw-layers-panel large-thumbs></psw-layers-panel>Within the CSS, there’s :host([large-thumbs]) which assigns particular CSS variables.
:host([large-thumbs]) {
  --psw-custom-layer-thumbnail-size: var(
    --spectrum-global-dimension-size-800
  );
  --psw-custom-layer-thumbnail-border-size: var(
    --spectrum-global-dimension-size-50
  );
}
For every layer, there is a component with the title psw-layer-thumbnail. That is the place the CSS variables will probably be utilized. It should inherit it from the principle container.
<psw-layers-panel-item>
  <psw-tree-view-item>
    <psw-layer-thumbnail class="thumb"></psw-layer-thumbnail>
  </psw-tree-view-item>
</psw-layers-panel-item>
Right here, the CSS variables are assigned to the thumbnail.
:host {
--layer-thumbnail-size: var(
--psw-custom-layer-thumbnail-size,
var(--spectrum-global-dimension-size-400)
);
--layer-badge-size: var(--spectrum-global-dimension-size-200);
place: relative;
width: var(--layer-thumbnail-size);
min-width: var(--layer-thumbnail-size);
peak: var(--layer-thumbnail-size);
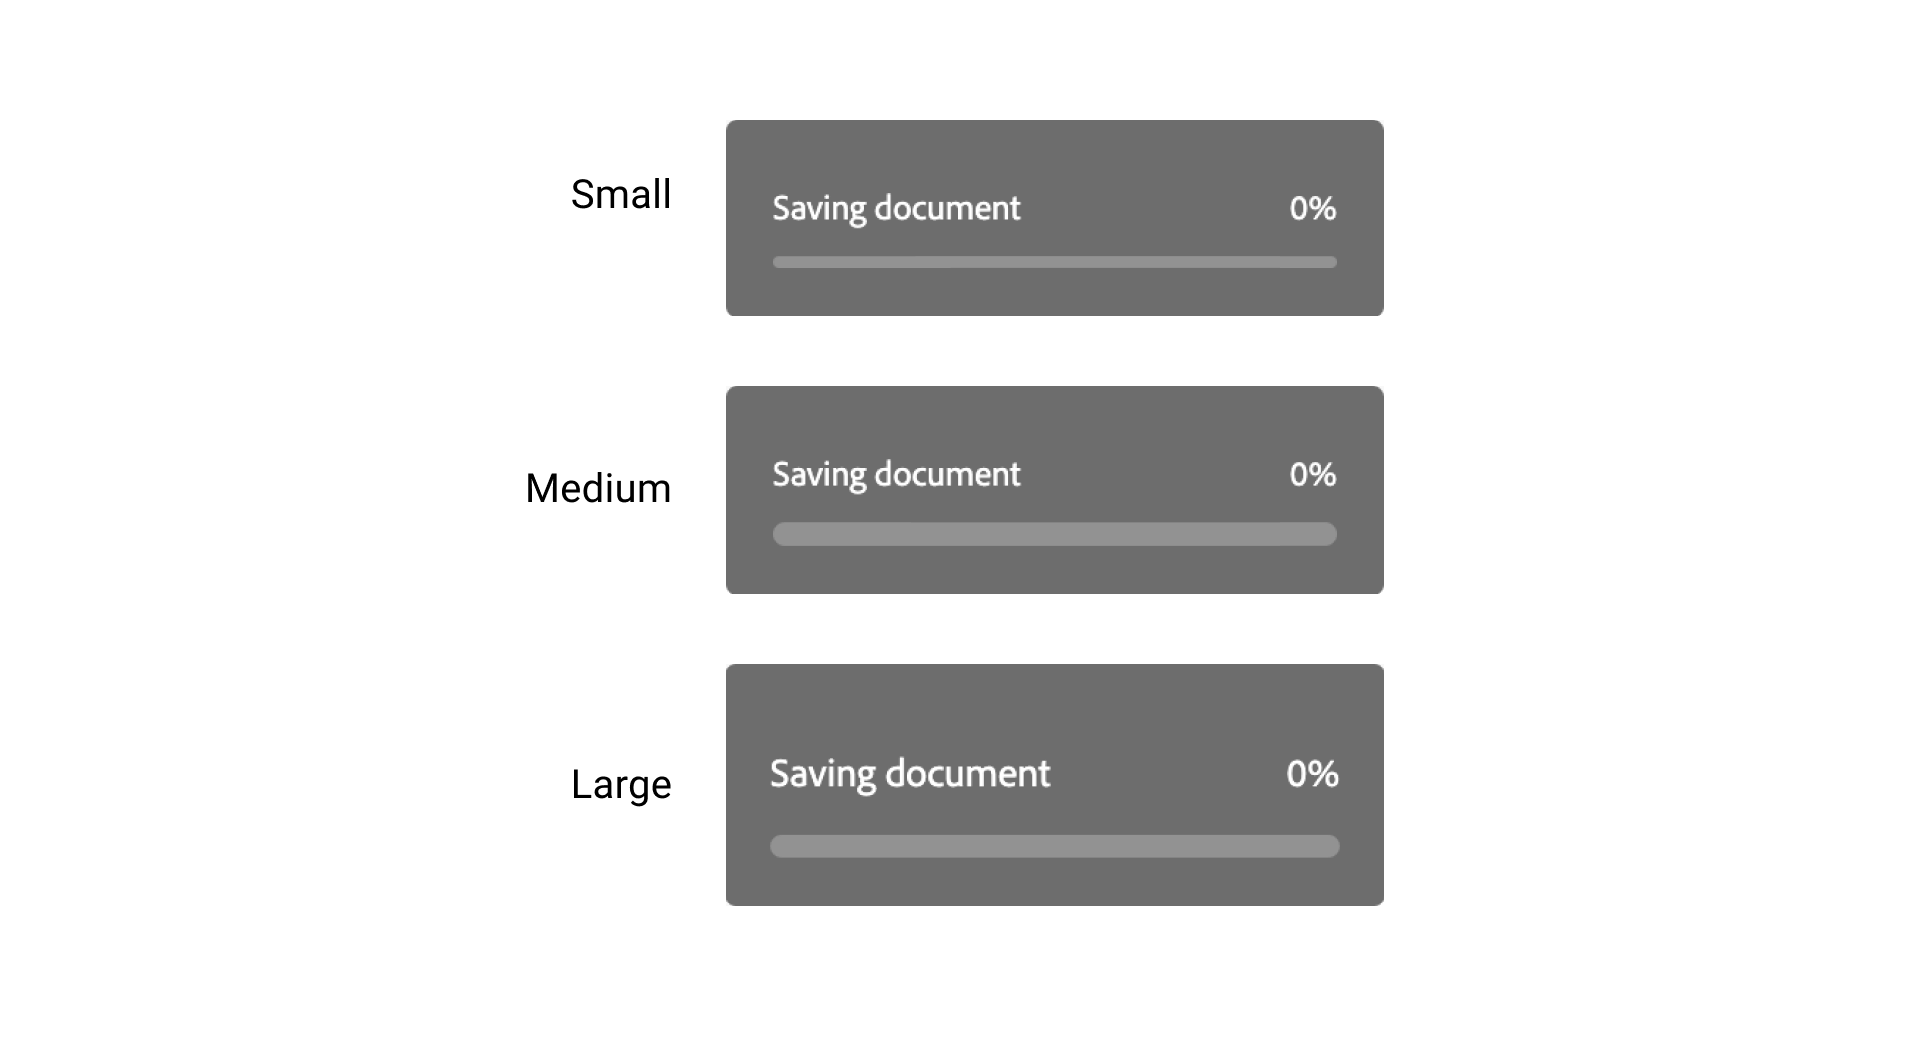
}Loading progress
Managing the scale of the part is finished by utilizing the attribute dimension. The CSS variables change based mostly on the scale.
:host([size="m"]) {
  --spectrum-progressbar-size-default: var(
    --spectrum-progressbar-size-2400
  );
  --spectrum-progressbar-font-size: var(--spectrum-font-size-75);
  --spectrum-progressbar-thickness: var(
    --spectrum-progress-bar-thickness-large
  );
  --spectrum-progressbar-spacing-top-to-text: var(
    --spectrum-component-top-to-text-75
  );
}
Picture controls
I just like the naming right here. If the HTML attribute fairly is current, then the UI is less complicated (doesn’t have a border).
That is additionally executed through CSS variables.
:host([quiet]) {
  --spectrum-actionbutton-background-color-default: var(
    --system-spectrum-actionbutton-quiet-background-color-default
  );
  --spectrum-actionbutton-background-color-hover: var(
    --system-spectrum-actionbutton-quiet-background-color-hover
  );

}
Radio buttons
On this instance, the group used CSS variables to vary the scale of a radio button based mostly on the dimension HTML attribute.

<sp-radio dimension="m" checked="" function="radio"></sp-radio>:host([size="m"]) {
--spectrum-radio-height: var(--spectrum-component-height-100);
--spectrum-radio-button-control-size: var(
--spectrum-radio-button-control-size-medium
);
}When the principle menu is lively, there’s a “holder” factor that fills the entire display and is positioned under the menu.
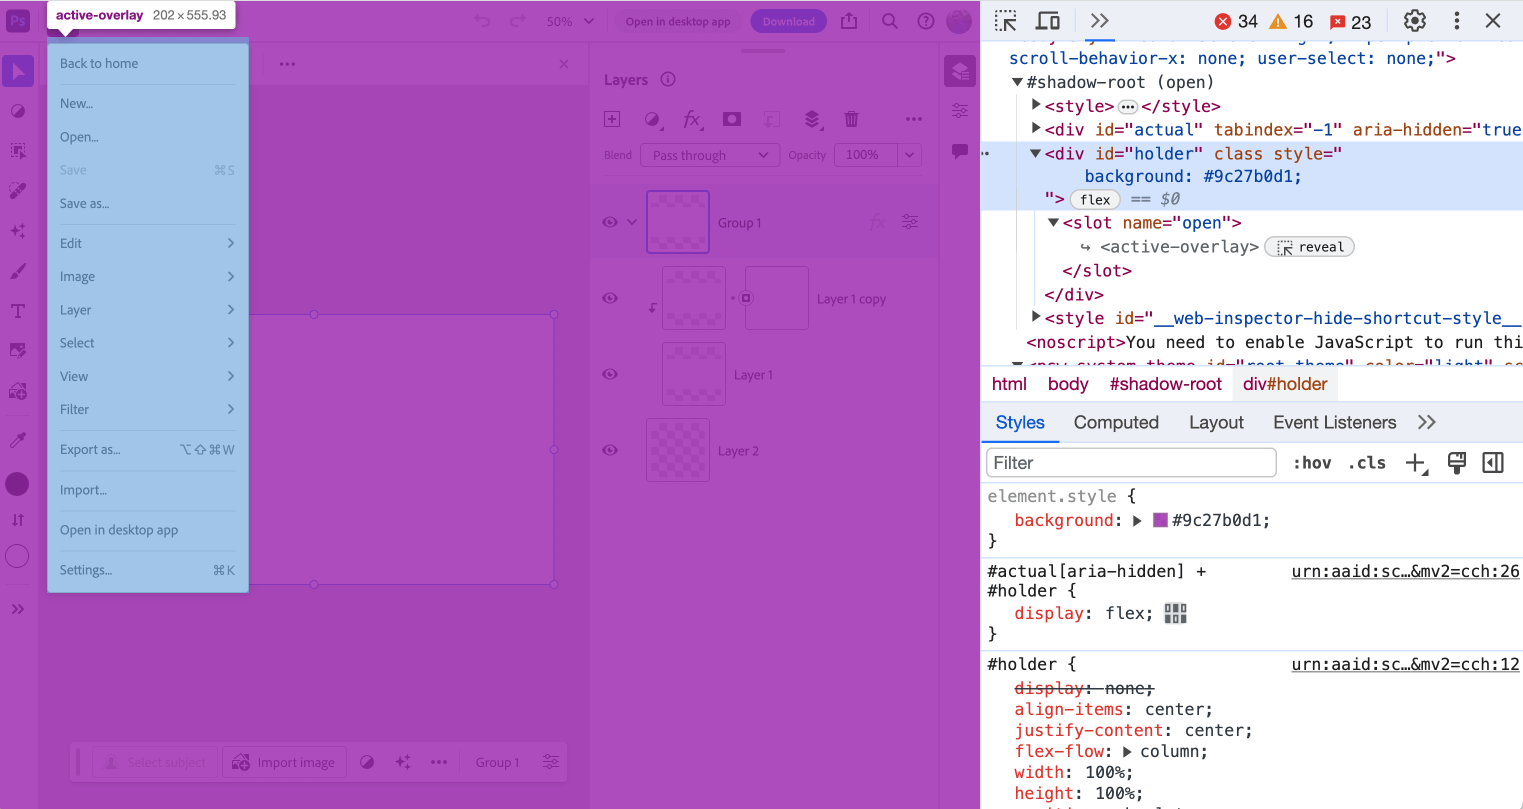
#precise[aria-hidden] + #holder {
  show: flex;
}

#holder {
  show: none;
  align-items: heart;
  justify-content: heart;
  flex-flow: column;
  width: 100%;
  peak: 100%;
  place: absolute;
  prime: 0;
  left: 0;
}
This factor is to stop customers from clicking or hovering on different components of the web page. I believe it’s right here to imitate desktop apps.
I noticed a use for CSS viewport items in right here. The mixing modes menu has a most peak of 55vh.
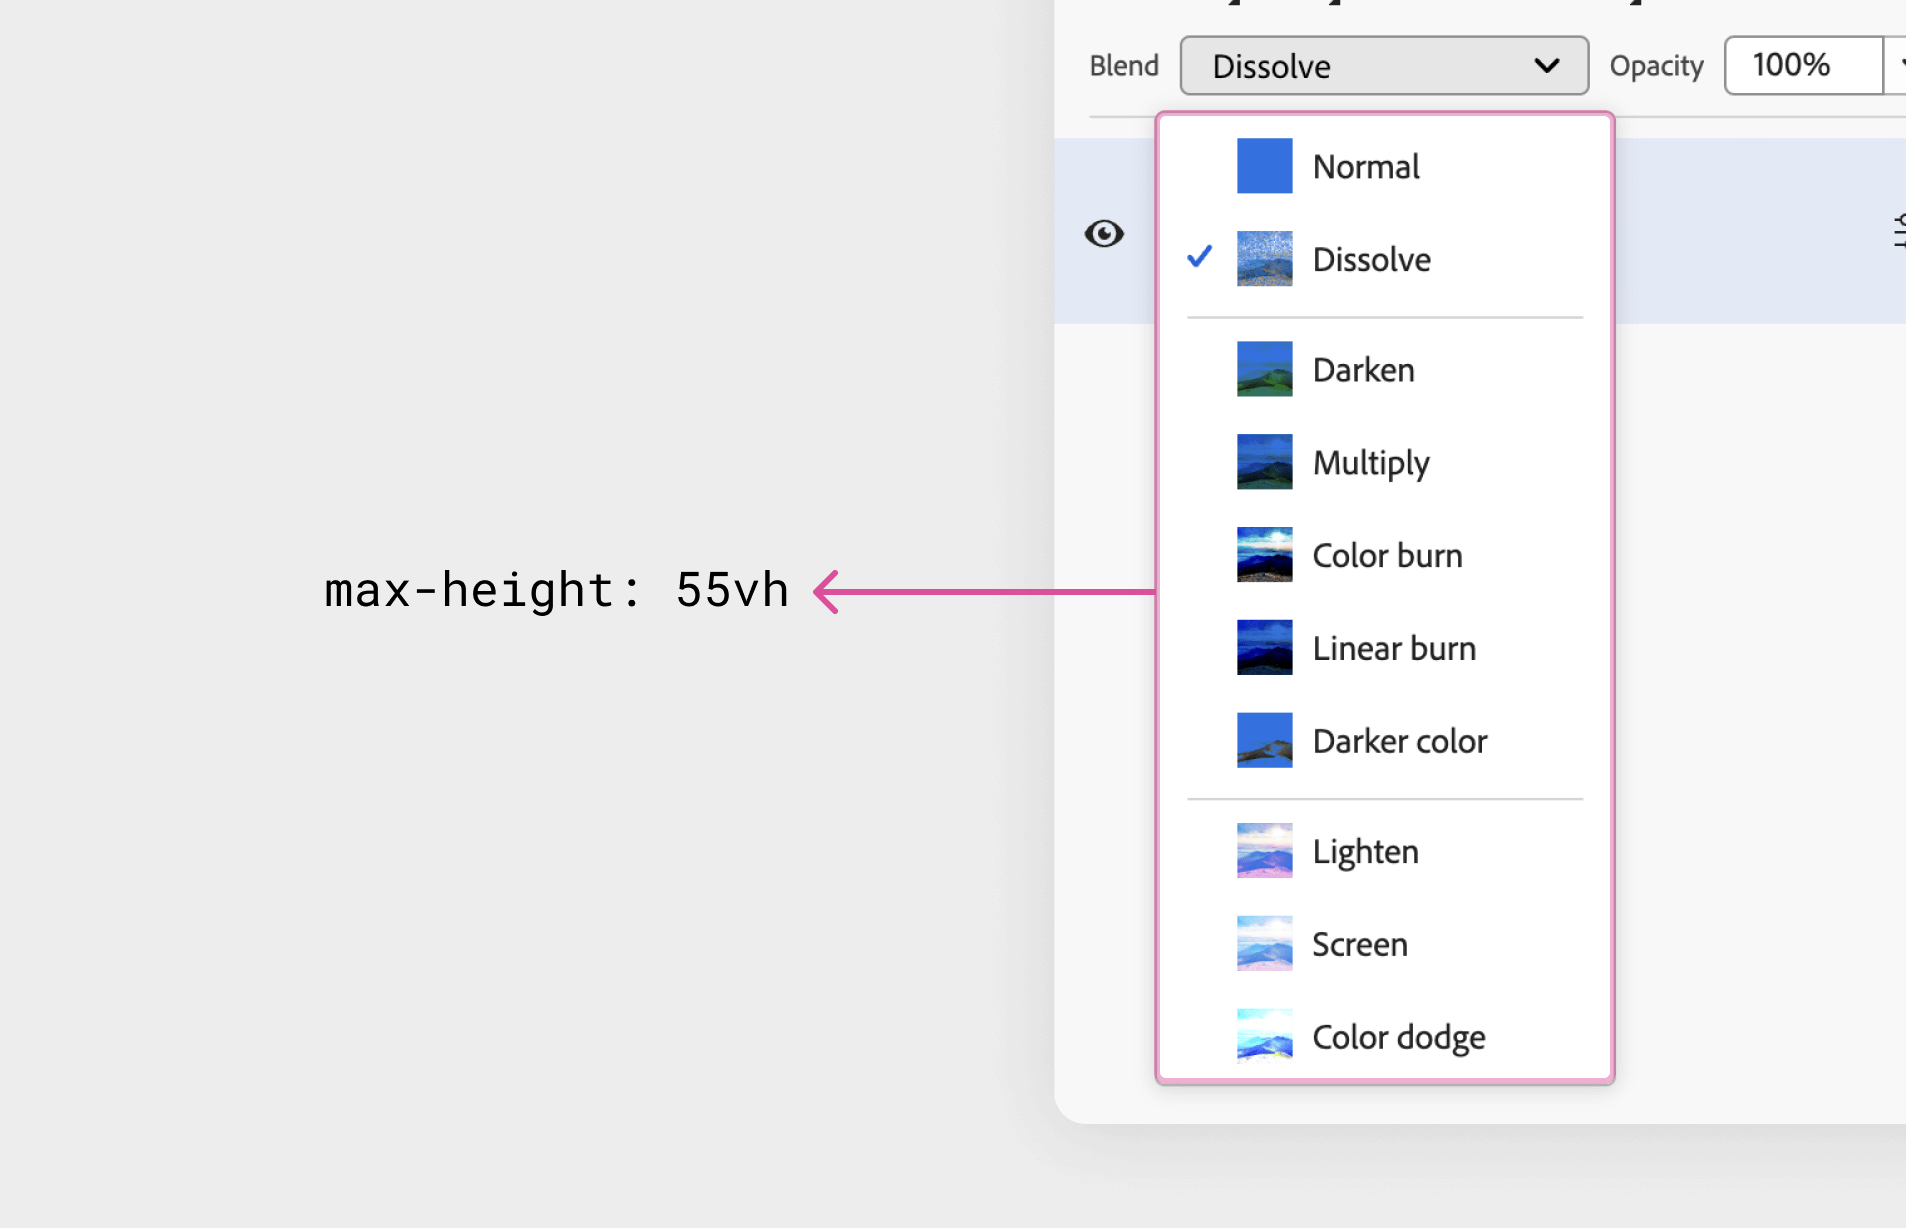
sp-menu {
  max-height: 55vh;
  --mod-menu-item-min-height: auto;
}

::slotted(*) {
  overscroll-behavior: comprise;
}
Oh, and in addition overscroll-behavior: comprise is used. This can be a nice function to keep away from scrolling the physique content material. See this text for extra particulars.
See the video of the way it behaves on resize:
Annotations part
The person can both pin a remark or a drawing wherever on the canvas. I inspected the annotations part to see the way it was constructed.
I just like the CSS variables for dynamic positioning and coloration
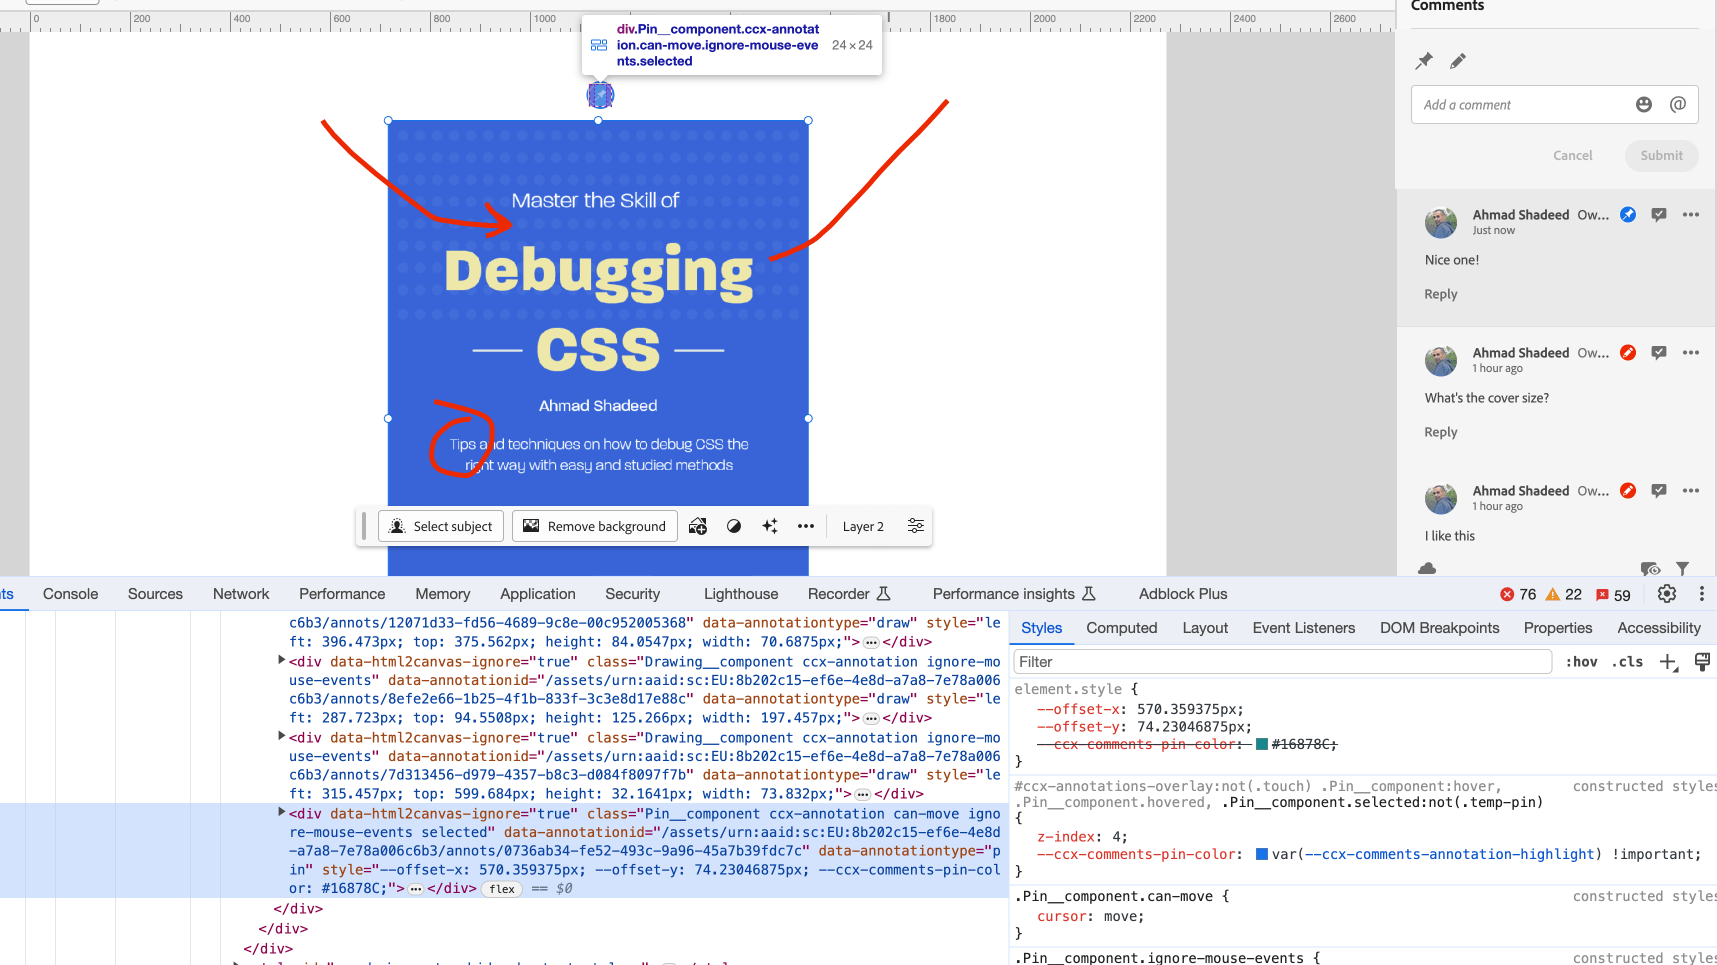
To place every remark within the place that the person selected, the group used CSS variables which can be fed through JS to deal with that.
<div
  data-html2canvas-ignore="true"
  class="Pin__component ccx-annotation"
  fashion="--offset-x: 570.359375px;
           --offset-y: 74.23046875px;
           --ccx-comments-pin-color: #16878C;"
></div>
.Pin__component {
--pin-diameter: 24px;
left: calc(var(--offset-x) - var(--pin-diameter) / 2);
prime: calc(var(--offset-y) - var(--pin-diameter) / 2);
place: absolute;
peak: var(--pin-diameter);
width: var(--pin-diameter);
border-radius: var(--pin-diameter);
border: 1px strong white;
background: var(--ccx-comments-pin-color);
}Utilizing SVG for drawing annotations
That is good till you zoom out. The SVG stroke received’t resize and it’ll look very thick.
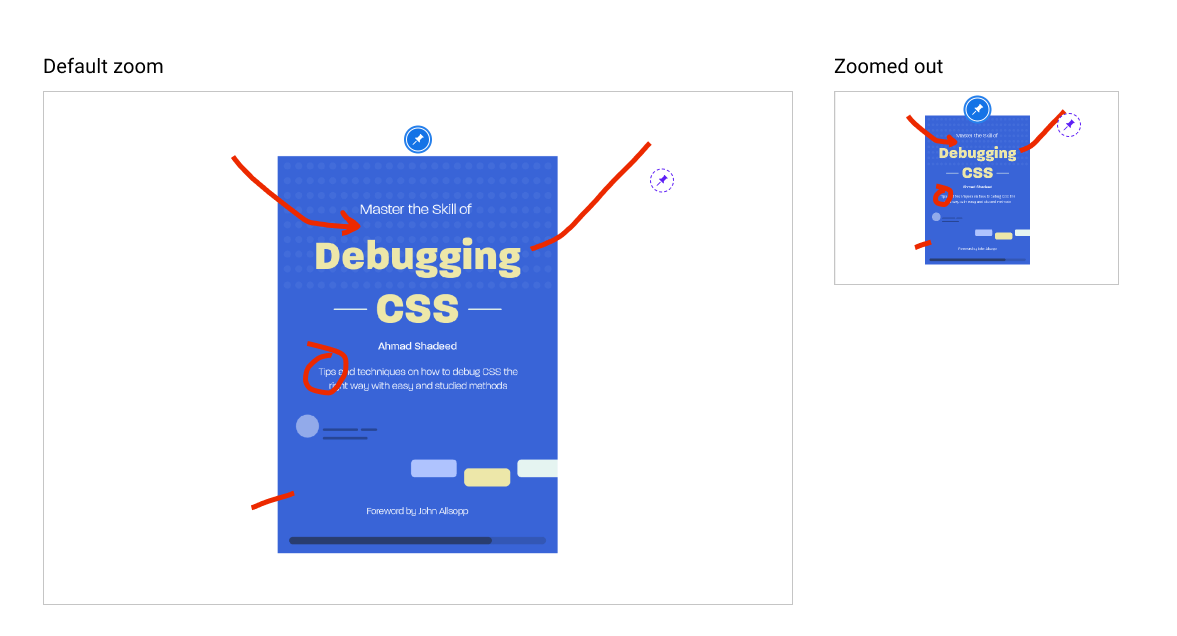
As per my data, this may be mounted by including vector-effect: non-scaling-stroke. I didn’t strive it although.
Utilizing object-fit: comprise for the layer thumbnail
Within the layers panel, the thumbnail has object-fit: comprise to keep away from distortion.
See the next video:
Outro
Thanks quite a bit for following alongside. I hope that you just loved it and realized one thing new. In case you are all in favour of extra articles like this, I already written a couple of: