


Our product workforce is busy including many nice new options to Aha! Whiteboards and Aha! Data — together with wireframes, voting, and enhancements to viewing Aha! Roadmaps knowledge inside a whiteboard. We added all of this performance in simply the previous couple of months, and we’re busy constructing much more options that can ship product worth to our customers.
Because the engineering lead for these merchandise, I noticed all the above options (and others) on our product roadmap and had a number of ideas:
- How can we simply construct options that depend on dynamic content material and real-time person collaboration?
- How can we do this on Canvas? Rendering dynamic content material on Canvas is sophisticated — or at the very least, it is rather more troublesome than utilizing HTML and React, which is how we’ve constructed most interactive options at Aha!
The problem
Anybody who has used Canvas up to now understands the problem. You can not merely render content material to the display — you could manually draw content material utilizing features reminiscent of lineTo, fillRect, fillText, and so forth. Contemplate the actually easy instance of rendering “Hey, world!” with fundamental styling and a fast structure. Let’s try to reproduce this HTML in Canvas:
<span type="border: strong 1px black; padding: 5px; font: 16px Instances;">
  Hey, world!
</span>
The code above will produce this:
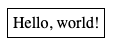
However let’s have a look at what we would wish to generate this in Canvas:
// Rendering context
const ctx: CanvasRenderingContext2D = canvas.getContext('second');
const padding = 5;

// Measure the textual content
ctx.font="16px Instances";
ctx.textBaseline="prime";
const textMetrics = ctx.measureText('Hey, world!');

// Calculate the field dimension
const contentWidth = textMetrics.width + padding * 2;
const contentHeight = textMetrics.fontBoundingBoxDescent + textMetrics.fontBoundingBoxAscent + padding * 2;

// Draw the border
ctx.fillStyle="black";
ctx.strokeRect(0, 0, contentWidth, contentHeight);

// Render the textual content
ctx.fillText('Hey, world!', padding, padding + textMetrics.fontBoundingBoxAscent);
Nearly 20 strains of code simply to render probably the most fundamental of content material.
Dynamic content material
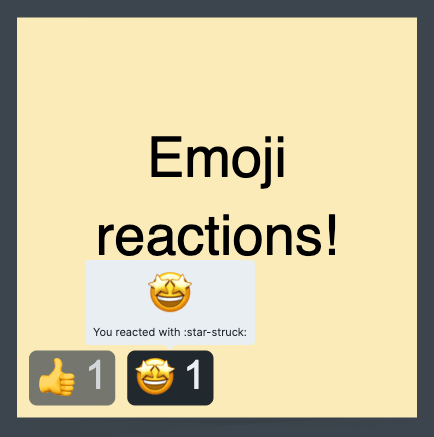
This turns into much more advanced while you begin including dynamic content material. For instance, one of many first options in our Aha! Whiteboards roadmap was so as to add emoji reactions to our sticky observe form. It is a easy method to collect suggestions from everybody viewing the whiteboard. The function appears easy sufficient. In React/HTML, you may need one thing that appears like this:
<button className="emoji-button" onClick={clickHandler}>
  👍 1
</button>
And here’s what the person would see:

In Canvas, this turns into rather more troublesome. We now have to render the button, add the padding and border radius, after which render the emoji and response quantity.
But it surely would not cease there: What if 10 folks react with a thumbs-up? Or 100? Now, that button have to be wider to adapt to the content material within it. In HTML, you do not even have to consider this. It simply occurs. You’d simply write your code like this:
<button className="emoji-button" onClick={clickHandler}>
  👍 {counter}
</button>
Likelihood is that is how your element was written within the first place. You did not even take into consideration the best way to resize the button ingredient — the browser’s rendering engine simply did that for you. Emoji reactions was simply the primary function I noticed in our roadmap. And there have been many others. However the large, daunting one was wireframes.
Not solely did we’d like a method to render a button that was completely in our management, however we additionally wanted to permit customers to create their very own buttons and add their very own content material to it. And a button was one of many less complicated parts we wanted.
The naive resolution
The very naive resolution could be to jot down every button and wireframe form individually. You could possibly maybe create a renderButton operate as a helper to render a button to the Canvas. Generalize the above code right into a operate, and also you give you one thing like this:
// Rendering context
const ctx: CanvasRenderingContext2D = canvas.getContext('second');

operate renderButton(textual content: string, padding = 5) {
  ctx.save();

  // Calculate the field dimension
  const textMetrics = ctx.measureText(textual content);
  const contentWidth = textMetrics.width + padding * 2;
  const contentHeight = textMetrics.fontBoundingBoxDescent + textMetrics.fontBoundingBoxAscent + padding * 2;

  // Draw the button background
  ctx.beginPath();
  ctx.roundRect(0, 0, contentWidth, contentHeight, 4);
  ctx.fill();

  // Render the textual content
  ctx.fillText(textual content, padding, padding);

  ctx.restore();
}
However this resolution is proscribed. It solely solves a selected downside and would not assist fill within the performance hole that HTML addresses out of the field. Think about how this might scale as you add extra advanced shapes like these:
Navigation menu:

Dropdown picker:
So the complexity of rendering all of those wireframes grows rapidly, even with comparatively easy shapes. How do you calculate the width and peak of every navigation merchandise? How do you render the borders, backgrounds, and dividers between every merchandise?
Buttons
Let’s take a deeper take a look at a quite simple form we’ve in our Wireframes: the button. As I demonstrated above, implementing a fundamental button renderer wouldn’t be troublesome in and of itself. However there may be already a little bit of added complexity right here. Our button wanted to help a number of kinds:
Every of those variations provides a bit extra code and complexity to our renderButton operate. It might undoubtedly be doable to help all of those designs with a single operate, however wouldn’t it be elegant? Reusable? Dynamic?
Did you discover the icons? Properly, customers can select to position the icon on the appropriate facet as a substitute. And so they can change the colour of the button and the textual content, too. By themselves, every of those are minor issues so as to add. However ultimately, that operate would turn out to be overloaded with all of the variations, customizations, and edge circumstances that have to be dealt with.
JSX
To ensure that our workforce to have the ability to simply implement all of those options, we wanted a readable, elegant, and highly effective method to render dynamic content material to Canvas in a well-recognized means. I assumed to myself, would not it’s nice if we may simply render content material to Canvas the identical means we do with React?
After which I had my Aha! second. WE COULD! To do that, we might use one of many actually highly effective and modern options that React launched to the world — one thing known as JSX. It is actually simply syntactic sugar to jot down HTML syntax into declarative and well-structured ingredient objects. For these of you who’re unfamiliar with JSX, what it does for you beneath the hood is convert code like this:
<button className="emoji-button" onClick={clickHandler}>
  👍 {counter}
</button>
Into one thing like this:
_jsx('button', { className: 'emoji-button', onClick: clickHandler }, '👍 ', counter);
JSX, for my part, was the largest innovation that got here out of React on condition that you could possibly write HTML instantly in your JavaScript. I had used different frameworks reminiscent of MooTools up to now. You could possibly use them to dynamically assemble HTML in JavaScript, however with a really verbose and tedious syntax. It appeared similar to the transformed code above. And it labored, but it surely was not satisfying or nice.
The fantastic thing about JSX is you can override how parts are transformed to JavaScript code utilizing one thing known as a pragma. A pragma, or directive, is one thing that tells the JSX compiler the best way to course of the code. In your JSX/TSX code, you possibly can add a pragma to the highest of your file like this:
/** @jsx CanvaSX */
import { CanvaSX } from 'canvasx';
Now, as a substitute of changing your JSX to React code, the above code could be transformed to one thing known as CanvaSX code (extra on this later):
CanvaSX('button', { className: 'emoji-button', onClick: clickHandler }, '👍 ', counter);
The answer
My objective was easy and clear: I wished to have the ability to write JSX code that might render a easy navigation/tab menu. The system ought to generate the structure and render that content material for me dynamically, and I should not have to consider the complexities of measuring textual content and padding and layouts. It might have to deal with quite common structure patterns reminiscent of margin, padding, (rounded) borders, and so forth.
The actually highly effective function could be to have all of the structure complexity utterly hidden from the developer. When rendering the navigation objects, the width of every merchandise would have to be primarily based on the textual content and/or icon inside it, after which the borders and background must be rendered primarily based on the width of that content material. We’d then have to render dividers between every merchandise.
Introducing CanvaSX
I spent a while prototyping a tough implementation of a rendering engine that I’ve come to name CanvaSX (Canvas+JSX). The early variations have been fairly tough, however the advantages have been apparent. I may write easy shapes like a button or navigation menu utilizing very acquainted syntax, and I did not even have to consider calculating coordinates or layouts.
Ultimately, I added help for fundamental interplay properties (reminiscent of onClick and tooltip handlers) and a few very rudimentary flexbox-like parts, too. Now, we may have one thing like an actual button utterly rendered in Canvas. The top consequence made the emoji button so simple as this code:
<Rect
  fill={backgroundColor}
  borderRadius={2}
  padding={2}
  onClick={emojiClickHandler}
  tooltip={emojiTooltipContent}
>
  <FlexRow hole={2} verticalAlignment="heart">
    <Emoji shortCode={shortCode} />
    <Textual content shade={textColor}>{votes}</Textual content>
  </FlexRow>
</Rect>
Which made positive we may provide reactions like these:
The wireframe button may be very related, but it surely merely passes alongside person enter to the properties. For instance, to help rounded vs. sq. buttons, we simply want to jot down one thing like this:
<Rect
  fill={backgroundColor}
  borderRadius={spherical ? 32 : 4}
>
  <Textual content shade={textColor}>{textual content}</Textual content>
</Rect>
This code may be very simple to learn for anybody acquainted with React, and CanvaSX addresses all the structure complexities.
How does it work?
The magic behind CanvaSX is that each element can measure itself. With this info, CanvaSX can generate the layouts routinely. That is what the Textual content element’s measuring operate would possibly seem like:
Textual content.calculateDimensions = (props, ctx: CanvasRenderingContext2D) => {
  ctx.save();

  if (props.font) {
    ctx.font = props.font;
  }

  const textMetrics = ctx.measureText(props.youngsters);

  ctx.restore();

  return {
    width: textMetrics.width,
    peak: textMetrics.fontBoundingBoxAscent,
  };
};
A parting observe
Constructing CanvaSX is likely one of the highlights of my profession. I’ve had the chance to work on many options in my greater than 5 years of working at Aha! These embody capability planning for groups, redesigned drawers, Aha! Develop, and our customized card structure editor. I’ve just lately labored on many enhancements to Aha! Whiteboards, which is the place CanvaSX got here in. It has confirmed itself to be extraordinarily highly effective and versatile — and it’s now used as the inspiration for emoji reactions, wireframes, up to date report playing cards, and our brand-new voting instrument!
I work with a workforce of extraordinarily proficient engineers at Aha! We collaborate to resolve arduous issues and ship worth to our customers. If this feels like one thing you’d get pleasure from doing, it’s best to try our open positions.