


We should perceive the chances and limitations of one another’s instruments to work hand in hand, so let me present you the design facet of issues and all of the little Figma treasures you won’t but perceive totally.

- We work with parts and variants in Figma.
- We work with types in Figma, however they aren’t very sensible.
- We are able to arrange and check responsive design!
- We have now no breakpoints in Figma.
- We are able to additionally work with precise information (kind of).
- You would possibly wish to level out smooth grid vs. arduous grid to us.
- Why we typically mess up line-height.
- All now we have in Figma is PX.
- We are able to arrange fairly candy prototypes in Figma.
- We are going to invite you to ‘View Solely’ rights, providing you with entry to all the pieces you want as a developer.
1. We Work With Elements And Variants In Figma
Elements In Figma
In Figma, we are able to arrange re-usable UI parts and create cases. Elements will also be nested. Therefore we are able to observe a pleasant atomic design path.
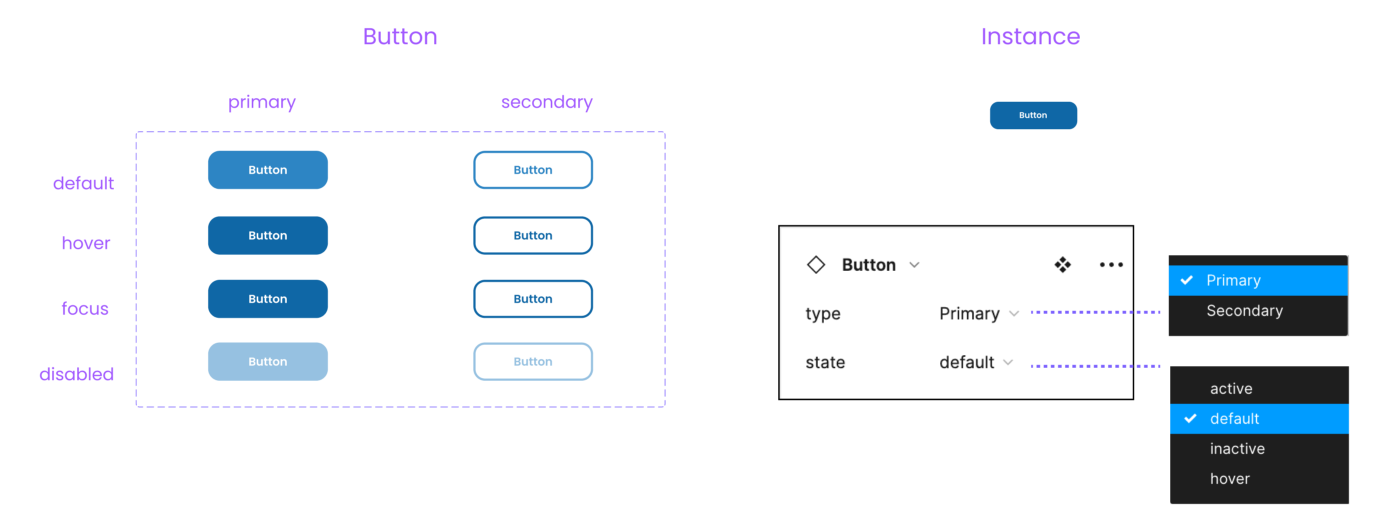
We Additionally Have Variants
We are able to additionally create part units containing variants, swapping them simply all through our design through the properties panel. Subsequently, all states of a part might be present in one place for documentation.
Figma variants might be one-dimensional or multi-dimensional, including a number of properties.
Tip: With true/false or sure/no, you possibly can create a toggle of the whole part. It is a nice approach to create a gentle/darkish mode.I noticed this setup in Joey Banks’s wonderful iOS 16 UI Equipment for Figma. Greatest file setup I’ve ever seen generally!

We Have Props!
Element properties have been launched in March 2022. So I assume a whole lot of builders have no idea about the potential for utilizing them in design but. To this point, now we have textual content props, as an illustration, swap and toggle props. And naturally, we are able to mix all of them collectively.
Exterior Or Native Element Libraries
Simply as in code, we are able to retailer parts domestically or create exterior libraries. (Identical for types, by the best way). This fashion, we are able to pull parts into a number of information in Figma but stay a single supply of fact and tidy construction.

Alternatives Between Design And Code
Align UI And Code Elements In Naming And Construction
Because of using parts, variants, and props, we are able to align our UI parts with code parts. Nonetheless, to take action, we’d like details about the construction, naming, conduct, and so on., from growth. So sit down with us, have a espresso, and present us the code base you’ve or dream of constructing. Many movies and tutorials present how totally different groups deal with this alignment course of. I go away you to the rabbit gap.

Fast Hyperlink UI And Code Elements In Figma
If you wish to hyperlink parts to a code base with out a lot effort and documentation, you possibly can merely add a hyperlink and an outline to the Figma part documentation (a bit hidden). The hyperlink will create a button within the examine tab linking on to, e.g., the Github part of the identical part in code. The Figma part search additionally picks up the outline, which is useful for bigger techniques.
Embed A Figma Element In Your Documentation
You may merely copy a hyperlink (Cmd + L) of the Figma file (or body) and stay embed it in locations like Notion, GitHub, and lots of extra. I did simply this within the instance under. It is a nice approach to stay embed your design with an current (most likely extra code-heavy) documentation. It should, after all, replace as you modify your Figma file.
Create A Check Surroundings And Swap Element Libraries
If parts and types have the identical identify in two totally different libraries, they are often swapped. It is a actually nice alternative to arrange check environments in Figma earlier than pushing a brand new fashion or part to the grasp file. Extra related for superior setups the place code and parts are already aligned.
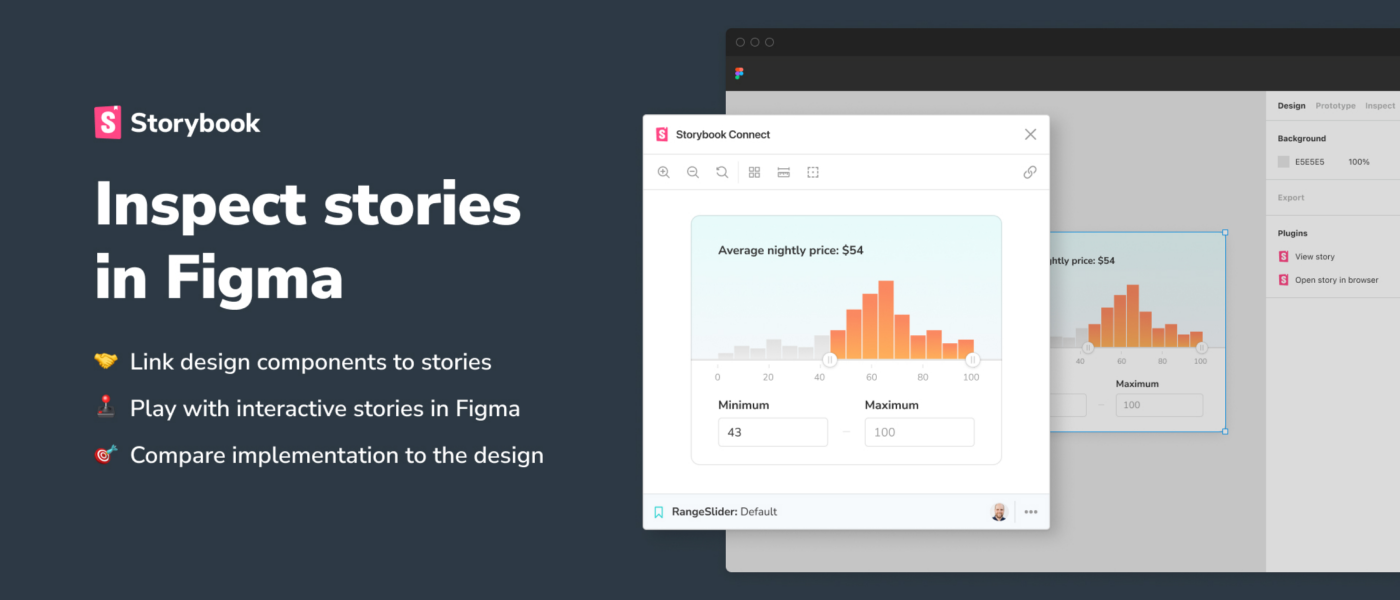
Align With Your Precise Elements By way of Storybook
There are some plugins to align UI parts and code parts. Essentially the most promising one I noticed is Storybook Join. By the best way, if in case you have this incredible setup, how do you align your code? And Figma makes certain to remark! I’d love to listen to and add it!
Be aware: Aligning parts is incredible, however it additionally takes a whole lot of effort and, most of all, upkeep, so use it the place it is smart, e.g., a design system. If you happen to simply design a one-pager web site, you continue to use parts with a clear and scalable design and clear constructing blocks to be coded, however they don’t essentially have to align with the code. It’s like you wouldn’t construct an meeting line to streamline the method of creating a cake in the event you would solely wish to bake a birthday cake on your good friend. But you continue to use the identical primary elements.
2. We Work With Types In Figma, However They Are Not Very Sensible
Types In Figma
In Figma, we are able to create types for coloration, textual content, grids, and issues like shadows or blurs and re-apply them throughout our design. Nonetheless, that’s just about it.
Tip: Click on on the gray background space of the canvas, and also you get an outline of all (native!) types.
There isn’t any magic documentation
However any design crew often paperwork types and their use both throughout the similar Figma file or in a separate file. Simply as with parts, we are able to hyperlink to exterior types. Oh, and there are no spacing techniques types, so we simply want to doc this and set the proper distances by hand.

Alternatives Between Design And Code
Figma Token Plugin to create or join with current tokens
As you possibly can see, Figma types are a bit remoted and don’t work together with each other. So you can not set a base font measurement to scale and adapt the scaling price. You may solely set a hard and fast measurement. Additionally, now we have no types for spacing techniques (but). Nonetheless, with the Figma Tokens plugin, you possibly can create tokens in Figma and work with them. And much more spectacular, you possibly can join and may align with code tokens. Take a look at the (actually well-made) documentation and this incredible video by the creator Jan Six. So wonderful!!!

3. We Can Set Up And Check Responsive Design!
It is a massive one! Let’s take a look at it step-by-step. The instruments now we have for responsive design are the next:
Our instruments in Figma for responsive design:
We are able to use the above instruments individually, in no way, or mix them. It relies upon so much on what we wish to construct. There isn’t any proper or mistaken.

Crucial to know from a developer’s viewpoint is that now we have no automated breakpoints in Figma (I’ll speak about the way to cope with that in a bit).
Auto Structure
Auto structure is absolutely highly effective however takes some apply to work with (and can drive you nuts to start out with, however keep it up!!!). It’s (loosely) primarily based on flexbox, as you’ll discover once you glimpse on the Examine tab.
With the auto structure, we are able to set:
- Area between objects (might be optimistic for spacing or destructive for stacking);
- Padding on all sides individually;
- Alignment;
- Set little one factor so packed or house between (superb for navigations);
- Resizing conduct (full container, hug content material, or fastened each horizontally and vertically);
- Nest auto structure to create highly effective parts and even complete pages;
- Add relative positioned parts inside an auto structure body (new);
- Robotically adapt to new content material whereas maintaining all settings in place.
Constraints
Constraints are far more simple to work with in Figma. With constraints, you possibly can pin parts to the guardian body when resizing. Be aware that they are going to react to a change in guardian measurement however won’t adapt to a change in content material!
Be aware: You can’t add auto structure and constraints to the identical body. It’s both or (small exception for relative positioned parts inside auto-layout). There isn’t any higher or worse. It relies on what you wish to construct.
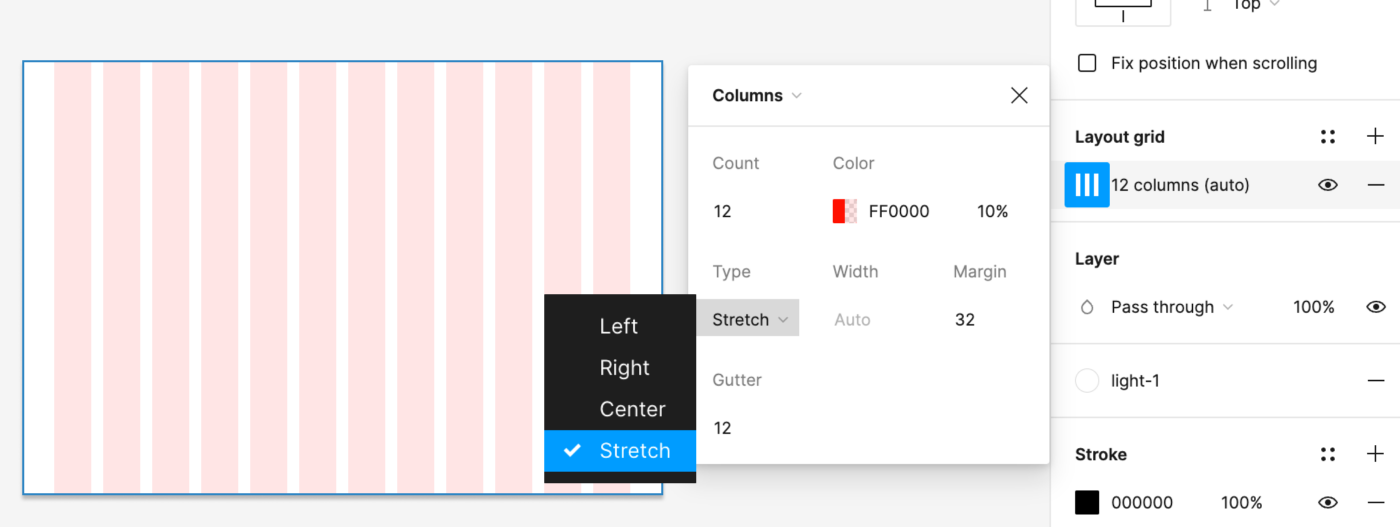
Grids
We are able to add grids to frames. When establishing grids, we are able to alter columns, gutter, margin, and conduct.
Mix Grids And Constraints
The cool factor is that as quickly as a grid is utilized to a body, the constraints will assume the columns because the guardian body. So we are able to arrange very nice and easy responsive conduct by combining grids and constraints.
Tip: Figma is all about nesting. You too can apply grids to nested frames, e.g., to create a body for the sidebar with a hard and fast with and one other nested body holding the content material.
Limitation:
This works nice for a fast check or easy setup. Nonetheless, as quickly as you add extra content material, you’ll discover that the margins and padding won’t adapt when resizing. It is a Figma concern; in CSS, it might nonetheless work simply nice.

Mix Grid, Constraints, And Auto Structure Components
So though we can’t mix auto structure and constraints inside a body, we are able to place auto structure parts/cases inside a guardian body after which use constraints round them. On this method, the content material reshuffles properly, maintaining all set parameters.
Limitation:
Horizontal spacing will nonetheless not adapt. So you’ll most likely have the query in thoughts: “And if I make all of it into an auto structure?” Sure, you possibly can!
Pure Auto Structure Pages
So we might additionally arrange the design in auto structure solely. There are two methods to make use of this:
- Imitating a traditional grid, then we simply set the house between = gutter and get the identical consequence.
- Not work with a Grid System in any respect, however arrange your design later in flexbox, CSS-Grid or the rest, then we simply “auto structure away” as we wish, you can too combine fastened and fluid.
Limitation:
The auto structure will solely distribute parts equally, so you can not have one factor occupying 60% and the opposite 40%; it would swap to 50⁄50%. You would need to repair one factor and have the remainder fluid.
4. We Have No Breakpoints In Figma
Okay, nice, so now we have these candy options to arrange responsive parts. Nonetheless, now we have no automation in Figma to arrange a breakpoint to check throughout totally different display sizes from cellular to desktop.

We Can Make Our Personal Breakpoints By Hand!
Nonetheless, we are able to create our personal breakpoints by hand! So with the technical data given, we are able to arrange the visible illustration in Figma. I’m simply utilizing a random instance of breakpoints right here.

We are able to then place our auto structure parts inside these ranges and see the place changes are crucial. In my instance, I swap from a full fluid display on cellular to an overlay with a hard and fast measurement at breakpoint S.
This fashion, we are able to actually check our parts and even complete pages and have already got a reasonably lifelike thought of the feel and appear.
If You Need To Work With A Responsive Grid
We are able to use the identical testing setup for responsive grids if wanted. With the mandatory data, grids might be arrange for a number of display measurement ranges after which saved as types and re-applied. We then simply want so as to add the proper grid when testing the breakpoint vary.
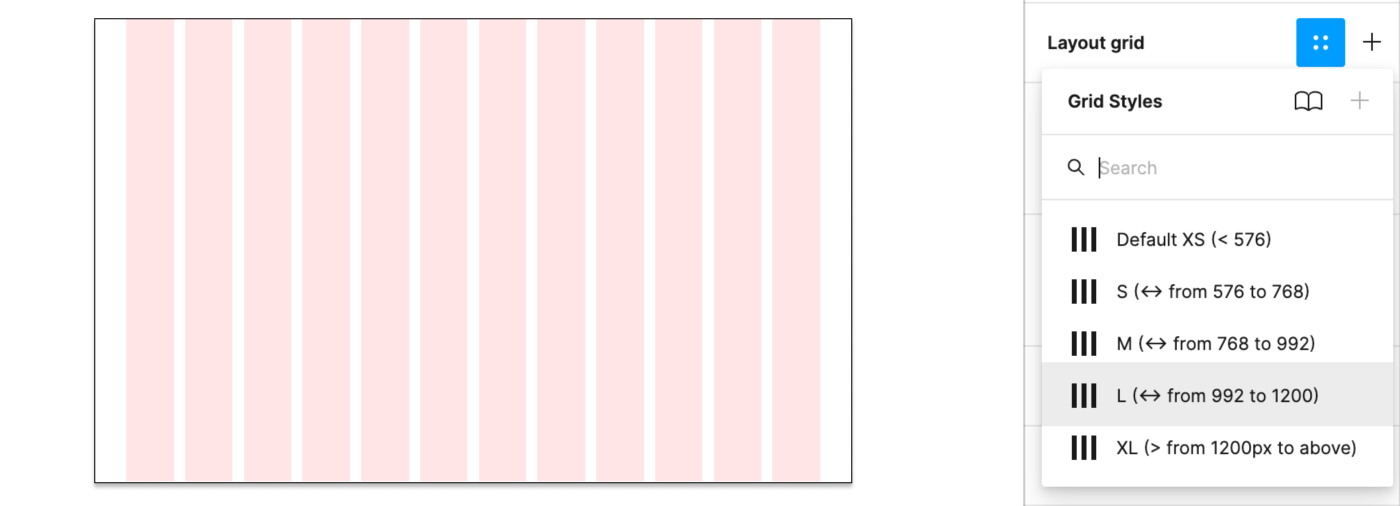
Be aware: Typically, you would possibly use the identical grid for a number of breakpoints, then simply be aware, e.g., Grid: S+M (from 576 to 992). This fashion, you possibly can at all times cut up it in two once more in case the margin or something modifications sooner or later.
Responsive Typography Is Non-Existent
Sadly, what kicks in mechanically with media queries in CSS must be added by hand in Figma. We are able to arrange a responsive Typescale after which want to ensure to change textual content fashion (if relevant) when breakpoints are altering. It’s a bit annoying and filled with potential errors, I do know.

If you wish to work with fluid typography (VW items, clamps(), calc(), you identify it), that is greatest examined within the browser as we can’t simulate fluid textual content conduct with Figma. We are able to, nonetheless, choose a particular min and max display measurement to get a tough thought of the state of affairs at a particular width.
Breakpoint Plugin
Nonetheless, to finish on an thrilling subject: When you undergo the trouble of establishing your parts and pages responsively, you possibly can chuck them into the breakpoints plugin and get a extremely pretty general thought of the design.
Alternatives Between Design & Code
Save Time, Cash And Nerves
Let’s be sincere handing in a static design after which seeing the consequence within the browser by no means results in an easy-going relationship between design and growth. It’s a bottleneck that burns time, cash, and nerves on either side.
Now, this doesn’t imply that we hand off design with a little bit of auto structure on prime, and that’s it. Seeing the result within the browser will certainly maintain some surprises and room for dialogue. Nonetheless, now we have a strong base to start out working from and may enter a constructive dialogue between design and growth to fine-tune.
Some issues will little question stay simpler to check in CSS than in Figma (e.g., responsive typography), which is simply nice. In the end, it’s about working as a crew and valuing one another’s effort and time to create nice merchandise.
Align Elements With Code
We are able to additionally align parts additional with current code by mimicking the conduct.
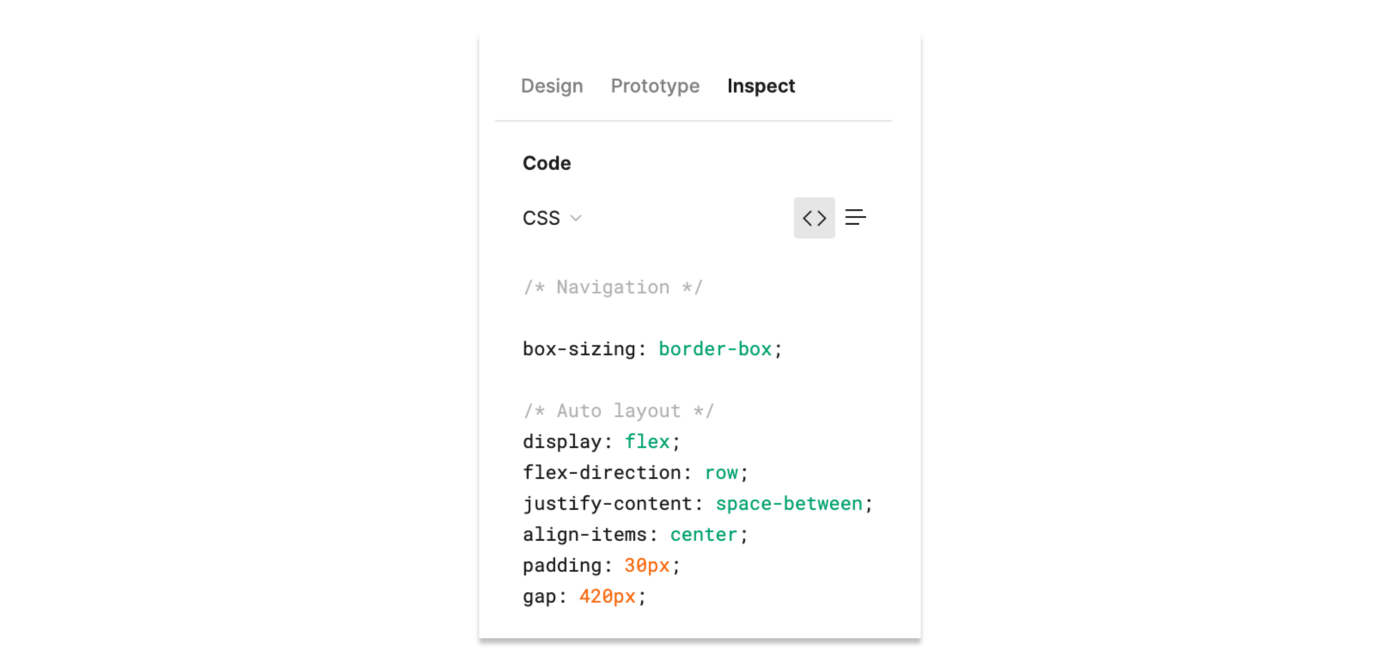
Flexbox In The Examine Tab. However In The Finish, It’s Up To Growth!
When peeking into the examine tabs, we are able to see that auto structure interprets to (kind of) flexbox, or as Figma put it, “Auto Structure needs to be a considerate subset of flexbox” hmmm. That is additionally the place it will get slightly complicated as a result of it doesn’t imply you HAVE to make use of flexbox. In Figma, we solely have constraints and auto structure, and as you noticed, they each have professionals and cons to them and don’t replicate CSS conduct 100%. So if there’s a extra modern or wise method of setting one thing up, then, by all means, go for it!
5. We Can Additionally Work With Precise Knowledge (Type Of)
Figma can’t hook up with a traditional database, however we are able to use precise information with some preparation. You need to use the Google Sheets Sync plugin and simply add precise content material there. By merely naming our layers with #columnname, run the plugin, add the hyperlink, and hit sync. And growth, there you go. There’s additionally a Plugin for Airtable and Notion Sync working just about in the identical method.

Tip: You may even swap variants dynamically! Isn’t that nice?
Alternatives Between Design And Code
Know What You Are Dealing With
It’s nice to check precise content material and ask for some collaboration from copywriters or content material managers on the fly. This fashion, we don’t design with excellent lorem ipsum and inventory picture parts however lifelike parts in content material measurement and look.

Basically, we should always check parts with totally different content material reminiscent of superb state, little content material, heavy content material, empty, error, and loading states the place relevant. I made a guidelines for parts you need to use earlier than launch.
Working with precise information provides us a good suggestion of potential shortcomings. We are able to additionally see if the database wants some grooming or if the picture pool wants a bit of affection and a focus to stay as much as the model promise.
6. You Would possibly Need To Level Out Gentle Grid vs. Onerous Grid To Us
After we click on on Grids, Figma provides this px grid to the background. Order! Construction! As a designer, you soar at this, and as you have been instructed to house with 8pt, you utilize the grid.

So now we have this grid, which is why many designers soar to conclusions utilizing a tough grid to set their spacing (it may be used for different alignment and useful in cellular setup, although). We have now no spacing blocks or cubes to create a smooth grid, we are able to set this by hand, although, and nudge in steps of 8, however that’s about it.
Tip: In Figma, we are able to alter the nudge quantity. Press Cmd + / and kind “nudge” and alter to 8. Be sure to maintain alt urgent when nudging to see the distances. By urgent shift and up and down arrows, we then nudge in, e.g., 8pt steps.
Alternatives Between Design And Code
How Does Spacing Work For You In CSS?
Be at liberty to level out (ideally in the beginning of the venture) that there isn’t a such magic background grid in CSS and that the spacing system means measuring in spacing blocks from factor to factor (together with the road top!). Or, in different phrases, clarify the distinction between the arduous grid vs. the smooth Grid that we use later in UI Design and CSS.

And but once more: Use the Figma Tokens Plugin.
Right here we are able to simply pull the true spacing system with spacing tokens and apply it to our parts. We are able to additionally arrange our personal tokens simply in Figma proper within the plugin.
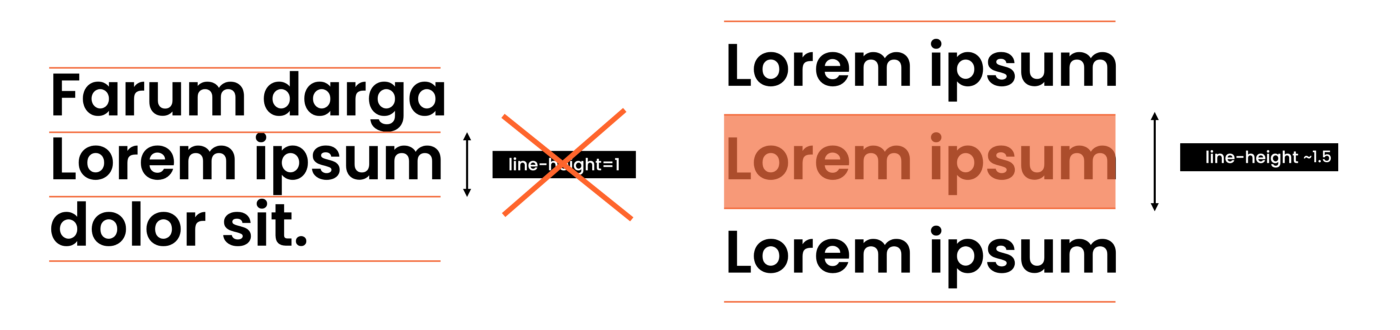
7. Why We Typically Mess Up Line-height
Typography is UI design, fairly a posh subject. Here’s a detailed class I made. Many UI Designers have a graphic design background, the place textual content is aligned with the baseline. Nonetheless, in Figma and CSS, we work with line top. This usually results in a whole lot of confusion amongst new designers, and I get the query “how do I do away with this entry house on prime and backside of my textual content?” so much. You don’t. Simply work with it!

Be aware: We can’t set line top in Figma to one thing like 1.5 notation! By default, it makes use of px. However we are able to cheat slightly and use %, so 1.5 in CSS could be 150% in Figma. You’ll nonetheless discover the px worth solely within the examine tab.
Alternatives Between Design And Code
Clarify It!
In order a developer, you would possibly discover that the road top is randomly set to 1. It is a determined design try to do away with the “random” house we don’t perceive (but). So it is smart to remind (new) designers that UI Design is dynamic. Display screen sizes change, and content material size will differ (both as a result of the content material is added or translated into a brand new language). Thus, we are able to by no means assume a single line of the textual content stays a single line of textual content endlessly. Additionally, we don’t wish to create too many types. So clarify that working with the pure line top is simply nice, and you’ll do the identical in CSS.
8. All We Have In Figma Is PX
In Figma, we are able to solely work with px, and we work at 1px=1pt. We would not have rem, em, or some other relative approach to outline issues like font measurement. So in the event you see px in every single place in a UI Design, this doesn’t imply we wish it arduous coded!!!

9. We Can Set Up Fairly Candy Prototypes In Figma
We are able to create somewhat spectacular prototypes immediately from our design information in Figma. If you happen to hit the play button within the file (prime proper), you possibly can see them. We are able to hyperlink frames to new pages or overlays and in addition animate inside part units from variant to variant.
We are able to additionally arrange particular person flows, making them good and tidy to navigate and check.
10. We Will Invite You To ‘View Solely’ Rights, Giving You Entry To All the things You Want As A Developer
As a developer, you’ll most likely obtain an invitation to “view solely” a Figma file, crew, or venture. You may take a look at a file I arrange in view mode right here (make to join a free Figma account beforehand).

Alternatives Between Design And Code
As a developer, it is possible for you to to navigate the file and pull out all data you want:
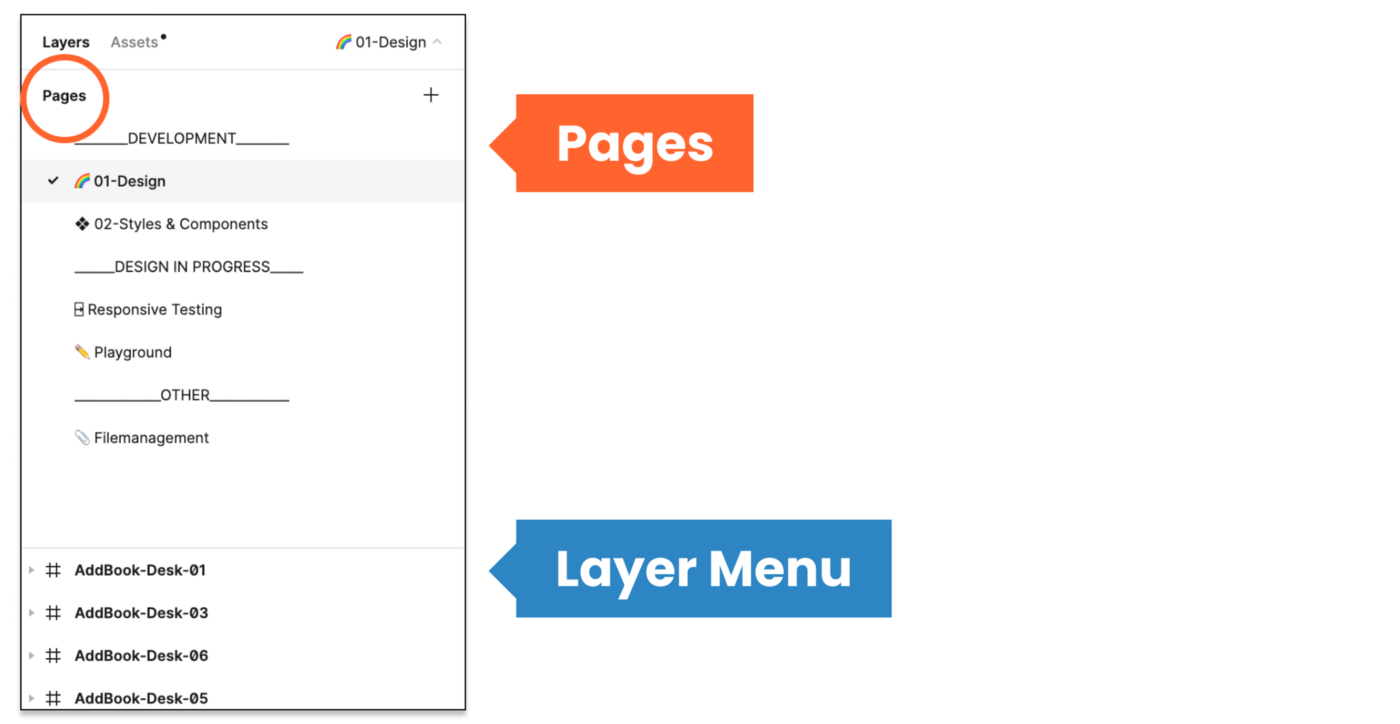
Pages
You may navigate the totally different frames on the canvas however be aware how there are totally different pages above the layers menu on the left. Each crew makes use of pages in a different way, some for variations and sprints, some to construction the file into the design, parts, and testing. In any case, guarantee to not overlook the pages as they’re the file’s construction.
Examine Mode
When coming into a file with view mode, you will note the examine menu open per default. Click on on a component, and you can be proven the distance to the closest objects and the specs on the right-hand facet menu.

You may swap between CSS, iOS, and Android.

When clicking on the primary part, you will note the hyperlink to the code documentation (if relevant) and any feedback in examine mode.

This solely exhibits up if it was added to the design tab’s part documentation. And also you clearly solely want this if you wish to align UI and code parts.

By the best way, it really works with any hyperlink. Nonetheless, some such Github hyperlinks create a pleasant customized button.
Types Overview
Click on on the canvas to get an outline of all types within the file. Be aware that this solely exhibits native types; some may be pulled in from an exterior library. So the most effective is to verify for fashion documentation (each design crew ought to set this up for you) to ensure you have all data.

It is best to, nonetheless, nonetheless obtain a basic overview of all types out of your design crew, together with inner and exterior types used now or sooner or later.

Bounce To The Fundamental Element
That is actually essential but a bit hidden. Click on on any occasion on the canvas after which click on on the diamond-shaped image signal, and you’ll soar to the primary part and documentation. That is the place you may get all data and measurements.

It is best to then be led to the Figma UI part library. This may be a neighborhood web page or an exterior UI part doc providing you with all the mandatory data and specs outlined by the UI crew. If you don’t discover such an outline, kindly ask your design crew to set this up for you.

There isn’t any magic automation for fashion and part overview in Figma. This must be arrange and documented by the design crew, and the format could differ.
Export Belongings Of Any Measurement And Kind
Belongings might be exported to any asset within the format (JPG, PNG, SVG) and @measurement from the “view solely” mode, so no bulk export by the design crew is required anymore.

Tip: For a particular top or width, as a substitute of 3x, 2x, simply enter the width adopted by w (e.g., 300w), and it’ll export it, maintaining the picture proportions. It additionally works for top (h).
Go away feedback and talk about inside your crew.

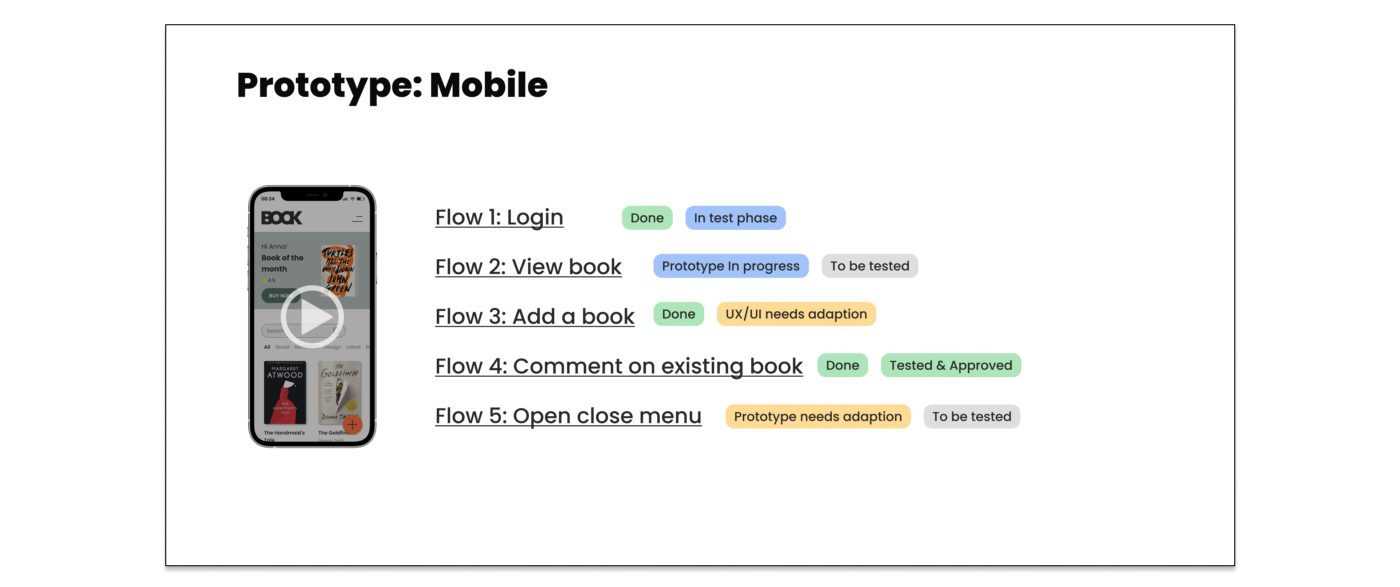
Prototype
Hit the play button (prime proper nook of your design file), and you’ll soar to the presentation mode seeing your prototype in motion. Normally, the designer was good sufficient so as to add some flows and construction the prototype, so that you get a good suggestion of various flows.

Tip: Particular person hyperlinks might be created from each movement of the prototype menu. I like utilizing this to arrange an outline of the design and testing levels. You too can hyperlink to some other crew planning file right here.
Keep In Contact!
If you happen to favored this text, be certain that to subscribe and go to me on moonlearning.io, the place I train about UX/UI Design+Figma. This text can also be the bottom of my discuss and workshop through the Smashing Convention New York, the tenth to the thirteenth of October 2022. See you there!