

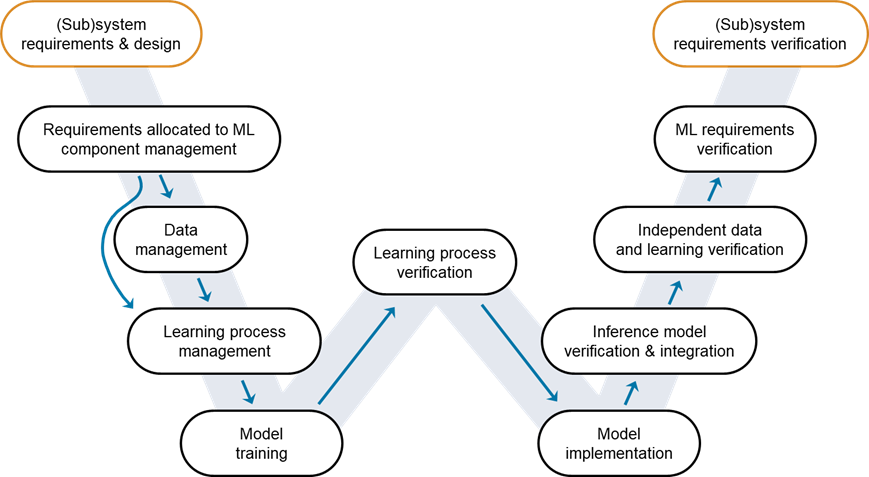
 Determine 1: W-shaped growth course of. Credit score: EASA, Daedalean.
This weblog submit focuses on the steps it’s essential to full and iterate on beginning with amassing necessities and as much as creating a strong AI mannequin. As an example the verification and validation steps from necessities to modeling, we’ll use for example the design of a pneumonia detector.
Determine 1: W-shaped growth course of. Credit score: EASA, Daedalean.
This weblog submit focuses on the steps it’s essential to full and iterate on beginning with amassing necessities and as much as creating a strong AI mannequin. As an example the verification and validation steps from necessities to modeling, we’ll use for example the design of a pneumonia detector.
Verification and Validation for Pneumonia Detection
Our aim is to confirm a deep studying mannequin that identifies whether or not a affected person is affected by pneumonia by inspecting chest X-ray photographs. The picture classification mannequin must be not solely correct but additionally extremely strong to keep away from the doubtless extreme penalties of a misdiagnosis. We’ll establish the issue and take it via all of the steps within the W-shaped growth course of (W-cycle for brief).
The dataset we shall be utilizing is the MedMNISTv2 dataset. If you’re aware of MNIST for digit classification, MedMNIST is a set of labeled 2D and 3D biomedical light-weight 28 by 28 photographs. We determined to make use of this dataset due to its simplicity and the power to quickly iterate over the design. Extra particularly, we’ll use the PneumoniaMNIST dataset, which is a part of the MedMNISTv2 assortment.
Necessities Allotted to ML Element Administration
We’ll begin with step one within the W-cycle associated to AI and Machine Studying; amassing the necessities particular to the Machine Studying element. Word that for any non-Machine Studying element gadgets, you may comply with the V-cycle incessantly used for growth assurance of conventional software program.
At this stage, key questions to contemplate are:- Are all the necessities applied?
- How are the necessities going to be examined?
- Can the mannequin habits be defined?
Necessities Toolbox allows you to writer, hyperlink, and validate necessities inside MATLAB or Simulink. You possibly can create necessities utilizing wealthy textual content with customized attributes or import them utilizing necessities administration instruments.
As you may see within the screenshot of the Necessities Editor app under, we have now already collected a number of necessities associated to enter and output information, accuracy, robustness, latency, and implementation. For every requirement, you may also add an outline that higher explains what that particular requirement intends to perform.
Information Administration
The following step within the W-cycle is Information administration. Since we’re fixing a supervised studying downside, we’d like labeled information for coaching the mannequin. MATLAB affords varied labeling apps (together with Picture Labeler and Sign Labeler) which are extraordinarily helpful at this level, permitting you to label your dataset interactively (and with automation).
Fortunately, information has already been labeled into “pneumonia” and “regular” photographs. I must search skilled recommendation to label X-ray photographs or discover the suitable algorithm to automate the method. The information set has additionally been partitioned into coaching, validation, and testing units. So, we don’t want to fret about that both. All we have to fear about at this level is to conveniently handle our photographs. The imageDatastore object lets you handle a set of picture information the place every particular person picture matches in reminiscence, however the whole assortment doesn’t essentially match. Certainly, the MedMNIST photographs are small and can all slot in reminiscence, however utilizing a knowledge retailer lets you see how one can create a scalable course of for extra practical workflows. By indicating the folder construction and that the label supply might be inferred from the folder names, we will create a MATLAB object that acts as a picture information repository.trainingDataFolder = "pneumoniamnistTrain"; imdsTrain = imageDatastore(trainingDataFolder,IncludeSubfolders=true,LabelSource="foldernames"); countEachLabel(imdsTrain)
ans =

  2×2 desk

      Label      Rely
    _________    _____

    regular       1214
    pneumonia    3494
Word that the dataset is imbalanced in direction of extra pneumonia samples. So, this needs to be thought-about within the loss perform as we prepare the mannequin.
Studying Course of Administration
At this stage, we’d prefer to account for all of the preparatory work earlier than the coaching section. We’ll give attention to growing the community structure and selecting the coaching choices (coaching algorithm, loss perform, hyperparameters, and many others.).
You possibly can simply design and visualize the community interactively utilizing the Deep Community Designer app. After you have designed the community (on this case, a easy CNN for picture classification), MATLAB code might be generated for coaching.numClasses = numel(classNames);
layers = [
imageInputLayer(imageSize,Normalization="none")
convolution2dLayer(7,64,Padding=0)
batchNormalizationLayer()
reluLayer()
dropoutLayer(0.5)
averagePooling2dLayer(2,Stride=2)
convolution2dLayer(7,128,Padding=0)
batchNormalizationLayer()
reluLayer()
dropoutLayer(0.5)
averagePooling2dLayer(2,Stride=2)
fullyConnectedLayer(numClasses)
softmaxLayer];
Nevertheless, developing with the optimum hyperparameters may not be so easy. The Experiment Supervisor app helps you discover the optimum coaching choices for neural networks by sweeping via a spread of hyperparameter values or utilizing Bayesian optimization. You possibly can run totally different coaching configurations, even in parallel, when you have entry to the required {hardware}.
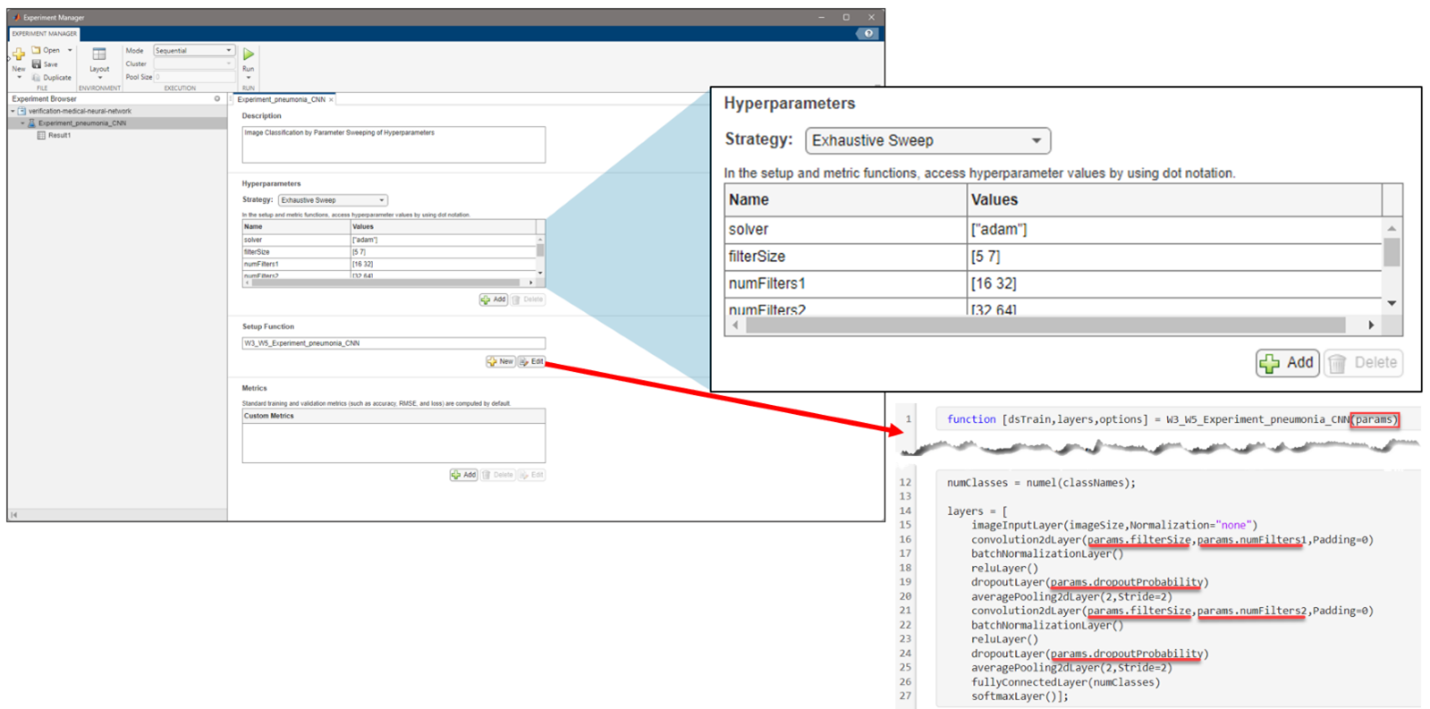 Determine 4: Establishing the issue in Experiment Supervisor to search out an optimum set of hyperparameters from the exported structure in Deep Community Designer.
Mannequin Coaching
It’s now time to coach the mannequin – or extra precisely, fashions. We first run the experiment we have now configured within the Experiment Supervisor app. This provides us a superb mannequin to begin with.

Determine 5: Discovering an preliminary mannequin with the Experiment Supervisor app.
Though we appear to have obtained good outcomes with our mannequin (~96% accuracy for the validation dataset), this mannequin will fail to adjust to a number of the different necessities we established earlier (e.g., robustness). We talked about earlier than that regardless that the W-cycle appears linear, we frequently should iterate on our design. To take action, we explored extra coaching methods. First, we did data-augmented coaching, that’s, we carried out significant transformations to the photographs (rotation, translation, scaling, and many others.). This ends in higher generalization, much less overfitting, and bettering the mannequin robustness.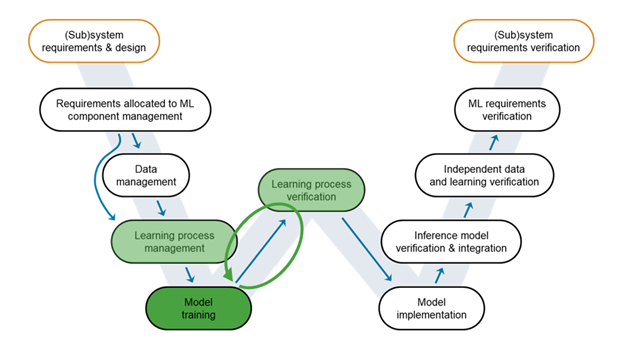 Determine 6: An iterative strategy in direction of constructing an correct and strong mannequin.
Nevertheless, as we’ll see in a future weblog submit, this data-augmented coaching is not going to be sufficient for our functions. So, our final iteration will contain utilizing a coaching algorithm referred to as the Quick Gradient Signal Technique (FGSM) for Adversarial Coaching (be taught extra). The aim is to generate adversarial examples throughout coaching, that are visually just like the unique enter information however may cause the mannequin to make incorrect predictions.
Keep tuned for our subsequent weblog submit. We’ll deal with the subsequent stage within the W-cycle, the thrilling matter of Studying course of verification.
Determine 6: An iterative strategy in direction of constructing an correct and strong mannequin.
Nevertheless, as we’ll see in a future weblog submit, this data-augmented coaching is not going to be sufficient for our functions. So, our final iteration will contain utilizing a coaching algorithm referred to as the Quick Gradient Signal Technique (FGSM) for Adversarial Coaching (be taught extra). The aim is to generate adversarial examples throughout coaching, that are visually just like the unique enter information however may cause the mannequin to make incorrect predictions.
Keep tuned for our subsequent weblog submit. We’ll deal with the subsequent stage within the W-cycle, the thrilling matter of Studying course of verification.