What we’ll be constructing?
First we’ll attempt to construct a easy(not so easy really) film assessment app. The place customers can vote on films, write feedback and could also be add films too.
Then within the second half we are able to go deeper by including a reserving system to the films and have a number of theaters. We’ll be utilizing Rocketgraph to do that because it gives a whole backend with auth advert db so we do not have to fret about that.
For this you may must outline customers, films and a spot to retailer them:
-
Authentication: You want to retailer customers in a desk on say a Postgres DB.
-
Realtime: You want to get realtime feedback, and likes from the DB straight to your frontend for the person.
-
A Database: The place you’ll be able to map customers to films and customers and films to likes.
💡To learn this text it’s essential to have a primary understanding of React.js
Rocketgraph : A whole backend that beats Firebase and is open-source
A little bit background. Rocketgraph gives a whole backend. It comes with a Postgres DB, Hasura console to handle your Postgres and add GraphQL layer to your information, Authentication and Serverless capabilities.
So to sum it up we offer auth in your internet apps, GraphQL for realtime issues like messages/notifications/feedback and so on and Serverless capabilities for something you need to offload. Our Serverless Github app auto-compiles your Github code to AWS Lambda capabilities.
So what the hack is GraphQL?
GraphQL is a language specification by Meta to attain realtime queries in your information by asking for precisely what you want. That is totally different from conventional API method the place the question is coded into the backend and front-end has little or no management over what/ ask for information.
Consider it like a JSON question. You ask for what information you need inn a json-like question and it’ll return precisely these fields.
On this article we’ll leverage the facility of GraphQL, React Apollo and Hasura to construct a real-time system for score and commenting on films. We are able to use this similar system to guide film tickets too.
TLDR Model
In the event you simply need to see the code. Right here is the code base for this text. Right here you’ll be able to see extra examples. That is the open-source software program behind Rocketgraph
Hold studying

Cool, let’s begin from the fundamentals
Create a react challenge and develop the front-end. Overlook in regards to the backend, we’ll add it later.
mkdir movie-voting
cd movie-voting
Subsequent scaffold a primary react software.
npx create-react-app ./
Set up react router to have the ability to navigate between pages. Set up react-apollo and graphql for real-time stuff as talked about above.
yarn add react-router-dom
yarn add @apollo/shopper graphql
Delete the redundant recordsdata reminiscent of emblem from the challenge and replace the index.js file to as follows:
// src/index.js
import React from "react";
import ReactDOM from "react-dom";
import { BrowserRouter as Router, Routes, Route } from "react-router-dom";
import App from "./App";

ReactDOM.render(
  <React.StrictMode>
      <Router>
          <Routes>
            <Route path="/login" />
            <Route path="/signup" />
            <Route path="/" factor={<App />} />
          </Routes>
      </Router>
  </React.StrictMode>,
  doc.getElementById("root")
);
Now we have to add the App.js and login/signup parts. Thats simple.
App.js
import emblem from './emblem.svg';
import './App.css';


const films = [
  {
    name: 'Snatch',
    img: 'https://occ-0-3934-3211.1.nflxso.net/dnm/api/v6/E8vDc_W8CLv7-yMQu8KMEC7Rrr8/AAAABVJgO06RKuruJpcyezdM43Ai2ZjvNDmtbnwUXVtvXVhhvpL0tvhr4s9e3j8UojFCLao5a7v8Dg5kti1vFKcA0ldZXWnnC03nBRIt.jpg?r=cbf',
    likes: 10,
    state: true,
  }
];

operate App() {
  return (
    <div className="App">
      <header className="App-header">
        <p>
          Motion pictures listing
        </p>
      </header>
      {
        films.map(film => {
          return (
              <div className="movie-box">
                <div className="movie-box-header">
                </div>
                <div className="movie-box-body">
                  <img alt={film.title} className="movie-image" src={film.img} />
                </div>
                <div className="movie-box-footer">
                  {film.title}
                  <div className="like-button"><i class="fa fa-heart" fashion={{"colour": "crimson"}}aria-hidden="true"></i></div>
                </div>
              </div>
          )
        })
      }
    </div>
  );
}

export default App;
Now we’ve the fundamental residence web page design. Let’s create the login and signup pages.
signup.js
import React, { useState } from "react";
import { useNavigate } from 'react-router-dom';

export default operate Login(props) {
  const [email, setEmail] = useState("");
  const [password, setPassword] = useState("");
  const navigate = useNavigate();

  async operate handleSubmit(e) {
    e.preventDefault();
    navigate("/");
  }

  return (
    <div>
      <h1>Signup</h1>
      <type onSubmit={handleSubmit}>
        <enter
          sort="e mail"
          placeholder="e mail"
          worth={e mail}
          onChange={(e) => setEmail(e.goal.worth)}
        />
        <enter
          sort="password"
          placeholder="password"
          worth={password}
          onChange={(e) => setPassword(e.goal.worth)}
        />
        <button>Signup</button>
      </type>
    </div>
  );
}
Let’s have a look at if that labored
yarn begin
Congratulations🥂, you simply created the skeleton for the online software. Now we simply need to fill within the information, auth and realtime.
Enter Rocketgraph. The right way to create a backend with authentication and serverless capabilities.
Simply signup and click on on create a challenge within the dashboard:

Subsequent we’ll find out about some superb options that can magically construct the backend for you with the facility of GraphQL.
As soon as your challenge is up, you get a Hasura console and a Postgres DB as proven under. Please await the providers in addition up. It would take about 3-5 minutes.
What’s Hasura?
Hasura is a tremendous open-source instrument that GraphQLises your postgres database. What it means is that your information remains to be within the postgres db however you get the powers of GraphQL. It additionally has an editor which routinely generates GraphQL queries primarily based in your Postgres Tables.
Again to Rocketgraph
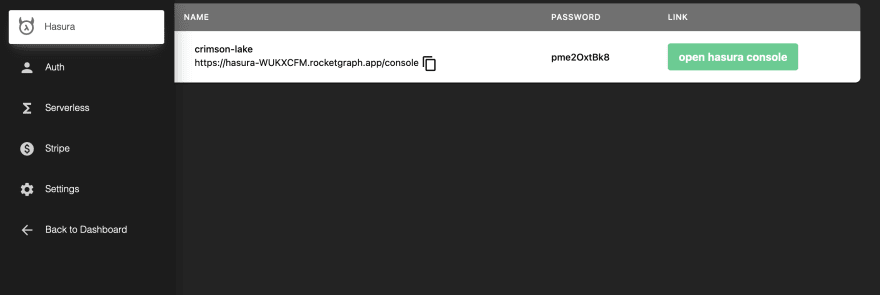
When your challenge is booted up, you get a Hasura hyperlink right here:

Open Hasura, and now we ca begin creating tables for our Database.
We’d like a Motion pictures desk as proven under:
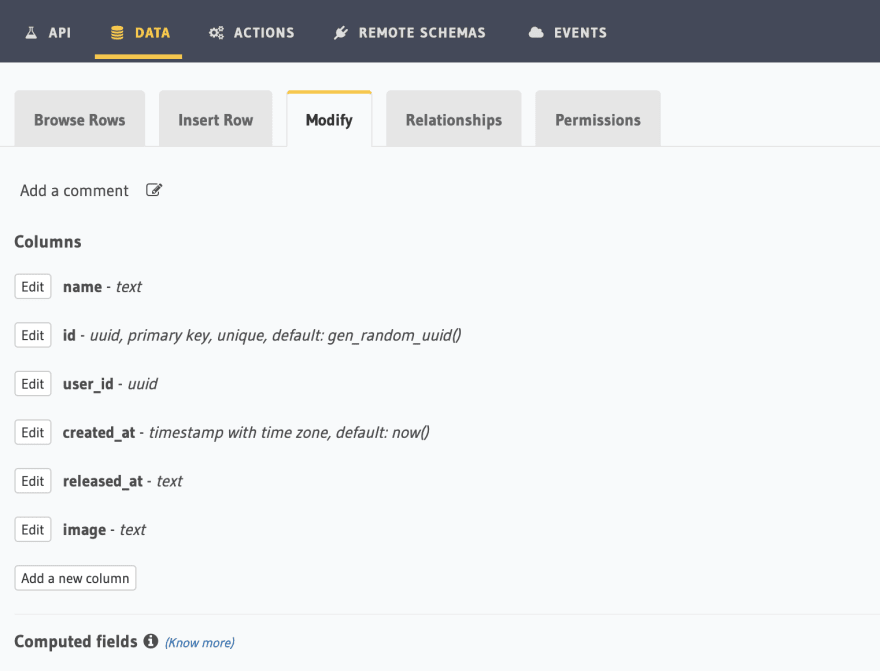
We additionally must let the customers entry it. In Rocketgraph person is a job that’s authenticated and our JS SDKs ship within the JWT along with your requests so you do not have to.
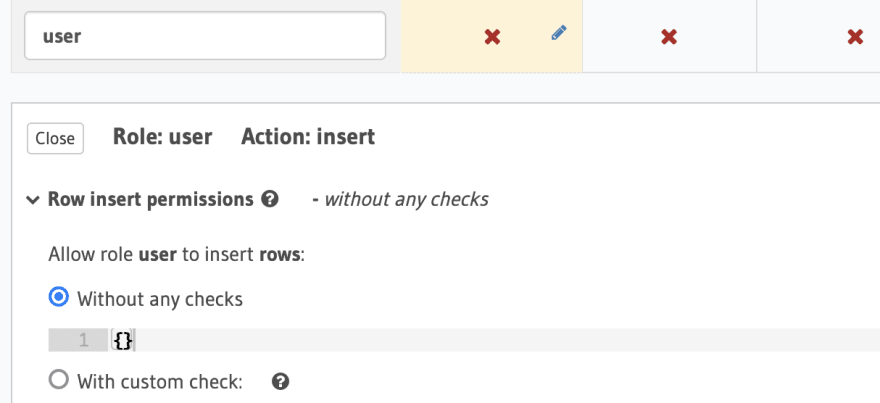
Go to the permissions tab on the films and add the next permissions:
For insert put permissions as follows:

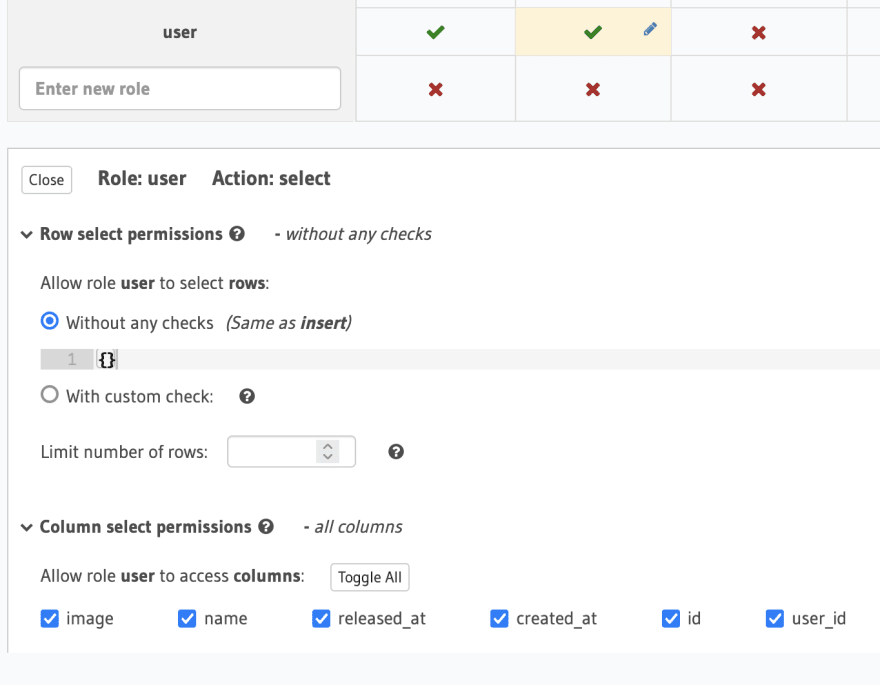
And for choose, it is the identical:
Enter GraphQL utilizing react-apollo and graphql packages. Apollo makes it simpler to question your GraphQL immediately from React and gives some highly effective performance like useSubscription which we’ll talk about later.
Let’s set up them.
yarn add @apollo/shopper graphql
We’ll additionally want some customized made JS libraries to get authentication to work.
yarn add @rocketgraphql/react-apollo @rocketgraphql/rocketgraph-js-sdk
Now we’ll add auth to our code utilizing the RApolloProvider supplied by @rocketgraphql/react-apollo
First create a folder named utils after which create config.js inside it with the next content material:
import { createClient } from "@rocketgraphql/rocketgraph-js-sdk";
import Cookies from 'js-cookie';

const config = {
  baseURL: "https://backend-REPLACE",
};

const { auth } = createClient(config);

export { auth };
Change the above https://backend-REPLACE with the backend url in your Rocketgraph dashboard:
You will discover it within the Auth part.
Change the code in index.js to:
// src/index.js
import React from "react";
import ReactDOM from "react-dom";
import { BrowserRouter as Router, Routes, Route } from "react-router-dom";
import App from "./App";
import Signup from "./parts/login";
import { RApolloProvider } from "@rocketgraphql/react-apollo";
import { auth } from "./utils/config";

ReactDOM.render(
  <React.StrictMode>
      <RApolloProvider auth={auth} gqlEndpoint="https://gqlEndpoint/v1/graphql">
        <Router>
            <Routes>
              <Route path="/login" factor={<Signup />}/>
              <Route path="/signup" />
              <Route path="/" factor={<App />} />
            </Routes>
        </Router>
      </RApolloProvider>
  </React.StrictMode>,
  doc.getElementById("root")
);
Change the above https://gqlEndpoint/v1/graphql to the graphql endpoint you’ve right here in your Hasura console:

Subsequent we’ll add auth.
login.js
import React, { useState } from "react";
import { useNavigate } from 'react-router-dom';
import { auth } from "../utils/config";

export default operate Login(props) {
  const [email, setEmail] = useState("");
  const [password, setPassword] = useState("");
  const navigate = useNavigate();

  async operate handleSubmit(e) {
    e.preventDefault();

    // login
    attempt {
      await auth.signIn({e mail, password, supplier: "native"});
    } catch (error) {
      alert("error logging in");
      console.error(error);
      return;
    }

    navigate("/");
  }

  return (
    <div>
      <h1>Login</h1>
      <type onSubmit={handleSubmit}>
        <enter
          sort="e mail"
          placeholder="e mail"
          worth={e mail}
          onChange={(e) => setEmail(e.goal.worth)}
        />
        <enter
          sort="password"
          placeholder="password"
          worth={password}
          onChange={(e) => setPassword(e.goal.worth)}
        />
        <button>Login</button>
      </type>
    </div>
  );
}
signup.js
import React, { useState } from "react";
import { useNavigate } from 'react-router-dom';
import { auth } from "../utils/config";


export default operate Login(props) {
  const [email, setEmail] = useState("");
  const [password, setPassword] = useState("");
  const navigate = useNavigate();

  async operate handleSubmit(e) {
    e.preventDefault();

    // login
    attempt {
      await auth.register({e mail, password});
    } catch (error) {
      alert("error logging in");
      console.error(error);
      return;
    }

    navigate("/");
  }

  return (
    <div>
      <h1>Signup</h1>
      <type onSubmit={handleSubmit}>
        <enter
          sort="e mail"
          placeholder="e mail"
          worth={e mail}
          onChange={(e) => setEmail(e.goal.worth)}
        />
        <enter
          sort="password"
          placeholder="password"
          worth={password}
          onChange={(e) => setPassword(e.goal.worth)}
        />
        <button>Login</button>
      </type>
    </div>
  );
}
That is it. Rocketgraph will do the remainder. Customers will probably be populated within the person database.

You may take a look at this by signing up and checking that the person is created.
Let’s construct extra options
Enter react-apollo.
App.js
import './App.css';
import { gql, useSubscription } from "@apollo/shopper";

const GET_MOVIES = gql`
  subscription {
    films {
      id
      created_at
      title
      picture
    }
  }
`;

operate App() {
  const { information, loading } = useSubscription(GET_MOVIES);
  if (loading) {
    return <div>Loading</div>;
  }
  return (
    <div className="App">
      <header className="App-header">
        <p>
          Motion pictures listing
        </p>
      </header>
      {
        information && information.films && information.films.size ?
        information.films.map((film, index) => {
          return (
              <div className="movie-box" key={index}>
                <div className="movie-box-header">
                </div>
                <div className="movie-box-body">
                  <img alt={film.title} className="movie-image" src={film.picture} />
                </div>
                <div className="movie-box-footer">
                  {film.title}
                  <div className="like-button"><i className="fa fa-heart" fashion={{"colour": "crimson"}} aria-hidden="true"></i></div>
                </div>
              </div>
          )
        }) : "No films"
      }
    </div>
  );
}

export default App;
That is it, simply add information in your db and you may see it right here in realtime.
Superior 😎 Now lastly let’s add the like button
Necessary half (Person-Id)
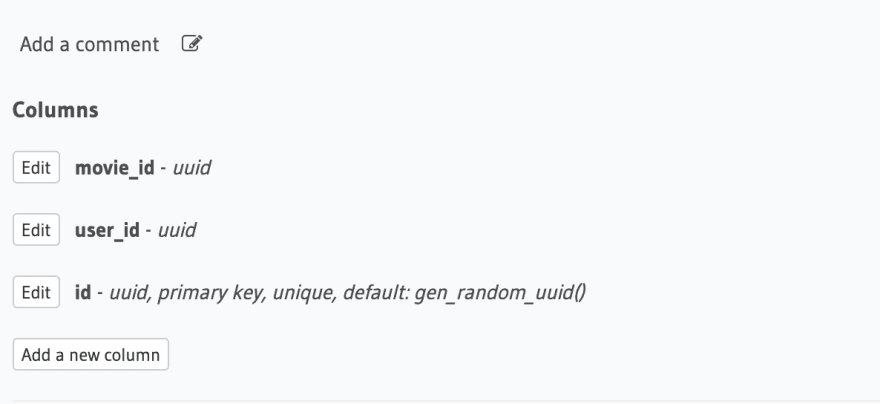
First create likes desk with id, movie_id and user_id as proven under in Hasura
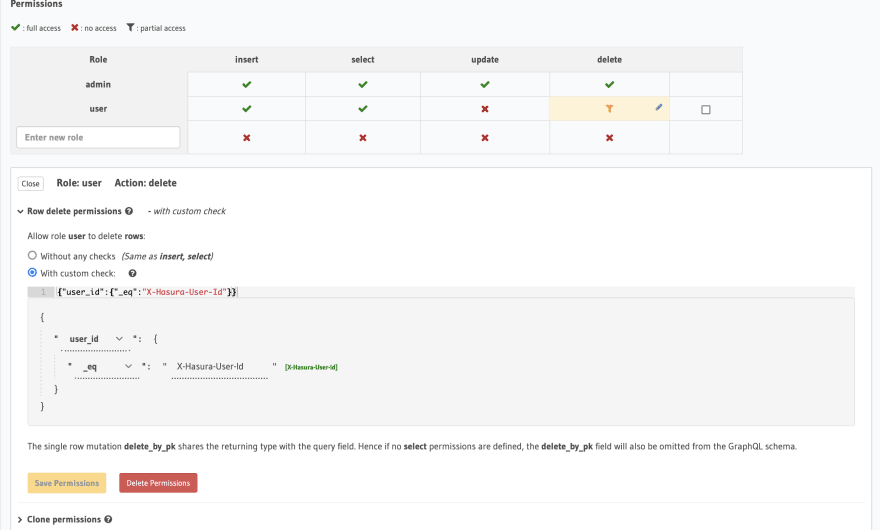
We must extract this Person-Id from the jwt token itself.
To do this
Step 1
Create a brand new function named person and click on on Insert to edit it is permissions
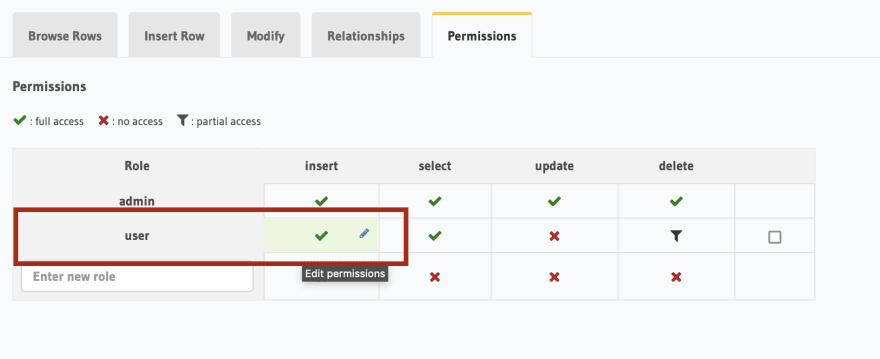
Step 2
Enable person function to switch all. Verify these bins

Step 3 – most vital
Set the user-id routinely
Click on on column presets and choose user-id. Set from X-Hasura-user-id.
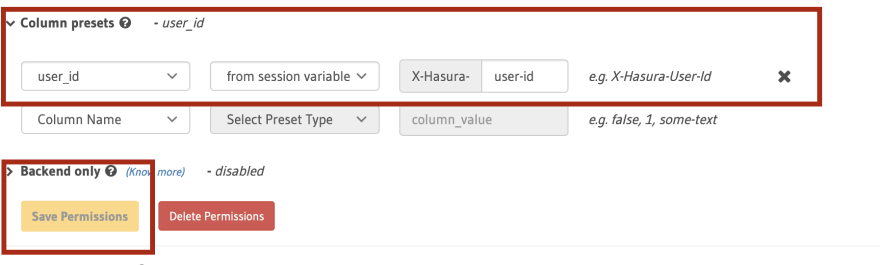
And click on save. Now we’ve ready our desk to carry the likes/votes
Enter Aggregations (Likes)
Create a brand new file in parts namedlikeCount.js
import React, { useState } from "react";
import { gql, useSubscription, useMutation } from "@apollo/shopper";

const likes = (movie_id) => gql`
  subscription {
    likes(the place: {movie_id: {_eq: "${movie_id}"}}) {
        id
        user_id
    }
  }
`;

const LIKE = gql`
  mutation like($movie_id: uuid!) {
    insert_likes(objects: {movie_id: $movie_id}) {
        affected_rows
    }
  }
`;

const UNLIKE = gql`
    mutation not like($movie_id: uuid!) {
        delete_likes(the place: {movie_id: {_eq: $movie_id}}) {
            affected_rows
        }
    }
`;

operate Part({film}) {
  const LIKE_COUNT = likes(film.id);
  const [addLike, { like_data, like_loading, error }] = useMutation(LIKE);
  const [unLike, _] = useMutation(UNLIKE);

  const [isRed, setIsRed] = useState(false);
  const { information, loading } = useSubscription(LIKE_COUNT);
  console.log(information, film);
  if (loading) {
    return <div>Loading</div>;
  }
  const likeThis = () => {
    setIsRed(!isRed);
    if (isRed) {
        unLike({variables: {movie_id: film.id}});
    } else {
        addLike({ variables: { movie_id: film.id }});
    }
  }
  return (
    <span>
        {information.likes.size}
        <i className="fa fa-heart" fashion={{"colour": isRed ? "crimson" : "grey"}} aria-hidden="true" onClick={likeThis}></i>
    </span>
  );
}

export default Part;
Oh wait! That may delete all likes within the desk. So let’s safe our desk by:
And import this into App.js like this:
import './App.css';
import { gql, useSubscription } from "@apollo/shopper";
import LikeCountComponent from "./parts/likeCount";

const GET_MOVIES = gql`
  subscription {
    films {
      id
      created_at
      title
      picture
    }
  }
`;


operate App() {
  const { information, loading } = useSubscription(GET_MOVIES);
  if (loading) {
    return <div>Loading</div>;
  }
  return (
    <div className="App">
      <header className="App-header">
        <p>
          Motion pictures listing
        </p>
      </header>
      {
        information && information.films && information.films.size ?
        information.films.map((film, index) => {
          return (
              <div className="movie-box" key={index}>
                <div className="movie-box-header">
                </div>
                <div className="movie-box-body">
                  <img alt={film.title} className="movie-image" src={film.picture} />
                </div>
                <div className="movie-box-footer">
                  {film.title}
                  <div className="like-button"><LikeCountComponent film={film} /></div>
                </div>
              </div>
          )
        }) : "No films"
      }
    </div>
  );
}

export default App;
That is a wrap! Congrats, you simply made a film voting app.