

Whereas studying find out how to construct a Figma plugin, I stumbled upon a couple of attention-grabbing usages of Flexbox and Grid in Figma. When I discovered them, I simply received distracted and couldn’t resist digging extra.
Flexbox and Grid have been offering us internet builders with a number of new capabilities to construct new layouts, and what I’ll present you on this article is simply that.
To maneuver together with this text, you don’t must have an in depth data of Flexbox or Grid, and I’ll attempt to clarify most examples from the bottom up.
Let’s get discovering.
Introduction
The aim of this write-up is to point out how highly effective flexbox and grid are and to spotlight these attention-grabbing use-cases for them. There may be a couple of bits which can be centered on refined UI particulars which I like very a lot.
Utilizing CSS Grid
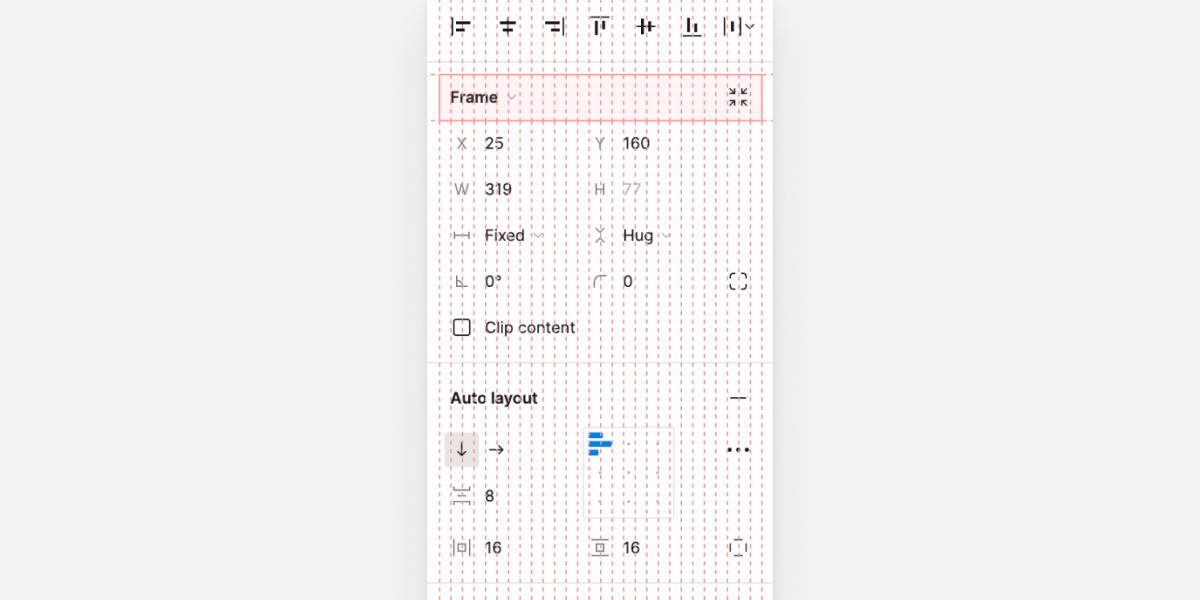
On the proper facet of Figma, now we have the default “Design” tab. When deciding on a component on the canvas, we are able to see its x-axis, y-axis, width, and top values. This additionally might be totally different relying on the ingredient being a textual content, group, body, and extra.
What I discovered attention-grabbing right here is utilizing CSS grid for every row within the design tab. I dig that so, a lot.
Take into account the next determine.
Discover how now we have many strains. These are for the 28 columns, sure! You learn that proper. Any row within the design tab is constructed on high of that grid.
Every column has a width of 8px.
.raw_components--_singleRow {
  show: grid;
  grid-template-columns: repeat(28, 8px);
  grid-template-rows: 32px;
}
Additionally, when controlling the small print of a drop shadow, for instance, the identical grid is getting used.
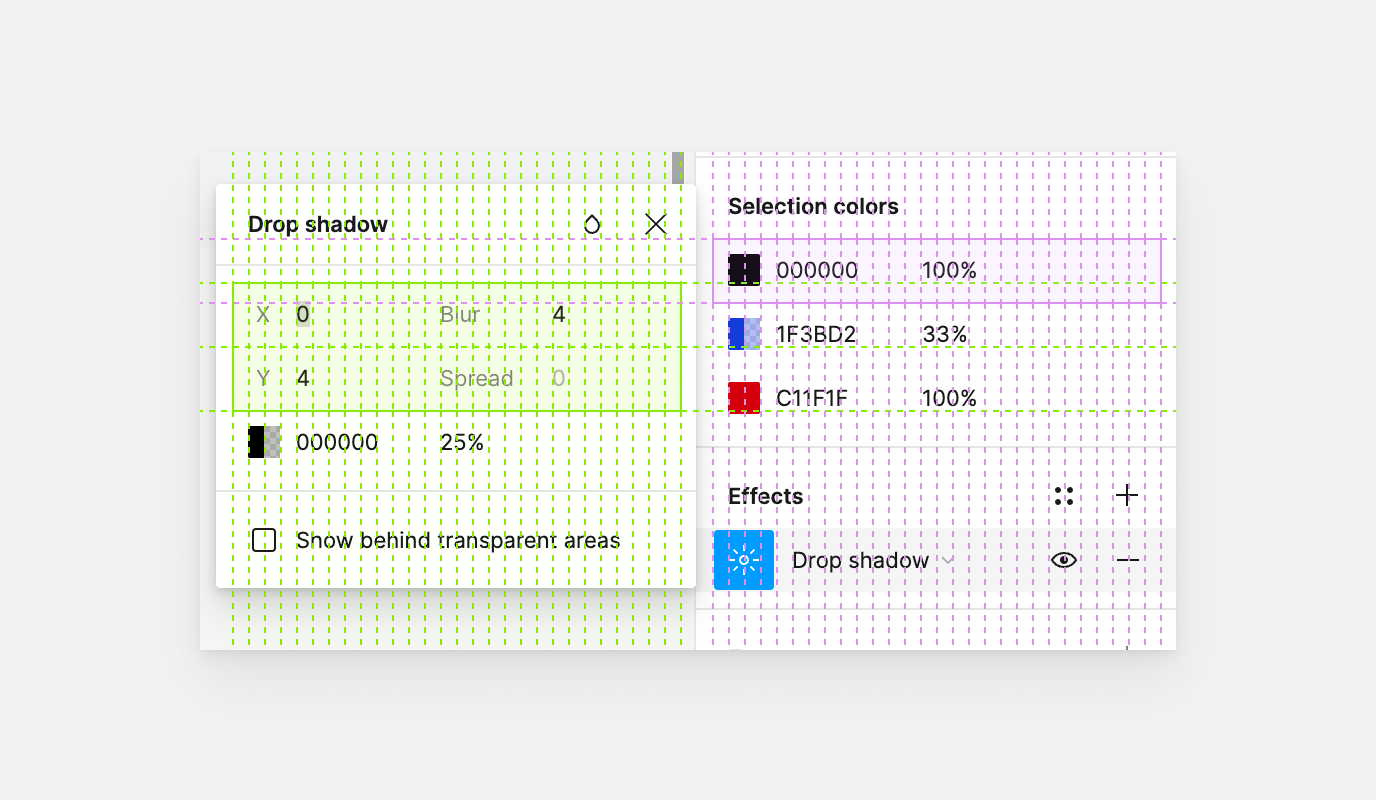
For me, this can be a good use for CSS grid, though from the primary look you may assume that these are little layouts, however once more, it’s a very legitimate use of CSS grid.
Alignment buttons
On this utilization, every alignment button is taking 4 columns (32px) of the grid. Discover how the icon itself is properly centered too.
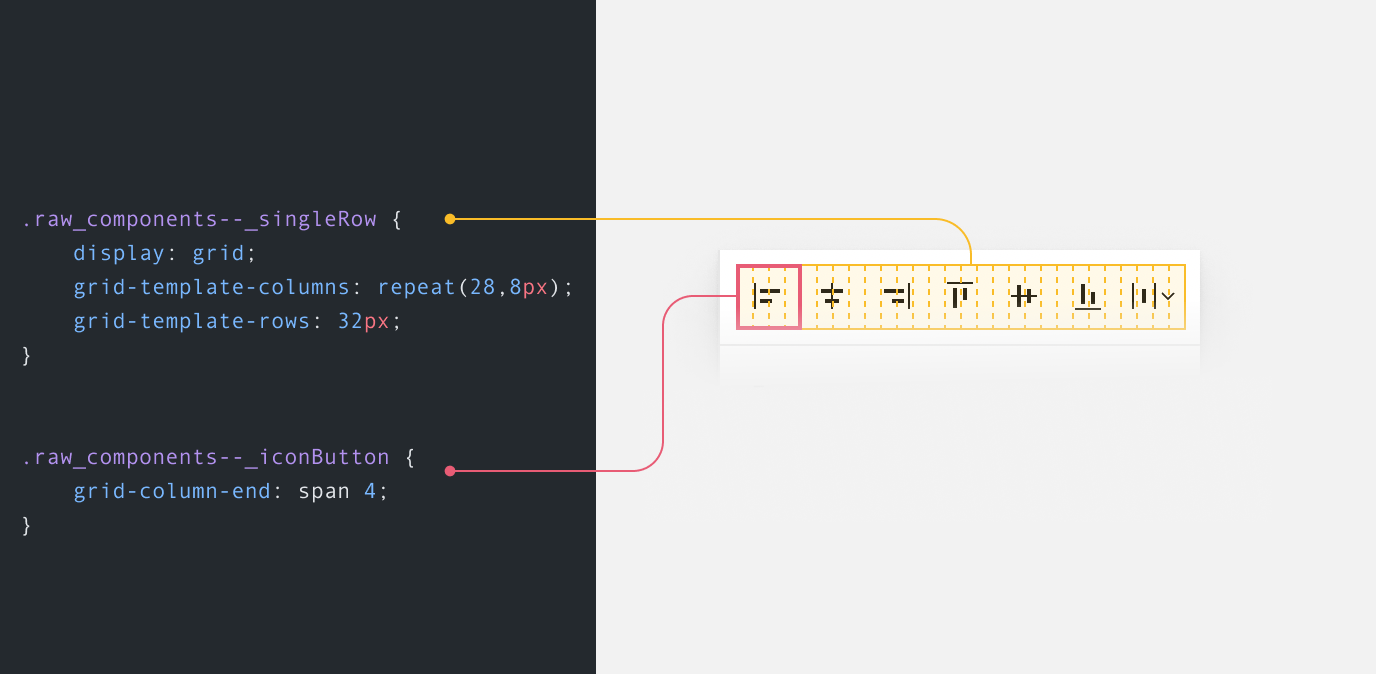
.raw_components--_singleRow {
  show: grid;
  grid-template-columns: repeat(28, 8px);
  grid-template-rows: 32px;
}

.raw_components--_iconButton {
  grid-column-end: span 4;
}
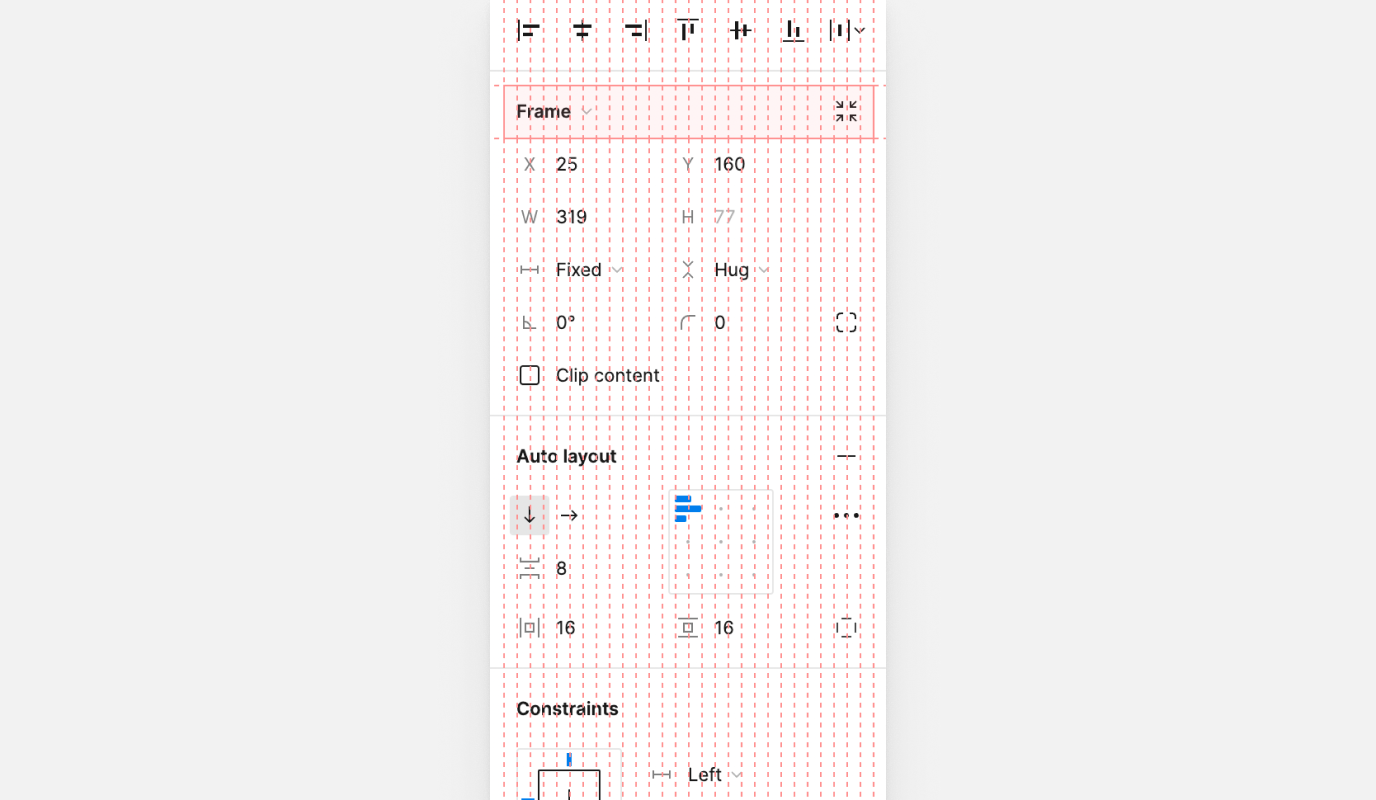
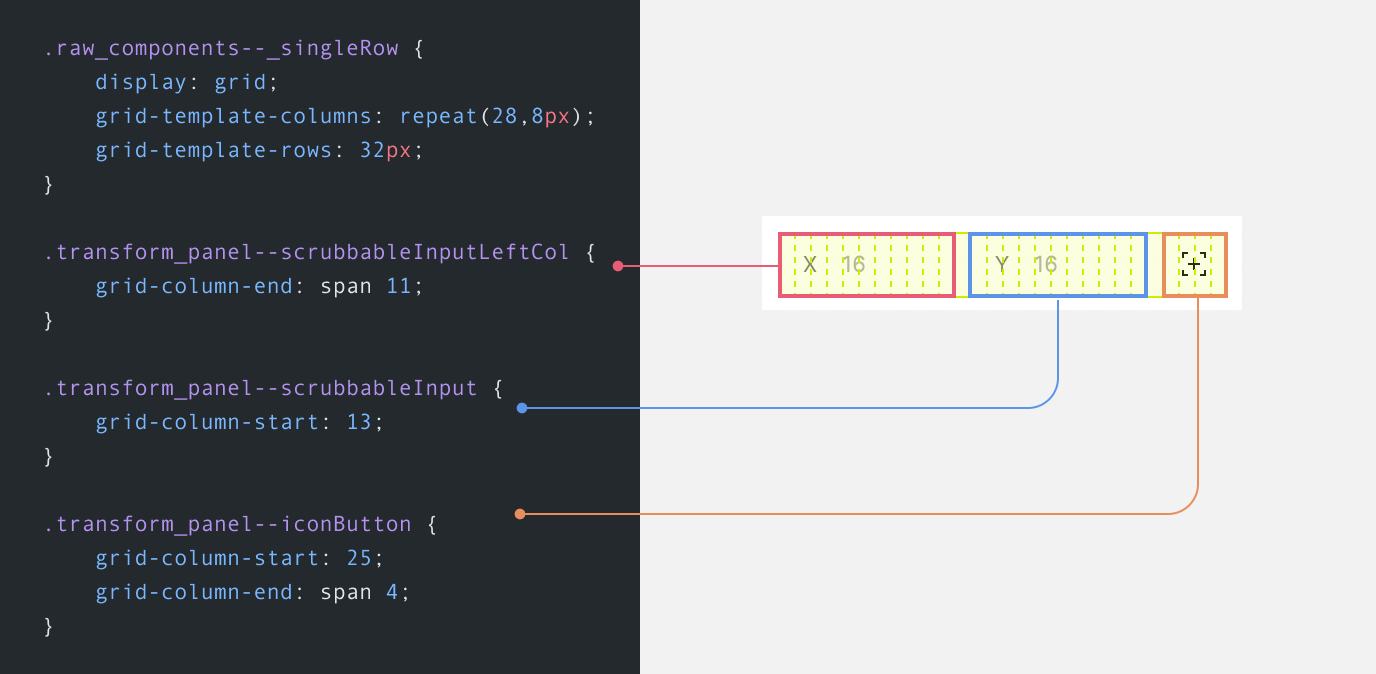
Factor place
On this instance, we see how the inputs for the x-axis and y-axis are divided, together with the newish “Absolute place” button.
Auto format
The bit that I discovered very attention-grabbing is the Auto Structure controls.
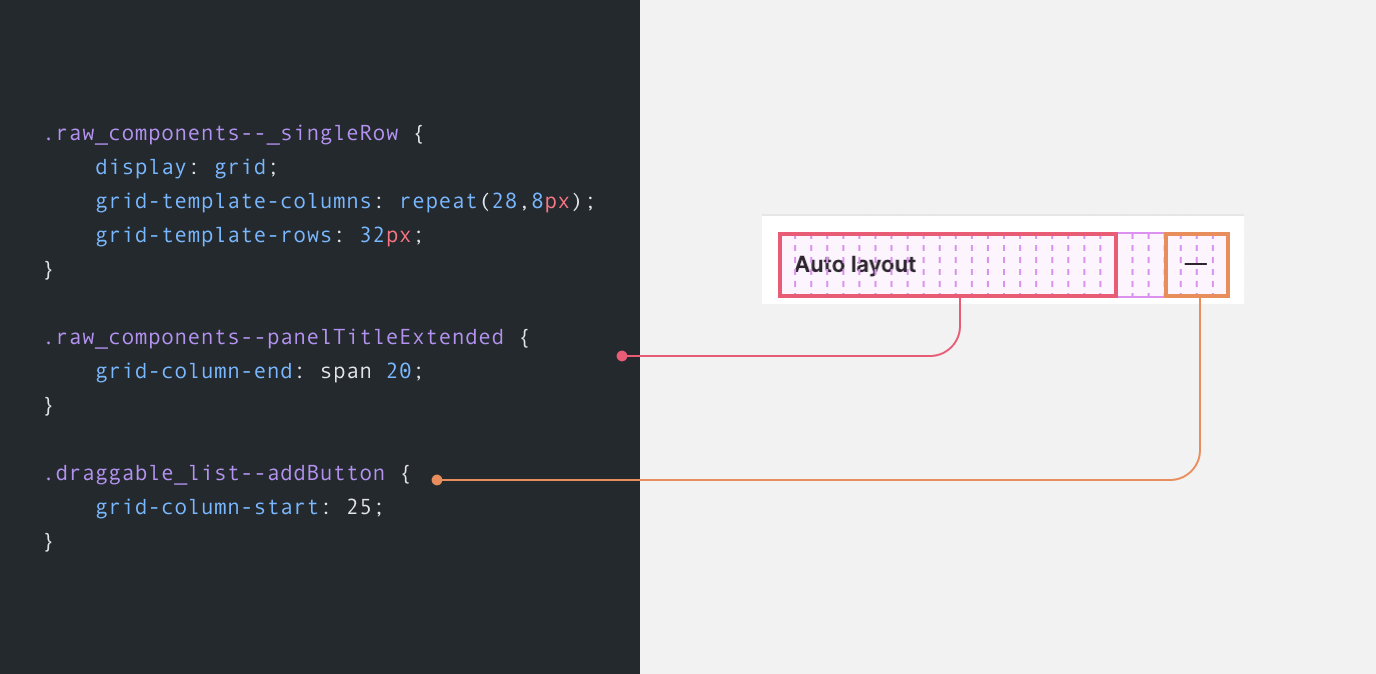
We have now a 28-column * 2 rows grid this time to accommodate for the controls that assist us in aligning the kid gadgets inside an Auto Structure container.
.stack_panel_v4--doubleRow {
  show: grid;
  grid-template-columns: repeat(28, 8px);
  grid-template-rows: repeat(2, 32px);
}
Cool. Let’s dig into the small print!
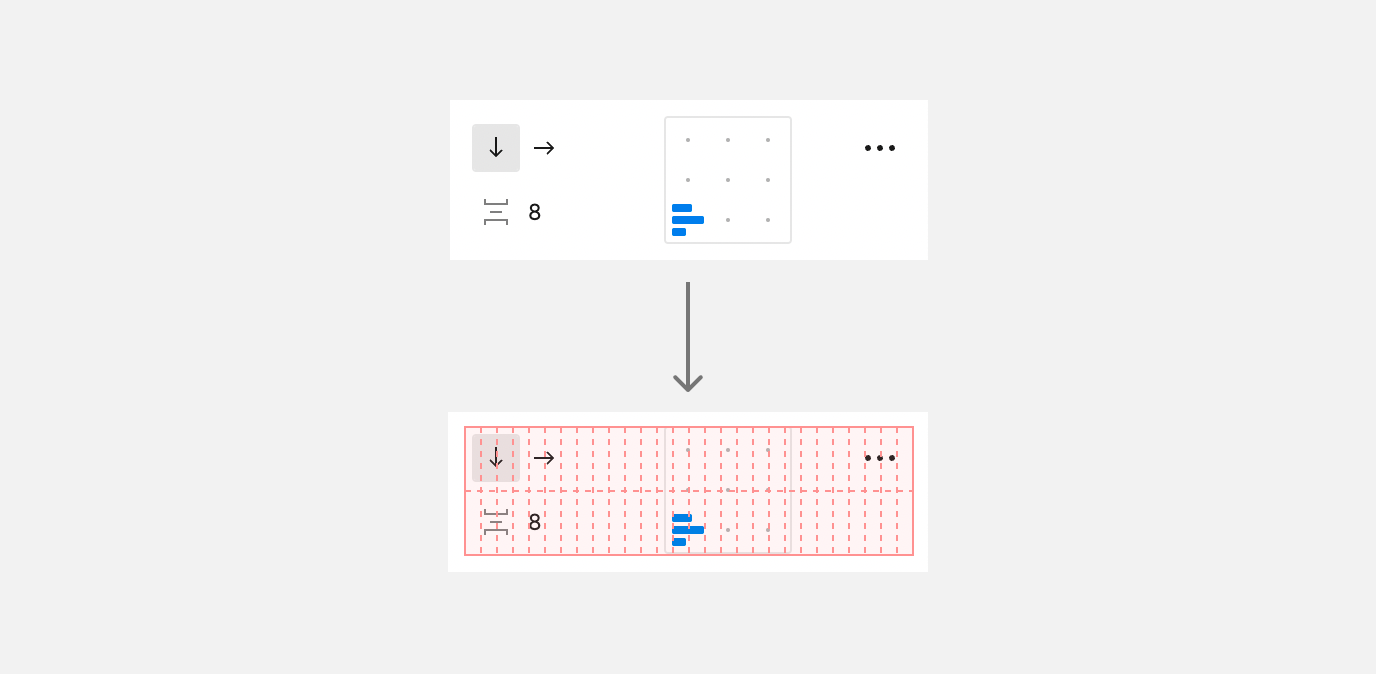
On the grid stage, every ingredient is positioned utilizing grid-column or grid-row or each.
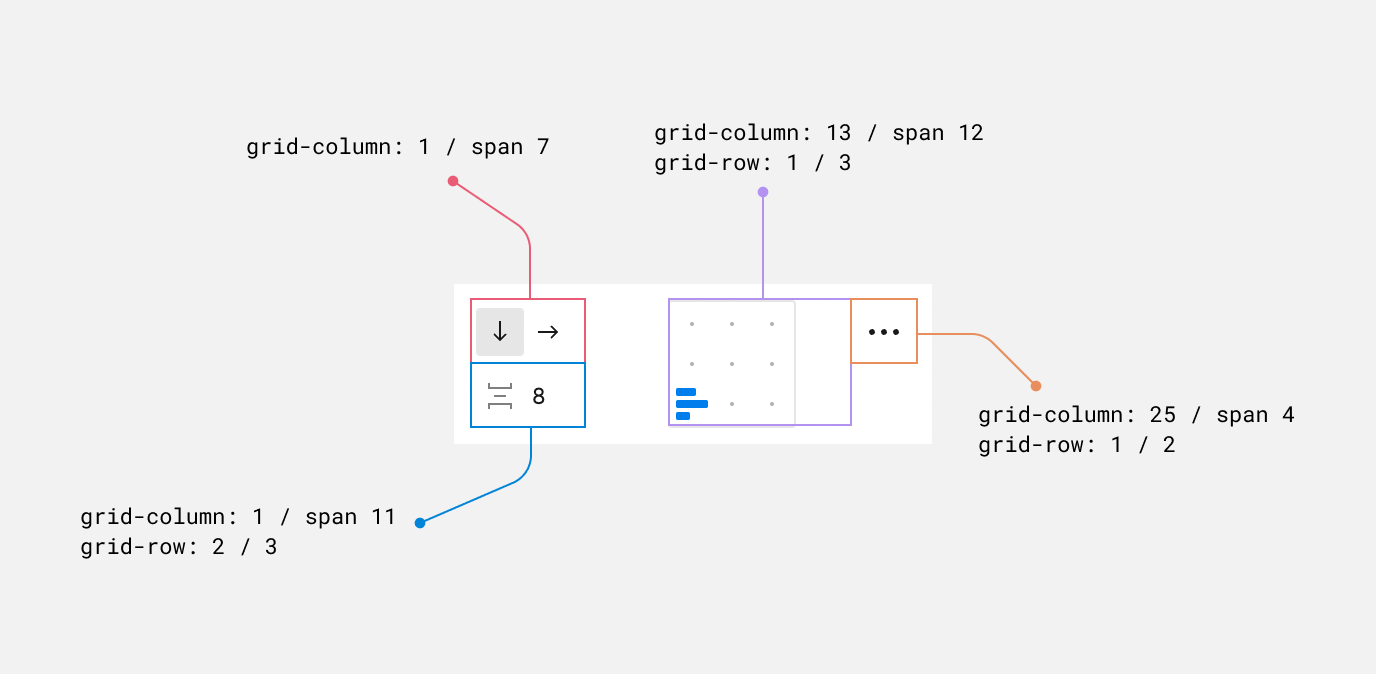
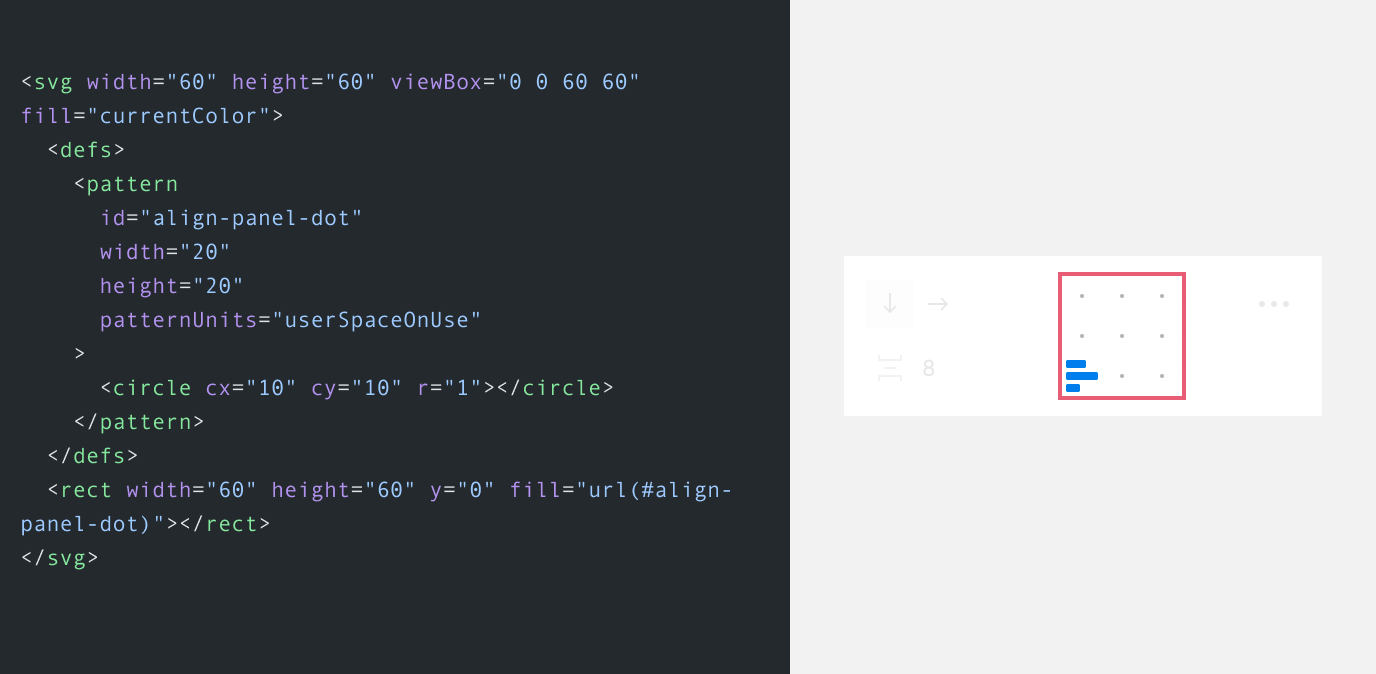
The alignment dots you see are product of an SVG sample. What a improbable element, and utilization!
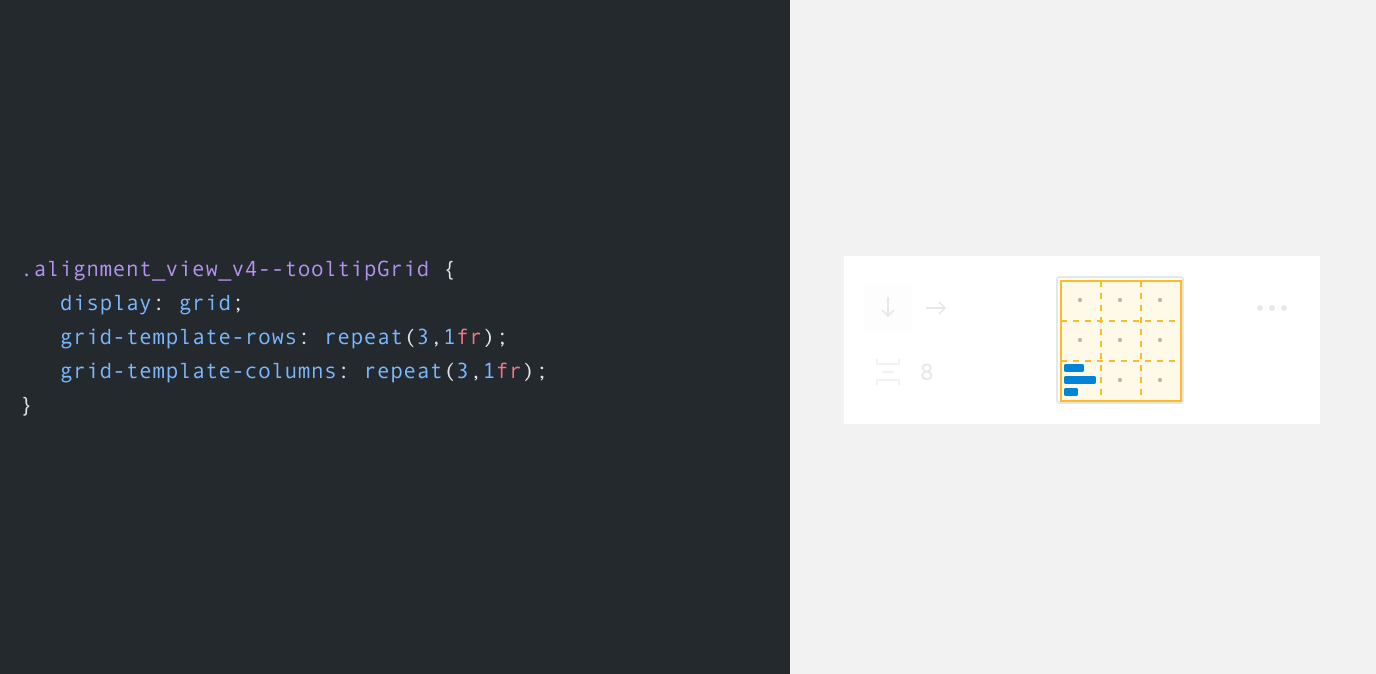
And never solely that however there’s a 3*3 grid that incorporates 9 grid gadgets. I imagine that these are right here to function a clickable space for every alignment.
.alignment_view_v4--tooltipGrid {
  show: grid;
  grid-template-rows: repeat(3, 1fr);
  grid-template-columns: repeat(3, 1fr);
}
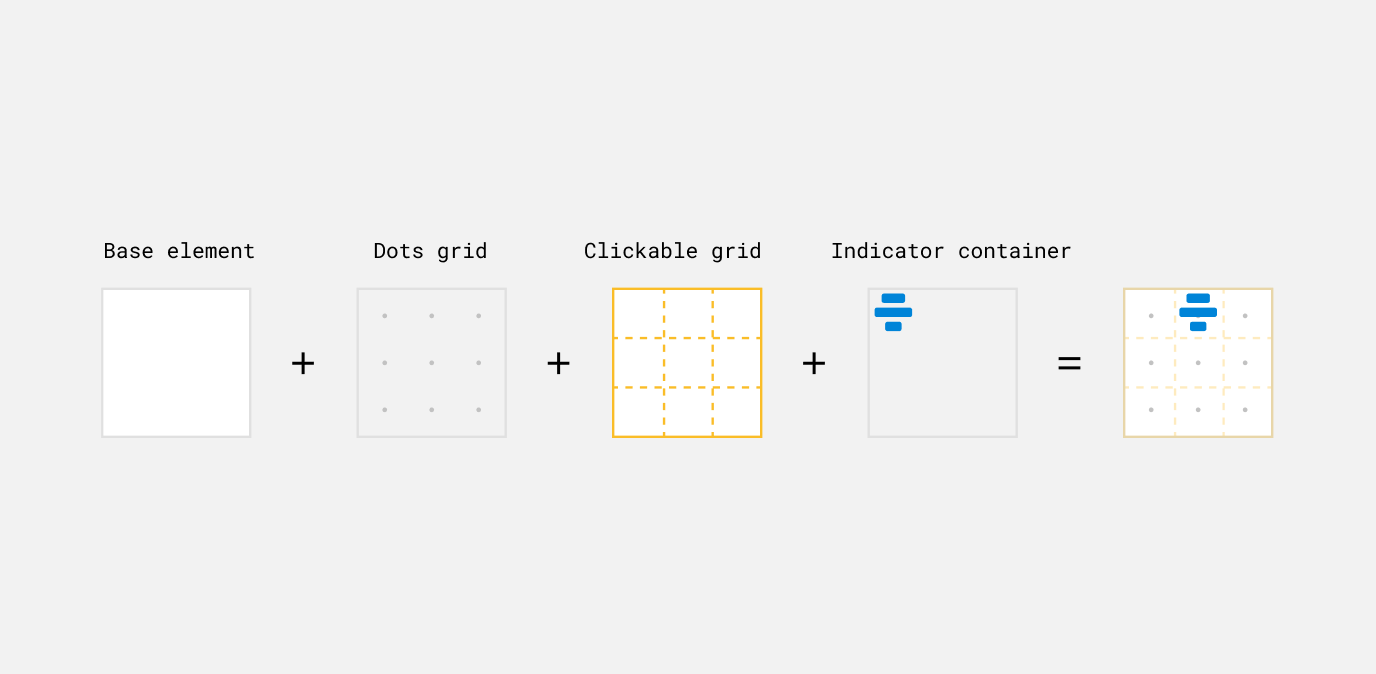
Subsequent, is the indicator container the place now we have the icon that reveals how the weather inside an Auto Structure container are aligned.
To make issues simpler to know, I divided that entire sq. into 4 components:
- Base backgrounds
- SVG dots
- The three*3 grid the place now we have clickable areas
- Indicator container (the blue icon)
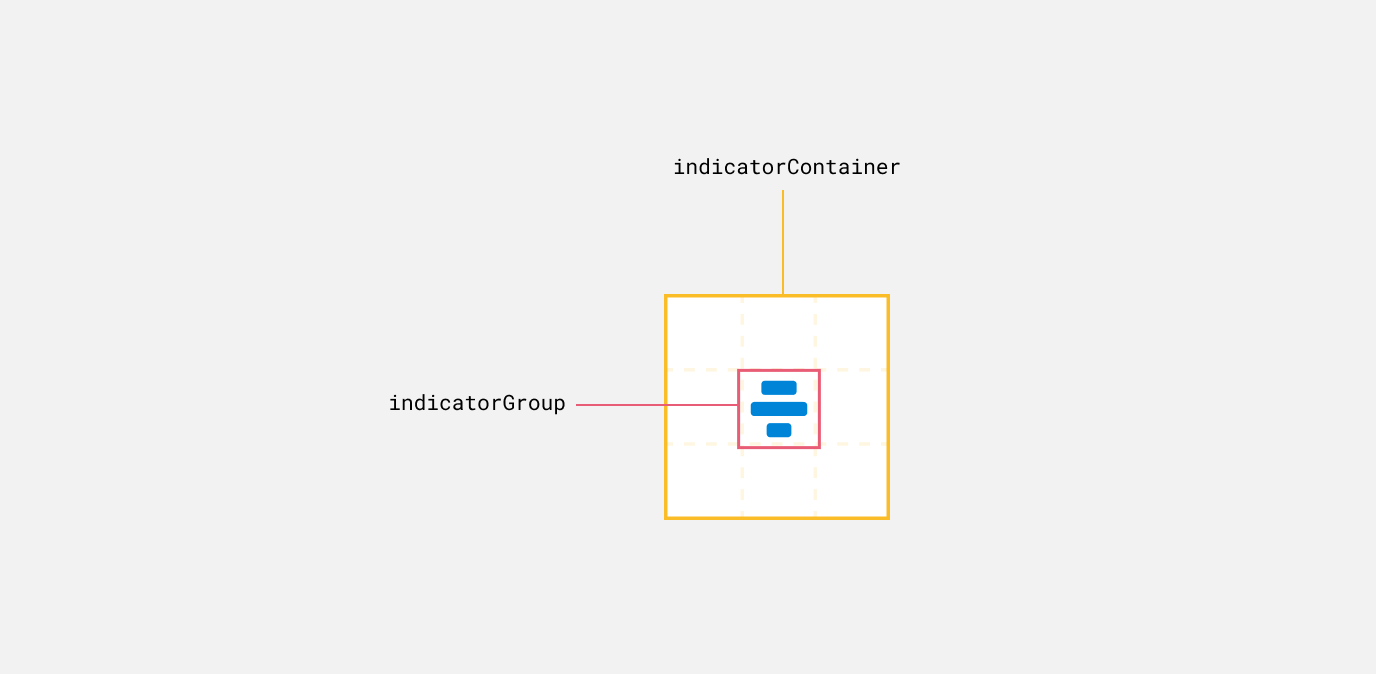
We are going to deal with the indicator container for now. Let’s take a look at the bottom markup and CSS.
<div class="alignment_view_v4--indicatorContainer">

  <div class="alignment_view_v4--indicatorGroup">
    <div class="alignment_view_v4--indicator"></div>
    <div class="alignment_view_v4--indicator"></div>
    <div class="alignment_view_v4--indicator"></div>
  </div>
</div>
Within the above markup, now we have each the indicator container, and the alignment icon. I appreciated that the icon itself is constructed and aligned with flexbox.
.alignment_view_v4--indicatorContainer {
  place: absolute;
  high: 1px;
  proper: 1px;
  backside: 1px;
  left: 1px;
  show: flex;
  flex-direction: column;
  justify-content: heart;
  align-items: heart;
}
With that, we’ll have two Flexbox wrappers, as soon as for the indicatorContainer ingredient and the opposite for the icon itself.
Right here is the styling for the blue icon. We have now a flex container with column as a course, then 3 gadgets that symbolize the blue strains of their totally different sizes.
.alignment_view_v4--indicatorGroup {
  show: flex;
  flex-direction: column;
  align-items: heart;
  justify-content: space-between;
  width: 20px;
  top: 20px;
}

.alignment_view_v4--indicator {
  top: 4px;
  border-radius: 1px;
}

.alignment_view_v4--indicator:nth-child(1) {
  width: 10px;
}

.alignment_view_v4--indicator:nth-child(2) {
  width: 16px;
}

.alignment_view_v4--indicator:nth-child(3) {
  width: 7px;
}
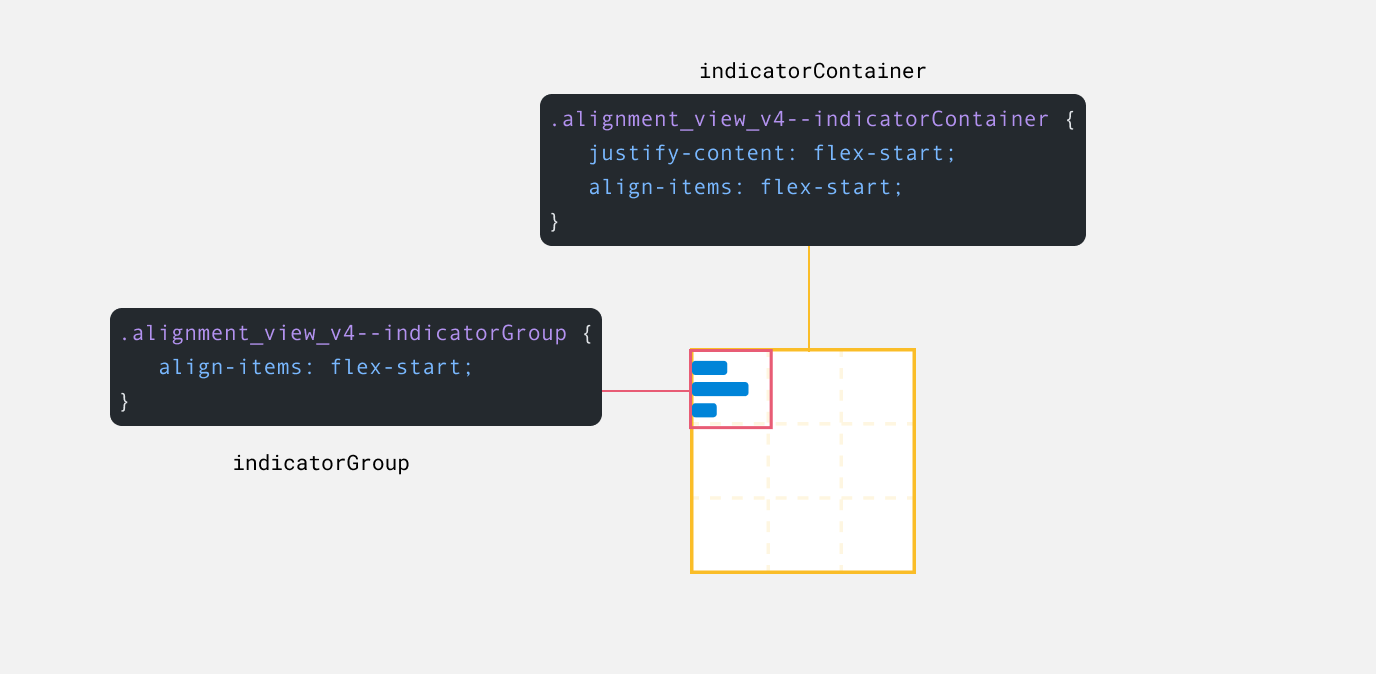
What amazes me right here is that after we change the alignment for an Auto Structure ingredient, each the indicatorContainer and indicatorGroup will replicate that.
Right here is an instance the place Auto Structure is about to high left alignment.
.alignment_view_v4--indicatorContainer {
  justify-content: flex-start;
  align-items: flex-start;
}

.alignment_view_v4--indicatorGroup {
  align-items: flex-start;
}
Utilizing flexbox
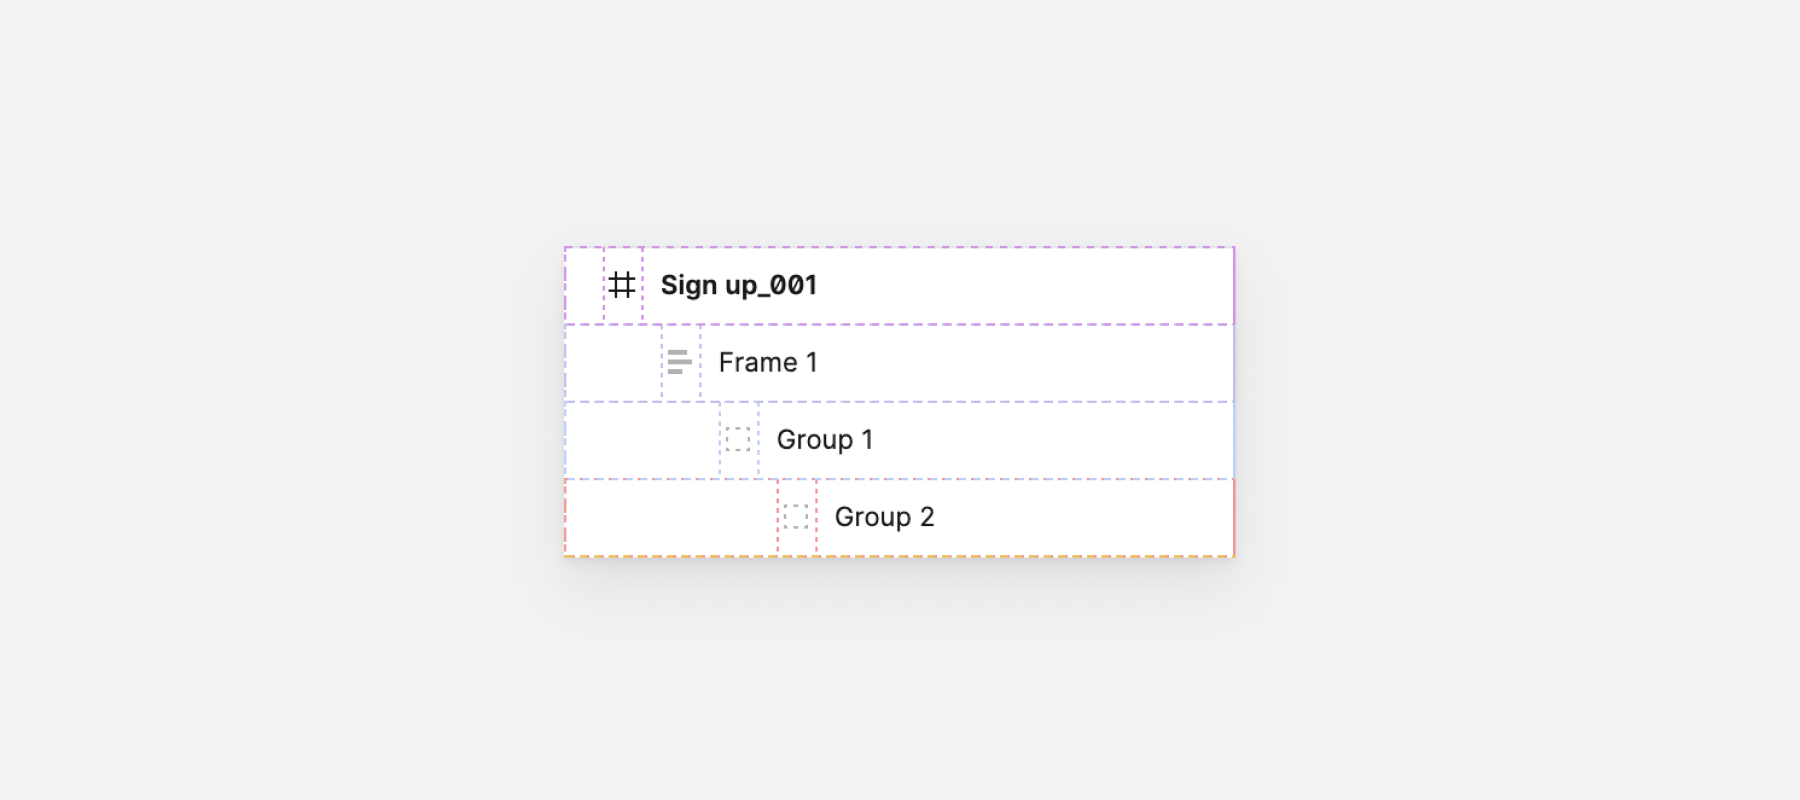
For the layer panel rows

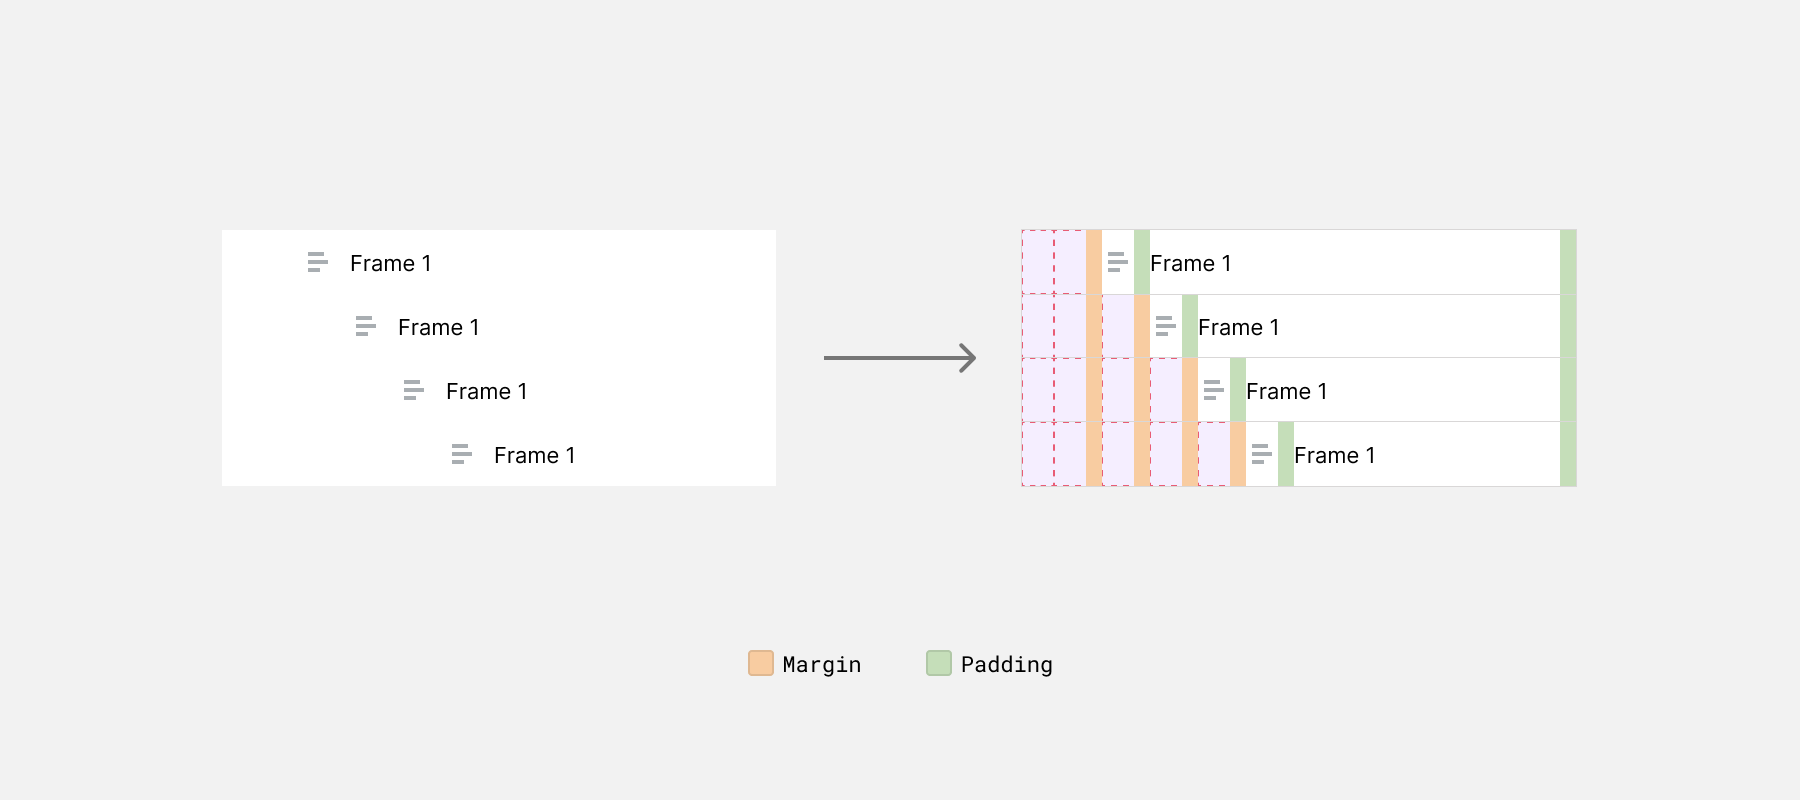
Within the determine above, now we have a predominant body named “Signal up_001”, and inside it, there are 3 nested gadgets. The extra the nesting, the extra spacing we’ve from the left to make it clear that there’s nesting.
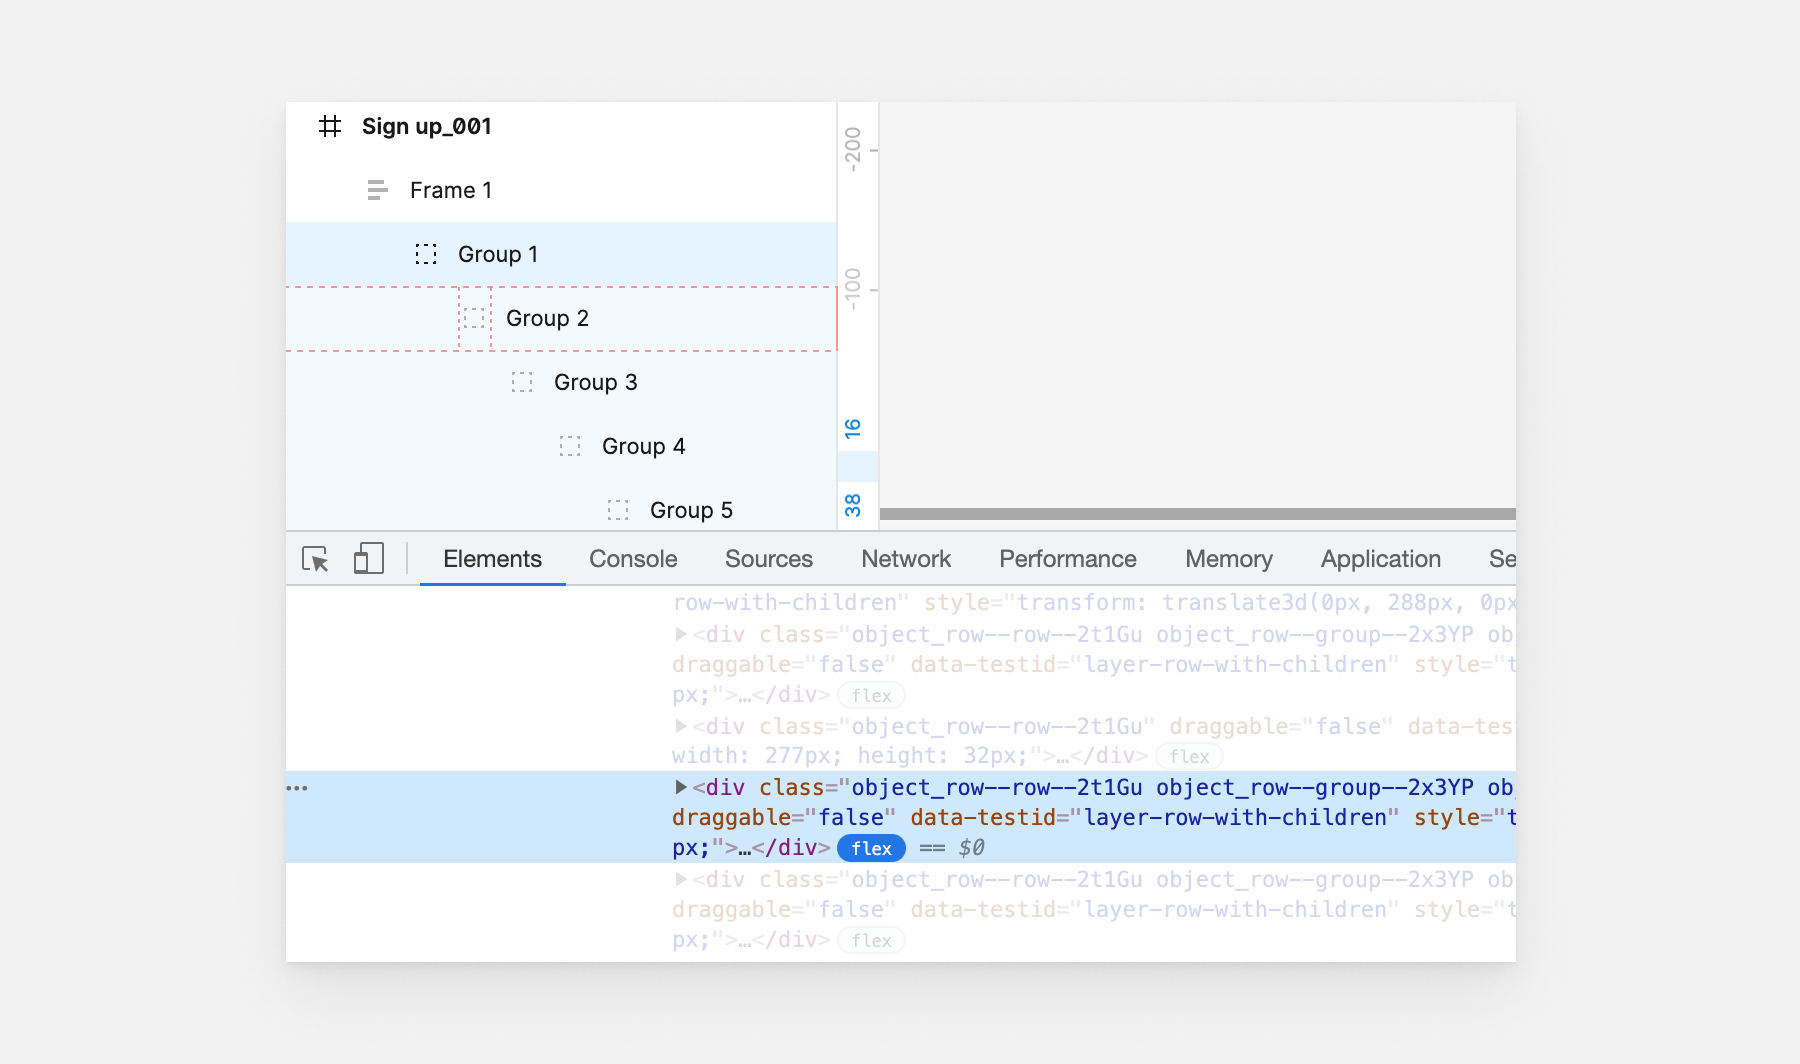
Upon inspecting the rows, here’s what I discovered:
Every row is a flex mother or father, thus I highlighted the flex tag subsequent to the HTML mother or father.
See it in motion within the following determine:
Cool, however the query is: how the spacing works? I actually anticipated it earlier than inspecting it and wasn’t stunned. The spacing occurs by including spacer elements.
![]()
Every spacer element has a width of 16px, and all areas have a margin-right: 8px apart from the primary one.
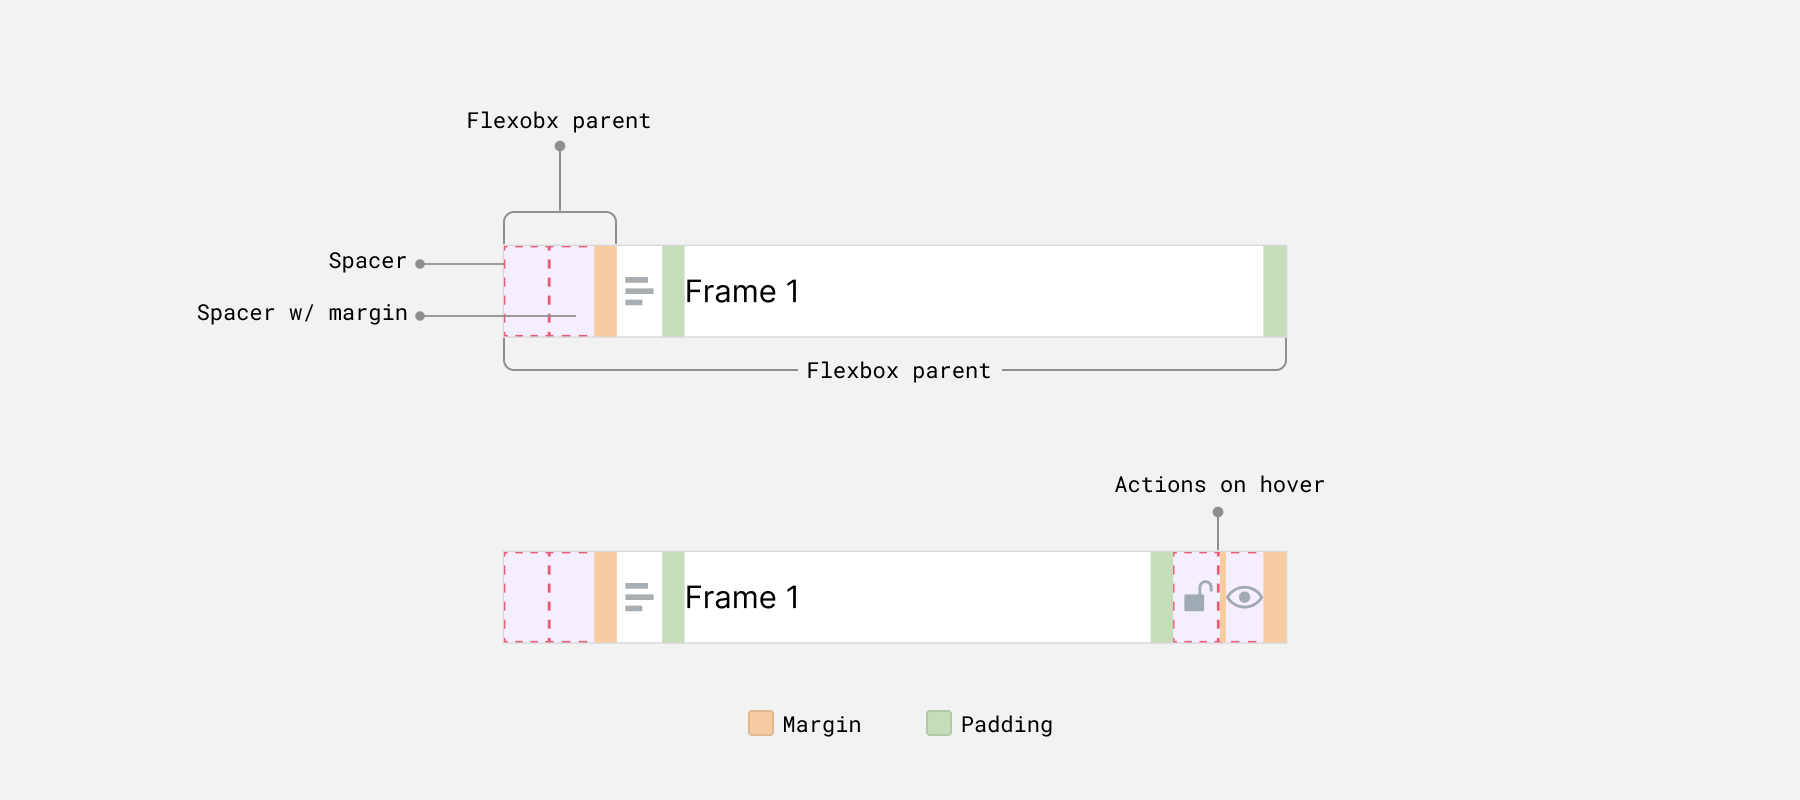
With extra nesting in place, the rows will appear like this.
Now that the visible facet is evident, let’s check out the markup and kinds.
<div class="object_row">
  <span class="object_row--indents">
    <span class="object_row--indent"></span>

  </span>
  <span class="object_row--layerIcon"></span>
  <span class="object_row--rowText"></span>
  <span class="object_row--rowActions">
    <span class="object_row--lockIcon"></span>
    <span class="object_row--visibleIcon"></span>
  </span>
</div>
We have now two flexbox dad and mom, one for the entire row and the opposite for the spacer elements (The workforce Figma referred to as them indents, and I like that title).
.object_row {
  show: flex;
  top: 32px;
}

.object_row--indents {
  show: flex;
  top: 100%;
}

.object_row--layerIcon {
  width: 16px;
}

.object_row--rowText {
  width: calc(100% - 16px);
  flex-shrink: 1;
}

.object_row--rowActions {
  width: 0;
}
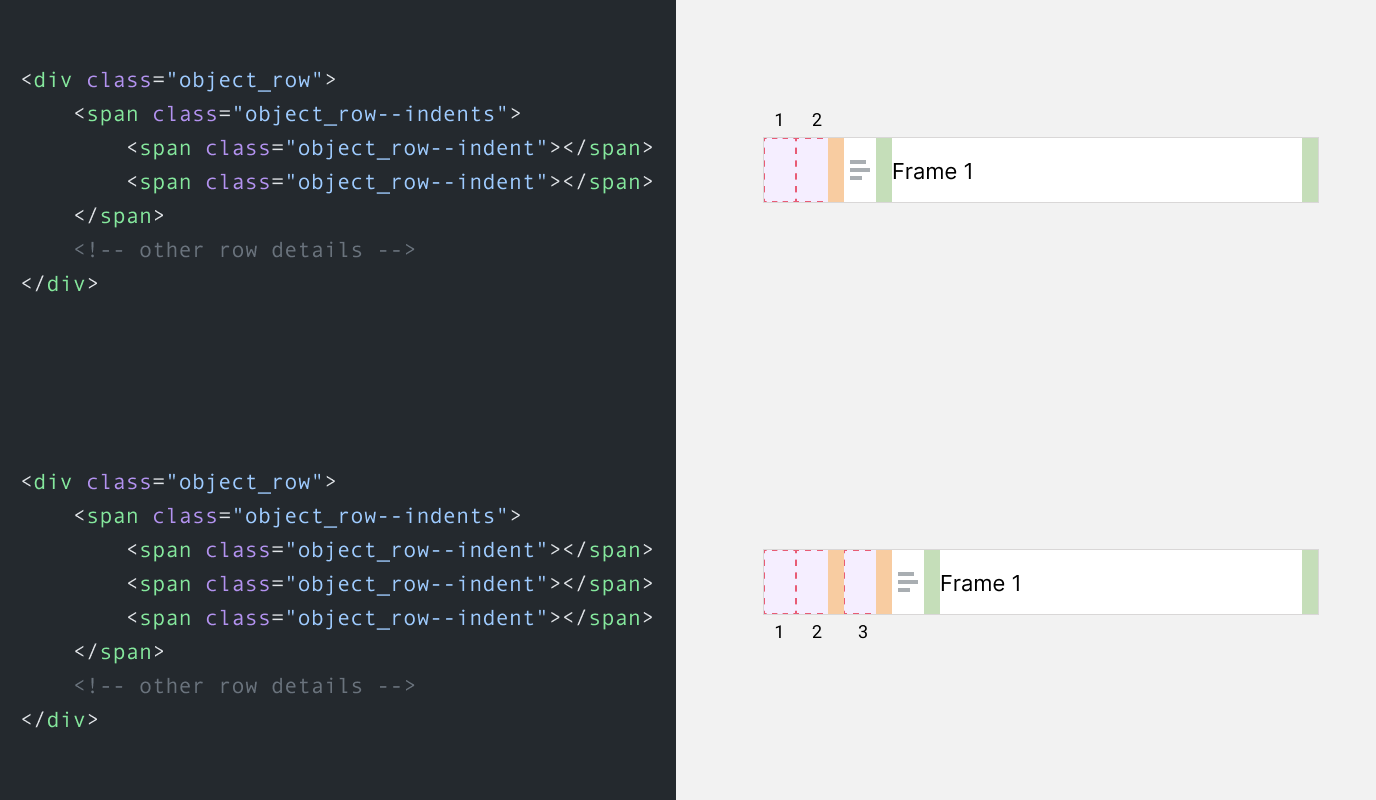
With the above, the nesting will occur by including a brand new spacer ingredient.
Take into account the next markup. We have now two spacers which implies that this row is the primary one in its group.
<div class="object_row">
  <span class="object_row--indents">
    <span class="object_row--indent"></span>
    <span class="object_row--indent"></span>
  </span>
  <span class="object_row--layerIcon"></span>
  <span class="object_row--rowText"></span>
  <span class="object_row--rowActions">
    <span class="object_row--lockIcon"></span>
    <span class="object_row--visibleIcon"></span>
  </span>
</div>
Isn’t that simply attention-grabbing, and funky? Seeing my favourite design software utilizing my favourite CSS function is simply..wonderful.
Different Flexbox use-cases
Flexbox is getting used closely for the little elements. Let’s discover a couple of of them.
Stroke particulars
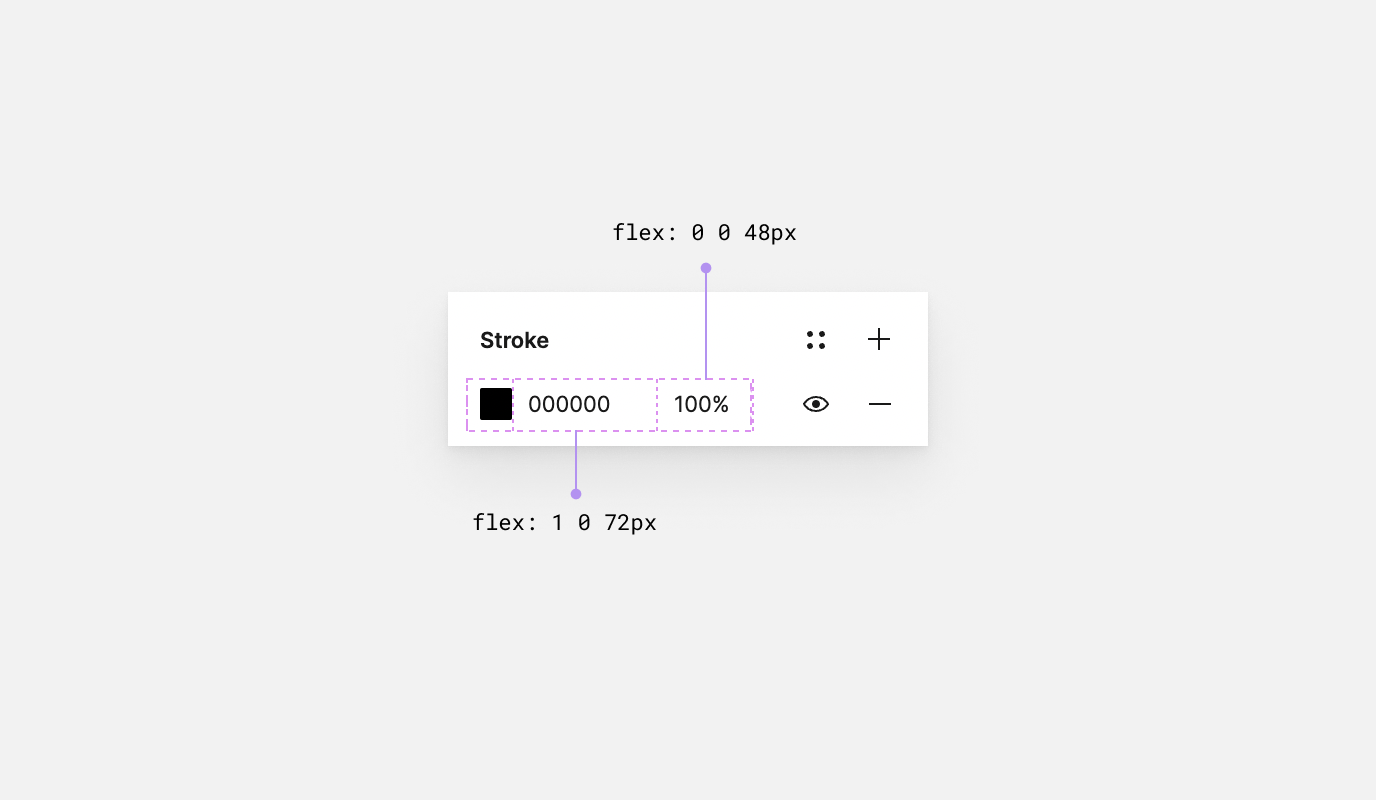
For colours, Flexbox is getting used for controlling the colour worth and the opacity.
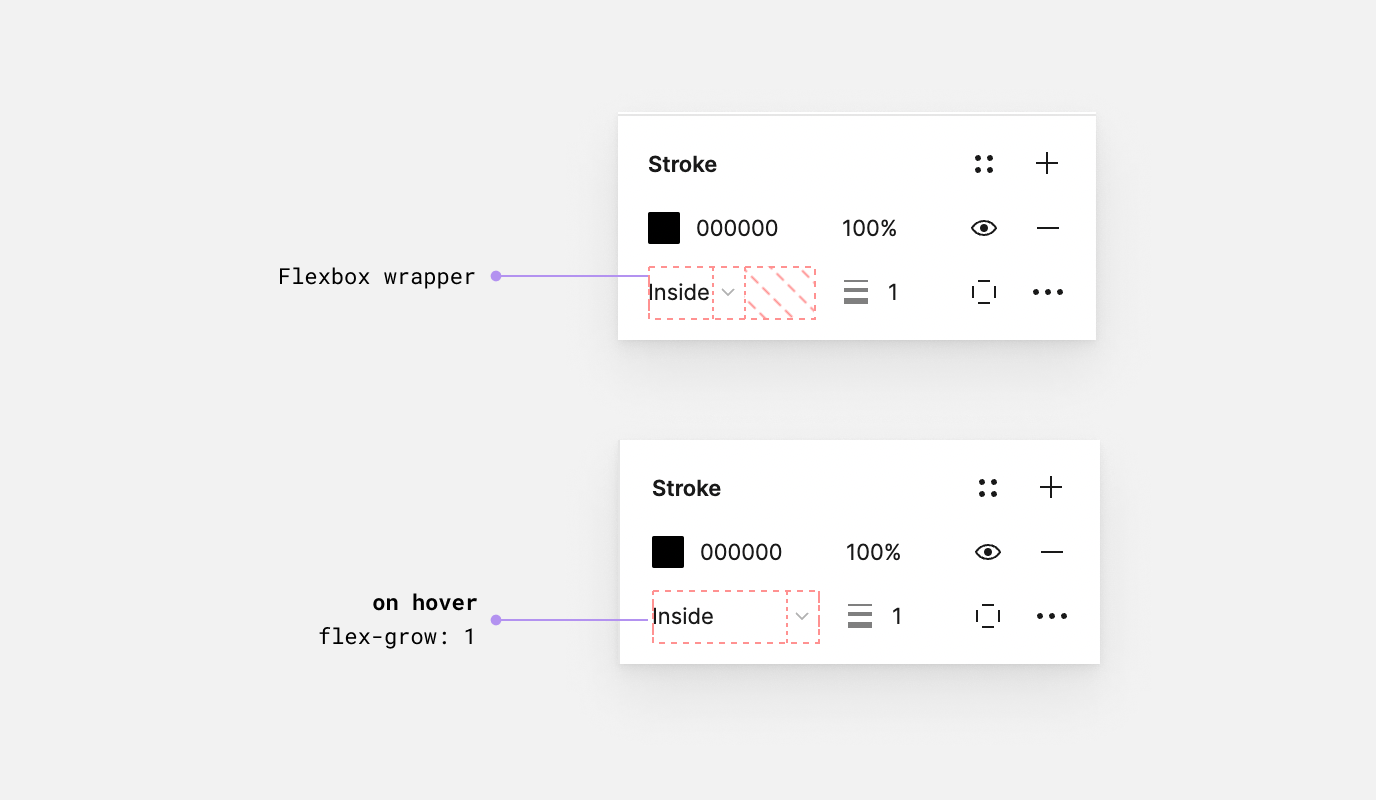
And on regards to the identical context, when the consumer hovers over the dropdown menu, it can increase the textual content to the complete out there area by utilizing flex-grow: 1.
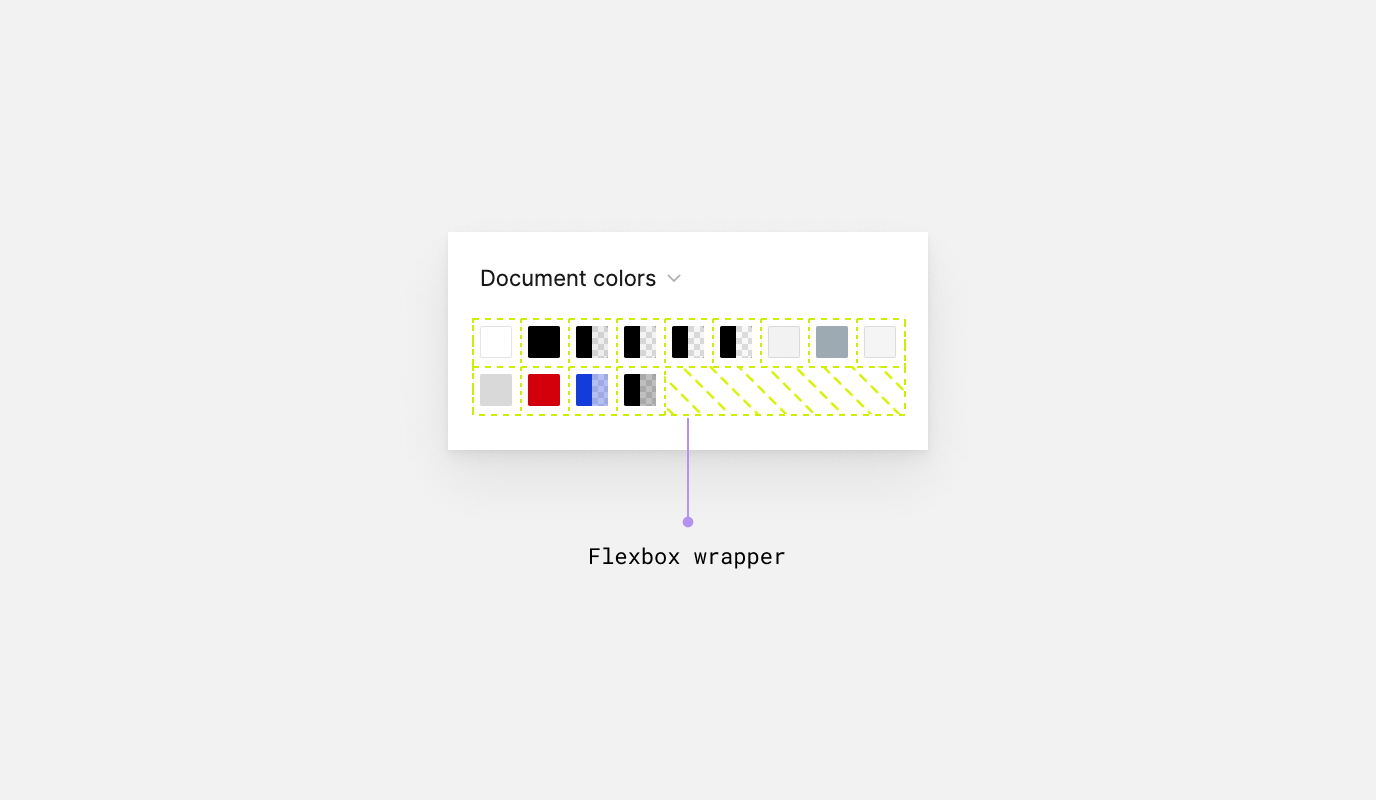
Doc colours
On this instance, it’s higher to make use of Flexbox so we are able to get the good thing about the wrapping. In any other case, utilizing CSS grid received’t present us with the identical outcome.
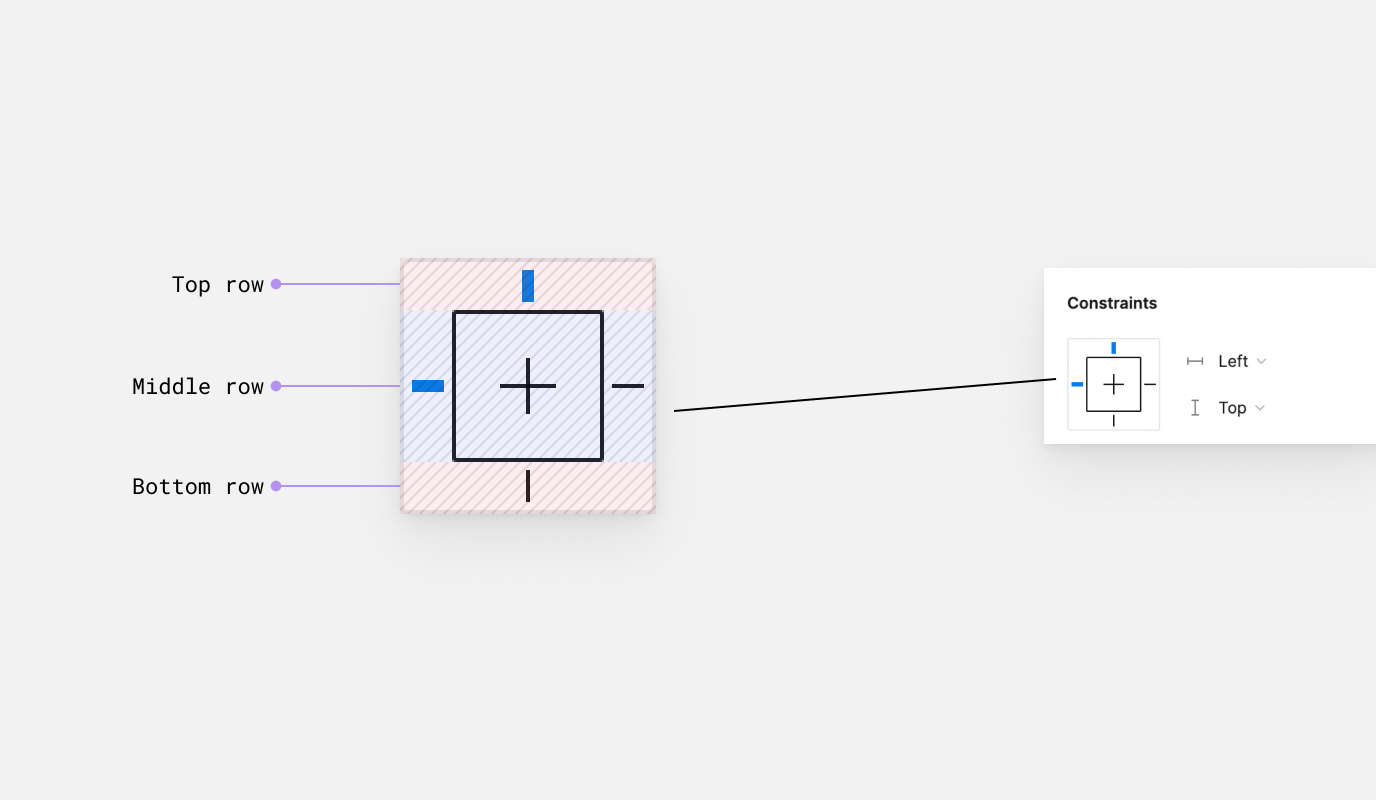
Constraints element
We have now a number of Flexbox containers right here. The primary one is for the highest, center, and backside rows. The second is for the center merchandise, which is a Flexbox container itself.
Conclusion
That’s it for this exploration. I loved such distinctive and enjoyable utilization for each Flexbox and Grid. It’s inspiring to see that in a software we’ll use, and for me, it impressed me to discover much more use instances for the CSS instruments we’ve.
In case you’re into that kind of articles, I printed a deep-dive into my exploration on constructing the Fb Messenger chat bubble.
Thanks for studying.