


On this article, we’ll see The best way to set up MySQL in Home windows working system step-by-step. MySQL is without doubt one of the standard open-source RDBMS (Relational database administration system).

What’s MySQL?
MySQL is without doubt one of the standard open-source RDBMS (Relational database administration system). It’s so utilized by many standard web sites like Fb, Twitter, YouTube, Flickr, and so on. MySQL was owned and sponsored by the Swedish firm, MySQL AB, which was introduced by Solar Microsystems, now Solar Microsystem is acquired by Oracle Company.
Let’s start:
Go to the official web site of MySQL with the intention to obtain the MySQL Installer for Home windows. You can too seek for “MySQL Database Set up” in Google as proven within the beneath picture. Click on on the Obtain MySQL Installer hyperlink.

In MySQL Neighborhood Downloads, Select the setup as per your system. I’m downloading the mysql-installer-community-8.0.25.0.msi (Home windows x86, 32 bit) setup file. Click on on the Obtain button with the intention to obtain the MSI Installer.

MySQL msi installer can be downloaded in jiffy.

Double click on on the downloaded installer file with the intention to begin the set up.

Within the subsequent MySQL Installer display, click on on Add button. If some product already put in in your system, these can be proven within the grid.

Choose the merchandise you wish to set up in your system.

As you may see within the beneath picture, I’ve chosen MySQL Server, MySQL Workbench, Connector for .Web, Documentation, and examples. Click on on Subsequent to proceed. You may choose merchandise as per your want.

Click on on Execute button with the intention to set up the chosen merchandise.

As soon as set up accomplished, click on on Subsequent with the intention to configure the put in merchandise. In my case, I’ve to configure the MySQL Server & Pattern and Examples.

Within the subsequent step, choose the config sort and different connectivity particulars. I chosen config sort as Growth Pc as I want MySQL for growth objective. Chosen TCP/IP with Port is 3306 and X Protocol Port worth is 33060 (Holding the default values) then Click on on subsequent button.

Choose the Authentication technique. I’ve chosen using Sturdy Password Encryption for Authentication which is advisable.

Enter the password for the basis account and Click on on the Subsequent button.

The following display is about registering MySQL as Home windows Service. Hold the chosen values (default) as proven within the beneath picture after which click on on the Subsequent Button.

Click on on the Execute button with the intention to apply the configuration chosen in above steps.

As soon as the configuration operation accomplished efficiently, Click on on the End button.

You may see that the Product Configuration accomplished. Click on on the subsequent button.

Choose Begin MySQL Workbench after setup and Begin MySQL Shell after the setup in case you wish to run simply after Workbench and MySQL shell simply after the set up. Click on on the end button.

As I’ve opted for the MySQL Workbench, it should open simply after the completion of the setup. You can too run it from the beginning menu by looking out MySQL Workbench. Click on on the Native Occasion (You may arrange the brand new reference to the server particulars as properly).

Present the basis password configured in the course of the set up.

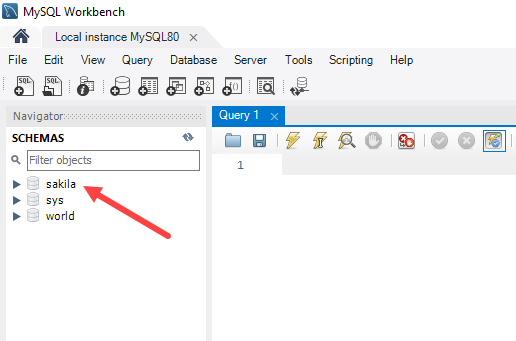
You may see the Pattern & Examples are configured within the Schema. You may create your individual new Database or Import the present one.
I hope this text will show you how to in establishing MySQL within the home windows working system.
Thanks.
