


SSL is a safety measure that encrypts knowledge despatched between two gadgets (i.e., a server and a pc.) With databases like PostgreSQL, SSL is essential to make sure your delicate data, comparable to bank card numbers or social safety numbers, can’t be intercepted by anybody apart from you.
By default, PostgreSQL doesn’t include SSL enabled. However don’t fear, although. this tutorial has acquired you coated in establishing PostgreSQL SSL. You’ll study to create an SSL certificates, configure PostgreSQL, and confirm that SSL is working appropriately.
Learn on to take your PostgreSQL safety to the subsequent stage!
Stipulations
This tutorial shall be a hands-on demonstration. When you’d prefer to comply with alongside, make sure you will have the next.
- A Linux machine – This tutorial makes use of Ubuntu Server 18.04, however any latest distribution ought to work advantageous.
- A non-root consumer with sudo privileges – This tutorial makes use of a root account, however you’ll be able to obtain the identical outcomes utilizing a sudo-enabled consumer.
- A completely qualifying registered area identify (FQDN) pointing to your server (not strictly required however makes establishing SSL a lot easier) – This tutorial makes use of the area psql.instance.com. Nonetheless, you’ll be able to exchange the area with your personal all through this tutorial.
- Snap package deal supervisor put in.
Beginning PostgreSQL with out SSL
Earlier than you’ll be able to arrange PostgreSQL to make use of SSL, you’ll have to have a working set up. For this tutorial, you’ll have to have PostgreSQL operating with out SSL enabled to check that every thing is working after you’ve arrange SSL.
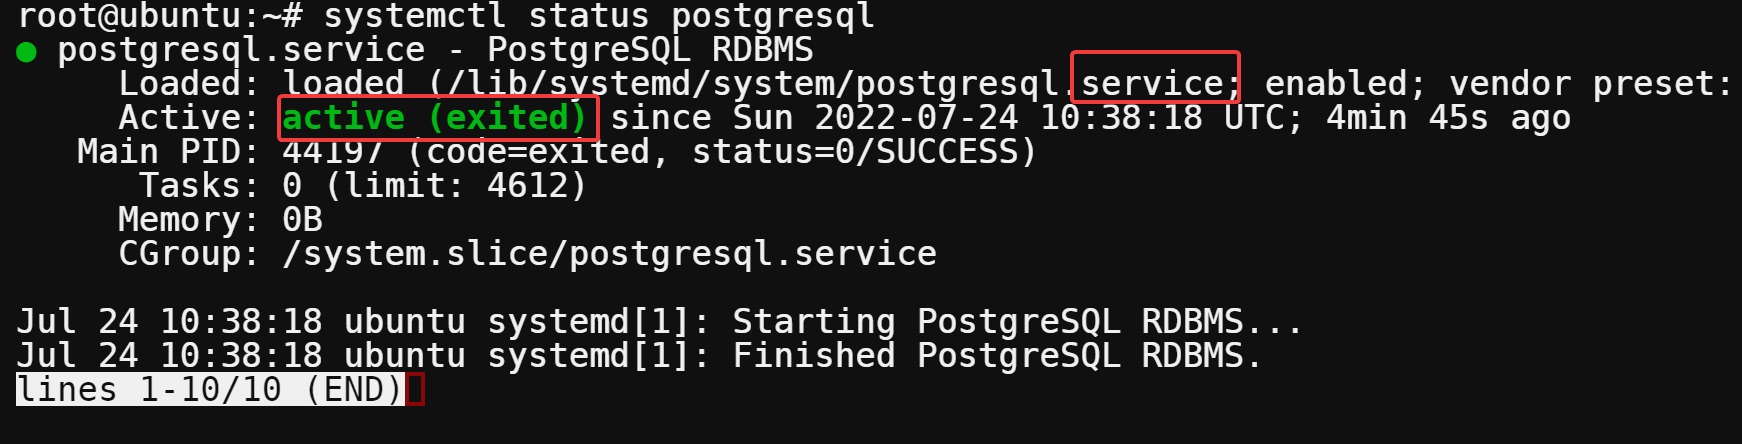
Open your terminal, and run the beneath systemctl command to begin the PostgreSQL service.
By default, the PostgreSQL service begins routinely after set up, however operating this command is an efficient measure to make sure the server is operating.
Append sudo earlier than each command when operating instructions that require elevated privileges if you happen to use a non-root account all through this tutorial.
systemctl standing postgresql
The output beneath signifies the PostgreSQL service is energetic (exited).
If PostgreSQL will not be operating, run the beneath command to begin, and allow the service to start out routinely on bootup.
# Begins the PostgreSQL service
systemctl begin postgresql
# Permits the PostgreSQL service to run on system bootup
systemctl allow postgresql

Putting in Certbot to Create PostgreSQL SSL Certificates
Now that you’ve got PostgreSQL operating, you’ll set up Certbot to simplify buying and renewing SSL certificates. You’ll use these certificates to encrypt the communication between the server and any shoppers that connect with your database.
On this tutorial, you’ll use the Snap package deal supervisor to put in Certbot to make retaining Certbot up-to-date a breeze.
1. Run the beneath command to refresh the checklist of accessible Snap packages.

2. Subsequent, run the snap set up command beneath to put in certbot.
snap set up --classic certbot
3. As soon as put in, run the next command to hyperlink (ln) your Certbot executable to /usr/bin so you’ll be able to name Certbot shortly.
ln -s /snap/bin/certbot /usr/bin/certbot
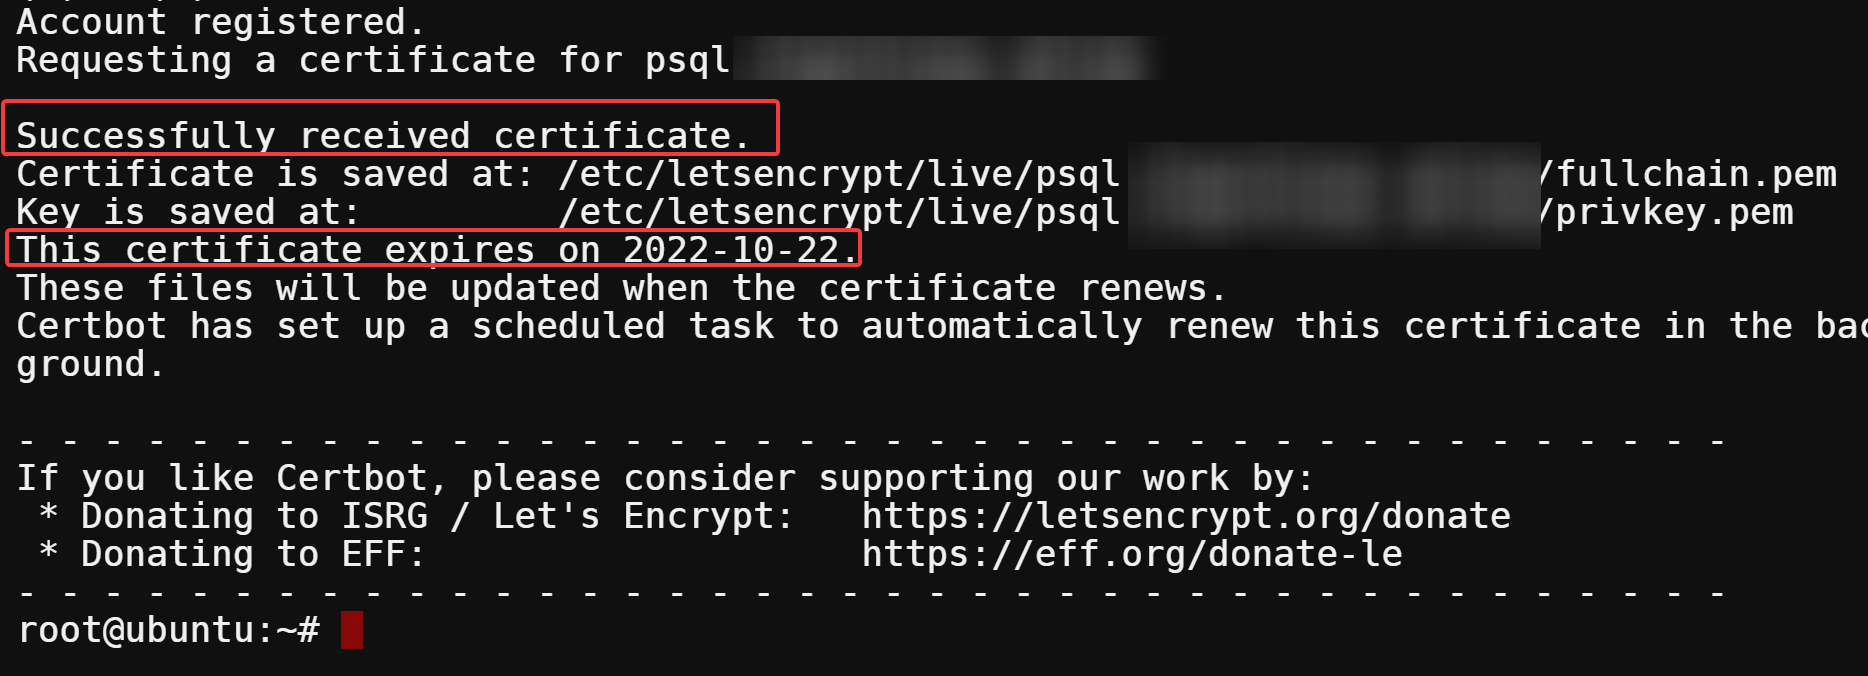
4. Now, run the beneath certbot command to request your area’s (psql.instance.com) SSL certificates (certonly). The –standalone mode tells Certbot to make use of its built-in server to confirm your area possession and requests a certificates from Let’s Encrypt.
certbot certonly --standalone -d psql.instance.comEnter your electronic mail deal with, press Enter to opt-in for necessary account notifications, and conform to the Let’s Encrypt phrases of service.

5. When prompted, sort Y and press Enter to conform to the phrases of service.

6. Subsequent, sort Y and press Enter to share your electronic mail deal with with the Digital Frontier Basis (EFF), a non-profit that helps help Certbot’s growth).

In case your area is efficiently verified, you’ll see the beneath output with certificates data like the next:
- Certificates validation – 90 days and shall be routinely renewed.
- Certification location and key information.
You’ll want to word down the trail to your certificates and key information. You’ll want them later whereas configuring PostgreSQL to make use of SSL.
When you obtain any errors, be sure you have adopted the first step up up to now. Specifically, examine that you simply’ve linked the Certbot executable to /usr/bin and that your area identify is appropriately specified.
Making a Certbot Renewal Hook
You now have a sound SSL certificates, however you haven’t configured PostgreSQL to make use of the certificates but. You could create a Certbot renewal hook and configure PostgreSQL to make use of SSL.
A renewal hook is required as a result of the certificates file is just accessible by root. With a renewal hook, the certificates and key information are copied to the PostgreSQL knowledge listing (owned by the postgres consumer) at any time when Certbot renews the certificates.
To create a Certbot renewal hook:
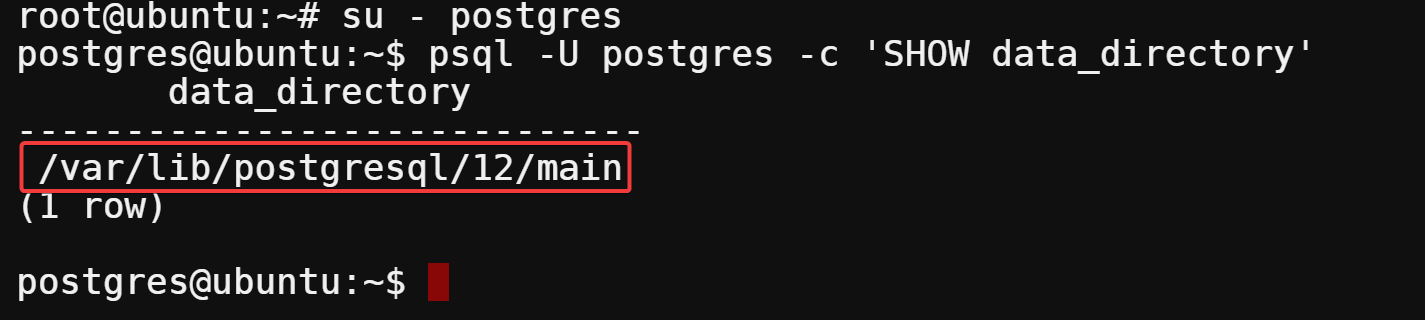
1. Discover the info listing on your PostgreSQL set up first. The information listing is normally /var/lib/postgresql/knowledge. However the location might be completely different relying on the way you put in PostgreSQL.
Run the next command to change to the postgres consumer and question (psql) for the info listing (‘SHOW data_directory’).
su - postgres
psql -U postgres -c 'SHOW data_directory'
The information listing is situated in the identical listing because the postgresql.conf file, on this case, /var/lib/postgresql/12/major. Observe the placement, as you have to it later to create a hook script (step three).
2. Subsequent, create a renewal hook script known as postgresql.deploy along with your most popular textual content editor.
nano /and so on/letsencrypt/renewal-hooks/deploy/postgresql.deploy3. Add the next code to the postgresql.deploy file, and exchange the next variable values:
DATA_DIRECTORY– The information listing you famous in the first step.
DOMAIN - Your precise area.
The code beneath defines the permission (umask), DOMAIN, and PostgreSQL DATA_DIRECTORY and copies the certificates (.crt) and key (.key) information to the anticipated places.
After modifying the variable values, save the modifications, and shut the file.
#!/bin/bash
umask 0177
DOMAIN=psql.instance.com
DATA_DIR=/var/lib/postgresql/12/major
cp /and so on/letsencrypt/reside/$DOMAIN/fullchain.pem $DATA_DIR/server.crt
cp /and so on/letsencrypt/reside/$DOMAIN/privkey.pem $DATA_DIR/server.key
chown postgres:postgres $DATA_DIR/server.crt $DATA_DIR/server.key
4. Lastly, run the chmod command beneath to set the right permissions for the renewal hook script (postgresql.deploy). This command provides the postgresql.deploy script executable permissions in order that Certbort can run the script.
chmod +x /and so on/letsencrypt/renewal-hooks/deploy/postgresql.deploy
Configuring PostgreSQL to Use SSL
With the renewal hook script created, now you can configure PostgreSQL to make use of SSL. You’ll want the postgresql.conf file’s location on your PostgreSQL set up. This file comprises all the configuration settings on your PostgreSQL server.
The postgresql.conf file is normally situated within the /major/ listing, which you present in step one of many “Making a Certbot Renewal Hook” part.
1. Run the psql command beneath to seek for the postgresql.conf file’s location if you happen to can’t discover it.
psql -U postgres -c 'SHOW config_file'Observe down the trail of your postgresql.conf file, as proven beneath.

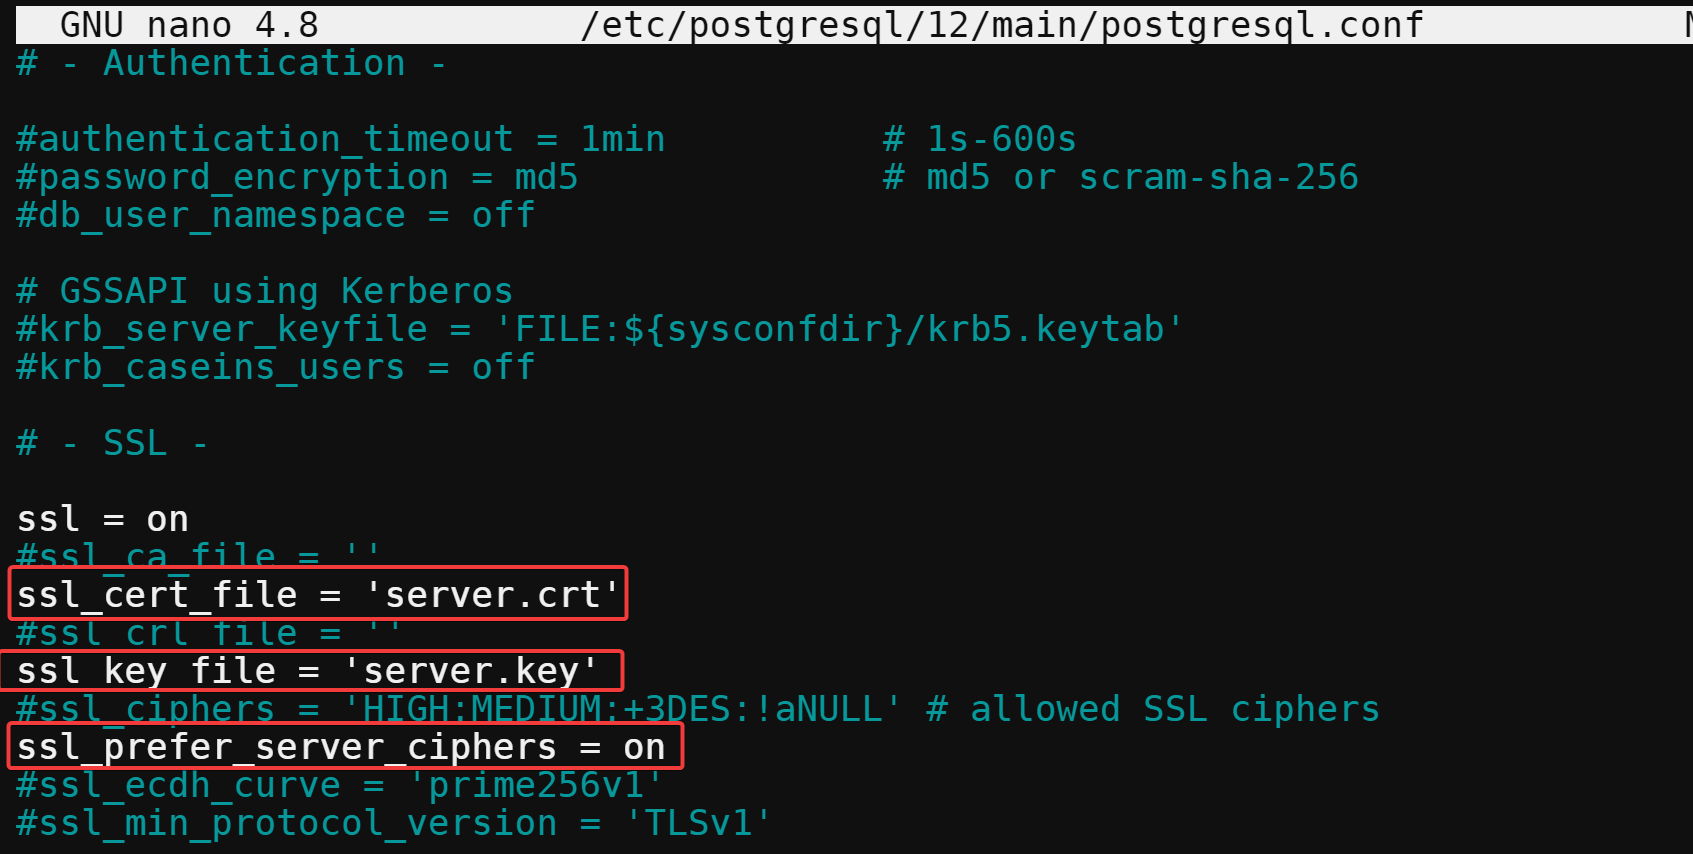
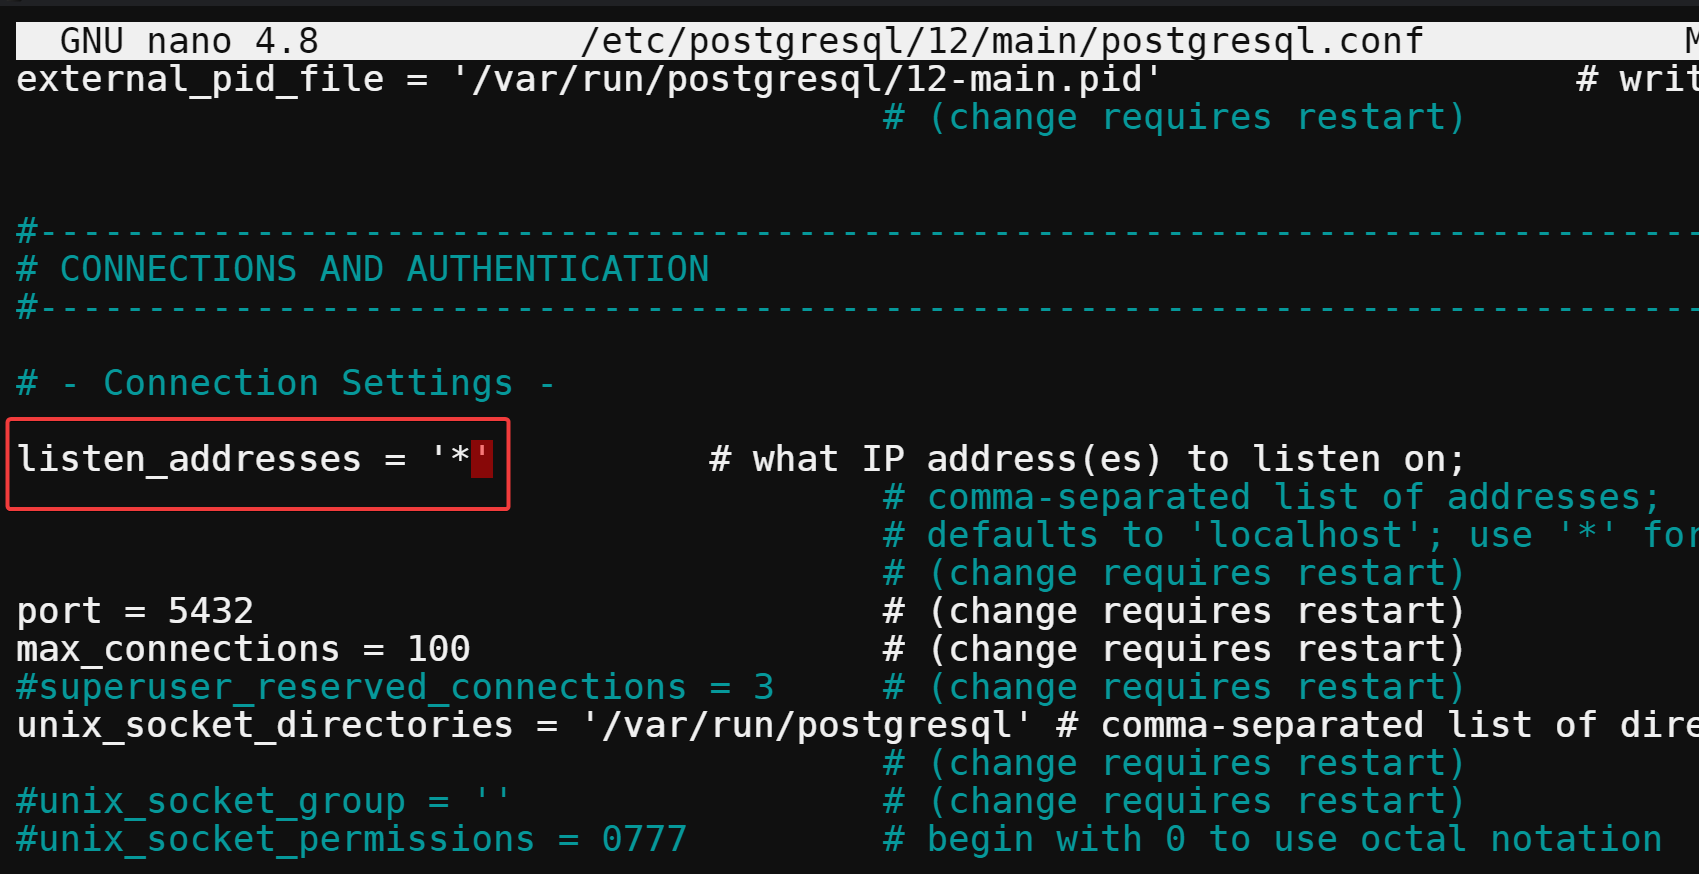
2. Open the /and so on/postgresql/12/major/postgresql.conf file in your textual content editor, discover and alter the values of directives underneath the SSL part with the next:
- ssl_cert_file, and ssl_key_file – Uncomment the directives by eradicating the # characters initially of every line.
Change the values with the paths to your certificates and key information you famous within the final step of the “Putting in Certbot to Create SSL Certificates” part. These directives inform PostgreSQL the place to seek out your SSL certificates and SSL key.
- ssl_prefer_server_ciphers – Uncomment the directive by eradicating the # characters initially of the road. Change the worth to on to inform PostgreSQL to make use of solely robust ciphers.
3. Subsequent, discover, uncomment the listen_address directive, and alter the directive’s worth to * to inform PostgreSQL to pay attention for connections on all out there IP addresses.
When you’ve modified the worth, save, and shut the file.
4. Subsequent, open the /and so on/postgresql/12/major/pg_hba.conf file in your most popular textual content editor.
This file comprises all of the consumer authentication settings on your PostgreSQL server and is managed by the postgresql.conf file.
5. Add the next strains to the pg_hba.conf file proper after any current host strains, save and shut the pg_hba.conf file.
These two strains inform PostgreSQL to require SSL for all consumer connections and use password authentication. Including each is essential as a result of some instruments, comparable to pgAdmin 4, don’t help SSL connections by default.
hostssl all all 0.0.0.0/0 md5
host all all 0.0.0.0/0 md5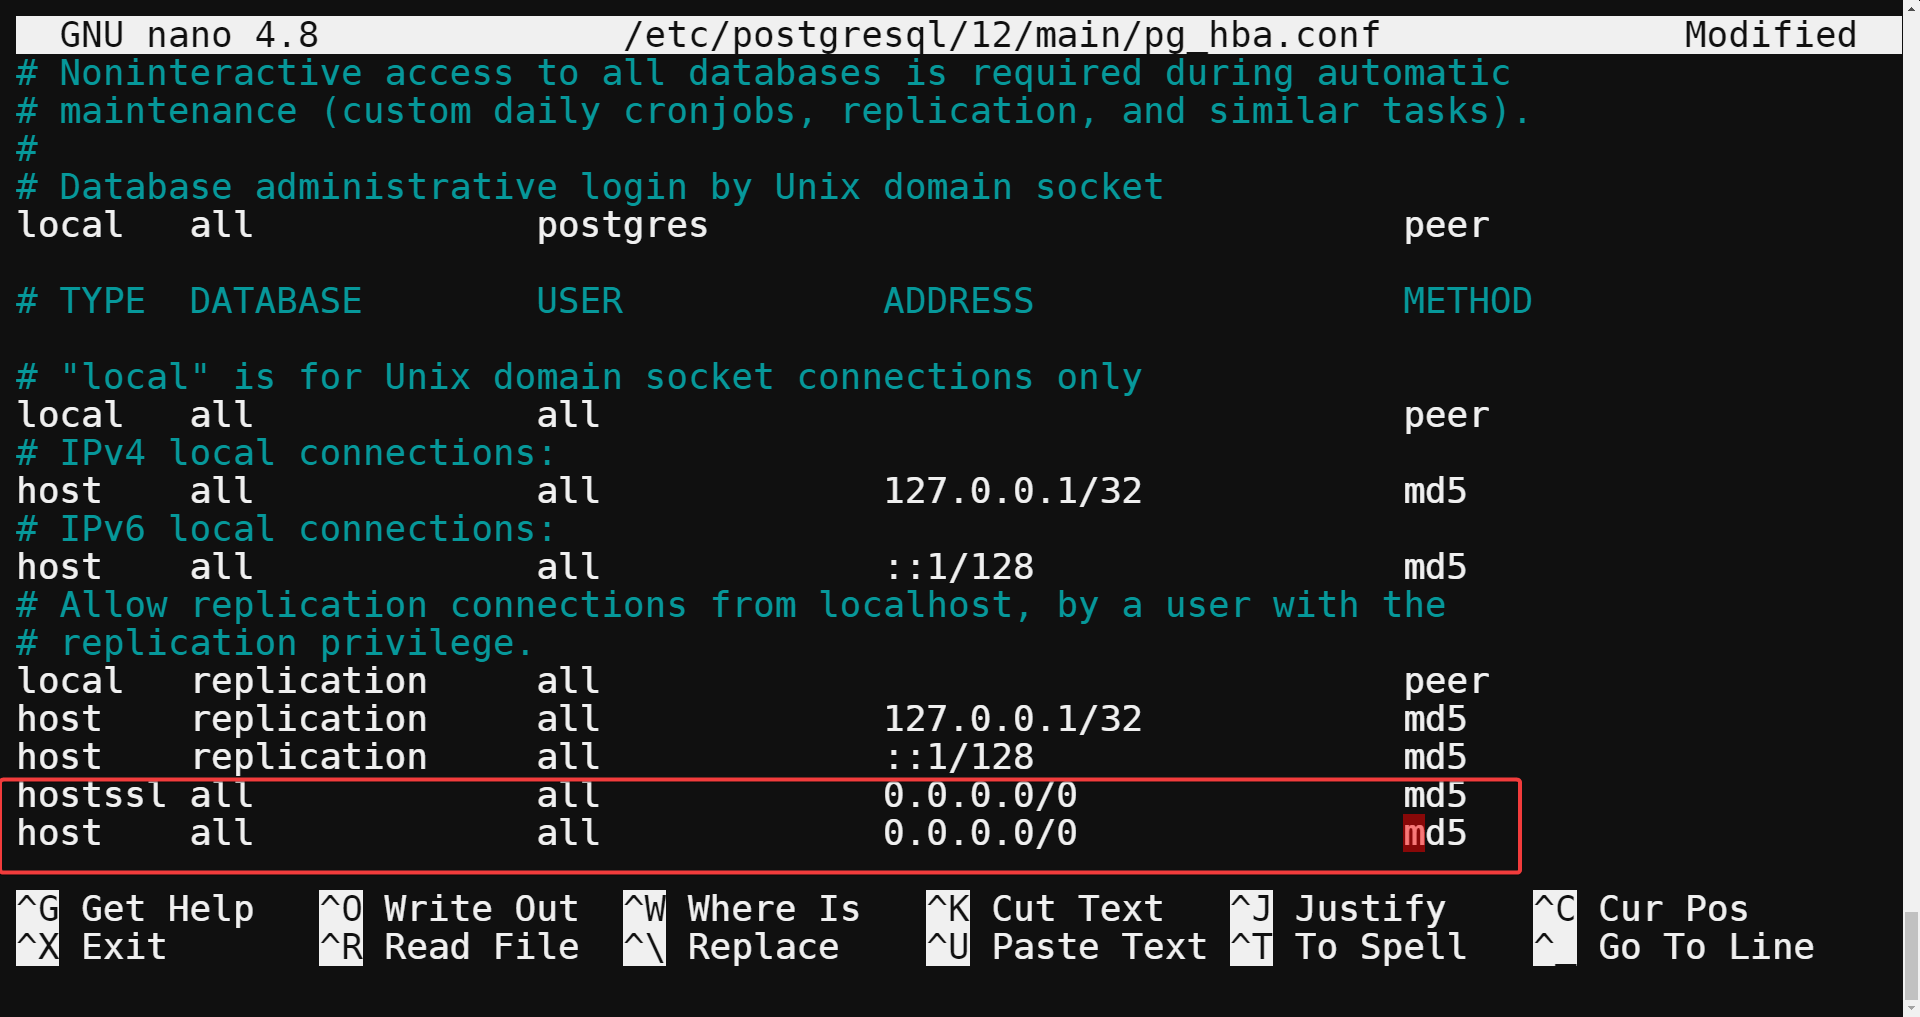
6. Now, run the beneath certbot renew command to power a renewal of your SSL certificates. Doing so causes Certbot to run your renewal hook script (postgresql.deploy).
This motion copies a brand new certificates and key, which PostgreSQL will use on the subsequent start-up.
certbot renew --force-renewal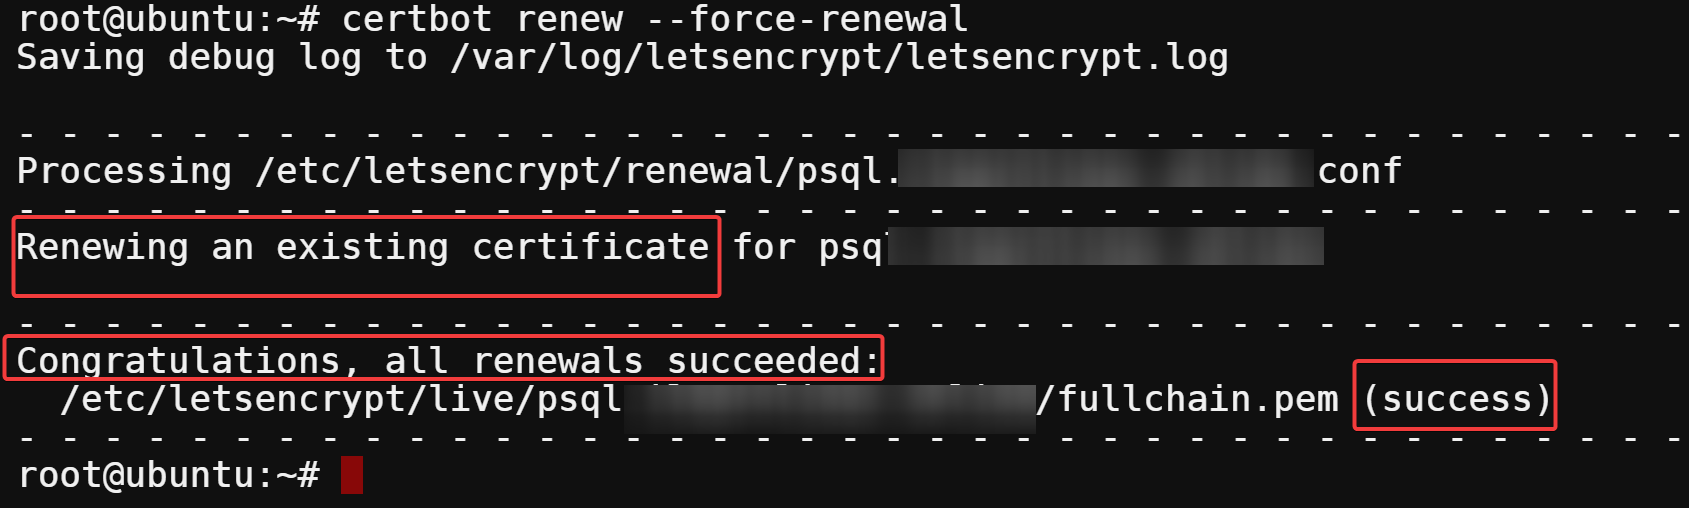
7. After the renewal, run the next command to checklist (ls) the contents of your knowledge listing (/var/lib/postgresql/12/major).
ls /var/lib/postgresql/12/major/server.*Under, you’ll be able to confirm that the brand new certificates and key have been copied with the 2 new information named server.crt and server.key, as proven beneath.

8. Lastly, run the service command beneath to restart your PostgreSQL server, apply the brand new configuration settings, and cargo the SSL certificates.
service postgresql restart
Testing Your SSL Connection
You’ve accomplished configuring PostgreSQL to make use of SSL. However how are you aware it’s working? You’ll have to check your SSL by connecting to the server with the psql command-line device.
Run the beneath command to connect with your server from one other machine that has psql put in. Make sure you exchange username (postgres), database identify (postgres), and psql.instance.com with your personal values.
The sslmode=require question parameter helps you to connect with your PostgreSQL server provided that establishing an SSL reference to the server is feasible.
psql -d "dbname=postgres sslmode=require" -h psql.instance.com -U postgres
When prompted, enter the password for the postgres consumer, and also you’ll see an output much like the next.
This output signifies that the SSL connection is encrypted utilizing AES256-GCM, so that you might be assured that your knowledge is secure from eavesdroppers.

Conclusion
Securing your database is at all times a prime precedence. With a PostgreSQL SSL certificates, you’re one step away from retaining out entities prying into your knowledge. And on this tutorial, you’ve realized to encrypt a PostgreSQL database connection. At this level, you’ll be able to already confidently encrypt all consumer/server communications and preserve your knowledge secure
With this newfound data, why not configure TLS connectivity in Azure Database for PostgreSQL? Defend your database communications whereas securing your knowledge at relaxation and in transit!