Margin utility courses in Tailwind CSS
With a view to create area across the HTML component’s outlined borders, we use the CSS margin property.
Tailwind CSS has utility courses for controlling the margin for components.
Margin Demo, Padding Demo, Each in a Type instance, Padding within the Desk instance
Just a few Tailwind margin courses
Utilizing these courses provides the margin in components:
m-0 = margin: 0px;
mx-0 = margin-left: 0px; margin-right: 0px;
my-0 margin-top: 0px; margin-bottom: 0px;
m-px margin: 1px;
me-px margin-inline-end: 1px;
m-1 margin: 0.25rem; /* 4px */
my-2 margin-top: 0.5rem; /* 8px */
margin-bottom: 0.5rem; /* 8px */
Tailwind has an enormous listing of pre-defined utility courses for margin that you would be able to see right here.
Tip: With a view to keep in mind margin/padding courses and which means in Tailwind, the margin courses begins with m whereas padding with p letter. The second letter:
t = high e.g. mt-2
b = backside e.g. pb-5 and so forth.
l = left e.g. ml-5
r = Proper e.g. pr-8
x = Left and Proper e.g. mx-2 (provides margin in left and proper)
y = High and Backside e.g. py-5 (Provides 5px padding in high and backside)
Padding utility courses in Tailwind CSS
Equally, Tailwind has courses for padding within the HTML components. CSS padding correctly provides spacing between the content material and border of HTML components.
First, take a look at just a few utility courses of padding in Tailwind after which we are going to present how padding and margin utilities work in numerous HTML components.
p-0 padding: 0px;
px-px padding-left: 1px;
padding-right: 1px;
pr-px padding-right: 1px;
p-0.5 padding: 0.125rem; /* 2px */
pb-0.5 padding-bottom: 0.125rem; /* 2px */
ps-1 padding-inline-start: 0.25rem; /* 4px */
pl-1.5 padding-left: 0.375rem; /* 6px */
pr-2 padding-right: 0.5rem; /* 8px */
See the whole padding utility courses listing right here.
On this following part, we are going to present examples of utilizing these margin and padding courses with numerous components.
An instance utilizing Tailwind padding courses
Within the first instance of Tailwind utility courses for padding, we are going to present you three bins with and with out Tailwind padding.
The picture exhibits three bins with out padding beneath:
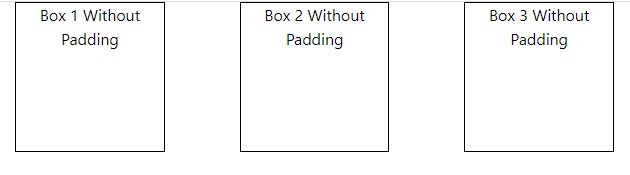
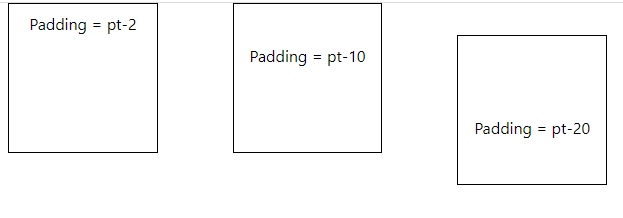
Then we utilized numerous padding makes use of and you may see the distinction within the content material area of the primary and second picture.
See on-line demo and code
|
1 2 3 4 5 6 7 8 9 10 11 12 13 14 15 16 17 18 19 20 21 22 23 24 25 26 27 28 29 30 31 32 33 34 35 36 37 38 39 40 41 42 43 44 45 46 47 48 49 50 51 52 53 54 55 56
|
<!DOCTYPE html>
<html>
<head>
<script src=“https://cdn.tailwindcss.com”></script>
<fashion>
.field {
border:strong 1px;
peak:150px;
width:25%
}
</fashion>
</head>
<physique class=“text-center mx-4 space-y-2”>
<div class=“flex flex-1 flex-wrap justify-between gap-2 darkish:text-neutral-800”>
<div class=“pt-2 field”>Padding = pt-2</div>
<div class=“pt-10 field”>Padding = pt-10</div>
<div class=“pt-20 mt-8 field”>Padding = pt-20</div>
</div>
</physique> </html> |
Word: we simply added padding utilities as in comparison with photos with out padding in above code.
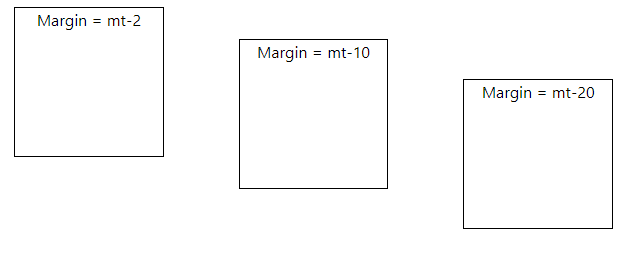
The instance of margin utilities
For exhibiting the margin utility class’s demo, once more we’ve got three bins. With margin utility courses, the hole between the field ought to differ as in comparison with with out utilizing margin.
Additionally, the content material is on the identical place from the field’s borders as we’ve got not used padding courses.
See on-line demo and code
Code:
|
1 2 3 4 5 6 7 8 9 10 11 12 13 14 15 16 17 18 19 20 21 22 23 24 25 26 27 28 29 30 31 32 33 34 35 36 37 38 39 40 41 42 43 44
|
<!DOCTYPE html>
<html>
<head>
<script src=“https://cdn.tailwindcss.com”></script>
<fashion>
.field {
border:strong 1px;
peak:150px;
width:25%
}
</fashion>
</head>
<physique class=“text-center mx-4 space-y-2”>
<div class=“flex flex-1 flex-wrap justify-between gap-2 darkish:text-neutral-800”>
<div class=“mt-2 field”>Margin = mt-2</div>
<div class=“mt-10 field”>Margin = mt-10</div>
<div class=“mt-20 field”>Margin = mt-20</div>
</div>
</physique>
</html> |
Output:
A demo of utilizing Tailwind margin/padding courses in type components
For this instance, we’ve got an HTML type with CSS fashion.
To extend the spacing between Type components and inside its contents (textboxes, labels and button), we used margin and padding utilities (together with different courses) as proven within the instance beneath:
See on-line demo and code
Code:
|
1 2 3 4 5 6 7 8 9 10 11 12 13 14 15 16 17 18 19 20 21 22 23 24 25 26 27 28 29 30 31 32 33 34 35 36 37 38 39 40 41 42 43 44 45 46 47 48 49 50 51 52 53 54 55 56 57 58
|
<!DOCTYPE html>
<html>
<head>
<script src=“https://cdn.tailwindcss.com”></script>
</head>
<physique class=“text-center mx-4 space-y-2”>
<div class=“w-full max-w-xs”>
<type class=“bg-blue px-8 pt-4 pb-4 mb-8 shadow-lg shadow-cyan-500/50 rounded”>
<div class=“mb-8”>
<label class=“block text-red-600 text-lg font-bold mb-4” for=“uname”>
Enter Username
</label>
<enter class=“shadow-md border w-full py-2 px-3 text-gray-500 focus:outline-none focus:shadow-outline spherical” id=“uname” sort=“textual content” placeholder=“Username Right here”>
</div>
<div class=“mb-6”>
<label class=“block text-red-600 text-lg font-bold mb-4” for=“password”>
Enter Password
</label>
<enter class=“shadow-md border border-red-500 w-full py-2 px-3 text-gray-700 mb-3 focus:outline-none focus:shadow-outline spherical” id=“password” sort=“password” placeholder=“**********”>
</div>
<div class=“flex items-center justify-between”>
<button class=“bg-green-600 hover:bg-green-800 text-white font-bold py-3 px-6 rounded focus:outline-none focus:shadow-outline” sort=“button”>
Log In
</button>
</div>
</type>
</div>
</physique>
</html> |
Output:
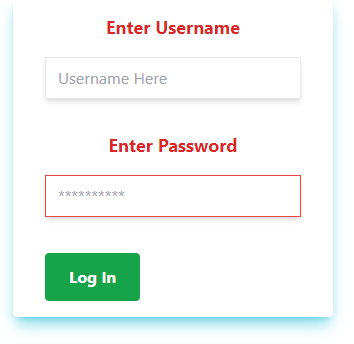
Discover the <type> tag the place px-8, pt-4, pb-4 courses are used for padding and mb-8 for the margin – together with different courses.
Equally, within the <label>, <enter>, and <button> tags, the padding and margin courses are used.
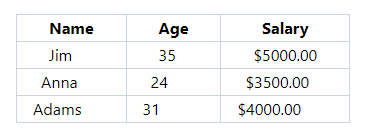
Utilizing padding within the desk instance
The demo beneath provides padding unities to the desk header and desk information for growing area between the textual content and borders.
Within the first picture, the desk is with out padding and makes use of just some border courses. Additionally, the margin is added on the first div stage:
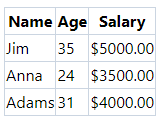
Within the instance beneath, we added px-8, px-6, and px-4 padding utility courses in header and desk information. It provides spacing of 8px, 6px, and 4px from left and proper.
See on-line demo and code
Code:
|
1 2 3 4 5 6 7 8 9 10 11 12 13 14 15 16 17 18 19 20 21 22 23 24 25 26 27 28 29 30 31 32 33 34 35 36 37 38 39 40 41 42 43 44 45 46 47 48 49 50 51 52 53 54 55 56 57 58 59 60 61 62 63 64 65 66 67 68 69 70 71 72 73 74 75 76
|
<!DOCTYPE html>
<html>
<head>
<script src=“https://cdn.tailwindcss.com”></script>
</head>
<physique>
<div class=“flex flex-5 mx-8 mt-10 justify-between gap-2”>
<desk class=“border-collapse border border-slate-400 “>
<thead>
<tr>
<th class=“border border-slate-300 px-8”>Title</th>
<th class=“border border-slate-300 px-8”>Age</th>
<th class=“border border-slate-300 px-8”>Wage</th>
</tr>
</thead>
<tbody>
<tr>
<td class=“border border-slate-300 px-8”>Jim</td>
<td class=“border border-slate-300 px-8”>35</td>
<td class=“border border-slate-300 px-8”>$5000.00</td>
</tr>
<tr>
<td class=“border border-slate-300 px-6”>Anna</td>
<td class=“border border-slate-300 px-6”>24</td>
<td class=“border border-slate-300 px-6”>$3500.00</td>
</tr>
<tr>
<td class=“border border-slate-300 px-4”>Adams</td>
<td class=“border border-slate-300 px-4”>31</td>
<td class=“border border-slate-300 px-4”>$4000.00</td>
</tr>
</tbody>
</desk>
</div>
</div>
</physique>
</html> |
Output: